Monthly Archives: May 2024
A Guitar Solo Trick You’ve Never Heard Before
By Craig Anderton
Let’s get right to what this sounds like. It’s not quite feedback or tape reverse, it’s…well, listen to what it does in this blues guitar solo.
Even better, it’s ridiculously simple to create this effect:
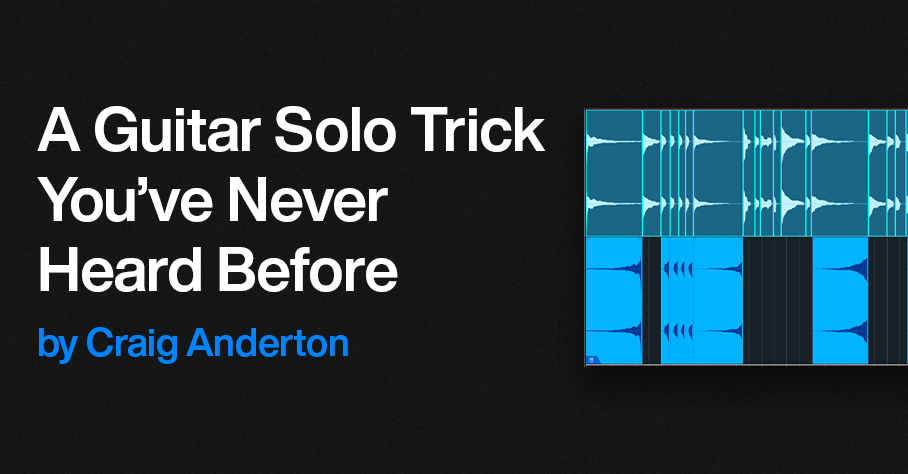
1. Right-click on your guitar solo, and then choose Audio > Audio Bend > Split at Bend Markers.
2. Now each note is separated, as in the top of fig. 1.
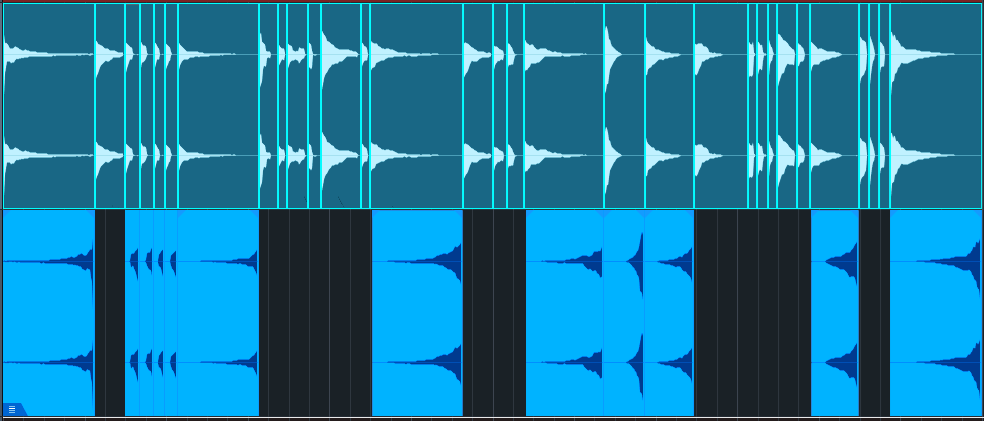
Figure 1: (Top) The original guitar solo in the audio example, after being split at bend markers. (Bottom) The track of reversed notes.
3. Create a new track.
4. Drag notes that decay to silence over a bit of time into the new track.
5. Select all the notes you copied to the new track. Choose Audio > Reverse Audio or type Ctrl/Cmd+R.
Additional Notes
- Adding reverb to only the reversed notes imparts an ethereal, feedback-type effect.
- When used selectively, this trick can also work extremely well with drum parts.
- Toward the beginning of the audio example, four short notes are also reversed. Doing so emphasizes these notes.
- The guitar sound in the audio example uses Ampire’s VC30 with the 2×12 VC 30 cab.
- So…am I crazy, or is this a really cool effect? Although I guess both could be true 😊
Add Punch & Snap to Drum Hits
By Craig Anderton
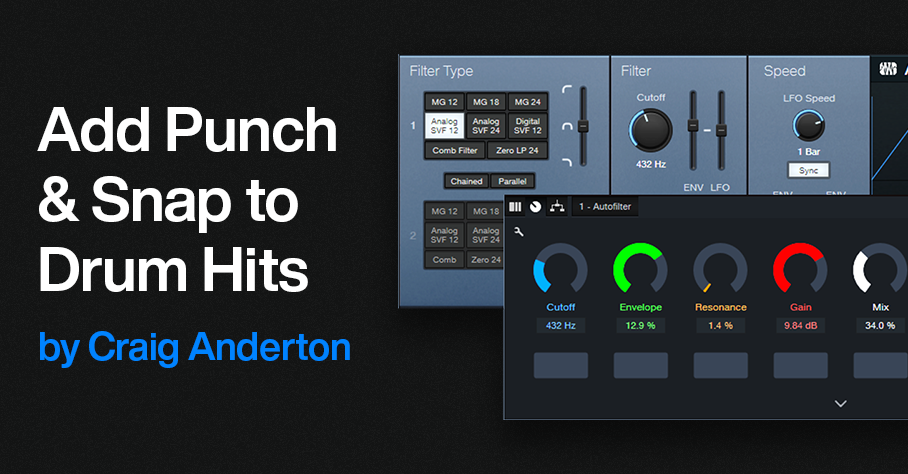
A Pro EQ3 stage’s gain can respond dynamically to incoming signal level, so that louder inputs kick the gain higher (or lower). But Studio One also has an Autofilter EQ, whose frequency responds to the incoming signal level. With a bandpass filter, louder signals can push the peak higher in frequency. This is particularly useful for adding “snap” to acoustic drum parts (especially snare and tom hits), for a more lively, animated feel—as you’ll hear in the audio example. The first half is an unprocessed drum loop. The second half uses the technique described in this tip.
This works with Studio One Artist, because all you need is the Autofilter. But this tip also includes an Extended FX Chain for Studio One Professional/+ users. The Macro Controls make editing a little more convenient.
Download the Extended FX Chain here
Initial Setup
1. The top Filter Type is Analog SVF 12. Set its slider to Bandpass. Bypass the lower filter.
2. To zero the Filter LFO sliders and the Resonance Env slider, ctrl+click on them. Set Env Attack to 5.00 ms and Env Release to 1.50 s. Make sure Auto is off.
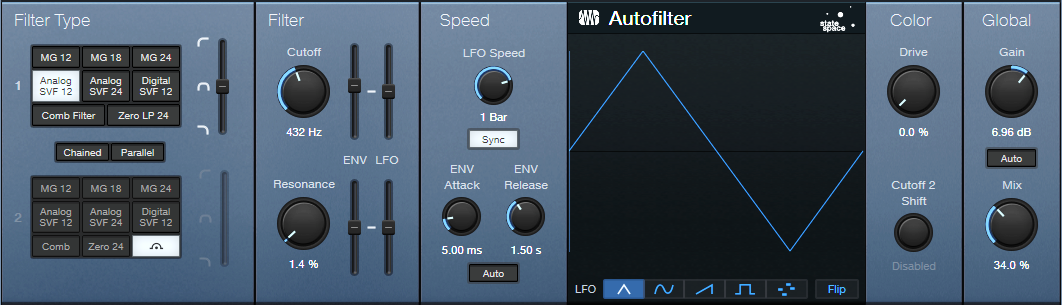
Figure 1: Typical Autofilter settings.
Tweak the Sound
It’s easiest to hear the results of your edits by temporarily turning the Resonance parameter to around 20% and the Mix control to 100%. This provides an exaggerated version of the filtered sound. However, note that the magic doesn’t happen until you mix this behind the dry audio. The effect’s goal is to reinforce the sound, not overwhelm it.
The Filter Cutoff and Cutoff Env slider interact. So, the best sound depends on getting a good relationship between the two. The optimum setting varies for different drums. Set the Filter Cutoff in the lower midrange, and use the Cutoff’s Env slider to add a little modulation. The Env slider is very sensitive, so you won’t need much modulation to vary the filter cutoff over a wide range. Be careful to avoid too much modulation. One advantage of using the FX Chain is that the Env control covers a small range of the envelope amount, which simplifies dialing in a setting.
Now you’ll hear a wah-like sound along with the drums. Next, mix the processed sound with the dry sound. Reduce the Resonance to around 5% or less. Turn Mix to 0.0% to hear the unprocessed drums. Bring up the Mix control to add the processed sound. The Mix control’s sweet spot is typically between 20% and 50%, but again, it varies for different drum sounds. Adjust Gain as needed.
Bear in mind that slight changes in the Filter Cutoff and/or Cutoff Env can make a major difference in the sound.
The Extended FX Chain
Fig. 2 shows the Macro Controls panel. This brings out the parameters mentioned above to cover a convenient range of values. In particular, the Envelope range isn’t as critical.
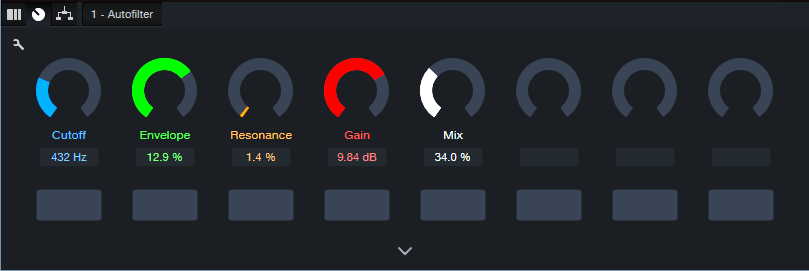
Figure 2: Macro Controls for the Add Snap to Your Snare.multipreset Extended FX Chain.
Pssst…Can You Keep a Secret?
Although this application is disguised as a way to enhance acoustic drums, it can also produce some really wild effects. With lots of processed sound, there’s a compression-like effect, and turning up the Resonance can get downright weird. It also works well on individual drums as well as drum buses and loops. So, don’t be afraid to experiment! You never know when dialing in the “wrong” settings will sound right.
How To Distribute Your Music with Studio One From Creation to Digital Streaming Platforms
If you’re a PreSonus user, you’re probably pretty hands-on in producing and recording your
music. Maybe you already know how to master spatial audio or are reading this blog to figure
out multitimbral instrumentation with guitar (no—seriously!).
These are vital skills for any independent musician. Distributing your music online can empower
you to take control of your music’s journey.
What is TuneCore?
If you’re reading this, your experience with digital distribution might be limited. That’s ok! Maybe
you’re only distributing to platforms like Soundcloud and Bandcamp. Perhaps you don’t even
know what a DSP is* and haven’t started your journey of sharing tracks with the public at large.
That’s where TuneCore comes in.
TuneCore is an independent artist development platform specializing in music distribution. Both
TuneCore and PreSonus are here to support you at every stage of your career, and distributing
your music online is one of the most critical aspects. This is why we partnered to build a
“creation-to-DSP” pipeline that Studio One and TuneCore users can benefit from.
However, it’s important to note that true support for artists begins with education. Understanding
the ins and outs of Music Distribution 101 is crucial for your success as an independent
musician. So, let’s dive in and demystify this essential aspect of your music career.
* DSP = digital service provider, i.e., Spotify, Apple Music, TIDAL, Amazon Music
How Digital Music Distribution Works
At its core, digital music distribution is simply the process of making your music available on
various online platforms or marketplaces.
Each platform or marketplace has its own technical and content guidelines, which must be
adhered to for music to be hosted. These can range from audio file format specifications to
correctly labeling an “explicit” song as such. We’ve broken them down in detail right here.
Tips to Distribute Your Music
If you don’t have time to read that, though (and who does?), save this cheat sheet for your
future use:
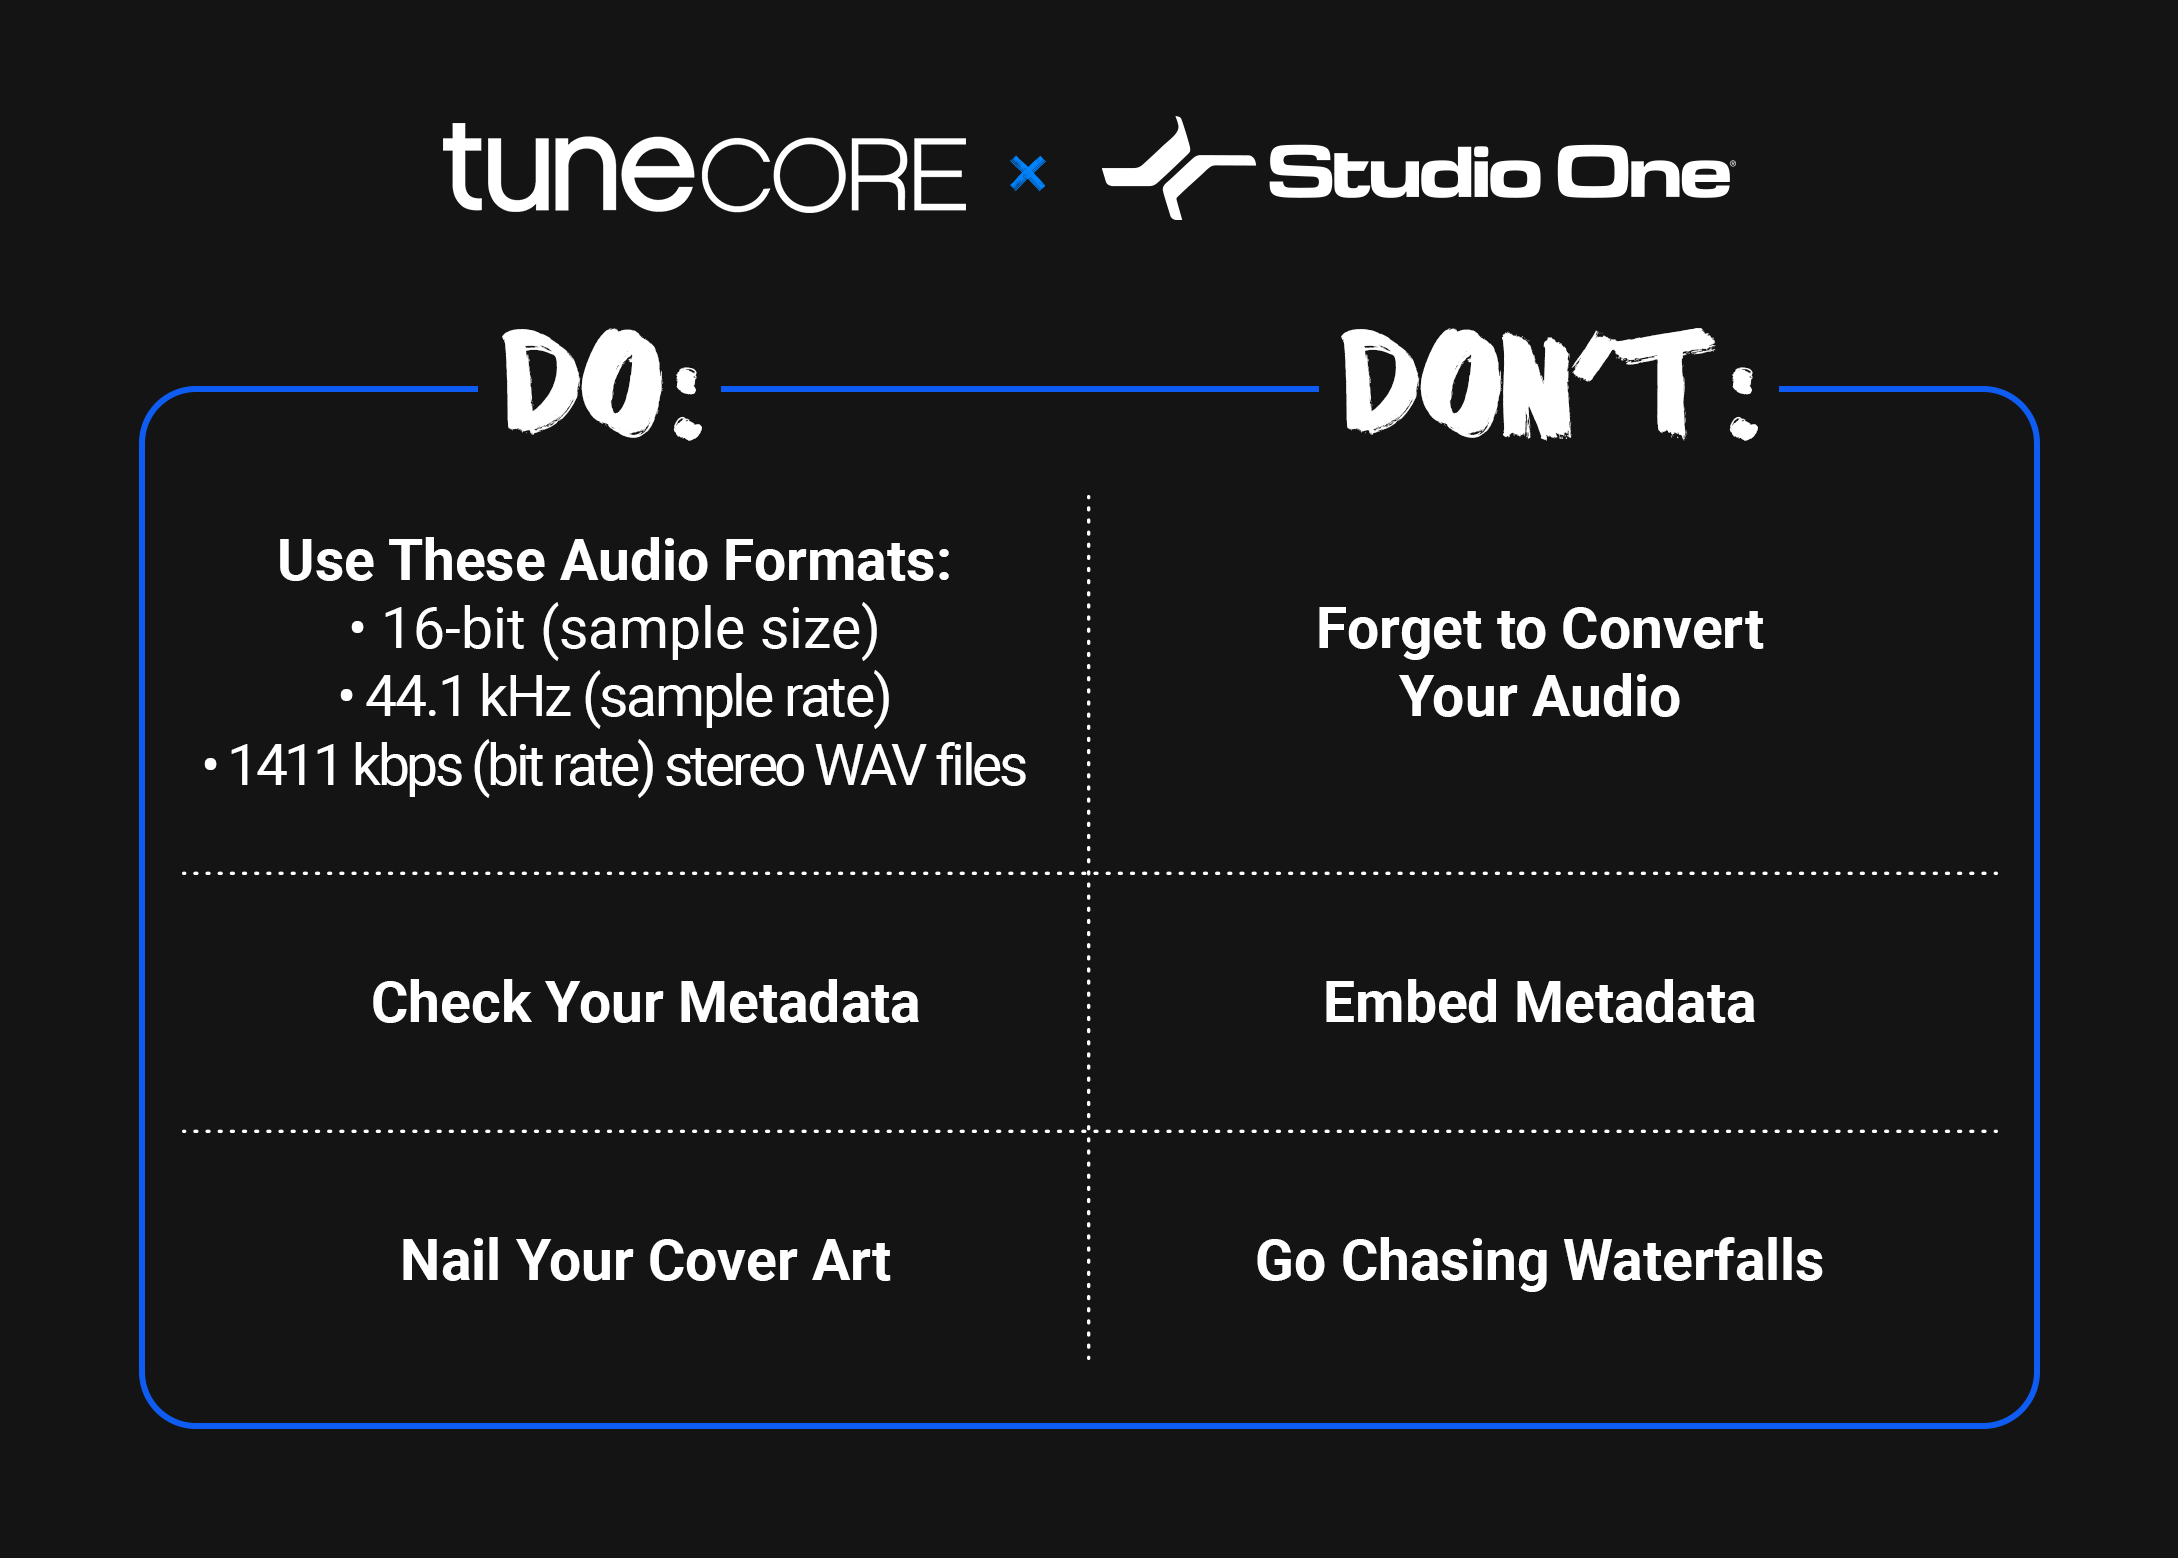
DO: Check Your Metadata
Painstakingly reviewing your metadata is one of the most vital components of the distribution
process. It’s also one of the most tedious. But it’s worth it.
From a music publishing perspective, metadata is king – and correctly inputting metadata
ensures that you get the most royalty matches possible to earn streams on DSPs like Spotify
and Apple Music, locations like bars and hotels, and so much more. We cannot stress this
enough: making sure your song’s metadata is accurate is of the utmost importance.
Similarly, your cover art is the face of your music, and it’s crucial to get it right.
Here are the five most important metadata components to check:
- IPI/CAE number – a unique identifier assigned to all songwriters and publishers who are
registered with a collection society (such as BMI or ASCAP - ISRC (And Release Info) – a unique,12-digit alphanumeric identifier that helps identify
the usage of your sound recordings and their underlying compositions (this helps you
collect publishing royalties) - ISWC – a unique, 10-character code identifying musical works that links to a song’s
recording (this helps you collect master royalties) - Alternative Titles & New Recordings – such as a live recording, another artist’s cover
version of your song, a remix, slowed or sped-up versions, etc. - Songwriters and Shares – Percent of Song Ownership
This can be overwhelming. The good news is that when you distribute through Studio One x
TuneCore, we’ll ask for and help you identify all this information. It won’t undergo TuneCore’s
review process until you’ve imputed it
DON’T: Embed Your Metadata
Given how vital metadata is to you getting paid for distributing your music, it’s understandably
vital that you don’t try to cut corners when inputting it.
Embedding is a form of cutting corners.
Having your metadata already attached to the track you’re uploading sounds convenient, but
let’s happily shatter that illusion. Digital stores don’t accept embedded files. Getting your music
to fans (and getting paid for it) means uploading tracks that pass a DSP’s content guidelines,
and embedding isn’t one of them.
Again, through Studio One’s integration with TuneCore, you’ll be able to enter all this metadata
yourself and ensure you’re good to go.
DO: Nail Your Cover Art
Regarding DSPs like Tidal or Amazon Music, audio isn’t the only component of a track with
content requirements.
Your cover art also needs to be in store-ready shape.
If you haven’t given this much thought, don’t sweat it. However, it’s important to note that not
meeting these requirements can lead to your music not being distributed on certain platforms.
Musicians are rightly more focused on their craft and a song’s audio fidelity than the technical
specters of the accompanying image.
Here are the components you MUST nail down to get your artwork cleared:
- Image Format: JPG or GIF
- Aspect Ratio: 1:1 (Perfect square)
- Resolution: At least 1600 x 1600 pixels in size
- Best quality RGB Color Mode (this includes black and white images)
- If you’re distributing your music to the Amazon On Demand store (for printing physical
CD covers), you need a resolution of 300 DPI.
Here’s what you CAN’T include:
- Words or phrases that don’t match the Artist Name or Song/Album Name
- Email addresses, URLs/websites, contact info (this includes social handles), or pricing
- Stickers from your artwork from a scanned copy of the physical CD
- Something that suggests the release format “CD, DVD, Digital Exclusive, the disc.”
- Cut off text or images
- An image that’s compressed into one corner with white space
- Names of digital stores or their logos
- Words that express temporality, like “new,” “latest single,” “limited edition,” or “exclusive.”
For even more information – like how to correctly attach cover art to your track – check out our
recent guide to cover art here.
DON’T: Go Chasing Waterfalls
This was a TLC joke.
We stand by it.
PreSonus x TuneCore
PreSonus made its name by making it easier than ever for musicians to achieve end-to-end
music creation. With Studio One – featuring Apple Spatial Audio and direct distribution through
TuneCore – that goal is a full-fledged reality.
As the above video illustrates, PreSonus x TuneCore users can get their music across the
proverbial finish line and into TuneCore’s capable hands for distribution without ever closing out
of Studio One.
The hardest part was learning the basics of music distribution. Now that you have, you can get
back to creating and releasing music.
We’ll handle the rest.
Studio One: Your Binaural Beats Lab
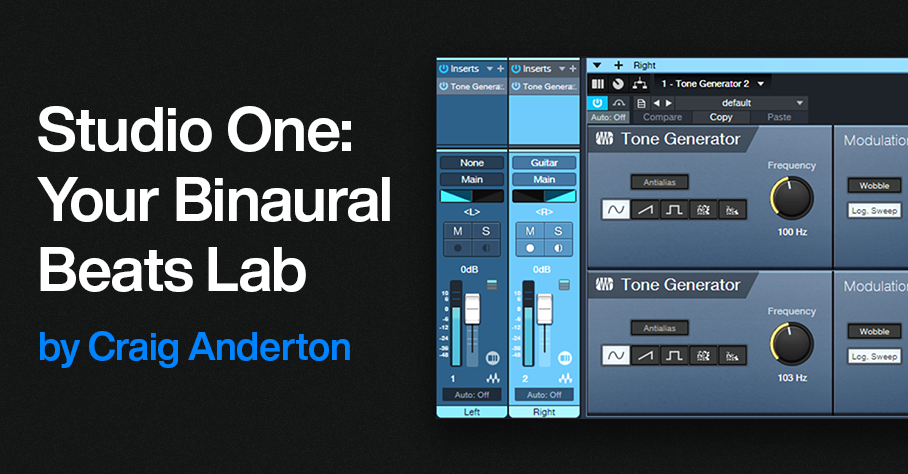
By Craig Anderton
When I heard about “binaural beats,” I was interested—I like beats, and I’m into binaural audio. But this has nothing to do with either one. Instead, it’s a sonic phenomenon that’s supposed to influence our mental state. Some think it’s woo-woo new age silliness, while others think it’s a largely unexplored area of psycho-acoustics.
I don’t know which is correct, so this tip is not a diss or endorsement of binaural beats. Instead, Studio One makes it easy to experiment with the concept, so you can decide for yourself if it has merit. Try it, and feel free to post your reactions in the comments below.
What We Do Know
Neurons in your brain create electrical signals that result in brain waves. EEG machines can measure their frequencies. Different frequencies occur during different mental states. For example, during deep sleep, the frequency range is 1-4 Hz. These are called Delta waves. Theta waves (4-8 Hz) occur with complete relaxation. Alpha waves (8-14 Hz) are associated with meditative/creative mental states, and Beta waves (12-30 Hz) happen when your mental gears are alert and turning.
With biofeedback training, it’s possible to recognize when you’re in various mental states. Eventually (the differences are very subtle), you can identify when you’re in a particular state, even without a biofeedback machine. But can you induce a particular state in your brain? This is where we leave science behind, and enter the anecdotal world of binaural beats.
What We Don’t Know
Binaural beats play back two different frequencies through headphones. They’re offset by frequencies that correspond to brainwaves. The claim is that by making the offset equal to specific brain wave frequencies, listening to binaural beats causes your brain to do “frequency following,” which helps induce a certain state. For example, if you want to go to sleep, you offset two frequencies by 1-4 Hz, like 100 Hz in one ear and 102 Hz in the other. Or if you want to go into an alpha state, the frequencies could be (for example) 110 Hz and 120 Hz.
There have been studies about using binaural beats for pain reduction, sleep disorders, and the like (search on “have there been any credible studies regarding the efficacy of binaural beats?). Some results have shown potential, some haven’t, and others are too influenced by bias. The jury’s still out on what conclusions we can draw.
Studies are always done with headphones that separate the two frequencies going into your ears. There are “binaural beats” videos on YouTube, but many of them are just a single sound that mixes waveforms from two frequencies. Others are true stereo. Perhaps not surprisingly, the comments for the various videos range from “hahahaha what morons” to “OMG, this solved my insomnia problem.”
Studio One Setup
It’s easy to check out this phenomenon for yourself (fig. 1).
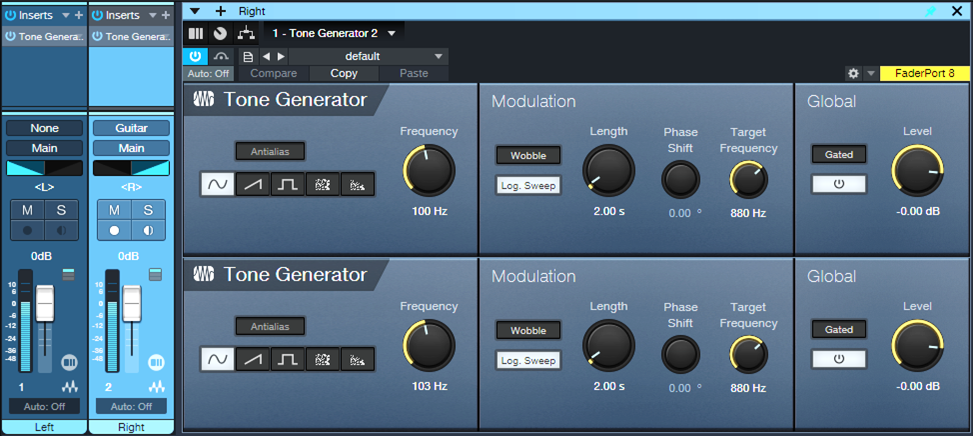
Figure 1: Channel and effects setup for experimenting with binaural beats.
1. Create two audio tracks. They can be mono or stereo.
2. Insert a Tone Generator in each channel. Choose the Sine waveform.
3. Pan one channel full left, and the other full right.
4. Offset their frequencies by the desired amount.
Using Binaural Beats
I don’t have a clue how to use this technique. I did see some studies that thought 10 minutes was about the optimum listening time. Others recommend much longer. It seems listening at a low volume is better (or at least less annoying, given that you’re listening to constant tones). I didn’t see anything that specified optimum frequencies for the tone generators, other than the offset amount. This is very much a DIY research project.
But does it work? Well, this is new to me, and I don’t know…so I’ll be interested to hear your thoughts.
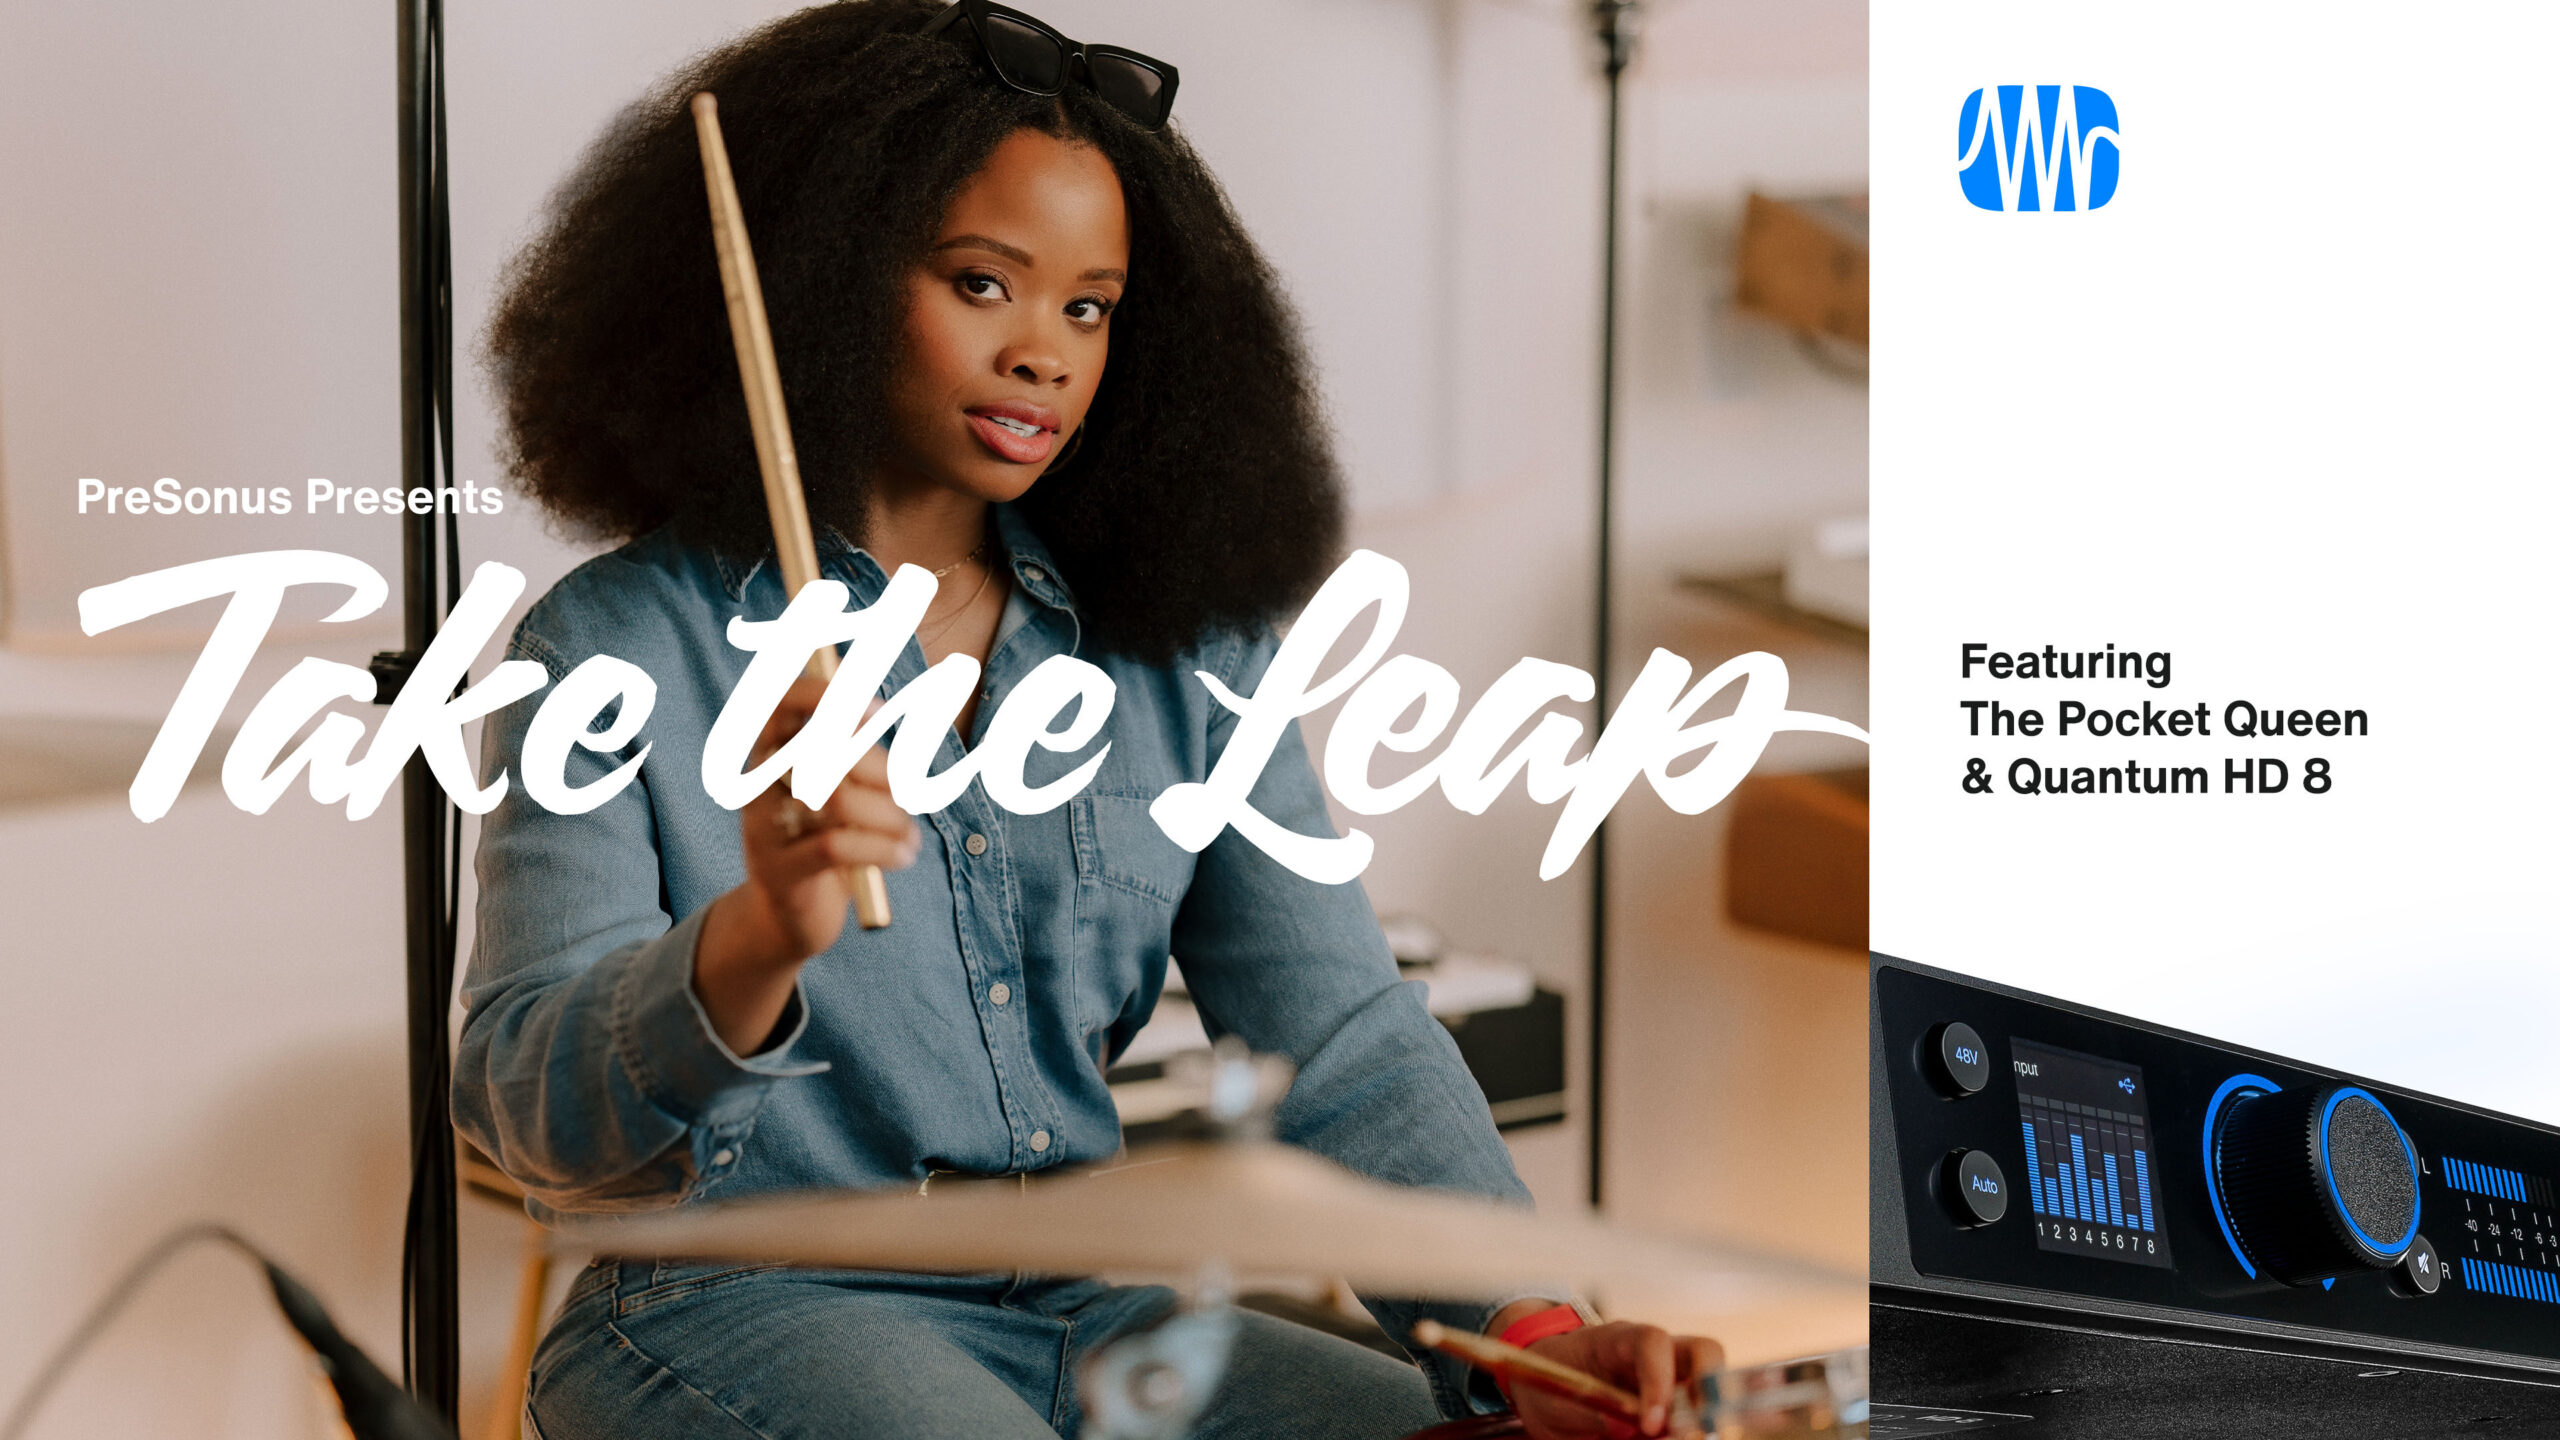
The Pocket Queen | Take the Leap | Quantum Audio Interfaces
Professional drummer, producer, and New Orleans native talks about taking the leap.
A life in music requires passion, creativity, and dedication – and for many creators, their trajectory can be traced back to a defining moment that changed everything: the moment they took the leap.
Taylor Gordon, aka The Pocket Queen, is an American drummer and producer born and raised in New Orleans. The rising star has a flourishing fanbase on Instagram, and her uniquely groove-oriented fusion of jazz, funk, and pop has seen her perform with some of the biggest stars in music (Beyonce, Stevie Wonder, Willow, Michelle Williams, Robert Glasper, and more).
Watch as Taylor performs her new instrumental track “Cloud 9” through the all-new PreSonus Quantum HD 8 audio interface, and shares her story of New Orleans roots, attending the Berklee College of Music, and taking a leap of faith to pursue music professionally in Los Angeles.
Though she currently resides in Los Angeles, Taylor isn’t shy when it comes to talking about her hometown: “I don’t claim to be from any other city I’ve lived but my birthplace: New Orleans, Louisiana. I don’t go home often, but whenever I do, I get a better understanding of myself. It’s like I pick up wherever I left off. My accent starts to come back a little. I look around and the people look like me, act like me.”
Founded on the banks of the Mississippi River more than 300 years ago, New Orleans is a city rich in history and existing in a near-constant state of flux. “A lot of restaurants and places I used to go are no longer there: Destroyed by Katrina, or went out of business. Chefs left, recipes changed. Even my childhood schools are gone and the neighborhoods are still in ruins. So I try my best to hold on to the memories. The Southern hospitality and culture. I take them with me wherever I go.”
Despite her current and burgeoning success, Taylor’s came from very humble beginnings: “I’m from this music city, but I grew up very sheltered. So I found my groundings in church. The choir director and his son were incredible drummers and I would sit there and watch him in awe every week. Becoming a drummer seemed like this daunting, impossible, unattainable thing.” But Taylor saw herself being able to attain that level in her own way, and it inspired her to find her own voice: “One day I took a leap of faith, mustered up the nerve to play for a church service. That’s where I found my footing and learned that music is about serving something greater than myself.”

Emboldened by her experiences, Taylor took another leap of faith and applied to Berklee College of Music where she studied new genres, gained live performance experience, and learned how to produce, compose, and program music. Then, In July 2013, she took the ultimate leap and bought a one way ticket to Los Angeles, California. “I had no job offers; I didn’t even have a drum kit; I just knew that God promised he would take care of me if I took a leap of faith. So I did.”
The last decade has seen Taylor’s career blossom with an ever-expanding roster of increasingly high-profile performances even as she continues to produce her own music – and all of this success is ultimately derived from her love of drumming: “For me, ‘pocket’ is more about the spaces of silence between the notes. It’s about being in the right place at the right time. And that philosophy applies to my life, and my music. There have been a lot of leaps, detours and dead ends, and there will probably be more on this journey – but while the route may change, the destination stays the same.”
PreSonus products used: PreSonus Quantum HD 8 USB-C Audio Interface.
Meet the all-new family of Quantum USB-C Recording Audio Interfaces, and get in-depth information about the entire product line here.
Introducing the All-New Quantum Audio Interfaces
Take the Leap with the Next Generation of PreSonus Audio Interfaces
MEET THE ALL-NEW FAMILY OF QUANTUM AUDIO INTERFACES
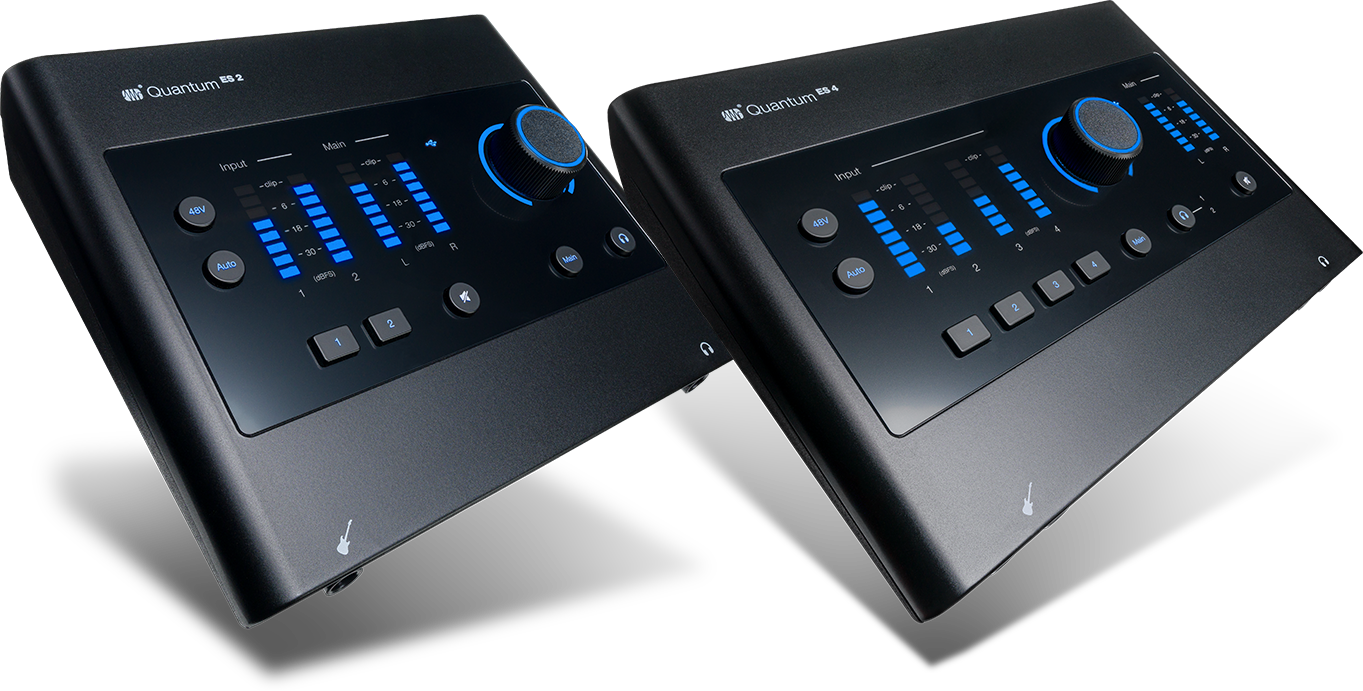
The culmination of nearly 30 years of PreSonus expertise, Quantum delivers newly-redesigned MAX-HD preamps, class-leading converters, front-facing instrument inputs co-developed with industry-leading experts at Fender®, and stunning, high-fidelity performance for self-made audio creators and professional studio sessions. Sleek, stylish, and packed with premium features, these USB-C audio interfaces are available in four distinct models: Quantum ES 2, ES 4, HD 2, and HD 8.

ES SERIES
The Quantum ES 2 and ES 4 models are powerful, compact audio interfaces that deliver pristine preamps and class-leading converters in an intuitive and accessible design – making them the perfect interface for self-made audio creators capturing their creativity at home, or on the go.
Quantum ES interfaces deliver high-quality 24-bit converters, new MAX-HD mic preamps with +75 dB of gain for transparency and accuracy across the frequency range, 115 dB dynamic range, Auto Gain, inputs co-developed by Fender, loopback, and 6 months of Studio One+ in an intuitive and compact design.
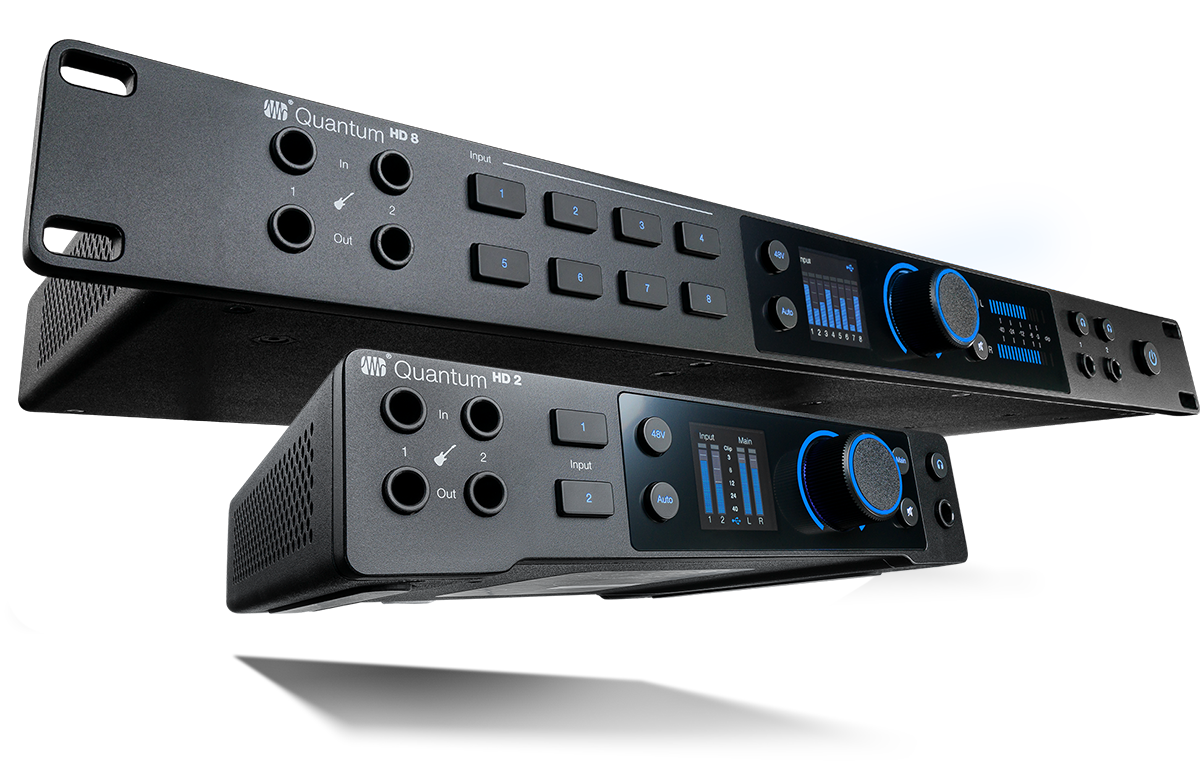
HD SERIES
The tabletop Quantum HD 2 and rack-mountable HD 8 audio interfaces empower creators with high-quality audio production, newly-redesigned MAX-HD preamps, class-leading converters, and instrument inputs co-developed with industry-leading experts at Fender®.
Quantum HD interfaces deliver premium performance and high-fidelity features in powerful tabletop and rack-mountable forms. Boasting high-quality 32-bit converters, extensive I/O, and seamless access to Studio One for professional studio sessions, the HD series features ADAT/standalone mode and two dedicated re-amp outputs that you can use to send a dry pre-recorded guitar signal out to an external amplifier for further processing and recording – plus 12 months of Studio One+ Hybrid.
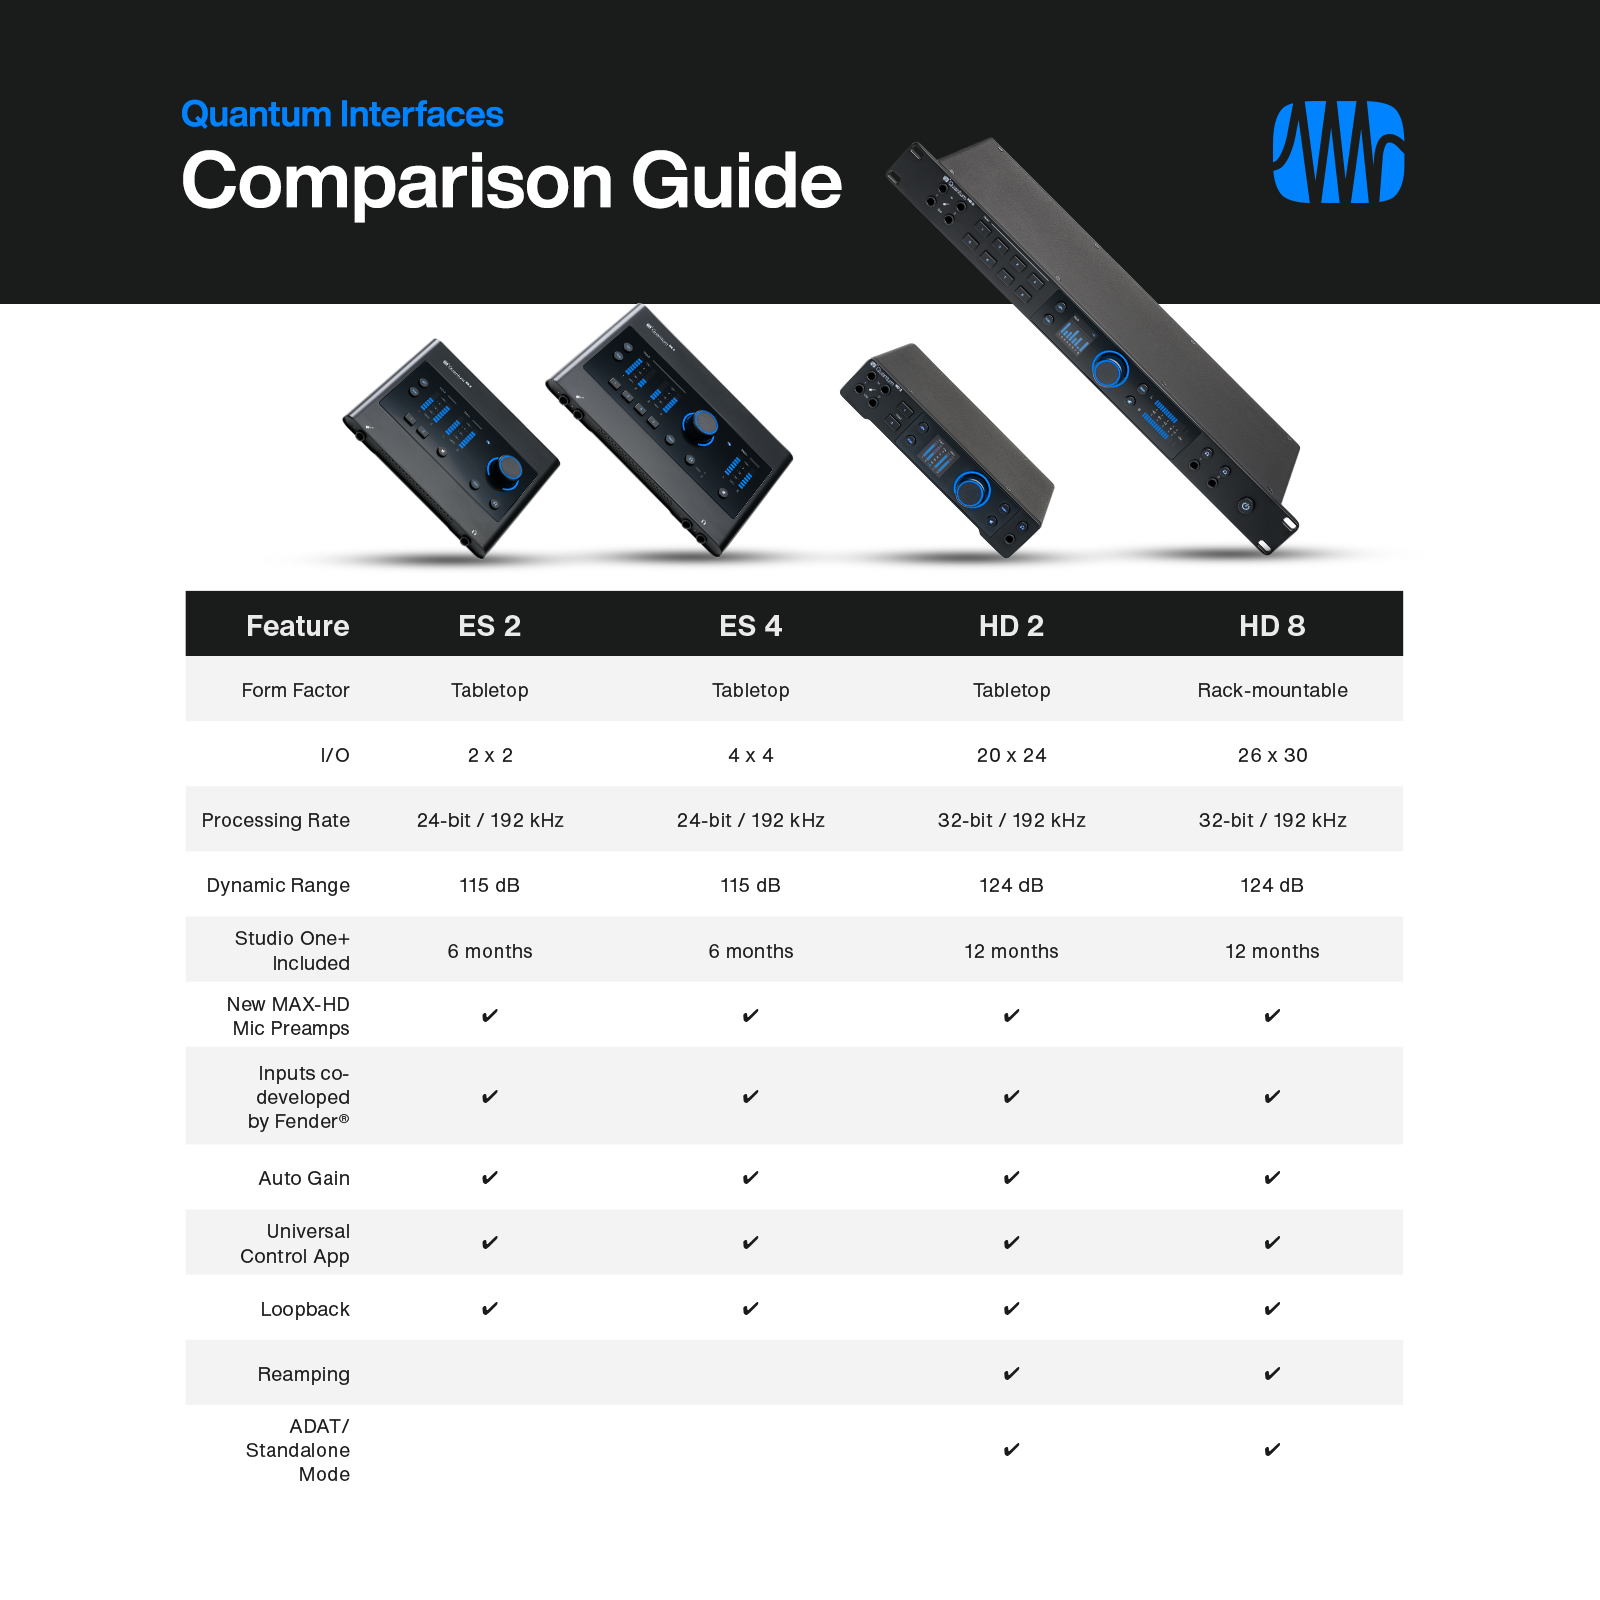
COMPARISON GUIDE
Not sure how to choose the right interface for you? Use our handy comparison guide to find the best audio interface for all your recording needs.
Groove Hacking with Multiband Gating
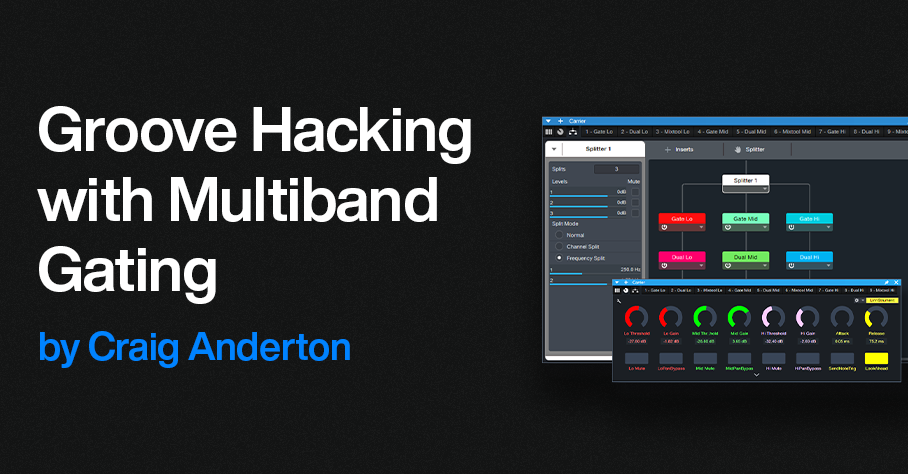
by Craig Anderton
About four years ago, I did a tip on multiband gating. Although it was a cool effect, it was guitar-centric, cumbersome to edit, and time-consuming to put together. But that was before Track Presets—this improved version requires only a single Track Preset, and works well with synths, guitars, and other instruments. Furthermore, a Macro Controls panel provides flexible, versatile editing. (There’s a download link at the end, along with an audio example.)
The overall design is somewhat like a vocoder. It uses a Modulator to generate control signals, and these process a Carrier. The mixer channel layout in fig. 1 may look daunting, but loading the Track Preset does almost all the work for you.
Setup
1. Load the Groove Hacking Track Preset.
2. Open the Mix view. When you load the Track Preset, the Output assignments for the Modulator’s Lo, Mid, and Hi FX Channels default to Main.
3. Assign these outputs (circled in orange in fig. 1) to the sidechains in the Carrier’s Gates:
- Assign the Lo band output to the Carrier’s Lo Gate sidechain.
- Assign the Mid band output to the Carrier’s Mid Gate sidechain.
- Assign the Hi band output to the Carrier’s Hi Gate sidechain.

Figure 1: The blue channels are the Carrier, the violet channels are the Modulator. The Modulator bus outputs with the orange outline have been assigned to Gate sidechains in the Carrier.
4. Choose audio for the Audio In and Modulator tracks, and you’re ready to do some groove hacking. To get a feel for how this works, try a synth pad or power chord for the Carrier, and a drum loop for the Modulator.
5. The Macro Controls panel’s default settings will likely not work well with the Audio In and Modulator tracks you’re using, because the Groove Hacking effect is sensitive to levels. So, once you have the setup in place, use the Macro Controls panel to optimize the effect.
How to Use the Carrier Bus Macro Controls
Fig. 2 shows the Macro Controls for the Carrier’s FX Chain.
Figure 2: Controls that relate to a specific Gate have the same color. The yellow macro controls, and the LookAhead and Send Note Trig buttons, are global.
The following are per-band Gate controls:
- Threshold edits the triggering characteristics for each Gate (Lo, Mid, and Hi bands). If turned up too high, triggering won’t happen and you’ll hear no sound. If turned down too low, the sound will be on almost all the time instead of following the modulator’s rhythm.
- Gain adjusts the output level for each Gate. Use these controls to achieve the best balance among the three frequency bands.
- Mute turns off individual bands. When choosing the optimum Threshold for one band, it’s convenient to mute the other bands.
- Pan Bypass. The Lo, Mid, and Hi bands have default pan positions of center, left, and right respectively. Turn on the Pan Bypass button to center a band in the stereo field.
The following are global controls:
- Attack edits the time for the triggered sound to ramp up to its full level. Turning this up can give short “swell” effects.
- Release is important, because it determines the percussive character of the triggered sounds.
- For advanced applications beyond the scope of this tip, enabling Send Note Trig exposes the Gate note trigger outputs as MIDI inputs for Instrument tracks. Every time a Gate opens, it sends a MIDI note trigger. For example, you might want to trigger a kick drum sound every time the Lo Gate opens. The triggers default to Note C3 with a Velocity of 100. To modify the note pitch and velocity, open the FX Chain, and open the Gate whose note you want to edit.
- Leave LookAhead on. Turning it off reduces latency by 2 ms, but the tradeoff is less precise triggering.
Under the Hood: How It Works
The Carrier Section (blue channels in fig. 1) has an Audio Input channel and a bus. The Audio Input’s pre-fader Send feeds audio to the Carrier bus. The bus splits the audio into three bands, followed by gates. Triggering the gates from control signals generated by the Modulator Section (violet channels in fig. 1) processes the Carrier audio.
The Modulator Section derives the control signals:
- The Modulator audio’s channel has three pre-fader sends that feed three FX Channels.
- Each send goes to its own FX Channel.
- Each FX Channel has a Pro EQ3 that isolates a particular frequency band.
- Each FX Channel Output provides a control signal to the sidechains of the Carrier’s Gates. These control signals open and close the Gates.
The Carrier Section processes the audio it receives from the Audio In track’s pre-fader Send with the Carrier’s Extended FX Chain. Fig. 3 shows the FX Chain’s Routing Window. The splits are frequency-based, with split points at 250 Hz and 1.50 kHz. Each band goes to a series connection of a Gate, Dual Pan, and Mixtool.

Figure 3: Incoming Carrier audio feeds a frequency-based Splitter, which splits into three bands. Each of the three bands goes to a dedicated Gate, Dual Pan, and Mixtool.
Optimizing the Frequency Splits
You may need to optimize the Carrier’s Splitter frequencies, as well as the Modulator’s EQ frequencies, for the audio you want to process. In most cases, the Carrier’s Splitter bands and Modular EQ bands should be the same, and the Modulator’s frequency bands shouldn’t overlap. To do this:
- Set the Modulator’s Lo band Pro EQ3’s HC Freq to the same frequency as the Mid band Pro EQ3’s LC Freq. This is also the same frequency as the Splitter’s low frequency split.
- Set the Hi band Pro EQ3’s LC Freq to the same frequency as the Mid band Pro EQ3’s HC Freq. This is also the same frequency as the Splitter’s high frequency split.
The stages mentioned above are the only ones used in the Pro EQ3 processors. For the best separation between the bands, choose a 24 dB/octave slope. However, there are no rules! The bands can overlap, have different slopes, use a peak response for some bands, or whatever sounds best.
How to GetTips for Getting the Most Out of This Tip
- Groove Hacking pairs well with virtual instruments, especially pads. Replace the Audio In track with an Instrument track. Insert a pre-fader send in the Instrument track, and assign it to the Carrier bus.
- Adjusting the Threshold Macro Control for each band is crucial. Mute the bands whose Threshold you’re not adjusting. For further editing, the Lo, Mid, and Hi FX Channel faders can fine-tune the audio going to the Gate’s sidechain. If a band’s Gate Threshold can’t be turned down or up far enough, reduce or raise the level of its corresponding FX Channel fader respectively. Automating these faders and varying their levels can add even more variety to the sound.
- The Carrier’s pre-fader send allows for flexible mixing. With the Carrier’s channel fader down, the Audio In or Instrument track’s pre-fader send sets the mix of the Carrier in the final output. Turning up the Carrier’s channel fader mixes in the original signal feeding the Audio In (or the sound of a virtual instrument from an Instrument track).
- To mix in some of the raw Modulator sound, turn up its Channel fader.
- The Carrier bus can receive sends from multiple Channels, not just the Audio In. So, you can process multiple channels simultaneously.
- To vary the stereo placement and width of the three Carrier band’s outputs, open the FX Chain and alter the Dual Pan settings.
- Experiment with this tip early in the mixing process. You may find you don’t need as much instrumentation when one of them is blurring the line between melody and rhythm.
In the audio example, the Modulator is a drum loop from the MVP Loops – Afro Pop loop library. The Carrier is a Mai Tai preset. In the second half, a bit of the dry modulator sound fades in.
Download the Groove Hacking Track Preset here!