Category Archives: Studio One
Studio One 5.3 has arrived
The best DAW just got better. Again.
Studio One 5.3 adds new features, enhancement, and powerful workflow improvements to Studio One 5. This is a free update for Studio One 5 users and PreSonus Sphere members.
1. Sound Variation improvements for composers
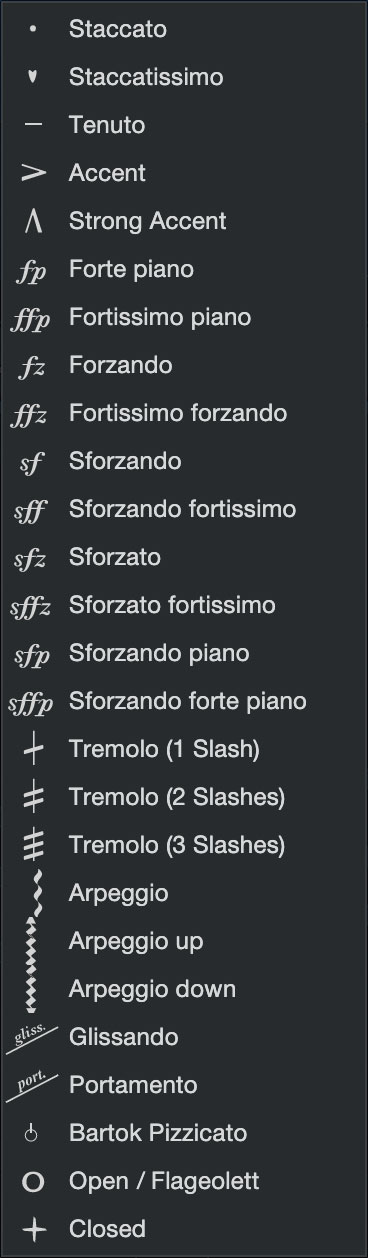
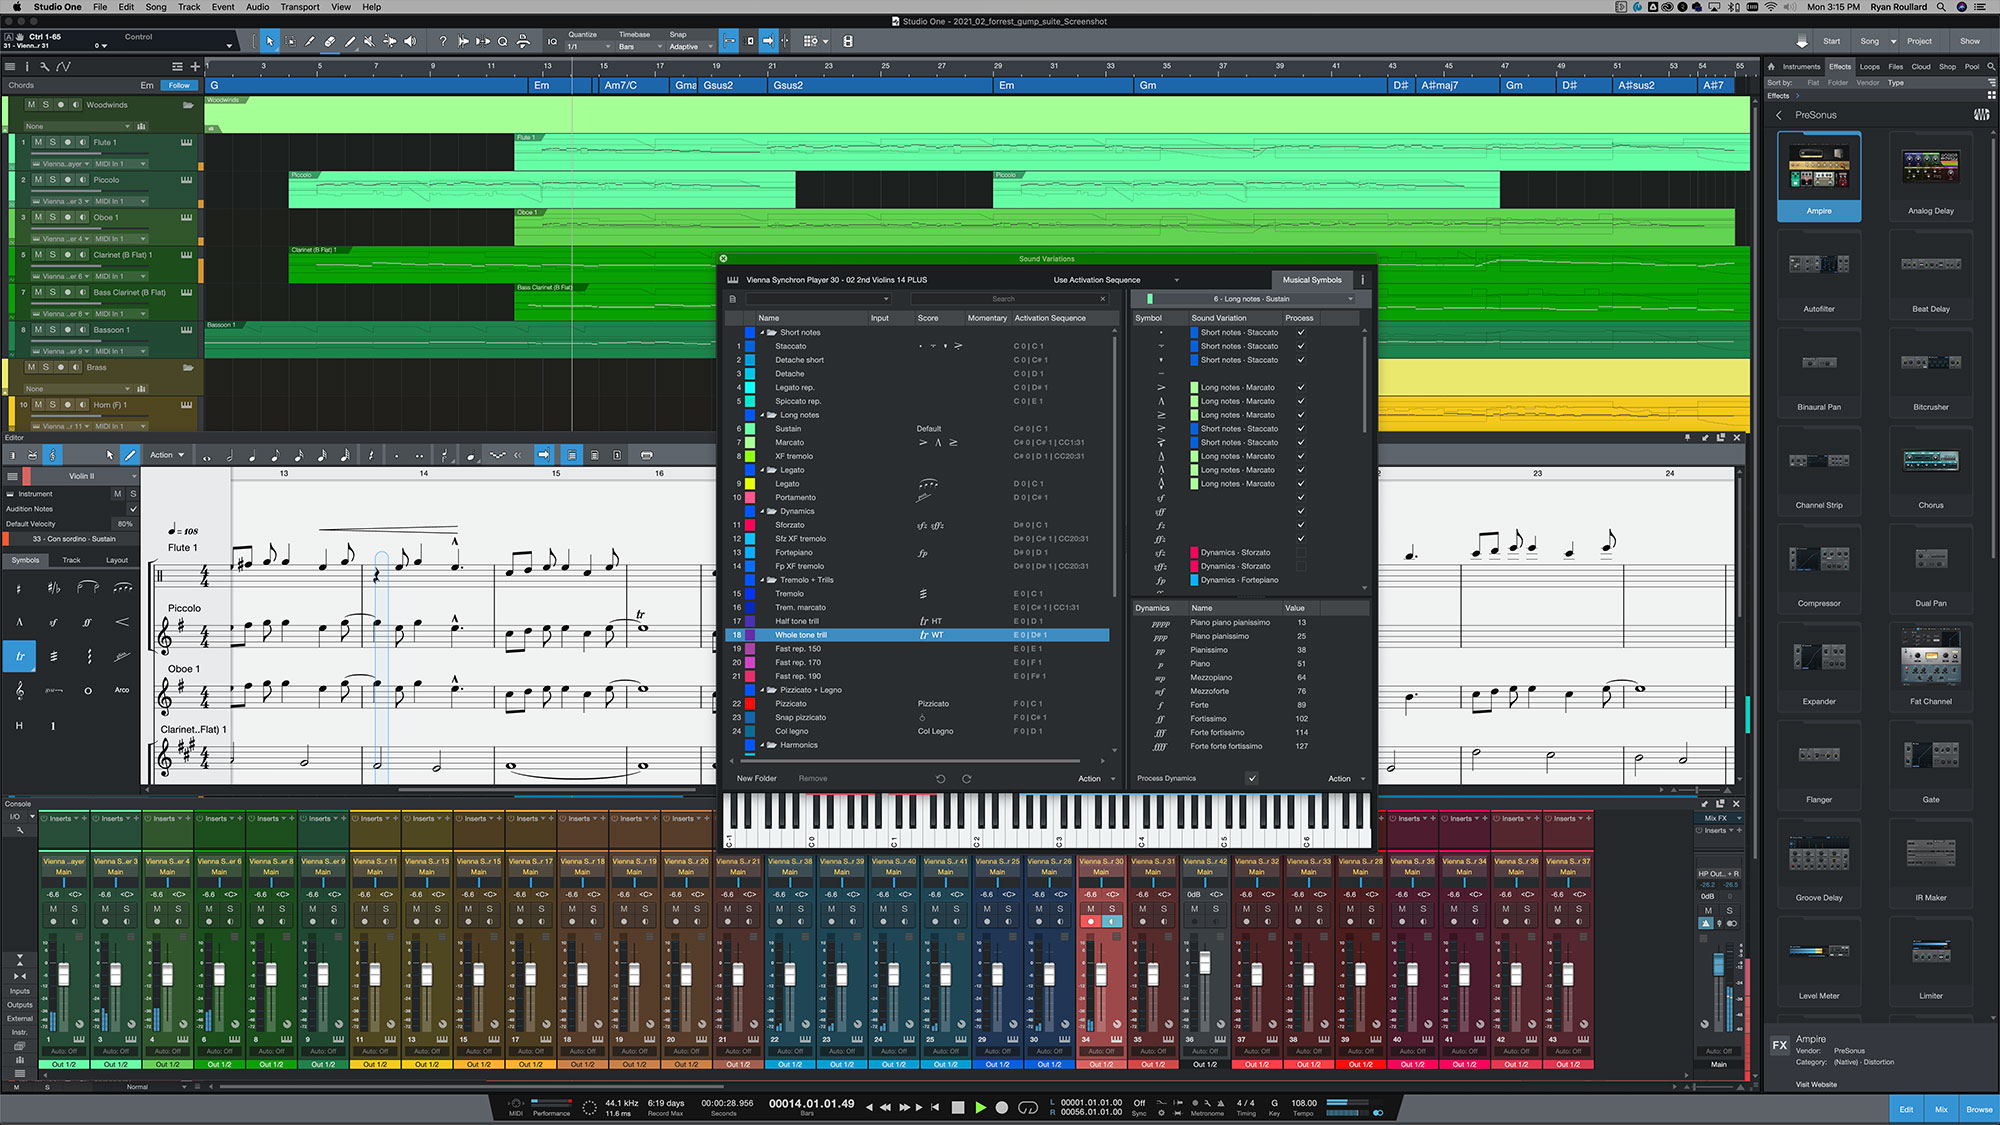
Musical Symbols and Dynamics Processing are now integrated with Sound Variations
Both Musical Symbols and Dynamics Processing have been added to the Sound Variations editor. The integration of Musical Symbols allows composers to add symbols to their scores in a manner already familiar to them—and virtual instruments will respond with the appropriate performance articulations. Dynamics symbols are tied to MIDI Velocity, with customizable values.
Musical Symbols also now receive their own Lane in the Note Editor—any changes made in Score View will be reflected in Piano View, and vice-versa. The Lane is divided into note-based Articulations—such as Staccato, Accent, or Portamento; and range-based Directions like Pizzicato, Vibrato, or Col Legno. Musical Symbols are now displayed directly on Note Events, and there’s even a Variations Global Track view atop the Piano View.
Musical Symbols can be mapped by hand, or Auto-Assigned based on the Sound Variation names of the currently-loaded instrument. And perhaps best of all, orchestral libraries from our friends at Vienna Symphonic Library, UJAM, and EastWest have already done the Sound Variations mapping of their robust libraries for you—a major time-saver!
MIDI channel support for Sound Variations and improved selection
Studio One 5.3 has extended the output mapping of Sound Variations to include MIDI channel information as part of an activation sequence. MIDI channel mapping can be used alone or in combination with other activation messages like keyswitches, controllers, or velocity—deepening Sound Variations’ usability with Kontakt instruments.
Sound Variations are faster and easier than ever to search and apply thanks to a quick right-click menu of recently-used Variations—for quick re-application—and a one-click “apply” button to place the currently-active Sound Variation at the cursor point.
Learn more about Sound Variations and Musical Symbols here.
2. Show Page improvements
Drag ‘n’ drop more things to create Patches on the fly

Drag ‘n’ drop now works in the Show Page for virtual instrument Presets—drag a Preset from the Browser to a Player and it will create a new instance of the associated Instrument and create a new Patch. The same works with dragging Ampire to a Real Instrument or Backing Track Player—it even works with complex FX chains.
Seamless patch changes
When playing virtual instruments live, seamlessly switching between different sounds is a must! Virtual Instrument Player Patch changes are now gapless during a performance, so long notes held across patch changes will not be cut off while the new instrument is activated. Try it!
Learn more about Show Page Improvements here.
3. Format conversion and backup options
Zip and upload to PreSonus Sphere
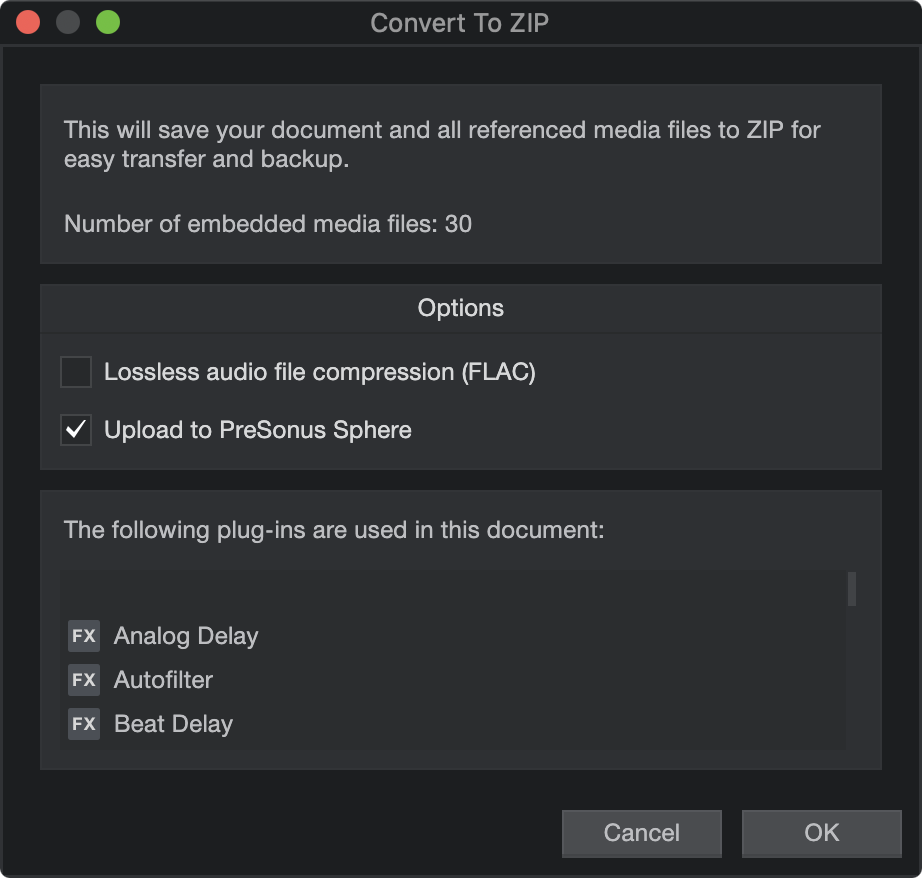
In 5.3, you can now save any Document (Song, Show, or Project) to a .ZIP file, with the options to convert all media to .FLAC and/or exclude any unused media—keeping your file sizes down. And with one extra click, Studio One will upload your .ZIP to PreSonus Sphere Workspace for safekeeping or collaboration. Of course, you and your collaborators can download them again straight from the Cloud tab of Studio One’s Browser—you don’t have to leave Studio One and mess about with your computer’s file explorer or Internet browser. And Studio One can also open any Zip it makes.
You’ve also got new options to quickly export .AAF, Capture Sessions, MIDI Files or Open TL via the “Convert To…” option in the File menu.
Learn more about Archive and Backup improvements here.
4. New creative applications of The Chord Track
Rapid chord progression prototyping via D’n’D
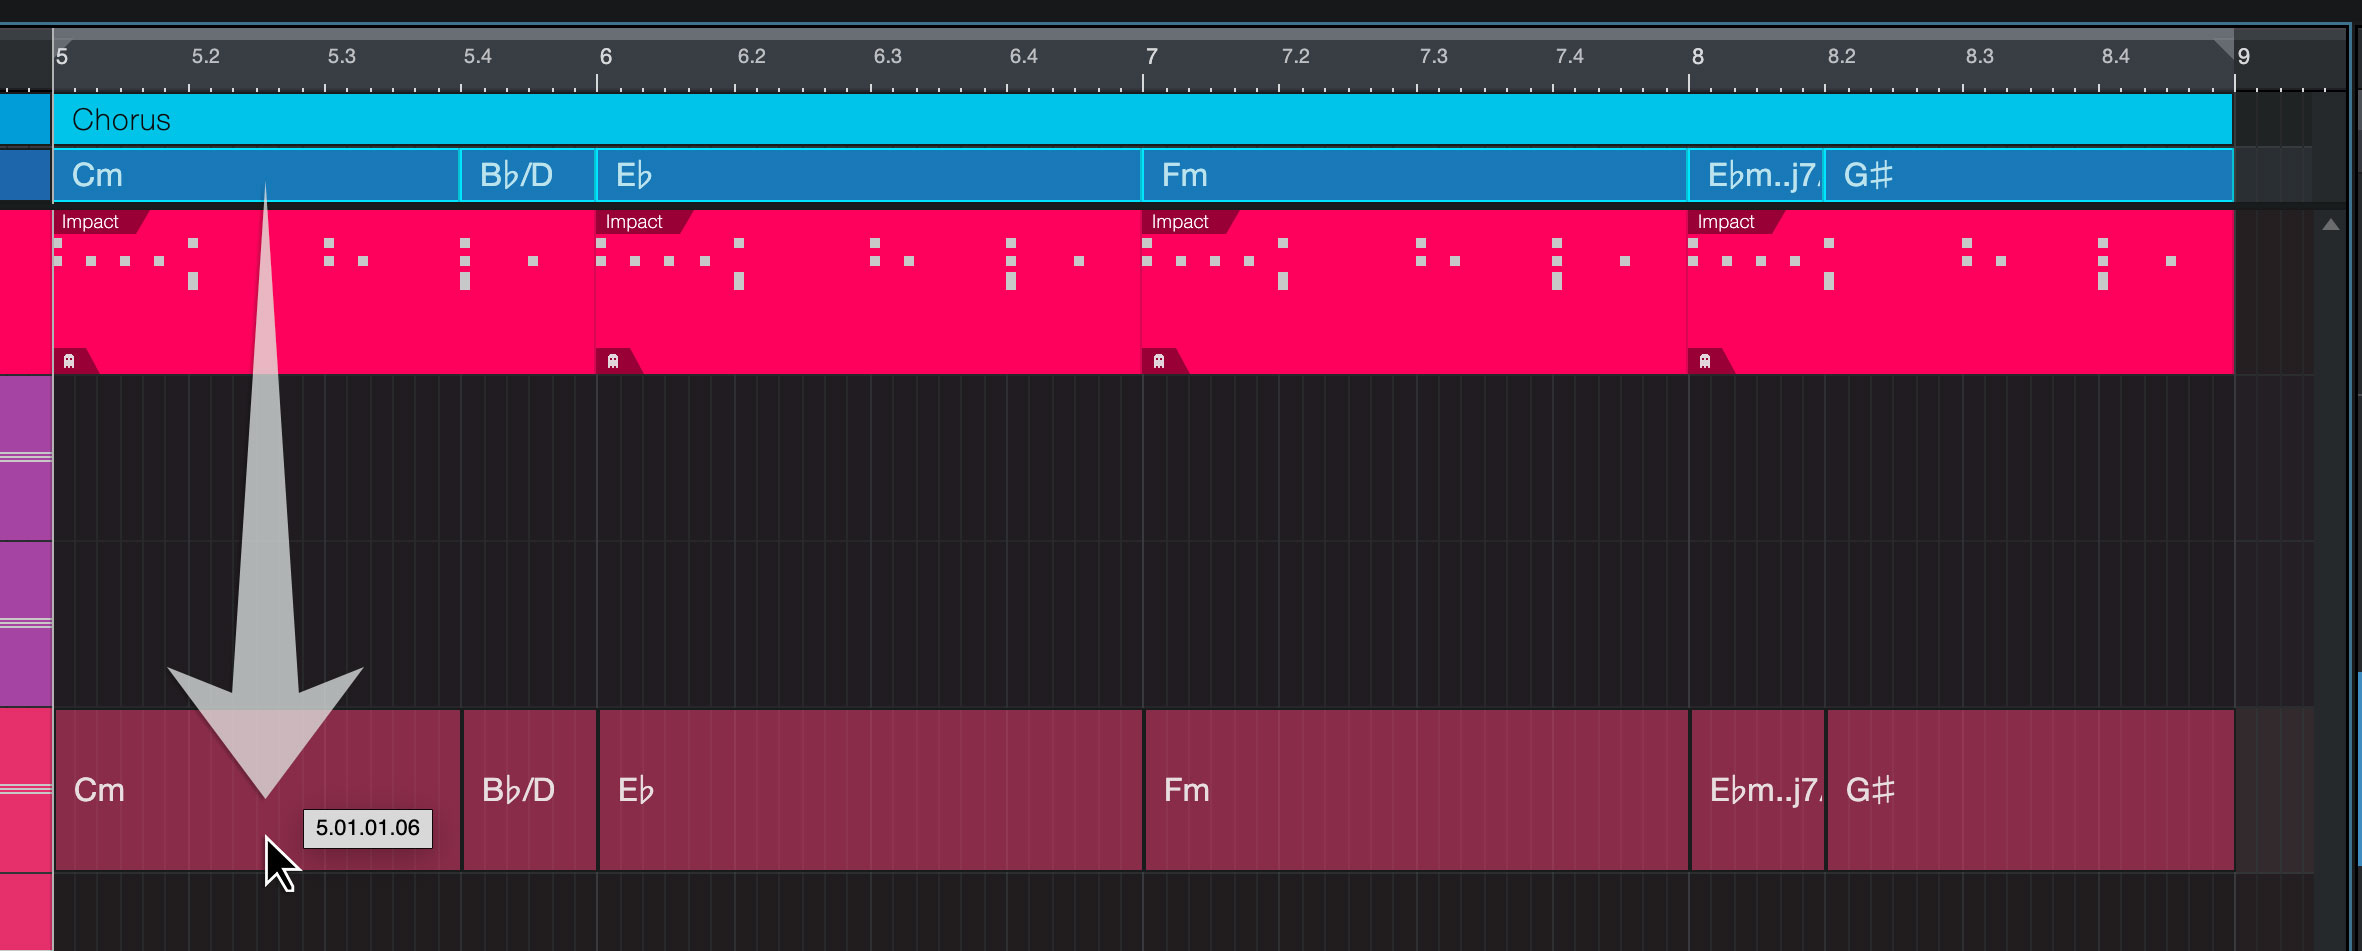
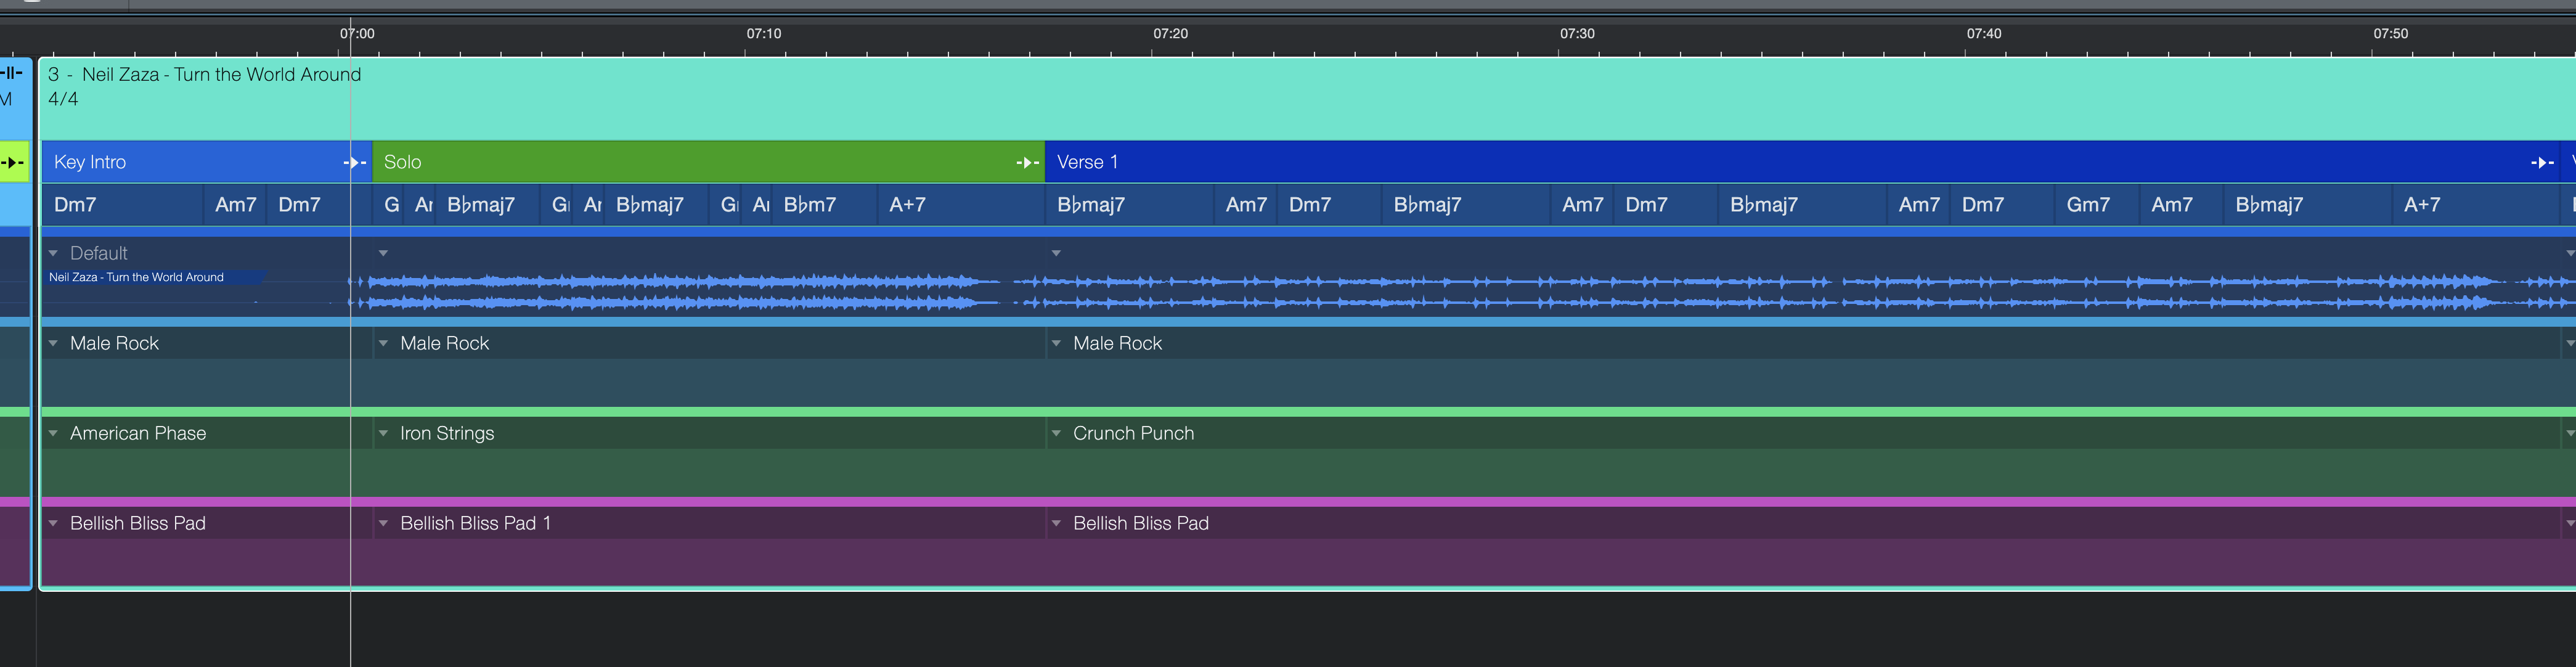
With a single drag ‘n’ drop (of course), you can now drag a Chord Event from the Chord Track into an Instrument Track to render a simple Note Event chord to play with—great for auditioning and prototyping new arrangements.
You can even drag an Audio Event directly to an Instrument Track to render your chords as a Note Event, if the chords had been detected before.
Learn more about Chord Track updates here.
5. MPE support for VST3 instruments
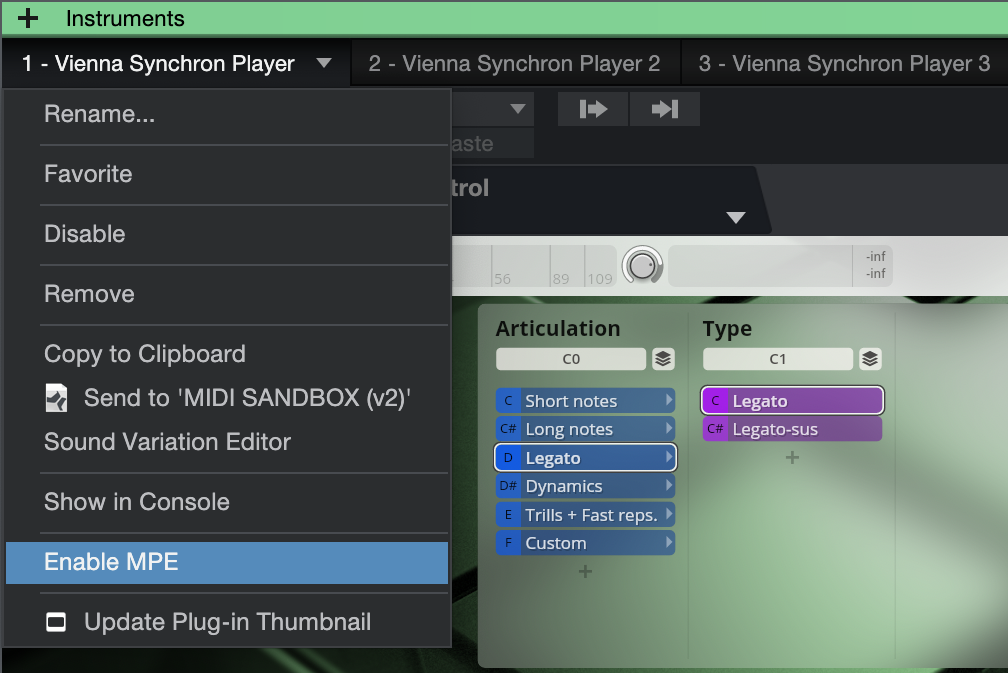
5.3 adds MPE support for VST3 instruments using Note Controllers in Studio One. This allows MPE compatible VST3 instruments to work with Studio One and compatible hardware controllers. Great for users of those instruments which automatically hide their VST2 counterpart when a VST3 version is installed.
Learn more about MPE support here.
Full Studio One 5.3 video playlist:
Check out the “What’s new in Studio One 5.3” playlist!
Learn more about Studio One
Shop Studio One
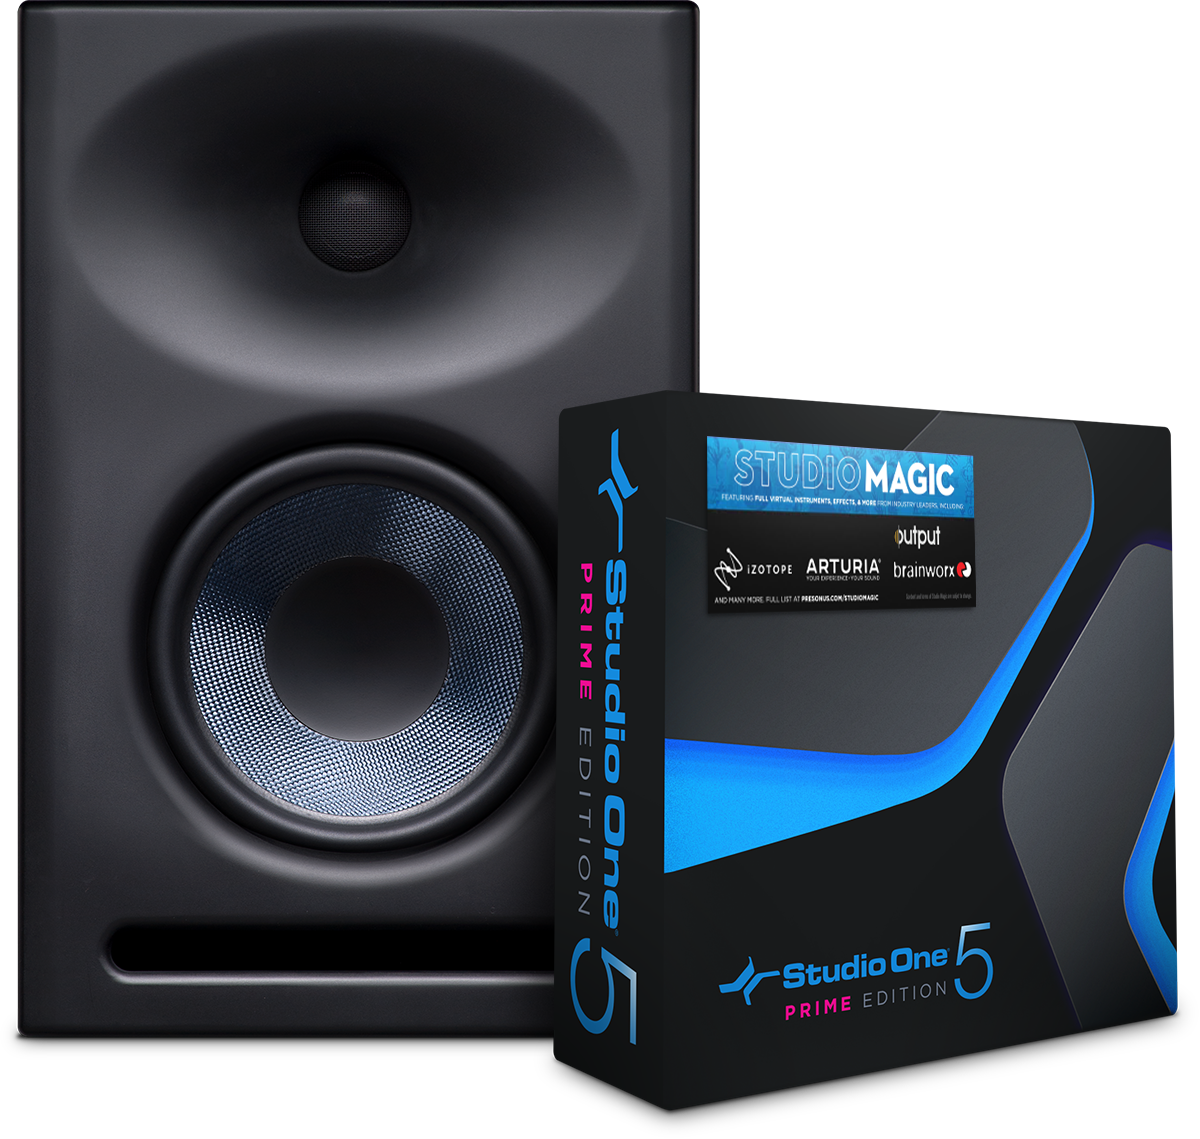
PreSonus Studio Monitors now include Studio Magic and Studio One Prime
What some folks may call “something a little extra,” or “a bonus,” we like to call lagniappe. It’s that thirteenth beignet in a baker’s dozen, or the recipe in the back of your PreSonus manual.
And it’s in that spirit that after the success of a limited time promo, we decided that all PreSonus customers who henceforth purchase our qualifying studio monitors (including the subwoofers!) will get a big ol’ Studio Magic software bundle worth over $1000 US bucks, that includes tons of plug-in effects, virtual instruments, and even music lessons—as well as a special version of Studio One Prime that grants access to all of those aforementioned plug-ins!
Click here to learn more about what you get in Studio Magic. It’s a lot!
Qualifying monitors include:
- Eris-series
- R-series
- Sceptre-series
- Temblor-series subwoofers
Metal Guitar Attack!

They’re called “power chords” for a reason—that delightful mix of definition, sludge, and hugeness is hard to resist. But can we make them more huge and more powerful? Of course, we can, so let’s get started
This tip gives two options: non-real-time, and real time (using the High Density Ampire pack, although other amp sims and processors can work, too). Either technique also works well for LCR mixing fans.
Non-Real-Time Hugeness
- Insert Ampire in your guitar track, and edit it for your ideal sound (the Default Ampire preset is a good place to start).
- Right-click in the track’s column, and select Duplicate Track (Complete).
- Repeat Step 2. Now you have three identical tracks with identical processing.
- The key to getting Total Hugeness is transposition. Click on one track’s Event, open the Inspector (F4), and set Transpose to -12 (fig. 1). Click on another track’s event, and in its Inspector, set Transpose to +12. Don’t change the pitch of the remaining track.
After the next section, we’ll get into panning and EQ.

Figure 1: The guitar power chord track has been duplicated twice. The audio on the track to the right has been dropped an octave.
Real-Time Hugeness
Follow the steps above for non-real-time hugeness, but don’t do Step 4. Instead:
- For one of the tracks, open up Ampire. Insert the Pitch Shifter before the amp, choose “dn 1 Oct” (fig. 2), click on the top of the pedal, and then drag up until the pedal’s Tune tooltip shows 100. The audio will now be transposed an octave down. If you don’t have the Ampire High Density pack, the transposers in other amp sims will work, but the one in High Density seems better than average.
Figure 2: The Pitch Shifter processor provides real-time transposition.
- Similarly, do the same processing on another track, but this time choose “up 1 Oct.”
What’s Next
Whether you chose real-time or non-real-time hugeness, you now have three tracks: Standard pitch, tuned down an octave, and tuned up an octave. Let’s do panning and levels. Here are some options.
- Standard pitch full left, +12 center, -12 full right. This gives the biggest sound and is used in the audio example.
- Standard pitch full left, -12 full right, and mute the +12 track. This is ideal for all you LCR fans. It opens up a big hole in the center for bass, kick, snare, and vocals.
- Standard pitch full left, +12 full right, -12 full right. Another LCR favorite. The +12 gives a more defined sense of pitch in the right channel, so something else with a strong sense of pitch (e.g., Organ of Doom) can fit comfortably in the left channel.
- Standard pitch center, +12 full left, -12 full right. This emphasizes the main guitar track with the standard tuning.
This approach also lends itself well to automating mute on the various channels. Unmute the octave below when you want to fatten the sound, unmute the octave higher when you want a more defined sense of pitch.
Applying EQ to the transposed audio can customize the sound further. If you’re doing a duo with only drums and guitar, on the octave below track, boost the bass and trim the highs. Pan it to center, and pan the other two tracks left and right. Another possibility is giving more definition to the octave higher track by rolling off the lows and highs a bit and boosting the mids around 2 kHz or so.
Let’s check out the audio example…remember, it’s only one guitar.
Kisnou: Emotional Journeys Across Sonic Landscapes
Italian musician, composer, and producer Kisnou shapes the undefined chaos that was generated as consequence to profound experiences growing up as his kingdom – a place where to give complete freedom to creativity and imagination.
 With masterpieces such as “Alive,” “Falling Deeper,” and “Vertigo,” people from all over the world began to feel a deep connection with Kisnou’s music, counting for more than 7 million total streams on Spotify alone in 2020. Featured on BBC, New Balance, TV commercials and countless Spotify playlists, his music is often defined as otherworldly: perfect for anyone who wants to experience a real sonic journey.
From ambient to electronic, from orchestral to indie, Kisnou is a never-ending adventure that explores worlds of atmospheric sounds and storytelling. Featuring bittersweet poetry, untold stories, cold atmospheres, field recordings, and broken song structures, each song is a deep cinematic experience you will not forget.
Kisnou began making music using FL Studio back in 2015, eventually working for years within the Ableton Live software environment before recently discovering Studio One and PreSonus Sphere’s creative workflow environment.
In his words:
So… at the beginning, I really had no knowledge, never played an instrument. I just jumped and went for it. I felt like I had some stories to tell.
I’m a self-taught producer. It’s pretty easy to learn so many things online. I also used to listen to a lot of music, every day—while drawing or doing homework, while coming home from school. It was a part of me and of my life, every day. Many people are surprised when I say that I’m self-taught, especially those who are musicians or producers as well. It makes me feel happy, but I have always been down to Earth and very respectful. For example, in 2020 an American writer sent me one of his books, as a thank you gift because he loved my music. The book is called Wounded Tiger, and the author is such a wonderful person. It is a book about World War II and the true stories of multiple people that lived through that moment of history. I can’t say much about it but the author is trying to find the right chance to make a movie out of it… and I might be a part of the soundtrack team. Fingers crossed!
I graduated in 2019 and got my Bachelor of Arts in Commercial Music, but since 2017 I have been making music for a good fan base online that has grown quite fast. I hit my first million streams on a song, and from there it started to get even better! I had an income, collaboration opportunities, and a licensing partnership with Marmoset Music that got me some really good placements! One of my songs was featured in a New Balance commercial and a Tomorrowland video. Now music is my full time job. I currently have around 150,000 monthly listeners on Spotify alone.
The first artist who actually truly inspired me to make music was Koda. He is a talented guy from Los Angeles who wrote some beautiful songs. His songs were just pure magic for me, they resonated like nothing else. I felt like the lyrics were talking to me. My favorite song from him is “Angel.” I loved the video as well, so much that I contacted the video artist a couple of years ago and we created the music video for my song “In The Origin, We Breathe.”
Other inspirations include: The Cinematic Orchestra, Bersarin Quartett, Sorrow (a great electronic/garage music producer), Pensees, and Owsey. I come from the Ableton world, so I am also very much into electronic music, future garage, and ambient. I am in love with atmospheres, long reverbs, evolving sounds, textures and so on.
Lately I have been listening to the YouTube channel Cryo Chamber. Some songs are a bit too dark sometimes, but you can find such incredible atmospheres. I find it very inspiring.
 You know, I live in the countryside, so I am always spending time in nature. I feel like I am lucky to be living here, but at the same time you might feel isolated or lonely quite often. It depends on the mood I guess.
I used Ableton for 3-4 years, made great songs thanks to that DAW, but somehow… I wasn’t really feeling comfortable there. I was slowly getting sick of it, even if the creative tools, the stock plugins and workflow were amazing.
By chance I found out about Studio One and then I started to see what you could do with it and it slowly got my interest, until I finally decided to make the switch.
Currently, I just try to make Studio One adapt to my workflow and that was quite easy. The possibility to internally customize shortcuts and create macros is just wonderful in my opinion. I have many macros mapped around my keyboard, and have others on the buttons of my mouse. I have mapped CTRL + ALT as a hold command on one of the two main side buttons, then on the other one I have a Macro that activates the bend marker view, automatically swaps to the Bend Tool so that I can do my edits and then press it again to deactivate the bend view.
On the four lower side buttons I have mapped the editor, channel, inspector and browser for quick tasks. Though If I hold control and press those buttons, or ALT, I have other sets of commands to help me out.
One more functionality that I love is the Transform to Audio Track command, which prints a MIDI file into audio, but it’s better compared to what I’ve seen in other DAWs I’ve used in the past (FL Studio, Ableton, or Pro Tools) because I can print the MIDI to audio and preserve the instrument—so that If I ever want to revert back to the plug-in, I can do that at any given moment. I can choose to render the insert FX or not, which is also great.
 In other DAWs, I either had to make a copy of the plug-in, print one to audio and leave the other there, just disabled. Sometimes I printed a MIDI file into audio feeling that it was perfect, then days later, I felt like I wanted to edit the plugin… and I couldn’t do it anymore because I had not copied the plug-in instance before printing.
Lastly, I’m pleased to be a featured artist on PreSonus Sphere!
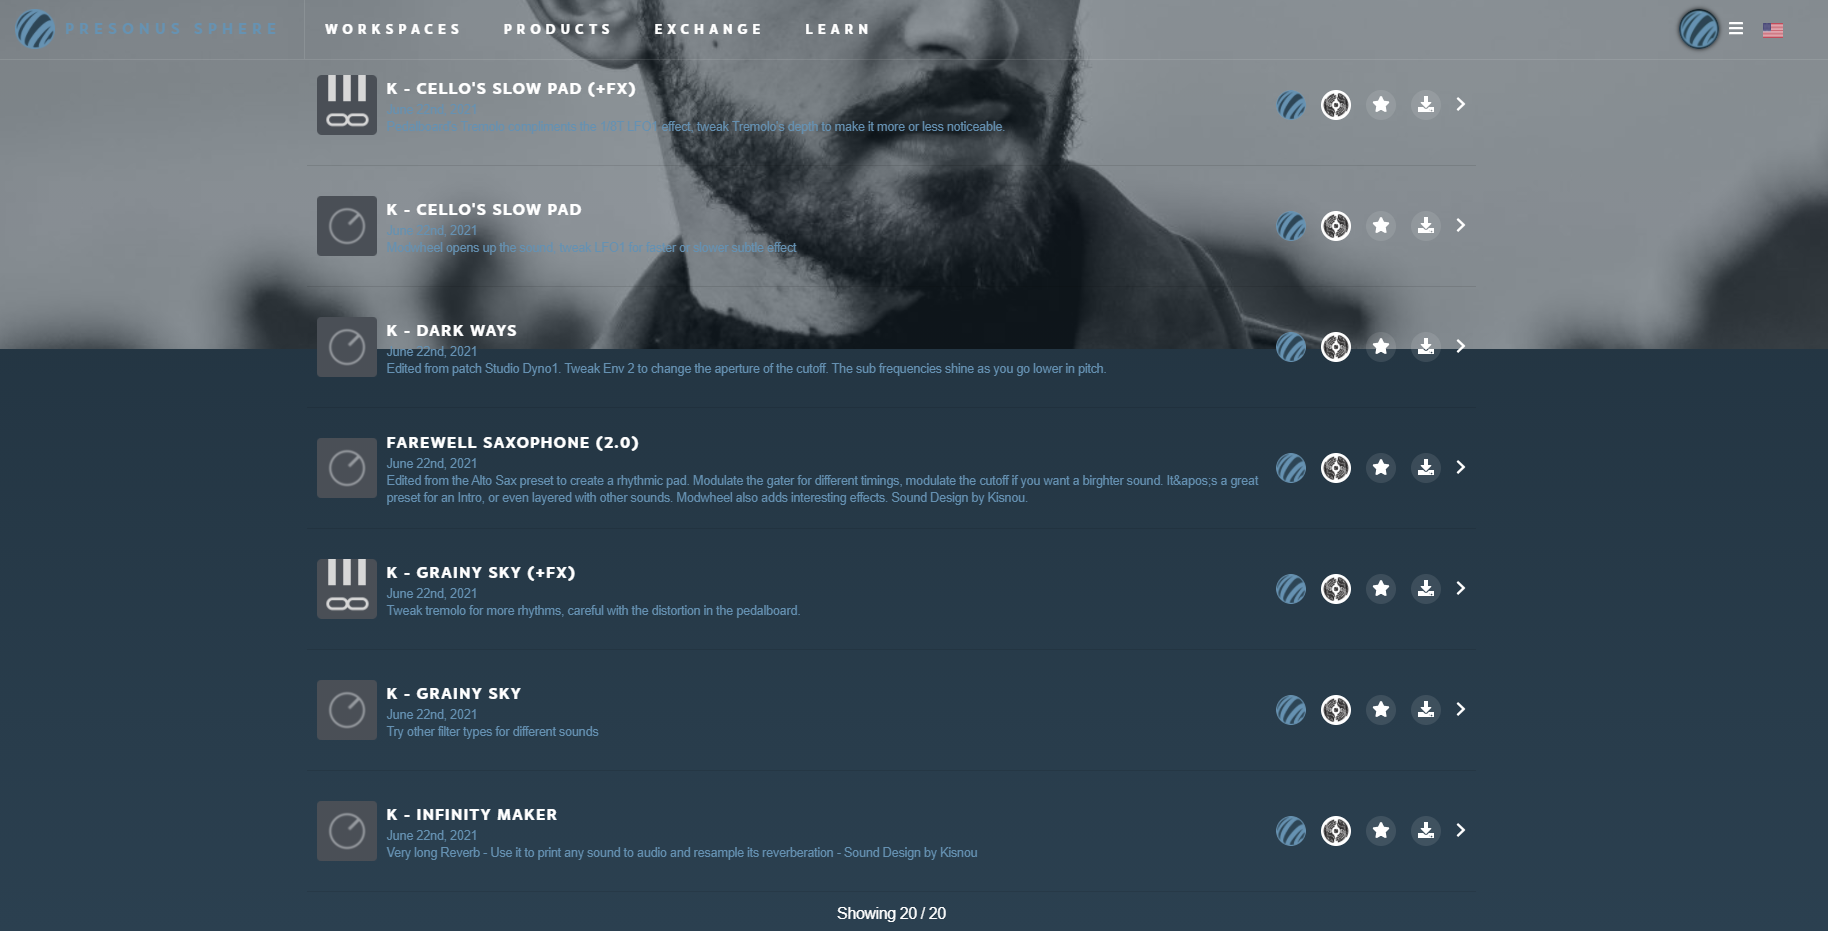
The presets I created revolve around the use of white noise, layering and distortion: aspects that I have been exploring in the last months to create a sort of vintage but modern, textured sound. Warm, lush pads and pluck sounds, distorted reverbs and atmospheres were my North Star when creating these presets.
There’s 20 presets in all in this pack: FX chains, pad sounds for Presence, some Macros, Mai Tai patches, and a custom reverb of mine… enjoy!
PreSonus Sphere members can click here to get them!
![]()
Join PreSonus Sphere today to check out Kisnou’s exclusive Presets and from those by other featured artists!
Only $14.95 per month for Studio One Professional, Notion, and so much more.
Mid-Side Processing with Artist
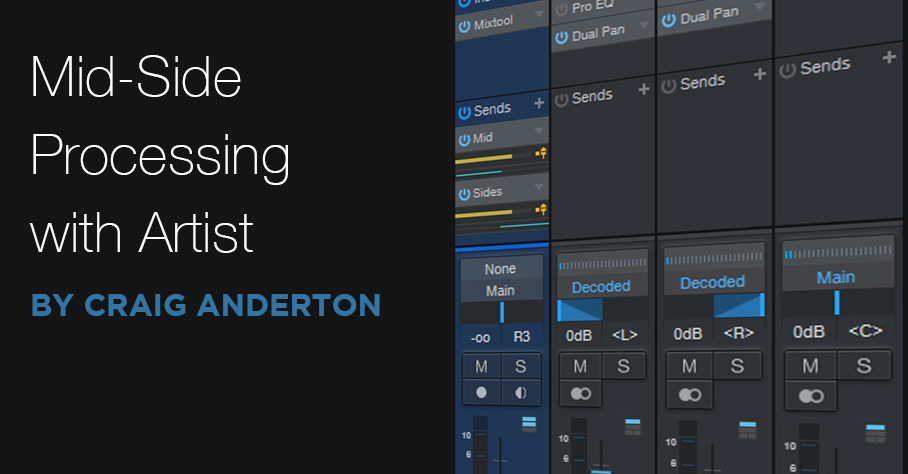
This is a companion piece to last week’s tip, which described how to implement Splitter functionality in Studio One’s Artist version. The Pro version has a Splitter-based, mid-side processing FX Chain that makes it possible to drop effects for the mid and side audio right into the FX chain. However, the Splitter isn’t what does the heavy lifting for mid-side processing—it’s the Mixtool, which is included with Artist.
Mid-Side Refresher
The input to a mid-side processing system starts with stereo, but the left and right channels then go to an encoder. This sends a signal’s mid (what the left and right channels have in common) to the left channel, while the sides (what the left and right channels don’t have in common) go to the right channel.
The mid is simply both channels of a stereo track panned to center. So, the mid also includes what’s in the right and left sides, but the sides are at a somewhat lower level. This is because anything the left and right channels have in common will be a few dB louder when panned to center.
The sides also pan both channels of a stereo track to center, but one of the channels is out of phase. Therefore, whatever the two channels have in common cancels out. (This is the basis of most vocal remover software and hardware. Because vocals are usually mixed to center, cancelling out the center makes the vocal disappear.)
Separating the mid and side components lets you process them separately. This can be as simple as changing the level of one of them to alter the balance between the mid and sides, or as complex as adding signal processors (like reverb to the sides, and equalization to the mid).
After processing, the mid and sides then go to a decoder. This converts the audio back to conventional stereo.
lMid-Side Channel and Bus Layout
Fig. 1 shows what we need in Artist: the original audio track, a bus for the mid audio, a bus for the side audio, and a bus for the final, decoded audio.
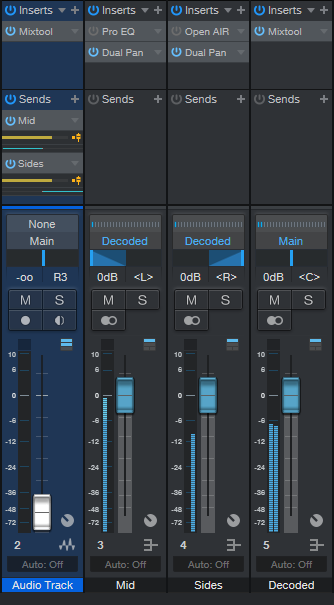
Figure 1: Channel and Bus layout for mid-side processing in Artist.
Insert a Mixtool in the original audio track, and enable MS Transform (see fig. 2). Then, we need to send the encoded signal to the buses. Insert one pre-fader send, assign it to the Mid bus, and pan it full left. Then, insert another pre-fader send, assign it to the Sides bus, and pan it full right.
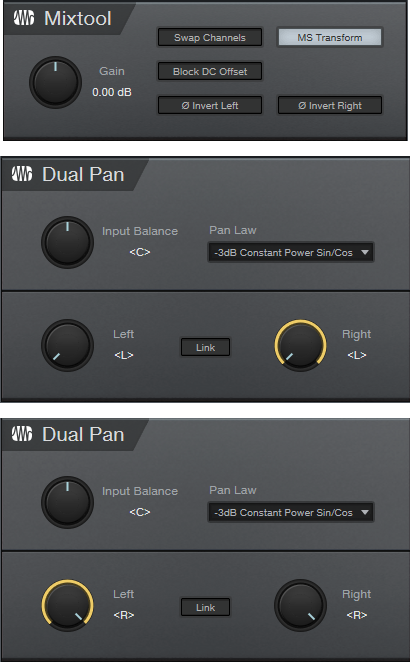
Figure 2: The Mixtool settings are the same for both Mixtools. The middle Dual Pan inserts in the Mid bus, while the lower Dual Pan inserts in the Sides bus.
Referring to fig. 2, the Mid bus has a Dual Pan inserted after any processing, with both controls panned full left. Similarly, the Sides bus has a Dual Pan inserted after any processing, with both controls panned full right. (The Pro EQ2 and OpenAIR inserted in fig. 1 are included just to show that you insert any effects before the Dual Pan plug-ins; they’re not needed for mid-side processing.) Pan the Mid bus pan fader left, and the Sides bus pan fader right.
Assign the bus outputs to the Decoded bus. This has a Mixtool inserted, again with MS Transform enabled. And that’s all there is to it—the Decoded bus is the same as the original audio track, but with the addition of any changes you added to the Mid or Side buses.
To make sure everything is set up correctly, remove any effects from the Mid and Sides, and set all the bus levels to 0. Copy the original audio track, insert a Mixtool into it, and enable Invert Left and Invert Right. Adjust the copied track’s level, and if there’s a setting where it cancels out the decoded track, all your routing, panning, and busing is set up correctly. Happy processing!
The Dynamic Brightener—Reloaded
In April 2019, I did a Friday Tip called The Dynamic Brightener for Guitar. It’s kind of a cross between dynamic EQ and a transient shaper, and has been a useful FX Chain for me. In fact, it’s been so useful that I’ve used it a lot—and in the process, wanted to enhance it further. This “reloaded” version makes it suitable for more types of audio sources (try it with drums, bass, ukulele, piano, or anything percussive), as well as less critical to adjust. It also lessens potential high-frequency “smearing” issues—the original version applied large amounts of boost and cut, with a non-linear-phase EQ.
Although the original version could have been built using a Splitter, I did a bus-based implementation so that it would work with Studio One Artist. This new version needs to use the Splitter (sorry, Artist users), but that’s what allows for the improvements.
Another interesting aspect is that by using the effects’ expanded view in the channel inserts, you don’t even need to open the effect or Splitter interfaces, to do all the necessary tweaking. This makes the reloaded version much easier to edit for different types of tracks.
How It Works
Fig. 1 shows the FX Chain’s block diagram.
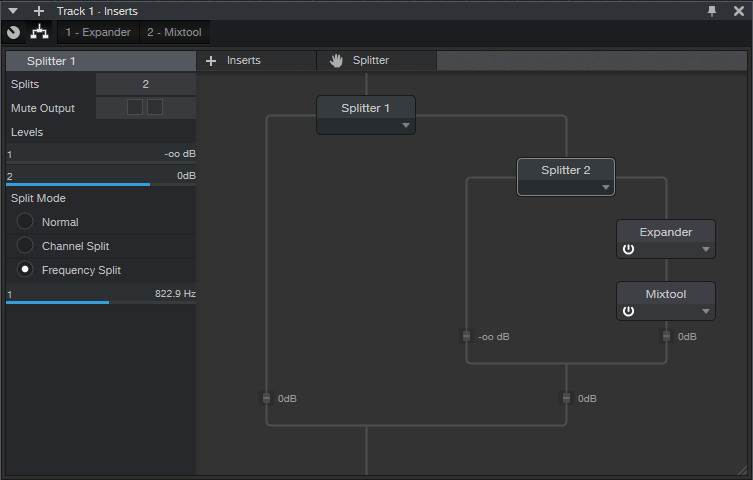
Figure 1: The Reloaded Dynamic Brightener’s block diagram.
Splitter 1 is a normal split. The left split provides the track’s dry sound, while the right split goes to Splitter 2, which is set up as a Frequency Split. The Frequency Split determines the cutoff for the high frequencies going into the right split. Splitter 2’s left split, which contains only the split’s lower frequencies, is attenuated completely. Basically, Splitter 2 exists solely to isolate the audio source’s very highest frequencies.
These high frequencies go to an Expander, which emphasizes the peaks. This is what gives both the transient shaping and dynamic EQ-type effects. Because the high frequencies aren’t very loud, the Mixtool allows boosting them to hit the desired level.
Fig. 2 shows the initial Expander and Mixtool settings. But, you won’t be opening the interfaces very much, if at all…you don’t even need Macro Controls.
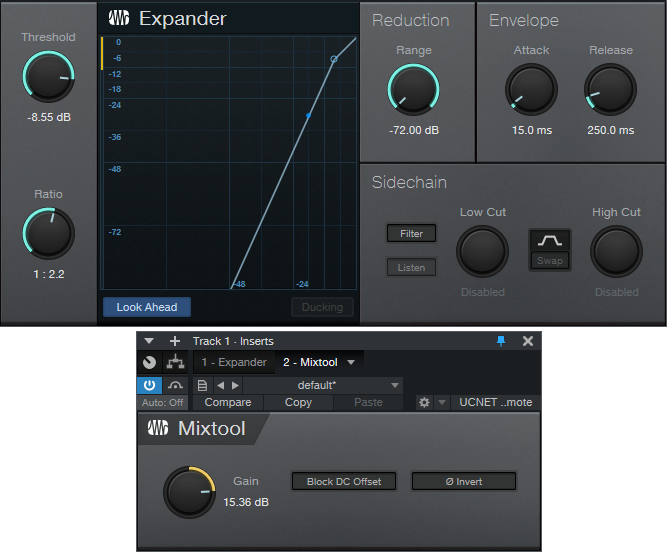
Figure 2: Initial parameter settings for the Expander and Mixtool.
Using the Reloaded Dynamic Brightener
In the short console view, open up the “sidecar” that shows the effects. Expand the effects, and set the mixer channel high enough to see the ones shown in fig. 3.
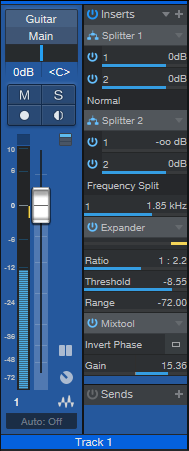
Figure 3: The Reloaded Dynamic Brightener controls.
Here’s how to optimize the settings for your particular application:
- Turn off Splitter 1’s output 1 power button. This mutes the dry signal, so we can concentrate on the brightener’s settings.
- Adjust Splitter 2’s Frequency Split to isolate the optimum high-frequency range for brightening. This can be as low as 1 kHz or less for guitars with humbucker pickups, on up to 6 kHz (or more) to emphasize drum transients.
- Set the Expander’s Ratio and Threshold parameters for the desired amount of brightening and transient shaping. Higher Threshold settings pick off only the top of the boosted high-frequency peaks; the Ratio parameter controls the transient shape. The higher the ratio, the “peakier” the transient.
- After editing the high frequencies, re-enable the dry signal by turning on Splitter 1’s output 1 button.
- Mix in the desired amount of brightening with the Mixtool Gain parameter. In extreme cases you may want to increase the level control at the end of the Splitter 2 branch, or the output level from Splitter 2 output 2, but this will be needed rarely, if at all.
- As a reality check to determine what the brightener contributes to the sound, turn off either Splitter 1 or Splitter 2’s output 2 power button to mute the brightened signal path.
This is a tidier, easier-to-adjust, and better-sounding setup than the original dynamic brightener. Download the FX Chain here—the default settings are for dry guitar, and assume a normalized overall track level. With lower track levels, you’ll need to lower the Expander Threshold, or boost output 2 from Splitter 1. But feel free to tweak away, and make the Reloaded Dynamic Brightener do your bidding, for a wide variety of different audio signals.
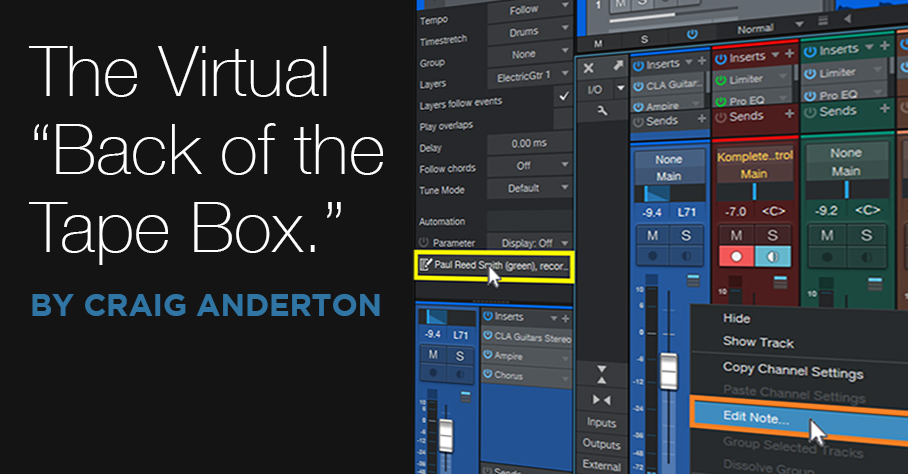
The Virtual “Back of the Tape Box.”
In the 20th century, tape reels came in boxes. Engineers wrote information about tracks, running order, timing, credits, and such on the back of the box. And because it was a box, you could fold up some sheets of paper and include lyrics, notes, and other information
These days, when you open a project, it’s just like you left it. But what mics did you use? How was the tone control set on the bass? And you got those loops from…which sample library? If you ever need to re-visit a track, fix a glitch, do an overdub, or weeks pass before you can finish a project, you’ll need to know these details. Let’s talk about taking notes, and while we’re keeping track of things, let’s also create a lyrics track.
Taking Notes
To access Studio One’s virtual “back of the tape box,” choose Song > Song Information.
- The Info tab shows selected meta data, info from the Song Notes tab, and any image you uploaded to Song Setup. The image can show an album cover, but also a miking setup, an analog processor’s control settings, or a cool picture that inspires you.
- For developing song lyrics, I keep the Song Notes tab open, and do my writing/editing there. Saving lyrics with a song is convenient. However, it’s also useful for other notes—session personnel, web site URLs with reference info, and so on.
- Track Notes (fig. 1) is where you can include all track-related information. It’s ideal for info that’s not included in a preset, like the vocal mic of choice, analog processor control settings, and which pickup you used on a guitar.

Figure 1: Track notes are key to documenting a session.
Track Notes Access Shortcuts
In addition to accessing track notes in the Song Information menu, you can scroll down in the Inspector to the field below automation, and click on it to open the corresponding Track Notes (fig. 2). Or, right-click anywhere within a Console channel, and select Edit Note from the context menu. This is the fastest way to view or edit Track Notes, compared to going to Song Information, selecting a tab, and then clicking on the track label.
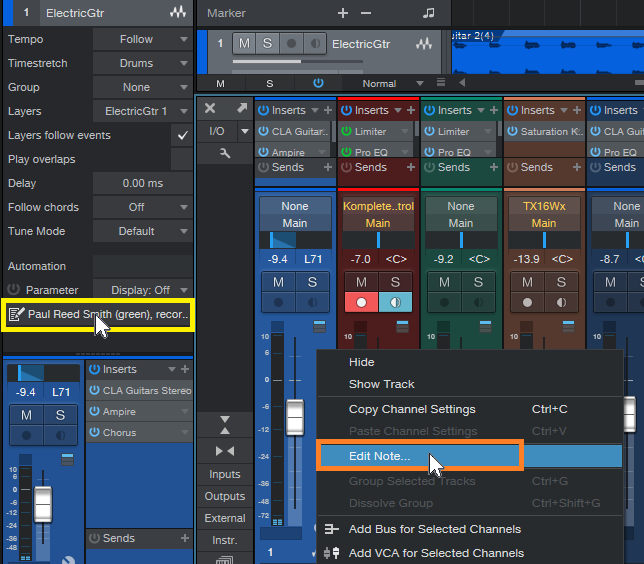
Figure 2: Open track notes from within the Inspector by clicking, or in a mixer Channel by right-clicking.
Furthermore, you can supplement Track Notes by entering information in the track name itself. Hovering over the name in the Arrange window or a mixer Channel (fig. 3) shows whatever you entered, which can be quite long if needed. This is useful for temporary notes, like if you recorded several similar parts, and need to differentiate among them.

Figure 3: You can see long track names by hovering over them.
Pipeline Docs
Analog processors…you love ‘em, right? But when they don’t have presets, and you’re using them with Pipeline, you’ll want to know how the controls were set. Pipeline’s image icon (lower left) allows uploading an image of control settings, while the pencil icon allows adding a note (fig. 4).
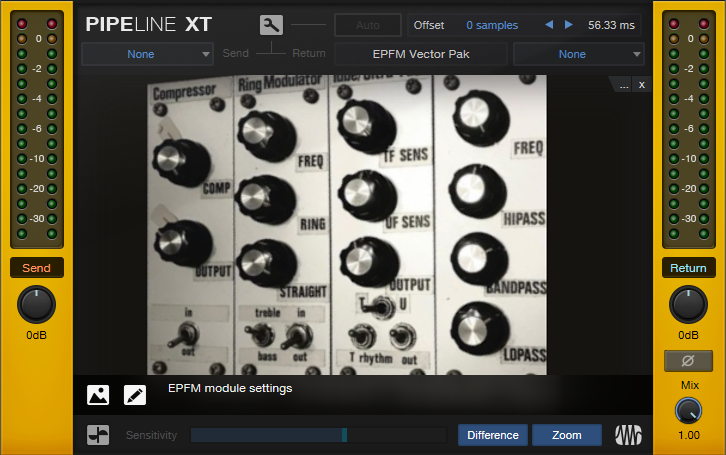
Figure 4: The rack of effects from my book “Electronic Projects for Musicians,” being used with Pipeline.
A photo larger than 1200 x 1200 will be scaled to fit the image space, but click on the image, and it expands to the original size. You may even be able to see all the controls on a rack-mount piece of gear.
If you have an analog synthesizer with so many controls they won’t fit in a picture, no problem. Pipeline doesn’t have to be used for its intended purpose. You can take a picture of the synth’s oscillators, another of the filters, another of the envelopes, Then, stack multiple Pipelines within a track, to be used solely as a picture gallery. However, each instance does add latency—when you don’t need to see the pictures, disable the track, and hide it to reduce clutter.
Of course, you could always put the images in a folder, and include that folder in your song folder. But it’s kinda cool that everything you need to know about a song can be stored within that song.
The Lyrics Track
A lyrics track is helpful, because you always know where you are in the song—not just in the “chorus” or “verse.” It can be located right above a vocal, so it’s easy to find and select a particular part that needs editing, overdubbing, deleting, etc. Although Studio One doesn’t have a lyric track per se, you can put one together in two ways (fig. 5). There are pros and cons to each approach.

Figure 5: Lyric track made with markers (top) and with a dedicated “lyrics track.”
Marker-based lyric track. Lyric markers are quite readable, and have useful songwriting functions:
- Select the Marker track, open the Inspector, and jump to a particular phrase by clicking on it. It’s a quick way to get where you want to go.
- Right-click on any marker, select “Create Arranger Sections from Markers,” and now you have the start of an Arranger Track based on the lyrics.
- Right-click on a marker, and choose “Stop at Marker” to make sure that playback won’t continue past that point.
Event-based lyric track. This might be best if you already have a lot of markers inserted, and don’t want to add more. Create a dummy track, and populate it with events whose lengths correspond to phrases. One advantage is that you can color-code the events to help guide you through a vocal by emphasizing certain phrases. Another advantage is that if you zoom in or out, the Event will continue to span the length of the chosen phrase. A Marker is always anchored to the beginning.
Hassan El Shafei: Journey Into Studio One
Our newest PreSonus Sphere Artist, Hassan El Shafei, is a musician, producer and founder of THE BASEMENT RECORDS in Egypt.

Hassan has produced records for some major artists in the Middle East, and was also one of the judges on the Arab Idol show (the equivalent to American Idol in the Middle East) for four seasons, which aired on MBC. Hassan started releasing his own records featuring other artists in the region, starting with this track, back in the days when he was predominantly still working in Logic and Ableton Live:
Here’s a more in-depth account of his history and evolution with DAWs and how he’s settled upon Studio One and PreSonus Sphere, in his own words:
I started producing a long time ago, using Logic when it was owned by E-magic (the good old days!) I loved Logic, but I felt limited until I got introduced to Ableton Live. I spent a bit of time on my own experimenting with it, but it was too daunting to use for ongoing projects until I took a quick crash course in London on Ableton Live, and then I switched when I felt comfortable using it. I didn’t switch 100 percent, though, because there were many things that were better done in Logic… but Ableton was a game changer, producing music in a completely different mindset… minimalism yet experimental!
The idea of racks, drum kits, and so on was endless, and it felt like a modular system that I could change according to my needs… BUT Ableton was also limiting in many ways: it was very unstable, and lacked many features—as if they were stubborn to actually fix or introduce features. So I started looking somewhere else after years of using Ableton and experimenting with the folks at Bitwig. (I even have a 1.0 badge, I think I had the beta before they released the first version!)
Bitwig were actually adding all the things to Ableton Live that the community wanted but, again they took their own route… which isn’t what I needed until finally I got introduced to Studio One.
I first tried Studio One 3 and was intrigued, but I couldn’t rely on it 100 percent until version 4 was out, which introduced Impact XT and Sample One XT. That changed everything for me, having its ease-of-use in my production environment—yet I also get the all-in-one kind of vibe, which I have never found in any DAW available and trust me… I have looked in every corner!!!
Studio One was the first DAW that lets me produce my whole record from writing ideas to final mixes in one place. That never happened before: it was always either Logic and Pro Tools or Ableton and Logic etc. Now it’s ONLY Studio One, and after all these years that’s really something special to note, in my opinion!
The workflow in Studio One is unbeatable: the Macros are pure magic, the ability to have Key Commands to assign uncommon commands makes Studio One very powerful. Production is a breeze, yet I have all these powerful tools: I can integrate Melodyne and ReVoice Pro via ARA, and I can use Layers while recording and Patterns for beatmaking.
Studio One is the most stable DAW I have ever used, it handles anything I throw at it. I have a big appetite when its comes to production, from producing pop records to scoring music to picture/video… and Studio One 5 is keeping up at my speed! Last but not least, the folks at PreSonus are amazing at consistently striving to achieve the best DAW out there; they are very active online, enthusiastic and most importantly… they listen to the community.
And that to me is priceless.
And one other thing—my newest projects have started to incorporatethe new Show Page in Studio One Version 5 for performing live perfectly in sync with my session tracks! Exciting!
Join PreSonus Sphere today! Only $14.95 per month for Studio One Professional, Notion, and so much more.
Follow Hassan on Instagram
Follow The Basement Records on Instagram
Dive into Ampire and Studio One with Forest Whitehead
Forest Whitehead hails originally from Shreveport, Louisiana, and has been based out of Nashville, TN since the fall of October of 2009.
Starting out as just a guitar player, he quickly began learning production and songwriting which led to signing his first publishing deal in 2011.
Since then, Forest has produced five #1 songs and has written four #1 songs most recognized for country superstar Kelsea Ballerini. He has a 2021 Grammy nomination for his work with Mickey Guyton for a song called “Black Like Me.”

After achieving success with his career in mainstream country radio, Whitehead has started an online presence called Music City Playbook that educates songwriters, artists, and producers on everything from songwriting, production, and publishing deals in the Nashville music industry.
With weekly production tutorials posted on his YouTube Channel, Forest’s goal is to become the go-to place online for quick success for songwriters wanting to produce their own music from home.
Make MIDI Guitar 2 Work with Windows
Jam Origin’s MIDI Guitar 2 (MG2) is a software-only, guitar-to-MIDI converter. It doesn’t require any special jacks, pickups, or multipin connectors—just give it your guitar’s audio output. MG2 works stand-alone, but can also insert as a plug-in into your guitar’s audio track, and generate a MIDI output. This shows up as an available MIDI input to an instrument track.
Unfortunately, when used as a plug-in, I encountered numerous issues—primarily degraded pitch bend performance and problems with VST3 instruments (apparently this is a common issue). I just couldn’t get it to work in a satisfying way.
However, there’s a workaround—and it works well. Pitch bends translate more smoothly, and it doesn’t matter whether the virtual instrument you’re driving is VST2 or VST3. Of course, like any MIDI guitar, you’ll need to clean up the data a bit but mostly, this involves just deleting notes shorter than a certain length. Pitch bending often needs editing, but on the other hand, MG2 handles vibrato very well.
The Solution: Virtual MIDI Ports
The solution is not to use MG2 as a plug-in. Instead, run it in stand-alone mode, assign its output to a virtual MIDI port, and set Studio One’s virtual instrument to that same virtual MIDI port. This approach bypasses any potential issues caused by taking MIDI data from an audio plug-in out, passing it through a DAW, and feeding it into an instrument.
Unlike the Mac, Windows doesn’t support virtual MIDI ports natively. However, the loopMIDI accessory program from Tobias Erichsen solves that. Download the program, and install it. The loopMIDI icon shows up in the taskbar. Right-click on it, and choose Configure loopMIDI (also check Autostart loopMIDI while you’re at it). Configuring just means hitting the + sign to create a port (fig. 1).
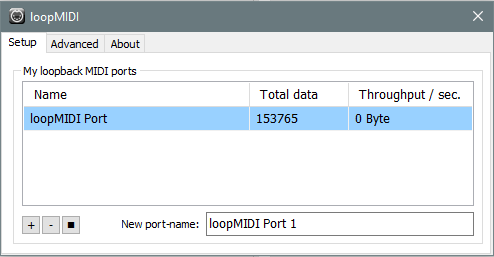
Figure 1: Configuring loopMIDI port.
After installing loopMIDI, we need to tell Studio One there’s a new MIDI control device. Open Studio One (because you checked Autostart, loopMIDI will already be running), and choose Studio One > Options > External Devices. Click the Add button, and set up loopMIDI as a MIDI keyboard (fig. 2).
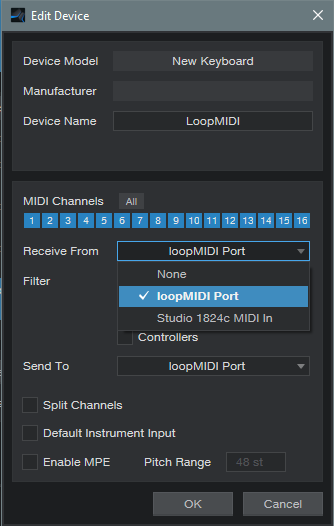
Figure 2: loopMIDI is being set up as a new MIDI controller.
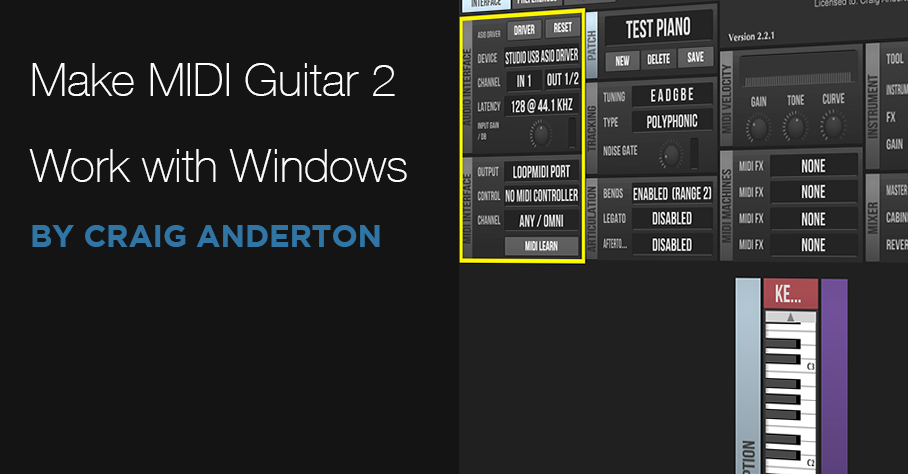
Next, set up MG2 in stand-alone mode (fig. 3). Note that there’s no problem with running MG2 and Studio One at the same time using a PreSonus ASIO interface (probably others as well).
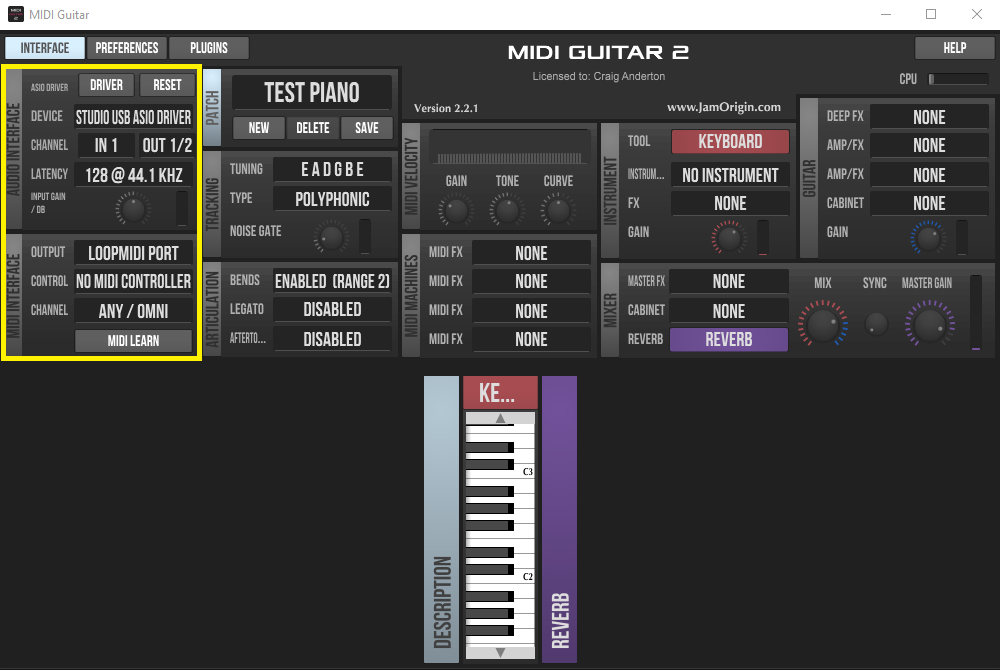
Figure 3: The sections outlined in yellow connect with your audio interface and Studio One.
In the Audio Interface section, specify the interface driver, and the input where MG2 will expect to find your guitar’s audio. Jam Origin recommends using 44.1 kHz with 128 samples of latency, and I didn’t argue. Set MG2’s MIDI Interface output to the loopMIDI port. This is where MG2 will send the MIDI data derived from your guitar.
For the final step, insert your virtual instrument into Studio One, and set its input to loopMIDI (fig. 4). Note that you don’t need to insert a guitar track, unless you want to record your guitar part as well as drive a virtual instrument. I insert a guitar track anyway, if for no other reason than to be able to use Studio One’s tuner—pitch-based guitar-to-MIDI converters seem to like accurate tuning.
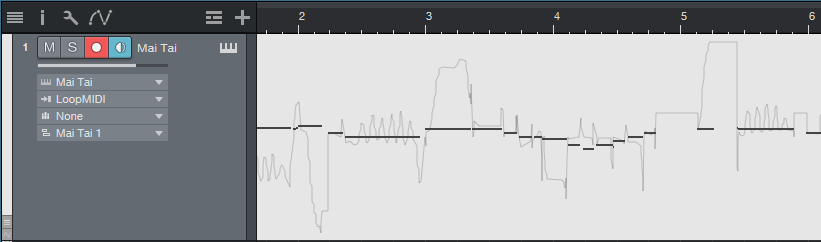
Figure 4: The Mai Tai input is set to loopMIDI. Note data (in monophonic mode), along with pitch bend, has been recorded.
Optimizing MIDI Guitar 2
To recap, your guitar goes into an audio interface input, MG2 in stand-alone mode listens to the audio input and converts it to MIDI, and then the MIDI data goes to your virtual instrument. However, we’re not quite done, because MG2 has various customization options.
The stand-alone version can play instruments, but we don’t need to do that because we’re triggering instruments in Studio One. So for the Instrument, choose No Instrument.
There’s a choice of polyphonic or monophonic tracking, depending on whether you want to play chords or single-note lines, and set bend to the same range in semitones as your instrument.
Experiment with Legato, which can even give infinite sustain. Gain and Curve help tailor your playing for the best triggering. In my experience, MG2 seems happiest when you don’t hit the strings too hard. In any event, those are the basics. Sorting out MG2’s settings in detail isn’t necessary, because you can go to the Jam Origin website and delve into the documentation there.
I must say that when I first tried using Jam Origin, I was frustrated, and felt I had just wasted $99. But after using the standalone/virtual port workaround, now I’m a happy camper. Sure, MIDI guitar isn’t perfect. But MG2 can lay down some tasty MIDI lines, and as to sawtooth-based power chords… well, let’s just say they sure are fun.