Category Archives: Studio One
The Really Grand Piano
Having worked on several classical and piano-oriented sessions, I’ve had the opportunity to hear gorgeous grand pianos in their native habitat. But it spoiled me. When I had to use sampled pianos in other types of productions, it always seemed something was missing.
This tip puts some of the low-end mojo back into sampled pianos. Sure, it’s done with smoke and mirrors, not by having wood interact with a room—but check out the audio example at the end, and you’ll hear what Beethoven has to say about it.
How It Works
The bass enhancement occurs by mixing a sine wave behind the main piano sound, but only in the lower octaves, and very subtly. This adds bass reinforcement that you won’t find in samples.
Set up a Multi-Instrument (sorry Artist users, this is a Pro version-only feature) that combines the piano of your choice, like the Presence Acoustic Full, and Mai Tai (fig. 1).
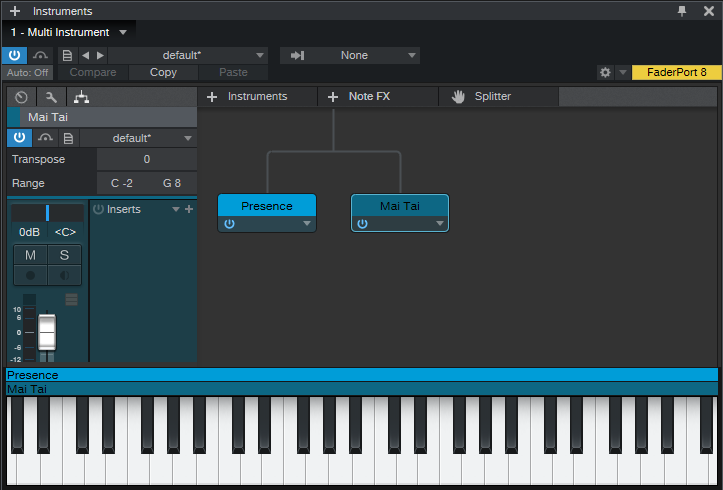
Figure 1: Multi-Instrument setup for grand piano reinforcement.
For Mai Tai, you want the simplest sound possible—one sine wave oscillator, no modulation except for an amplitude envelope, no random phase, and no effects other than EQ. By turning the Filter cutoff down to around 100 Hz or so, turning Key tracking all the way down, and using the EQ (in the bass range) to take out all the highs, we now have the sine wave tracking your playing on only the lowest notes (fig. 2).
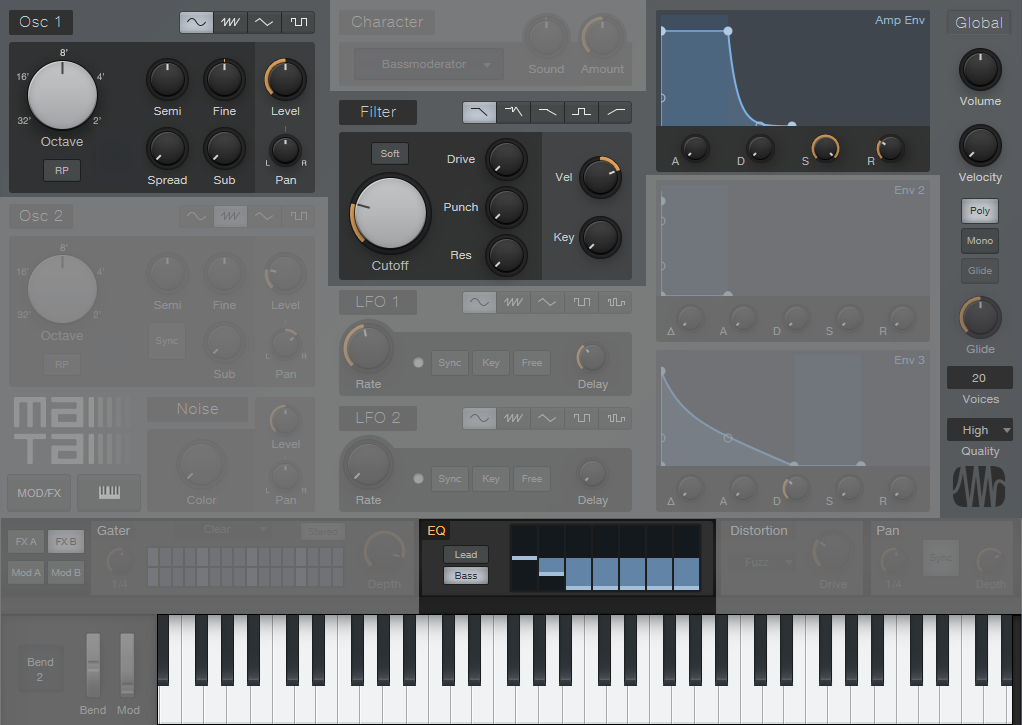
Figure 2: Mai Tai sine wave reinforcement preset. Sections that aren’t used are grayed out.
Tweaking
The Mai Tai’s level setting is crucial. You want an almost subliminal effect—something you don’t notice unless you mute the Mai Tai. Check out this audio example, but note that I’ve mixed the Mai Tai up higher than I normally would, so you can hear what the sine wave adds to the piano sound. Also note that even with the extra emphasis on the lower octaves, you can’t hear an added sine wave on the higher notes. This is important for a realistic sound.
Finally, although I’ve emphasized using this with piano, the same technique can add a commanding low end to other sampled instruments, like acoustic guitar—yes, you can change your parlor guitar’s body into a jumbo—no woodworking required!
Drum Replacement with Melodyne

The problem: I was using one of Chris McHugh’s acoustic drum loops from the (sadly, no longer available) Discrete Drums sample library. However, it had been recorded at a slower tempo, and when sped up, it was a bit too “busy” in places.
The solution: Drum Replacement with Studio One, Pro EQ, Gate, and Melodyne, so I could edit Note data into the part I wanted.
Getting Started: Step by Step
- Copy the drum loop to a new track, because we’ll want to re-visit the original one for each drum. We’ll start by replacing the kick.
- Use the Pro EQ as an Event effect to dial in the kick drum’s fundamental (fig. 1.) Combine a steep high cut with a low-frequency boost at the kick’s main frequency to isolate the kick from the rest of the track. Note that the sound doesn’t matter, you just want readily identifiable peaks. However, do avoid distortion, so Melodyne can represent velocity well.
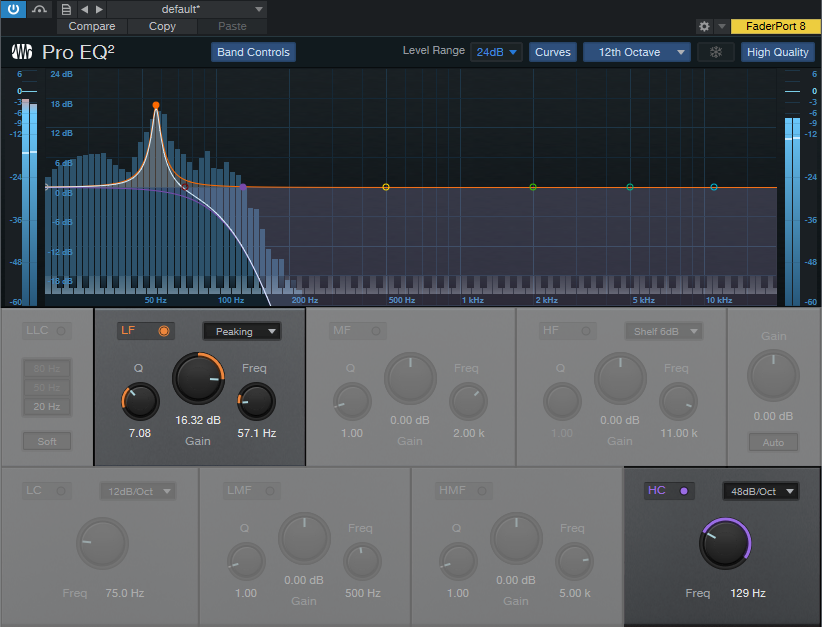
Figure 1: EQ settings to isolate the kick’s fundamental.
- Render the Event. This may leave some lower-level drum sounds or ambiance, so add a Gate, and set the Threshold to pick up only the kick drum’s peaks (fig. 2).
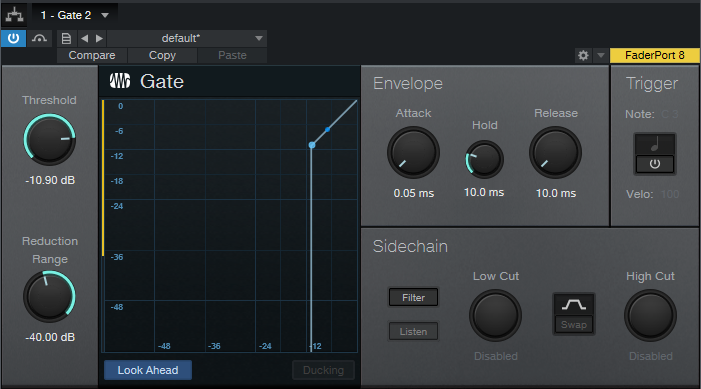
Figure 2: Gate settings to isolate the kick’s peaks.
- Render the Event again, select it, and choose Edit with Melodyne. Now the kick part looks like fig. 3.
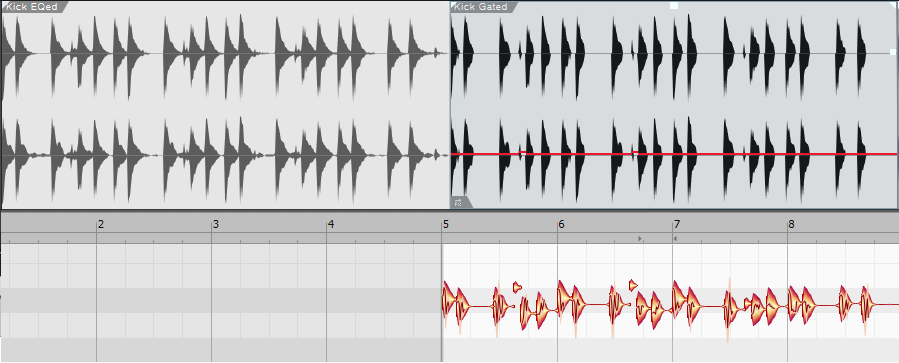
Figure 3: The Event on the left is the drum loop after EQing the kick. The Event on the right is the same one after gating. The lower blobs are the result of choosing Edit with Melodyne.
- Drag the Event track into an instrument track, and now you have note data for the kick.
Prepping the Note Data
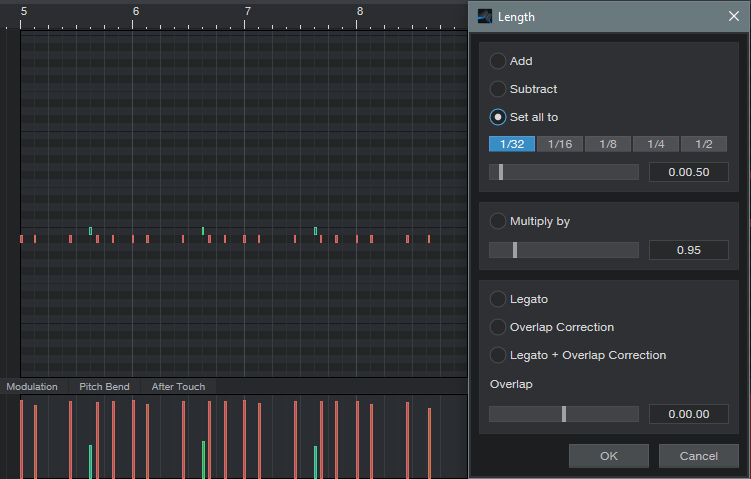
The note data length will vary. To tidy up the part, set all the drums to 16th or 32nd notes with Action > Length (fig. 4).
Note that Melodyne picked up on some low-velocity kick hits too (pretty cool). You could assign these to a different sample of a kick hit softly. Fortunately, the Discrete Drums library includes samples of the individual drums. So, I could load the samples into Impact XT, and this way the sound would work with other loops from the same collection. Since the drums are multi-sampled at different velocities, I selected all the notes, and used Studio One’s Transpose function to set them to the same pitch as the kick samples.
Hi-hat was the most difficult to convert to Note data, because snare hits can produce transients that extend into the hi-hat range. A 48 dB/octave low-cut combined with a major high-frequency peak did a decent job of isolating the hi-hat, but the frequency was extremely high and Melodyne wasn’t too happy about that. Transposing the Event down an octave or so before applying the gate made the hits more Melodyne-friendly.
Clean Up
I was taken aback at how well this technique was able to translate the acoustic drum loop into Note data. The best aspects were that it preserved the human timing of a real drummer, and Melodyne did a good job of preserving the dynamics. The only needed fix was removing a few notes caused by loud snare hits that came through on the hi-hat track, and of course, editing the data to create the part I wanted—done!
Stereo Cabs in a Single Ampire

Ampire has a User cab that can load impulse responses. You knew that, right? What you may not know is that you can load stereo cab impulses, and they magically make the User cab stereo. If you’re thinking “but creating impulses is such a hassle,” it’s not—let’s get started.
How It Works: Overview
Start by downloading the 44.1, 48, and 96 kHz stereo impulses. These are 1-sample spikes, so if you listen to them, don’t expect a thrilling audio experience. To create the impulse response, load a stereo impulse into an audio track, but no other audio—just the impulse. Send the audio to two cabs, set up in stereo (e.g., using two FX Channels, panned as desired). Don’t include any amps or effects—only the cabs. Bounce or otherwise mix/export the result. This is the stereo impulse response.
Step-by-Step Instructions
For the sake of example, we’ll assume you want a 4×12 M65 and a 2×12 VC 30 as your stereo cabs, but you can use any cabs you want, including cabs from other amp sims. Referring to fig. 1, this setup works for Artist or Pro.

Figure 1: Setup for creating a stereo impulse response.
- Create a stereo audio track, and load the impulse that matches the song’s sample rate.
- Create two FX Channels.
- Insert an Ampire into each FX Channel. Make sure that amps and effects are bypassed.
- Choose the 4×12 M65 cab for one Ampire, and the 2×12 VC 30 for the other one.
- Create a pre-fader Send to each FX Channel from the Stereo Impulse track, so you can turn the Stereo Impulse track’s fader down.
- Pan the FX buses as desired to create a stereo image for the two cabs.
- All the faders and Send levels should be set to 0 (except for the Stereo Impulse track fader, which should be all the way down). Note that the Send levels default to -6.0, so set these to 0.
Create the Impulse
- Click on the Stereo Impulse, then type Shift+P to set the loop indicators to the impulse length.
- Select Song > Export Mixdown. Choose the appropriate options (fig. 2). 64-bit float works fine for this application. Also check Import to Track.

Figure 2: Export your Impulse Response so you can use it with Ampire.
- Click on OK. This creates a track with an Impulse Response that’s the same length as the original impulse, and imports the new Impulse Response to a Song track.
- Normalize the Impulse Response you just created to around -3 dB.
- Create a folder for your stereo impulse responses, open it in the Browser, and drag the normalized Impulse response into it. Your work is done.
Fun Time!
Create an audio track, load Ampire, plug in your guitar, and select an amp. Choose the User cab, and then click on the + symbol in the Mic A: field. Navigate to where you saved the impulse response, load it, and kick back with your cool stereo cab.
To get you started, the folder you downloaded with the impulse also has stereo Impulse Responses for the M65+VC30 and 4x10American+2x12Boutique stereo cabs. Try them with the new High Gain and Painapple amps…you’re gonna love ‘em.
“Automating” the Unautomatable

You can record most hands-on control changes as automation by using Control Link, which has always been one of my favorite Studio One features. However, not everything exposes its parameters to automation—so let’s explore track-to-track recording, and embed your hands-on control changes as audio.
How to Set It Up
With track-to-track recording, you record the output from a Source track into a Target track. Set the Target track’s input to the Source track (fig. 1). You’ll monitor the Source track, not the Target track. So, turn the Target track’s fader down (the input monitoring setting doesn’t matter). Select record mode for the Target track. Note that track-to-track recording is inherently a real-time process.
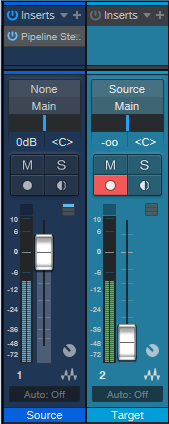
Figure 1: Setup for track-to-track recording.
Of course, you’re not limited to recording the output from another track—you can record any Output, Aux Track, or Bus (but not FX Channels). As to why this is useful, I’ve found four main applications.
Hands-on control for external hardware. Although you can automate some external hardware effects parameters with MIDI, that’s not always the case. Older effects, stompboxes, and analog hardware that was intended to be set-and-forget (e.g., tube preamps whose saturation you might want to vary over time) can’t be automated. Insert Pipeline in the Source track, set up Pipeline to bring the hardware’s ins and outs into the Source track, and then you can manipulate the effect’s controls while recording the results into the Target track. If you need to make changes, re-do the recording (although you may only need to punch a section).
Capture random effects processes. Several effects have randomized functions, so they never play back audio quite the same way twice. Recording audio from a Source track with this kind of effect inserted captures the resulting randomization. If you don’t like the results, try re-recording until you have something you prefer. Note that this can also record the output from an Instrument track that includes a randomizing insert effect.
Capture touchscreen control gestures. Studio One’s multitouch effects are very touch-friendly, and touchscreen gestures can connect with automation. But sometimes, it’s great having that palette of controls right in front of you, where you can change control settings on the fly while you get into the improvisational heat of the moment. When these effects are inserted in the Source track, you can record the audio caused by the real-time touchscreen changes into the Target track.
Accommodate what you can’t automate. This is a weird use case, but it’s another example of why track-to-track recording is useful. To compare the different cab sounds in the Line 6 Helix, I wanted to record an audio example of a guitar riff while I changed the amp sim cabs. But you can’t automate cab selection, and with 41 cabs, I didn’t want to have to stop, change the cab, and re-record the next example. So, I just looped the guitar riff, recorded into the Target track, and clicked on a different cab when I wanted to record it.
There are probably other applications I haven’t considered—so if you think of any, please mention them in the Comments section!
Ampire & Ampire High Density Pack Demo with Bobby Burnette of Wasted Creation
Bobby Burnette of New Orleans progressive deathcore band, Wasted Creation performs a guitar playthrough of their song “Asmodeus” at River City Studio here at PreSonus HQ in Baton Rouge.
WATCH THE PLAYTHROUGH
This session was tracked in Studio One Professional through the Revelator io24 audio interface. All guitar and bass tones are straight from Ampire, our guitar amplifier, cabinet, and pedal emulation plug-in. Some sounds and models featured were from the Ampire High-Density Pack expansion for Ampire.
*The original recording of “Asmodeus”, and this playthrough were both recorded, mixed, and mastered by PreSonus’ very own Product Manager, Kyle Eroche.
THE PRESETS
Here is a breakdown of the presets used in this track. Provided by the engineer of this track, Kyle Eroche.
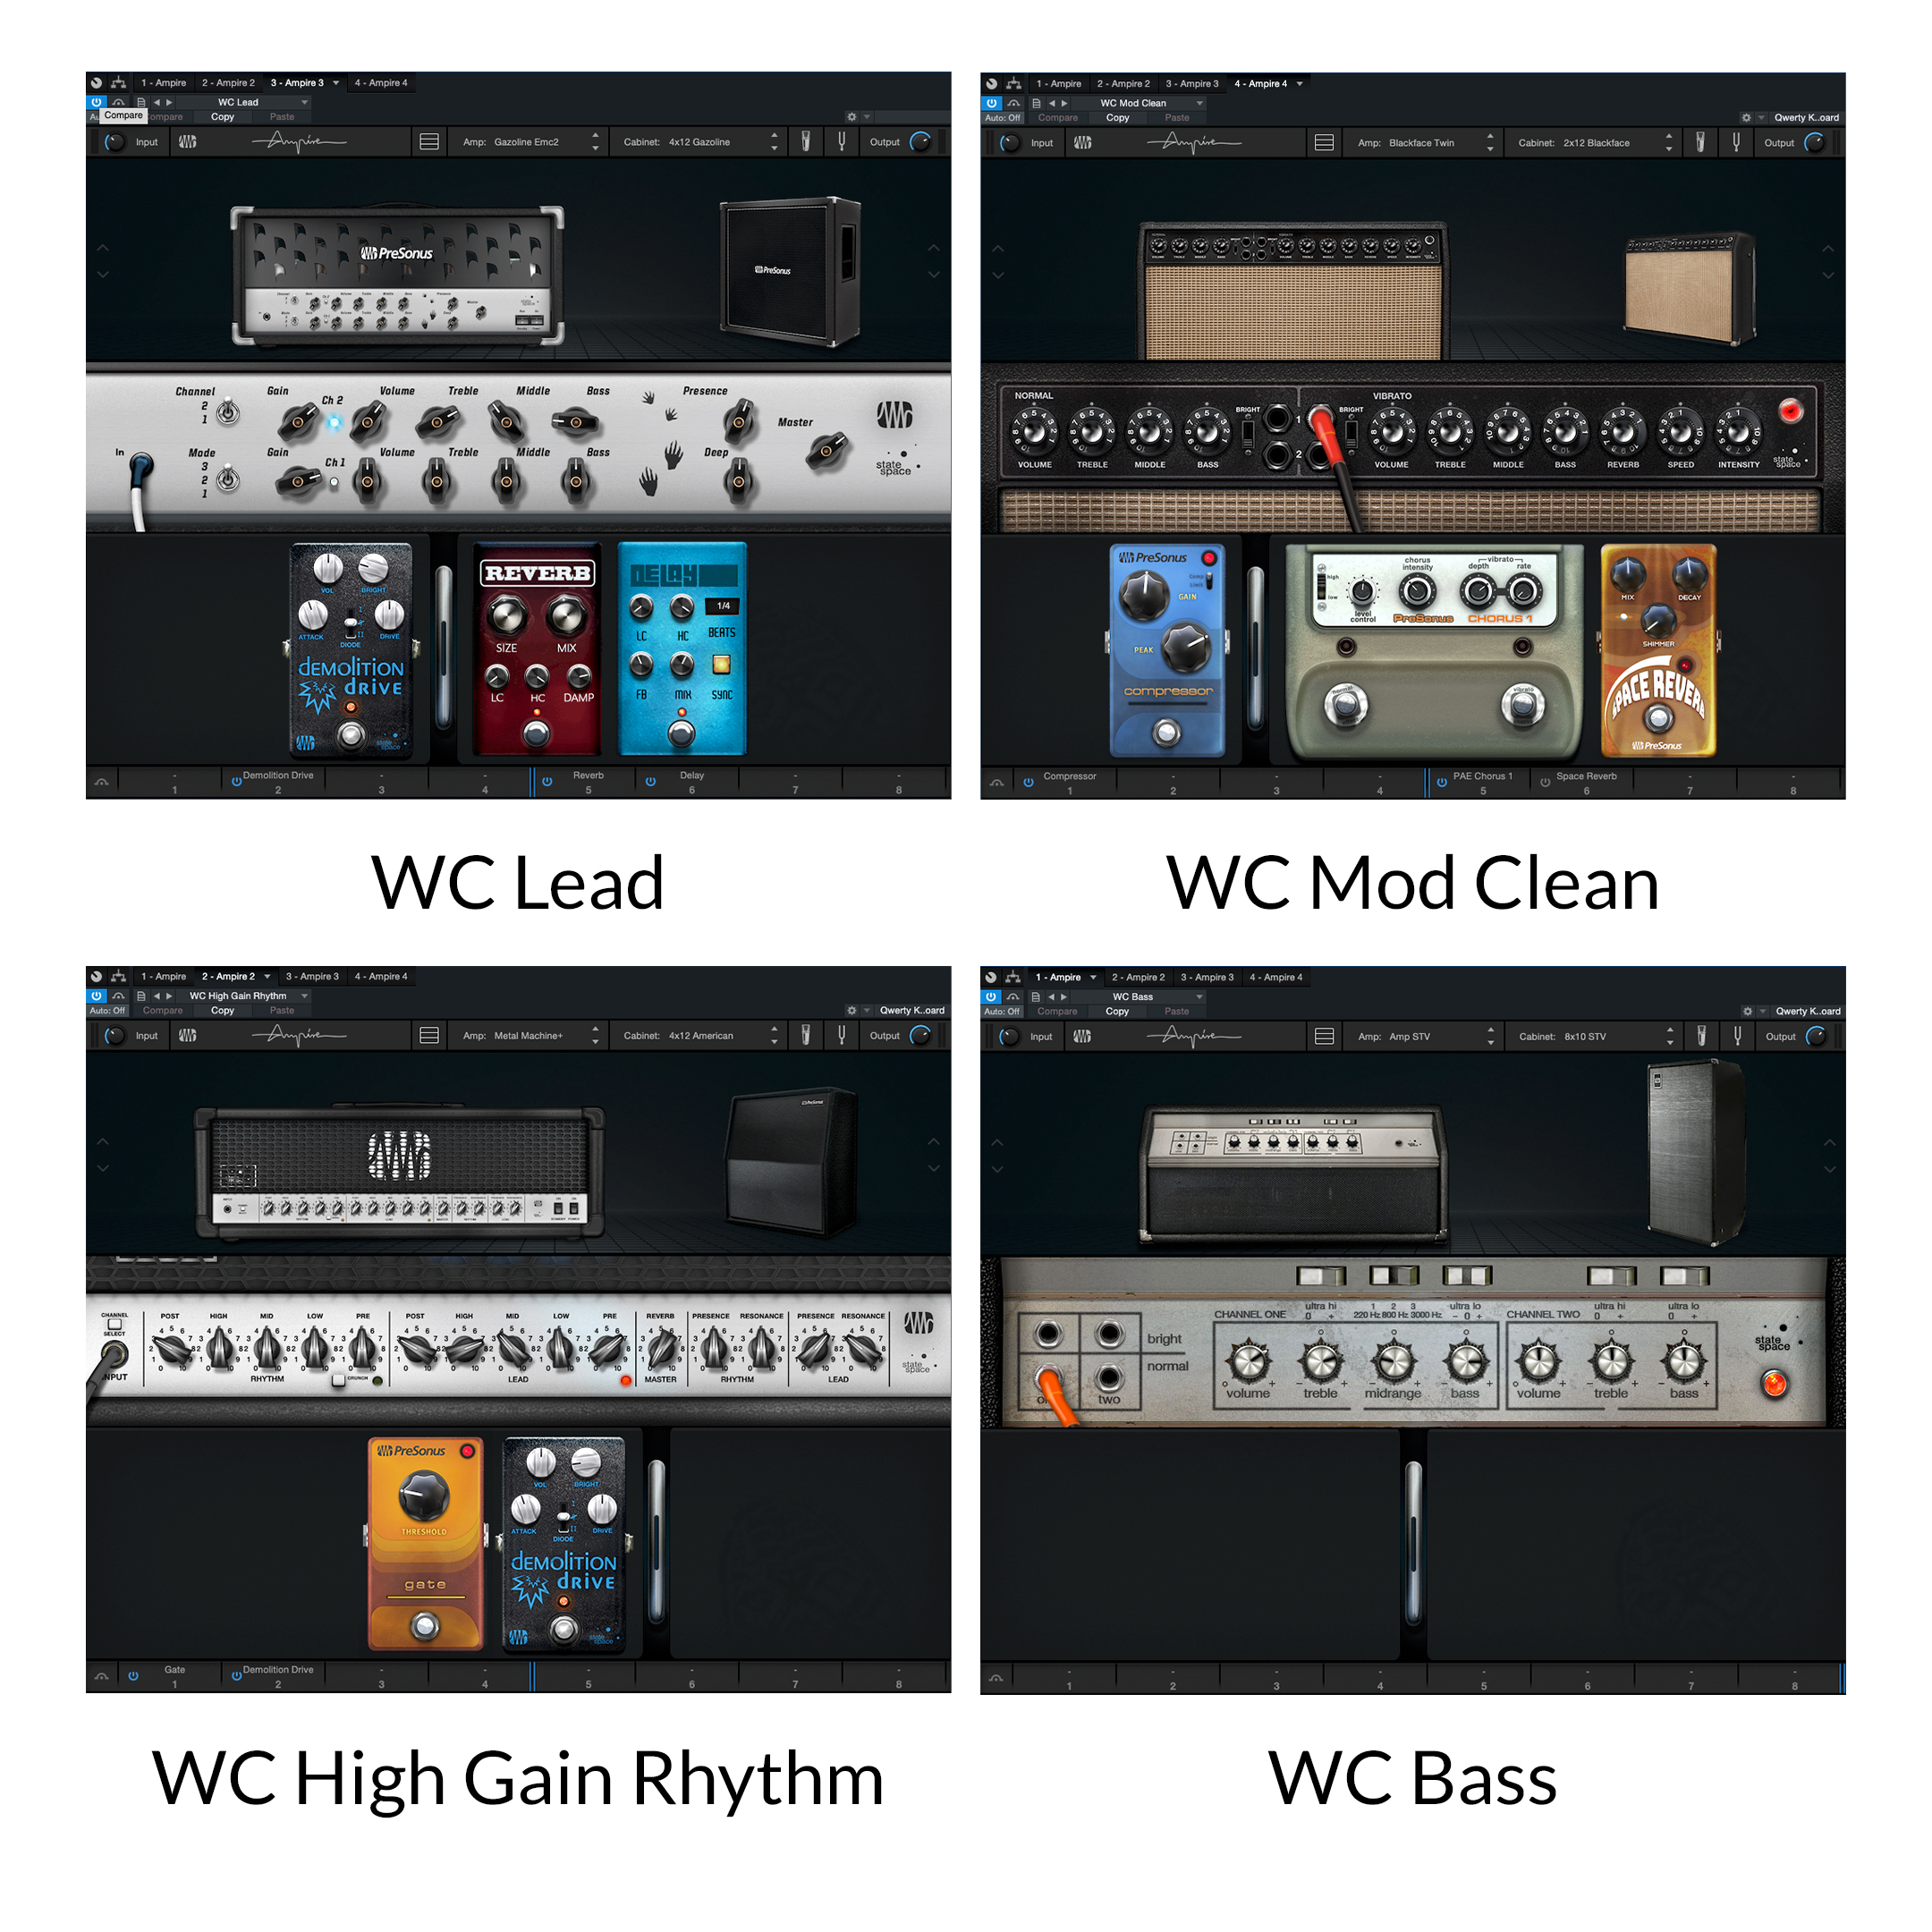
Wasted Creation Ampire Presets. Click to zoom
CLICK HERE To get the Ampire preset files used in this track for FREE
*Ampire High Density Pack required to use these presets.
- Amp: Gazoline Emc2 (High Density Pack Only)
- Cab: 4×12 Gazoline (High Density Pack Only)
- Pedals:
- Pre: Demolition Drive (High Density Pack Only)
- Post: Reverb > Delay
- Amp: Blackface Twin
- Pedals:
- Pre: Compressor
- Post:PAE Chorus 1 > Space Reverb (High Density Pack Only)
- Cab: 2×12 Blackface
- Amp: Metal Machine+ (High Density Pack Only)
- Pedals: Gate > Demolition Drive (High Density Pack Only)
- Cab: 4×12 American
- Amp: STV
- Cab: 8×10 STV
LINKS
Melodyne Essential = Polyphonic MIDI Guitar

Many people think Melodyne Essential works only with monophonic tracks. That’s true for editing notes, but it can transform polyphonic guitar playing to MIDI note data. Granted, there’s a tradeoff: no pitch bend. But for laying down pads, power chords, and the like with electric guitar, then playing them back on virtual instruments—no problem.
- After recording your guitar part, select it and choose Edit with Melodyne (Ctrl + M). You’ll see the familiar blobs, but not chords—only single notes.
- Choose Polyphonic Decay for the Melodyne algorithm (fig. 1). Even though Essential is monophonic, you’ll be able to choose this option.
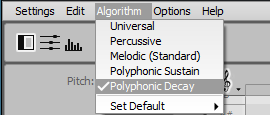
Figure 1: Choosing Polyphonic Decay is the key to transforming guitar parts into note data.
- You’ll see blobs that correspond to your chord notes, but they’ll be grayed out, because you can’t edit them. No worries.
- Create an Instrument track (Presence is always a fun choice) to play back your guitar part.
- Drag the audio that you processed with Melodyne into the instrument track, and you’ll see a polyphonic MIDI guitar part (fig. 2).
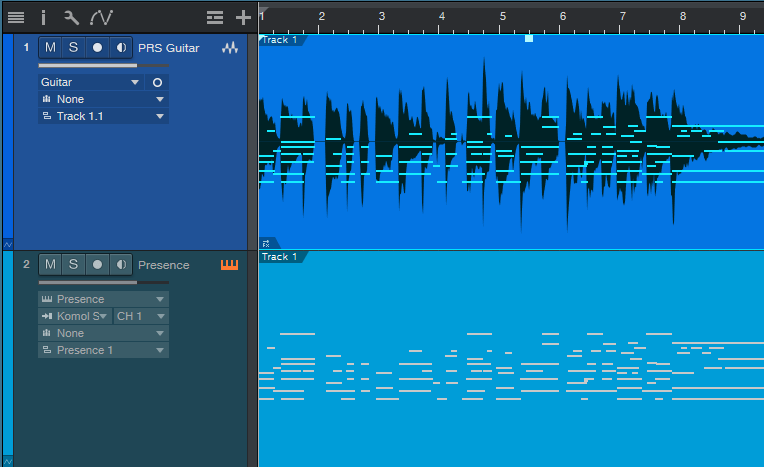
Figure 2: A polyphonic guitar part has been transformed into Note Data.
- Fig. 3 shows the unedited part. Translating guitar to MIDI is never perfect, and will almost always require some editing. Fortunately, Studio One can much of that for you, by automatically deleting notes with excessively low velocities and short durations.
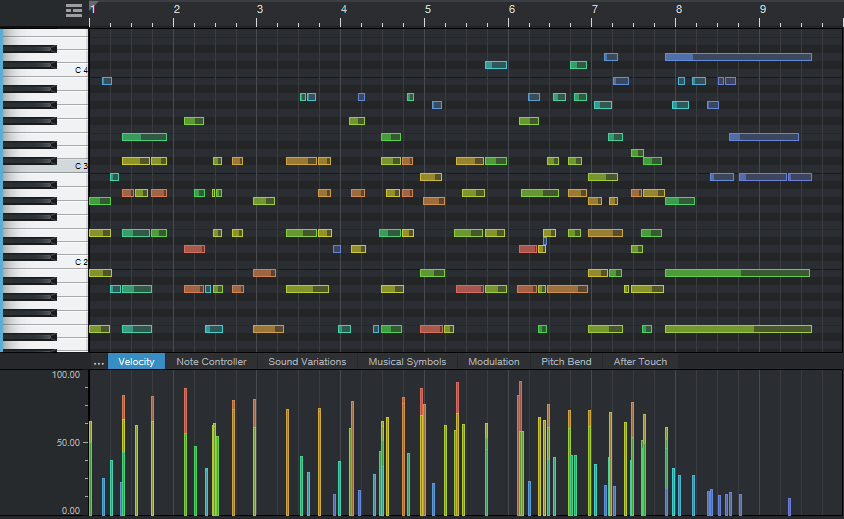
Figure 3: Check out all the low-velocity notes—they’re probably just glitches.
- Select all the notes, then choose Action > Select Notes. Choose Range, and select all notes with a velocity below 20% (fig. 4). Hit delete. If that doesn’t get rid of enough low-velocity notes, try again with a higher percentage (e.g., 30%).
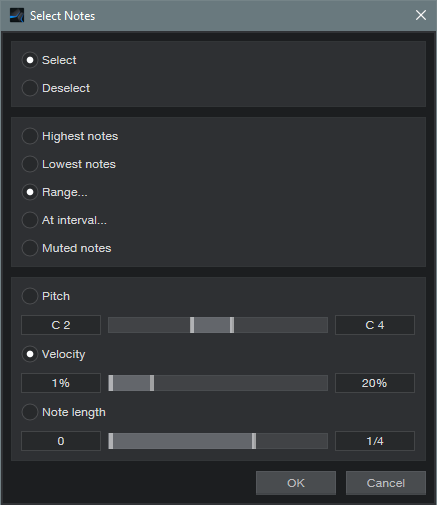
Figure 4: Initial settings to reduce low-velocity bogus notes.
- MIDI guitar may also produce “notes” that are more like short glitches. Go to Action > Delete Notes, and choose notes shorter than 0.0.1.50. If this doesn’t delete enough of the short notes, increase the duration (e.g., 0.0.1.80). Note that these two de-glitching processes would be good candidates for a Macro.
- Fig. 5 shows the results of applying the above processes in Studio One, and then doing about a minute’s worth of touch-up editing. (

Figure 5: The note data now looks ready for prime time.
Finally, let’s listen to the original guitar part, and the MIDI cello part it produced. Cool, eh?
New PreSonus Sphere Artist: Emily Wolfe’s “LA/NY” Playthrough
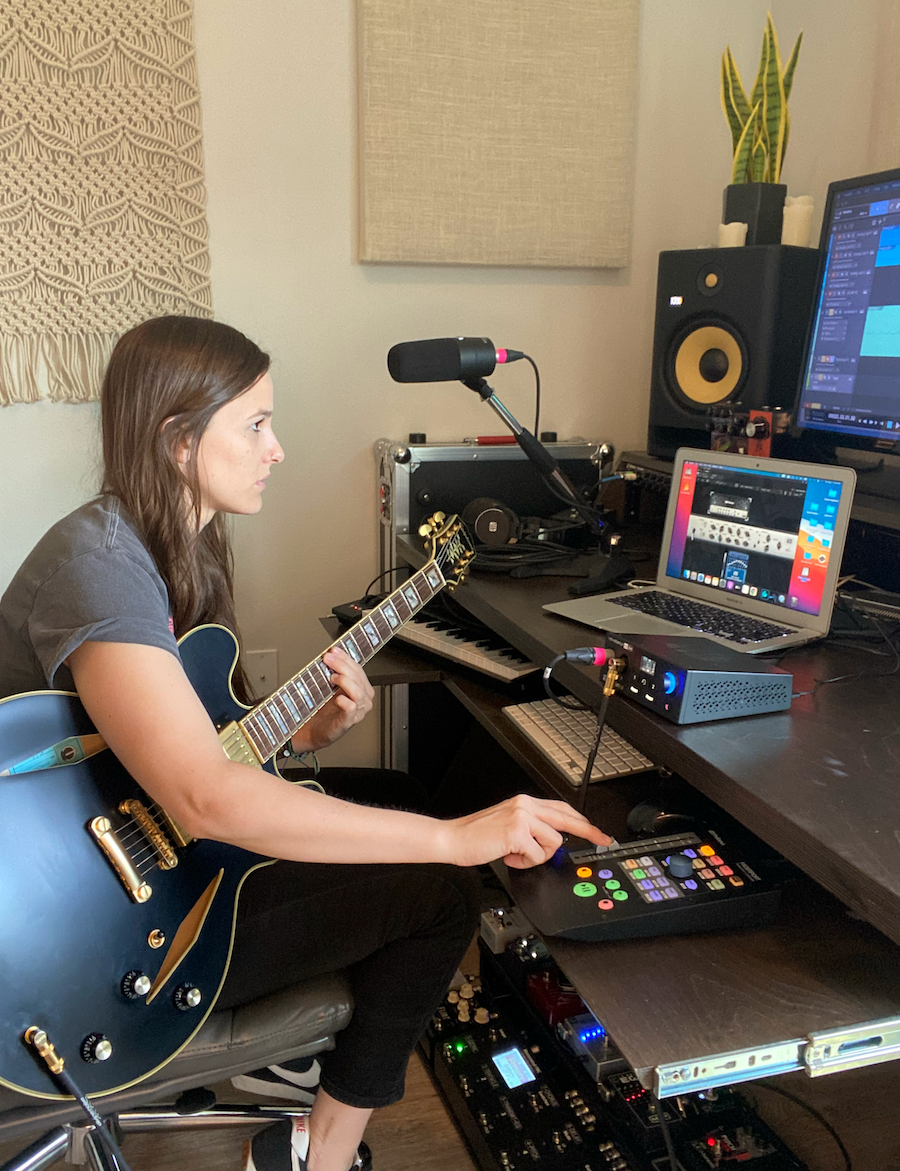
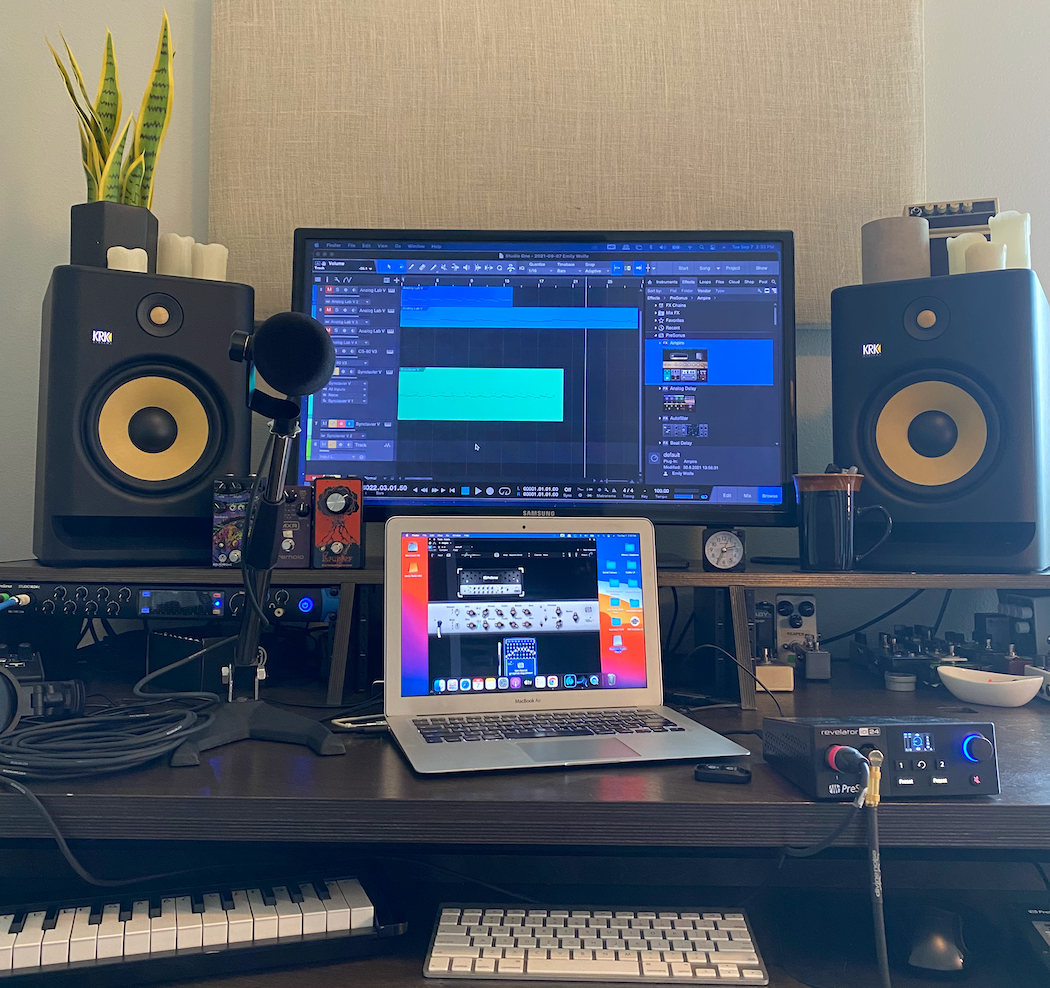
Here’s Emily using the Revelator io24 audio interface to perform her latest track, “LA/NY,” live from her home studio setup!
In conjunction with Studio One‘s Show Page, the pre-recorded backing tracks (drums/synthbass) and her live vocal and guitar audio signals can be professionally mixed and ready for livestreaming.
“LA/NY” is just one of many tracks from Outlier, her latest record. She discusses more about the production of Outlier below.
Tell us a bit more about “LA/NY”
“LA/NY” is a new song off my latest album, Outlier. It is a bit of a different direction for me, because I wanted to put forth a killer pop tune that also shined a light on my love of a fuzzy guitar solo.
Outlier is an album built on exquisite tension: like an endless push-and-pull between desire and resistance, determination and self-sabotage, the instinctive need to belong and the urge to strike out on your own. My songs were produced by Michael Shuman (Queens of the Stone Age and Mini Mansions) and it’s an album full of guitar-drenched sounds that’s wildly unpredictable and immediately magnetic.
What amp/pedals did you use for “LA/NY”?
It was all done within Studio One, using the PreSonus Ampire plug-in. Specifically, I used the Wild Drive, Demolition Drive, Equalizer and Delay pedals running into the Blackface Twin model amp paired with a 2×12 American Cabinet.
(NOTE: if you’re a PreSonus Sphere Member, you can download her exact Ampire Preset here)
How did you first discover PreSonus?
I first discovered PreSonus while working at a music shop in Austin, TX. They sold audio recording equipment from all different brands, but I noticed that PreSonus had the most intuitive software (Studio One Artist) included, as well as the best price point.
What was your first PreSonus product?
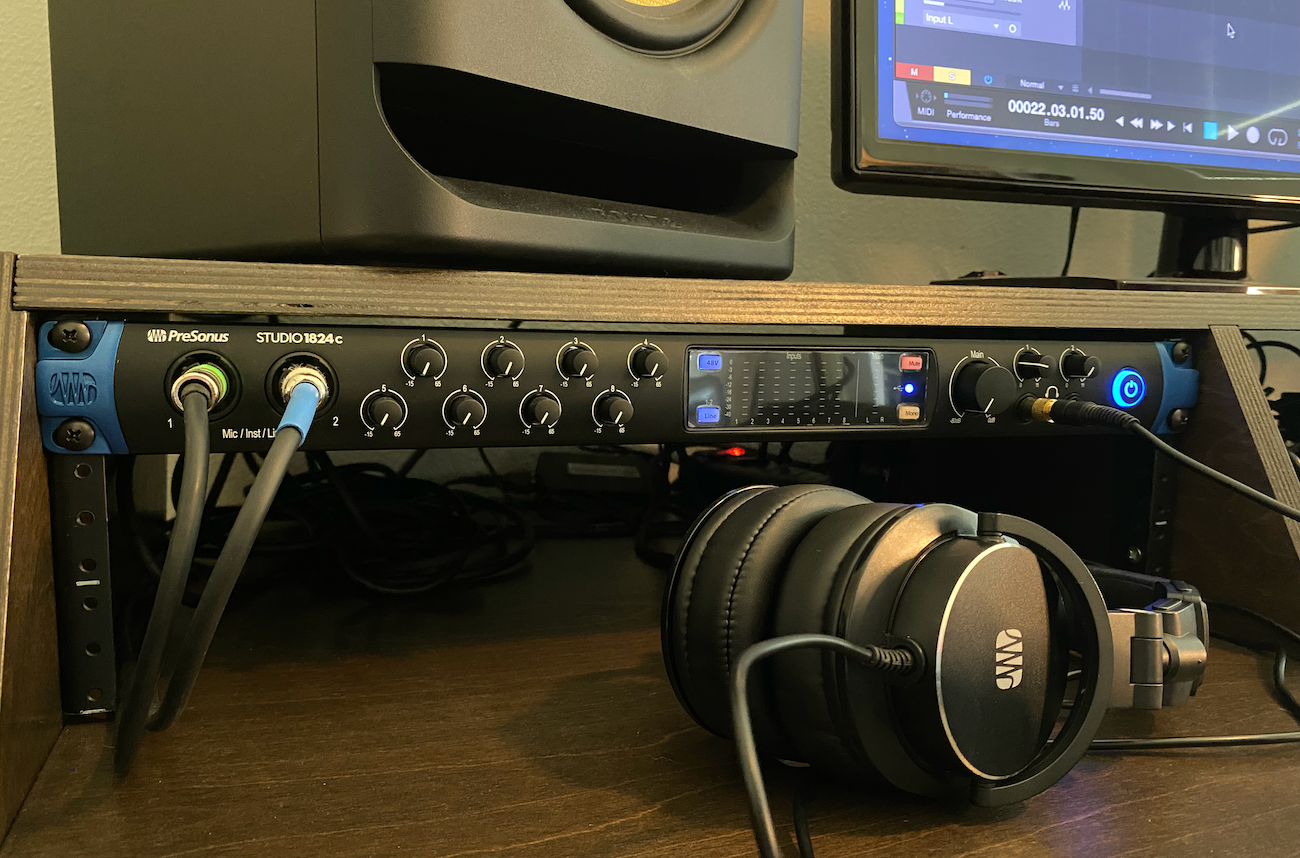 It was the Studio 1810c audio interface, but I have since upgraded to a Studio 1824c. I’ve got the FaderPort to the right of my computer keyboard. I also now have their Revelator io24 that you see me using in the video above, of course!
How long have you used Studio One?
About three years now.
What are your Top three favorite features about Studio One?
My favorite aspect of Studio One is how easy it is to use. The drag & drop aspect helps me work really quickly and efficiently. I also really love using Impact for drum sounds, Presence for sample-based instrument sounds, the Mai Tai polyphonic synthesizer, and Ampire for pedal FX and amp modeling.
We’re so stoked to welcome Emily into the family as a Featured Artist on PreSonus Sphere!
She is sharing eight of her custom Ampire Presets, along with a custom Vocal Preset and a Mai Tai synthesizer patch for all PreSonus Sphere members to access and enjoy.

Emily Wolfe: Featured PreSonus Sphere Artist
Join PreSonus Sphere today to check out Emily Wolfe’s exclusive Presets and from those by other featured artists!
Only $14.95 per month for Studio One Professional, Notion, and so much more.
Studio One on M1 Macs—what you need to know!
![]() Our support team is always adding new and useful information to the Knowledge base, and with the advent of native M1 support in Studio One 5.4, they’ve updated a number of articles on the matter. If you’re encountering any issues with VSTs or hardware while using Studio One 5.4 on an M1 Mac, or if you just want to optimize your computer for Studio One, you may find the following links useful.
Our support team is always adding new and useful information to the Knowledge base, and with the advent of native M1 support in Studio One 5.4, they’ve updated a number of articles on the matter. If you’re encountering any issues with VSTs or hardware while using Studio One 5.4 on an M1 Mac, or if you just want to optimize your computer for Studio One, you may find the following links useful.
How to switch from native Apple Silicon support to Rosetta mode
While Studio One 5.4 can be run natively on an M1 Mac, some users may be working with third-party VSTs or hardware that are not yet native M1-compatible. In cases like these, you’re still able to switch back to running Studio One in Rosetta mode until your VSTs and hardware are updated by their manufacturers. Here’s how to do that.
Support for Apple M1 Macs – everything you need to know
This is a great FAQ-style list of helpful tips for anybody running an M1 Mac and Studio One, covering Rosetta, third-party plug-ins, Melodyne, and other pertinent compatibility issues.
Managing CPU Usage in Studio One
The Managing CPU usage in Studio One article covers some 5.4/M1-specific topics, including using plug-in nap to prevent plug-ins from consuming CPU resources when no audio is passed through them. Users who enjoy fine-tuning their computers for maximum performance will find a ton of useful info here; this one delves deep into esoteric settings like NVRam resets and GPU switching.
There are a number of useful tuning solutions in this article for Windows users as well, including real tweaky stuff like BIOS hyperthreading settings and core parking.
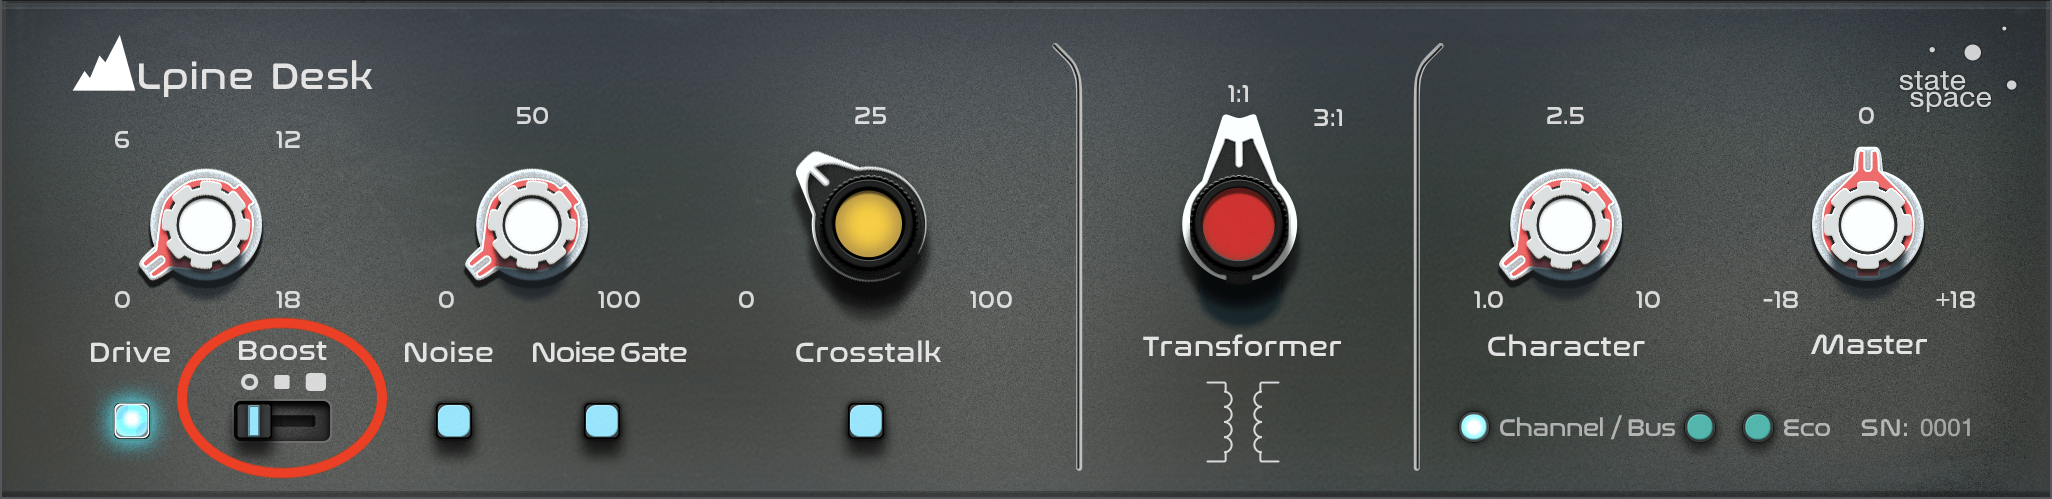
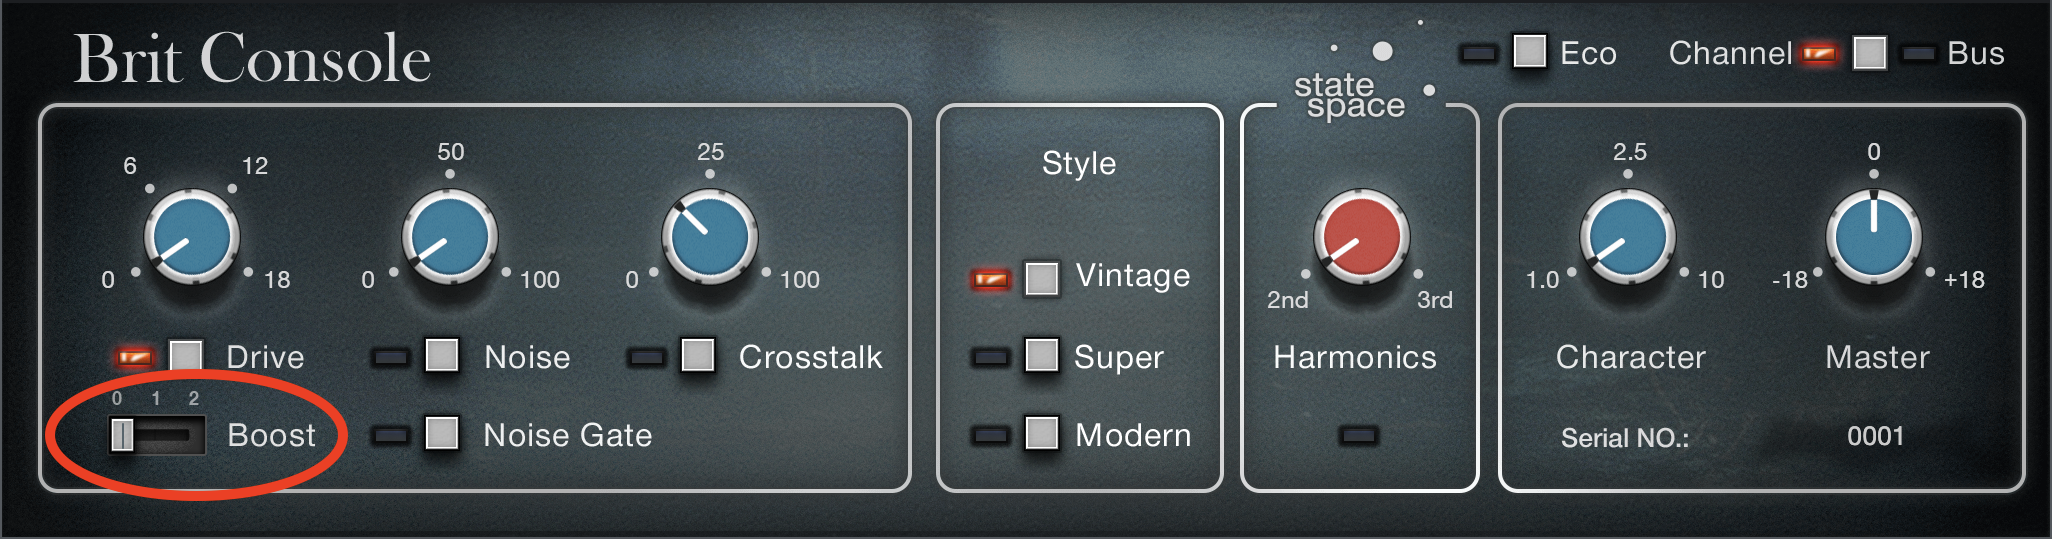
Retro Mix Legends 1.1: Now with more Boost!

Due to popular demand, we’ve added new functionality to two Retro Mix Legends Mix Engine Effects: Alpine Desk and Brit Console. This is a free update to existing owners of either (or both) plug-ins.
The #1 user request we received after releasing Alpine Desk and Brit Console was simple: more Boost!
The Boost option was originally intended to accurately recreate the grit and saturation inherent in driving the gain stages of popular consoles. Of course it makes sense that modeling clean, accurate, high-quality consoles would result in sonic artifacts that can be pretty subtle. It just turned out that Boost was too subtle for some users.
But hey, you asked for it, so we’re glad to announce: Alpine Desk and Brit Console now each have two different levels of Boost available: “on,” and “crank!” This makes the overall range of Boost available via the Drive control very wide indeed! It ranges from barely audible to… well, to borderline ridiculous.
Look, we understand that consoles aren’t stompboxes. But we also understand the impulse to throw accuracy out the window and just get loud once in a while.
Additionally, as of Studio One 5.4, Retro Mix Legends plug-ins (including Porta Cassette) feature the same performance improvements as CTC-1 and other Mix Engine Effects—their processing is selectively paused when channels aren’t processing audio—making for more efficient use of your CPU.
To update your Brit Console and/or Alpine Desk, choose “Studio One Extensions” from the drop-down menu, followed by “Check for Updates.”
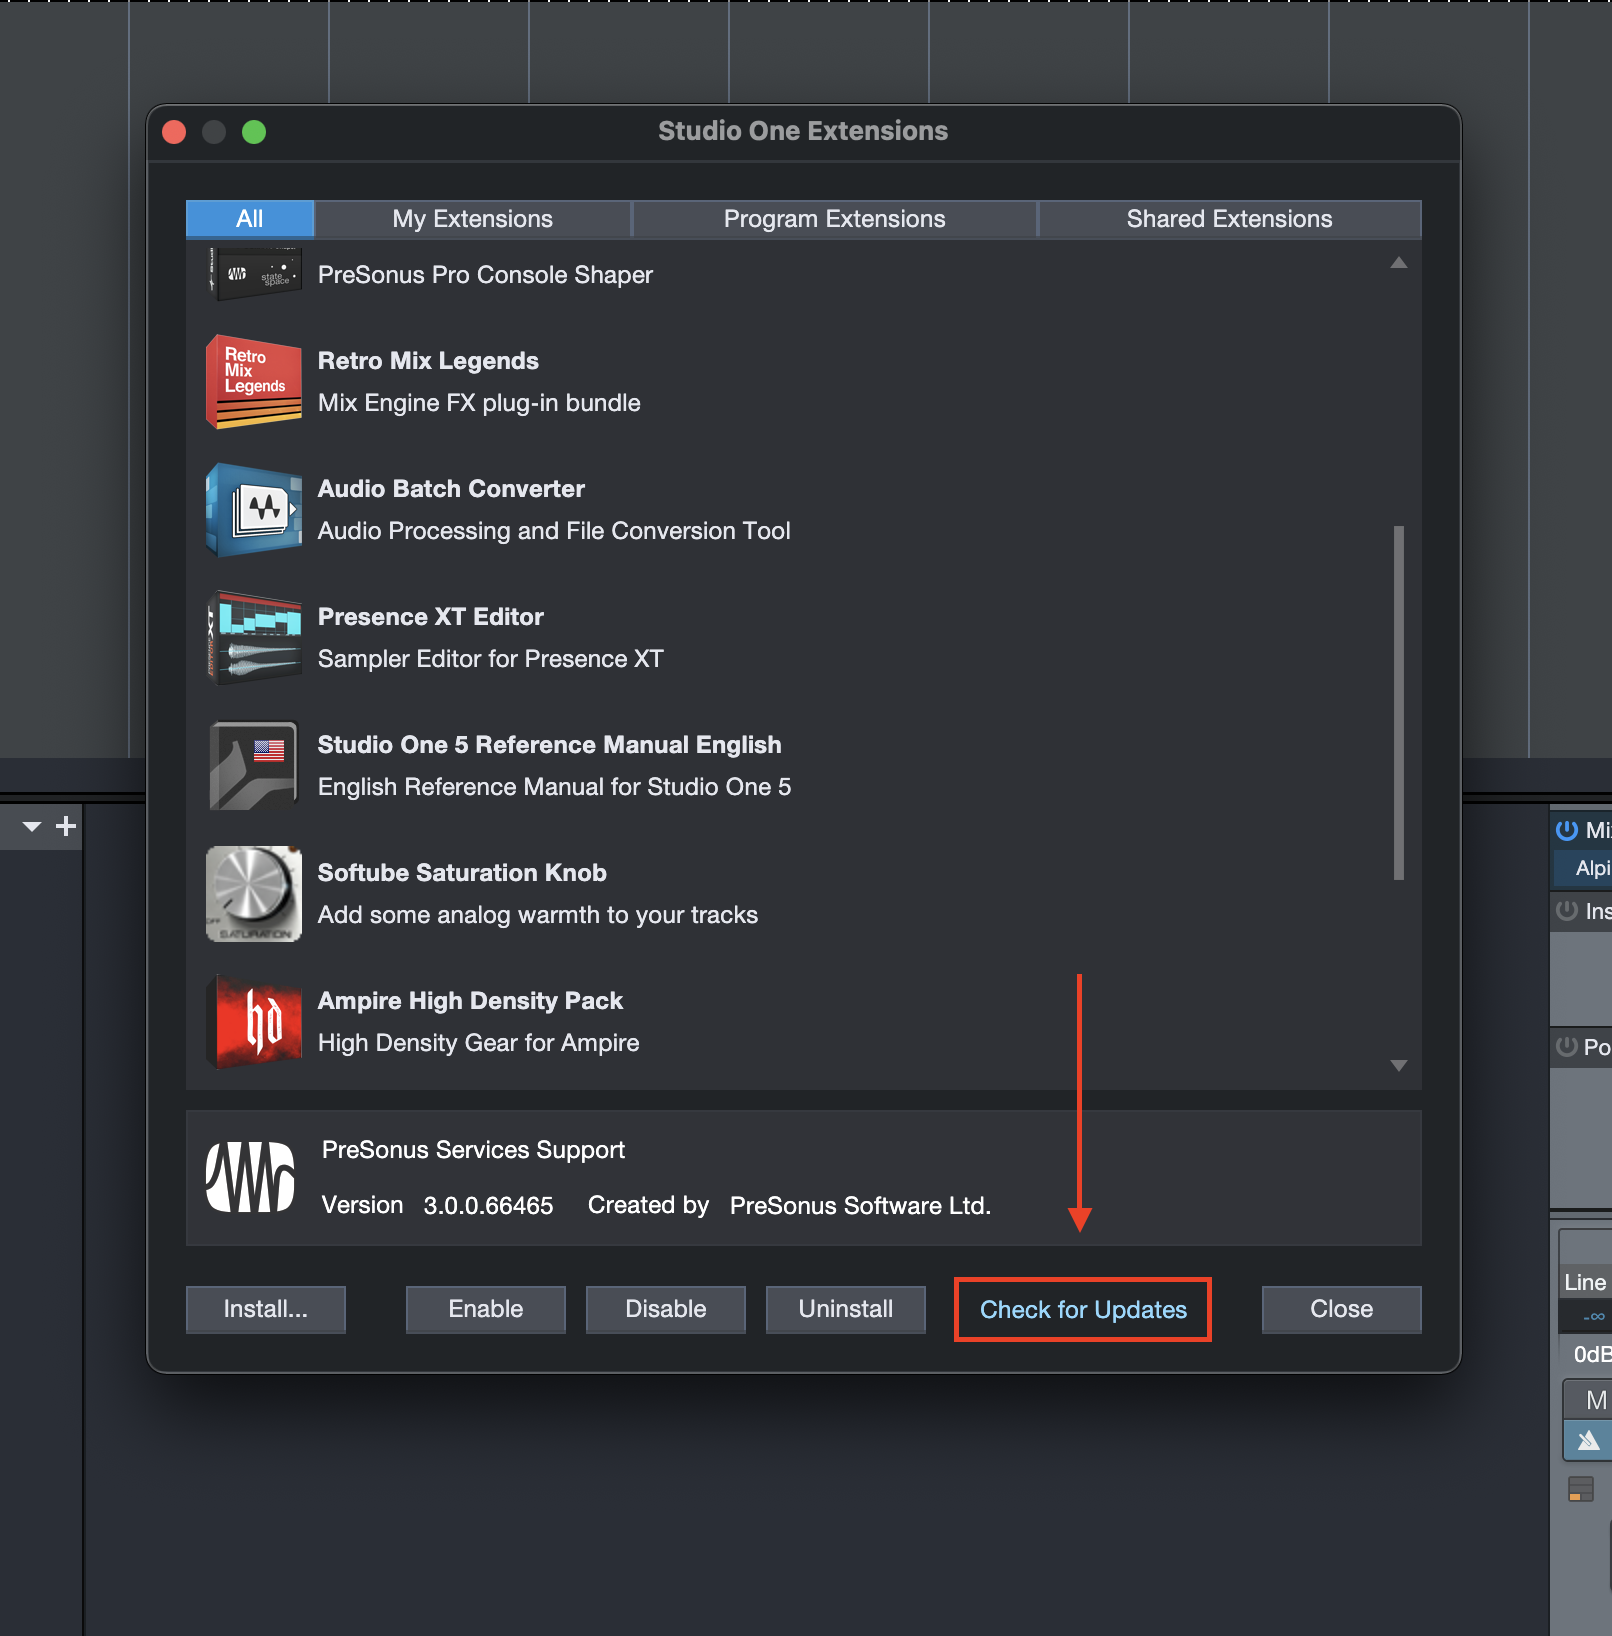
Check for Updates
If you do not already own the Retro Mix Legends Mix FX Plug-ins, you can pick them up HERE
Or you can get them included in PreSonus Sphere here for only $14.95/month.
Studio One 5.4 is here!

Studio One 5.4 adds new features, enhancement, and powerful workflow improvements to Studio One 5. This is a free update for Studio One 5 users and PreSonus Sphere members. Click “Check for Updates” from Studio One’s Start Page to get it!
Native support for Apple Silicon (M1) processors
![]()
With Studio One 5.4, PreSonus introduces native support for M1-based Apple computers. Native mode for Studio One 5.4 offers additional CPU optimization for better overall CPU performance. To achieve optimal performance, Native mode requires all VST plug-ins, instruments, and hardware drivers to also provide Native support. To that end, nearly all PreSonus application software, plug-ins, and hardware drivers now support full native compatibility with M1-based Macs.
Plug-in Nap

Studio One 5.4 introduces a new Plug-in Nap option that improves overall CPU performance by pausing processing for any plug-ins that are not currently passing audio. The status for each plug-in can be monitored in the updated Performance Monitor.
Plug-in Nap is automatically suspended when the plug-in window is opened. With this new option enabled, you can run more plug-ins in your session. Plug-in Nap does not currently support virtual instruments.
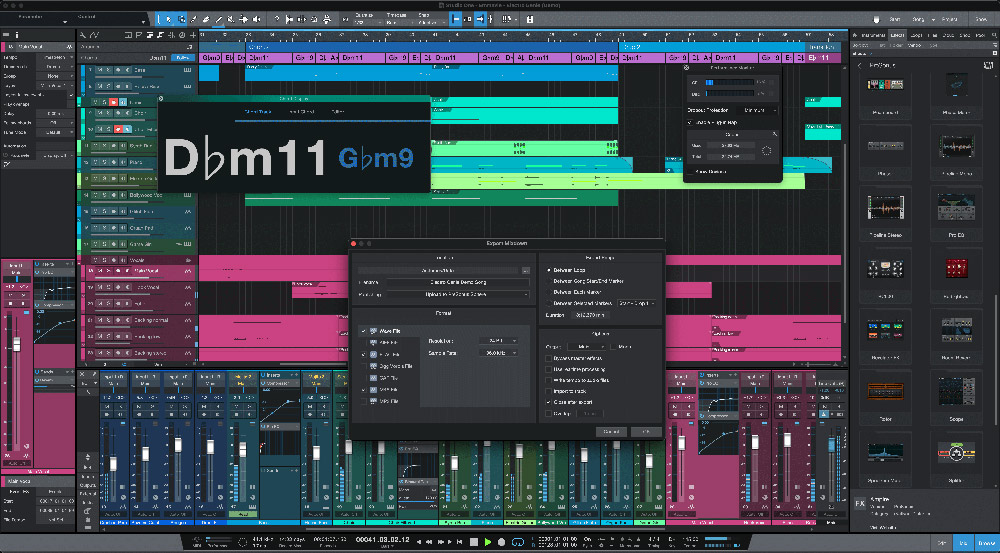
Export multiple formats in one pass
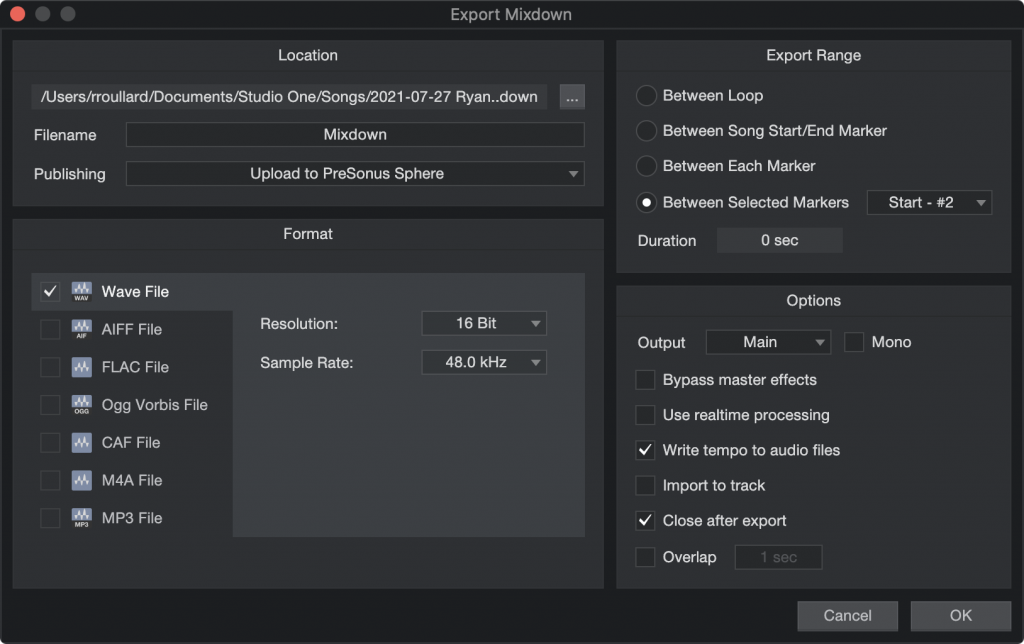
With only a single format selected, switching formats is as easy as clicking on a different format. Checking additional formats adds them to the selection. When a Publisher is selected (such as “Send to Notion,”) Studio One ensures that the default format of that publisher is part of the selection. Settings are now remembered when closing the “Export Mixdown” window. PreSonus Sphere members are able to export multiple formats simultaneously into a single PreSonus Sphere Workspace.
Realtime chord display in editor
A new Chord display for notes from the editor has been added to the Note Editor inspector underneath the existing Input Chord display. This display has two states, depending on the context:
“Current Chord” shows the chord detected from notes at the current play position, as well as the next upcoming chord.
“Selected Chord” shows the chord detected from the current note event selection. For multiple selected notes, the chord is determined from exactly these notes (can also be an arpeggio). For a single selected note, the detection looks for overlapping notes to determine the chord.
The current chord is displayed inside the tooltip, as well as on mouseover when editing notes.
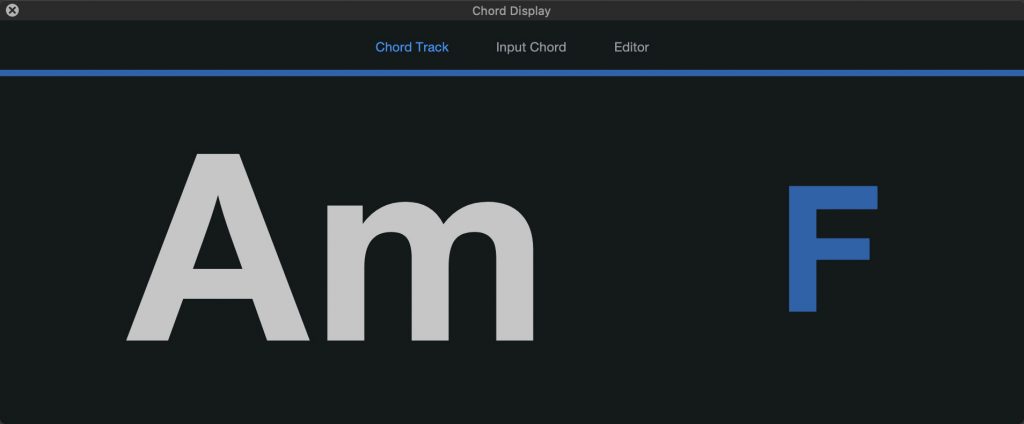
The floating Chord Display can be set to show the current chord from the Chord Track, the input chord, or the currently selected chord in the editor. When showing chords from the Chord Track, the window shows both the current and next chord, as well as a progress bar to indicate the time to the next chord change–making it a great tool for recording and performing artists, as well as teachers and students.
Updated Plug-in Manager
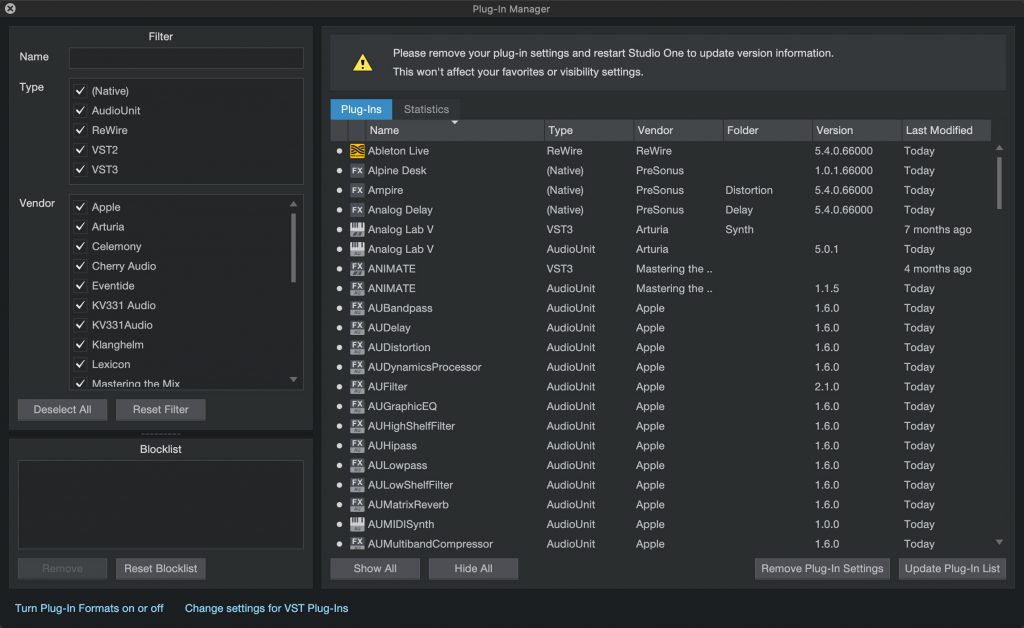
The Plug-in Manager in Studio One 5.4 has a new Version column so you can make sure your plug-in library is always up to date; and a new Statistics tab provides useful information.
Third-party plug-ins that fail during the Studio One launch scan are now moved to a Blocklist inside the Plug-in Manager so they don’t interfere with your session. You have the ability to manually reset the blocklist, remove individual plug-ins, or move problematic plug-ins manually to the Blocklist by simply dragging and dropping them.
Performance optimization for Mix Engine FX
Like Plug-in Nap, Studio One Mix Engine FX plug-ins from PreSonus also now use less CPU processing when channels are silent. This improvement is available for all Mix Engine FX version 1.1 or newer and is automatically active on any session using Mix Engine FX.
Autosave just got better
New in version 5.4, Autosave will wait to complete until playback is no longer in progress. In addition, Autosave now takes less time by always using cached plug-in data. The “Use cached plug-in data on save” option now affects manual Save only.
Improved chord detection
Detecting chords from audio in Studio One 5.4 now delivers more accurate results and improved timing. Chords detected from note events are now more accurate as well. The full set of chords that are available in the Chord Selector can be recognized from music parts.
This produces more consistent results when dragging chord events from the Chord Track to the arrangement and back.
“Copy external files” option for Songs, Projects, and Shows
The option “Ask to copy external files when saving Song…” has been renamed to “Ask to copy external files when saving Document” and now also works for Projects and Shows, as it did before for Songs: When a document is saved, a dialog offers to copy all “external” files (outside the Song/Project/Show) folder that have been added since the last save. This question only appears once for each file.
An essential file management feature—now available for all Studio One document formats!
“Remove all” option for sends
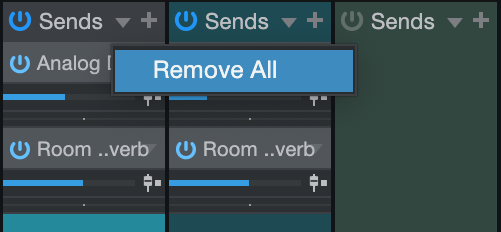
A convenient “Remove all” option for sends is now available in the Console. Click on the drop-down arrow next to Sends to access the new command. This command can also be applied to groups of Channels simultaneously.
Full Studio One 5.4 video playlist:
Learn more about Studio One
Shop Studio One