Category Archives: Studio One
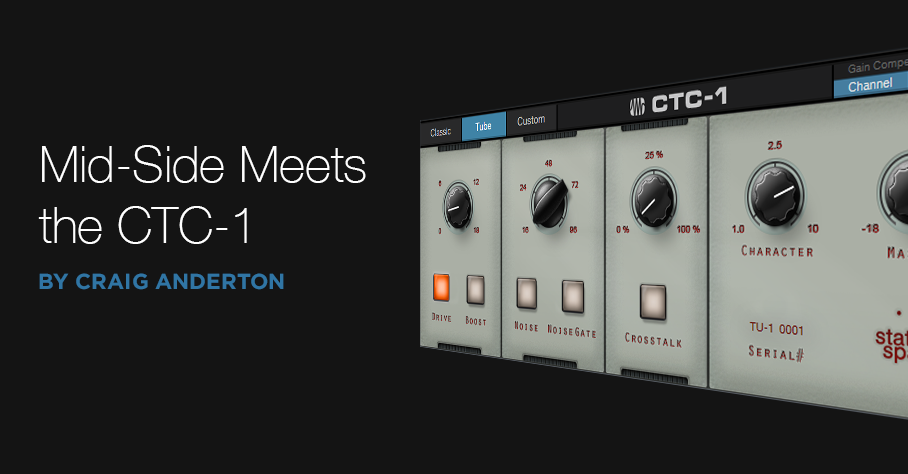
Mid-Side Meets the CTC-1
I’ve often said it’s more fun to ask “what if I…?” than “how do I?” “What-if” is about trying something new, while “how do I” is about re-creating something that already exists. Well, I couldn’t help but wonder “what if” you combined the CTC-1 with mid-side processing, and sprinkled on a little of that CTC-1 magic? Let’s find out. (For more information on mid-side processing, check out my blog post Mid-Side Processing Made Easy. Also, note that only Studio One Professional allows using Mix Engine FX.)
One stumbling block is that the CTC-1 is designed to be inserted in a bus, and the Mid-Side Transform FX chain won’t allow inserting Mix Engine FX. Fortunately, there’s a simple workaround (see Fig. 1).
- Copy the stereo track you want to process, so you have two tracks with the same stereo audio. One will provide the Mid audio, and the other, the Sides audio.
- Insert an MS-Transform FX Chain into each track (you’ll find this FX Chain in the Browser’s Mixing folder, under FX Chains)
- Create a bus for each track.
- Assign each track output to its own bus (not the main out). However, the bus outputs should go to the Main out.
- Add a CTC-1 Mix Engine FX in each bus.
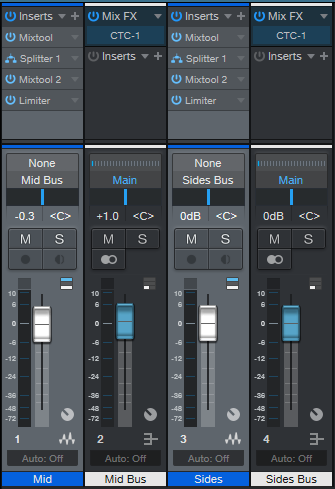
Figure 1: Setup for adding mid-side processing with the CTC-1 to a mixed stereo file.
- To dedicate one bus to the mid audio, and the other to the sides, open up the Splitters in the MS-Transform FX Chains.
- Mute the sides output for the Mid track (top of Fig. 2, outlined in orange). Then, mute the mid output for the Sides track (bottom of Fig. 2, also outlined in orange).

Figure 2: One bus is Mid only, the other is Sides only.
Now you can add the desired amount of CTC-1 goodness to the mids and sides. And of course, you can vary the bus levels to choose the desired proportion of mid and sides audio.
Audition Time!
The following example is an excerpt from the original file, without the CTC-1.
Next up, CTC-1 with the Custom option on the Mid, and the Tube option on the Sides. Fig. 3 shows their settings—a fair amount of Character, and a little bit of Drive.
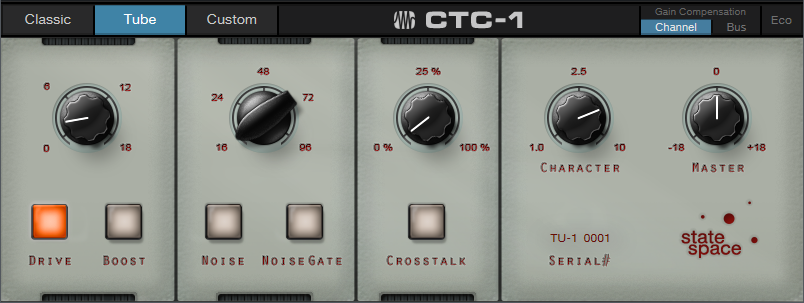
Figure 3: CTC-1 settings for the audio example.
If you didn’t hear much difference, trying playing Audio Example 1 again after playing Audio Example 2. Sometimes it’s easier to tell when something’s missing, compared to when something’s been added.
The more you know about the CTC-1, the more effectively you can use it. The bottom line is I now know the answer to my “what if” question: get some buses into the picture, and the CTC-1 can be hella good for processing mid and sides!
Studio One Remote 1.6 has been released!
 Studio One Remote 1.6 has been released! This free update adds support for the Listen Bus and the Show Page in Studio One 5.2. You’ll also find that Studio One Remote now offers the same Performance View as Studio One’s Show Page, allowing you to do all kinds of incredible things, like:
- Re-sequence your song’s Arranger Track sections live
- Control your patches per Show Player—even with multiple instances of Studio One Remote and multiple Players simultaneously!
- Navigate the Show Page’s Setlist
- Control any parameter from the Macro page
Studio One Remote 1.6 remains free of charge, and is compatible with Studio One 5 Artist and Professional.
- Get Studio One Remote from Google Play Store
- Get Studio One Remote from the Apple App Store
- Get Studio One Remote for Windows
Studio One 5.2 has arrived. Here’s what’s new!

Driven by a one-two combo of user requests and PreSonus Software innovation, Studio One 5.2 boasts over 30 new features and improvements… here’s a quick ten, with a full changelog linked below. This is a free update to PreSonus Sphere members and Studio One 5 owners, and can be obtained from your my.presonus account or by clicking “Check for Updates” on Studio One’s start page.
Arrange your songs live from the Show Page or Song Page
Use Studio One’s Arranger Track on the Show page to trigger different song sections during playback without missing a beat! You can even control your arrangement from the soon-to-be-updated Studio One Remote… and, actually, multiple Studio One Remote users will be able to control different elements of the same Show simultaneously.
You can also use Live Arranging on the Song Page to experiment with new song structures and arrangements without dropping the beat.
Sound Variations
Extensive support for articulations in orchestral libraries has arrived in Studio One via Sound Variations, with a powerful but intuitive mapping editor that provides tools for managing complex articulation maps. Trigger your Sound Variations from remote commands, key switches, hardware controllers, macros, and more. Furthermore, the new Dynamic Mapping API lets third-party developers enable their VST2 and VST3 instruments’ articulations to be queried by Studio One so that Sound Variation maps are automatically generated. Vienna Symphonic Library and UJAM are already on board.
Score View Improvements
We’ve added Drum Notation and Tablature to the Score view! Tablature supports multiple instruments and multiple tunings, for everything from Strats to baritone ukuleles, and you can even view tablature and standard notation simultaneously. Drum Notation has new symbols for open/closed/half-open techniques to be added as well.
And in standard Score View, notes can be entered into multiple voices for a single instrument; up to four voices can be created per staff.
PreSonus Sphere Workspaces in the Browser
PreSonus Sphere workspaces are also now available directly from the Studio One Browser for easy bidirectional file transfer. Drag and drop stuff from Studio One’s Edit window to your PreSonus Sphere workspace folders.
Splitter is now a plug-in
The Splitter—our powerful parallel processing tool in the Channel Editor—now lives alongside other Native Effects Plug-ins in Studio One’s Browser. If you haven’t experimented with this powerful processing option in the past, you should—and now it’s hard to miss!
Arrow tool Improvements
Genius updates to the Arrow tool make it easier than ever to edit Note Events in the Piano Roll.
Hardware Controller Improvements
ATOM SQ and FaderPort 8 and 16 now play better than ever with Studio One. ATOM SQ now supports Studio One’s Autofill command for plug-in control. Furthermore, you now get up to 8 pages of controls in Control Link for up to 64 individual controls. You can also now edit details of individual Pattern Steps with ATOM SQ.
FaderPort 8 and 16 users will be excited to know we’ve implemented grouping! Use multiple FaderPort 8/16s to create a robust mix setup that’s ideal for your space and process! You can also now deactivate Sends from your FaderPort as well as toggle the metronome and control volume level. Lastly, Studio One’s Channel visibility settings will now also be reflected accurately on your FaderPort(s).
Clip Versions
Now you can make edits to an Audio Clip that don’t affect every instance of the Clip in your Song; apply clip-based edits in Gain Envelopes or Melodyne independently!
New Safety Features
Studio One’s new “Boot with options” menu on launch allows you to troubleshoot problematic plug-ins and other culprits by selectively disabling them after a crash.
M1 Mac compatibility
Studio One 5.2 is compatible with M1 Macs running Rosetta 2.
And more…
Luke Mornay: Twenty Five Ten
We’re extremely excited for our good friend and recording artist Luke Mornay on the release of his new album Twenty Five Ten which has already grabbed a 5-Star review on New Sounds UK!
Let’s find out more about what he’s been up to with this project as a longstanding user of PreSonus hardware and software for his musical endeavors through the years.

Luke: I’m a producer / composer and mixing engineer best known for my remixes for Kylie Minogue (a Grammy-nominated Billboard #1), The Killers, Robbie Williams, Bob Marley and Amy Winehouse–to name but a few–I just produced Twenty Five Ten, an album in homage to my late mother.

It has sounds for here and now, rooted in decades of influences and experiences.
Featuring successful collaborations with Kevin Godley (10 CC, Godley & Creme), model Roxy Horner, Nick Tart (Diamond Head), Rachael & James Akin (EMF), Lucy Pullin (The Isle of Man, Robbie Williams), Melanie Taylor, Flora, Phat Hat.
My 18-track album was recorded in various places such as Brisbane (Australia), Tel Aviv, Mallorca, Brussels, Los Angeles, Dublin, Katowice (Poland), and Baton Rouge (USA).
Besides my emotional motivation to get this project done, I really wanted this record to connect genres, eras, and mix generations. Somehow connect the dots between timelines in a unified story, with its joyful and bonkers moments, with its own directions and contradictions, or more simply put: my story.
I have a rock-solid PreSonus eco-system based around a Quantum 2, FaderPort 16, and ATOM, nothing superfluous—they all have a purpose. The FaderPort 16 is giving me the gestures I’m used to when balancing tracks on a console; the vibe is based on even relationships between instruments.
It’s a different experience, and the decisions I’m making helped me to assign a more prominent role to sounds buried in a mix, with fingers on all faders I’m sorta painting a sonic picture based on my impression. With a mouse it’s also achievable, but it’s more cerebral; it’s laser focused, and less expressive.
The ATOM is perfect when I want to jam with drums or synth shots. It’s perfect for fortunate accidents! I come up with ideas I wouldn’t get from a keyboard. In some of my remixes I like to slice vocals that I then drop into impact to create what we call “vox lox” to build new lines, for example that was a centerpiece of my Kim Wilde Kids In America remix. The new chorus idea was all done with Impact XT and the ATOM.
Quantum 2 is just brilliant, it’s been my companion in so many tasks, it’s never let me down. As musical director for a Native American show I’m in charge of, I used this thing on stage in large venues with thousands of people, the sound was amazing and so stable. I also mixed a full season series for a TV network; a short film for Disney; sound mix for HBO; my album and remixes—it’s been so reliable and with a constant, pristine sound. It fits perfectly in my backpack, so I’m super mobile.
For what applications are you using Studio One Professional?
I’m working 100% in the box and I’m using Studio One for everything and anywhere.
I usually work from home, and when necessary I just take my laptop to a commercial studio, plug my Quantum 2 to their system, launch Studio One, and I’m set. I can do the adjustments I feel are needed and go back home.
My album was also mastered that way, I’ve had a reliable listening environment there, and all songs loaded into the project page. The big plus was when I felt that I was doing too much tweak, I could just open the song, fix whatever was needed with one click and go back.
Lately besides my remixes, I’ve been asked to mix a couple of original songs from the ’80s/’90s on which I’ve been given the multi-tracks, such as Fine Young Cannibals, Shakespear’s Sister, or Bananarama to name but a few.
I could really set up Studio One to be ready at all time and nicely organized like a vintage console, and now with Version 5 Professional, I can switch between an SSL or Neve sound in just 2 clicks. That’s fantastic.
What led you to choose Studio One?
Studio One is just another part of me, it never gets in the way. It’s a companion standing in front of me that is always ready for war.
The interface is very clean and soothing in a way, it always feels like some quietness before the storm. It also sounds great, fully-featured and with the Project page, you can virtually do anything within ONE app.
These days as a musician you have to wear so many hats that the last thing you want is distractions and learning curves on different apps. With Studio One I can produce, compose, mix, and master with features located in familiar places.
What Studio One features have proven particularly useful and why?
The drag & drop concept, be it for sounds, presets, instruments, or FX. This thing is a home run. When I feel that I’m not going to be in a productive mood, I spend a lot of time organizing all of the above for future sessions.
How does Studio One compare to other DAWs you have used?
 This software brings me peace of mind, and that’s priceless. PreSonus shines by making huge steps at their own pace with three priorities: the user experience, consistency and coherence.
They can be the adult in the room in a world where feature lists to sell new major updates are prioritized over the quality of their achievement.
With backward compatibility, if something is poorly implemented from the start, then you’re stuck with it until the end of days. We all love new features, of course, but it shouldn’t come at that price.
So when I see something not yet available in Studio One, I just tell myself: “If you can’t make music with what Studio One has to offer today, maybe you should just quit.” The kid in me is not a fan of that sentence, but it’s a nice motto to move on.
Which Studio One feature or concept doesn’t get enough spotlight (or isn’t talked about enough) in your opinion?
Without a doubt I’d say macros, they can be really powerful, I remember doing one for a friend of mine, he was new to Studio One, he was looking after a way to slice and map samples easily.
So I came up with one that analyzed the loop, detected transients, sliced at transients and sent them to Sample One XT, it was so good that I’ve added it to a shortcut and ended up using it myself. I’m thinking of sharing it with the community.

Any useful tips/tricks or interesting stories based on your experience with Studio One that would be of interest to our user base?
During the lockdown with friends we’ve had some virtual sessions, we were sending ideas back and forth and it appeared that none of them used MusicLoops, they were saving their ideas or overdubs as songs.
I told them that I have a folder called ideas, so every time I try a new synth or jamming with a virtual instrument, I just drag & drop it to that folder, and it then becomes an asset for my future project. Everything is saved in a single file with an audio version, MIDI, presets, and FX used all in one go.
From time to time, I like to browse that folder to see if there’s anything inspiring or useful.
That’s basically the story of the opening track on my album, I’ve had this nasty groove made with Impact XT floating around for some time, and one day it was the right idea for the mood I was in.
Never lose your ideas, phrases and so on, don’t expect to remember anything two years or two months from now with random or cryptic names… Just drag and drop in a place, where you’ll find your sparkles of ideas at all times!
Any final comments about PreSonus and Studio One?
I always found the name intriguing, now that I see how powerful it’s become over the years, and on its way to become the ultimate DAW, I take it that it was not just a name… it was a plan.
PreSonus Sphere Members: check out Luke’s newest Studio One Presets on his Featured Artist Profile!
Facebook | Instagram | YouTube | Spotify
Website : www.lukemornay.com
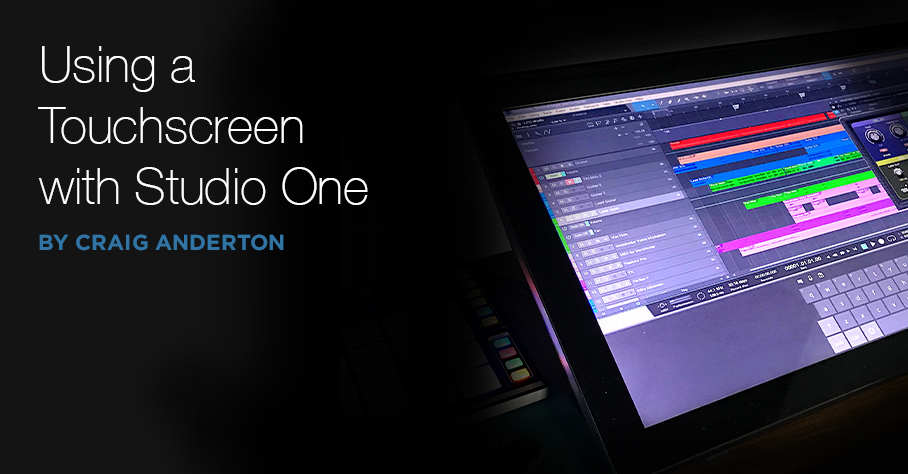
Using a Touchscreen with Studio One
The first touchscreens could detect a single touch, but modern touchscreens can handle up to ten touch points—which makes sense, because we have ten fingers. Studio One supports ten touch points natively on Windows, and thanks to a built-in TUIO extension, on the Mac as well.
DAW control with touch sounds sexy, but using touch on a large monitor is a different experience compared to using touch on a smartphone or tablet. Furthermore, whether a third-party plug-in supports multiple touchpoints is hit-or-miss. Also consider that a good touch monitor costs around $300—that’s quite a bit more than a standard monitor, so you need to decide how valuable touch would be to you.
Practically speaking, you probably don’t need touch, but it does offer two major advantages when working with Studio One. The main plus for me is being able to use a touchscreen control surface and mouse simultaneously—two-handed operation improves the physical workflow. The other advantage is being able to edit multiple parameters simultaneously with effects and virtual instruments (like adjusting filter cutoff while trimming the filter envelope amplitude, or editing EQ frequency and boost/cut8 simultaneously).
The Ergonomics of Using Touch
To use a touchscreen as a control surface, I lay the monitor down almost flat, at about a 20% angle (Fig. 1). It feels very much like working with a conventional hardware mixer. For this application, it’s vital that the monitor have an adjustable A-frame stand, so that you can adjust it to any angle you want.
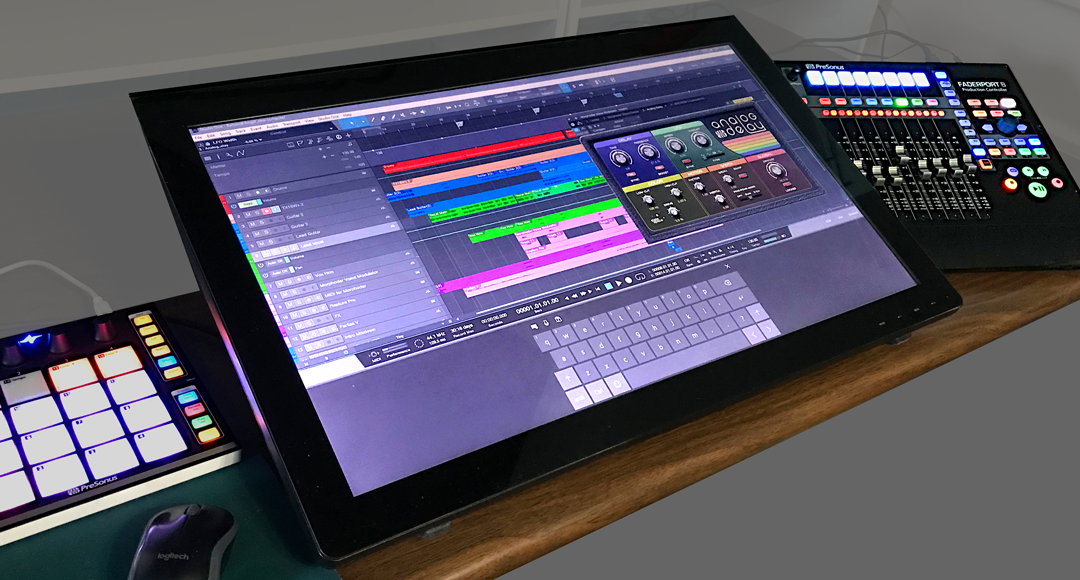
Figure 1: The Planar touchscreen is flanked by PreSonus control surfaces—that’s a lot of hands-on control. It’s at more of an angle than I normally use so that the screen is more visible.
Where touch doesn’t work, at least for me, is trying to use it with a conventional monitor placement (i.e., at a right angle to the desk surface, directly in front of you). Reaching out tires your arms; when I’m using the touch screen as a conventionally placed monitor for a project like writing an article, I rarely use touch. However, it can be helpful to move windows around while the mouse is doing something else, or touching a function after the mouse has made a selection. If you have RSI issues, touch can also provide a break from using a mouse all the time.
Also note that it takes a while to develop “touch technique.” You generally need to use the point of your finger to be sufficiently precise, and with the monitor at a low-lying angle, I usually have to aim a little toward the top of what I’m trying to hit. Also, you need to learn a few new tricks. You “right-click” simply by touching, and then continuing to hold your finger down until the context menu appears. And you can zoom tracks horizontally or vertically with two-finger pinches or stretches, which is pretty cool…as well move a project horizontally along the timeline by just swiping left or right.
Integrating a QWERTY Keyboard
You also need to decide how to integrate a QWERTY keyboard. If it’s in front of the touchscreen, then the touchscreen needs to go further back, which diminishes its ease of use because you have to reach further. One option is placing a keyboard on your lap, or adding an under-table keyboard drawer. Then you can slide the keyboard out when needed, and slide it back in when you want to concentrate on the touchscreen.
Another option is using Windows’ onscreen keyboard. Although primarily intended for tablet mode, right-click on the Taskbar, and choose “Show touch keyboard button.” This button will appear on the taskbar and persist; click on it to show/hide the keyboard. (Also for what it’s worth, you can enable a button for an onscreen touchpad.) Note that you have several keyboard options, from a mini-keyboard to one that includes Alt, Ctrl, Windows, and Function keys (Fig. 2).
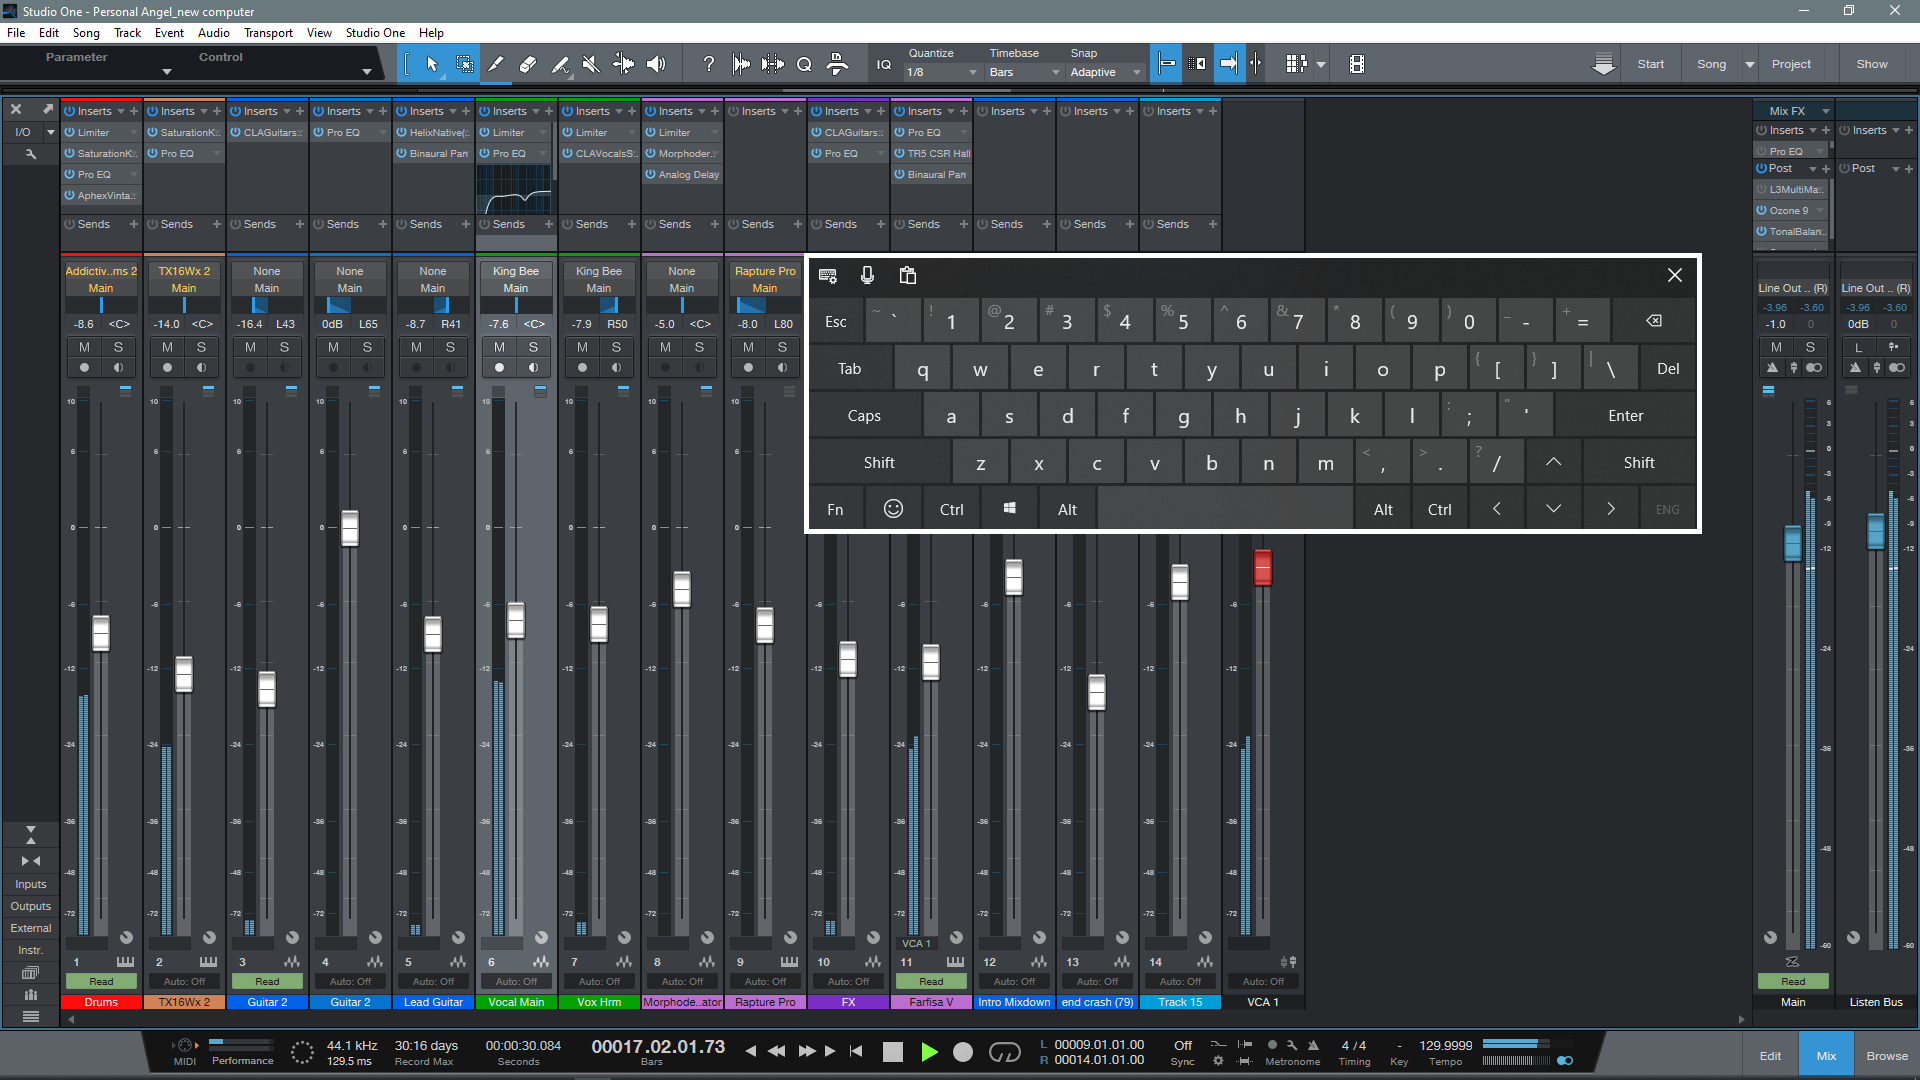
Figure 2: This shows the full keyboard, set for the option to float anywhere over the window. Note how the faders are stretched to give excellent touch resolution.
So Is It Worth It?
If you miss working on a hardware mixer surface, a gently angled, horizontal touch screen is pretty close to that experience. Studio One’s ability to extend the height of faders is also great—when you mostly want to concentrate on fine level adjustments, you can do so with touch. Multitouch on effect and instrument parameter adjustment is also welcome, especially compared to bouncing the mouse back and forth among parameters. Another factor is that unlike an external hardware control surface, you don’t have to “mentally map” the hardware to what you see on the screen—after all, you’re adjusting what’s on the screen.
If you have a choice between spending $300 on upgrading your speakers or buying a reasonably large touchscreen, I’d prioritize upgrading your speakers. But if you’re looking for a new tool that can give you an edge in certain workflows, a touchscreen may be the answer. And even if it isn’t, it can always serve as a conventional monitor, and provide an extra screen. And we can never have enough screens!
RMB Justize: Music Of The (PreSonus) Sphere
Discovering new sonic universes to explore is what being a musical artist is all about!
Let’s dive into RMB Justize’s discussion about his worlds of sound, and how he does it all with PreSonus Sphere:

“Versatility and persistence are a deadly combination of characteristics. They are much-needed weapons to have in an artist’s arsenal.”
Based in Chicago, IL with ties to the DMV area… Taylor Gang’s in-house producer Ryan “RMB Justize” Baker grew up in a musical household, his mother being a classical violinist for the Chicago Sinfonietta, exposing RMB’s ears as early as six years old.
“I caught the music bug from Mom, for sure. I remember turning 11 or 12 and having nothing but a voice recorder and a Yamaha DJX keyboard. Skateboarding was the thing back then, with influences ranging from Sum 41 to Incubus to The Neptunes and Noreaga. A couple of years later I finally dove into making music with computers, using every piece of software I could get my hands on until now. But… then came PreSonus Studio One, which changed it all for me.
“The interest came from an artist I worked with at the time—he wouldn’t stop mentioning it! After spending countless months into years on ProTools, FL Studio and Reason, I wanted a program that could do it all. I’m a religious template maker, as most are, so the workflow determines the imagination most if not all of the time and Studio One takes care of the madness with ease. Let’s just focus on the music and pushing envelopes more than finding where to click certain stuff. PreSonus did it right, ranging from AudioBox interfaces I’ve owned in the past, all the way to the new Quantum which gives me more than enough power to control the room.”
Since the premiere of Studio One version 5 in July of 2020, RMB has become a power user… eventually convincing a few fellow producers and artists to try it, if not make a full switch.
“There have been times where I’ve walked into big label studio sessions and people look confused because they’ve never seen Studio One in person! Once I show my way of doing certain things, using certain plug-ins in certain ways, they’re overly surprised. It’s hands-down the fastest program, which lets me flex my mind-work and turn my rough thoughts (even voice notes) into full records. I’ve had people come to my studio for sessions and look surprised when they ask why I use it. You have to try for yourself to find your workflow.”

Honorably noted, PreSonus Sphere has made his processes for online collaboration, recording, mixing, and mastering an album-quality one-stop-shop, helping the migration become a breeze. Especially during times of a pandemic where people can’t communicate like they normally would, it’s a necessity.
“I think all DAWs should have an ecosystem such as PreSonus Sphere, whether you’re just getting started or an A-list musician. The tools available make it seamless to share files and keep up to date on things like deadlines and most recent notes/mixes, rather than scrambling through emails and hard drives (which we can all relate to, I’m sure). Having that system in one spot, one site, one page, actually kept me in line when finishing a label record and staying up to date without confusion.” (Chevy Woods—Since Birth)
Recently focusing more on production and audio engineering as well, the AAF import feature has been a godsend.
“I still find myself walking people through how to convert sessions to AAF rather than tracking out. There is no other program that will line the session up identically with automation and fades, to say the least, which saves more time than I expected. That’s just a small piece of my realization, of how capable this DAW is. Cheers, PreSonus!”
Since the start of the COVID-19 pandemic, RMB’s main focus is to create cutting-edge music, knowing he has the perfect DAW to do so, with no issues.
RMB Justize @ PreSonus Sphere
Pro Tools Multi-Mono Mode with Studio One
A fundamental difference between Pro Tools and Studio One is effects handling, which can be confusing for Pro Tools users switching to Studio One (and yes, this tip is based on a true story). When you add an effect with Pro Tools’ mixer insert, you’ll see options for Multichannel and Multi-Mono effects—which Studio One doesn’t have.
Or does it? Actually, not only can Studio One emulate the Pro Tools Multi-Mono mode for people who’ve switched, but there are some advantages that are relevant to Studio One users.
In Pro Tools, Multichannel effects are like what we’re used to in Studio One (and other programs), where the effect processes a mono or stereo track. However, Multi-Mono effects insert separate effects for a stereo track’s left and right channels. Normally this is transparent to the user because the effects are linked, and have a single interface, so they seem like a Multichannel effect. However, Multi-Mono’s particular talent is that you can unlink the effects from each other, switch between the two channels in the interface, and process the two channels (or more, for surround) separately.
My Pro Tools friend was disappointed, because he would often use this feature when mastering, restoring tracks, working with two-track audio sources, and the like. For example, when prepping a file for mastering, he sometimes limited one channel to tame peaks, left the other channel with minimal limiting, then added a master limiter at the output to provide overall limiting (this isn’t the same as using a conventional stereo limiter, and unlinking the two channels). On occasion, the different channels needed different EQ as well.
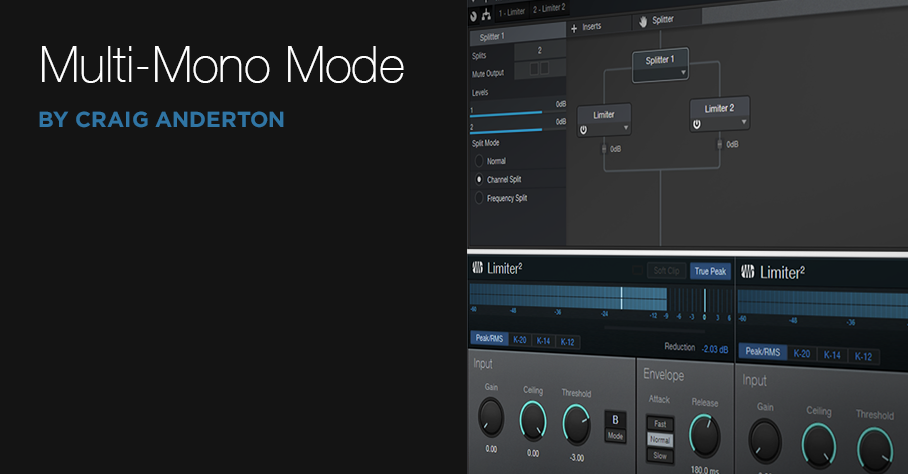
He knew about my Stereo to Virtual Mono blog post, but wanted to have everything in a single track, like Pro Tools. Fortunately, there’s a simple solution (Fig. 1). As an example, let’s use his scenario of wanting different limiters in each channel.
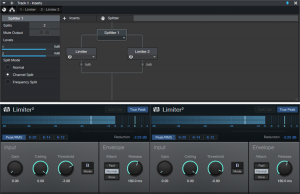
Figure 1: How to implement Pro Tools’ Multi-Mono effects functionality in Studio One.
- Open the Channel Editor, then click on the Routing button.
- Drag a Splitter into the Routing window.
- Set the Split Mode to Channel Split.
- Insert a Limiter2 into each split.
- (Optional) Insert a Limiter2 at the output, to provide the final limiting function.
Done! Now the left and right channels have their own limiters. But the Pro Tools guy also realized there was an advantage to Studio One’s pseudo-Multi-Mono mode: he didn’t have to switch between Limiter interfaces. Instead, he could pin them, and see both at the same time. When I reminded him he could bring out the Gain, Threshold, Ceiling, and Release controls for each Limiter to Macro knobs, save that as an FX chain, and use less screen real estate…let’s just say he was a happy camper.
This isn’t to diss Pro Tools, which (like any DAW) does some things well, and some things not so well. But it does show that when switching from one program to another, concerns you may have about needing to give up a favorite feature could be irrelevant.
Great Bass Sound—In 15 Seconds!
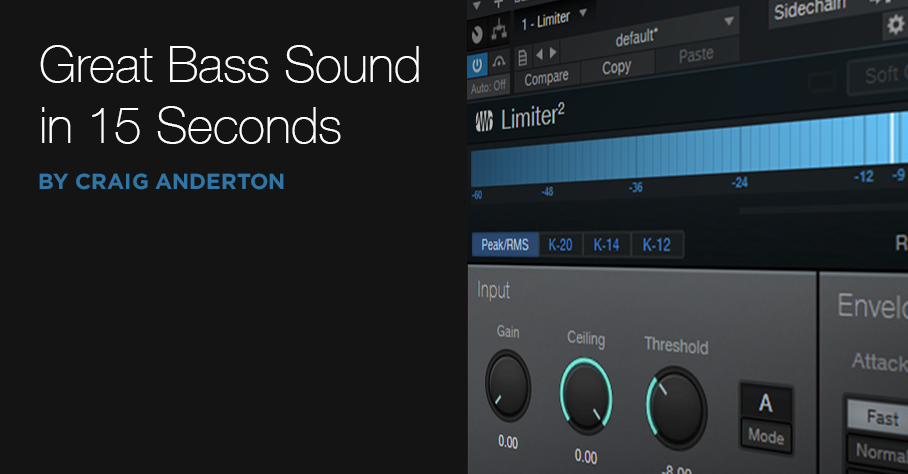
Compression and bass go together like ham and eggs, red beans and rice, or peanut butter and jelly (or gin and tonic, if you prefer something a little stronger). A lot of engineers plug in a compressor within milliseconds of turning up the bass track’s fader. Some “pro tips” on the web even recommend inserting lots of compressors in series. Hey, if one is good, then four must be better—right? Well, I’m not convinced.
Lately with electric bass (synth bass, too) I’ve been tossing compressors aside, and using Limiter2 when I want to get a solid sound down fast. And I mean fast—that 15 seconds is actually a bit misleading. I’ve clocked myself at under 12 seconds from drag-and-drop to pressing play, including editing the Limiter2 settings.
Check out the audio example. The drums are using my Bigness of Huge Drum Sound FX Chain. The first four measures are the bass sound as recorded, using the Limiter2. The next four measures are the same, but with the Limiter2 bypassed. Note that when the limiter is in play, the bass isn’t overwhelmed by the drums.
Fig. 1 shows the Limiter2 settings.
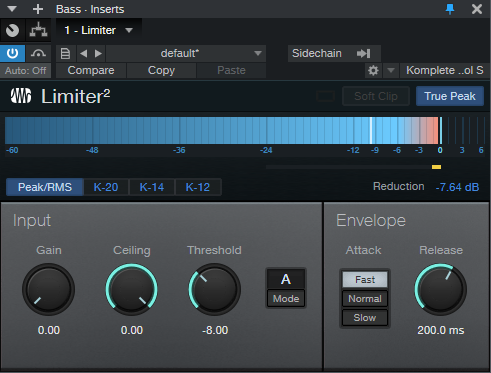
Figure 1: Settings for bass with the Limiter2.
That’s all there is to it. (But if you’re a 5-string bass fan, I do recommend changing the Release time to 300.0 ms.)
Granted, this isn’t necessarily a “one-size-fits-all” tip. You might want to add some EQ, some AutoFilter funk in parallel, or whatever. But this punchy, full sound will hold its own in the rhythm section, and get you through the tracking session. What’s more, if the bass player has a good touch and properly adjusted pickups, it maybe even take you to the final mix.
Create Ampire Cabs with Pro EQ2
IR-driven cabs are often the weak link with amp sims Fortunately, cab emulations have improved dramatically over the years. Yet like samples, they remain “frozen” to a particular cab—they have their sound, and that’s it.
Although some guitar players think that a cab is a magical device, it’s really just a filter. To be sure, it can be a magical filter…but it’s still a filter. So, we can use filters to create our own cabs. They won’t be able to replicate a specific cabinet down to the smallest detail, but that’s not the point. Using the Pro EQ2 filter to create your own cabinet can give responses that IRs can’t give, with a different sound that can be satisfyingly smooth, and…well, “analog.”
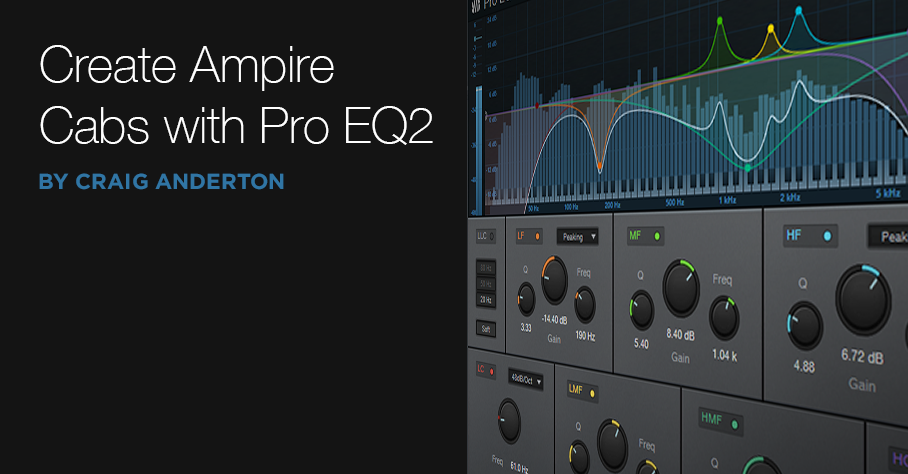
I analyzed the frequency response of several cabs, using the Tone Generator’s pink noise along with the Spectrum Analyzer plug-in, then tried to replicate the response as closely as possible with the Pro EQ2. Although sometimes I was shocked at how close this could come to the cab, more often than not I couldn’t help but make some tweaks—it’s almost like I had taken that cab, brought it into a woodworking shop, and made specific changes for my needs.
If you want to experiment…be my guest! Insert Ampire, choose your amp (I particularly like the following curves with the VC30), select no cab in Ampire (important!), insert the ProEQ2 afterward, and rock out. Here are some ideas to get you started. Note that the white curve is the sum of all the other curves, so that’s the curve you actually hear.
This curve is based on a 1 x12 cabinet that’s designed for leads, but works with rhythm parts as well (Fig. 1).
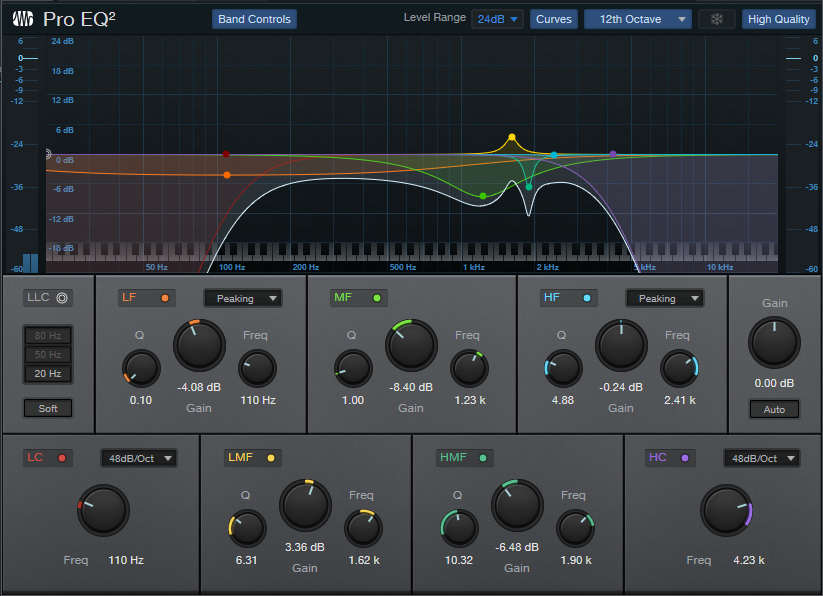
Figure 1
Here’s a curve that’s more “Tweedish” (Fig. 2)
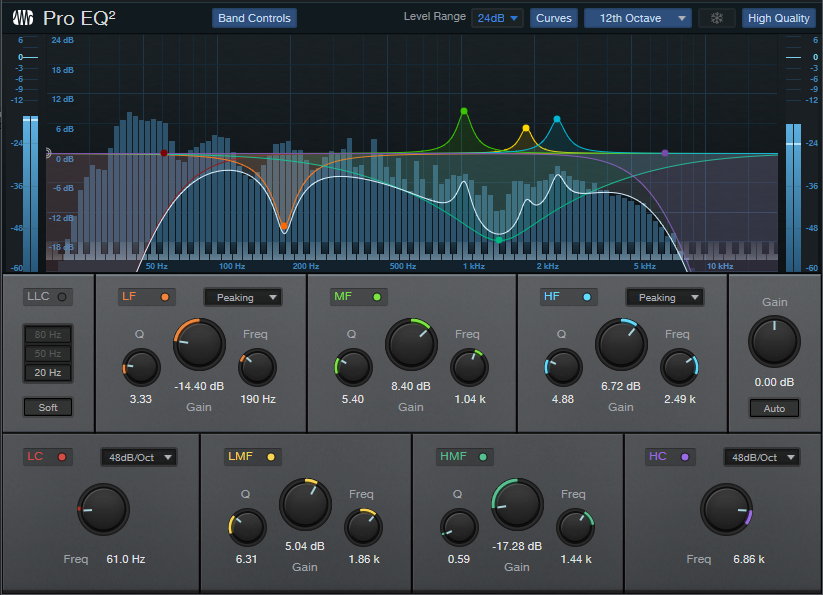
Figure 2
This curve (Fig. 3) is based on an amp by a company that no longer makes amps, but whose name I better not mention so that I don’t have to deal with lawyers. Suffice it to say they’re known mostly for making guitars that are popular with rock guitarists.

Figure 3
And here’s one more…just because we can (Fig. 4)! It’s based on a 2 x 12 cab.
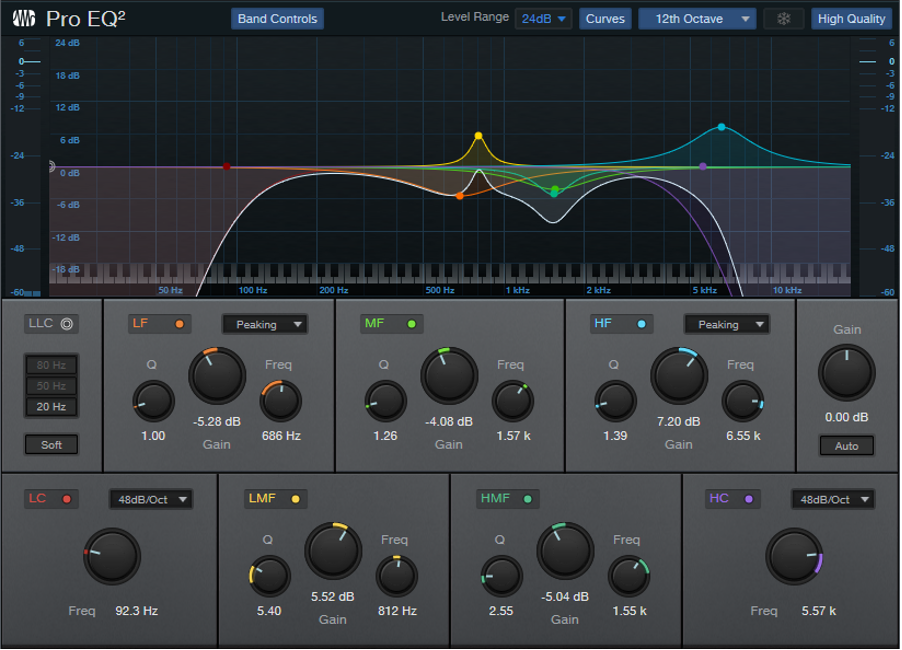
Figure 4
These all have two elements in common: high-frequency rolloffs, and interesting resonances. Although “EQ cabs” may not replace IRs, they’re not supposed to—this is about augmenting your options. Nonetheless, in many of my current productions, I prefer using the Pro EQ2-based cabs because it’s easier to tailor them to fit in with a specific mix.
For this week’s tip, I’m not providing presets because this isn’t about presets—it’s about editing an “analog” cab to give the sounds you need for your productions. So, the “best” curve will depend on what works best with your guitar, playing style, and production goals. In any event, I think you’ll find that constructing your own cabinet can provide a musically useful, and novel, way to expand on what IR-based cabinets can do.
Super-Simple Mono-to-Stereo Conversion

It may be a stereo world, but we still have a lot of mono signal sources. Although some people use delay to convert mono to stereo, this can be fraught if the stereo needs to collapse back to mono eventually. EQ can do an effective, albeit not as dramatic a job, and I wrote a blog post about How to Create Delay-Free Stereo from Mono using two Multiband Dynamics processors. This is a very flexible setup because you can automate the Multiband Dynamics parameters, as well as add in compression selectively if desired.
However, it’s also possible to convert mono into stereo within a single track—no buses needed—with a Splitter and some pan controls. While not as editable as the previous approach, it does the job, is simple to use, requires virtually no CPU power, and the stereo signal collapses back to mono with no problems.
How It Works
The mono-to-stereo conversion process works by splitting the incoming signal into five frequency bands (Fig. 1). A Dual Pan follows each band, with Link enabled and Width set to 0%. So, you can use the Pan controls (which are brought out to the Macro Controls panel) to place each band wherever you want in the stereo field. This is what creates the stereo image.

Figure 1: Block diagram for the Super-Simple Mono-to-Stereo Converter.
The Macros Control Panel
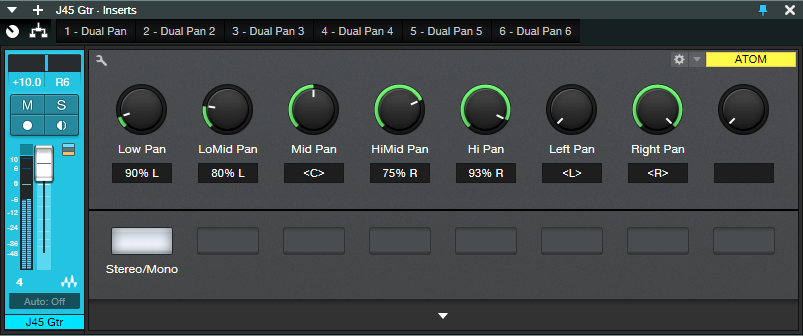
Figure 2: Macro Control knob panel.
There’s a downloadable FX Chain, which takes care of the parameter assignments for the Macro Controls (Fig. 2). However, it would be pretty easy to do it yourself. The five Pan knobs vary the Pan parameters in the five Dual Pans (one for each frequency band). The two right-most controls are tied to a Dual Pan at the output, and serve as “master pan” controls.
How to Use the Super-Simple Mono-to-Stereo Converter
The track being processed has to be in Stereo channel mode. It’s okay if you recorded the track in mono; just make sure Channel Mode is stereo when you play back, or convert the mono to “dual mono” by selecting the Event while the Channel Mode is stereo, and typing Ctrl+B.
The five left-most knobs control panning for the five bands. Pan the frequency bands as desired in the stereo field. Also note the Stereo/Mono switch. When dimmed, it de-activates all the Dual Pans, so it’s easy to compare the synthesized stereo and original mono sounds.
For the full stereo effect, set the Left Pan fully counter-clockwise, and Right Pan fully clockwise. To “tilt” the image more to one side or the other, bring the appropriate Pan control more toward center. For example, if you want to tilt the stereo spread toward the right channel, turn the Left Pan knob more clockwise.
One of my favorite applications is creating a stereo image from an acoustic guitar that was miked with a single mic (to avoid potential phase issues) or taken direct—you can still have a stereo “feel.” It’s also fun to follow Ampire with this FX Chain when you want to splatter a distorted rhythm guitar part across the stereo fiels, or give an old mono synth a stereo facelift.
As I said in the beginning, it’s a stereo world…but now your mono signal sources can be part of it a little more easily.