Safety First: Into the Archives, Part 1
I admit it. This is a truly boring topic.
You’re forgiven if you scoot down to something more interesting in this blog, but here’s the deal. I always archive finished projects, because remixing older projects can sometimes give them a second life—for example, I’ve stripped vocals from some songs, and remixed the instrument tracks for video backgrounds. Some have been remixed for other purposes. Some really ancient songs have been remixed because I know more than I did when I mixed them originally.
You can archive to hard drives, SSDs, the cloud…your choice. I prefer Blu-Ray optical media, because it’s more robust than conventional DVDs, has a rated minimum shelf life that will outlive me (at which point my kid can use the discs as coasters), and can be stored in a bank’s safe deposit box.
Superficially, archiving may seem to be the same process as collaboration, because you’re exporting tracks. However, collaboration often occurs during the recording process, and may involve exporting stems—a single track that contains a submix of drums, background vocals, or whatever. Archiving occurs after a song is complete, finished, and mixed. This matters for dealing with details like Event FX and instruments with multiple outputs. By the time I’m doing a final mix, Event FX (and Melodyne pitch correction, which is treated like an Event FX) have been rendered into a file, because I want those edits to be permanent. When collaborating, you might want to not render these edits, in case your collaborator has different ideas of how a track should sound.
With multiple-output instruments, while recording I’m fine with having all the outputs appear over a single channel—but for the final mix, I want each output to be on its own channel for individual processing. Similarly, I want tracks in a Folder track to be exposed and archived individually, not submixed.
So, it’s important to consider why you want to archive, and what you will need in the future. My biggest problem when trying to open really old songs is that some plug-ins may no longer be functional, due to OS incompatibilities, not being installed, being replaced with an update that doesn’t load automatically in place of an older version, different preset formats, etc. Another problem may be some glitch or issue in the audio itself, at which point I need a raw, unprocessed file for fixing the issue before re-applying the processing.
Because I can’t predict exactly what I’ll need years into the future, I have three different archives.
- Save the Studio One Song using Save To a New Folder. This saves only what’s actually used in the Song, not the extraneous files accumulated during the recording process, which will likely trim quite a bit of storage space compared to the original recording. This will be all that many people need, and hopefully, when you open the Song in the future everything will load and sound exactly as it did when it was finished. That means you won’t need to delve into the next two archive options.
- Save each track as a rendered audio WAV file with all the processing added by Studio One (effects, levels, and automation). I put these into a folder called Processed Tracks. Bringing them back into a Song sounds just like the original. They’re useful if in the future, the Song used third-party plug-ins that are no longer compatible or installed—you’ll still have the original track’s sound available.
- Save each track as a raw WAV file. These go into a folder named Raw Tracks. When remixing, you need raw tracks if different processing, fixes, or automation is required. You can also mix and match these with the rendered files—for example, maybe all the rendered virtual instruments are great, but you want different vocal processing.
Exporting Raw Wave Files
In this week’s tip, we’ll look at exporting raw WAV files. We’ll cover exporting files with processing (effects and automation), and exporting virtual instruments as audio, in next week’s tip.
Studio One’s audio files use the Broadcast Wave Format. This format time-stamps a file with its location on the timeline. When using any of the options we’ll describe, raw (unprocessed) audio files are saved with the following characteristics:
- No fader position or panning (files are pre-fader)
- No processing or automation
- Raw files incorporate Event envelopes (i.e., Event gain and fades) as well as any unrendered Event FX, including Melodyne
- Muted Events are saved as silence
Important: When you drag Broadcast WAV Files back into an empty Song, they won’t be aligned to their time stamp. You need to select them all, and choose Edit > Move to Origin.
The easiest way to save files is by dragging them into a Browser folder. When the files hover over the Browser folder (Fig. 1), select one of three options—Wave File, Wave File with rendered Insert FX, or Audioloop—by cycling through the three options with the QWERTY keyboard’s Shift key. We’ll be archiving raw WAV files, so choose Wave File for the options we’re covering.
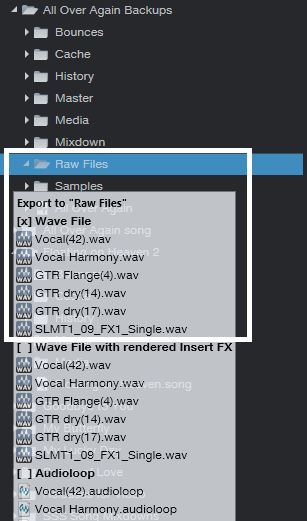
Figure 1: The three file options available when dragging to a folder in the Browser are Wave File, Wave File with rendered Insert FX, or Audioloop.
As an example, Fig. 2 shows the basic Song we’ll be archiving. Note that there are multiple Events, and they’re non-contiguous—they’ve been split, muted, etc.
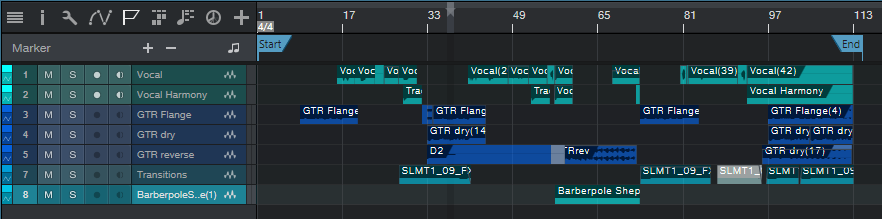
Figure 2: This shows the Events in the Song being archived, for comparison with how they look when saving, or reloading into an empty Song.
Option 1: Fast to prepare, takes up the least storage space, but is a hassle to re-load into an empty Song.
Select all the audio Events in your Song, and then drag them into the Browser’s Raw Tracks folder you created (or whatever you named it). The files take up minimal storage space, because nothing is saved that isn’t data in a Song. However, I don’t recommend this option, because when you drag the stored Events back into a Song, each Event ends up on its own track (Fig. 3). So if a Song has 60 different Events, you’ll have 60 tracks. It takes time to consolidate all the original track Events into their original tracks, and then delete the empty tracks that result from moving so many Events into individual tracks.
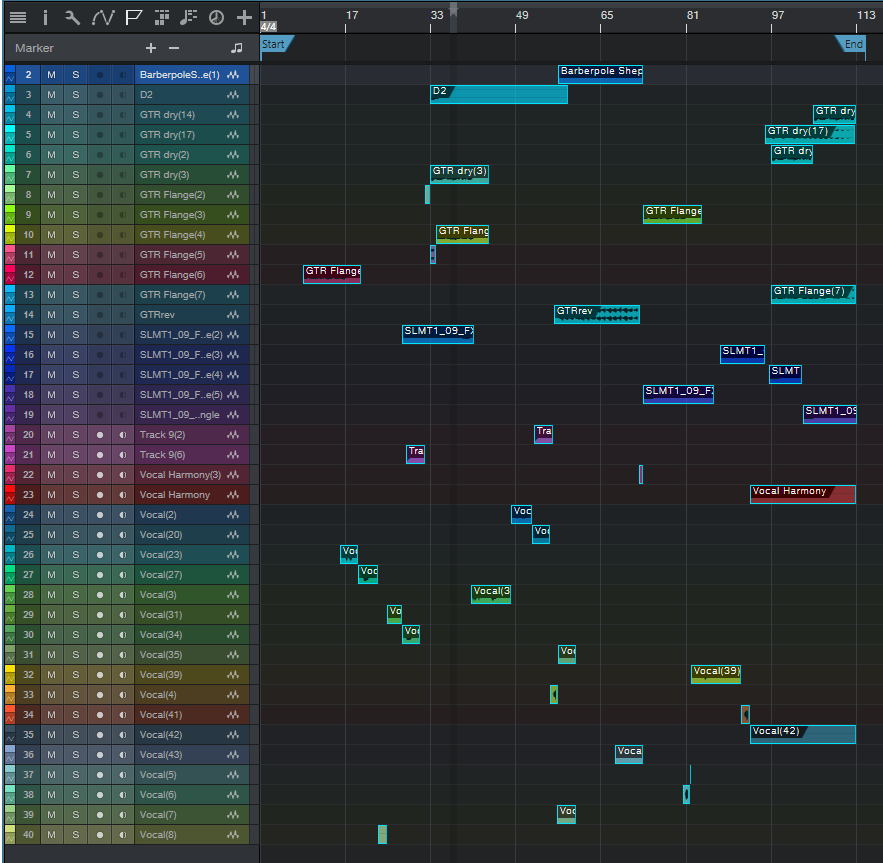
Figure 3: These files have all been moved to their origin, so they line up properly on the timeline. However, exporting all audio Events as WAV files makes it time-consuming to reconstruct a Song, especially if the tracks were named ambiguously.
Option 2: Takes more time to prepare, takes up more storage space, but is much easier to load into an empty Song.
- Select the Events in one audio track, and type Ctrl+B to join them together into a single Event in the track. If this causes clipping, you’ll need to reduce the Event gain by the amount that the level is over 0. Repeat this for the other audio tracks.
- Joining each track creates Events that start at the first Event’s start, and end at the last Event’s end. This uses more memory than Option 1 because if two Events are separated by an empty space of several measures, converting them into a single Event now includes the formerly empty space as track data (Fig. 4).
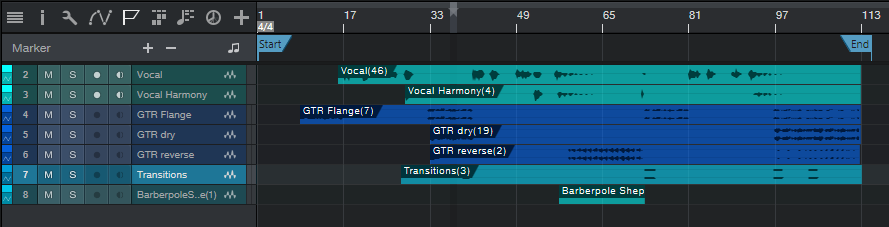
Figure 4: Before archiving, the Events in individual tracks have now been joined into a single track Event by selecting the track’s Events, and typing Ctrl+B.
- Select all the files, and drag them to your “Raw Tracks” folder with the Wave File option selected.
After dragging the files back into an empty Song, select all the files, and then after choosing Edit > Move to Origin, all the files will line up according to their time stamps, and look like they did in Fig. 4. Compare this to Fig. 3, where the individual, non-bounced Events were exported.
Option 3: Universal, fast to prepare, but takes up the most storage space.
When collaborating with someone whose program can’t read Broadcast WAV Files, all imported audio files need to start at the beginning of the Song so that after importing, they’re synched on the timeline. For collaborations it’s more likely you’ll export Stems, as we’ll cover in Part 2, but sometimes the following file type is handy to have around.
- Make sure that at least one audio Event starts at the beginning of the song. If there isn’t one, use the Pencil tool to draw in a blank Event (of any length) that starts at the beginning of any track.
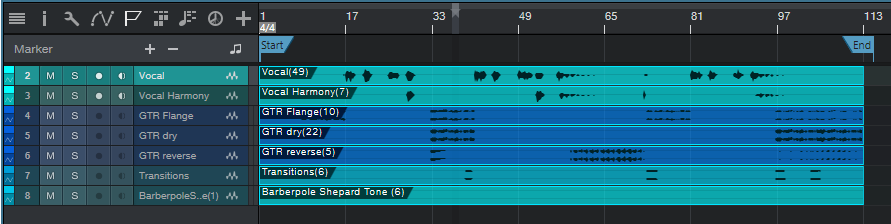
Figure 5: All tracks now consist of a single Event, which starts at the Song’s beginning.
- Select all the Events in all audio tracks, and type Ctrl+B. This bounces all the Events within a track into a single track, extends each track’s beginning to the beginning of the first audio Event, and extends each track’s end to the end of the longest track (Fig. 5). Because the first Event is at the Song’s beginning, all tracks start at the Song’s beginning.
- Select all the Events, and drag them into the Browser’s Raw Tracks folder (again, using the Wave File option).
When you bring them back into an empty Song, they look like Fig. 5. Extending all audio tracks to the beginning and end is why they take up more memory than the previous options. Note that you will probably need to include the tempo when exchanging files with someone using a different program.
To give a rough idea of the memory differences among the three options, here are the results based on a typical song.
Option 1: 302 MB
Option 2: 407 MB
Option 3: 656 MB
You’re not asleep yet? Cool!! In Part 2, we’ll take this further, and conclude the archiving process.
Add Studio One to your workflow today and save 30%!
