Author Archives: Craig Anderton
Friday Tips: Studio One’s Secret Equalizer
[Announcement: the follow-up book to “How to Record and Mix Great Vocals in Studio One” is now available—hop on over to the PreSonus Shop to check out “More than Compressors: The Complete Guide to Dynamics in Studio One.” Thank you! We now return to our regularly scheduled programming.]
Pop quiz: How many EQ plug-ins ship with Studio One Pro?
If you answered seven, congratulations! Then you know about the Pro EQ, the three different Fat Channel EQs, Ampire’s Graphic Equalizer, the Channel Strip, and using the Multiband Dynamics as a really hip graphic EQ. But actually, the correct answer is eight.
If you turn off the “auto” aspects of the Autofilter, you can take advantage of two filters, each with multiple filter topologies: three “rhymes-with-vogue”-style lowpass Ladder filters (sorry, if I mention the actual synthesizer name, I get hassled), two analog state-variable filters (yes, the same topology as the infamous Project #17, the “Super Tone Control,” in my book Electronic Projects for Musicians), one digital state-variable filter, a comb filter, and a zero-delay, 24/dB octave low-pass filter. Furthermore, you can route the two filters in series, or in parallel, as well as offset their cutoff frequencies from each other by up to 2 octaves.
The state-variable filters are particularly interesting because you can alter the response continuously from lowpass, to bandpass, to highpass, all with variable cutoff and resonance. This gives responses that are difficult, if not impossible, to obtain any other way.
So who cares about different filter types, anyway—other than guitar players who want to get totally rad wah effects? Well, these are invaluable for sound design, FX and breaks for DJs, synthesizer sweeps, and to add spice to tracks that sound just too darn normal. Don’t think of these filters necessarily as standard EQ, but more like EQ-based special effects. These parameters are automatable too, which opens up even more possibilities.
Using the testing procedure described in the Testing, Testing tip from May 16, let’s look at some of the spectral responses this exceptionally versatile pair of filters can produce.
But First, Turn Off Everything that Says Auto
To use the Autofilter as a filter, we need to turn off the automated aspects. Ctrl+click on both pairs of Env and LFO sliders to zero them out. Now we’re left with only the filters, not the modulators trying to control them. Also turn off the gain’s Auto function, because in some of the unusual ways we’ll be using the filter, overloading and nasty distortion can result from Auto gain.
Filtering Time
Fig. 1 shows the response for the 24 dB/octave ladder filter, with resonance turned up. Note that the Pro EQ high cut (lowpass) and low cut (highpass) filters can’t create this kind of curve, because they don’t have resonance controls. This is very much like the response of the classic rhymes-with-“vogue” filter, and you can automate the filter cutoff for grandiose filter sweeps.
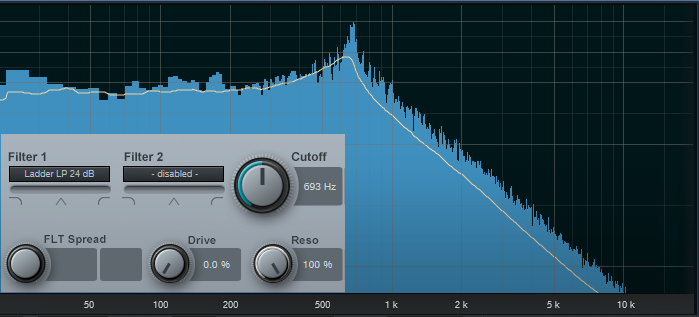
Figure 1: 24/dB ladder response, with resonance.
But wait! There’s more—because there are two different filter sections, you can offset the resonant frequencies to create double peaks. In Fig. 2, the frequencies are offset by two octaves, and the filters are in parallel (see the section outlined in orange). So now we have a double-peak ladder filter…cool.
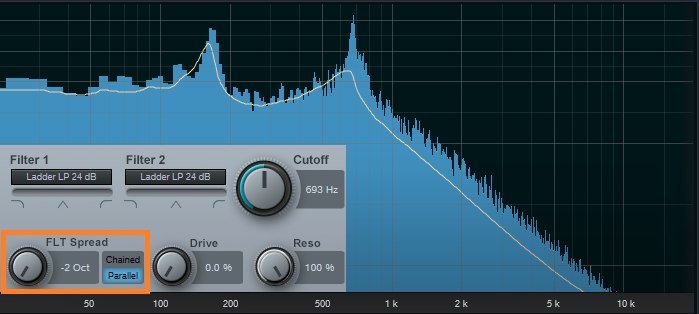
Figure 2: Double-peak ladder filter.
We can also do the “twin peaks” type of filter effect with the state-variable filters set to bandpass mode (Fig. 3). Here the filters are in parallel, and as with the above curve, they’re offset two octaves apart.
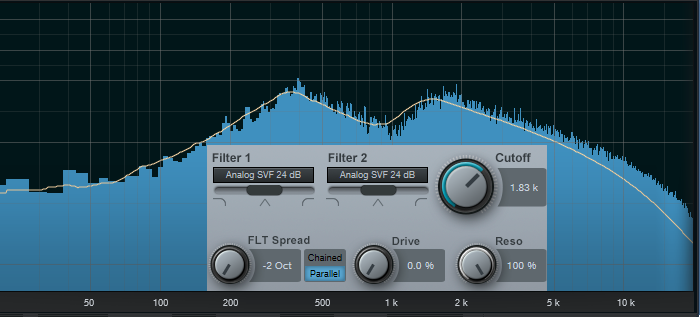
Figure 3: Dual bandpass filters in parallel can create twin peak filter responses, with fairly steep “skirts” on both sides of the peaks.
If you chain the two state-variable filters in series, set them to bandpass mode, don’t offset them, and boost the resonance, the filter curve makes a wonderful wah pedal (Fig. 4). The peak is sharp, with a steep rolloff on either side.
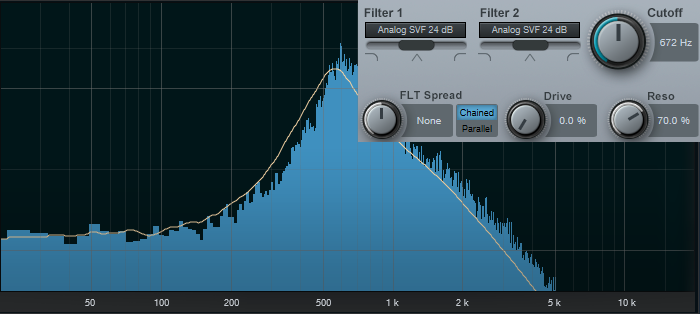
Figure 4: If you’re looking for a wah pedal sound…start here.
This also produces a strong sense of pitch with white or pink noise. One cool trick is using this setting to add a “tuned” aspect to snare drums, and other percussion instruments. Edit Studio One’s Tone Generator plug-in to generate pink noise, feed that into the above filter configuration, turn up the resonance, tune the cutoff to the desired pitch, then gate the noise with a snare hit. Mix in the desired amount of noise to give the drum a sense of pitch.
The highpass setting is useful as well, because you can obtain what’s popularly called the “voice of the Gods” effect for announcing and narration. Using a highpass filter gets rid of the super-low-frequency p-pops, but the resonance adds a boost in the bass range above the nasty stuff, so the voice still sounds full and big (Fig. 5).
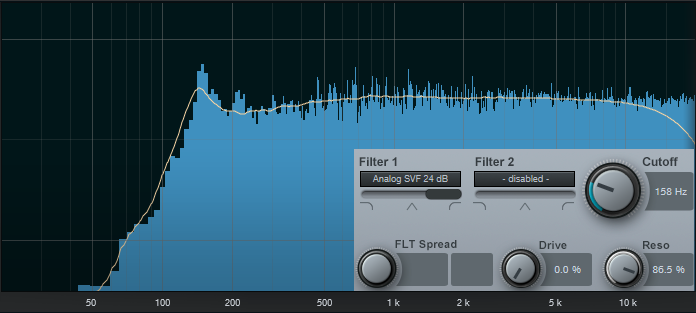
Figure 5: A high-pass filter with resonance can do wonders for narration.
It’s also possible to create responses that are just plain unusual, like this notch + double peak outside of the notch (Fig. 6). For some sound-design type wind sounds, drop the resonance to around 30%, and sweep the cutoff between 2 kHz and 6 kHz. Modulating randomly around a relatively low cutoff frequency can also give good rain and downpour sounds. Besides, who doesn’t like a curve that looks like Batman.
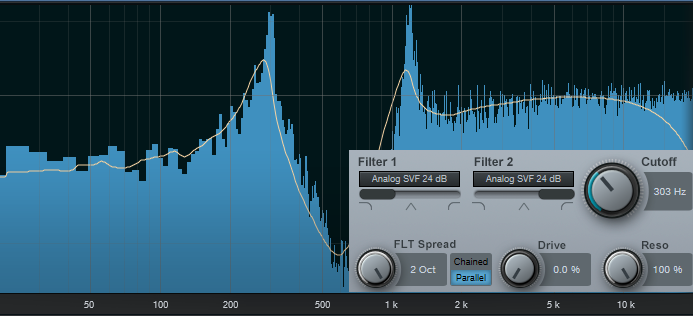
Figure 6: This unusual filter response has various uses for sound design.
Combining two different filter topologies can also give interesting results. Fig. 7 shows a ladder filter in parallel with a state variable filter, along with considerable amounts of resonance. If you really want to scope out this configuration’s flexibility, vary the Filter 2 slider to alter the topology, and/or vary the Filter Spread to change the offset between the two filter types. Of course, changing resonance alters the sound even further.
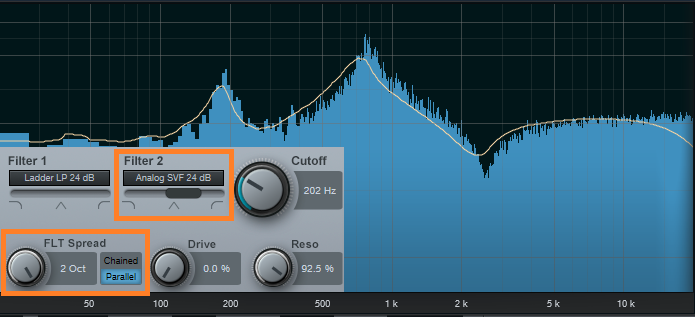
Figure 7: This filter configuration is in love with sound design and automation.
And finally…this is going to sound ridiculous, but bear with me. I often augment sampled female choir presets; octave lower sine waves mixed in subtly can give the illusion of a male choir combined with a female choir. But that’s not all—noise can be a powerful enhancer for choirs, and it’s possible to set the Autofilter to impart vocal-like qualities to pink noise.
For this application, the Zero Delay LP 24 dB is the filter of choice to insert after the Tone Generator’s pink noise output, because the filtering has a smooth kind of quality, even with high resonance. To concentrate the spectrum on voice, a Pro EQ follows the Autofilter to take off the highs and lows outside of the vocal range (Fig. 8).
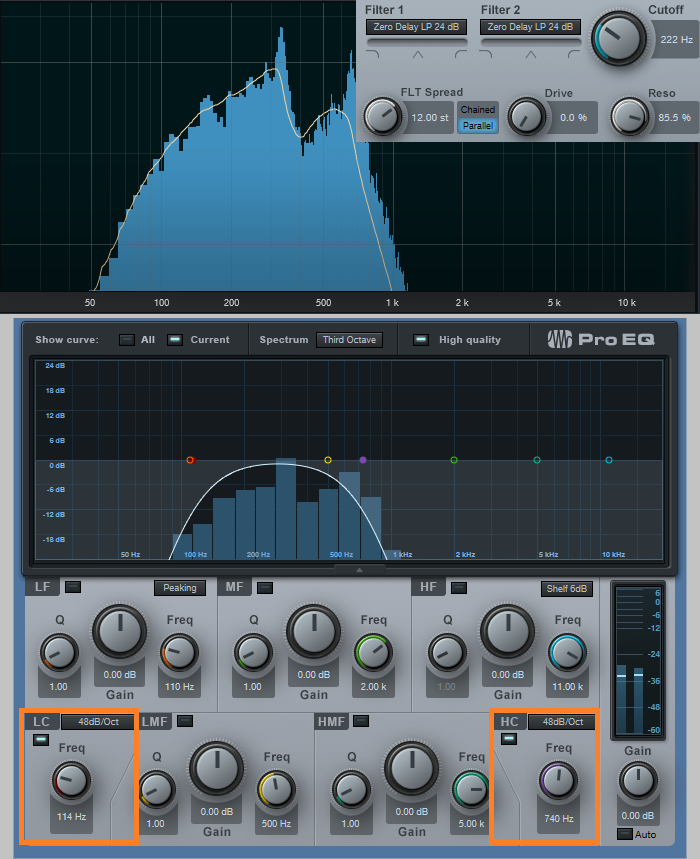
Figure 8: The Pro EQ shapes the pink noise into more of the vocal range.
Okay, now for the bummer: You can’t control the Autofilter cutoff, and therefore the pitch, with notes—only controllers. That’s not a problem if you just need a kind of pedal point choir addition; tune the cutoff to the desired pitch, and use volume automation to bring it in and out.
One workaround is to sample the resulting choir-like noise at different pitches, and load them into Sample One XT (or Impact XT) so you can create envelopes that match the envelope of whatever choir sound you’re using, and play the notes from a keyboard. The result is uncanny—in some ways, it makes a sampled choir sound more like a real choir than if it consisted only of samples. And finally, for sound design, don’t forget that filtered white noise can also augment crowd sounds.
Autofilter? Okay, yeah, well…I guess. But there’s a lot more to the story than just wah pedals and funk bass.
Grab a copy of Craig’s latest eBook here!
Friday Tips: In Praise of Saturation
Sure, everyone sorta knows about saturation. But let’s drill down, give some audio examples that really get the point across, and explain how saturation can help everything from individual tracks to master tapes. Really.
To be clear, we’re not talking about the distortion that “flat-tops” a waveform. Fig. 1 shows a comparison of unsaturated, saturated, and distorted versions of the same waveform (using version 4.5’s new “smooth” waveform view feature).
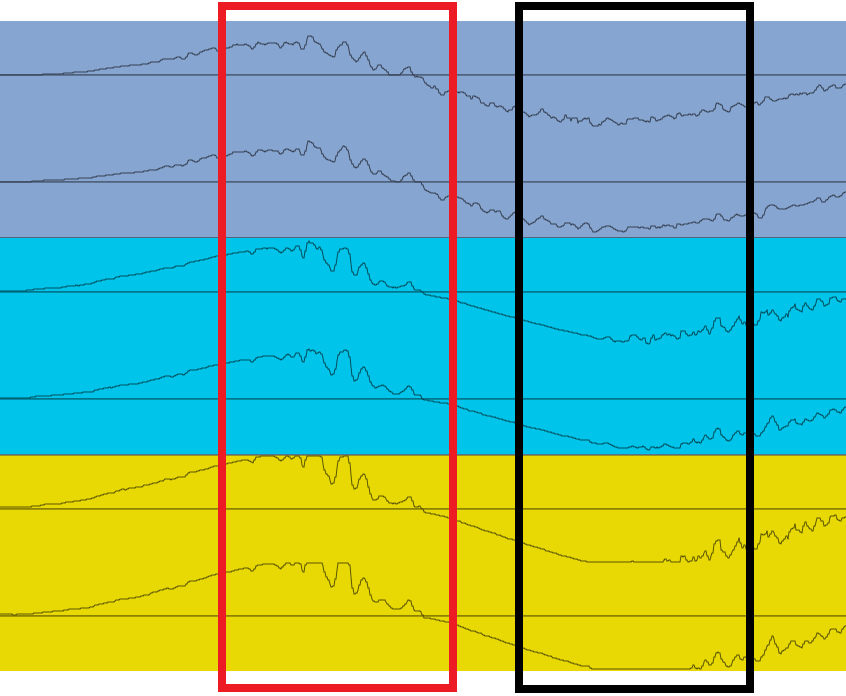
Figure 1: The gray waveform is unsaturated, the blue saturated, and the yellow distorted.
Comparing the three, in the section outlined in red, the saturated version is louder but the waveform isn’t all that different from the unsaturated audio. The distorted waveform is louder than the saturated one, but the peaks are flattened. This is particularly noticeable with the negative-going peak highlighted in black. Flattening peaks produces the kind of nasty digital distortion no one really likes, but saturation is a different animal…as the audio examples will show.
Before going any further, if you don’t have the free Softube Saturation knob, go to your PreSonus account and download it from Products > Add-Ons (Fig. 2).
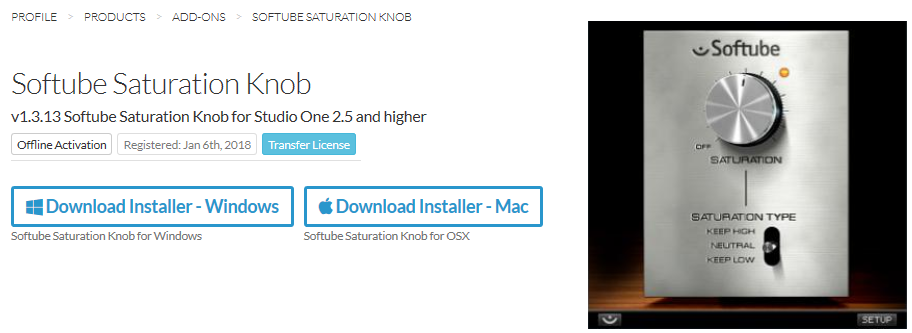
Figure 2: What are you waiting for? It’s free.
It’s a pretty basic module—turn the knob clockwise for more saturation (but I’ve never turned it up as high as shown in the picture!). Keep Low means it will apply more saturation to high frequencies, Keep High means more saturation for low frequencies, and Neutral means equal-opportunity saturation for all frequencies.
Saturation is great with drums, including mixed drums. You’ll get more punch and level (Fig. 3) that helps drums stand out in a track, without any of the artifacts (like pumping or breathing) associated with some dynamics processors.
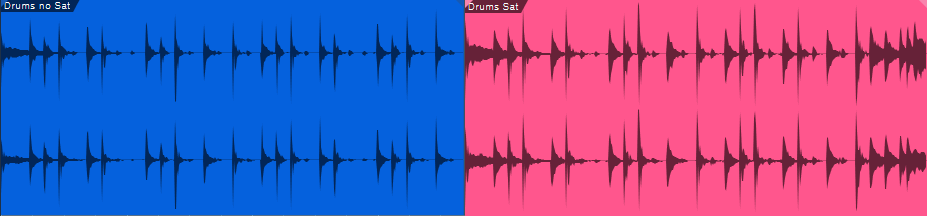
Figure 3: The waveform for the drums audio example. Unsaturated is blue, saturated is red.
Now listen to the audio example. The first four measures are the unsaturated version, the last four measures the saturated one. Note that both were normalized to the same peak value. Even though the waveforms don’t look all that different, the saturated version really punches through—yet doesn’t sound “distorted.” This same kind of approach can also work well for bass.
Now, let’s move on to saturating a two-track master. This may sound like a bad idea, until you realize that tape emulation plug-ins are basically just adding saturation, although some do it with a bit more finesse than a simple saturation plug-in (e.g., the Waves J37 provides different virtual tape formulations and bias settings). Fig. 4 shows the audio example’s waveform.

Figure 4: The two blue, four-measure groups are unsaturated; the two red, four-measure groups are saturated.
The audio example is excerpted/adapted from the song All Over Again (Every Day). I added a very slight pause between the unsaturated and saturated sections, although I’m quite sure you’ll hear the difference anyway. (To hear the final, mastered song—which of course was done in Studio One—click on the link.)
For this kind of application, you don’t want to apply too much saturation—a little bit goes a long way. As you turn up the knob you may think it’s not really making a difference, but it is. Toggle bypass frequently for a reality check. Fig. 5 shows the settings used for the master tape example.

And there you have it—we’ve done our shoutout for saturation. If you’ve missed out on the fun, load it in a track, and listen to what happens. You just might like what you hear!
End Boring MIDI Drum Parts!
I like anything that kickstarts creativity and gets you out of a rut—which is what this tip is all about. And, there’s even a bonus tip about how to create a Macro to make this process as simple as invoking a key command.
Here’s the premise. You have a MIDI drum part. It’s fine, but you want to add interest with a fill in various measures. So you move hits around to create a fill, but then you realize you want fills in quite a few places…and maybe you tend to fall into doing the same kind of fills, so you want some fresh ideas.
Here’s the solution: Studio One 4.5’s new Randomize menu, which can introduce random variations in velocity, note length, and other parameters. But what’s of interest for this application is the way Shuffle can move notes around on the timeline, while retaining the same pitch. This is great for drum parts.
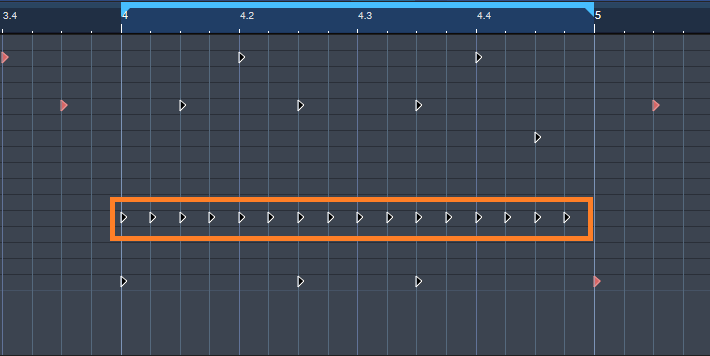
The following drum part has a really simple pattern in measure 4—let’s spice it up. The notes follow an 8th note rhythm; applying shuffle will retain the 8th note rhythm, but let’s suppose you want to shuffle the fills into 16th-note rhythms.
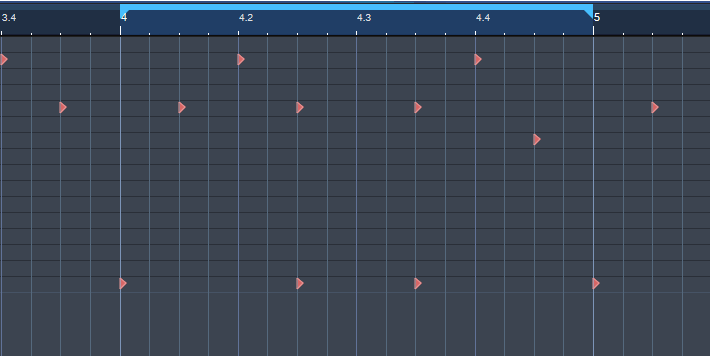
Here’s a cool trick for altering the rhythm. If you’re using Impact, mute a drum you’re not using, and enter a string of 16th notes for that drum (outlined in orange in the following image). Then select all the notes you want to shuffle.
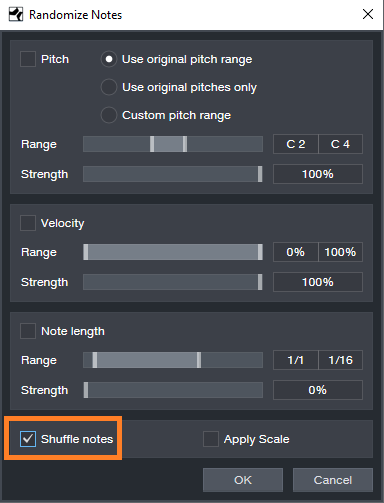
Go to the Action menu, and under Process, choose Randomize Notes. Next, click the box for Shuffle notes (outlined in orange).
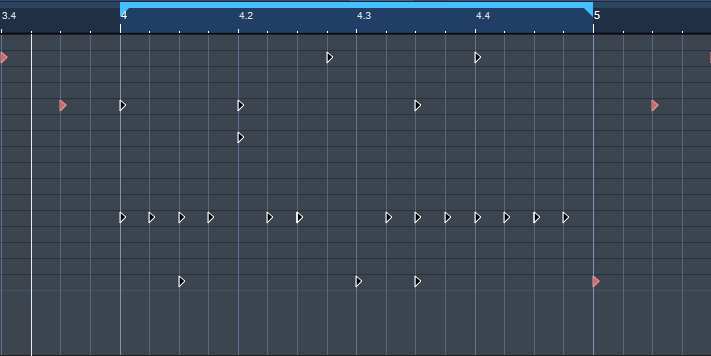
Click on OK, and the notes will be shuffled to create a new pattern. You won’t hear the “ghost” 16th notes triggering the silent drum, but they’ll affect the shuffle. Here’s the pattern after shuffling.
If you like what you hear from the randomization, great. But if not, adding a couple more hits manually might do what you need. However, you can also make the randomizing process really efficient by creating a Macro to Undo/Shuffle/hit Enter.
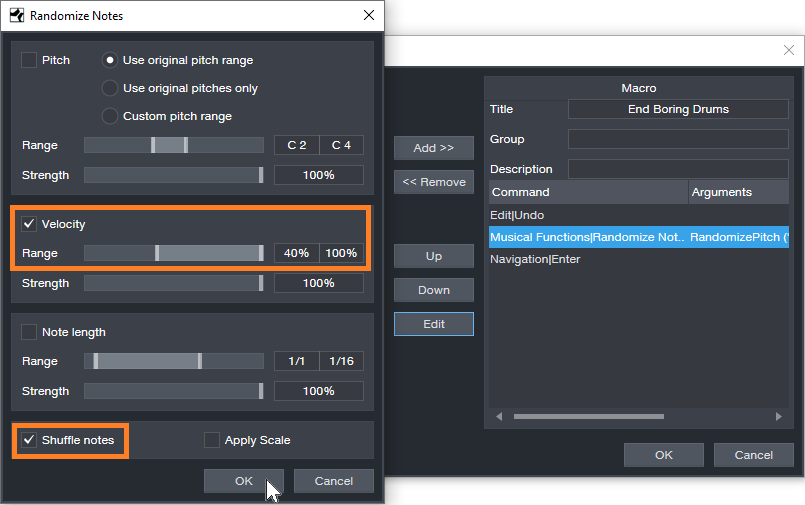
Create the Macro by clicking on Edit|Undo in the left column, and then choose Add. Next, add Musical Functions|Randomize. For the Argument, check Shuffle notes; I also like to randomize Velocity between 40% and 100%. The last step in the Macro is Navigation|Enter. Finally, assign the Macro to a keyboard shortcut. I assigned it to Ctrl+Alt+E (as in, End Boring Drum Parts).
With the Macro, if you don’t like the results of the shuffle, then just hit the keyboard shortcut to initiate another shuffle…listen, decide, repeat as needed. (Note that you need to do the first in a series of shuffles manually because the Macro starts with an Undo command.) It usually doesn’t take too many tries to come up with something cool, or that with minimum modifications will do what you want. Once you have a fill you like, you can erase the ghost notes.
If the fill isn’t “dense” enough, no problem. Just add some extra kick, snare, etc. hits, do the first Randomize process, and then keep hitting the Macro keyboard shortcut until you hear a fill you like. Sometimes, drum hits will end up on the same note—this can actually be useful, by adding unanticipated dynamics.
Perhaps this sounds too good to be true, but try it. It’s never been easier to generate a bunch of fills—and then keep the ones you like best.
Friday Tips: Testing, Testing!
Studio One has several analysis tools, and you can use them to learn a lot about how effects work. One of my favorite test setups is inserting the Tone Generator at the beginning of the Insert Device Rack to generate white noise (a test signal with equal energy throughout the audio spectrum), the Spectrum Meter at the end of the Rack, and the device under test in between them. Here’s the Tone Generator, set to generate white noise.

As one example of the benefits of testing gear, a lot of engineers like the gentle tone-shaping qualities of Pultec’s MEQ-5 midrange equalizer. So you need an MEQ-5 plug-in, or the hardware, to obtain that effect with Studio One…right? Maybe not.
One reason for the “sound” of Pultec equalizers is that they used passive circuitry, so the EQ curves were broad. But the Pro EQ can do gentle curves as well, simply by choosing a low Q setting. The screen shot shows Pro EQ settings for a “Pultec-like” curve, with a considerable amount of boost and cut.

But how much is it really like a Pultec? Let’s find out. Choose the same settings on the Pro EQ and on an MEQ-5, then run some white noise through both, using the Spectrum Meter’s FFT analysis.
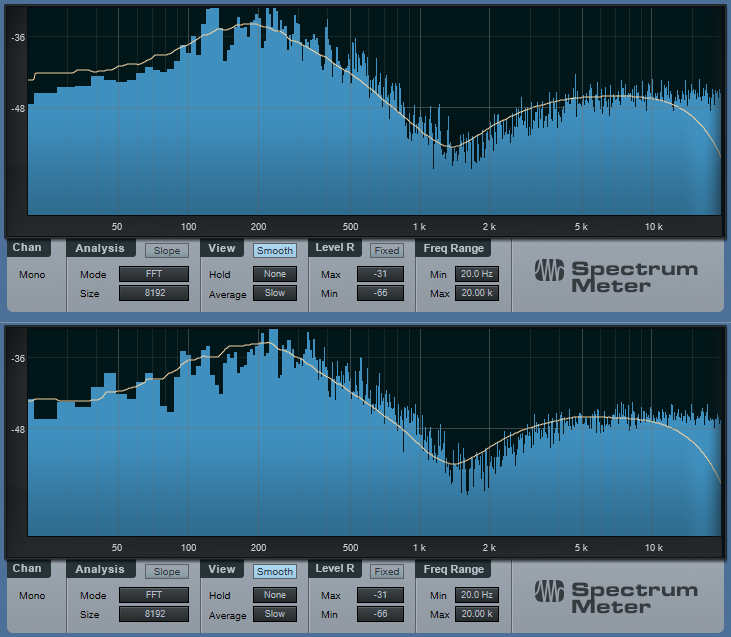
The white, smoothed line shows the average frequency response (white noise is changing constantly because it’s random, so in this case we want a smoothed, average reading). The top graph is the Pro EQ, and the bottom graph is the MEQ-5. Sure, there may be some subtle sonic differences due to the use of different filter topologies. But if you’re looking for those gentle, tone-shaping curves, the Pro EQ does just fine.
You can also find out exactly what’s going on with some effects. For example, Studio One has a phase shifter effect, and you probably know that phase shifting produces notches in the audio. But how deep are the notches? And how far apart are they? Let’s take a look.
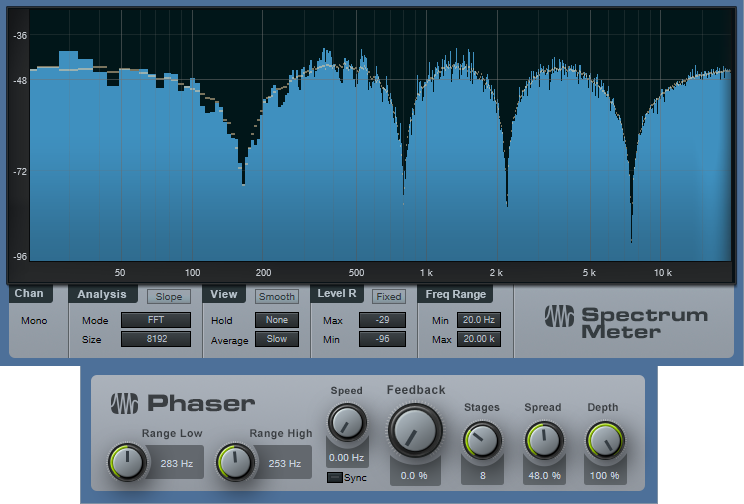
The Phaser is set to 8 stages, so there are 4 notches. For this measurement, we want to know the instantaneous value of the notches, so the average isn’t smoothed. With depth up full, the notches are around -35 dB or so.
While we’re at it, let’s check the frequency response of guitar cabinets, so we can find out why they sound so different from each other.
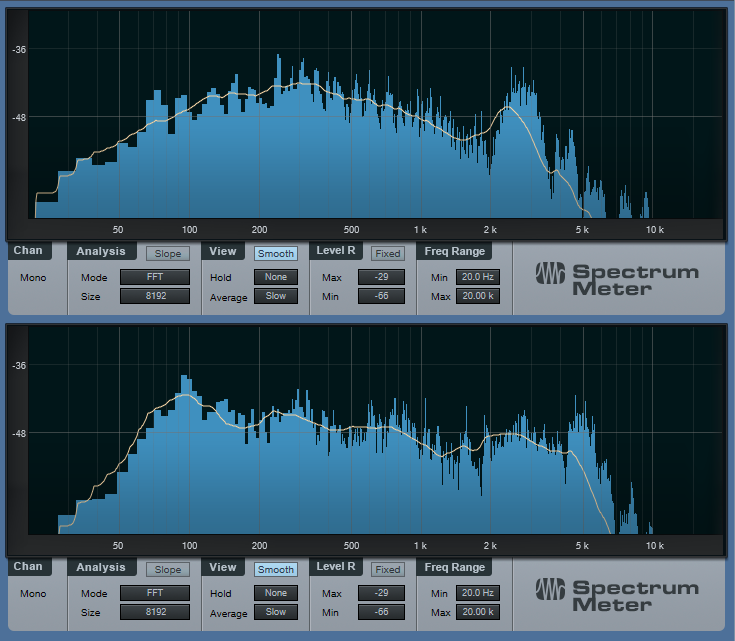
The upper image shows the response for a Mesa Boogie Mark IV cabinet. Note the prominent peak in the 3 kHz range, and the rolloff below 200 Hz—now you know why those solos can really cut through a mix. Compare that with the lower image of a 1965 Fender Princeton. It has a low end bump to give a full sound, a bit of a notch around 1.5 kHz, and has more high end above 5 kHz than the Mark IV.
As to why these readings matter, suppose you recorded a guitar part, and want it to have more of a Mesa Boogie vibe. Just tweak your EQ accordingly to approximate the curve.
Using white noise for testing can also show why SSL E-series and G-series EQ curves are different, the differences between standard and constant-Q parametric stages, what really happens when you move graphic EQ sliders around, and more. If you’re curious about scratching beneath the GUI of your effects, Studio One’s analysis tools can reveal quite a bit.
Friday Tips: The Air Machine
Boosting the highs a bit is a time-honored mixing and mastering technique. You don’t want to overdo it, but a little brightness can give a song a lift, increase vocal intelligibility, articulate instruments better, and add some welcome “ear candy.” If you look at the spectral energy of a lot of hit records going back decades, you’ll often find a few extra dB of boost in the 7 to 10 kHz range, to add some “air” and sweetness.
So just boost the EQ a little bit, right? Well, that’s one option…but we can do better. The Air Machine FX Chain (Fig. 1) is equally at home on individual tracks in the Song page (try it judiciously on drums, drum room mics, acoustic guitar, piano, vocals, etc.), or on finished mixes in the Project page. And yes, there’s a download at the end so you don’t even have to create this yourself.
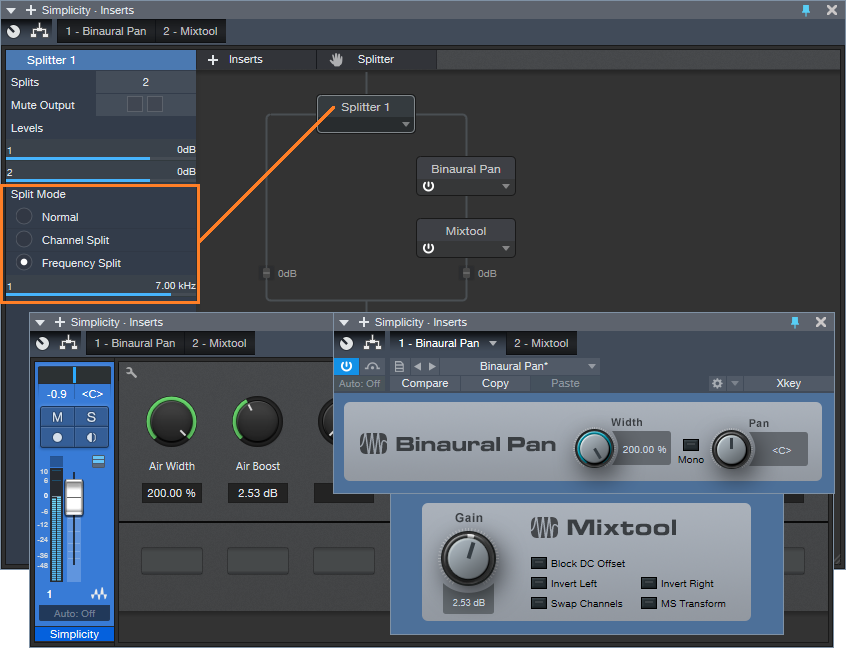
Figure 1: The Air Machine modules.
Here’s how it works. By choosing the Splitter’s Frequency Split mode (outlined in orange), the Splitter acts as a crossover that sends the high frequencies through the right-hand split. The default crossover frequency is 7 kHz, but we’ll have more to say about this later.
The high frequencies then go through the Binaural Pan processor, which spreads out the stereo imaging. Because high frequencies are very directional, this not only increases the sense of “air,” but the feeling of space. Then, the Mixtool adds the appropriate amount of high-frequency boost.
As to assigning controls to the FX Chain, see Fig. 2.

Figure 2: Under the hood of the Air Machine FX Chain.
The Air Width parameter alters the Binaural Pan Width parameter over its full range. The Air Boost control sweeps from no boost (0 dB Gain on the Mixtool) up to a maximum of about 6 dB. You really don’t want to go any higher than that.
The one control I couldn’t put in the FX Chain was the Splitter’s crossover frequency, so you may want to open up the FX Chain to alter this. The higher the frequency, the more boost you can apply without the high frequencies becoming overbearing. Sometimes, though, you might want to bring the crossover frequency down to 5 kHz or so if you want a more pronounced effect…or even up to 10 kHz for just a light dusting of high frequencies.
Yes, it really is that simple. And yes, the effect is best when used subtly. But try it—I think there’s a chance this may end up becoming one of your favorite FX Chains.
Download the Air Machine FX Chain here.
Friday Tips: Attack that Autofilter!!
Studio One’s Autofilter has a sidechain, which is a good thing—because you can get some really tight, funky sounds by feeding a drum track’s send into the Autofilter’s sidechain. Then, use the Autofilter’s sidechain to modulate a track’s audio in time with the beat. Funky guitar, anyone?
But (there’s always a “but,” or there wouldn’t be a Friday Tip of the Week!), although this is a cool effect, a real wah pedal doesn’t start instantly in the toe-down position before sliding back to the heel-down position. Your foot moves the pedal forward, then back, and it takes a finite amount of time to do both.
The “decay-only” nature of autofilters in general is certainly useful with drums. After all, drums are a percussive instrument, and a percussive filter sweep is usually what you want. But the other day I was working on a song, and really wanted an attack/decay filter effect that was more like a real wah pedal—where the filter moved up to the peak, before moving back down again. Here’s the result.
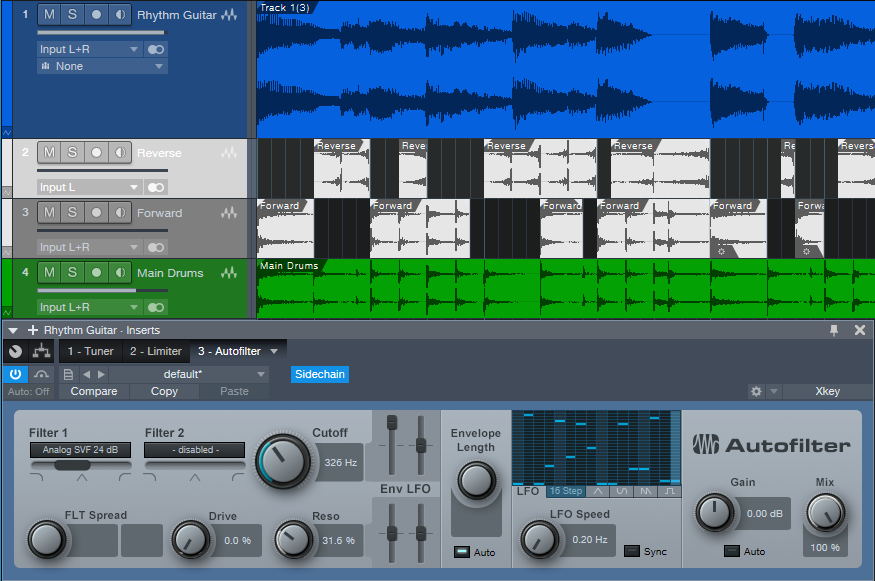
On the Autofilter, ctrl+click on the LFO sliders to zero them out, so that the LFO isn’t adding its own signal (although of course, you can do that if you want—the 16 Step option is particularly useful if you do). The screen shot gives a good idea of a typical initial setting.
The dark blue track is the guitar, and the green track, the drum part. I often cut up tracks are that modulating other tracks, and Track 3—a copy of the main drum track—is no exception. This track’s pre-fader send goes to the Autofilter’s sidechain input. The track’s channel fader is down, so that the audio doesn’t go through the mixer. We’re using this track only to provide a signal to the Autofilter’s sidechain.
Track 2 is a reversed version of the drum part. It also has a pre-fader send that goes to the Autofilter sidechain (conveniently, you don’t need to bus signals together to send signals from multiple tracks into a Studio One effect’s sidechain). Like Track 3, the track’s channel fader is down, so that the audio doesn’t go through the mixer
The end result is that the reversed drums provide an attack time that sweeps the filter up, while the forward drums provide a decay that sweeps the filter down. So is the sound more animated than using only the forward drum part? Listen to the audio example, and decide for yourself. The first section uses the forward trigger only, while the second section adds in the attack trigger—the effect is particularly noticeable toward the end.
Friday Tips: How to Normalize Comped Takes
Comping’s goal is to piece together the best parts of multiple Takes (vocals, guitar, etc.) into a single, cohesive part. This involves Studio One’s loop recording, which repeats a section of music over and over during a looped section. You record another Take during each pass, while previous Takes are muted. Doing multiple takes without having to stop lets you get comfortable, and try different approaches. Once you have multiple versions, you audition and select the best sections.
However, when auditioning the Takes to decide which sections are best, it’s helpful to compare levels that are as similar as possible. Normalization is the right tool for this—but while it’s not yet possible to normalize individual Takes, there’s a simple solution.
- Right-click on the main, parent Track for the Takes and choose Unpack Layers to Tracks (Fig. 1).

Figure 1: The four Takes right immediately below the parent vocal have been unpacked into four Tracks (color-coded blue).
- Next, select all the audio in the new Tracks.
- Type Ctrl+B and then Alt+N. This normalizes all the Tracks.
- Right-click on each Take’s audio and choose Delete (do not delete the Take itself; see Fig. 2).
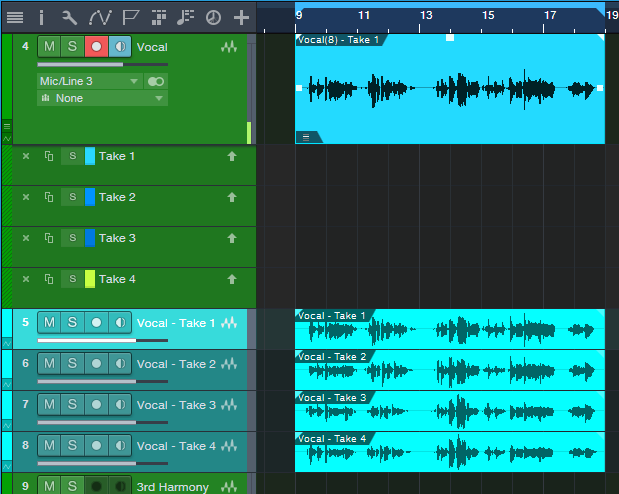
Figure 2: The Takes have been deleted. The four normalized tracks are below.
- Select the audio in the new Tracks.
- Drag the audio from the new Tracks up, so that they replace where the Takes were (Fig. 3).
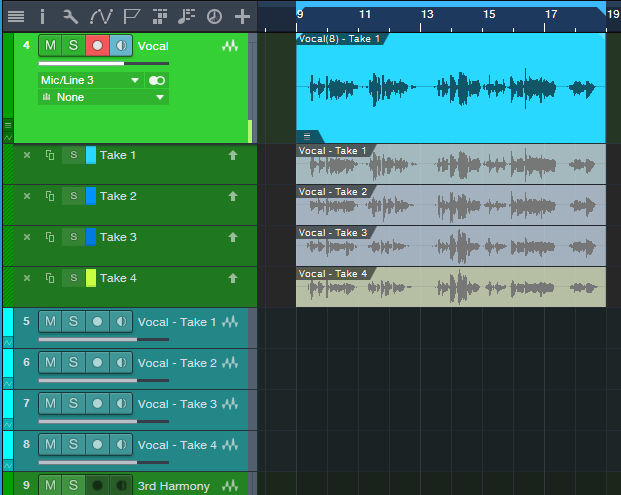
Figure 3: The normalized Track audio now occupies the Take Lanes.
- The empty Tracks are no longer needed, so remove them.
- And that’s all there is to it—now you can take advantage of Studio One’s Take-oriented comping tools, as well as the Listen tool (keyboard shortcut 8), with normalized audio.
Friday Tips: The Center Stage Reverb
If you’ve ever played a large venue like a sports arena, you know that reverb is a completely different animal than what the audience hears. You hear your instrument primarily, and in the spaces between your playing, you hear the reverb coming back at you from the reflections. It might seem that reverb pre-delay would produce the same kind of effect, but it doesn’t “bloom” the way reverb does when you’re center stage in a big acoustical space.
This week’s tip is inspired by the center stage sound, but taken further. The heart of the effect is the Expander, but unlike last week’s Expander-based Dynamic Brightener tip, the Expander is in Duck mode, and fed by a sidechain. Here’s the Console setup.
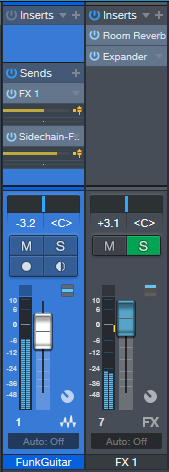
In the audio example, the source is a funk guitar loop from the PreSonus loop collection; but any audio with spaces in between the notes or chords works well, especially drums (if the cymbals aren’t happening a lot), vocals that aren’t overly sustained, percussion, and the like. I deliberately exaggerated the effect to get the point across, so you might want to be a little more tasteful when you apply this to your own music. Or maybe not…
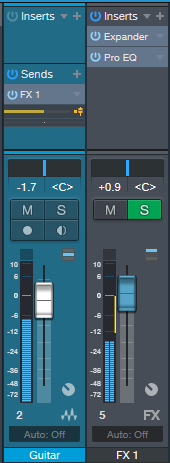
The guitar’s channel has two sends. One goes to the FX Channel, which has a Room Reverb followed by an Expander. The second send goes to the Expander’s sidechain input. Both are set pre-fader so that you can turn down the main guitar sound by bringing down its fader, and that way, you can hear only the processed sound. This makes it easier to edit the following Room Reverb and Expander settings, which are a suggested point of departure. Remember to enable the Expander’s Sidechain button in the header, and click the Duck button.
The reverb time is long—almost six seconds. This is because we want it going constantly in the background, so that after the Expander finishes ducking the reverb sound, there’s plenty of reverb available to fill in the spaces.
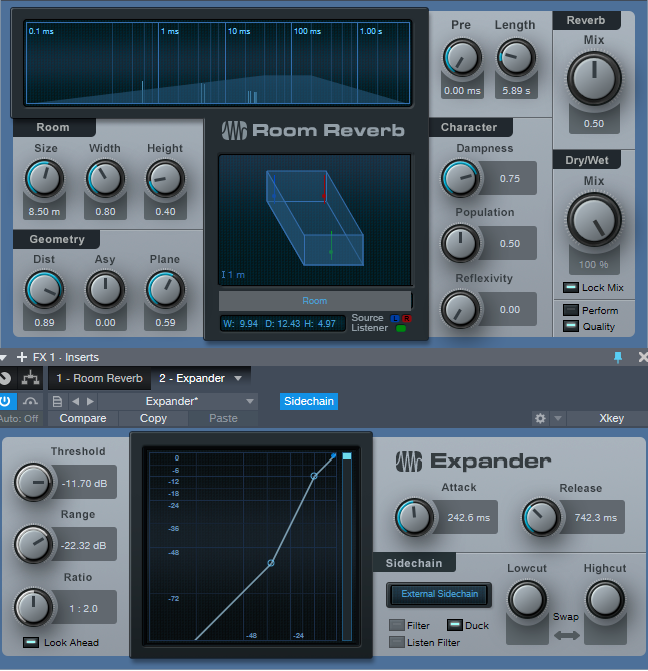
To tweak the settings, turn down the main guitar channel so you can monitor only the processed sound. The Expander’s Threshold knob determines how much you want the reverb to go away when the instrument audio is happening. But really, there are no “wrong” settings—start with the parameters above, play around, and listen to what happens.
This is a pretty fertile field for experimentation…as the following audio example illustrates. The first part is the guitar and the reverb effect; the reverb tail shows just how long the reverb time setting is. The second part is the reverb effect in isolation, processed sound only, and without the reverb tail.
This is a whole different type of reverb effect—have fun discovering what it can do for you!
Friday Tips: The Dynamic Brightener for Guitar
When you play an acoustic guitar harder, it not only gets louder, but brighter. Dry, electric guitar doesn’t have that quality…by comparison, the electrified sound by itself is somewhat lifeless. But I’m not here to be negative! Let’s look at a solution that can give your dry electric guitar some more acoustic-like qualities.
How It Works
Create an FX Channel, and add a pre-fader Send to it from your electric guitar track. The FX Channel has an Expander followed by the Pro EQ. The process works by editing the Expander settings so that it passes only the peaks of your playing. Those peaks then pass through a Pro EQ, set for a bass rolloff and a high frequency boost. Therefore, only the peaks become brighter. Here’s the Console setup.
The reason for creating a pre-fader send from the guitar track is so that you can bring the guitar fader down, and monitor only the FX Channel as you adjust the settings for the Expander and Pro EQ. The Expander parameter values are rather critical, because you want to grab only the peaks, and expand the rest of the guitar signal downward. The following settings are a good point of departure, assuming the guitar track’s peaks hit close to 0.
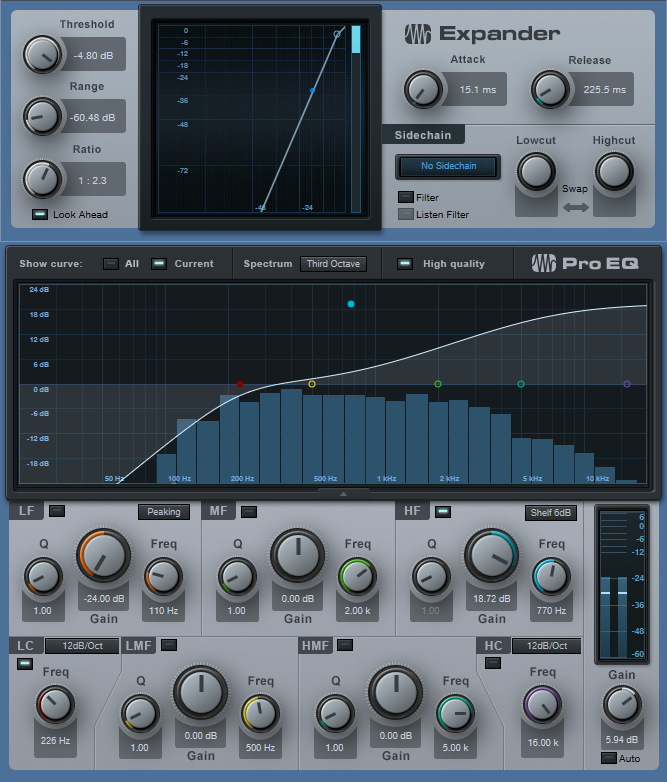
The most important edit you’ll need to make is to the Expander’s Threshold. After it grabs only the peaks, then experiment with the Range and Ratio controls to obtain the sound you want. Finally, choose a balance of the guitar track and the brightener effect from the FX Channel.
The audio example gets the point across. It consists of guitar and drums, because having the drums in the mix underscores how the dynamically brightened guitar can “speak” better in a track. The first five measures are the guitar with the brightener, the next five measures are the guitar without the brightener, and the final five measures are the brightener channel sound only. You may be surprised at how little of the brightener is needed to make a big difference to the overall guitar sound.
Also, try this on acoustic guitar when you want the guitar to really shine through a mix. Hey, there’s nothing wrong with shedding a little brightness on the situation!
Friday Tips: Crazee Snare Enhancements!
You never know where you’ll find inspiration. As I was trying not to listen to the background music in my local supermarket, “She Drives Me Crazy” by Fine Young Cannibals—a song from over 30 years ago!—earwormed its way into my brain. Check it out at https://youtu.be/UtvmTu4zAMg.
My first thought was “they sure don’t make snare drum sounds like those any more.” But hey, we have Studio One! Surely there’s a way to do that—and there is. The basic idea is to extract a trigger from a snare, use it to drive the Mai Tai synth, then layer it to enhance the snare.
Skeptical? Check out the audio example.
ISOLATING THE SNARE
If you’re dealing with a drum loop or submix, you first need to extract the snare sound.
- Create an FX Channel, and insert a Pro EQ followed by a Gate.
- Add a pre-fader send from your mixed drums to the FX Channel. Aside from providing a more consistent level for triggering, a pre-fader send lets you turn down the main drum track. This way you hear only the FX Channel, which makes it easier to tweak the EQ and isolate the snare.
- With the Gate bypassed, tune the Pro EQ to the snare frequency. Use the LC and HC with a 48 dB/octave slope to provide the preliminary isolation, then use a super-sharp bandpass setting to zero in on the snare frequency (Figure 1). The EQ’s background spectrum analyzer can help by making sure the bar in the range you’re boosting goes as high as possible. In stubborn cases, you may need to double up the bandpass filter with a second sharp bandpass filter.
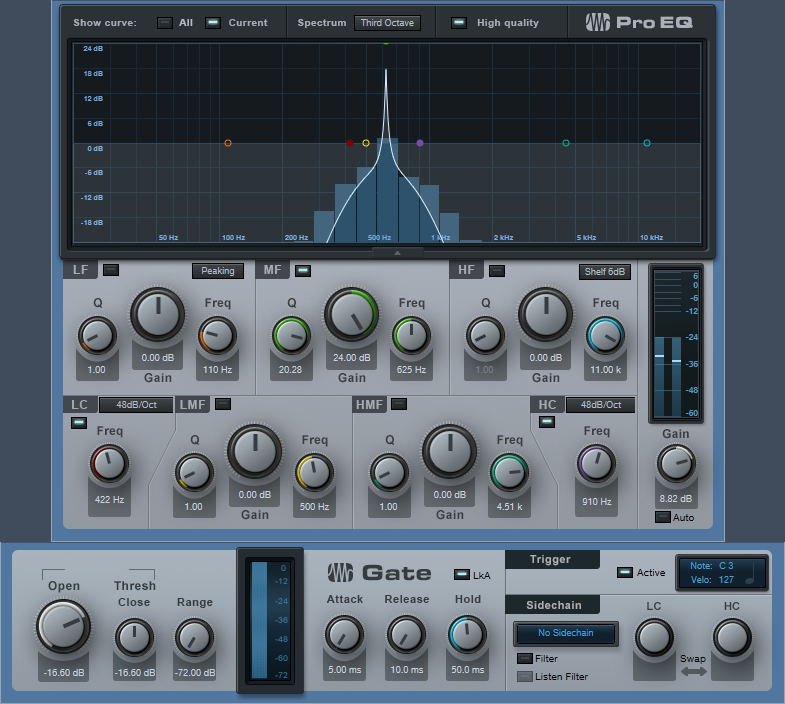
Figure 1: Use the Pro EQ and Gate to extract a snare drum trigger.
- Enable the gate, and click on Active to enable the trigger output. Set the Note and Velocity as desired (however when using noise with Mai Tai, the specific Note isn’t that critical). Adjust the Gate’s settings so that it triggers on the snare hits. Like the Pro EQ, the controls here are critical as well.
- A short attack is usually best.
- Keep release relatively short (e.g., 10 ms), unless you want to mix in some of the peaked/gated sound from this channel along with the Mai Tai and drums.
- Hold times around 50 ms can help prevent false triggering. But you can also get creative with this control. If you don’t want to trigger on hits that are close together (e.g., fills), a long Hold time will trigger on the first snare of the series, but ignore subsequent ones that fall within the hold time.
- Insert the Mai Tai. Set its input to Gate, and enable the mixer’s Monitor button. Figure 2 shows the finished track layout.

Figure 2: Track layout for snare drum extraction.
TWEAKING THE MAI TAI
Now the fun begins! Figure 3 shows a typical starting point for a snare-enhancing sound.
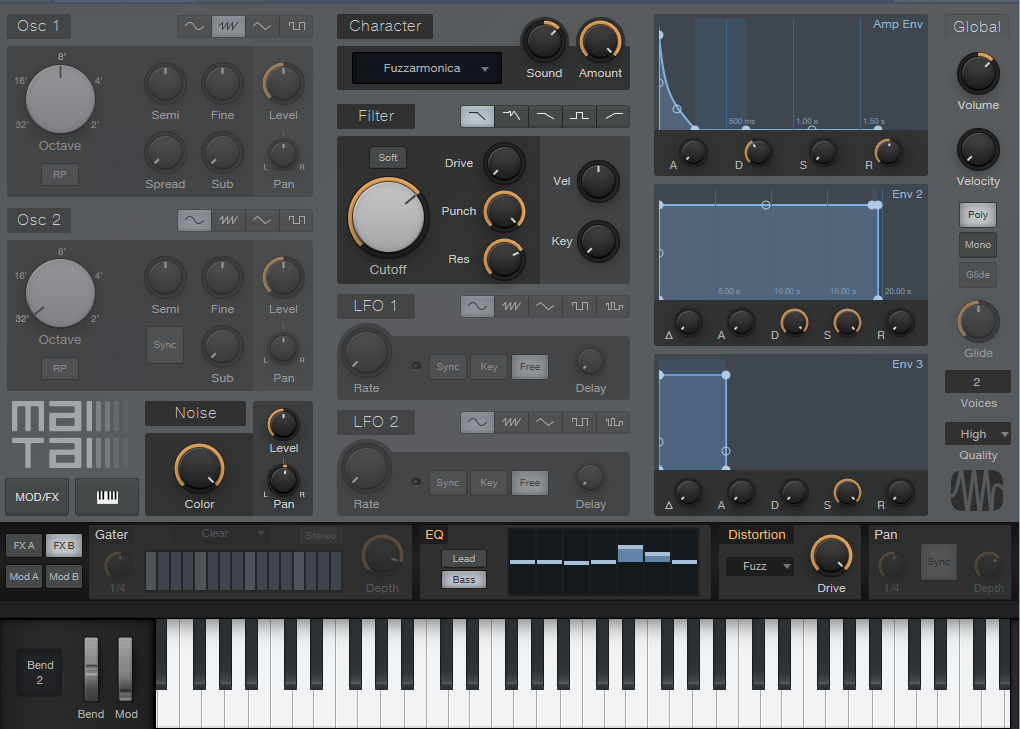
Figure 3: Starting point for a cool snare drum sound with Mai Tai.
The reason for choosing Mai Tai as the sound source is because of its “Character” options that, along with the filter controls, noise Color control, and FX (particularly Reverb, EQ, and Distortion), produce a huge variety of electronic snare sounds. The Character module’s Sound and Amount controls are particularly helpful. The more you play with the controls, the more you’ll start to understand just how many sounds are possible.
BUT WAIT…THERE’S MORE!
If the snare is on a separate track, then you don’t need the Pro EQ or FX Channel. Just insert a Gate in the snare track, enable the Gate’s trigger output, and adjust the Gate Threshold controls to trigger on each snare drum hit. The comments above regarding the Attack, Release, and Hold controls apply here as well.
Nor are you limited to snare. You can isolate the kick drum, and trigger a massive, low-frequency sine wave from the Mai Tai to give those car door-vibrating kick drums. Toms can sometimes be easy to isolate, depending on how they’re tuned. And don’t be afraid to venture outside of the “drum enhancement” comfort zone—sometimes the wrong Gate threshold settings, driving the wrong sound, can produce an effect that’s deliciously “right.”