Tag Archives: Craig Anderton
Komplete Kontrol Integration in Studio One, Part 1/3
Studio One 4.53 introduced integration with Native Instruments’ Komplete series of keyboards, which is a big deal. Although these keyboards are theoretically dedicated to NKS-compatible plug-ins and mixer/transport hands-on control, with Windows systems (Mac fans, there’s more on this later) you can use the keyboard as a general-purpose, hands-on MIDI controller for non-NKS plug-ins, including all bundled PreSonus effects and instruments (as well as plug-ins from other manufacturers). Also, unlike standard NKS, you’ll be able to control effects, regardless of whether or not they’re inserted in an instrument track.
There’s a lot to cover, and since this is more like a tutorial than a tip, it’s split into three parts: DAW control with Studio One, creating custom templates for plug-ins, and how to apply the templates in your workflow.
INTEGRATING THE KEYBOARD
Choose Studio One > Options > External Devices, and click Add. Scroll to the entry for Native Instruments, unfold it, and select either your A/M or S series keyboard for Receive From and Send To. I’m using an S49 (Fig. 1).
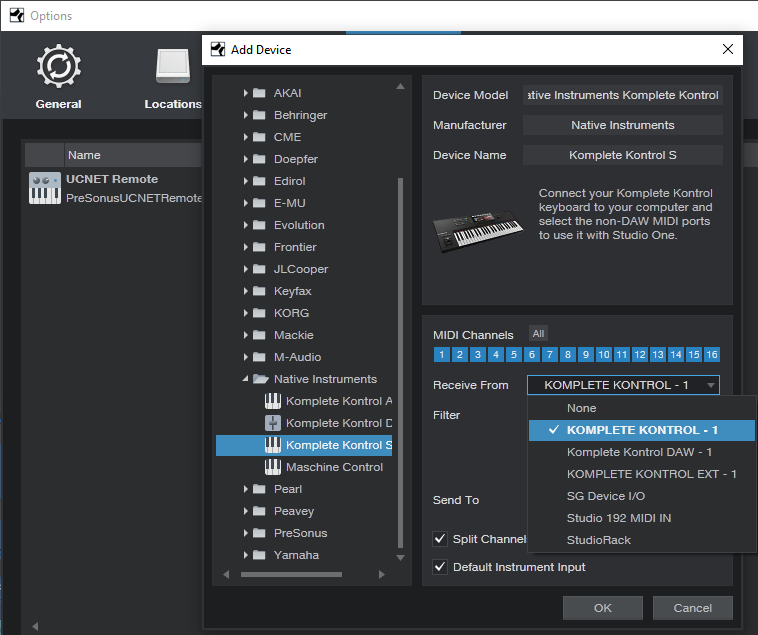
Figure 1: Komplete is selected as the keyboard, with Split Channel selected for more convenient use with multitimbral instruments, like IK Multimedia’s Syntronik.
INTEGRATING THE CONTROL SURFACE
Now let’s set up the Komplete keyboard as a new control surface. Again, choose Studio One > Options > External Devices, click Add, and scroll down to the entry for Native Instruments. Unfold it, and select Komplete Kontrol DAW – 1 for both Receive From and Send To (Fig. 2).
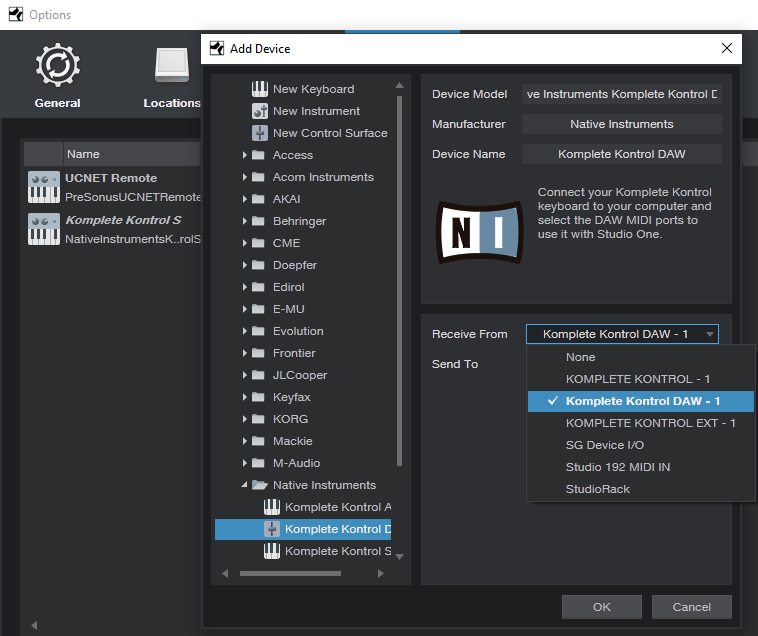
Figure 2: How to add the Komplete keyboard as a control surface for DAW integration.
CHOOSING THE MODE OF OPERATION
To edit NKS plug-ins, press the PLUG-IN mode button in the keyboard’s cluster of six buttons, toward the upper right. Controls that don’t relate to a synth or effect, such as the Transport, Metronome, Tape Tempo, and the like remain active. When it’s time to mix and you want full integration with Studio One’s mixer, press the MIXER button.
The following describes how the control surface for the current S-series Mk2 keyboards integrates currently with Studio One; click here for information from PreSonus on suitability with other NI keyboards, and updates.
Transport. The Play, Rec, and Stop buttons do what you’d expect, but there’s more to the story than that—there are several nuanced options. The following assumes you’re starting from a stopped transport.
- Press Play to begin from the Play Start marker. If there’s no Play Start marker, playback starts from the cursor’s current position. If you stop and re-initiate playback, playback re-starts from the cursor’s original position.
- Return to zero: When the transport is stopped, press Stop again to return to zero.
- Pushing on the big navigation knob toward the right initiates playback from the Play Start marker. (Note that this involves pushing downward into the knob, not left/right or up/down.) If there’s no Play Start marker, playback begins from the Loop Start, whether the loop is active or not.
- Push downward on the navigation knob during playback to jump to the Loop Start, which resumes playback automatically from there.
- Pressing Shift+Play operates the same way as using the navigation knob for playback control.
- With any scenarios involving the Play Start marker, it doesn’t matter if it’s before or after the Loop Start, or within the loop itself.
- Press Rec to initiate or punch-in recording. Press again to end or punch out recording. If you don’t record audio or MIDI while recording is active, there’s no blank event—it’s like nothing ever happened.
- Shift+Rec toggles the count-in between on and off. When you press Shift and count-in is enabled, the Rec button letters light bright red. Otherwise, the rec button letters are dimmed.
- Loop toggles the loop between on and off. To move the loop (whether enabled or not), hold the Loop button down, and rotate the navigation knob. For example, if the loop extends for four measures, moving the knob 1 click clockwise moves the loop forward to the next four measures. Moving the knob 1 click counter-clockwise moves the loop backward to the previous four measures.
- Metronome toggles between on and off.
Mixer
- The display for each visible channel shows the channel’s name, fader level, pan, metering (but not overloads), and status of a channel’s Record, Solo, and Mute buttons.
- Track select buttons. The eight buttons above the display select a track, however, moving the navigation dial left or right moves from one track to the adjacent track (left or right respectively).
- Hold Mute, and then select a channel with its track select button, to mute/unmute. The keyboard’s corresponding select button glows yellow.
- Hold Solo, and then select a channel with its track select button, to solo/unsolo. The keyboard’s corresponding select button glows blue.
- Shift+navigation knob move down (not push inward) selects level for the selected track. This mode remains selected until changed. Both the associated track knob, and the navigation knob, alter the selected track’s level. Holding Shift while moving either knob provides finer resolution. The individual track knobs provide the finest resolution.
- Shift+navigation knob move up (not push inward) selects pan for the selected track. This mode remains selected until changed. Similarly to level selection, both the track knob and navigation knob alter the selected track’s pan, and holding Shift while moving either knob provides finer resolution. The individual track knobs provide the finest resolution. Note: The Pan control for the Main channel is always shown panned full left. You can ignore this, because the Main channel doesn’t have a pan control anyway. The pan is centered properly.
- Auto toggles between Read and Touch (write) automation for the selected track. Be aware that you can’t choose automation off with Auto.
- Left/right arrow buttons select channels in groups of 8. However, if the last bank of eight has fewer than eight channels, the display will fill with the last eight channels. For example, if you expect the last bank to be channels 17-24 but only 22 channels are in use, the keyboard will display channels 15-22. This is by design, because it makes sure there aren’t any blank channels—you can always see eight channels at a time. If you hit the left arrow button, it won’t go back to channel 9, but be offset by the same amount as the previous bank. To “reset” the banks, hit the left arrow button until you’re back at the beginning.
Miscellaneous Functions
- Undo and Redo. For Redo, hold Shift and press Undo.
- Quantize. This quantizes whatever is selected, at the current quantize value.
- Tap this, even if not lit, for tap tempo. I love this feature when starting a song.
This takes care of the mixer and transport functions. Next week, we’ll cover how to create custom MIDI control setups using the Komplete Kontrol application, and that will prepare us for Part 3, which describes how to create “faux NKS” control surface capabilities for PreSonus instruments and effects. Yes, it really is possible…
How to Play Faster—By Playing Slower
In the comments for last week’s tip on varipseed-type formant changes, reader Randy Hayes asked if it was possible to change the tempo similarly so that you could play along with something at a slower tempo, then speed it back up (while still being the correct key). This was a common technique with tape, but because pitch and speed were locked together, there would be formant changes—whether you wanted them or not—when you returned the slowed-down track to pitch.
One of the MIDI’s great features is that you can sloooooooow down the tempo, play along with the slowed-down track, then speed it up to make it seem like you have lightning-fast technique. The good news is that with audio, you can slow down Studio One’s tempo without changing pitch, which sounds great in theory. The bad news is that this isn’t always a painless solution, because Events recorded at a slower tempo will likely need to be time-stretched when you return to the original tempo, and you may also need to call up the Inspector for Events or Tracks to specify how the Events should relate to tempo. Also, if there’s a Tempo Track with tempo changes, then you have to offset all the tempo data, as well as make sure you restore it to the proper tempo when you’re done.
Fortunately, there’s an easy way to record along with a song at a slowed-down tempo, and have the correct timing for the recorded part when you restore the song to its original tempo. This complements last week’s formant-changing trick; the technique starts off similarly but ends up quite differently.
- Create a premix of your existing tracks with the Export Mixdown function. In the dialog box, check Import to Track and Close after Export (Fig. 1; outlined in white).
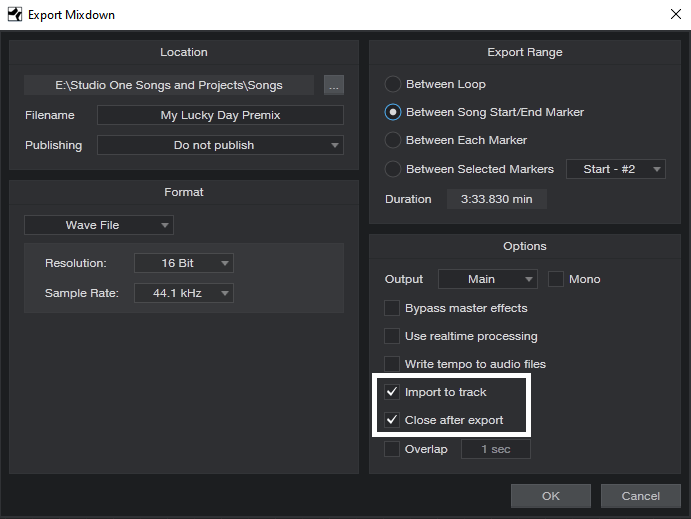
Figure 1: Use the Export Mixdown function to create a premix.
- After the premix is imported, mute all other tracks except for the Imported premix track.
- Select the premixed track, and right-click on it (Fig. 2), or open its Inspector (F4), to access the Speedup parameter. Note that this parameter can also slow down the speed, by entering a value less than 1.00.
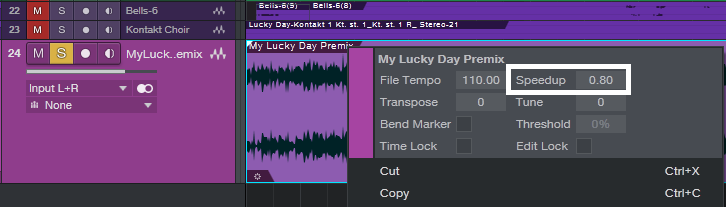
Figure 2: Access the Speedup parameter by right-clicking on the premix.
- Slow down the premix to the desired tempo with the Speedup parameter. For example, a Speedup reading of 0.80 means the song’s tempo is 80% as fast as it had been previously. Bear in mind that you can’t do a ridiculous amount of slowing down without affecting the audio quality of the track you’re recording, but overall, Studio One is quite forgiving.
- Record the new track as you listen to the premix’s slowed-down tempo.
- Before restoring the original tempo, the track you recorded has to start at the song’s beginning. If that’s where you started recording, fine. Otherwise, use the Paint tool to draw an Event between the start of the song and the start of your part, select them both, and type Ctrl+B to merge them together (Fig. 3).
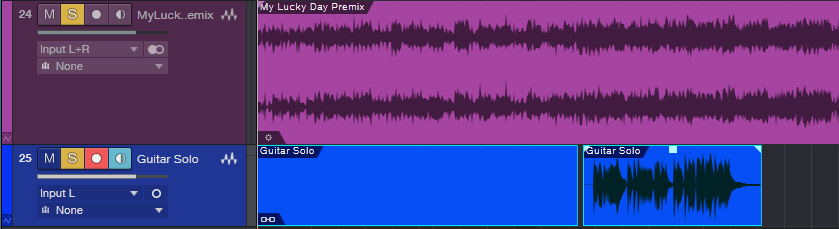
Figure 3: The recorded guitar solo, with an added “dummy” Event that starts at the beginning of the song, prior to merging them together.
- Now, right-click on the overdub you recorded so you can access its Speedup parameter.
- Open up your calculator to determine how much you need to speed up the overdub. Divide 1 by the slowdown amount to obtain the correct Speedup amount. For example, if you slowed down to 0.80, then 1/0.80 = 1.25. So, set the recorded track’s Speedup parameter to 1.25 (Fig. 4).
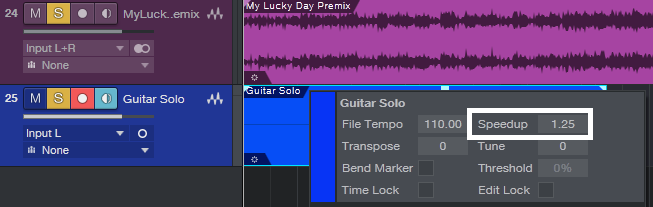
Figure 4: Once the newly recorded track goes to the start of the song, change the Speedup parameter to compensate for the slowdown.
- Delete the premix (or mute it if you plan to do more recording at the slower tempo), and unmute the other tracks. The part you recorded should now match the Song’s overall tempo, even if there are tempo changes.
Note that any vibrato will be sped up when you restore the new part to the original tempo. This may be something you want, but if not, just remember to apply a slower vibrato than usual. Also, the timing will be tighter—a note that’s off the beat by a bit will hit closer to the beat when sped up.
Sure, some people might think this is cheating. But back when recording studios started adding EQ or reverb to vocalists, that was considered cheating too. The technique is the skill with which we use our tools, and having “Studio One technique” can be just as important—and valid—as having technique on your chosen instrument.
Just remember, all that matters about music is the emotional impact on the listener. They don’t care what you did to produce that emotional impact!
Varispeed-Type Formant Changes
Back in the days of tape, when dinosaurs ruled the earth and gas station attendants checked your oil, variable-speed tape recorders allowed changing the pitch of all the tracks with a single control. This was useful for many applications. The most common were speeding up masters a bit to make them a little brighter and tighter, doing tape flanging, and perhaps the most popular, changing vocal formants. If you transposed the recorder’s pitch down a little bit, recorded a vocal as you sang along with the lower pitch, and then transposed back up again on playback, the vocal formant would be higher and brighter. Similarly, for a darker, warmer sound, you could transpose up, sing along with that, and transpose back down again. The same principle worked with other instruments, but vocals were the most popular candidates for this technique.
The main limitation (although it could also be an advantage in some situations) is that the tempo and pitch were interdependent—a higher pitch meant a faster speed, and a lower pitch, a slower speed. This was useful for masters, because you could speed up and brighten a track by upping the speed by 2% or so. The Friday tip for June 8, 2018 covered how to emulate true, variable speed tape effects when working on a final stereo mix.
A major advantage of today’s digital audio technology is that pitch and tempo can be independent, and one of Studio One’s attributes is that the audio engine retains its sound quality with reasonable pitch changes (e.g., a few semitones). This makes it very easy to do the old tape trick of changing vocal formants; here’s how.
- First, create a premix of your existing tracks with the Export Mixdown function. In the dialog box, check Import to Track and Close after Export (Fig. 1).
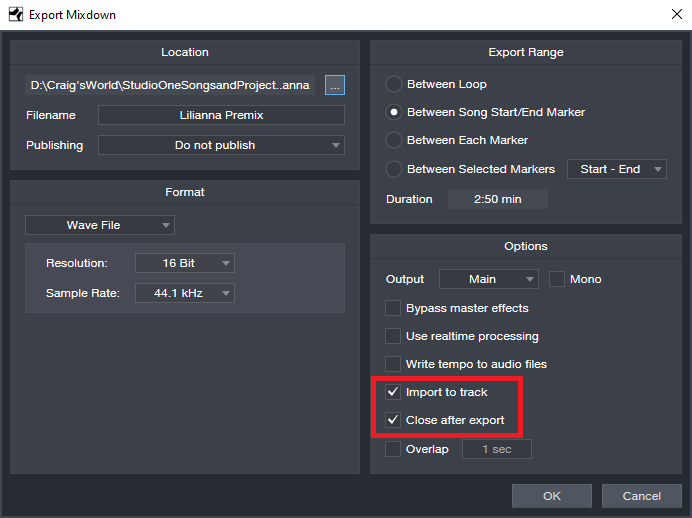
Figure 1: Use the Export Mixdown function to create a premix.
- After the premix is imported, mute all other tracks except for the Imported premix track.
- Select the premixed track, and right-click on it (Fig. 2), or open its Inspector (F4), to access the Transpose and Tune parameters.
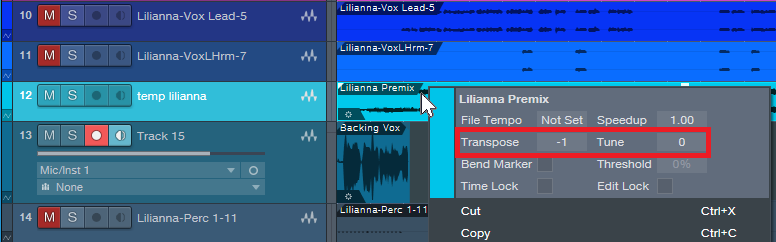
Figure 2: You can access the Transpose and Tune parameters by right-clicking on the premix.
- To brighten the vocal formant, use the Tune and/or Transpose function to lower the pitch.
- Record the vocal track as you listen to the premix.
- After recording the vocal track, right-click on the vocal Event, or open its Inspector, and tune it up by as much as you tuned the premix track down. For example, if you tuned the premix down a semitone, tune the vocal track up a semitone.
- Delete the premix (or mute it if you plan to do more formant-shifted tracks), unmute the other tracks, and enjoy your formant-shifted vocal.
This is especially useful when doubling parts, because the double can have a slightly different timbre. And with background vocals, shift some formants up, and some formants down, for a bigger, more interesting sound. And of course, if you just can’t quite hit that high note…you’re covered. I promise I won’t tell.
I also like using this with guitar and other instruments. I’ve gotten away with pitching guitar up 7 semitones for a bright sound that splits the difference between a standard guitar sound, and one that’s more like “Nashville” tuning (as described in the Friday Tip for December 1, 2019). At the other end of the tonal spectrum, playing along with the premix tuned up, and pitching back down, is like using a low tuning on a guitar—great for those massive metal guitar sounds.
—————————————
As we enter 2020, thank you very much for your support of these blog posts, and your comments. Also, thank you for supporting the Studio One book series that I’m writing. When I wrote the first book, I wondered if there would be any demand for it, or whether I was just wasting my time. Well, you’ve answered that question… so now I’m working on book #5 of the series, about how to record great guitar sounds with Studio One. It won’t be done for a while, but it wouldn’t have been done at all without your support (or the great-sounding new amp sims, for that matter).
Finally, let’s all thank Ryan Roullard and Chad Schoonmaker, who wrangle the blog and social media each week to get this blog posted and promoted. It’s not like they don’t already have enough to do at PreSonus, which makes their involvement just that much more appreciated. Thanks guys!
How to Use FX Chain Transition Curves
FX Chains are a powerful Studio One feature, yet I can’t help but notice that when I write tips about FX Chains, some people are lost without a download…so I get the impression people might think that making FX chains is difficult. But it isn’t really, and your reward for creating one is a multi-effects processor that you can call up whenever you want, as well as assign controls that allow tweaking parameters without having to open up the effect GUIs themselves.
One of the most important aspects of mapping parameters to knobs is choosing the right Transition settings, so let’s delve deeper into how to make them do your bidding.
Transition Settings Explained
A great aspect of FX Chains is being able to map Macro knobs to multiple parameters and control them all simultaneously. For example, in the EZ Squeez tip for a one-knob compressor, a single Macro knob varied the Compressor Ratio, Release, Threshold, Knee, Attack, and Gain controls simultaneously. Because of this, when changes in the Ratio or Threshold parameter reduced the output, the Gain control could increase automatically to compensate.
When you map a parameter to a Macro knob, the default is for the knob to alter the parameter over its full range. But, you often don’t want to vary the parameter over its full range. For example, if you were creating a wah pedal effect with the Pro EQ, you wouldn’t want the filter to go from 20 Hz to 20 kHz. A more realistic range would be around 300 Hz to 2 kHz.
The Transition setting allows restricting the parameter range covered by a control. When you click on the small Transition graphic, a bigger view opens up where you can set the parameter’s upper and lower limits (Fig. 1).
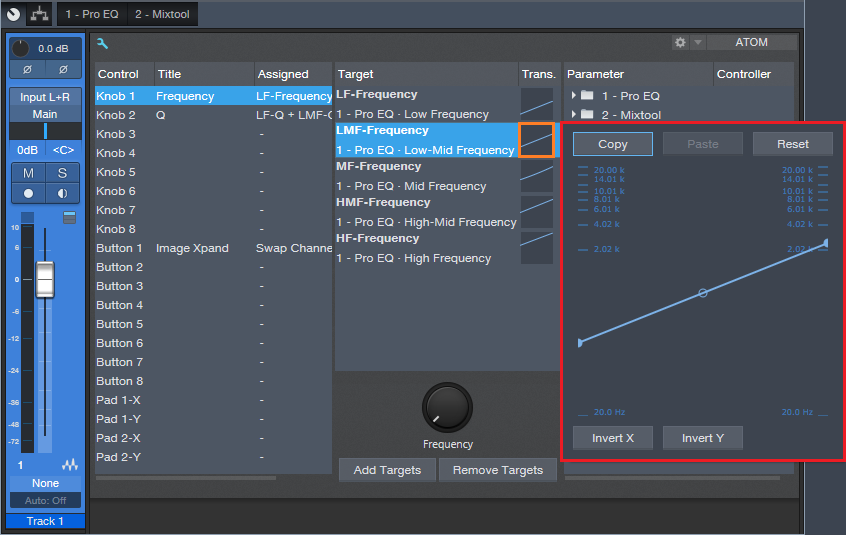
Figure 1: Click on the small graphic window (outlined in orange) to open up a bigger view (outlined in red).
However, the calibrations are sometimes difficult to read, so it can be challenging to create a precise change. Fortunately, there’s an easy solution.
Suppose you want to change the Pro EQ LMF frequency from exactly 150 Hz to 2.4 kHz (five octave range) by turning one of the Macro knobs. To do this:
- Open the Pro EQ GUI so you can see the LMF Freq knob, and “pin” the Pro EQ so that it remains visible.
- Click on the Knob icon in the Pro EQ’s upper left. The Macro Controls panel will appear (or the Macro Control Mappings window if it was opened up last). Since we want to use the Macro Control Mappings window, if the Macro Controls panel appears, click on its little wrench icon toward the upper left.
- Turn the knob at the bottom of the Macro Controls Mapping window fully counter-clockwise.
- Open the larger transition window for the LMF – Frequency parameter.
- Click on the transition line’s left node, and drag it while observing the LMF Freq knob in the Pro EQ. Stop dragging when it hits 150 Hz; you’ve now adjusted the knob’s lower limit. Note that it’s sometimes difficult to obtain a precise setting; you can’t, for example, type in direct value. You may want to temporarily slow down your mouse pointer speed (in the mouse section of your system properties) to make this easier.
- Now we need to set the upper-frequency limit. Turn the knob at the bottom of the Macro Controls Mapping window fully clockwise.
- Re-open the larger transition window for the LMF – Frequency parameter.
- Click on the transition line’s right node, and drag it while observing the LMF Freq knob in the Pro EQ. This time, stop dragging when the knob’s frequency readout shows 2.4 kHz. Note that you won’t be able to reach exactly 2.4 kHz; the closest I could come was 2.38 kHz…close enough. It’s not always possible to hit a value exactly, but most of the time, this doesn’t matter.
This kind of precision came in handy when creating the Imaging Phaser, where I wanted each frequency band in the Pro EQ to cover five octaves, and the bands had to be offset an octave from each other.
Bend Me, Shape Me
The Transition setting has another very useful feature—you can click the node in the middle to bend the curve into different shapes. For example, the Gain parameter in the EZ Squeez compressor needed to increase in level as the settings became more extreme, which squashed the signal more and brought down the level. Dragging the midpoint down a bit accelerated the amount of Gain as the single knob was turned higher (Fig. 2).
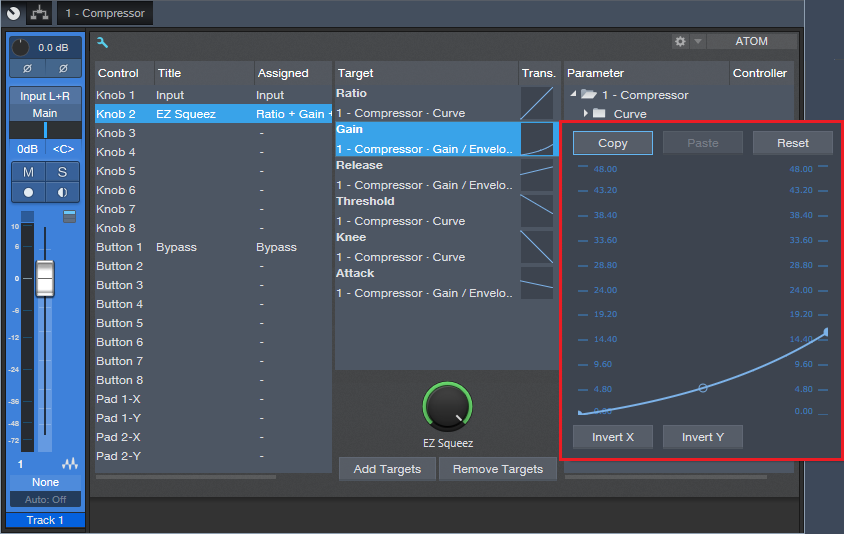
Figure 2: Bending the Transition line alters the “feel” of controls.
Where the Heck Are FX Chains Stored, Anyway?
Whenever a FX Chain tip provides a download link, there’s an inevitable comment in the Comments section along the lines of “Where do I store this after I download it”? The easiest way to find out is to go to the Browser, expand the FX Chains folder, expand a sub-folder if necessary, right-click on an FX Chain, and choose Show in Explorer (Windows) or Show in Finder (Mac). Now you’ll know where your FX Chains live. Note that you can also specify the location for your presets in Studio One > Options > Locations > User Data.
The VoxTool FX Chain
Y’all seem to like FX Chains, so here’s one of my favorites—the VoxTool, a toolchest for bringing out the best in vocals and narration as quickly as possible. You’ll still need to add any desired time-based effects (doublers, reverbs, or whatever), or perhaps some compression, but this will help take care of pops, EQ, peaks/transients, and vibrato during the songwriting process. In fact, this FX Chain may even do the job all the way to the final mix.
You can download the FX Chain from the link at the end of this tip; but let’s cover how the various modules affect the sound, so that (if needed) you can tweak this FX Chain for your particular voice.
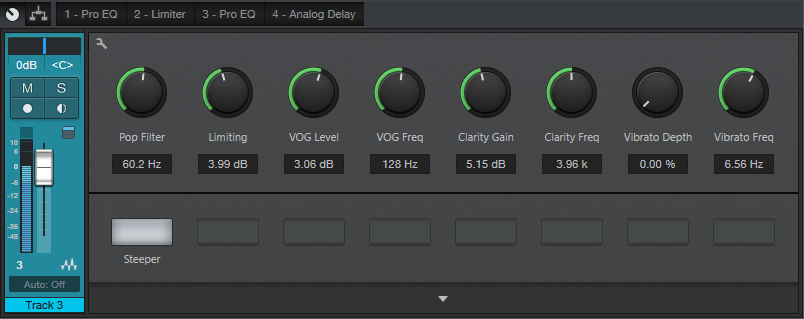
1. PRO EQ
This stage uses the Low Cut Filter, set to 48 dB/octave, with the cutoff frequency controlled by the Pop Filter control. Turning up this control attenuates the low frequencies where pops occur. The Steeper button adds a bit more low-frequency attenuation, aimed specifically at subsonics, by enabling the LF stage.
2. LIMITER
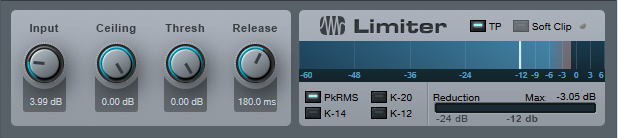
Now that the p-pops are reduced, we can add some limiting to tame any vocal peaks or transients. The Limiting control in the Macro Controls panel turns up the Limiter’s input control to increase the amount of gain reduction.
3. PRO EQ
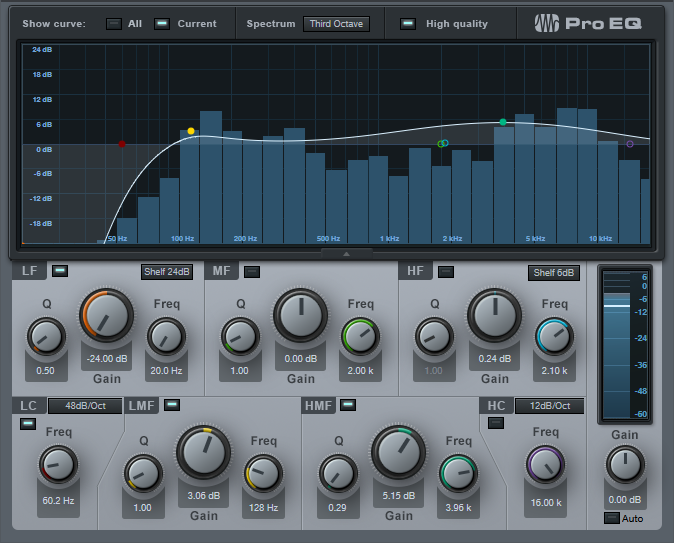
This link in the FX Chain uses four filter stages. Like the first Pro EQ, the Low Cut stage ties to the Pop Filter control for further attenuation of sub-vocal low frequencies, while the Steeper switch enables the LF stage for additional pop filtering. The LMF section provides the VOG effect (what narrators call “Voice of God”). This adds fullness to the bass, like an FM late-night DJ, which can also help restore some low-end depth in the vocal range if removing pops extends a bit into the vocal range. The HMF stage is the engine for the Clarity Gain and Clarity Frequency controls. Increasing Clarity Gain adds intelligibility and articulation to the vocals; vary the Clarity Frequency control to find what works best with your voice.
4. ANALOG DELAY
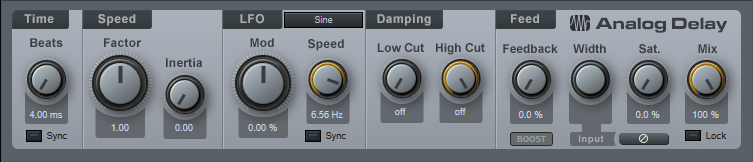
This provides a vibrato effect, with Vibrato Depth and Vibrato Frequency controls applied to the Analog Delay module. You likely won’t want to leave Vibrato Depth up, but instead, control it with automation, a footpedal, mod wheel, or whatever to add vibrato when needed.
That’s all there is to it! So download the VoxTool FX Chain, and bring your vocals up to speed—fast.
Tighten Mixes with the “Tightener” FX Chain
Sometimes when you’re mixing, sounds conflict because they have too much energy in the same part of the spectrum. The usual solutions are to lower the level of the sound deemed less important, or use EQ to try to ensure that each sound carves out its own part of the spectrum. This week’s tip presents an entirely different solution. It’s the kind of tip where people will likely go “yeah, whatever…” until they run into this problem, try the tip, and find that amazingly enough, it works.
But we’ll also take advantage of this tip to describe how to make a simple FX Chain. FX Chains are an extremely powerful Studio One feature, so if you haven’t gotten into creating your own yet, this is a good project for getting started.
HOW IT WORKS
The Tightener creates four sharp, narrow notches in a Pro EQ, at frequencies related to the musical key. For example in the key of A, the notches are at 110 Hz, 220 Hz, 440 Hz, and 880 Hz. If you have, for example, a song in the key of A where the guitar conflicts with the piano, to have less piano and more guitar, insert the Tightener FX Chain for the key of A into the piano track, and increase the depth of the notches. Here’s how to create a Tightener FX Chain.
- Insert a Pro EQ into a track, and open its interface.
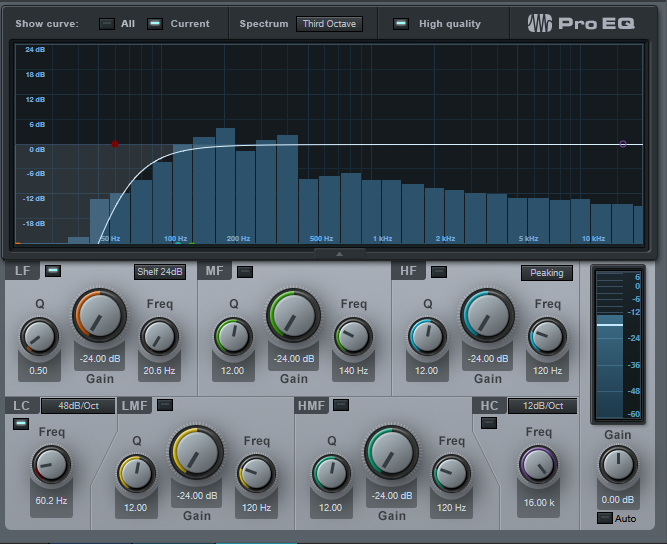
- We’ll be using the LF, LMF, MF, and HMF stages. Set the Q for each stage to 24.00.
- Referring to the chart at the end, type a filter frequency into each filter stage. For example, with the key of A, choose 110 Hz for the LF stage, 220 Hz for the LMF stage, 440 Hz for the MF stage, and 880 Hz for the HMF stage (Fig. 1).
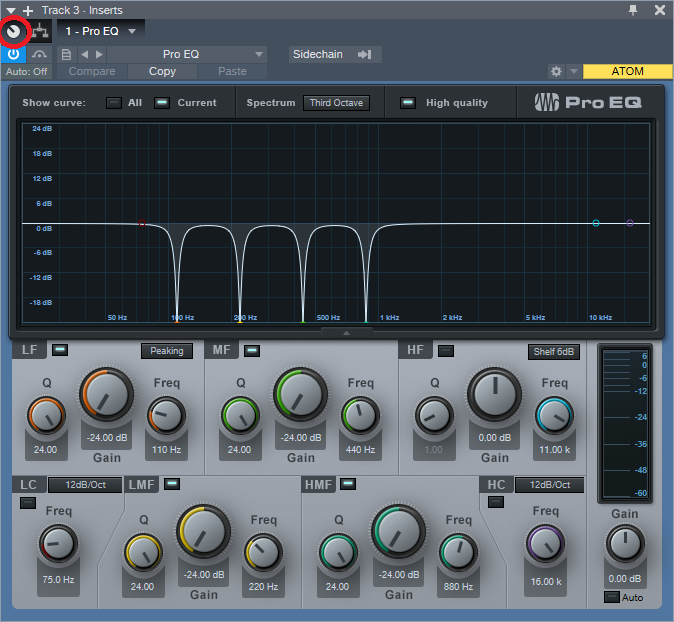
Figure 1: The filter settings for the key of A Tightener, with the notches set to maximum depth.
- Click on the knob icon in the effect’s upper left corner (just above the enable/bypass “power” button; it’s circled in red in Fig. 1). This opens the FX Chain Macro Controls interface. Then, click on the interface’s Wrench icon to open the Macro Controls editor.
- In the right-hand pane, unfold the Pro EQ folder, then unfold the Low Frequency, Low-Mid Frequency, Mid Frequency, and High-Mid Frequency folders.
6. Ctrl+click on LF-Gain, LMF-Gain, MF-Gain, and HMF-Gain to select all four parameters. The FX Chain Editor should now look like Fig.

Figure 2: The FX Chain Editor shows the Pro EQ parameters used for the tightener.
- Now click on Add Targets. The Gain control parameters will appear in the middle pane. They’ll all be controlled by the one knob at the bottom.
- I wanted the knobs to work so that when the control is full up, there’s no notch and the EQ works normally. Then to reduce the energy at a particular key, turning down the control increases the notch depth, producing more of a cut. However, if you turn the Macro control at the bottom of the window and watch the filter response, you’ll see it goes from full notch at minimum, to full boost when turned up. We don’t want the boost.
- Click on one of the Trans graphs, and drag the node in the upper-right-hand corner down to 0. This ensures that when the knob is up all the way, its filter gain is zero. Then, click on Copy (Fig. 3).

Figure 3: Adjust one of the graphs so that the maximum value is 0, then copy and paste to the other graphs.
- Click on the other three graphs, and choose Paste. Now all the Gain controls will track each other.
- Look at the filter, and vary the knob at the bottom of the FX Chain Editor. All the notches will go from maximum notch with the control fully counter-clockwise, to minimum notch with the control clockwise.
- Now double-click on the knob label, and type a name like “Tightener A” or “Tightener C#” or whatever, depending on the filter frequencies.
- Click on the wrench to close the Editor. To save the FX Chain, click the downward arrow in the Macro Control panel’s upper left, and choose where to store your preset (Fig. 4).
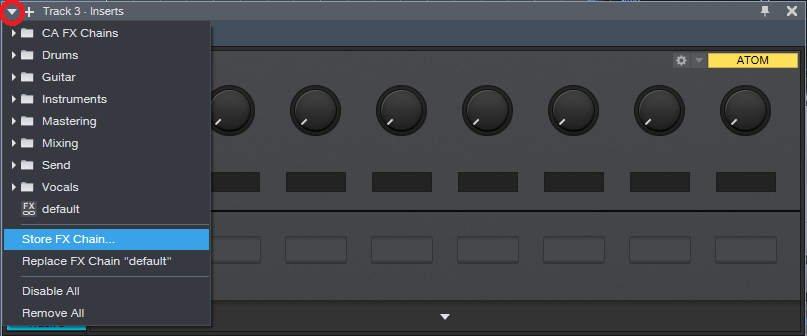
Figure 4: Don’t forget to store your FX Chains, so you can use them again.
And now you have a Tightener FX Chain! But you’ll want one for each key. It’s easy enough to do—type new frequencies into the four EQ bands, rename the control for the appropriate key, and then save the FX Chain under the name of the new key. For example, if you change the frequencies to 147 Hz, 294 Hz, 587 Hz, and 1175 Hz, you now have a key of D tightener. Here are the frequencies for all the keys (Fig. 5).

Figure 5: Frequencies for an octave’s worth of tighteners.
You need to be a little strategic about applying this FX Chain; it’s needed only when you want to help keep instruments from stepping on each other.
So that you can get started experimenting with this as easily as possible, all the Tightener FX Chains are available for download. After downloading, place them in the folder Studio One Songs and Projects\Presets\PreSonus\FX Chains\Tighteners, or wherever you specified the location for presets in Studio One > Options > Locations > User Data.
But even if you download them, try your hand at creating an FX Chain if you haven’t done so already. They’re really handy.
Download ALL 12 Tighteners Here!
How to Create Compelling Mixes in Studio One—New from Craig Anderton
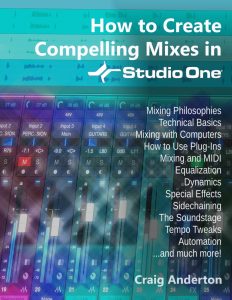
Available NOW at shop.presonus.com from Craig Anderton… How to Create Compelling Mixes in Studio One! This is Craig’s third book on Studio One, and it weighs in at a whopping 258 pages!
Click here to read more and shop!
Mixing is where you create an experience that transports the listener into your musical world. And now, renowned music technology expert Craig Anderton brings his years of production and mixing expertise to an easy-to-understand, comprehensive guide about all aspects of mixing. Chapters include Mixing Philosophies, Technical Basics, Mixing with Computers, How to Use Plug-Ins, Mixing and MIDI, Prepare for the Mix, Adjust Equalization, Dynamics Processing, Sidechaining, Add Other Effects, Create a Soundstage, Mix Automation, Final Timing Tweaks, and Review and Export.
Profusely illustrated, and loaded with constructive, practical, meaningful advice that will improve your mixes dramatically, this 258-page eBook sets the standard for discovering how to make compelling mixes in Studio One.
- 258 pages, 67,500 words, over 180 four-color illustrations
- Downloadable PDF, with links from the contents to book topics
- “Key Takeaways” section for each chapter summarizes chapter highlights
- “Tech Talk” sidebars do deep dives into selected topics
- Covers all aspects of mixing with Studio One
Chapter 1: Mixing Philosophies
Chapter 2: Technical Basics
Chapter 3: Mixing with Computers
Chapter 4: How to Use Plug-Ins
Chapter 5: Mixing and MIDI
Chapter 6: Prepare for the Mix
Chapter 7: Adjust Equalization
Chapter 8: Dynamics Processing
Chapter 9: Sidechaining
Chapter 10: Add Other Effects
Chapter 11: Create a Soundstage
Chapter 12: Mix Automation
Chapter 13: Final Timing Tweaks
Chapter 14: Review and Export
Appendix A: Mixing with Noise
Appendix B: Calibrating Levels
Friday Tip: Percussion Part Generator
Just as we can use plug-ins to process audio, Studio One’s Note FX are plug-ins for MIDI data. They tend to be overshadowed by our shiny audio plug-ins, but have a lot of uses…like generating cool percussion parts.
This may sound like a stretch (“c’mon, can it really generate a musical percussion part?”), but the audio example will convince you. The first four measures are a percussion part created by the Arpeggiator NoteFX, the second four measures combine the percussion part with a house drum loop, and the final four measures are the house drum loop by itself—so you can hear how boring the loop sounds without the added percussion part.
This part was created with three conga and two bongo samples, each assigned to its own MIDI note. The initial “part” was just those five notes, each with a duration of four measures. It doesn’t really matter how long the notes are, you just want them to be continuous for the duration of the drum part. I then added the Note FX Arpeggiator plug-in to arpeggiate the notes (Fig. 1).

Figure 1: The Note FX Arpeggiator, set up to play different drums at different velocities.
By themselves, the standard up/down and down/up patterns tend to sound overly repetitive. The Random option (outlined in red above) helps, but then you have a random percussion part, which doesn’t relate to the music. So let’s introduce the secret sauce: automation (Fig. 2).
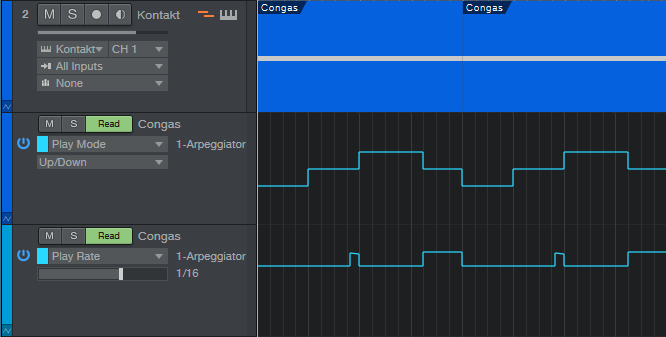
Figure 2: The automation lanes control Note FX parameters.
The key here is automating the Play Mode and Rate. The Play Mode automation starts with up/down for a measure, then down/up, then random for a bit more than a measure, and then down/up again. This adds variety to the part, and when it repeats, the random section creates additional variations so that all the parts don’t sound the same.
But what really adds the human element is varying the Rate. It starts off as 1/16th, but then just before the third measure starts, does one beat that starts with 1/32nd notes and ramps down over the beat to 16th-note triplets. The last three beats of the four measures uses a 32nd-note Rate so that the “robot percussion” adds some tasty, faster fills to lead into the next measure. I used down/up during these faster parts, but random can sound good too.
The final touch is Swing, which is set to around 70% in the audio example. Note how even though the drum loop is metronomically correct, adding swing to the percussion part lets it “dance” on top of the drums.
Now, here’s a very important consideration: You may look at the above and think “this sounds too easy,” or maybe “but what are the exact settings I should use?” The answers are yes, it really is that easy; and the exact settings really don’t matter all that much—feel free to experiment. Studio One’s little robot percussionist is full of surprises, and the way to uncover those is to play around with the settings, and automate them to create variations.
Finally, I’d like to mention that I have a new eBook out! At 258 pages, “How to Create Compelling Mixes in Studio One” is considerably longer than my two previous Studio One books. I’ve been working on it for the past year, and it’s finally available in the eBook section of the PreSonus shop. Check it out—I sincerely hope it helps you make better mixes.
10 Presence XT Techniques
September is winding down, but we still have one week left to celebrate Studio One’s 10th anniversary—so it’s time for another Friday Tip with 10 Tips! Let’s take a look at some practical, convenient techniques you can do with Presence XT. And yes, there’s a fun downloadable preset at the end.
- “Tighten” and “Loosen” Drum Kits

The Artist Instruments folder has a bunch of drum kits. However, I like to fine-tune drum pitches—higher pitches for a tighter, more beatbox/analog drum sound, or lower for a big rock vibe. Although the Sample Shift control can change pitch, it also changes where the drum appears on the keyboard. For example, if you Sample Shift a snare on the F key by +3, then the drum is lower in pitch, but it now plays back on D instead of F.
There’s a simpler way to tune your drums. Set Env 2 to Full Sustain, and modulate Pitch with it. Turn the modulation amount up to tighten the sound, or down to loosen.
- Control Presence Effects with the Mod Wheel

According to Presence, you can’t control effects parameters with the mod wheel—but there are a lot of useful techniques you can do with a mod wheel, other than control vibrato. Here’s one way to control the effects with your keyboard controller’s mod wheel.
- Choose Studio One > Options, and click on External Devices.
- Click on Add, and choose New Control Surface. Set Receive from your keyboard. You’ll get a scary message warning you “This port is already in use,” but just ignore it and click OK.
- Click OK on the Add Device menu, and now Studio One thinks your keyboard is a control surface.
- In the Mix view, click on the External button toward the left. When the External Devices column appears, double-click on New Control Surface.
- Click on MIDI Learn, and move your mod wheel. Name it to make it feel welcome, and then disable MIDI Learn.
Now you can link anything you want with the mod wheel, including effects. For example…
- Control Distortion Drive with the Mod Wheel
Adding distortion to bass is a beautiful thing, and it’s even more beautiful when you can control the distortion amount with the mod wheel.
- Click on the Edit Mapping button in Presence’s upper right (the somewhat inscrutable gear symbol). Now you can see the control mapping in Presence—which is really important if your monitor isn’t wide enough to show the Edit Mapping option in the toolbar.
- Contrary to the help, which assumes you’re rational and using a separate hardware control surface, move the Mod wheel and it should show up in the right side of the Edit Mapping section.
- Move the Distortion Drive control, which will show up on the left side of the Edit Mapping section.
- Click the “assign” triangle in the middle of the Edit Mapping section, and now the Mod Wheel will control the Drive control. (Another tip: distortion gourmets recommend “Bad Tube” as the best choice for bass distortion.)
- More Expressiveness
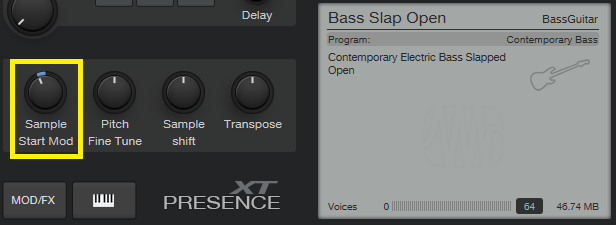
The Sample Start Mod control can add major expressiveness because it lets you control the attack’s character via velocity. Here’s how it works: when Sample Start Mod turned counter-clockwise off-center, with low velocities playback starts further into the sample, past the initial attack. But higher velocities trigger the full attack sound. For example, with an instrument like Slap Bass, this technique can emphasize the slap component with high velocities, while lower velocities bypass the slap. However, Sample Start Mod can affect any instrument with a defined attack.
Because a sample may not start at a zero-crossing, you may hear a click with some velocity values. Adding a little bit of Amp Env attack (usually only a millisecond or two) fixes this.
- Change the Female Choir into Monks
Call up the Vox > Choir > Choir Full preset. Set Transpose to -12, and Sample Shift to Semi-Tone: 12. You might also want to slather on some more reverb by turning up the Size and Mix, but regardless, you’re ready for your next moody movie soundtrack, or Gregorian chants dance remix.
- Get Saxy
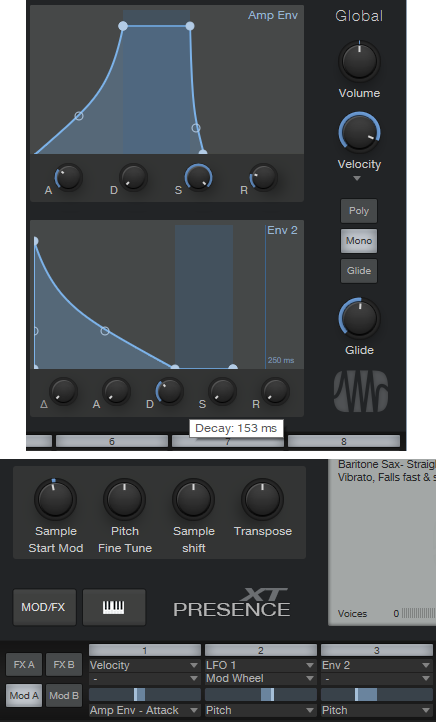
Let’s face it, John Coltrane fans—a sampler will never replace a sax player. However, the Winds > Baritone Sax > Baritone Sax Full preset is pretty good, so it seemed like a useful starting point for something a little more expressive. There are several treaks, but the main action is with the modulation.
- Set Sample Start Mod to -7000. If you play softly, this starts playback further into the sample, so you don’t hear the attack. However, as mentioned previously, modulating sample start can produce clicks because playback may not start on a zero crossing, so…
- Set the Amp Env Attack to 83 ms. This gets rid of any clicks. However, we want a fast attack with high velocities, so…
- In the Mod section, use Velocity to apply negative modulation to the Amp Env attack (you don’t need much) so that hitting the keys harder gives a faster attack.
- We also want to have notes bend up to pitch somewhat, so set the Decay for Env 2 to 153 ms. Again in the Mod section, use it to apply negative modulation to pitch. This causes the pitch to start off somewhat flat, then slide up to the correct pitch.
The penultimate touch is some vibrato by modulating Pitch. I used LFO set to about 4.5 Hz, with 680 ms of Delay time, controlled by the Mod Wheel (although I think Aftertouch is an even better choice, if your controller supports it). And of course, we want some reverb. The existing reverb is okay, but push the Size to 2.45 seconds, and Mix to 45%. Yeah, that’s the ticket! You might also want to choose Mono, unless you know any saxes that play chords. And yes, I’ve provided a downloadable preset for your playing pleasure—scroll down to the end.
- Foolproof Bass Slides

Set the bend to +7 for bend up, and 0 for bend down. Now when you want to slide down to a note, start at the top of the mod wheel, and then bring it down at whatever rate you want. It’s impossible to “overshoot” the target note, even when using the virtual mod wheel on the instrument GUI, with bend down set to 0.
- Add Analog Synth “Drift”
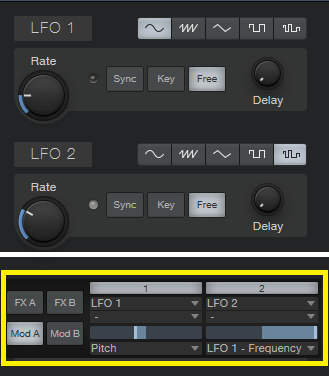
The pitch of analog synths drifts over time. Although Presence XT has a random LFO waveform, it’s stepped, and there’s no way you can “round off” the corners to create smooth variations. But there’s a solution (isn’t there always…). Use the sine waveform for LFO 1 and set it to a low rate, like 0.1 Hz. Select the random waveform for LFO 2, set to a slightly faster rate (like 0.4 Hz), and use it to modulate LFO 1. Meanwhile, use LFO 1 to modulate pitch; you don’t need to use much modulation to obtain a useful effect. Try this with Artist Instruments > Synths > Analog Fifths—you’ll be impressed.
- The Presence XT Editor Is Worth It

There might be a tendency to overlook the editor because Presence XT does enough on its own. And yes, I know the editor is $79.99. But, it’s cheaper than getting another sampler, and the capabilities are impressive. It’s easy to figure out, and it doesn’t take long to add samples—for example, you can specify the root note, high note, and low note by hitting keys. When using per-note samples, you can do fine-tuning, as well as add expressive features like sample start. Presence XT Editor is also a development system, so if you come up with some amazing presets, you can put them into a saleable bundle, and even password-protect it. If you’re into sound design and creating sample-based instruments, I highly recommend unlocking Presence XT’s Editor page.
- But Wait—There’s More!
Presence XT can load sounds from other formats—EXS, Giga, Kontakt version 4 (and below), and Sound Fonts. Finally, check out Tip 1 in the September 13 Friday Tip on using ATOM as an auxiliary keyboard. This makes it easy to access the keyswitching in Presence XT presets that contain this feature, even if you have only a four-octave keyboard.
I hope y’all enjoyed this month’s special editions of the Friday Tip. Happy birthday, Studio One!
Download the saxy sax preset, CA Baritone Sax Full
10 Not-Hitting-Drums ATOM Tips
It’s easy to assume ATOM is an MPC-type pad controller, and ignore it if that’s not of interest. But ATOM is tightly integrated with Studio One for navigation, editing, and more, and also works with third-party software—which even applies to third-party software (like virtual instruments) running inside Studio One.
1. The Auxiliary Keyswitch Keyboard
The problem: you have a 4-octave keyboard, but you’re using a program like SampleTank or Kontakt that uses lower-octave keys for keyswitching. The solution: Add ATOM as an auxiliary keyboard for triggering keyswitches (Fig. 1).

Figure 1: IK SampleTank’s lower keys trigger loops (as identified with arrows), while the upper keys play one-shots. You can set up ATOM to play the lower, keyswitched notes, and play the one-shots from your main keyboard.
1. Select the Instrument track and set it to All Inputs, so it receives notes from the main keyboard and from ATOM.
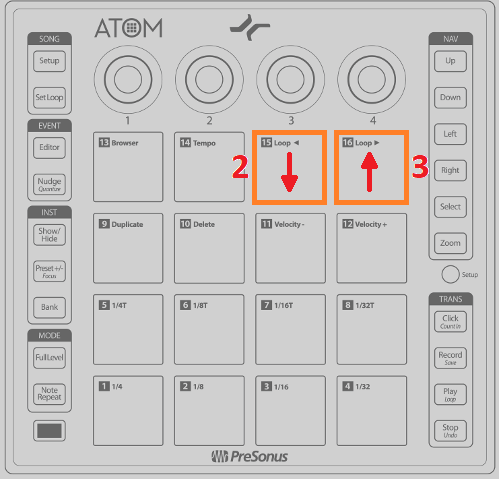
Figure 2: Use Pads 15 and 16 to cover the desired keyboard range for keyswitching.
2. Tap Pad 15 to transpose down an octave (Fig. 2). Each tap transposes down another octave. To keep track of how far down you’ve transposed, Pad 15 is orange at the default octave, tan = -1 octave, purple = -2 octaves, and red = -3 octaves.
3. Tap Pad 16 to transpose up an octave. Each tap transposes up another octave.
Considerate Bonus Feature: ATOM remembers the octave settings for different instrument tracks, even if they’re not instruments bundled with Studio One.
2. “Feel Factor” Changes
Leading or lagging rhythms by only a few milliseconds can make a major difference in the “feel,” the mix, and therefore, the music’s emotional impact (for more about the “feel factor,” please check out this article on my educational site, craiganderton.org). But how can you do that with Studio One, whose highest resolution goes to 64th notes? It’s easy with ATOM—and frankly, this feature alone justifies ATOM to me. The following works with both note and audio data.
1. In Studio One, turn off snap.
2. Select the notes (or audio Events) whose timing you want to shift.

Figure 3: You can lead or lag events in 1 millisecond increments with ATOM.
3. On ATOM, press and hold Nudge (Fig. 3).
4. Tap the Left button to move the selected notes or Events ahead (lead) by 1 ms, and the Right button to move the selected notes late (lag) by 1 ms (Fig. 4).
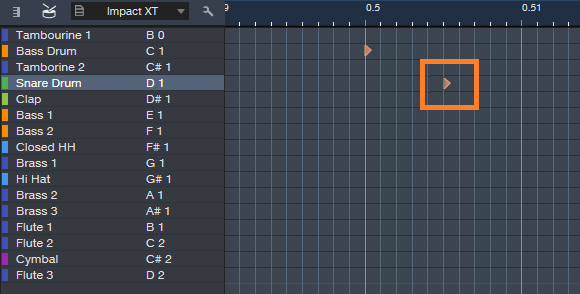
Figure 4: The timeline shows seconds. The note outlined in orange has been nudged 5 ms later.
This is huge. Try moving percussion a few milliseconds ahead of the beat to give a more “urgent” feel, or a snare a few milliseconds after the beat for a “bigger” sound.
3. Don’t Panic!
Stuck notes? No problem—see Fig. 5. (Note: the upper left Setup button needs to be off.)

Figure 5: It’s easy to nuke stuck notes with ATOM.
1. Press and hold the Quick Setup button, and select the track with the stuck notes.
2. Tap Pad 4 to send an All Notes Off command.
4. Tap Your Tempo
This is one of my favorite features for songwriting, because it’s a lot easier to tap a tempo (Fig. 6) than tweak it when you have a song idea.
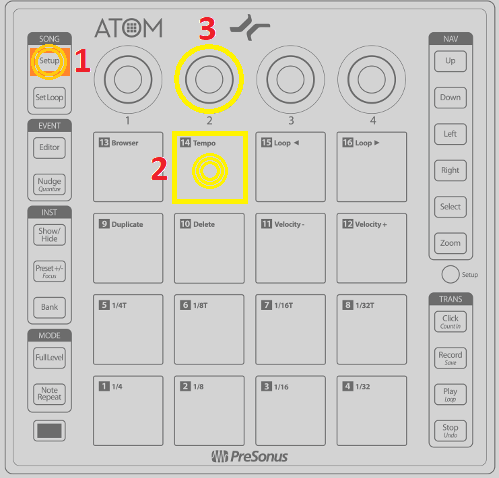
Figure 6: It’s easy to capture a song’s “feel” when songwriting by using tap tempo.
1. Tap the Song Setup button in the upper left.
2. Tap Pad 2 at the desired song tempo; this sets the tempo in the control bar.
3. To fine-tune the tempo, turn Knob 2.
5. The Hands-On Instrument Browser
You can call up instruments and presets quickly with ATOM (Fig. 7).
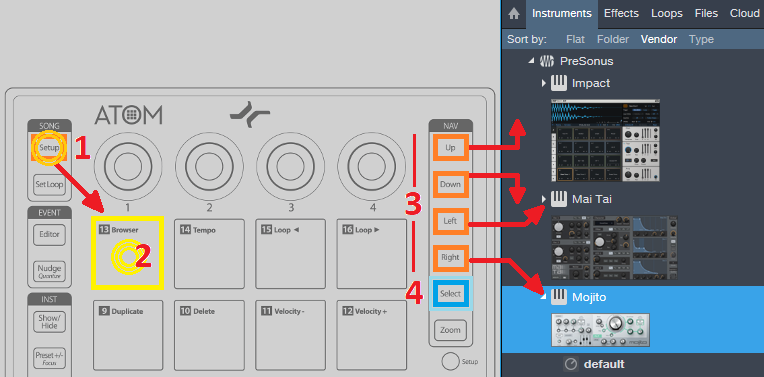
Figure 7: ATOM plays well with the Browser.
1. Press Setup, and it glows orange.
2. Toggle the Browser show/hide by tapping Pad 13 (Browser).
3. When the Browser is open, use the Up and Down buttons to go up and down through the list of instruments and presets. Use the Right button to open a preset list, and the Left button to close the list.
4. When you have the preset or instrument you want, press Select. This creates an Instrument track with the currently selected preset, or the instrument itself if no preset is selected.
6. Wicked Fast Exclusive Solo
There are many times—especially when proofing tracks before mixing–that I want to be able to select tracks quickly, and go into exclusive solo mode (i.e., only that track will be soloed—even other tracks that are soloed will be muted). It’s super fast if the Arrange View or Console has the focus (Fig. 8).
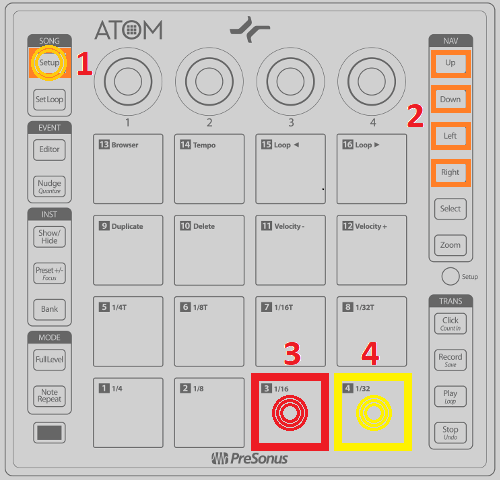
Figure 8: Step through tracks quickly, and “exclusive solo” them, with ATOM.
1. Tap Setup, and it glows orange.
2. Use the Up button or Left button to step up through tracks, and the Down or Right button to step down through tracks. (That’s kinda cool that either one Up/Down or Left/Right works, because it’s natural to use Up/Down in the Arrange view, and Left/Right on the Console).
3. Tap Pad 3 to mute the selected track.
4. Tap Pad 4 to solo the selected track, or Alt+Pad 4 for exclusive solo.
7. Control FX Chain Macro Knobs

Figure 9: Want hands-on control over the various FX Chains I’ve presented in these Friday Tips? ATOM can do it.
This is an easy one. Call up an FX Chain. Move the ATOM knob you want to assign to a Macro control. Right click on the Macro control. Assign it to the ATOM knob (Fig. 9).
8. Faking Studio One as a Third-Party Application
ATOM is happiest when playing with Studio One, because of the tight integration. But I still use Cakewalk’s Rapture Pro in a lot of tracks; I sampled a ton of Gibson basses, and made what I think are some really cool instruments with them. Unfortunately, in theory you can’t use ATOM’s aftertouch or knobs as a generic control surface when running in Studio One…but hey, we laugh at theory around here! You can, by faking Studio One into not recognizing ATOM as ATOM.
1. Go to Studio One > Options > External Devices, and remove ATOM.
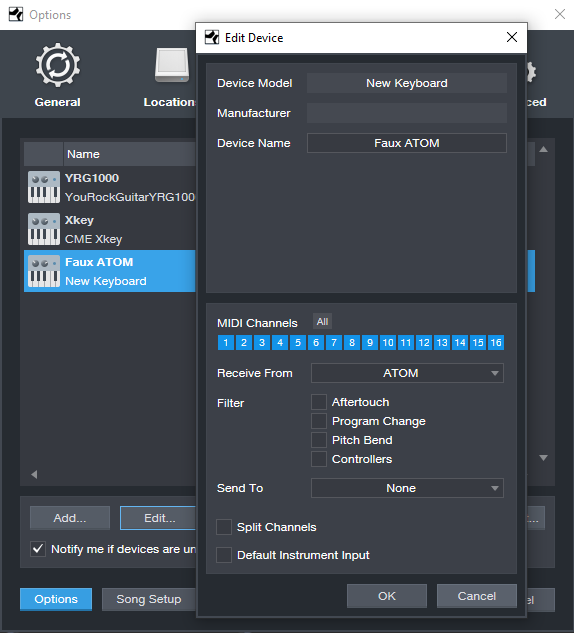
Figure 10: How to fool ATOM into thinking Studio One is a third-party application.
2. Click Add, and choose New Keyboard (I named it Faux ATOM; see Fig. 10). You don’t need to Send To anything. ATOM’s status light at the top will glow green to indicate ATOM isn’t under Studio One’s control.
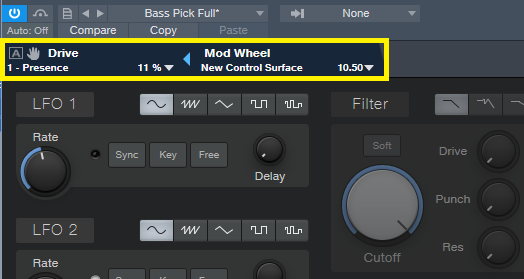
3. If your instrument has MIDI learn, assign the four controls or aftertouch however you want, and record as you would any automation from a control surface (Fig. 11).
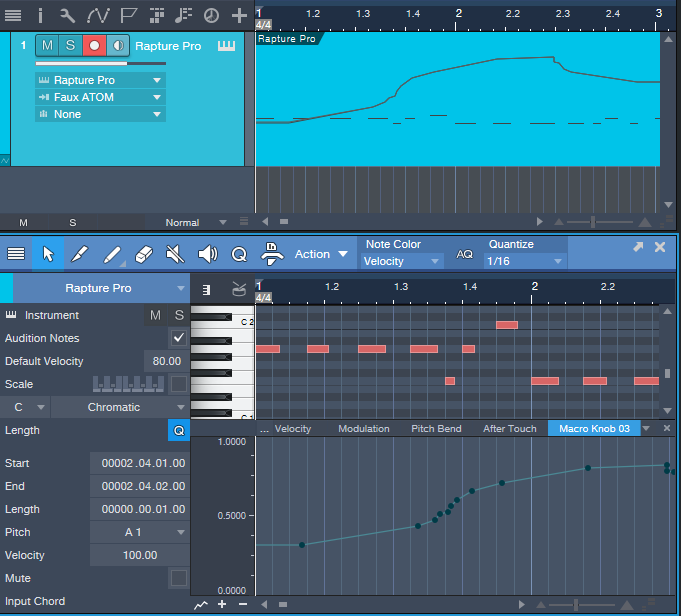
Figure 11: The screen shot shows the results of recording ATOM’s Macro Knob 3 as a control source for a third-party synthesizer.
Don’t worry, you haven’t lost ATOM. Go Studio One > Options > External Devices, and remove Faux ATOM. Click on Reconnect; Studio One finds ATOM, and lists it as an external device. Another option is to close and re-open Studio One (ATOM gets added automatically).
9. Cool Event Editor Stuff
The documentation seems to imply that you can do cool event editor things only with the Instrument track, but that’s not quite true—you can do plenty with audio tracks as well.
1. Press the Editor button (in the left side, under Event). It doesn’t matter if Song Setup is on, because if it is, hitting Editor turns it off. The Edit view appears.
2. To hide the Edit view, hold Shift and tap Editor.
While in the Editor (or with audio tracks, the Arrange view):
10. The More Ways to Undo, the Better
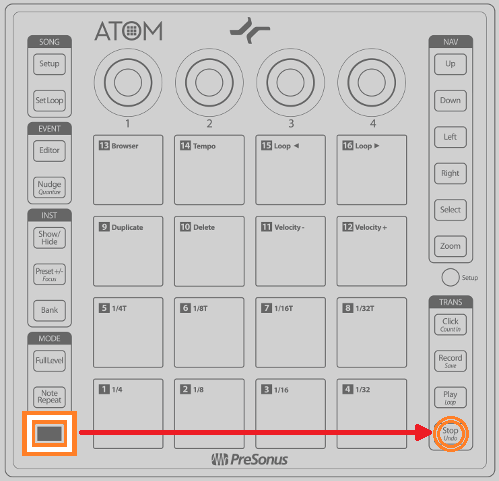
Figure 12: No one will ever know you made that horrible mistake if you undo.
Hold Shift and tap Undo (Fig. 12) to undo your last mistake…because there are never enough ways to undo!