Category Archives: Studio One
Mastering the low end with BASSROOM

Tom Frampton
This blog post will tell you how to get the perfect amount of bass when mastering audio using BASSROOM.
This is where so many potentially awesome tracks fail. Too much bass and your track will sound bloated and lack clarity. Not enough bass and your track will sound weak.
I have a process that helps me set the perfect amount of bass for my clients every time. Since I implemented this technique I can honestly say that my mastering business has dramatically improved (more than doubled!)
I hope that this technique helps you too, whether it’s growing your studio business or simply nailing the master of a track that will further your career as an artist.
Let’s start with why nailing the low-end is so difficult:
- Monitors with great low-end response are super expensive.
- Acoustic treatment is expensive BUT essential for any monitors (expensive or not) to be effective.
- Even when we have great monitors and acoustic treatment how can we be sure of what the perfect low-end level is?
So we’re up against a few hurdles here, but the technique I’ll explain will improve the low- end of your masters, even in the most basic studio set-ups.
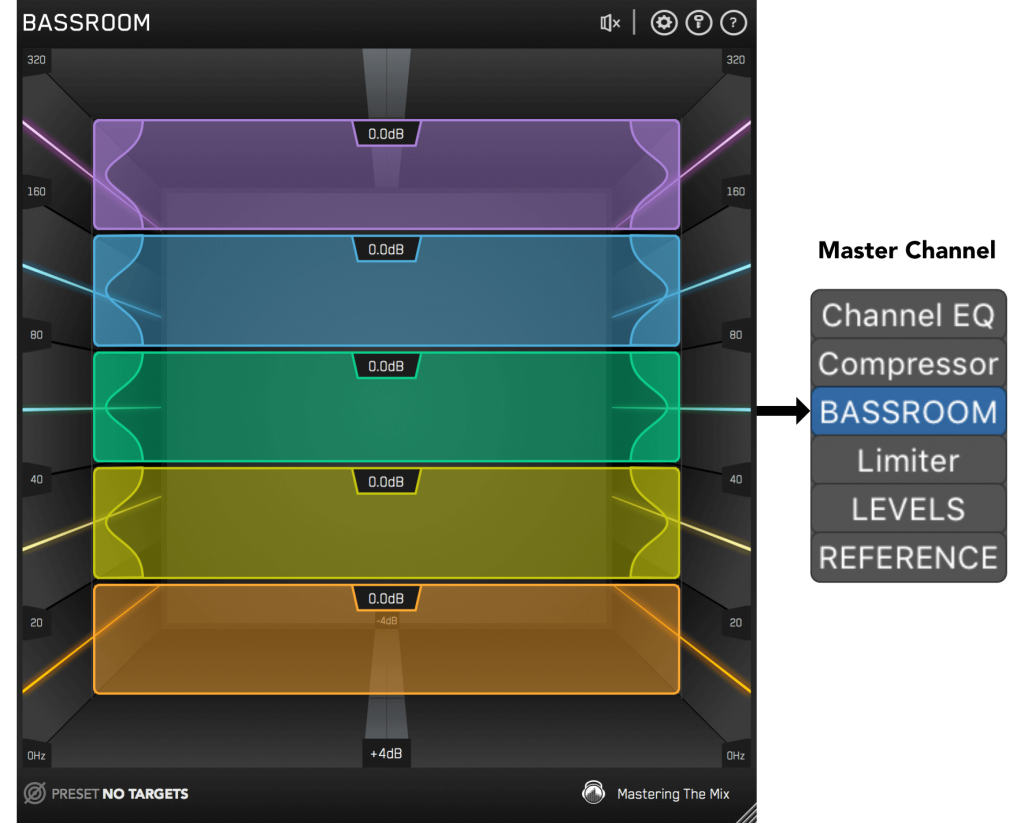
Step 1: Load Up Our Mixing and Mastering EQ BASSROOM on The Master Channel
BASSROOM uses complex algorithms that accurately identifies how the human ear perceives low-frequencies relative to the balance of the whole mix. For that reason it should be loaded on your master channel so it can analyse and be applied to your whole mix.
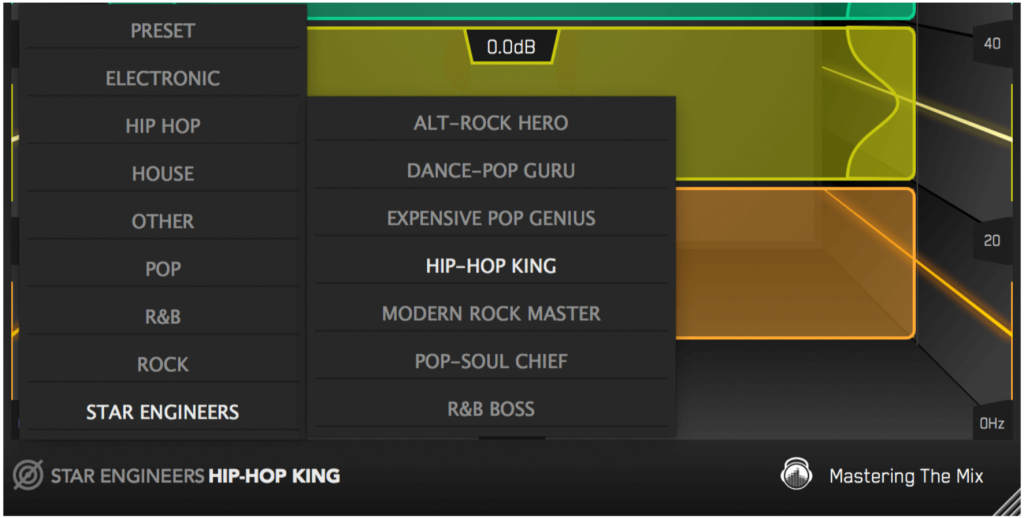
Step 2: Choose A Preset
To get the most value from BASSROOM, start by selecting a preset that best suits the material you’re working on.
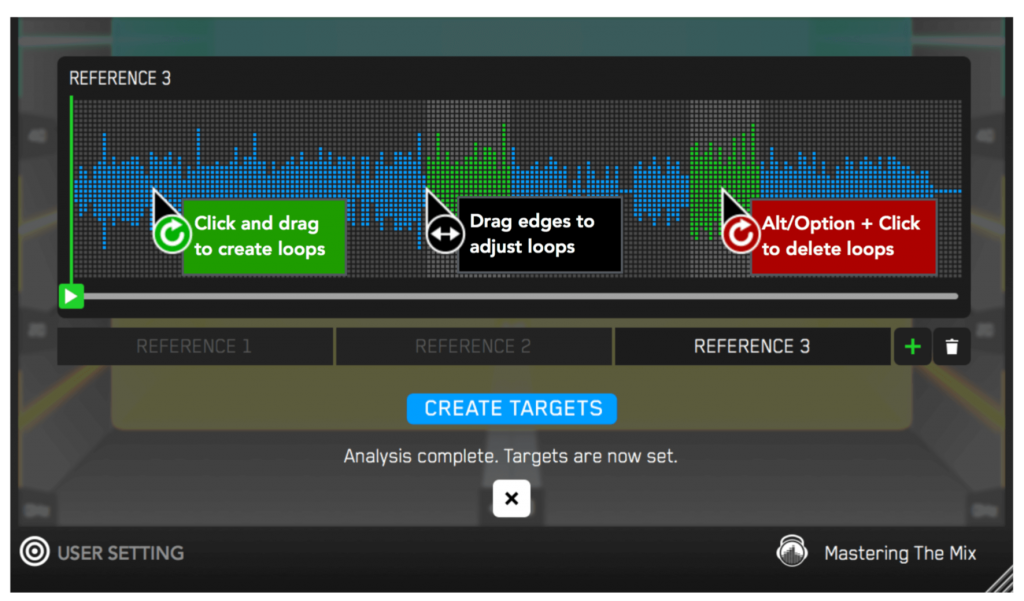
Step 3: Create A Target
Rather than choosing a preset, you can create your own target values by clicking the target icon in the bottom left corner and importing reference tracks. If you’re creating targets, we recommend clicking and dragging on the waveform to select the drop or chorus for the analysis, as this is usually the material with the best representation of the bass in the track. BASSROOM will create targets based on all the tracks loaded into the analysis window.
Step 4: Shape Your Low End
Now monitor a bass heavy section of your production (i.e. the drop or chorus), and you’ll see the targets move to the suggested EQ positions based on the tonal balance of your mix compared to the tonal balance of your preset. Use the targets to get a great starting point, then adjust by ear to tweak your low-end to perfection. The algorithm accounts for differences in loudness, so the targets will be accurate and relevant whether you’re mixing or mastering.
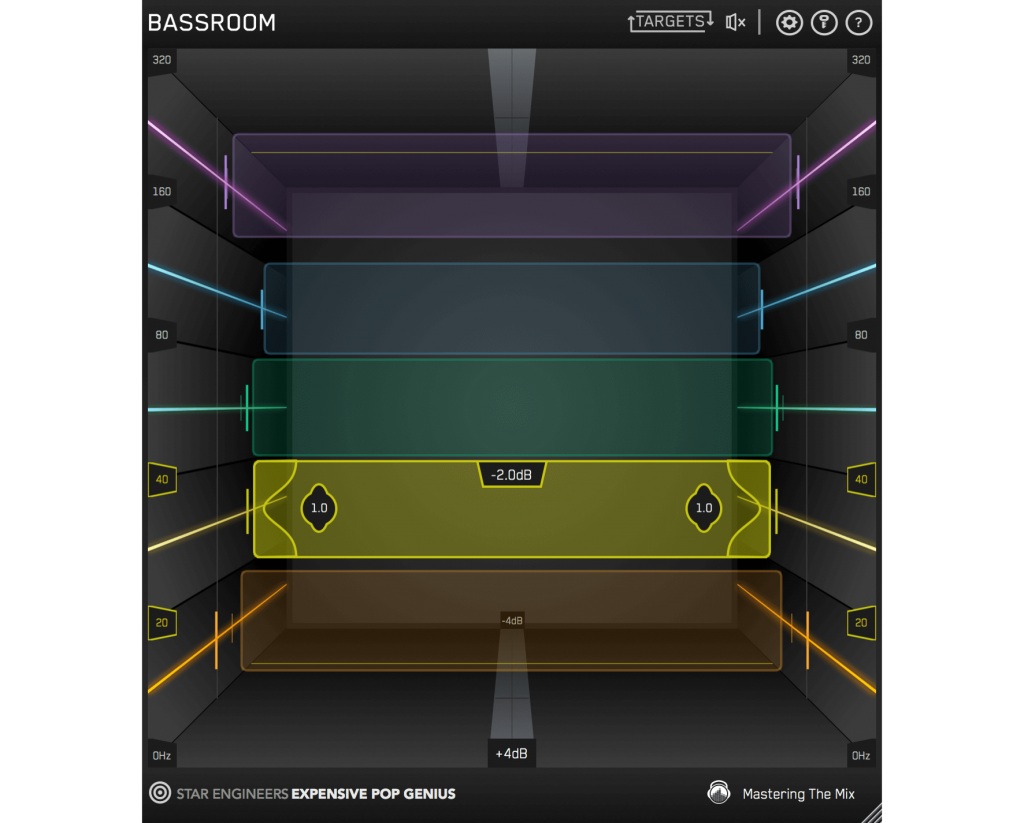
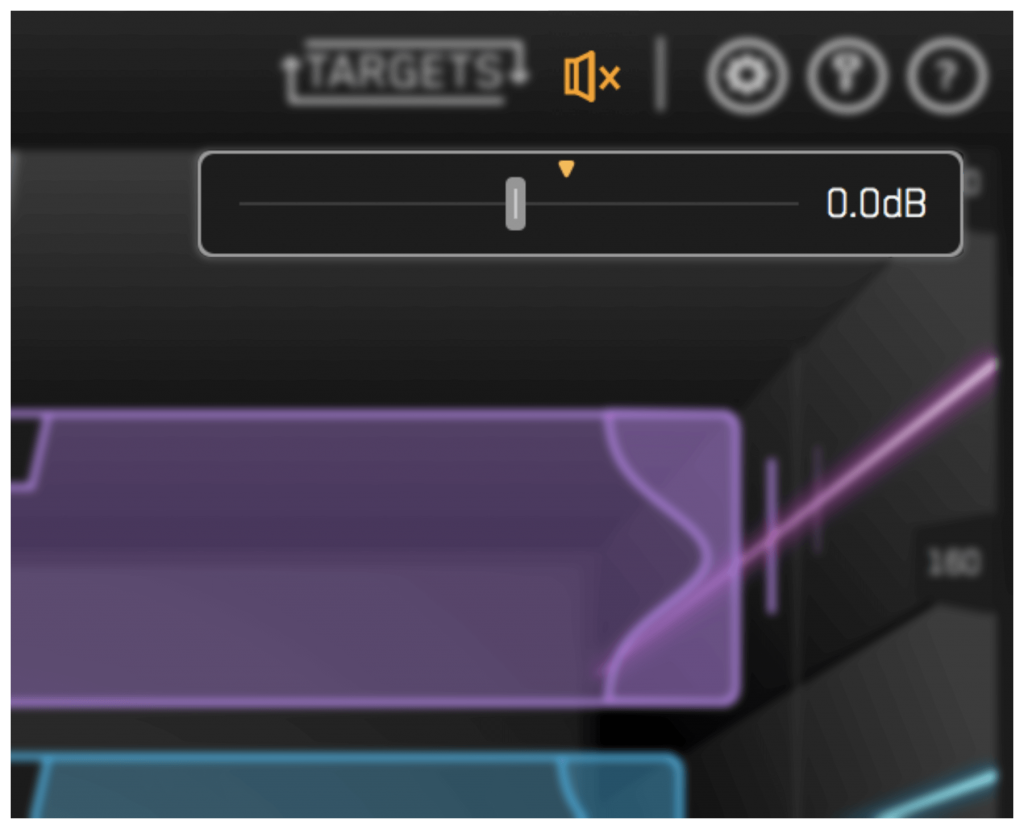
Step 5: The Level Match
The EQ adjustments may have changed the overall gain of your audio. If the gain has changed by more than 2dB the speaker icon will turn orange. Hover your mouse over the bypass icon to open the output gain and level match pointer. Match the gain slider to the level match pointer to match the perceived loudness of your audio before it passed through BASSROOM.
HEAR THE DIFFERENCE!!
Not only will your low-end fall into place, but the level matching will give you a well-balanced sound across the whole frequency spectrum. Toggle bypass on and off to hear the difference.
Click here to get BASSROOM!
Friday Tip: Tempo Changes for Already Mixed Songs – Reloaded
The June 22, 2018 tip covered how to make mastered songs better with tempo changes, but there was some pushback because it wasn’t easy to make these kinds of changes in Studio One. Fortunately, it seems like the developers were listening, because it’s now far easier to change tempo. I’ve been refining various tempo-changing techniques over the past year (and had a chance to gauge reactions to songs using tempo changes compared to those that didn’t), so it seemed like the time is right to re-visit this topic.
WHY TEMPO CHANGES?
In the days before click tracks, music had tempo changes. However, with good musicians, these weren’t random. After analyzing dozens of songs, many (actually, most) of them would speed up slightly during the end of a chorus or verse, or during a solo, and then drop back down again.
For example, many people feel James Brown had one of the tightest rhythm sections ever—which is true, but not because they were a metronome. There were premeditated, conscious tempo changes throughout the song (e.g., speeding up during the run up to the phrase “papa’s got a brand new bag,” in the song of the same name, then dropping back down again—only to speed up to the next climax). Furthermore, the entire song sped up linearly over the course of the song.
Note that you didn’t hear these kinds of changes as something obvious, you felt them. They added to the “tension and release” inherent in any music, which is a key element (along with dynamics) in eliciting an emotional response from listeners.
THE PROBLEM WITH TEMPO CHANGES
It was easy to have natural tempo changes when musicians played together in a room. These days, it’s difficult for solo artists to plan out in advance when changes are going to happen. Also, if you use effects with tempo sync, not all of them follow tempo changes elegantly (and some can’t follow tempo changes at all). Let’s face it—it’s a lot easier to record to a click track, and have a constant tempo. However…
THE STUDIO ONE SOLUTION
Fortunately, Studio One makes it easy to add tempo changes to a finished mix—so you can complete your song, and then add subtle tempo changes where appropriate. This also lets you compare a version without tempo changes, and one with tempo changes. You may not hear a difference, but you’ll feel it.
As mentioned in last year’s tip, for the highest possible fidelity choose Options > Advanced > Audio, and check “Use cache for timestretched audio files.” Next, open a new project, and bring in the mixed file. Important: you need to embed a tempo, otherwise it’s not possible to change the tempo. So, open the Inspector, and enter a tempo under File Tempo. It doesn’t have to match the original song tempo because we’re making relative, not absolute, changes. Also choose Tempo = Timestretch, and Timestretch = Sound – Elastique Pro Formant.
MANIPULATING THE TEMPO TRACK
Working with the tempo track is now as easy as working with automation: click and drag to create ramps, and bend straight lines into curves if desired. You can set high and low tempo limits within the tempo track; the minimum difference between high and low Tempo Track values is 20 BPM, however you can change the tempo track height to increase the resolution. The bottom lines it that it’s possible to create very detailed tempo changes, quickly and easily.
So what does it sound like? Here are two examples. The first is a hard-rock cover version of “Walking on the Moon” (originally recorded by The Police, and written by Sting).
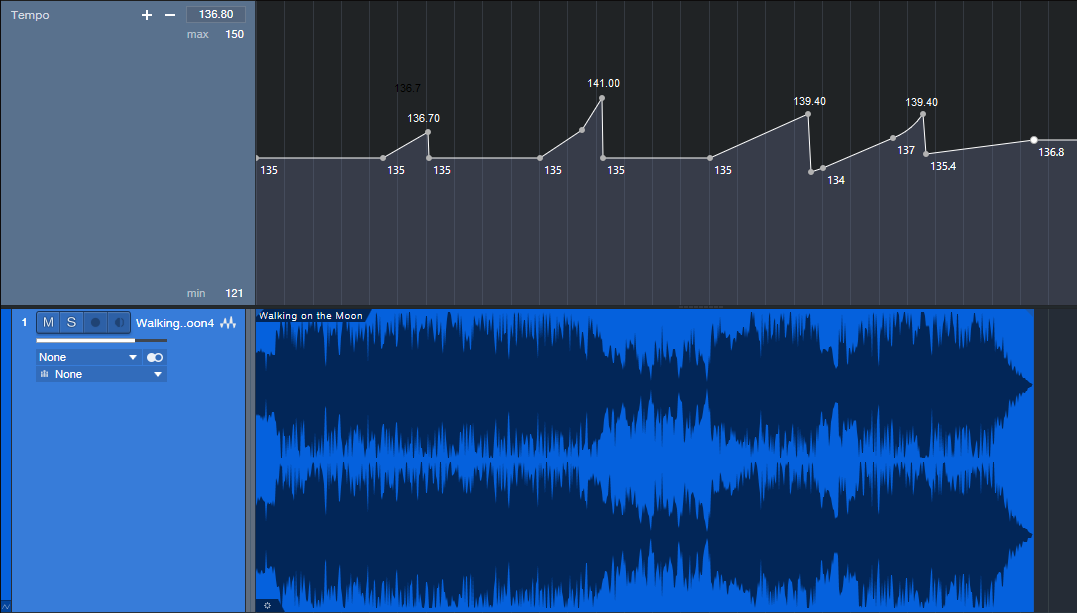
The differences are fairly significant, starting with a low of 135 BPM, going up to 141 BPM, and dropping down as low as 134 BPM.
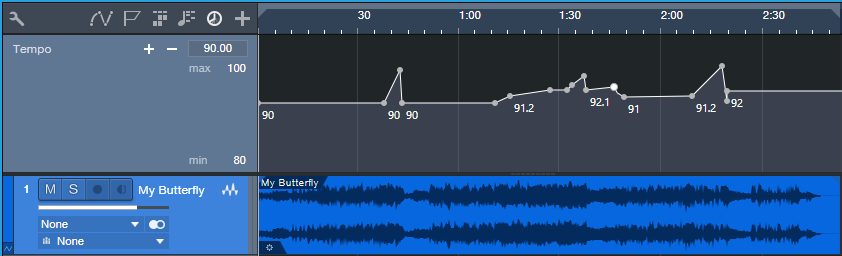
Here’s another example, a slower song called “My Butterfly.” It covers an even greater relative range, because it goes from a low of 90 to a high of 96 BPM. You may be able to hear the speedup in the solo, not just feel it, now that you know it’s there.
Note that when possible, there’s a constant tempo at the beginning and end. It doesn’t matter so much with songs, but with dance mixes, I can add tempo changes in the track as long as there’s a constant tempo on the intro and outro so DJs don’t go crazy when they’re trying to do beat-matching.
So is it worth making these kinds of changes? All I know is that the songs I do with tempo changes get a better response than songs without tempo changes. Maybe it’s coincidence…but I don’t think so.
Friday Tips – Why Mono Matters for Mixing
With the ideal mix, the balance among instruments is perfect, and you can hear every instrument (or instrument section) clearly and distinctly. However, getting there can take a while, with a lot of trial and error. Fortunately, there’s a simple trick you can use when setting up a mix to accelerate the process: Start your mix with all channel pan sliders set to center (Fig. 1).
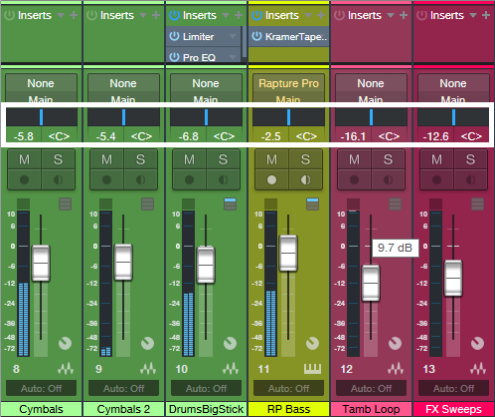
Figure 1: All the pan sliders (outlined in white) are set to center for a reason.
With stereo tracks, changing the track interleave to mono isn’t adequate, because it will throw off the channel’s level in the mix. Instead, temporarily add a Dual Pan set for the -6dB Linear Pan Law, and center both the Left and Right panpots (fig. 2). Now your stereo track will appear in the mix as mono.

Figure 2: Use the Dual Pan, set to the -6dB Linear pan law, to convert stereo channels temporarily to mono when setting up for a mix.
Analysis Time
Now listen carefully to your mix. Are all the instruments distinct? Monitoring in mono will reveal places where one instrument might mask or interfere with another, like kick and bass, or piano and guitar (depending on the note range).
The solution is to use EQ to carve out each instrument’s rightful place in the frequency spectrum. For example, if you want to prioritize the guitar part, you may need to reduce some of the piano’s midrange, and boost the regions above and below the guitar. For the guitar, boost a bit in the region where you cut the piano. With those tweaks in place, you’ll find it easier to differentiate between the two.
For kick/bass issues, the usual solution is to increase treble on one of them—with kick, this brings out the beater sound and with bass, string “zings” and pick noises. Another option is to add saturation to the bass, while leaving the kick drum alone. If the bass is playing relatively high notes, then perhaps a boost to the kick around 50-70 Hz will help separate the two.
Keep carving away, and adjusting the EQ until all the instruments are clear and distinct. Now when you start doing stereo placement, the sound will be open, with a huge soundstage and a level of clarity you might not obtain otherwise—or which might take a lot of tweaking to achieve.
We’re Not Done with Mono Just Yet…
Okay, now you have a great stereo mix. But it’s also important to make sure your mix collapses well to mono, because you have no control over the playback system. It might play from someone’s smartphone, and sounds mostly mono…or play back over speakers that are close to each other, so there’s not real good stereo separation. Radio is another possibility where the stereo might not be wonderful.
Some processors, especially ones that control stereo imaging with mid-side processing, may have phase or other issues when collapsed to mono. Short, stereo delays can also have problems collapsing to mono, and produce comb-filtering-type effects. So, hop on over to the main bus, and click the Channel Mode button to convert the output to mono (Fig. 3).
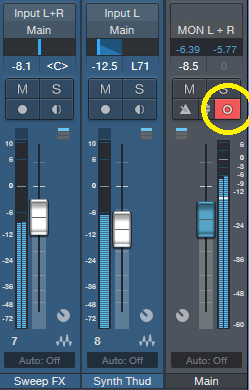
Figure 3: The Channel Mode button (circled in yellow) can switch the output between mono and stereo.
Hopefully, everything will sound correct—just collapsed to mono. But if not, start soloing channels and comparing what they sound like with the Channel Mode button in stereo and mono, until you chase down the culprit. Make the appropriate tweaks (which may be as simple as tweaking the delay time in one channel of a stereo delay processor), make sure the mix still sounds good in stereo, and you’re done.
Friday Tip – Make Impact XT Drums More Expressive
A sampled drum sound can get pretty boring. There’s even a name for triggering the same sound repeatedly—“the machine gun effect.” Sometimes you want this, but often, it’s preferable to have a sound that responds to velocity and is more expressive.
There are two ways to address this with Impact XT, depending on whether you have multiple samples recorded at different intensities (i.e., softer and harder hits), or only one sample, which then means you have to “fake” it sounds like it was recorded with different intensities.
Multiple Drum Samples
This is the most common way to create expressive drum parts. Drum sample libraries often include multiple versions of the same drum sound—like soft, medium, and hard hits. The technique we’ll describe here works for more than three samples, but limiting it to three is helpful for the sake of illustration.
Impact XT makes it super-simple to take advantage of sounds recorded at different intensities because you can load multiple samples on a single pad. However, note that if a pad already contains a sample and you drag a new sample to a pad, it will replace, not supplement, the existing sample. So, you need to use a different approach.
- Drag the first (soft) sample on to an empty pad.
- Click the + sign to the lower left of the pad sample’s waveform display, navigate to the medium sample, and load it (Fig. 1).
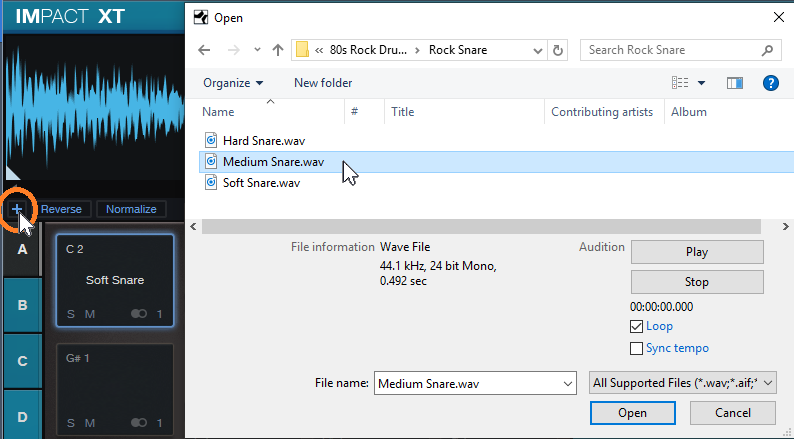
Figure 1: Click on the + sign to load another sample on to a pad.
- Click the + sign again, navigate to the hard sample, and load it.
- Above the pad’s waveform view, you’ll now see three numbers—one for each sample. Impact XT splits the velocity range into an equal number of smaller ranges based on the number of drums you’ve loaded, and automatically assigns the drums to the ranges. 1 is the first sample (soft) you dragged in, 2 is the second (medium) sample, and 3 is the last (hard) sample. Although Impact XT does automatic velocity assignment, you can drag the splitter bar between the numbered sections to vary the velocity ranges (Fig. 2).
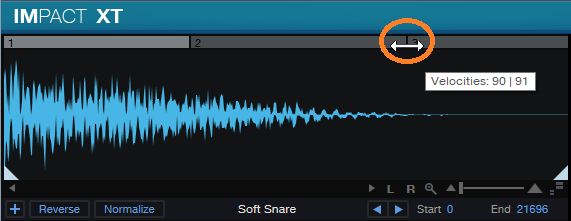
Figure 2: The splitter bar between samples can alter the velocity range to which a sample responds.
Now you’ll trigger different drum samples, depending on the velocity.
How to Fake Multiple Drum Samples
If you have a single drum sample with a hard hit, then you can use Impact XT’s sample start parameter to fake softer hits by changing the sample start time. (Starting sample playback later in the sample cuts off part of the attack, which sounds like a drum that’s hit softer.)
- Do all the steps above, but keep loading the single, hard hit. This loads multiple versions of the same sample on the same pad, split into different velocities.
- Click on the number 1 in the bar above the waveform to select the first sample.
- Drag the sample start time further into the sample to create the softest hit (Fig. 3).
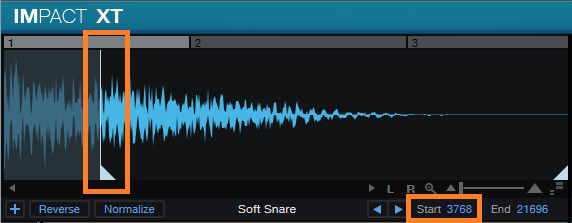
Figure 3: Click on the sample start line, and drag right to start sample playback past the initial attack. The readout toward the lower right shows the amount of offset, in samples.
- Click on the number 2 in the bar above the waveform to select the second sample.
- Move the sample start time halfway between the sample start and the altered sample start time in step 3.
Play the drum at different velocities. Tweak sample start times, and/or velocities, to obtain a smooth change from lower to higher velocities.
But Wait…There’s More!
Let’s add two more elements to emphasize the dynamics. These parameters affect all samples loaded on the pad, and are also effective with pads that have only a single sample.
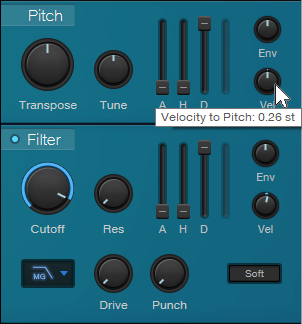
Figure 4: Assigning velocity to Pitch and Filter Cutoff can enhance dynamics even further.
At the Pitch module, turn up the Velocity to Pitch parameter by around 0.26 semitones (Fig. 4). This raises the pitch slightly when you hit the drum harder, which emulates acoustic drums (the initial strike raises the tension on the head, which increases pitch slightly, depending on how hard you hit the drum).
Similarly, back off on the Filter Cutoff slightly, and turn up the Filter’s Vel parameter a little bit (e.g., 10%). This will make the sound brighter with higher velocities.
Done! Now go forth, and give your music more expressive drum sounds.
Friday Tip – Create “Virtual Mics” with EQ
I sometimes record acoustic rhythm guitars with one mic for two main reasons: no issues with phase cancellations among multiple mics, and faster setup time. Besides, rhythm guitar parts often sit in the background, so some ambiance with electronic delay and reverb can give a somewhat bigger sound. However, on an album project with the late classical guitarist Linda Cohen, the solo guitar needed to be upfront, and the lack of a stereo image due to using a single mic was problematic.
Rather than experiment with multiple mics and deal with phase issues, I decided to go for the most accurate sound possible from one high-quality, condenser mic. This was successful, in the sense that moving from the control room to the studio sounded virtually identical; but the sound lacked realism. Thinking about what you hear when sitting close to a classical guitar provided clues on how to obtain the desired sound.
If you’re facing a guitarist, your right ear picks up on some of the finger squeaks and string noise from the guitarist’s fretting hand. Meanwhile, your left ear picks up some of the body’s “bass boom.” Although not as directional as the high-frequency finger noise, it still shifts the lower part of the frequency spectrum somewhat to the left. Meanwhile, the main guitar sound fills the room, providing the acoustic equivalent of a center channel.
Sending the guitar track into two additional buses solved the imaging problem by giving one bus a drastic treble cut and panning it somewhat left. The other bus had a drastic bass cut and was panned toward the right (Fig. 1).
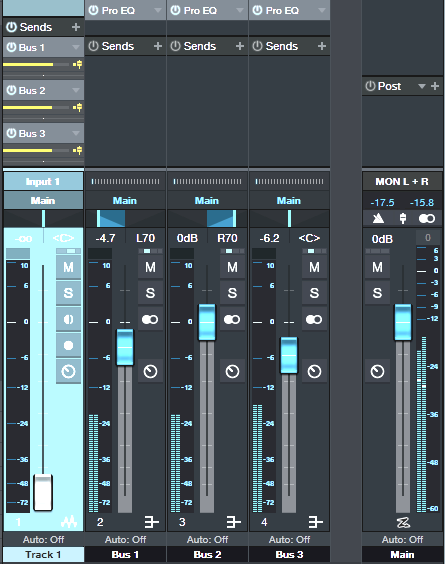
Figure 1: The main track (toward the left) splits into three pre-fader buses, each with its own EQ.
One send goes to bus 1. The EQ is set to around 400 Hz (but also try lower frequencies), with a 24 dB/octave slope to focus on the guitar body’s “boom.” Another send goes to bus 2, which emphasizes finger noises and high frequencies. Its EQ has a highpass filter response with a 24dB/octave slope and frequency around 1 kHz. Pan bus 1 toward the left and bus 2 toward the right, because if you’re facing a guitarist the body boom will be toward the listener’s left, and the finger and neck noises will be toward the listener’s right.
The send to bus 3 goes to the main guitar sound bus. Offset its highpass and lowpass filters a little more than an octave from the other two buses, e.g., 160 Hz for the highpass and 2.4 kHz for the lowpass (Fig. 2). This isn’t “technically correct,” but I felt it gave the best sound.
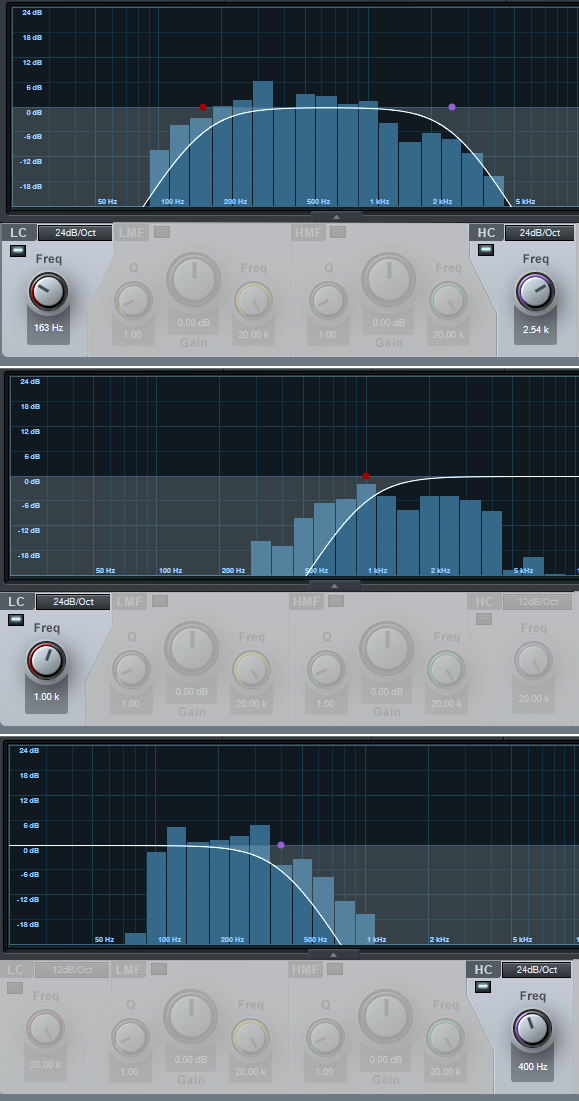
Figure 2: The top curve trims the response of the main guitar sound, the middle curve isolates the high frequencies, and the lower curve isolates the low frequencies. EQ controls that aren’t relevant are grayed out.
Monitor the first two buses, and set a good balance of the low and high frequencies. Then bring up the third send’s level, with its pan centered. The result should be a big guitar sound with a stereo image, but we’re not done quite yet.
The balance of the three tracks is crucial to obtaining the most realistic sound, as are the EQ frequencies. Experiment with the EQ settings, and consider reducing the frequency range of the bus with the main guitar sound. If the image is too wide, pan the low and high-frequency buses more to center. It helps to monitor the output in mono as well as stereo for a reality check.
Once you nail the right settings, you may be taken aback to hear the sound of a stereo acoustic guitar with no phase issues. The sound is stronger, more consistent, and the stereo image is rock-solid.
Video Using VocALign in Studio One Pro!
In this video, producer Paul Drew shows how VocALign seamlessly works inside Presonus Studio One Professional and almost instantly aligns the timing of multiple vocal tracks to a lead using ARA2, potentially saving hours of painstaking editing time.
ARA (Audio Random Access) is a pioneering extension for audio plug-in interfaces. Co-developed by Celemony and PreSonus, ARA technology enhances the communication between plug-in and DAW, and gives the plug-in and host instant access to the audio data. This video shows Studio One but the workflow is very similar in Cubase Pro & Nuendo, Cakewalk by Bandlab and Reaper.
Purchase VocALign today right out of the PreSonus Shop!
Friday Tip – Panning Laws: Why They Matter
Spoiler alert: We’ll get into some rocket science stuff here, which probably doesn’t affect your projects much anyway…so if you prefer something with a more musical vibe, come back next week. But to dispel some of the confusion regarding an oft-misunderstood concept, keep reading.
You pan a mono signal from left to right. Simple, right? Actually, no. In the center, there’s a 3 dB RMS volume buildup because the same signal is in both channels. Ideally, you want the signal’s average level—its power—to have the same perceived volume, whether the sound is panned left, right, or center. Dropping the level when centered by 3 dB RMS accomplishes this. As a result, traditional hardware mixers tapered the response as you turned a panpot to create this 3 dB dip.
However, there are other panning protocols. (Before your head explodes, please note you don’t need to learn all this stuff—it’s just to give you an idea of the complexity of pan laws, because all we really need to do is understand how things work in Studio One.) For example, some engineers preferred more of a drop in the center, so that audio panned to the sides would “pop” more due to the higher level, and open up more space in the center for vocals, kick, and bass. You could accomplish the same result by adjusting the channel level and pan, but the additional drop was sort of like having a preference you didn’t need to think about. To complicate matters further, some mixers lowered the center signal compared to the sides, while others raised the side signals compared to the center. If a DAW does the latter, when you import a normalized file and pan it hard left or hard right, it will go above 0 and clip.
But wait! There’s more. Some engineers didn’t want equal power over the panpot’s entire travel, but a slightly different curve. Others wanted a linear change that didn’t dip the signal at all.
Fortunately, Studio One has a rational approach to pan laws, namely…
- The panpots in Studio Once’s channels default to the traditional 3 dB dip, so there’s perceived constant level as you pan a mono signal from left to right. For stereo, they act as a balance control.
- Although most programs set the pan law as a global preference, Studio One includes the Dual Pan plug-in, which offers five different pan laws. This lets different channels follow different pan laws.
THE “WHAT-THE-HECK-DO-PAN-LAWS-DO” TEST SETUP
To see how the different panning laws affect signal levels, I created a test setup (Fig. 1) with a mono track fed by the Tone Generator set to a sine wave. Two pre-fader sends went to two buses, each with a Dual Pan inserted and linked for mono. That way, one bus’s Dual Pan could be set for hard pan and the other bus’s Dual Pan for center, to compare what happens to the signal level.
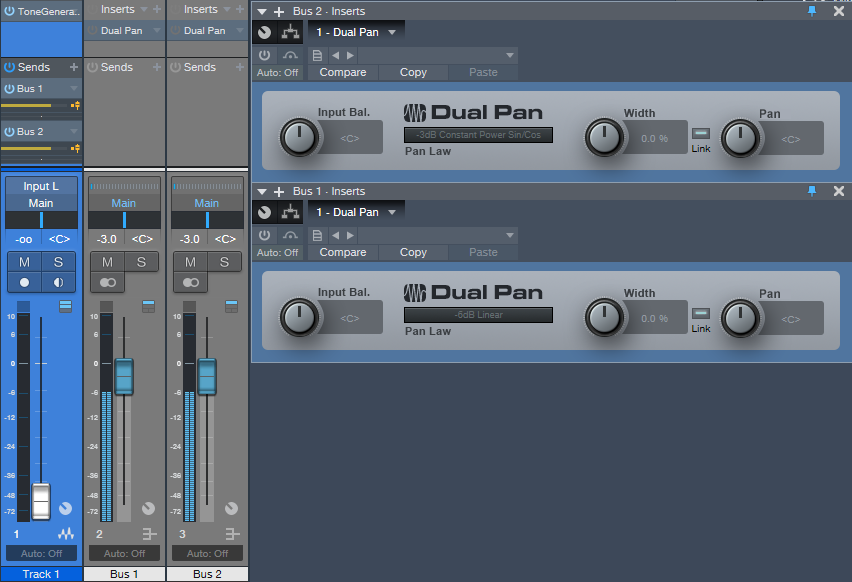
Figure 1: Test setup to determine how different pan laws affect signal levels.
In all the following test result images, Track 1 shows the mono sine wave at 0 dB, Bus 1 shows the result of panning the Dual Pan full left, and Bus 2 shows the result of panning the Dual Pan to center.
Fig. 2 uses the -3dB Constant Power Sin/Cos setting for the Dual Pans. Note that the centered version in Bus 2 is 3 dB below the same signal panned full left. This is the same setting as the default for the channel panpots. However, if you collapse the output signal to mono, you’ll get a 3 dB center-channel buildup. (A fine point: setting the Main bus mode to mono affects signals leaving the main bus; the meters still show the incoming signal. To see what’s happening when you collapse the Main out to mono, you need to insert a Dual Pan in the Main bus, click on Link, and set all controls to center.)
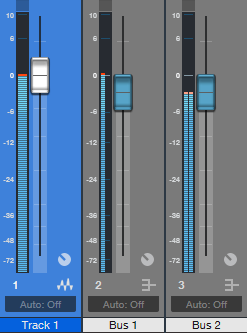
Figure 2: -3dB Constant Power Sin/Cos pan law.
Fig. 3 uses the -6 dB linear curve. Here, the centered signal is -6 dB below the signal panned hard left. Use this curve if the signal is going to be collapsed to mono after the main bus, because it keeps the gain constant when you collapse stereo to mono by eliminating the +3 dB increase that would happen otherwise.

Figure 3: The -6 dB linear curve is often preferable if you’re mixing in stereo, but also anticipate that the final result will end up being collapsed to mono.
Fig. 4 shows the resulting signal from the 0dB Balanced Sin/Cos setting. There’s no bump or decrease compared to the centered signal, so this acts like a balance control with a constant amount of gain as you pan from left to right.

Figure 4: 0dB Balanced Sin/Cos acts like a balance control.
Sharp-eyed readers who haven’t dozed off yet may have noticed we haven’t covered two variations on the curves described so far. -3dB Constant Power Sqrt (Fig. 5; Sqrt stands for Square Root) is like the ‑3 dB Constant Power Sin/Cos, but the curve is subtly different.
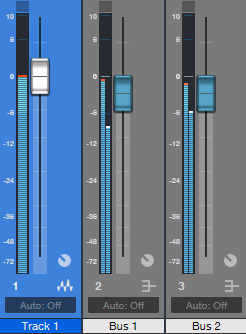
Figure 5: -3dB Constant Power Sqrt bends the curve shape slightly compared to the other Constant Power curve.
In this example, the panpot is set to 75% left instead of full left. Bus 1 shows what happens with -3dB Constant Power Sin/Cos, while Bus 2 is the Sqrt version. The Sqrt version is in less of a hurry to attenuate the right channel as you pan toward the left. Some engineers feel this more closely the situation in a space that’s not acoustically treated, so there’s a natural acoustic center buildup.
Finally, Fig. 6 compares the 0 dB Balance variations, sin/cos and linear.
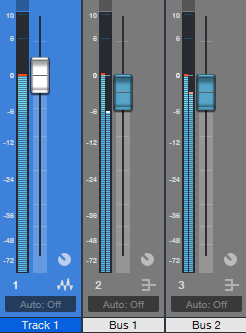
Figure 6: Comparing the two 0 dB Balance pan law options.
The difference is similar to the Constant Power examples, in that the basic idea is the same, but again, the linear version doesn’t attenuate the right channel as rapidly when you pan left.
I HAVEN’T FALLEN ASLEEP YET, SO PLEASE, JUST TELL ME WHAT I SHOULD USE!
The bottom line is when using the channel panpot with a mono track, if you live in a stereo mixdown world the above is mostly of academic interest. But if you’re mixing in stereo and know that your mix will be collapsed to mono (e.g., for broadcast), consider using the Dual Pan in mono channels, and set it to the -6 dB Linear pan law.
For stereo audio, again, a channel panpot works as it should—it acts like a balance control. However if the output is going to be collapsed into mono, you might want to leave the channel panpot centered, and insert a Dual Pan control to do the panning. It should be set to -6 dB Linear, controls unlinked, and then you move both controls equally to pan (e.g., if you want the sound slightly right of center, set both the left and right panpots to 66% right). Now when you pan, the mono levels in the main bus will be constant.
ONE MORE TAKEAWAY…
And finally…I’m sure you’ve seen people on the net who swear that DAW “A” sounds better than DAW “B” because they exported the tracks from one DAW, brought them into a second DAW, set the channel faders and panpots the same, and then were shocked that the two DAWs didn’t sound identical. And for further proof, they note that after mixing down the outputs and doing a null test, the outputs didn’t null. Well, maybe that proves that DAWs are different…but maybe what it really proves is that different programs default to different pan laws, so of course, there are bound to be differences in the mixes.
Friday Tips: The Best Flanger Plug-In?
Well…maybe it actually is, and we’ll cover both positive and negative flanging (there’s a link to download multipresets for both options). Both do true, through-zero flanging, which sounds like the vintage, tape-based flanging sound from the late 60s.
The basis of this is—surprise!—our old friend the Autofilter (see the Friday Tip for June 17, Studio One’s Secret Equalizer, for information on using its unusual filter responses for sound design). The more I use that sucker, the more uses I find for it. I’m hoping there’s a dishwashing module in there somewhere…meanwhile, for this tip we’ll use the Comb filter.
Positive Flanging
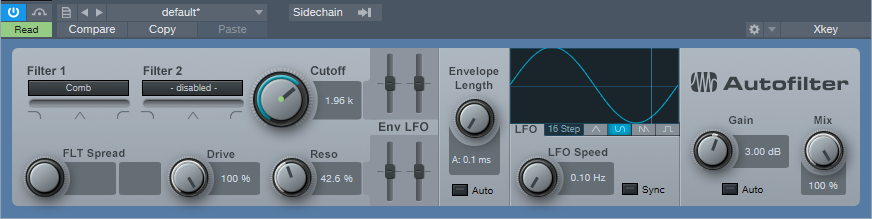
Figure 1: When set properly, the Autofilter’s comb filter can make a superb flanger.
Flanging depended on two signals playing against each other, with the time delay of one varying while the other stayed constant. Positive flanging was the result of the two signals being in phase. This gave a zinging, resonant type of flanging sound.
Fig. 1 shows the control settings for positive flanging. Turn Auto Gain off, Mix to 100%, and set both pairs of Env and LFO sliders to 0. Adding Drive gives a little saturation for more of a vintage tape sound (or follow the May 31 tip, In Praise of Saturation, for an alternate tape sound option). Resonance is to taste, but the setting shown above is a good place to start. The Gain control setting of 3 dB isn’t essential, but compensates for a volume loss when enabling/bypassing the FX Chain.
Varying the Cutoff controls the flanging effect. We won’t use the Autofilter’s LFO, because real tape flanging didn’t use an LFO—you controlled it by hand. Controlling the flanging process was always inexact due to tape recorder motor inertia, so a better strategy is to automate the Cutoff parameter, and create an automation curve that approximates the way flanging really varied (Fig. 2)—which was most definitely not a sine or triangle wave. A major advantage of creating an automation curve is that we can make sure that the flanging follows the music in the most fitting way.
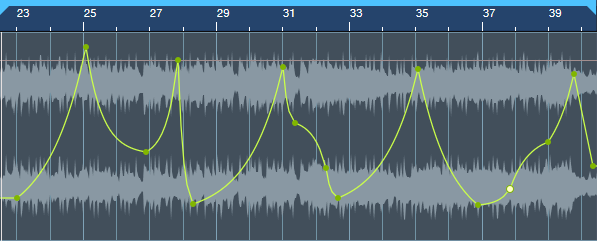
Figure 2: The Cutoff frequency automation curve used for the audio examples.
Negative Flanging
Throwing one of the two signals used to create flanging out of phase gave negative flanging, which had a hollower, “sucking” kind of sound. Also, when the variable speed tape caught up with and matched the reference tape, the signal canceled briefly due to being out of phase. It’s a little more difficult to create negative flanging, but here’s how to do it.
- Set up flanging as shown in the previous example, and then Duplicate Track (Complete), including the Autofilter.
- Turn Resonance all the way down in both Autofilters (original and duplicated track). This is important to obtain the maximum negative flanging effect. Because of the cancellation due to the two audio paths being out of phase, there’s a level drop when flanging. You can compensate by turning up both Autofilters’ Gain controls to exactly 6.00 dB (they need to be identical). This gain increase isn’t strictly necessary, but helps maintain levels between the enabled and bypassed states of the Negative Flanging FX Chain.
- In the duplicated track’s Autofilter, turn off the Autofilter’s Automation Read, and turn Cutoff up all the way (Fig. 3).
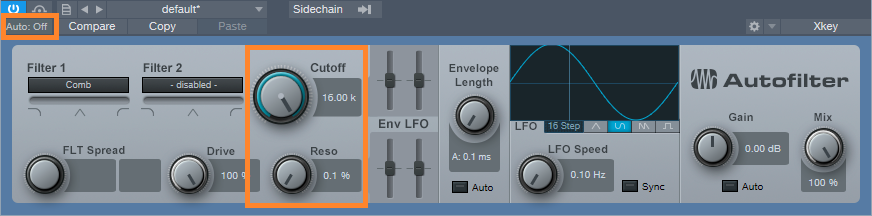
Figure 3: Settings for the duplicated track’s Autofilter.
- Insert a Mixtool after the Autofilter in the duplicated track, and enable both Invert Left and Invert Right (Fig. 4). This throws the duplicated track out of phase.

Figure 4: Mixtool settings for the duplicated track.
- Temporarily bypass both Autofilters (in the original and duplicated tracks). Start playback, and you should hear nothing because the two tracks cancel. If you want to make sure, vary one of the track faders to see if you hear anything, then restore the fader to its previous position.
- Re-enable both Autofilters, and program your Cutoff automation for the original track (the duplicated track shouldn’t have automation). Note that if you mute the duplicate track, or bring down its fader, the sound will be positive flanging (although with less level than negative flanging, because you don’t have two tracks playing at once).
So is this the best flanger plug-in ever? Well if not, it’s pretty close…listen to the audio examples, and see what you think.
Both examples are adapted/excerpted from the song All Over Again (Every Day).
The Multipresets
If you like what you hear, download the multipresets. There are individual ones for Positive Flanging and Negative Flanging. To automate the Flange Freq knob, right-click on it and choose Edit Knob 1 Automation. This overlays an automation envelope on the track that you can edit as desired to control the flanging.
Download the Positive Flanging Multipresets Here!
Download the Negative Flanging Multipresets Here!
And here’s a fine point for the rocket scientists in the crowd. Although most flangers do flanging by delaying one signal compared to another, most delays can’t go all the way up to 0 ms of delay, which is crucial for through-zero flanging where the two signals cancel at the negative flanging’s peak. The usual workaround is to delay the dry signal somewhat, for example by 1 ms, so if the minimum delay time for the processed signal is 1 ms, the two will be identical and cancel. The advantage of using the comb filter approach is that there’s no need to add any delay to the dry signal, yet they can still cancel at the peak of the flanging.
Finally, I’d like to mention my latest eBook—More Than Compressors – The Complete Guide to Dynamics in Studio One. It’s the follow-up to the book How to Record and Mix Great Vocals in Studio One. The new book is 146 pages, covers all aspects of dynamics (not just the signal processors), and is available as a download for $9.99.
Artist Denny White Discusses Career and Studio One!
We were recently introduced to Denny White via his artist bro and Studio One fan Josh Cumbee. Denny combines pop and electronic beats, soulful blues vocals, and a singer/songwriter style that takes listeners on a trip! Living in Los Angeles has awarded him opportunities to play alongside acts such as Young the Giant, Dawes, and Tove Styrke. He JUST released some vocal sample packs with our friends at Splice, and he’s currently working on a collection of singles leading up to his debut full-length album coming out soon! We recently had the opportunity to chat with him about his career and his gear.
Give us some background on yourself. How long have you been making music?
I grew up in a sleepy California suburb called Hemet and music was always at the centerpiece of everything we did. I fell slowly into making music as a career, and still find it crazy that I call this my “job.” My freshman year of college, I met my good buddy Brent Kutlze, who produced my first solo EP and mentored me early on. I saw first hand how he wrote & produced for other artists, while also being a full-time one himself in his band OneRepublic. Releasing that first EP led to me meeting a manager, doing hundreds of co-writes, moving to LA, and eventually signing a publishing deal with Warner Chappell.
How has the music industry changed since your early days?
It’s such a catch-22… everything’s changed while nothing has at the same time. I was technically streaming music in high school with Limewire and MySpace, but couldn’t have dreamed it would morph into streaming as we know it today. On the recording side, I’m still producing on a laptop like I was in college, but everything is light years better and faster than anything I could have imagined then. One of the biggest changes is the vast amounts of knowledge and resources available to everyone now. The industry once sounded like some mysterious faraway place that only a few had access to, but now that glass ceiling has been shattered. I’ve written with kids who know about publishing, licensing, producing, and even their own frequency preferences on a vocal, thanks to amazing resources like Pensado’s Place, or podcasts like Ross Golan’s And the Writer is.
 Describe the first time you wrote a song.
My first song was written for a school talent show, and I hope to find a dusty VHS tape someday with a little me on it, most likely singing a mid-tempo Ben Folds-esque piano tune.
Who has been an influence in your life?
Hands down my wife’s been the biggest influence in my life. Musically, I’ve been the benefactor of so many talented friends and collaborators who’ve had an influence on me as well over the years, Brent Kutlze, Michael Brun, David Hodges, Alex Delicata, Steve Wilmot, and Jeff Sojka to name a few!
Have you ever wanted to give up on music? What keeps you going?
I’ve never wanted to give up on music per se, but have definitely contemplated other career paths, as this one has the propensity to drive you mad; you really have to love it despite the wild ebb and flow of the industry and embrace the process daily. My faith and family keep me going on days I don’t want to.
How did you first hear of PreSonus?
I’ve always known about PreSonus but knew little about the products until really hearing about Studio One from my freakishly talented friend Josh Cumbee last year.

What do you like about PreSonus? What caught your eye?
I remember being in Josh’s studio and was immediately intrigued when I saw the Start Page of Studio One. It felt so unique and custom to Josh. The first feature that caught my eye was the window in the middle where you can upload your own art, that prints on every mixdown. Also, the organization of seeing all recent files on the left, without having to scroll through a list or search your hard drive immediately spoke to my OCD-ness.
What PreSonus products do you use?
I use Studio One, Monitor Station v2, and just snagged the newest FaderPort for even more control!
What features are you most impressed with in Studio One?
I really dig Console Shaper, and the immediate vibe it can give to any blank start. The hybrid dual buffer engine is insane and makes it possible to work in large projects that historically would have been a cluster cuss, and allows me to use instances of soft synths that are taxing on CPU like Kontact or Vengeance Avenger up until the finish line. Tracklist organization, Fat Channel, and “Candleblower” bass in Mai Tai are a few of the other million things I love in it.
Any user tips or tricks or interesting stories based on your experience with Studio One?
Recently I released a Vocal pack on Splice, and Sample One XT made all my vocal chops feel so much more creative and important-sounding than anything I could have accomplished in my sad old DAW’s sampler. First I’d record pass of adlibs, tune with the integrated Melodyne (insanely fast,) then map individual samples across 3-5 keys and quickly explore new melody ideas. Another huge lifehack is I have “W” set to “Locate Mouse Cursor.” It’s insane how much time these things have saved me, and now I’m able to be creative almost immediately.
How easy/difficult was Studio One to learn?
The transition was so easy. I was very reluctant at first, thinking It’d take way too much time, but after doing a few sessions in it I was back at full speed with a whole new perspective on producing.


Where do you go for support?
From the Knowledgebase to millions of videos on YouTube, or texting one of my friends about Studio One, there’s never a shortage of support.
Recent projects? What’s next for you?
Last week I released my first Vocal Sample Pack on Splice that I’m really proud of. Currently, I’m in the middle of writing for my album, while also producing a record for Gabriel Conte!
Keep up with Denny on Instagram!
Check out his work on Spotify!
Buy his Vocal Sample Pack from Splice Here!

Studio One’s Percussion Part Generator
Shakers, tambourines, eggs, maracas, and the like can add life and interest to a song by complementing the drum track. But it’s not always easy to play this kind of part. It has to be consistent, but not busy; humble enough to stay in the background, but strong enough to add impact…and this sounds like a job for version 4.5’s new MIDI features.
We’ll go through the process of creating a cool, 16th-note-based percussion part, but bear in mind that this is just one approach. Although it works well, there are many ways you can modify this process (which we’ll touch on at the end).
First, Choose Your Sound
Ideally, you’ll have a couple different samples of the percussion instrument you want to use. But if you don’t, there’s a simple workaround. I use Impact for these kinds of parts, and if there’s only one sample of something like a shaker, I’ll drag it to two pads, and detune one of the pads by -1 semitone so they sound different. In the following example, we’ll call the original sample Sound 1, and detuned sample, Sound 2.
The Process
Let’s create a two-bar percussion loop to start. Grab the Draw tool, and set the Quantize value to 1/4. Drag across the two measures to create a hit at every quarter note for Sound 1 (Fig. 1).
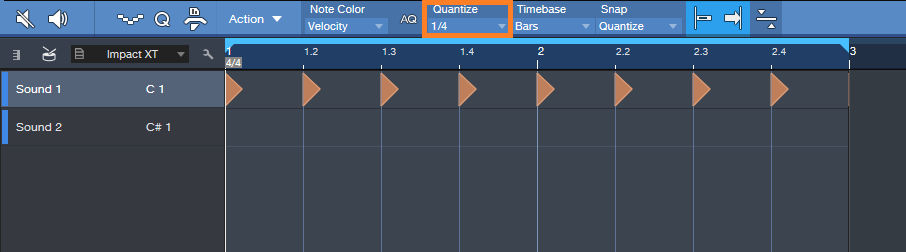
Figure 1. Having a constant series of 1/4-note hits anchors the rhythm so we can alter other hits.
Next, set the Quantize value to 1/16. Drag across the two measures to create a hit at every 16th note for Sound 2 (Fig. 2). Hit Play, so you can marvel at how totally unmusical it sounds.
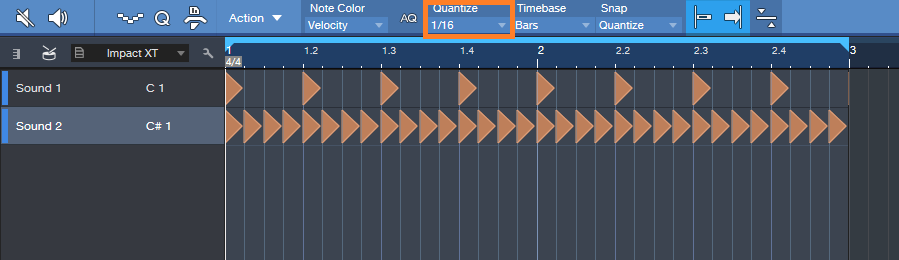
Figure 2: We’ll be modifying the series of 16th notes to add interest.
Now let’s make the part sound good. The key here is not to alter the 1/4 note hits—we want them rock solid, so that the rhythm won’t get pulled too far astray when we start adding variations to the 16th notes.
Select only the 16th notes for Sound 2, and let’s use version 4.5’s new Thin Out Notes command. I’m a fan of Delete notes randomly, and we’ll delete 40% of the notes. Choose the 1/16 grid, since that matches the part. Click OK, and now the part isn’t quite so annoyingly constant (Fig. 3).
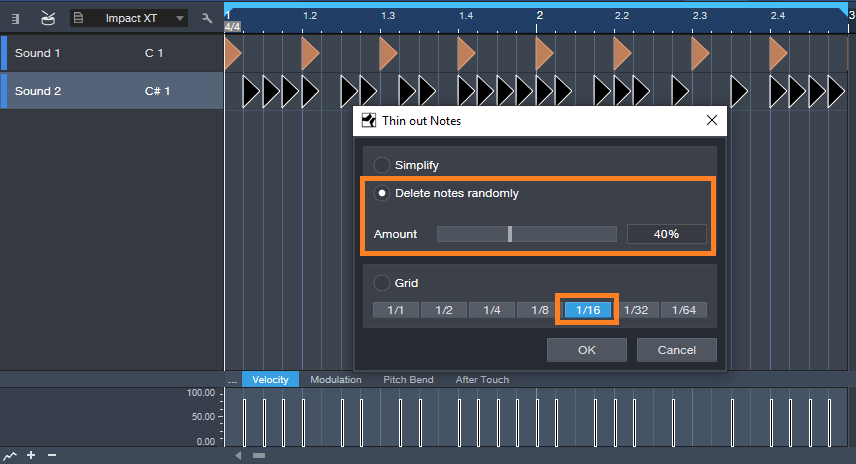
Figure 3: Dropping out the occasional random note adds interest.
But we still need to do something about the velocity, which is way too consistent—the real world doesn’t work that way. Select the string of 16th notes again, and this time, choose Humanize. Set a Velocity range and Note start range (like -40/40% and -.0015/0.0015 respectively), and then click OK (Fig. 4). Now look at the velocity strip: it’s a lot more interesting. The timing changes are also helpful, but they don’t have the “drunken percussion player” quality that you get a lot with randomized timings, because those rock-solid quarter note hits are still establishing the beat.
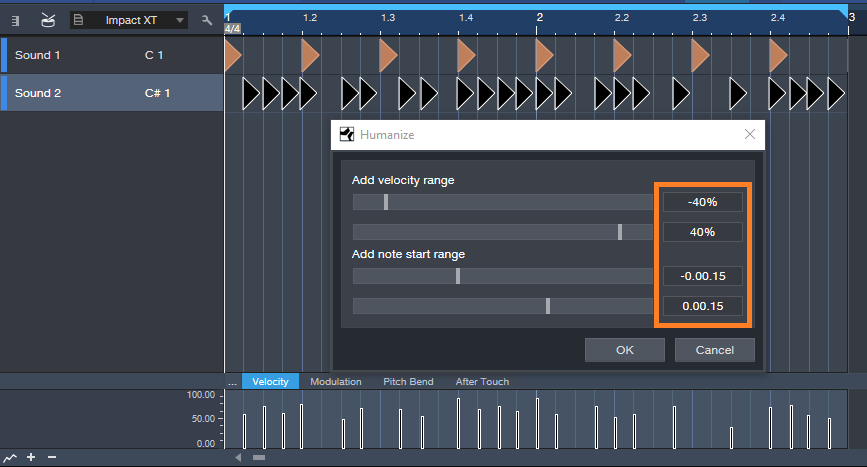
Figure 4: Humanizing velocity and start times for only the 16th notes adds variations that make the part more lively.
So now we have an interesting two-measure loop, but let’s not loop it—instead, we’ll create a part that lasts as long as we want, and it will still be interesting. Here’s how.
Duplicate the two measures for as long as you want. Select all the notes in the Sound B row, and choose Randomize notes. Uncheck everything except Shuffle Notes. Click on OK. All the notes will stay in the same position, and because there are no other candidate notes for shuffling, the timing won’t change. What will Shuffle is velocity. If you created a Shuffle Macro for the May 24 tip on End Boring MIDI Drum Parts, it will come in handy here—keep hitting that macro until the pattern is the way you want. After you de-select the notes, if you’ve chosen Velocity for note color, you’ll have a pretty colorful velocity strip (Fig. 5).
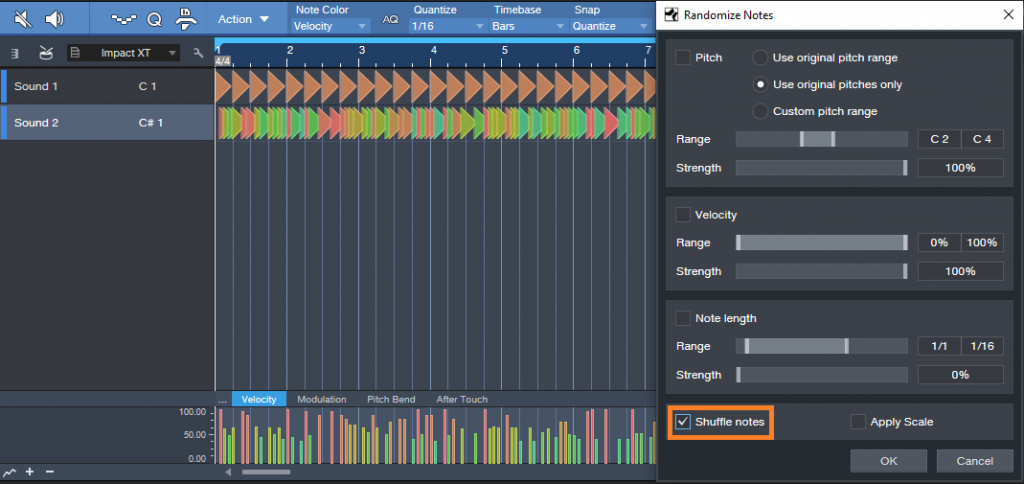
Figure 5: Shuffling velocity in a longer part adds more interesting dynamics.
Now you have a part that sounds pretty good, and once you become familiar with the process, you’ll find it takes less time to generate a part than it does to read this. Here are some options to this technique.
- Instead of creating a short loop, duplicating it, and then shuffling velocity, you can start off with a much longer event using the same basic principle (a row of quarter notes and another of sixteenth notes). Then, when you drop out notes randomly, there will be more variations within the pattern compared to dropping out notes for a couple measures and duplicating them.
- Another way to do something similar to dropping notes is with the Randomize function—set the lower end of the velocity range to 0. This can even be useful to thin out a part further after dropping random notes, for example, if there’s a lot going on with other instruments in a section.
- Some percussion instruments have samples of multiple hits. This allows using the Shuffle function, as described in the May 24 tip, to mix up the pitches a bit.
- A little processing can also be cool—like the Analog Delay, set for a dotted 8th-note delay, mixed in the background…or a little reverb.
- Re-visit Humanizing, with more drastic velocity changes.
The bottom line: there are a lot of possibilities!