Friday Tip – Create “Virtual Mics” with EQ
I sometimes record acoustic rhythm guitars with one mic for two main reasons: no issues with phase cancellations among multiple mics, and faster setup time. Besides, rhythm guitar parts often sit in the background, so some ambiance with electronic delay and reverb can give a somewhat bigger sound. However, on an album project with the late classical guitarist Linda Cohen, the solo guitar needed to be upfront, and the lack of a stereo image due to using a single mic was problematic.
Rather than experiment with multiple mics and deal with phase issues, I decided to go for the most accurate sound possible from one high-quality, condenser mic. This was successful, in the sense that moving from the control room to the studio sounded virtually identical; but the sound lacked realism. Thinking about what you hear when sitting close to a classical guitar provided clues on how to obtain the desired sound.
If you’re facing a guitarist, your right ear picks up on some of the finger squeaks and string noise from the guitarist’s fretting hand. Meanwhile, your left ear picks up some of the body’s “bass boom.” Although not as directional as the high-frequency finger noise, it still shifts the lower part of the frequency spectrum somewhat to the left. Meanwhile, the main guitar sound fills the room, providing the acoustic equivalent of a center channel.
Sending the guitar track into two additional buses solved the imaging problem by giving one bus a drastic treble cut and panning it somewhat left. The other bus had a drastic bass cut and was panned toward the right (Fig. 1).
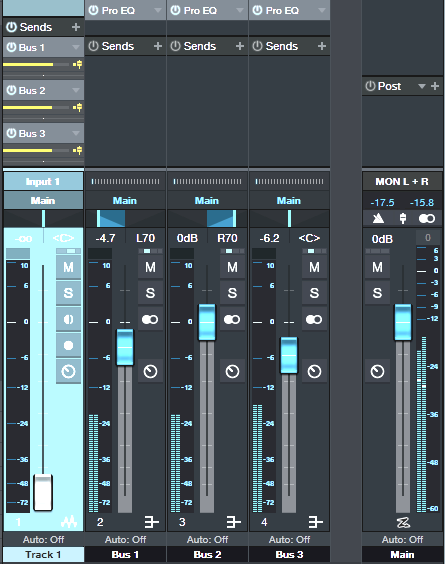
Figure 1: The main track (toward the left) splits into three pre-fader buses, each with its own EQ.
One send goes to bus 1. The EQ is set to around 400 Hz (but also try lower frequencies), with a 24 dB/octave slope to focus on the guitar body’s “boom.” Another send goes to bus 2, which emphasizes finger noises and high frequencies. Its EQ has a highpass filter response with a 24dB/octave slope and frequency around 1 kHz. Pan bus 1 toward the left and bus 2 toward the right, because if you’re facing a guitarist the body boom will be toward the listener’s left, and the finger and neck noises will be toward the listener’s right.
The send to bus 3 goes to the main guitar sound bus. Offset its highpass and lowpass filters a little more than an octave from the other two buses, e.g., 160 Hz for the highpass and 2.4 kHz for the lowpass (Fig. 2). This isn’t “technically correct,” but I felt it gave the best sound.
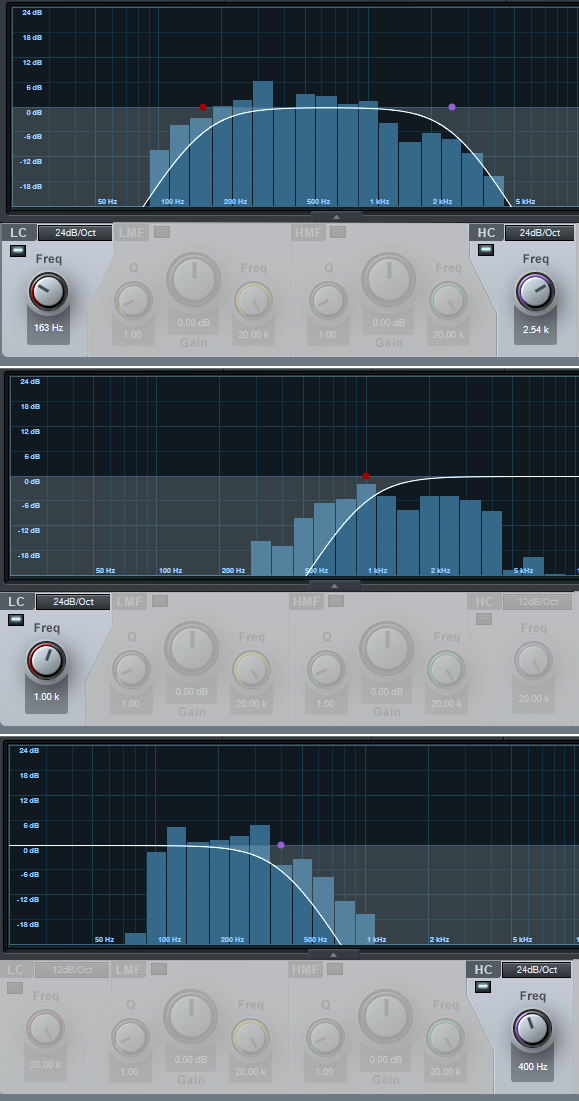
Figure 2: The top curve trims the response of the main guitar sound, the middle curve isolates the high frequencies, and the lower curve isolates the low frequencies. EQ controls that aren’t relevant are grayed out.
Monitor the first two buses, and set a good balance of the low and high frequencies. Then bring up the third send’s level, with its pan centered. The result should be a big guitar sound with a stereo image, but we’re not done quite yet.
The balance of the three tracks is crucial to obtaining the most realistic sound, as are the EQ frequencies. Experiment with the EQ settings, and consider reducing the frequency range of the bus with the main guitar sound. If the image is too wide, pan the low and high-frequency buses more to center. It helps to monitor the output in mono as well as stereo for a reality check.
Once you nail the right settings, you may be taken aback to hear the sound of a stereo acoustic guitar with no phase issues. The sound is stronger, more consistent, and the stereo image is rock-solid.