Friday Tip – Panning Laws: Why They Matter
Spoiler alert: We’ll get into some rocket science stuff here, which probably doesn’t affect your projects much anyway…so if you prefer something with a more musical vibe, come back next week. But to dispel some of the confusion regarding an oft-misunderstood concept, keep reading.
You pan a mono signal from left to right. Simple, right? Actually, no. In the center, there’s a 3 dB RMS volume buildup because the same signal is in both channels. Ideally, you want the signal’s average level—its power—to have the same perceived volume, whether the sound is panned left, right, or center. Dropping the level when centered by 3 dB RMS accomplishes this. As a result, traditional hardware mixers tapered the response as you turned a panpot to create this 3 dB dip.
However, there are other panning protocols. (Before your head explodes, please note you don’t need to learn all this stuff—it’s just to give you an idea of the complexity of pan laws, because all we really need to do is understand how things work in Studio One.) For example, some engineers preferred more of a drop in the center, so that audio panned to the sides would “pop” more due to the higher level, and open up more space in the center for vocals, kick, and bass. You could accomplish the same result by adjusting the channel level and pan, but the additional drop was sort of like having a preference you didn’t need to think about. To complicate matters further, some mixers lowered the center signal compared to the sides, while others raised the side signals compared to the center. If a DAW does the latter, when you import a normalized file and pan it hard left or hard right, it will go above 0 and clip.
But wait! There’s more. Some engineers didn’t want equal power over the panpot’s entire travel, but a slightly different curve. Others wanted a linear change that didn’t dip the signal at all.
Fortunately, Studio One has a rational approach to pan laws, namely…
- The panpots in Studio Once’s channels default to the traditional 3 dB dip, so there’s perceived constant level as you pan a mono signal from left to right. For stereo, they act as a balance control.
- Although most programs set the pan law as a global preference, Studio One includes the Dual Pan plug-in, which offers five different pan laws. This lets different channels follow different pan laws.
THE “WHAT-THE-HECK-DO-PAN-LAWS-DO” TEST SETUP
To see how the different panning laws affect signal levels, I created a test setup (Fig. 1) with a mono track fed by the Tone Generator set to a sine wave. Two pre-fader sends went to two buses, each with a Dual Pan inserted and linked for mono. That way, one bus’s Dual Pan could be set for hard pan and the other bus’s Dual Pan for center, to compare what happens to the signal level.
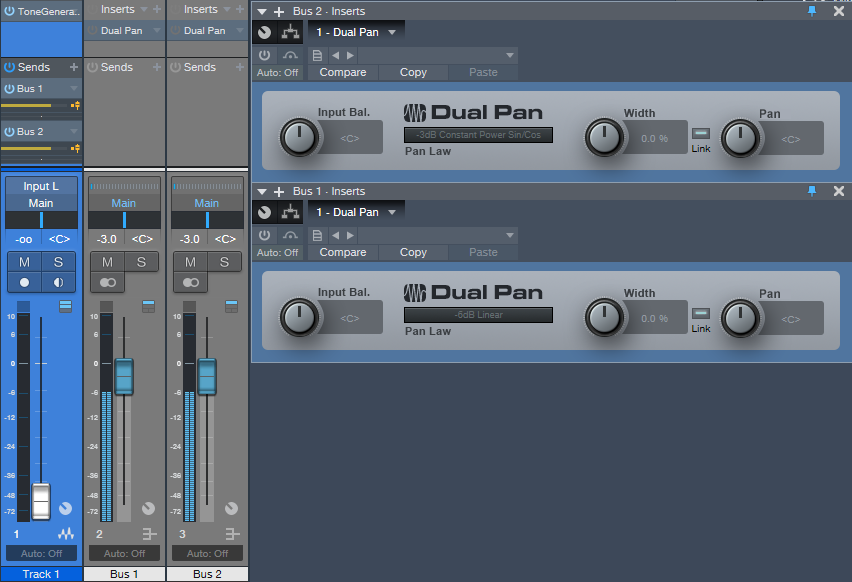
Figure 1: Test setup to determine how different pan laws affect signal levels.
In all the following test result images, Track 1 shows the mono sine wave at 0 dB, Bus 1 shows the result of panning the Dual Pan full left, and Bus 2 shows the result of panning the Dual Pan to center.
Fig. 2 uses the -3dB Constant Power Sin/Cos setting for the Dual Pans. Note that the centered version in Bus 2 is 3 dB below the same signal panned full left. This is the same setting as the default for the channel panpots. However, if you collapse the output signal to mono, you’ll get a 3 dB center-channel buildup. (A fine point: setting the Main bus mode to mono affects signals leaving the main bus; the meters still show the incoming signal. To see what’s happening when you collapse the Main out to mono, you need to insert a Dual Pan in the Main bus, click on Link, and set all controls to center.)
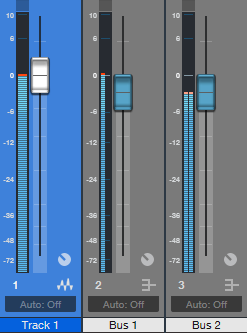
Figure 2: -3dB Constant Power Sin/Cos pan law.
Fig. 3 uses the -6 dB linear curve. Here, the centered signal is -6 dB below the signal panned hard left. Use this curve if the signal is going to be collapsed to mono after the main bus, because it keeps the gain constant when you collapse stereo to mono by eliminating the +3 dB increase that would happen otherwise.

Figure 3: The -6 dB linear curve is often preferable if you’re mixing in stereo, but also anticipate that the final result will end up being collapsed to mono.
Fig. 4 shows the resulting signal from the 0dB Balanced Sin/Cos setting. There’s no bump or decrease compared to the centered signal, so this acts like a balance control with a constant amount of gain as you pan from left to right.

Figure 4: 0dB Balanced Sin/Cos acts like a balance control.
Sharp-eyed readers who haven’t dozed off yet may have noticed we haven’t covered two variations on the curves described so far. -3dB Constant Power Sqrt (Fig. 5; Sqrt stands for Square Root) is like the ‑3 dB Constant Power Sin/Cos, but the curve is subtly different.
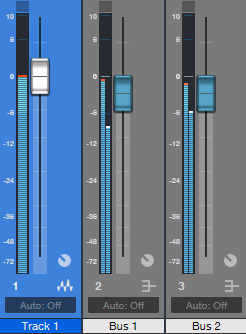
Figure 5: -3dB Constant Power Sqrt bends the curve shape slightly compared to the other Constant Power curve.
In this example, the panpot is set to 75% left instead of full left. Bus 1 shows what happens with -3dB Constant Power Sin/Cos, while Bus 2 is the Sqrt version. The Sqrt version is in less of a hurry to attenuate the right channel as you pan toward the left. Some engineers feel this more closely the situation in a space that’s not acoustically treated, so there’s a natural acoustic center buildup.
Finally, Fig. 6 compares the 0 dB Balance variations, sin/cos and linear.
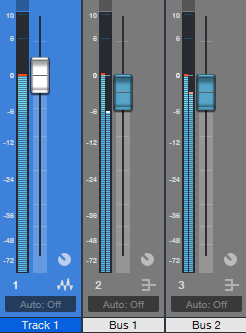
Figure 6: Comparing the two 0 dB Balance pan law options.
The difference is similar to the Constant Power examples, in that the basic idea is the same, but again, the linear version doesn’t attenuate the right channel as rapidly when you pan left.
I HAVEN’T FALLEN ASLEEP YET, SO PLEASE, JUST TELL ME WHAT I SHOULD USE!
The bottom line is when using the channel panpot with a mono track, if you live in a stereo mixdown world the above is mostly of academic interest. But if you’re mixing in stereo and know that your mix will be collapsed to mono (e.g., for broadcast), consider using the Dual Pan in mono channels, and set it to the -6 dB Linear pan law.
For stereo audio, again, a channel panpot works as it should—it acts like a balance control. However if the output is going to be collapsed into mono, you might want to leave the channel panpot centered, and insert a Dual Pan control to do the panning. It should be set to -6 dB Linear, controls unlinked, and then you move both controls equally to pan (e.g., if you want the sound slightly right of center, set both the left and right panpots to 66% right). Now when you pan, the mono levels in the main bus will be constant.
ONE MORE TAKEAWAY…
And finally…I’m sure you’ve seen people on the net who swear that DAW “A” sounds better than DAW “B” because they exported the tracks from one DAW, brought them into a second DAW, set the channel faders and panpots the same, and then were shocked that the two DAWs didn’t sound identical. And for further proof, they note that after mixing down the outputs and doing a null test, the outputs didn’t null. Well, maybe that proves that DAWs are different…but maybe what it really proves is that different programs default to different pan laws, so of course, there are bound to be differences in the mixes.