Attack Delay—Done Right!

The Attack Delay effect, used primarily with guitar, fades in a note or chord over the initial attack to give a more pad-like sound. The effect feeds audio into a gate with an attack time, and triggers the gate when a note or chord hits.
However, you need a brief silence between notes or chords (I prefer using this with chords), so the gate can reset prior to initiating the next attack. It’s kind of annoying to have to modify your playing style to accommodate this pause. Also, if the gate threshold is too high, you won’t hear any note—and if it’s too low, you might lose the attack effect. Attack Delay stompboxes can be iffy, which may be one reason why you don’t see one on every pedalboard.
Nonetheless, this can be a beautiful effect when done right…and as the audio example shows, Studio One can do it right.
Attack Delay Setup
The key is to insert the Gate in the track you want to process, but not trigger the Gate from that track. Instead, you create a copy of the original track, and optimize it for triggering the Gate. The copy then controls the Gate through its sidechain (you don’t listen to the copied track).
(Optionally, before setting this up, consider compressing or limiting the original guitar track so that it has a longer sustain. You don’t want the guitar to fade too much before the attack fades in.)
Fig. 1 shows the mixer setup. The GtrPadTrig track’s pre-fader send goes to the Gate’s sidechain. Turn down this track’s channel fader, because we don’t want to hear the copied track. The guitar track in the audio example inserts Ampire before the Gate, and reverb after the Gate. The reverb adds an ethereal quality as the guitar fades into the chord.
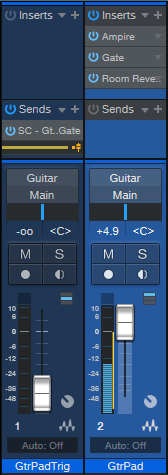
Figure 1: Mixer setup.
Next, prep the control track in the Edit window. Open the Audio Bend panel (to the right of the speaker icon in the Edit window toolbar), right-click on the Event, and choose Detect Transients. If necessary, adjust the Bend Marker Threshold (or remove and add Bend Markers) so that Bend Markers appear only at the beginning of chords or notes (fig. 2).
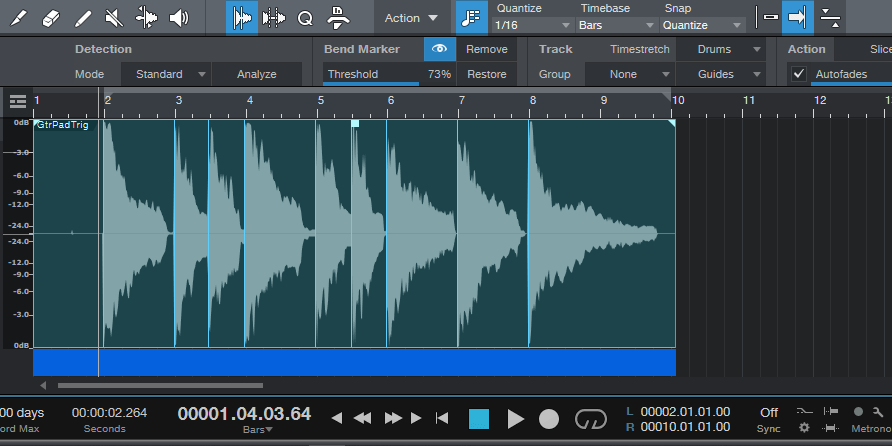
Figure 2: The beginning of each chord has a Bend Marker. This shows the waveform prior to splitting.
Mind the Gap
Right-click on the Event, and choose Split at Bend Markers. All the Events will be separate and selected. Click on the right edge of any Event, and drag to the left. Because all the Events are selected, this opens up a gap before all the chord attacks (fig. 3).

Figure 3: The control track is on the top, and the audio we listen to below it.
Now start playback, and adjust the Gate parameters. This is a little tricky at first, because you want the Threshold set so that triggers coming in from the sidechain open the Gate, coupled with a Release time that’s short enough so that the Gate doesn’t shut off immediately. I usually leave about a 100 ms gap between chord attacks, and set the Gate release time to 60 ms. Your mileage may vary.
If the triggering isn’t reliable, adjust the Threshold, gap length, or Release. To edit the gap, select all the events and vary the right edge of one of them—they’ll all move together. Sometimes, there might be one obstinate note that doesn’t trigger correctly, in which case you can select only the Event before it, and vary its gap for reliable triggering with the next chord.
Yes, this takes a little effort to set up, but it’s cool. Besides, there’s nothing wrong with exploring an effect that remains somewhat rare, because it’s hard to get right—fortunately, Studio One can get it right.