Category Archives: Studio One
Songwriting with Impact XT
This tip is for those of you who didn’t see my Studio One workshop at Sweetwater GearFest 2018, were turned away because of that pesky fire marshal’s rules about crowds, or who didn’t realize Studio One 4 has some pretty advanced looping capabilities—as well as the ability to trigger pitch transpositions for loops.
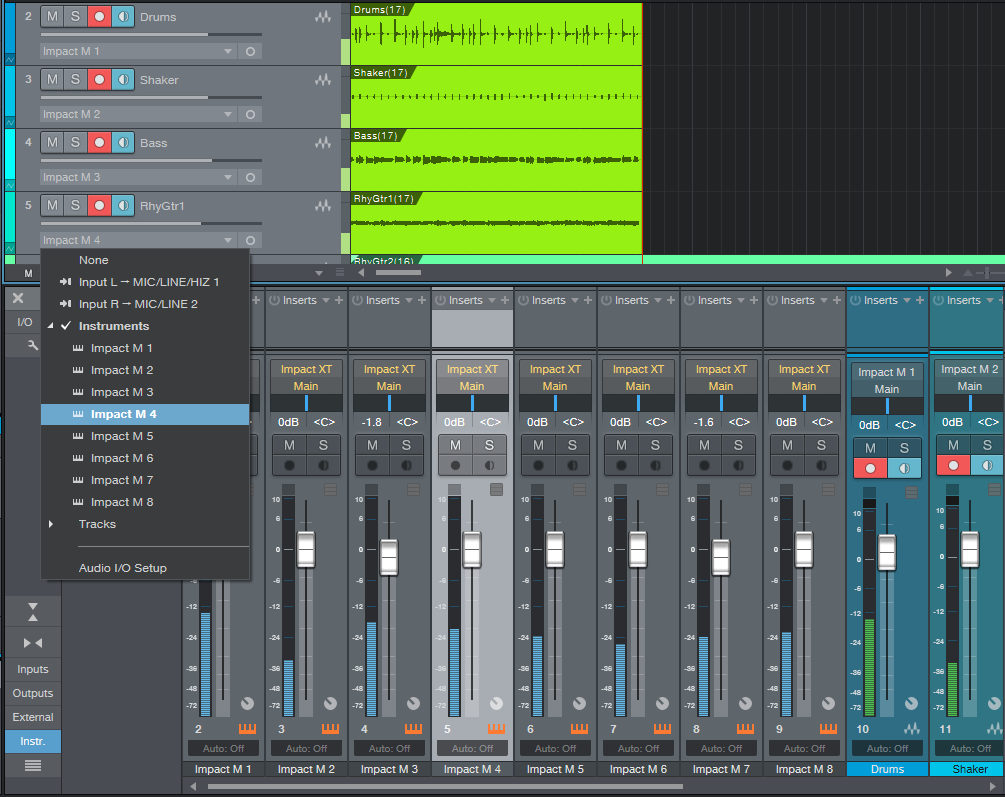
With Impact XT, you can load loops on pads, and then trigger them (on and off) in real time via MIDI notes. Assign each output from an Impact XT pad to a track input (in the screen shot, Track 5 is recording the output of Impact XT M4), set all the tracks to record, and you can record the results of your improvisations.
The following screen shot shows the results of recording the first part of a potential song. Note how some tracks have sounds that extend the length of the recording, while other tracks had their sounds brought in at specific times by triggering an Impact XT pad.
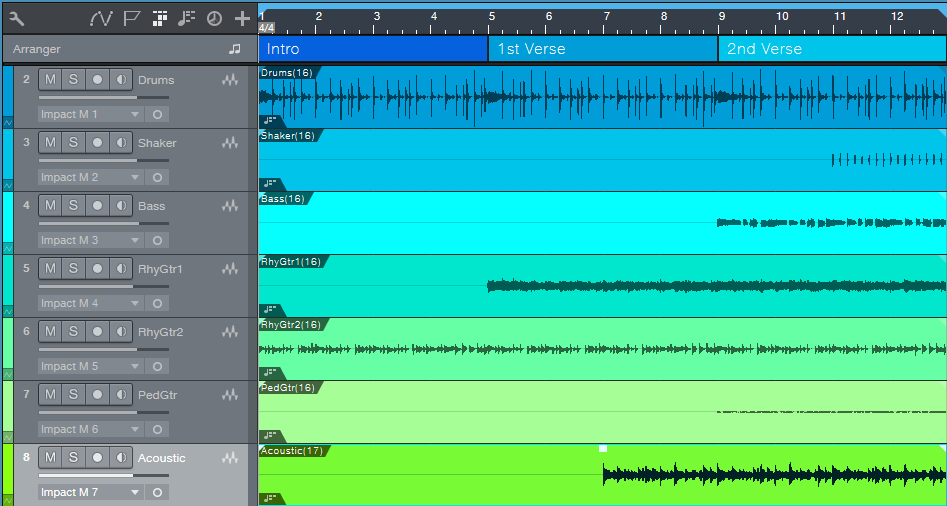
This by itself is pretty cool, because you can weave loops in and out to create an arrangement. The song goes longer than this, but the above shows what you’re hearing in the following audio example. Granted, it’s not much of a song—it just kinda drones on and on. But keep reading…this is just the start.
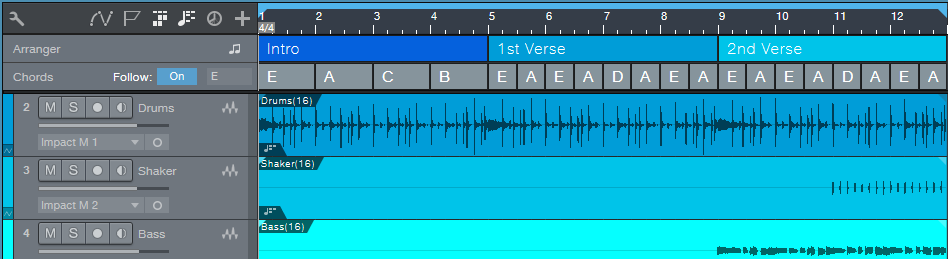
The process becomes far more interesting when you bring the chord track into play, because you can transpose the loops to create a chord progression that becomes the basis for a song. All the tracks, even the drums, were set to follow the chord track. Listen to how although some of the original loops added a fourth to the tonic, when this was synched to the chord track, all of the loops followed a tonic-to-fourth chord progression. In other words, it wasn’t just one loop adding a fourth, but the entire song transposing to the fourth. We also gained an intro; here’s the chord progression that was used.
And here’s what the chord progression sounded like after harmonic editing. The major difference is in the intro, and transposing to D to kick off the second half of each verse.
Working this way can be very inspirational because you can create a basic arrangement with loops, and then use the Chord Track to create a chord progression. Although PreSonus is careful to point out that Harmonic Editing is more for “prototyping” songs and they expect that you’ll want to replace the “scratch” parts, I’ve found that many times the scratch parts end up being keepers—and I gotta say, I love what happens when you tell drums to follow the chord track!
Studio One 4 User, James Reynolds, at the Top of the Charts!
Currently sitting in the no.1 and no.2 slot on the USA iTunes Charts are two songs mixed by mix engineer, music producer and songwriter James Reynolds who also is a Studio One user!

As a huge fan of the DAW, Reynolds worked with us on the development of the new Studio One 4, and it’s his go-to DAW for many reasons.
Reynolds was recently interviewed for Sound on Sound Magazine. Check out some of the article here. Here are just a few things he had to say about Studio One:
“I was on Cubase for a while, and then I switched to Logic. I stayed in Logic for a long time, rather than moving to Pro Tools, because I found Logic more creative. But when I discovered Studio One I really liked it, and today it is absolutely perfect!”
“Pro Tools and Studio One are very similar, because Studio One is designed to make it very easy to convert to for Pro Tools users, who would find it a piece of cake. Where it differs is in the drag‐and‐drop workflow, which is super‐fast. You have a sidebar with all your plug‐ins listed in your folders, and you just pull a plug‐in on the channel or the bus, and it will set up the routing for you. It is designed to be super‐quick. It has also taken a leaf out of Ableton’s book, so all your samples can be previewed real‐time and will automatically loop in time. Plus it has gone next level, for example in that you can create splits of your plug‐in signals within your channels. So let’s say you have a lead vocal, and you want to do a parallel bus for it within that channel, you do the split inside the plug‐in, and this gives you a lot of control very easily. It is all very well thought‐out and the automation is fantastic, and so is the MIDI.”
Click here to read more
Here’s more on what he has to say on Studio One. He’s basically the expert.
One more thing…. BTS’s latest release “IDOL” mixed by James, now holds the record for the biggest music video debut in YouTube’s history with over 45 million views in the first 24 hours! So that’s awesome.
Huge congrats to James and we’re so stoked for your success! Keep up with his success here.
Join the Studio One family here!
Friday Tip of the Week – EZ Squeez: the One-Knob Compressor!
Sometimes you just want a compressor that’s quick and easy. Maybe you’re tracking and need to compress the vocals, or hear what the bass will sound like when you add some compression on mixdown. But you know what happens—you adjust the threshold, and then the ratio, but now realize you need to re-adjust the threshold, which means the output gain needs adjusting…and maybe the knee…
If you have a bunch of ready-to-go presets, great. But here’s another option: The EZ Squeez compressor. It uses an FX Chain macro to alter six compressor parameters at once, so that a single knob sweeps from no compression, to some compression, to compression that’s more like a guitar sustainer stompbox. Although there’s a downloadable preset, I’d recommend reverse-engineering this to learn the power of the FX Chain’s Macro Controls. The principles used in this FX Chain apply to many other processors.
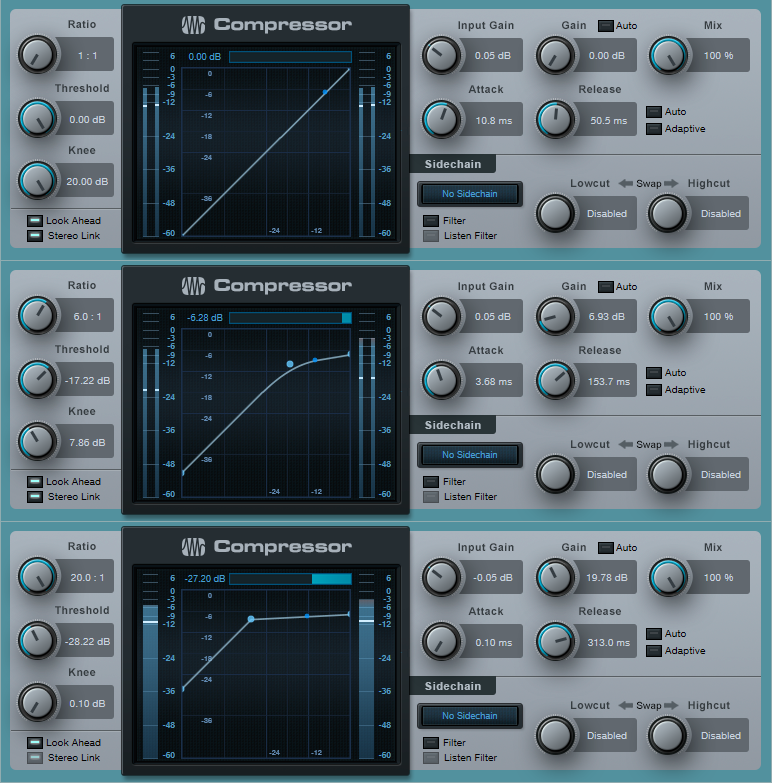
Figure 1: Three different Macro Control settings.
Figure 1 (top) shows the compressor settings with the EZ Squeez knob turned all the way counter-clockwise (minimal compression). As you turn up the EZ Squeez control, the Ratio, Release, and Gain increase, while the Threshold, Knee, and Attack decrease. The middle image shows the EZ Squeez knob turned up about 60% of the way. Turned up all the way, the parameter values become more extreme, as shown in the lower part of the screen shot.
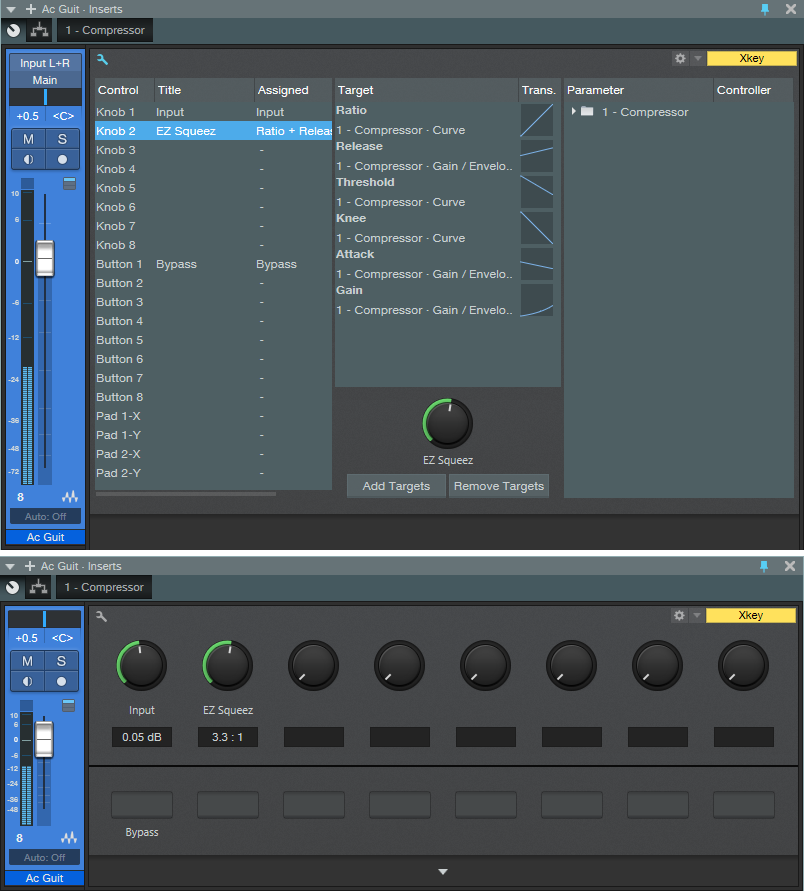
Figure 2: (Top) Macro Controls parameters and (bottom) Macro Controls interface.
Figure 2 shows the Macro Controls. Rather than expose the control settings, it’s easier just to download the Multipreset, and then click on the curves for yourself. Note the curves on the Gain and Release parameters. Given that there’s only one node on the curve you can’t get too sophisticated, but these are close enough to give a fairly even response as you move the knob from fully counter-clockwise to fully clockwise.
Because compressors are so dependent on the input signal level, I did cheat on the “one-knob” concept and added an input level control. This allows trimming the input level so that it falls in the compressor’s “sweet spot.” There’s also a bypass button so you can compare the compressed and uncompressed sounds.
As to applications, you’ll probably find that EZ Squeez knob settings of 30% to 65% will work for a variety of signal sources. Past that point, the compressor gets into a more extreme territory that pumps mixed drums, and acts more like a sustainer for guitar. But it’s easy enough to find what works the best—just turn the knob until the compression sounds right. After all, that’s the whole point!
Download the EZ Squeez.multipreset
Friday Tip: Delay-Free Stereo from Mono
After a recent tip on how to extract two mono tracks from a stereo track, one of the comments asked for how to convert mono into stereo. Well, we aim to please…so here’s one option.
A common way to create stereo from mono is by duplicating the track, delaying one of the tracks compared to the other, and panning them left and right. However, this approach has two problems. First, you might not want a delay. Second, when you collapse the signal back to mono, there will likely be partial cancellation due to phase differences. The method we’ll cover here not only produces stereo imaging from a mono source, but collapses perfectly to mono. It works with pretty much any instrument, but is most effective with instruments that play chords (for example, try this on acoustic guitar—it works well).
Console Setup
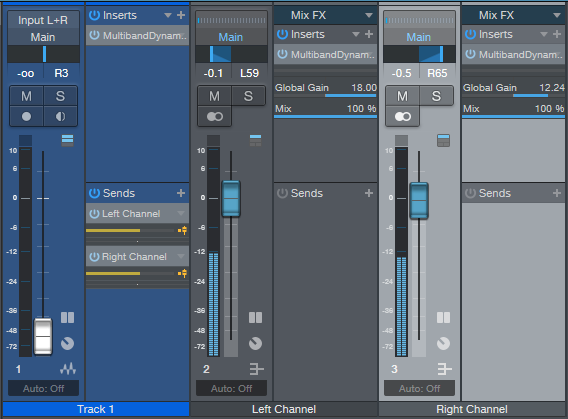
Create two buses. One of these will become the left channel, and the other, the right channel. In your mono source track, create two pre-fader sends (one for each bus). Turn down the mono source’s fader.
Multiband Dynamics Setup
Insert a Multiband Dynamics into one of the bus inserts. Solo the bus with the Multiband Dynamics. Click on “Edit All Relative” and set the Ratio control to 1.0. This will set all bands to a ratio of 1.0, which converts the Multiband Compressor into a multiband EQ.
Play the track you want to convert to stereo. Solo each band in the Multiband Compressor, and adjust the frequency sliders to divide up the frequency response evenly over the five bands (the screen shot shows frequencies selected for dry electric guitar). Mute bands 1, 3, and 5.

Next, drag the Multiband Dynamics into the other bus’s Inserts slot. For this bus, mute bands 2 and 4 instead of bands 1, 3, and 5, then pan the two buses left and right. Now the frequency responses are equal and opposite for the two buses. Voilà! Stereo! (Note that you probably don’t want to pan the buses too far to the left and right, because the stereo effect will be unrealistically exaggerated—as in the audio example. But it does get the point across.)
We’re not done yet, though. The levels of the two buses will be fairly low because with only two or three bands, the output level will be down quite a bit. Turning up the bus faders may be sufficient to compensate, but if not, turn up the Multiband Dynamics processors’ master Gain controls (not the per-band Gain controls). Feel free to play around with the pan and Gain controls to achieve the desired sonic balance. Also, no law says you need to mute every other band. For example, you might want a bassier sound on the left by muting the three upper bands, and a brighter sound toward the right by muting the two lower bands.
Finally, note that when you toggle the master bus from stereo to mono, the sound collapses to mono without any funky phase interactions. Done!
Studio Magic Suite Demo and Tutorials with Richard Gaspard!
Check out the great Studio Magic Suite Demo playlist from Richard Gaspard below. It features six videos that cover each plug-in available for free with the Studio Magic Plug-in Suite, like Klanghelm SDRR2tube, Brainworx Opto, Lexicon MPX-1, Maag EQ2, Output Movement, and SPL Attacker. ALL FREE when you buy a PreSonus interface or mixer… That’s over a $400 value!
Take a look at the whole suite here:
Learn more about the Studio Magic Suite here! It’s FREE and available right now in your My.Presouns account!
Friday Tip: Rotating Speaker Emulator FX Chain
A rotating speaker is an extremely complex signal processor (as most mechanical signal processors are—like plate reverbs). It combines phase shifts, Doppler shifts, positional changes, timbral variations, and more. And of course, Studio One includes the Rotor processor, which does a fine job of capturing the classic rotating speaker sound.
However, I’ve always felt that rotating speakers have a lot more potential as an effect than just emulating physical versions—hence this FX chain. By “deconstructing” the elements that make up the rotating speaker sound, you can customize it not only to tweak the rotating speaker effect to your liking, but to create useful variations that don’t necessarily relate to “the real thing.” What if you want a speed that’s between slow and fast? Or a subtler effect that works well with guitar? Or simulate the way that the horn spins faster when changing speeds because it has less inertia than the woofer? This FX chain provides a useful, more subtle variation on Rotor’s rotating speaker sound—check out the audio example—but the best way to take advantage of this week’s tip is to download the multipreset, roll up your sleeves, and start playing around.
Rotating speaker basics. There are two rotating speakers—one high-frequency driver, and one low-frequency drum. A crossover splits the signal to these two paths, so we’ll start the emulation by setting the Splitter to Frequency Split mode around 800 Hz. Here’s the routing.
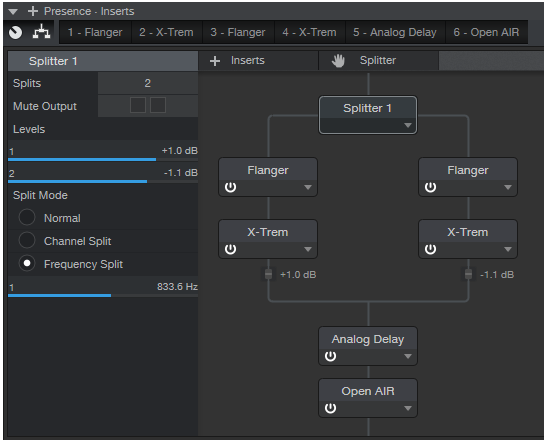
The high-frequency and low-frequency paths each go into a Flanger to provide Doppler and phase shifts, and an X-Trem for subtle panning to provide the positional cues. Let’s look at the individual module settings.
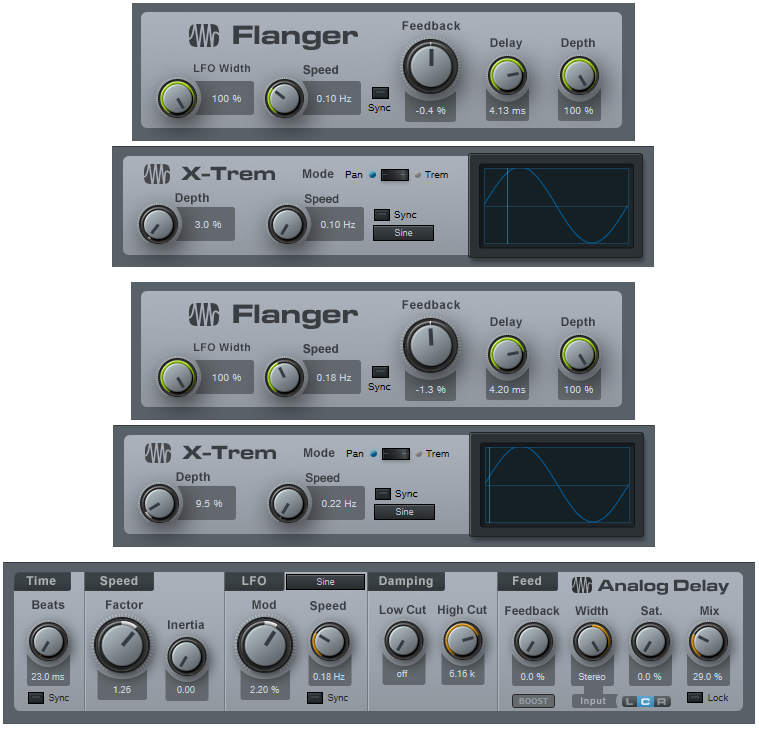
The Analog Delay adds a 23 ms reflection for a bit of a room sound vibe, with some modulation to add a Doppler shift accent. Finally, an Open Air reverb (using the 480 Hall from Medium Halls) creates a space for the rotating speaker.
Knob Control. This was the hardest part of the emulation, because changing speed has to alter (of course) Flanger speed, but also the Flanger’s LFO Width because you want less width at faster LFO speeds. The X-Trem speed and Analog Delay LFO speed also need to follow the range from slow to fast.
However, the curves for the control changes are quite challenging because the controls don’t all cover the same range. Fortunately you can “bend” curves in FX Chains, but you can’t have more than one node. As a result, I optimized the knob settings for the lowest and highest speeds—besides, a real rotating speaker switches to either speed, and “glides” between the two settings as it changes from one to the other. An additional subtlety is that the high-frequency “speaker” needs to rotate just a little faster than the low-frequency one. Also, they shouldn’t track each other exactly when going from the slowest to the fastest speed because with a physical rotating speaker, the low-frequency drum has more inertia.
All these curves do complicate editing any automation, because you need to write-enable each parameter when you turn the knob. So if you need to change some automation moves you made, I recommend not trying to edit each curve—just try another performance with the knob.
Oh, and don’t forget to try this on instruments other than organ!
CLICK HERE TO DOWNLOAD!
Listen here:
Friday Tip: Smoother, Gentler Sidechain Gating
I’ve always been fascinated with using one instrument to modulate another—like using a vocoder on guitar or pads, but with drums as the modulator instead of voice. This kind of processing is a natural for dance music, and using a noise gate’s sidechain to gate one instrument with another (e.g., bass gated by kick drum) is a common technique.
However, the sound of gating has always seemed somewhat abrupt to me, regardless of how I tweaked a gate’s attack, decay, threshold, and range parameters. I wanted something that felt a little more natural, a little less electro, and gave more flexibility. The answer is a bit off the wall, but try it—or at least listen to the audio example.
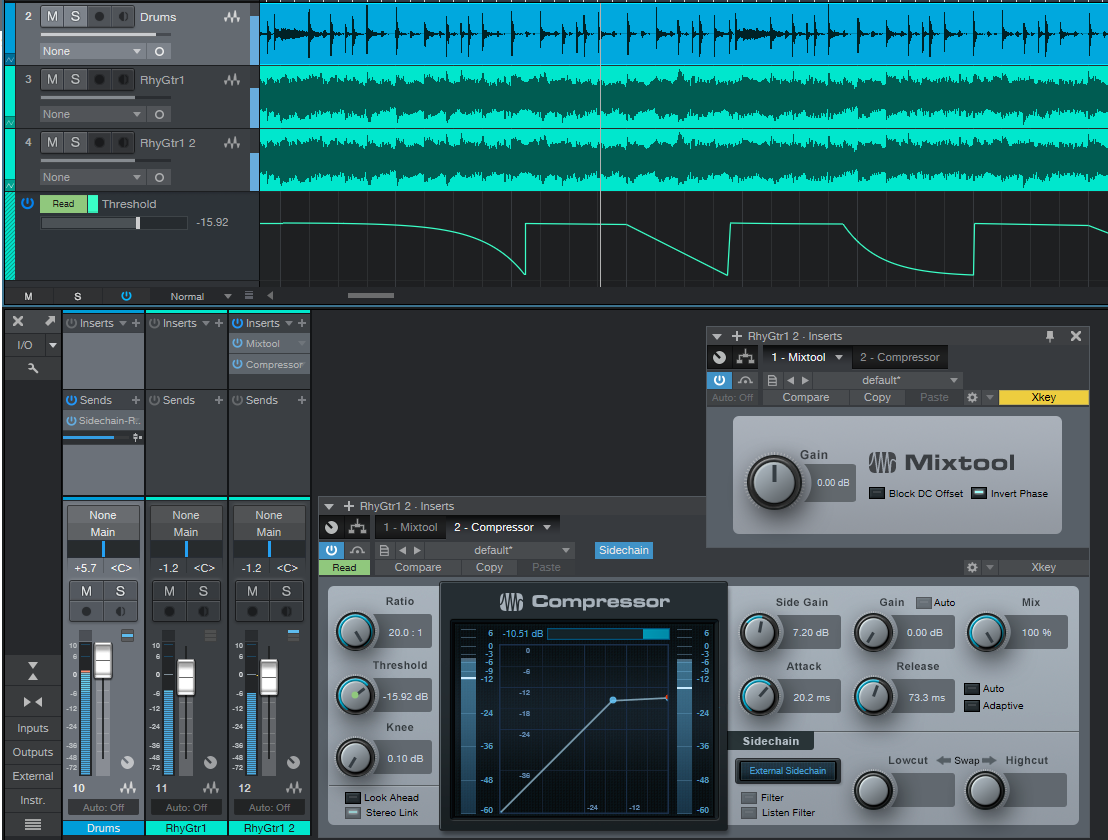
Setup requires copying the track you want to modulate (the middle track below), and then using the Mixtool to flip the copy’s audio 180 degrees out of phase (i.e., enable Invert Phase). This causes the audio from the original track and its copy to cancel. Then, insert a compressor in the copy, and feed its sidechain with a send from the track doing the modulating. In this case, it’s the drum track at the top.
When the compressor kicks in, it reduces the gain of the audio that’s out of phase, thus reducing the amount of cancellation. However, as you’ll hear in the example, the gain changes don’t have the same character as gating.
You can also take this technique further with automation. The screen shot shows automation that’s adjusting the compressor’s threshold; the lower the threshold, the less cancellation. Raising the threshold determines when the “gating” effect occurs. Also, it’s worth experimenting with the Auto and Adaptive modes for Attack and Release, as well as leaving them both turned off and setting their parameters manually.
Using a compressor for “gating” allows for flexibility that eluded me when adjusting a standard noise gate. If you want super-tight rhythmic sync between two instruments, this is an unusual—but useful—alternative to sidechain-based gating.
Friday Tip: Perfect Pads!
Pads that Loop Perfectly—Yes, It’s Possible!
Pads are hard to loop, because their flowing, continuous sound exposes loop points that are anything less than seamless—there will often be a click, pop, or other glitch. But there is a solution, so keep reading for how to create perfect loops for just about any pad.
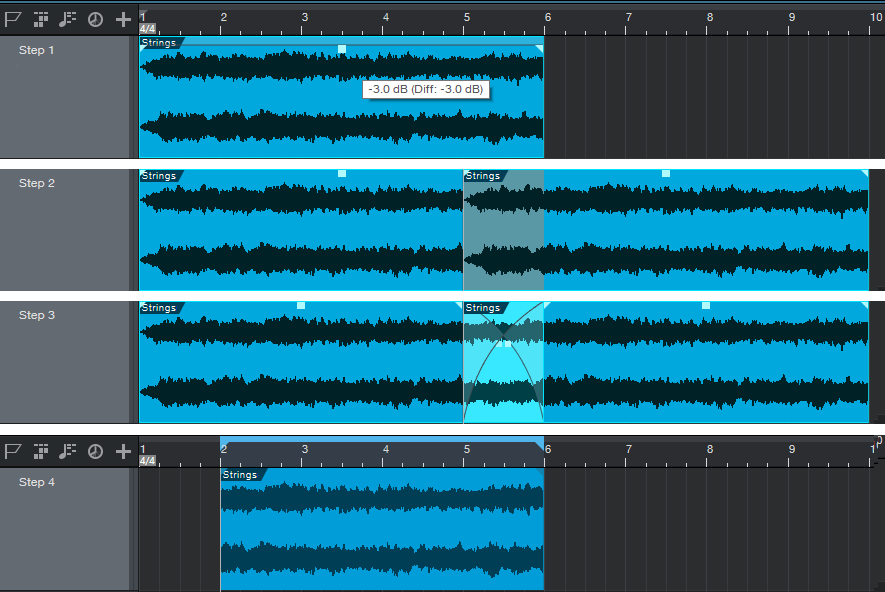
Step 1. Record a pad that’s one measure longer than what you want to loop. For example, record five measures to create a loopable four-measure pad. Normalize, then reduce the level by -3 dB or so to accommodate peaks that may result from later crossfading. Then, bounce the clip to itself to make this level change permanent.
Step 2. Copy the clip, and then paste it (or alt+drag the clip) so the first measure of the copy overlaps the last measure or the original clip. In this example, the overlap extends across measure 5.
Step 3. Shift+click on the original clip and the copied clip so they’re both selected, then type X to create a crossfade. Move the crossfade nodes up to create a logarithmic fade.
Step 4. With both clips still selected, bounce to create a single clip. Split at the end of the first measure and at the end of where the clips overlapped (in this case, measure 6). Delete both ends so what’s left extends from the start of measure 2 to the end of measure 6. Bounce what’s left to itself, loop it, and you’ll hear a perfect 4-bar loop.
Note: In some particularly challenging cases, you may need to overlap the clip’s first two measures over the clip’s last two measures to create a suitable crossfade. However, if the pad is relatively consistent you almost certainly won’t encounter any issues.
Friday Tip: Back to the 60s with Preverb
Reverse audio was a common technique back in the days when doing it was a challenge (flipping tape reels over, recording, flipping them back). Now that reverse audio is easy to do, it’s uncommon…go figure. But let’s revive reverse audio with preverb—reverb that swells up to a sound, instead of decaying after it. We’ll first look at a method that requires having some silence before the clip to which you want to add preverb, then cover what to do if the clip starts at the beginning of a song. Note: the screen shot shows each step, but you’ll end up with only the two yellow clips to create preverb—the other clips are for illustration only (i.e., you don’t need to keep copying the clip).

Step 1. Start by copying the clip or track to which you want to add preverb. Use the Paint tool to draw a silent section in front of the copied clip that’s equal to or longer than the anticipated reverb decay tail you’ll add in the next step, then bounce the silent part and the copied clip together. Tip: Consider rolling off some of the low end on the copy so the kick is less prominent. Kicks don’t get along with reverb all that well, and preverb is no exception.
Step 2. Select the bounced clip and type Ctrl+R, or right-click and choose Audio > Reverse Audio. Insert your reverb of choice (the Open Air 480 Hall preset from Halls > Medium Halls is a good place to start) into the copied/reversed track or clip, then set the reverb’s Mix control to 100% for an all-wet mix.
Step 3. After your reverb sound is as desired, right-click on this clip and choose Mixdown Selection. This clip contains only the reverb sound.
Step 4. Reverse this clip, and now you’ll preverb when you play it along with the original clip. You can also try nudging the preverb left or right to play with the timing—for example if the reverb has pre-delay, the kick and reverberated kick might argue with each other.
To add preverb before the entire song starts so that the preverb leads up to the first sound, select all tracks and shift them to the right to open up a few measures at the song’s beginning. Now you can extend the copy of the track or clip you want preverbed to the project start so it includes silence. Continue by copying the original track, reversing, and following the steps detailed previously to add preverb, then shift the tracks back to the their original position.
To hear preverb in a musical context, go to https://store.cdbaby.com/cd/craiganderton and click on the free preview of song 2, “The Gift of Goodbye.” The preverb is on the guitar solo toward the middle of the song and then occurs again at the end, during the fadeout.
Friday Tip: Stereo to Virtual Mono
There are several ways to convert stereo into two mono tracks with Studio One (e.g., for processing the two channels separately, reversing one channel but not the other, etc.), but those ways can be somewhat convoluted. One simple way to convert a stereo track into mono involves going into the Browser, right-clicking on the track’s filename, and selecting Split to Mono Files. But if a track consists of multiple clips from multiple files, then you first need to bounce them to create a track—yet you might not want to bounce them until later. And you’re also creating additional files.
The approach in this tip doesn’t create true mono tracks, but it treats a stereo track as two different tracks that behave exactly like mono tracks—which is probably the desired goal anyway. This method also doesn’t create any additional files, and is non-destructive.
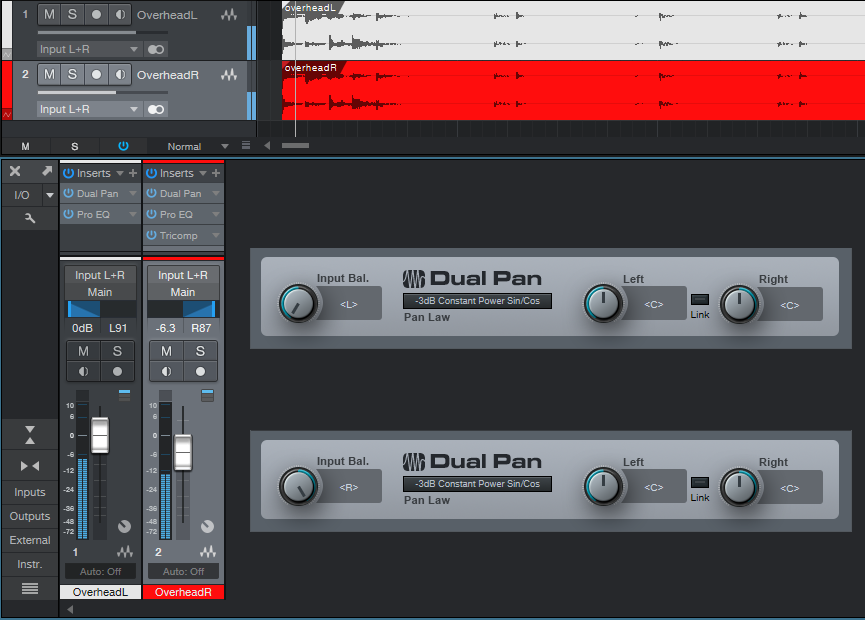
- Insert a Dual Pan into your stereo track. Set Input Balance to Left (fully counter-clockwise), and the Left and Right controls to Center.
- Select the track and choose Duplicate Track (Complete).
- In the duplicated track, set the Dual Pan Input Balance to Right (fully clockwise).
The original track becomes the left channel and the duplicated track, the right channel. Now you can process and pan each channel individually. To avoid confusion, rename one track so it includes the letter L, and the other so it includes the letter R. In the screen shot, the right track is red and the left track is white to follow the color scheme of RCA phono jack stereo connections in consumer electronics devices. Hey, why not?