Tag Archives: Studio One
Vocoder Tweaks and Tricks
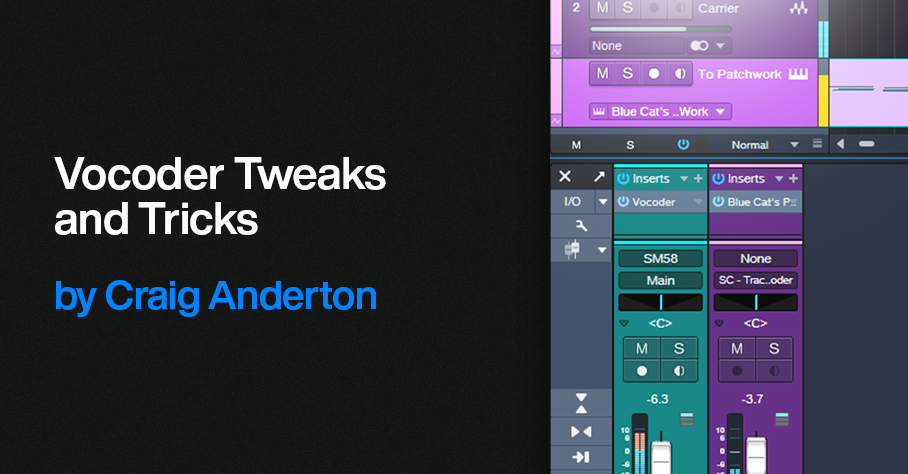
Vocoder’s aren’t “normal” effects. For example, Arturia’s Vocoder V is an effect/instrument hybrid, because it’s an audio effect that includes a synthesizer driven by a MIDI input. Prior to Studio One version 6, which added instrument sidechaining, Vocoder V didn’t work in Studio One. However, as mentioned in the Studio One forum by users Feugeu1 and Tremo, Blue Cat Audio’s PatchWork could provide a workaround.
With version 6, the workaround was no longer necessary, with one exception we’ll get to shortly (which also applies to the PreSonus Vocoder). Referring to fig. 1, here’s how to use Vocoder V with Studio One:
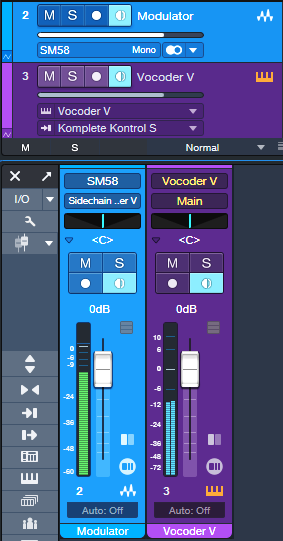
Figure 1: Track setup for using Arturia’s Vocoder V in Studio One.
1. Create an audio track for the Modulator audio (e.g., a microphone). Input Monitor must be on for real-time mic use, but not if you’re playing back audio.
2. Drag the Vocoder V into Studio One’ Arrange View to create an instrument track.
3. Instead of assigning the modulator’s track Output to the Main bus, assign the track Output to the Vocoder V’s sidechain.
4. In the Vocoder V’s Advanced settings section, choose Voice Input and a suitable preset (e.g., Vocoder). Close the Advanced settings section.
5. Verify that the Vocoder V instrument track’s input is assigned to your MIDI keyboard, its output goes to Vocoder V, and the instrument track’s Input Monitor is enabled.
Talk into the mic or play back audio from the track, and play your keyboard to trigger the Vocoder V. You can record the Modulator audio and the MIDI data feeding the Vocoder V at the same time.
Finally, under the “it’s always something” category, sometimes calling up the Vocoder V editor from PatchWork doesn’t work. Simply copy the Vocoder instance in PatchWork, cut it, and then paste it back into where you cut it.
About Low-Latency Monitoring and Vocoders
However, there’s a potential complication. PreSonus forum user Bailatosco found that when enabling low-latency monitoring for instruments, Vocoder V can’t accept audio input with Studio One. This is also true if you want to use a virtual instrument’s audio output as a carrier signal for Studio One’s Vocoder.
If you don’t use low-latency monitoring for your instruments, you can ignore the rest of this tip. But if low-latency monitoring is essential to what you do, the workaround used prior to v6.0 with Blue Cat Audio’s PatchWork plugin provides a solution. Fig. 2 shows the track setup.
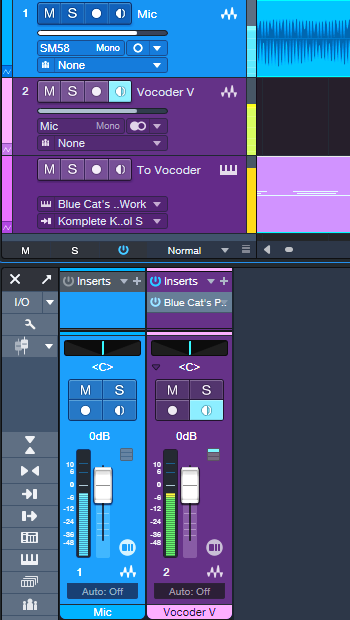
Figure 2: Track setup for using Vocoder V with Low-Latency Monitoring enabled.
1. Create an audio track. Choose your Mic (or other modulator source) as the input, and enable Input Monitor.
2. Insert Blue Cat Audio’s PatchWork in the audio track.
3. Load (not drag and drop) Vocoder V into one of the PatchWork slots.
4. Create an Instrument track. Assign its input to your MIDI keyboard, its output to PatchWork, and enable the Instrument track’s Input Monitor.
As with the previous example of using Vocoder V without low-latency monitoring, you can talk into the mic or play back audio from the track, and play your keyboard to trigger Vocoder V. Recording the Modulator audio and the MIDI data feeding the Vocoder V at the same time is also possible.
We can do a similar trick to feed an instrument carrier input into the PreSonus Vocoder, and be able to use low-latency monitoring. As with Vocoder V, the synth driving the Vocoder won’t benefit from low-latency monitoring, but any other instruments will. Fig. 3 shows the track setup.
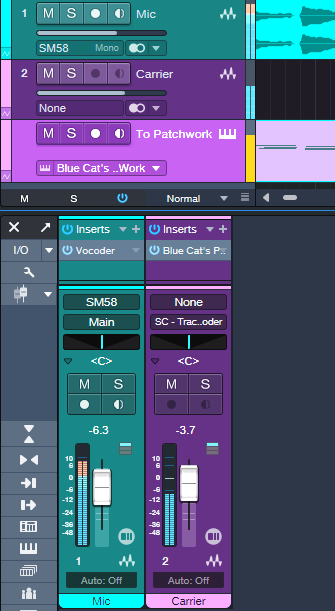
Figure 3: Track setup for using the PreSonus Vocoder with low-latency instrument monitoring.
1. Create an audio track. Choose your Mic (or other modulator source) as the input, and enable Input Monitor. Insert the Vocoder into this track.
2. Create a second audio track, and insert Blue Cat Audio’s PatchWork.
3. Load (not drag and drop) the instrument you want to use as a Carrier into one of the PatchWork slots.
4. Assign the second track’s output to the Vocoder sidechain (as shown in fig. 3), or add a pre-fader Send and assign it to the Vocoder sidechain if you want to be able to mix in the carrier sound with the second track’s channel fader.
5. At the Vocoder, choose the appropriate sidechain input, and choose Side-chain for the Carrier Source.
6. Create an Instrument track. Assign its input to your MIDI keyboard, its output to PatchWork, and enable the Instrument track’s Input Monitor.
Happy vocoding!
Release Your Music in Stereo and Immersive
For over a decade, stereo and mono vinyl records co-existed before the transition to stereo was complete. During that time, many records were released in both mono and stereo. We’re in a similar situation now, with stereo still ruling the world but with immersive sound (primarily Dolby Atmos) coming on strong. It makes sense to release music in both formats—and Studio One makes it easy.
I release my music on YouTube, which doesn’t support multichannel Atmos files. But YouTube can play back Atmos files that have been rendered as binaural stereo. As long as people listen on headphones or earbuds, the music will have that full, wide immersive quality. So, I now post a headphones-only Atmos mix, and a conventional headphones/speakers stereo mix. Given how many people listen to music on headphones or earbuds, this isn’t as limiting as it might seem.
So does this work? Following are links to a binaural and stereo mix of the latest song in my YouTube channel. Both are done entirely in Studio One 6.5. Don’t expect instruments whizzing around your head—this isn’t a movie or a game. The more you listen to Atmos Binaural mixes and acclimate to what the process does, the more you hear the full, wide effect compared to stereo.
Atmos Binaural (headphones or earbuds only)
Stereo (speakers or headphones)
Here’s an overview of why Studio One makes this process so easy, especially if you’re used to mixing with headphones. Refine the Atmos mix as much as you can with headphones, because that’s how people are going to listen to it. Then, create a new Project in the Project page.
Set the Dolby Renderer to Binaural, and send the file to the Project page. Return to the Song page, choose Stereo for the Renderer to downmix your Atmos mix to stereo, and then add that file to the Project. Your Project will then have both Atmos Binaural and Stereo files, which you can export for your two mixes.
Note that the stereo downmixing is faithful to the mix. Of course, the stereo file lacks the Atmos fullness, but you don’t lose any of the music. In fact, because the downmixing tries to translate any Atmos nuances to stereo, you may end up with a better stereo mix than if you’d started with a stereo mix.
How to Do It—The Details
Here’s the step-by-step process.
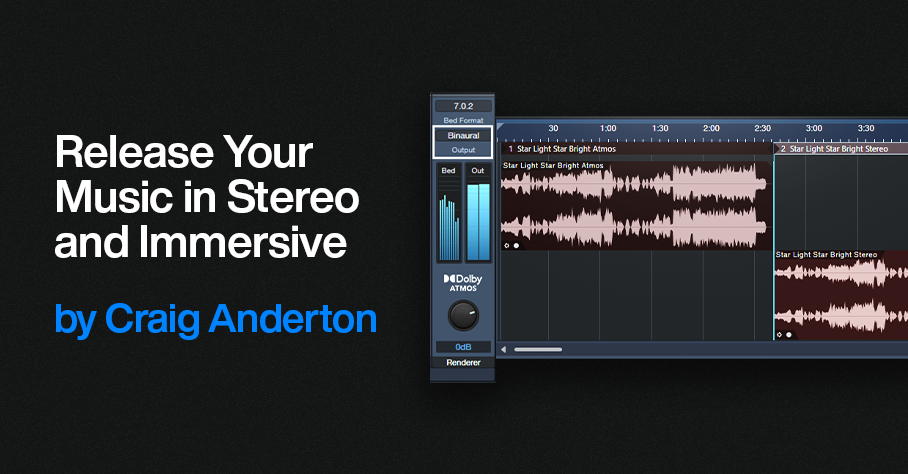
1. Finish your Atmos mix. Make sure it sounds awesome on headphones 😊. The Dolby Atmos Renderer should be set to Binaural (fig. 1).
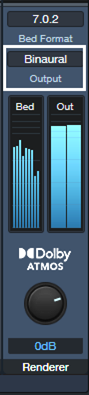
Figure 1: Choose Binaural for the output when rendering to Atmos Binaural.
2. Choose Song > Add to Project > New Project “Song Title.”
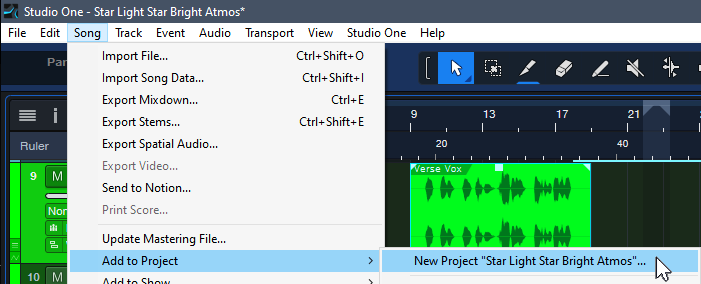
Figure 2: The New Project will eventually contain both the Atmos Binaural and Stereo renders.
3. Set the Sample Rate, and click OK. Click OK again when asked to update the mastering file. Optionally, normalize it after it’s updated.
4. Go back to your Atmos mix. Save As “Song Title” Stereo. (This gives you separate songs for Atmos and stereo, in case you want to make changes later in either one.) In the Atmos renderer, change the Output from Binaural to Stereo.
5. Choose Song > Add to Project > Song Title (the top item in the list, not the “New Project” item that’s the next one down).
6. Click OK when asked to Update Mastering Files.In your Project, the Atmos mix will be followed by a track with the Stereo mix (fig. 3). If you normalized the Atmos mix, normalize the Stereo Mix.
Figure 3: Both the Atmos and Stereo mixers are now in the Project page.
7. Add the insert processor(s) for the Atmos track and edit as desired. I typically use the Waves L3-16 to attain an LUFS reading of -12.5 so that the mix pops a bit more, with a True Peak between ‑1.0 and ‑1.5.
8. Drag the processor from the Atmos track insert to the Stereo track name in the track column. This inserts the processor in the Stereo file’s track.
9. Check the Loudness Information for the Stereo track. It will likely be lower. Edit your insert processors to obtain the same Post FX LUFS level as the Atmos track.
10. Listen to the stereo mix over loudspeakers as a reality check.
11. Click on Digital Release, and choose the formats for the two files.
And now, you’ve given your listeners a choice between an immersive binaural mix, or a conventional stereo one.
Tips
- In step 8, if you use more than one processor on your master file, it’s probably simplest to save the processors as a temporary FX Chain you can import into the other track.
- Because both mixes end up in the Project page, it’s easy to compare the two. The Phase meter will confirm the fuller sound you’re hearing, by displaying a wider, fuller stereo spread.
- You can process the master file in the Post fader insert section of the Main fader. However, I recommend doing it in the Project page, so you can go back and forth between the two files and obtain a consistent level prior to exporting.
- If there are significant differences between the two files (unlikely), you can return to either the original song or the one with Stereo in the title. Make your edits, then re-render.
- Similarly to mixing stereo over different loudspeakers to get a sense of how the mix translates over different systems, it helps to do reality checks on your Atmos Binaural mix with several different headphones.
String Arrangements Made Simple
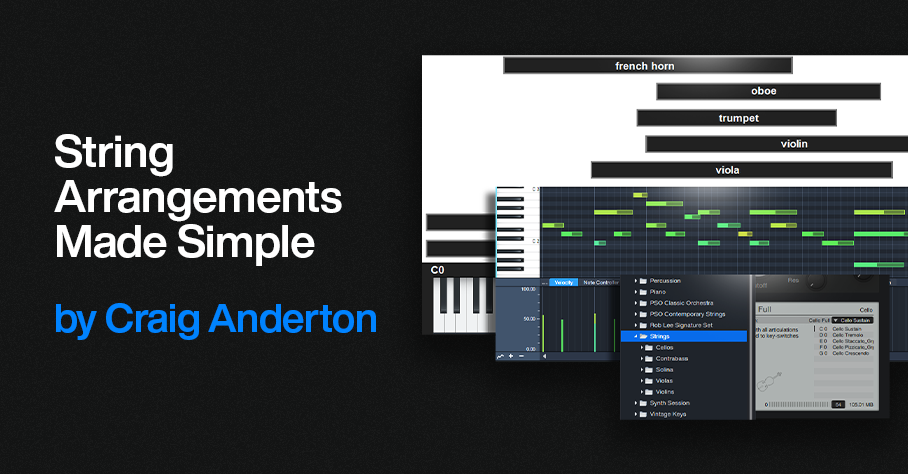
Strings can enhance almost any genre of music—and with a little more effort, you can do string arrangements that go beyond simply adding a string pad preset. So, let’s look at how to create a convincing string section intro for a song. To hear the example used for this tip, go to the end, and check out the stereo mix. There’s also a headphones-only Atmos mix that’s rendered to binaural.
Choose Your Instruments
You don’t need a high-end sample library to create string arrangements. The sounds included in Presence are excellent—I often prefer them to mainstream string libraries. The following presets from Presence’s Strings folder (fig. 1) sound wonderful for a string section: Violins > Violin Full, Violas > Viola Full, Cellos > Cello Full, and Contrabass > Contrabass Full. In the audio example, all used the Sustain keyswitch C1 (except C0 for the Cellos).
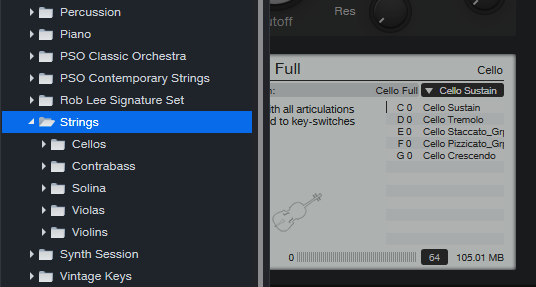
Figure 1: Presence’s Strings folder is your friend for string arrangements.
Group Your Instruments
Place each instrument in its own track, and group them via buses or VCA channels. After setting a balance of the instruments, vary their common bus level to add dynamics while retaining the proper balance. In larger arrangements, you can have individual groups for violins, other strings, brass, percussion, etc. I also use Sends to a common reverb, so that the instruments sound like they’re in the same acoustic space (fig. 2).
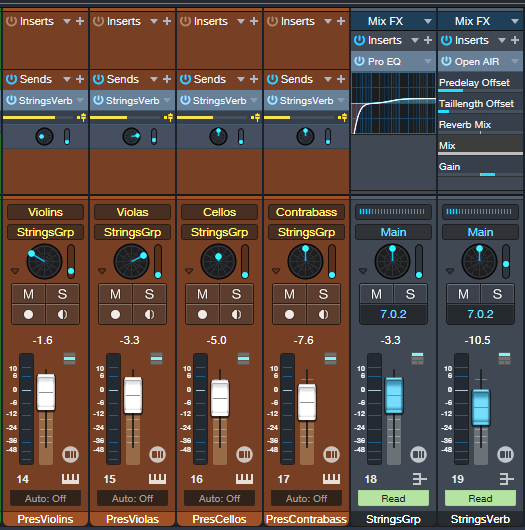
Figure 2: Track layout for the string section, set up for Dolby Atmos. This layout also works with conventional stereo.
Pay Attention to Instrument Note Ranges
The beauty of string arrangements is how the notes from different instruments weave around each other as they create harmonies in the “sweet spots” of their note ranges. (For a crash course in string arrangements, check out Bach’s string quartets.) Players normally don’t play much at the highest and lowest notes of an instrument’s range. Ideally, the notes from different instruments shouldn’t overlap too much. Let each instrument have its own space in the frequency spectrum (fig. 3).
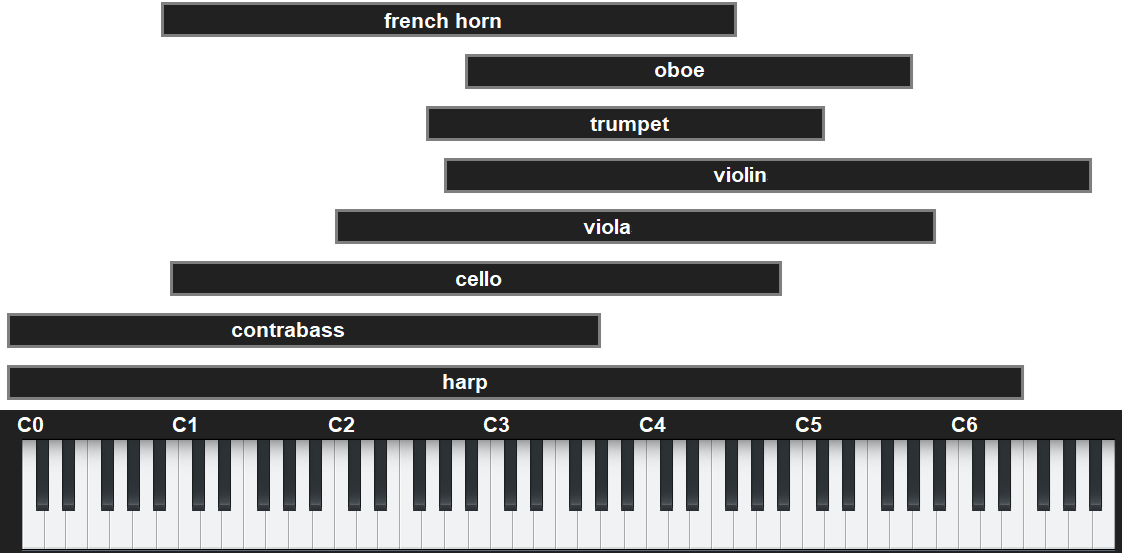
Figure 3: Typical note ranges for various orchestral instruments.
Edit Velocity, Modulation, and Keyswitches
These are all powerful tools for expressiveness. I generally prefer editing velocity rather than level for individual instruments (fig. 4), and edit overall level with the instrument groups.
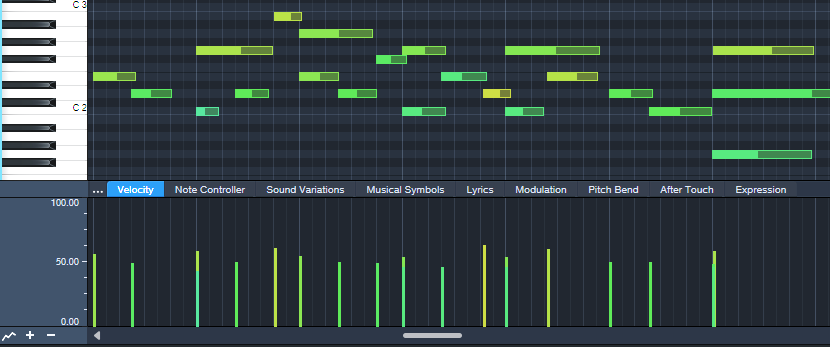
Figure 4: Notes for a violin part, and their velocities.
Modulation and Expression parameters are also essential. Fig. 5 shows vibrato being added to strings. I use the mod wheel for a human touch, but sometimes straighten out modulation changes that “wobble” too much.

Figure 5: Modulation added for violin vibrato.
Keyswitches choose different articulations, which can add variations and expressiveness in longer passages.
Tempo Changes: The Secret Sauce
Ritardandos, accelerandos, and rallentandos are not only important parts of a conductor’s toolbox, they’re the final touch for adding expressiveness in Studio One. Pushing tempo and pulling it back, in conjunction with velocity and modulation changes, gives a sense of realism and sophistication you can’t obtain any other way. Although tempo changes may not be an option if the strings are being added to music cut to a click, in a strings-only section tempo changes are pure gold. Fig. 6 shows the tempo changes used in the audio example.
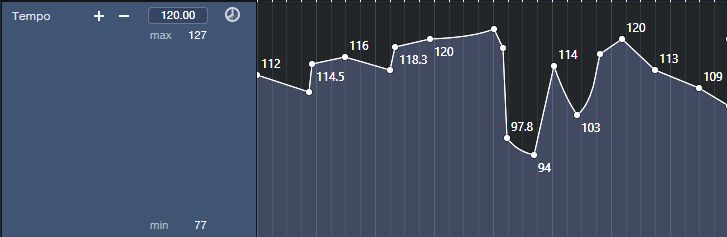
Figure 6: Tempo changes add feel and flow to music.
Let’s listen to all these techniques applied to a string section introduction. Here’s the stereo mix.
And for an extra treat, here’s the Atmos mix, rendered to binaural. You need to listen to it on headphones to preserve the Atmos effect==being rendered to binaural means it won’t sound right over speakers.
The Metal Amp De-Harsher
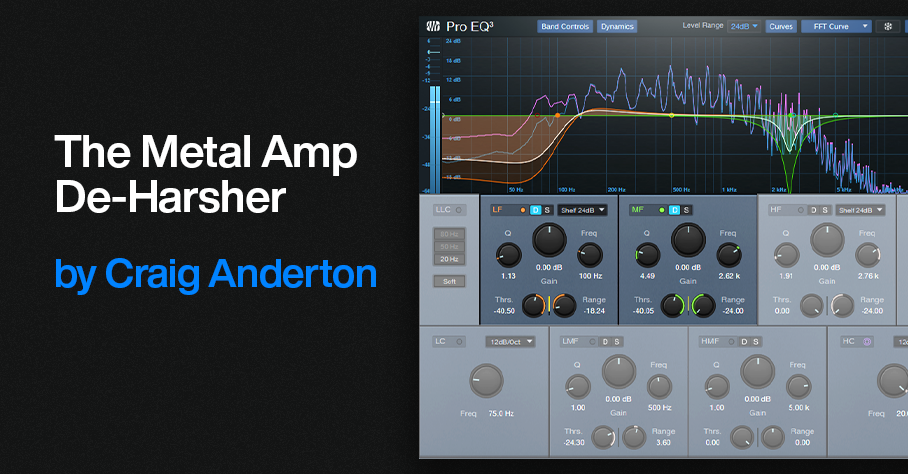
Since Dynamic EQ was introduced in version 5, I’ve used it to replace and improve some techniques I used to do with static EQ. For example, I’m a fan of adding a sharp notch in front of amp sims that feature heavy distortion. This is because notching out certain frequencies can lead to a smoother, less harsh sound. After tuning the notch for the sweetest tone, you make the Q narrow enough to take out only the frequencies that cause the harshness.
However, dynamic EQ can de-harsh amps with more finesse than static EQ. Fig. 1 shows the setup.
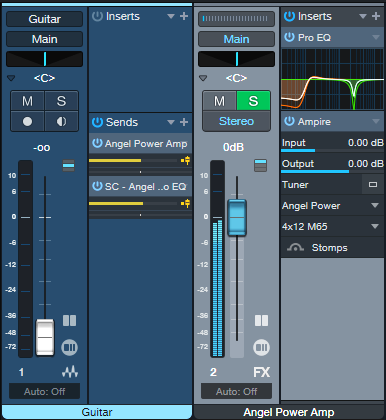
Figure 1: Setup for de-harshing with the Pro EQ3’s dynamic EQ.
The Pro EQ3 inserts before Ampire. I used Ampire’s Angel Power amp for the audio example. You’ll hear the biggest improvements with this technique when using high-gain amps, but it can also be effective with other amp sim designs.
Fig. 2 shows the Pro EQ3 settings. The de-harsher uses only two stages of EQ. The most crucial one is the midrange filter around 2.62 kHz. That’s the frequency I liked best, but be sure to vary the notch and try different frequencies with different amps. The effect is quite dependent on the notch frequency.
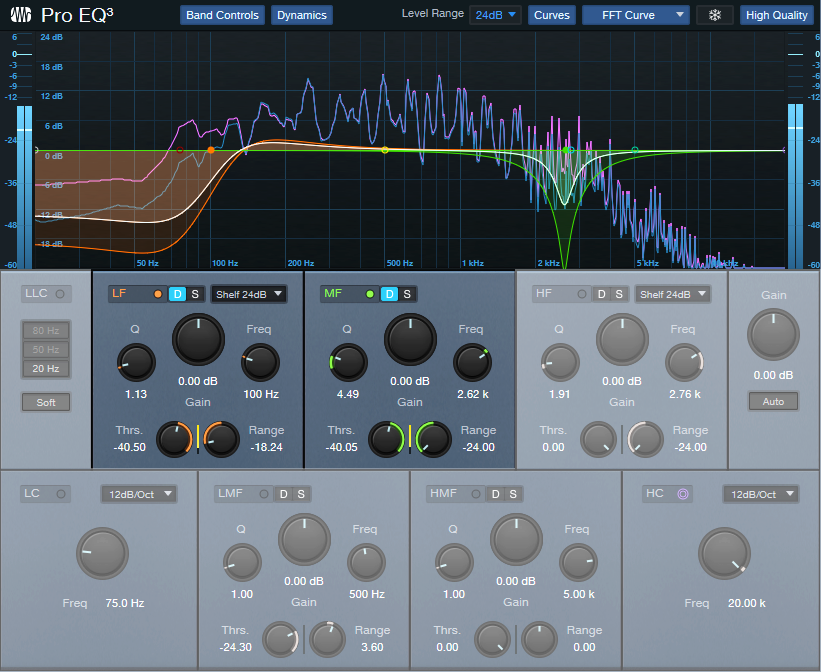
Figure 2: Pro EQ3 settings.
The low-frequency shelf is there because…well, because we can. There’s not a lot of useful energy down that low, so why have it take up bandwidth? Fewer frequencies being distorted means a cleaner sound.
Start with the settings shown. The optimum Threshold and Range parameter values depend on the input signal strength. For the Mid frequency, set the Threshold so that the notch reaches the full -24 dB of attenuation when hitting your strings the hardest. Dial back the Range if you want to re-introduce a little more bite. The low shelf settings aren’t that critical. I set it so that when slamming chords, there’s maximum attenuation.
The audio example plays the straight Angel Power amp, and then the same riff with the same settings but with the de-harsher EQ inserted before the amp. If you play the original version right after the de-harshed version, you may find it easier to notice the “spiky,” harsh artifacts that the de-harsher removes.
Capture—and Keep—Your Creative Impulses
Gregor Beyerle recently posted a video called Producer vs. Engineer—What’s the Difference?, which had quite a few comments. It seems most people feel that for those who work in the studio by themselves, these roles overlap. But it’s vital to understand the mindset of these different roles, because how we adapt to them can either enhance or destroy our creative impulses.
Why Creativity Is Elusive
You’ve probably experienced this: You have a great idea for some music. But by the time you boot your computer, open a file, turn on your interface, and get ready to record, the inspiration is gone. Or, you’re deep into a groove and being super-creative. Then some technical glitch happens that requires fixing before you can proceed. Yet after you fix it, you can’t get back to where you were.
These scenarios highlight how the brain works. Your brain has two hemispheres, which are dedicated to different functions. The brain’s left hemisphere is involved in analytical and logical processes. The right hemisphere deals more with artistic and creative aspects. Although this is oversimplified (both hemispheres also work in collaboration), research into the nature of these differences earned the Nobel Prize in 1981 for Physiology or Medicine.
So…How Can We Stay in a Creative Space?
Here’s where it gets interesting. The corpus callosum is a wide, thick nerve tract that connects the two hemispheres—and several studies with MRI and fMRI scanners have implied that a musician’s corpus callosum has better “wiring” than the general population. Apparently, playing music is like an exercise that improves the ability of information to flow between the two hemispheres.
Before home studios became common, recording involved the artist (right hemisphere), engineer (left hemisphere), and an experienced producer who integrated the two. The artist could stay in a right-brain, creative space because the engineer took care of the analytical tasks. The engineer kept a left-brain focus to make the technology run smoothly. Meanwhile, the producer integrated both elements to shape the final production.
Today, when we wear all three hats, we have to switch constantly among these three roles. This works against the way the brain likes to function. Once you’re doing tasks that take place primarily in one hemisphere, it’s difficult to switch to activities that involve the other hemisphere. That’s why getting sidetracked by a glitch that requires left-hemisphere thinking can shut down your creative flow.
Retrospective Recording to the Rescue
Fortunately, Studio One has a built-in engineer who remembers everything you play on a MIDI controller (fig. 1). Create an instrument track, and just…start playing. You don’t need to hit record or enable anything, because Studio One is always doing background recording of whatever MIDI data you play. You don’t even have to arm a track for recording, as long as the track’s Monitor button is enabled. If after playing for a while you come up with a great idea, just type Shift+[numpad *] or click the red button in fig. 1. Then, Studio One collects all the notes it squirreled away, and transfers them into the instrument track you were using.
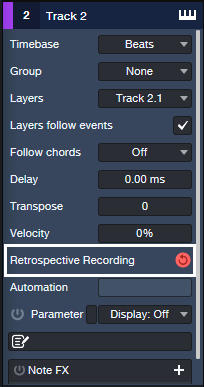
Figure 1: Retrospective Recording works in the background to capture all the MIDI notes you play, whether or not you’re recording.
There are two Retrospective Recording modes. If the transport isn’t running, simply play in free time. Or, if the transport is running and you’re playing to a click, the notes will be time-stamped correctly relative to the grid. Furthermore, with Input Quantize enabled (fig. 2), these notes will be snapped to the grid. However, be aware that if you switch Retrospective Recording modes (e.g., record with the transport stopped, then record with the transport running), anything captured previously using the other mode disappears.
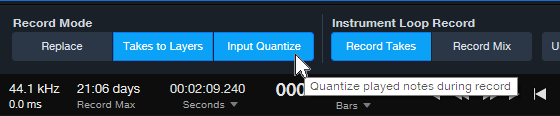
Figure 2: Play to the click, and Retrospective Recording will place your notes on the timeline—as well as quantize them if Input Quantize is enabled.
Retrospective Recording operates independently for each track. If you have different instruments on different tracks, you can play on one track and then decide to play on a different track. Everything in a track will be remembered until you transfer what you played to that track. For example, maybe you think playing on an acoustic piano will get your creative juices flowing, but you might wonder if an electric piano would be better. Load both instruments on their own tracks, play on each one, and you’ll find out which inspired you to play the better part.
What About Audio?
As expected, Studio One won’t remember audio that you play—audio requires much more memory than a MIDI data stream. But there’s a Faderport workaround that’s almost as good. Plug a footswitch into the Faderport. As soon as you open a song in Studio One, select a track, choose a track input, and arm the track for recording. Then, start playing. When inspiration strikes, press the footswitch. From that point on, Studio One will record on the track that you armed. Tap the footswitch again to stop recording but keep the transport running. You can resume recording with another footswitch tap. To end recording or playback, stop the transport.
Other techniques can help you stay in your right hemisphere. For example, the right hemisphere parses colors easier than text, so using color to identify tracks helps keep you in a creative space. Also, knowing shortcuts and macros can make initiating functions so second-nature you don’t have to think about them. In any case, the bottom line is that when it comes to being creative, you don’t want to think about anything—other than being creative.
Better Drum Reverb with Dynamic EQ
Sending too many low frequencies through reverb gives a bloated, muddy sound. This is one reason why you’ll rarely see a send from a bass track going into reverb.
Drums are different, because you often want reverb on drums. But you don’t want the kick sending a giant blob of low frequencies through the reverb. You can control this if your drums are on separate tracks or outputs, but drum loops don’t give you that option.
The usual solution is inserting a highpass filter prior to reverb, typically with a 100-300 Hz cutoff. This solves the kick problem, but it also reduces the frequencies that create the “fat” element in snare and toms. You usually want those drums in the reverb, to avoid a thin sound.
The Solution: Dynamic EQ
Using the Pro EQ3’s dynamic processing provides the ideal solution. Fig. 1 shows the track layout. The drums go through a send to an FX Channel, which inserts the Pro EQ3 prior to the Room Reverb (or reverb of your choice).
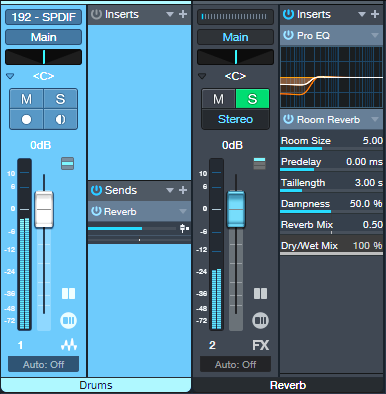
Figure 1: The Pro EQ3 inserts prior to reverb that’s processing the drums.
Fig. 2 shows the dynamic EQ settings. The low-frequency shelf EQ is set for a 12 dB/octave slope, which is steep enough to focus on the kick while leaving higher frequencies intact.
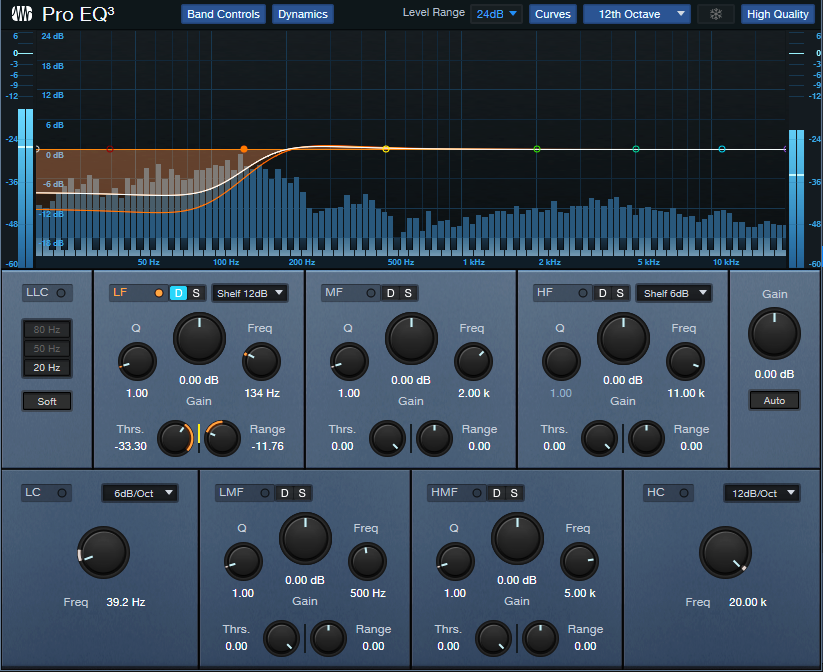
Figure 2: Suggested initial settings for the dynamic EQ parameters. Note that only the LF stage is being used.
The settings in fig. 2 should get you close to the sweet spot between too much bass, and a thin sound from not enough low frequencies. If needed, tweak the Threshold, Frequency, and Range parameters to optimize the sound further.
To hear how this affects the drum reverb, check out the following audio examples. They use a lot of reverb to get the point across. Here’s the drum reverb sound without the Pro EQ3 dynamic EQ.
With dynamic EQ, the sound is tighter and free of mud. Mission accomplished!
A Happy Accident for Drum Sounds
While trying to do something else with Melodyne, I stumbled on this way to add depth or tightness to drum sounds—quickly and easily. Here’s the sound of an acoustic drum loop.
With this technique, we can create a deeper sound, like this…
Or a tighter sound, like this…
Or a totally crazee sound for all you experimental electronic and sound design fans, like this…
Step-by-Step Instructions
1. Duplicate your drum event. You’ll need to layer a processed drum track with the original drum track.
2. Click on the duplicated drum event. Open it in Melodyne by typing Ctrl/Cmd+M.
3. Then as in fig. 1, choose Algorithm > Universal (Standard). This algorithm is available in all Melodyne versions, including Essential. Then, click on Redetect if needed.
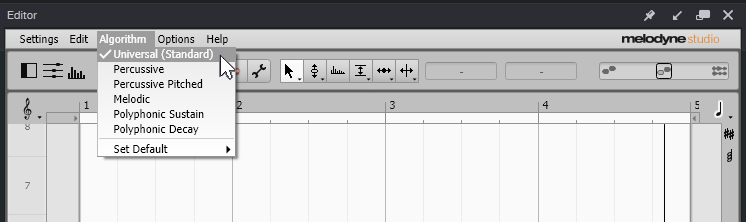
Figure 1: Choose Melodyne’s Universal detection algorithm.
4. Type Ctrl/Cmd+A to Select All the blobs. Melodyne will display your event so it looks like Fig. 2.
Figure 2: The drum blobs are ready to be transposed.
5. Drag the blobs up for a tighter sound, or down for a deeper sound. The DeepDrums audio example transposes all blobs down 5 semitones, while the TightDrums audio example transposes them up 5 semitones. (Sound design and electronic sound fans, feel free to play with extreme transposition amounts.)
6. Although not essential, I recommend inserting an Expander in the duplicated track. This can restrict the dynamics so that you hear transposition applied to only the drum attacks. Fig. 3 shows the Expander settings used in the audio examples. The optimum Threshold setting depends on the drum track’s level.
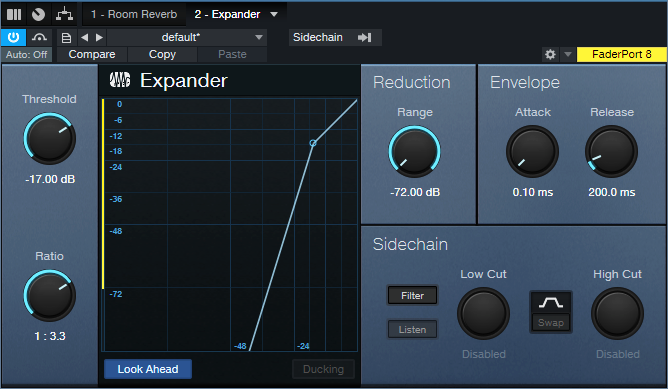
Figure 3: Initial Expander settings to restrict transposition to the drum peaks.
And that’s all you need to do! But if you want to take this further, you can drag individual blobs as desired. For example, you might want to drag a snare hit up by 7 or 8 semitones, or even more. Or, layer two drum parts modified with this technique, and use extreme transpositions…you have a lot of options!
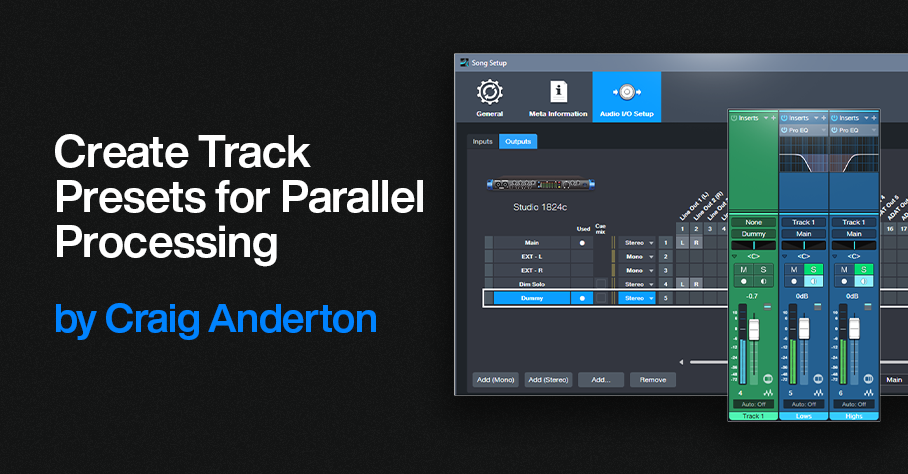
Create Track Presets for Parallel Processing
Parallel processing splits a signal into two or more parallel channels. Bi-amping is a common example of parallel processing:
- One channel processes low frequencies.
- The other channel processes high frequencies.
The two channels then mix together to a common output (e.g., the Main output bus). You generally don’t want the original audio that was split to appear in the mixed output of the two channels.
Parallel processing has many applications, like altering stereo image, emphasizing transients, doing creative compression effects, super-wide reverbs, and more. Studio One Professional has a Splitter module that makes parallel processing easy within an FX Chain. However, this isn’t always a perfect solution, for reasons described later. And Studio One Artist doesn’t have a Splitter—so let’s look at an alternate way to do splits.
Splitting with Buses
The traditional way to create a split for parallel processing uses buses. You insert pre-fader sends in the channel with the track you want to process. These go to two FX or Bus Channels (fig. 1). With pre-fader sends, the original channel’s fader can turn down all the way. This prevents the signal from going to the Main bus, yet audio still proceeds to the parallel paths.
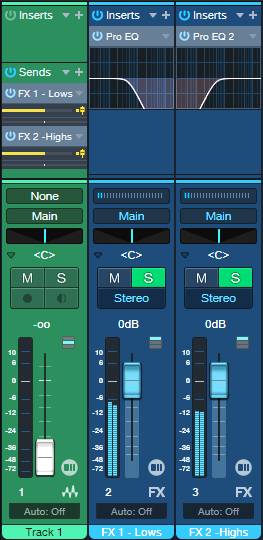
Figure 1: This example of traditional bus-based splitting provides bi-amping.
However, Track Presets can’t save a combination of tracks and buses, only tracks. So, let’s speed up your sessions with a Track Preset-friendly solution.
Splitting with Tracks
This option accomplishes the same goal, but you can save the setup as a Track Preset for instant recall. First, we need to do a little prep work. The parallel channels receive their inputs from Track 1’s output (note that the parallel tracks’ input fields in fig. 3 show “Track 1”). So, we can’t turn the Track 1 fader down to have the equivalent of a bus’s pre-fader send. Although there are some instances where you may want the original sound mixed in with parallel processing, most of the time you want to hear only the outputs from the parallel-processed tracks.
Fortunately, there’s an easy way to do a pseudo pre-fader send. In Song Setup, create a Dummy Output and don’t assign it to anything (fig. 2). We don’t want it to go anywhere. This lets the parallel processed tracks still receive their inputs from Track 1, but Track 1’s output feeds the Dummy bus instead of the Main bus. So, you won’t hear Track 1’s original audio.
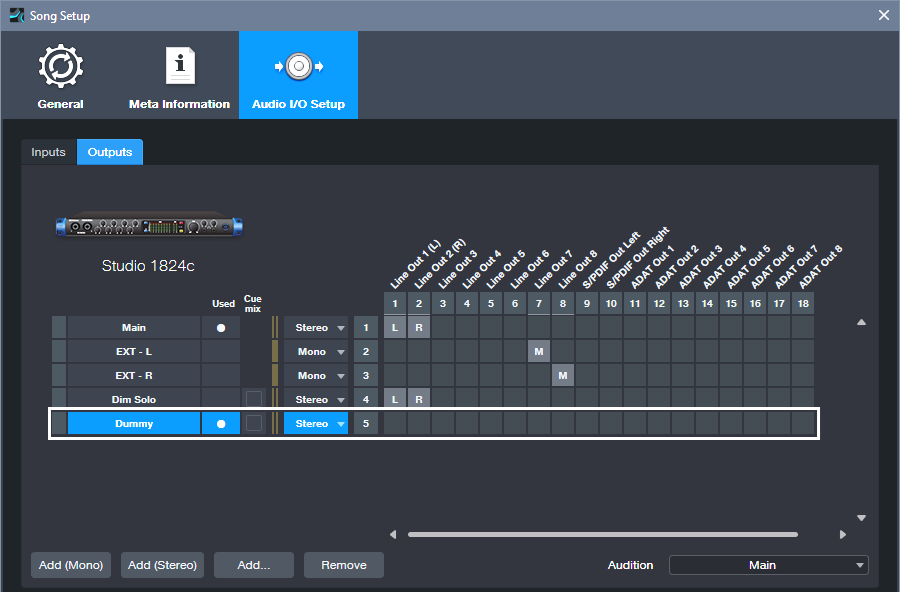
Figure 2: Use Song Setup to create a Dummy bus to nowhere.
Fig. 3 shows the track-based splitting configuration. Aside from assigning the source track to the Dummy bus instead of the Main bus, here are the differences compared to fig. 1:
- The parallel channels need to have their Monitor buttons enabled.
- If you want to blend in the original sound, assign its output to the Main bus instead of the Dummy bus. Because Track 1’s fader serves as a master input level control for the audio feeding the parallel paths, you have the equivalent of a post-fader send if needed.
- Solo Safe isn’t enabled automatically. To enable it, Shift+Click on the Solo buttons in the parallel channels.
- And (drum roll, please!) here’s the big advantage: You can select all three tracks, and save the configuration as a Track Preset. Just remember that any project in which you use this track-based configuration needs to have a Dummy output available in Song Setup.
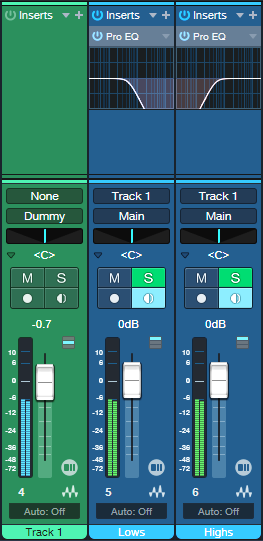
Figure 3: You can save this parallel processing configuration as a Track Preset.
Disadvantages Compared to Studio One Professional’s Splitter Module
- Unlike an FX Chain, this parallel processing method doesn’t insert neatly in a track, and requires an additional channel for each split you want to add. (The FX Chain’s Splitter can have five splits within a single channel and can do frequency-based splits, which is ultra-cool.) A mitigating factor is that once you set the level for the audio track that splits into the parallel tracks, you can hide it.
- Another limitation is there’s no panel for Macro Controls. For complex FX Chains with multiple splits and processors, Macro Controls can save a lot of time when you need to tweak the sound.
Advantages Compared to Studio One Professional’s Splitter Module
- With channel-based parallel processing, the effects providing the processing are exposed. You don’t have to open up the FX Chain to edit, delete, or replace them.
- Because the effects are in channels, you can expand the micro-view. This lets you modify parameters and see characteristics (like EQ curves) at a glance.
- It’s not possible to have inter-effect sends within an FX Chain. With the track-based approach, the splits can have sends that go to effects in other splits. For example, a sound in one split could trigger a dynamic EQ’s sidechain in a different split.
The bottom line is for Studio One Artist, track-based splits are a great way to create parallel effects. And with Studio One Professional, FX Chains provide exceptional functionality—but even so, track-based splits can perform some tricks that FX Chains can’t do.
Easy Atmos: Grab Headphones, Mix, Have Fun!
Everyone talks about the importance of Dolby® Atmos for post-production, but the implications go further than that. Atmos really does change how you create and experience music. I’d almost compare it to the switch from mono to stereo.
This blog post is about the simplest, quickest way I’ve found to start exploring the 5.1 format with Atmos: remix one of your pre-Version 6.5 songs for headphones, using Atmos’s immersive panning options and binaural rendering. (Note: Save the song you want to remix to a new folder, and work with the copy. Then if you hit Save accidentally, you won’t overwrite the original song.)
1. Open your pre-6.5 song in Studio One. It will look like it did in previous versions.
2. Choose Song > Spatial Audio. In the Spatial Audio tab under General, for Mode select Dolby Atmos. For Bed Format and Output Format, choose 5.1 (fig. 1). If you’re not familiar with the concept of a Bed, see last week’s blog post. Although you’re locked into choosing 48.0 or 96.0 kHz as the sample rate, Studio One will convert your song automatically if it was done at a different sample rate.
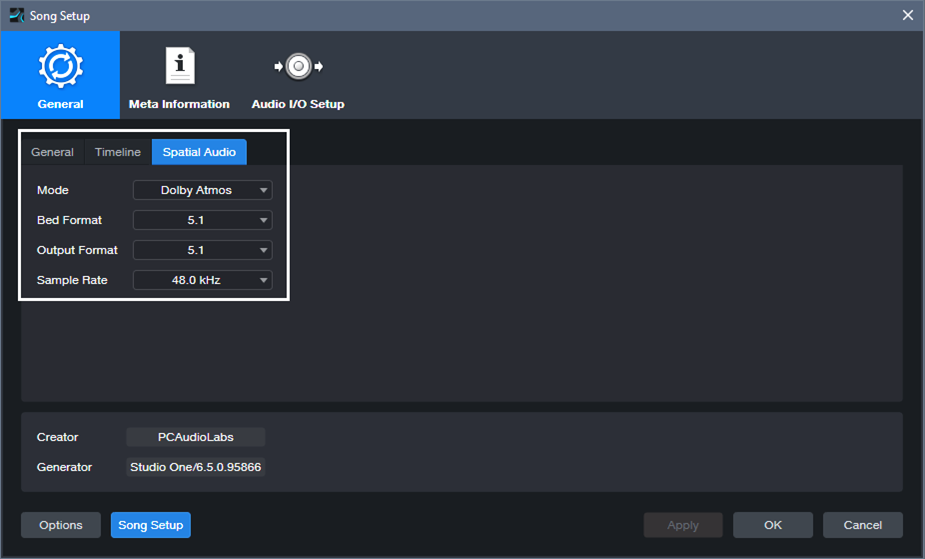
Figure 1: Song Setup for Spatial Audio.
3. Click Apply.
4. Under Audio I/O Setup, Outputs tab, select 5.1 for the Main output (fig. 2).
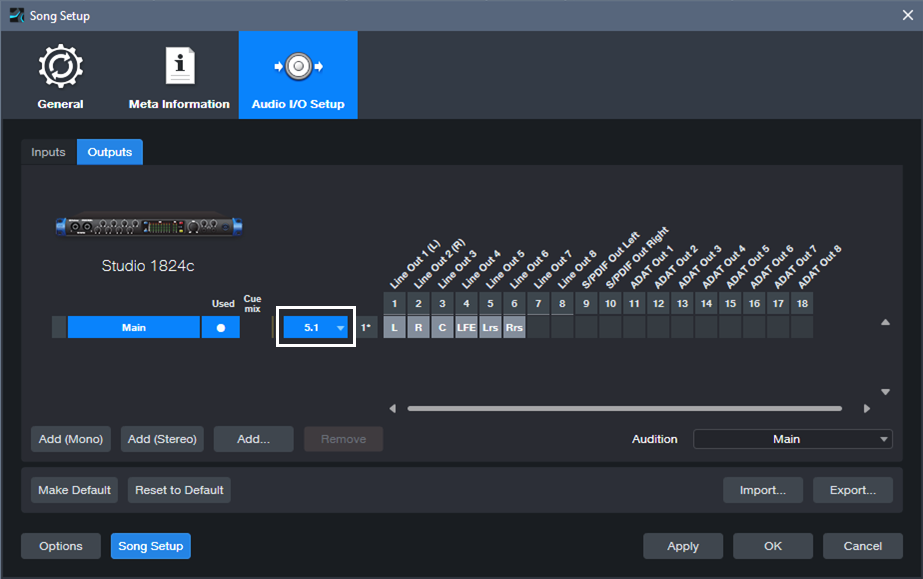
Figure 2: Audio I/O Setup for experimenting with Atmos.
5. Click Apply and OK.
6. Open the Console (F3). Your panpots have now been promoted to Surround Panners. (Regarding Sends and Surround Panning, please see the note at the end.)
7. In the Renderer section at the Console’s right-hand side, choose 5.1 for the Bed Format, and Binaural for the Output. Remember, you’ll need to do all your monitoring on headphones. To avoid blasting your ears, I highly recommend turning down the Renderer’s level, and then bringing it up to a comfortable listening level during playback.
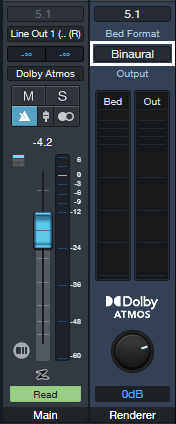
Figure 3: The Renderer section produces the binaural output for monitoring over headphones.
8. Start playback. It won’t sound exactly like the mix did previously, but that’s the point—now you can remix it for Atmos.
Of course, this is just a start. All we’re doing is setting up a sandbox so you can play with this shiny new Atmos toy in Studio One. Start your experiments with panning. Double-click on a Surround Panner to open it. You can change the width of the stereo field, its position, and whether the sound is close to the listener or further away. And yes, it’s all automatable. Choose Disable Center (which is more about dialog placement for movies, so we don’t need it). Also, LFE isn’t all that necessary for most music, unless one of your instruments is an explosion.
Right-click on a panpot, and you can replace the Surround Panner with a Spatial Object Panner, which places the sound anywhere in an immersive space that also emulates height. But we’re getting ahead of ourselves…for now, just have a good time playing around, and we’ll get deeper into how to actually mix with Atmos from an artistic/musical standpoint in later blog posts. Who knows? You might enjoy the process enough to set up a speaker-based surround system, and be seduced by the full impact of Atmos mixing.
About Sends
To have Surround panners for Sends, the Bus they go to needs to be configured for Surround. Do this by selecting 5.1 from the drop-down menu in the field below the Mute and Solo buttons (fig. 4).
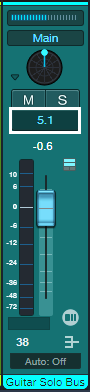
Figure 4: Where to choose the bus Speaker Configuration.
Note that Bus Channels, FX Channels, Aux Channels, and Send panpots can’t be Spatial Object Panners, only Surround Panners.
You Can Do Immersive Audio. Right Now.
You don’t need a massive surround system with speakers wired all over your studio to create immersive audio. Whether you want surround or Dolby® Atmos mixes, Studio One Professional 6.5 delivers immersive sound over not just speakers, but the headphones you already have. Although it’s counterintuitive that headphones pressed up against your ears can deliver immersive audio, binaural audio makes it possible—here’s why.
Binaural recordings capture audio using a dummy human head with molded, lifelike ear canals. There are two mics, one for each ear. Whether sounds are reaching human ears or microphones in dummy ears, sounds coming from the sides or back have different levels, frequency responses, and delay times compared to those sounds reaching your ears from the front. Incorporating these differences in audio played back through headphones makes it sound like you’re hearing audio from front, sides, above, and behind you. In other words, listening to a binaural recording through headphones sounds like you’re hearing sound in a real-world space. Which brings us to…
Surround
Before headphones can reproduce the effect of hearing immersive audio, we need to create music in the studio that provides a feeling of space. One option is surround sound, which has been applied to movies for almost half a century.
Surround places sound all around you by supplementing stereo’s left and right channels with four more speakers: center channel for dialog, left rear, right rear, and a subwoofer for a movie’s bass requirements—explosions, earthquakes, and so on. When mixing music for surround, the center isn’t as important as it is for movies, because placing the same audio in the left and right channels creates a phantom center. Also, subwoofers are more about effects than reproducing notes. You can’t differentiate note pitches below 20 Hz anyway.
Mixing for surround is kind of like mixing for stereo, except you direct audio files to multiple speakers. So, panpots are now surround panners (fig. 1).
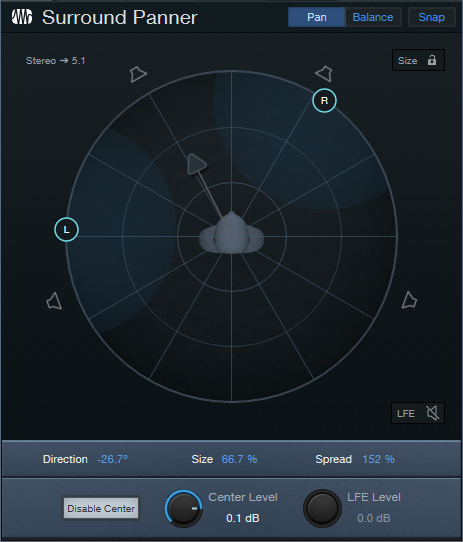
Figure 1: Studio One’s Surround Panner.
Enter Dolby Atmos
Dolby Atmos is a bigger leap from surround than surround was from stereo. First, Atmos adds an element of height. Now you’re not just surrounded by sound, but immersed in a space. Second, Atmos isn’t audio, like a WAV file. Unlike surround, where your choices of where to place sound are limited by the number of speakers, Atmos is about metadata that places mono or stereo sounds in a virtual 3D world.
The optimum way to experience Atmos is with speakers, although that involves some complications and calibrations. For example, to hear sound above you, your “height” speaker (often part of a soundbar) bounces sound off the ceiling. You also need a room that accommodates multiple speakers. However, there’s a brilliant alternative to speakers: binaural sound through headphones. You don’t need a complex multichannel setup, because thanks to binaural audio, you can mix with Atmos and hear the results over headphones. After creating your mix in Atmos’s 3D space, just render that as binaural audio, and voilà—people listening to your rendered mix over headphones will hear what you heard as you mixed it.
Check out Dolby’s short YouTube demo while listening on headphones, and you’ll hear how well an Atmos mix gives a sense of space with headphones.
What Atmos Metadata Defines
Atmos differentiates between a Bed and an Object. A bed is very much like a massive stem based on a conventional, channel-based mix with specific channel restrictions—like 2.0 (stereo), 5.1, or 7.1 surround. (Note that Atmos supports multiple beds.) Conceptually, this is no different than using the console in previous Studio One versions, except that the mix for the bed can include elements that go beyond stereo. These include multi-channel panning for 5.1 or 7.1 surround, and multichannel-friendly effects (fig. 2).
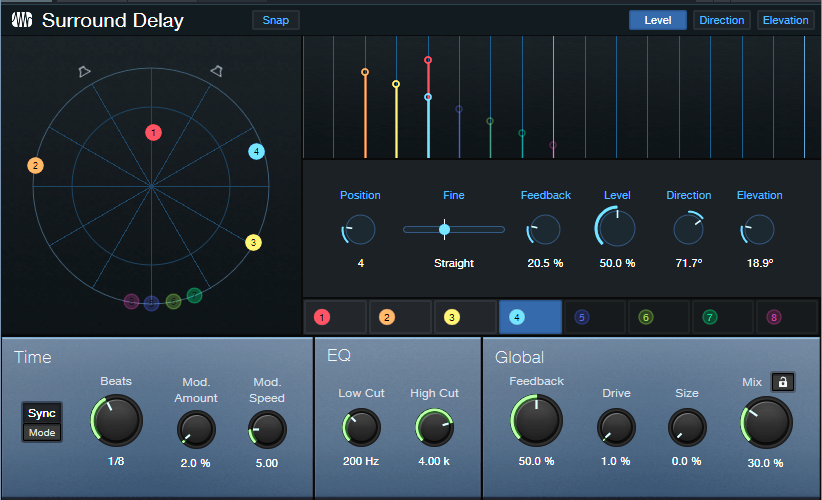
Figure 2: The new Surround Delay is pretty wild—just wait until you try it.
Spatially speaking, the bed has a fixed position in space. For example, consider a movie, where characters are seated in a casino. The bed would consist of the casino sounds in the background, people talking, gamblers, and wait staff moving around based on conventional surround panning.
An Object is discrete mono or stereo audio that can be placed anywhere in the 3D Atmos space. It’s not tied to particular channels, like the bed, but is “floating in space.” For example, in the casino example above, James Bond could be an object. He walks down a staircase in the back of the casino, saunters toward the front, moves to one side of a baccarat table, stands for a while to observe the action, and then walks over to where he can find a seat. Atmos’s dedicated object panning makes it easy to have objects move around in your 3D space (fig. 3).
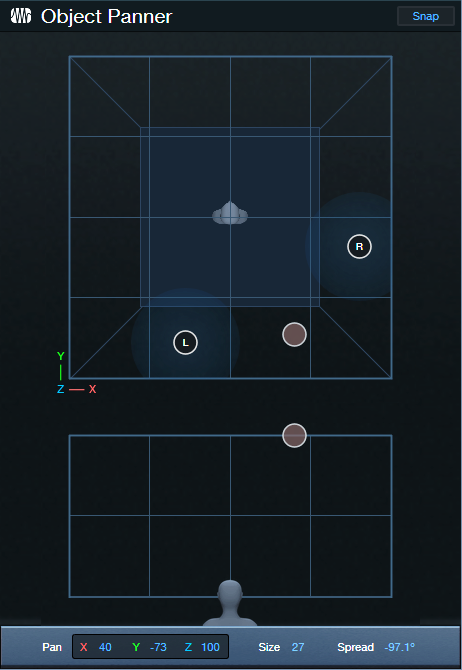
Figure 3: The Object Panner can move objects in a 3D space. You can automate these changes.
Another way to think of beds and objects is a band playing on stage. The drummer, bassist next to the drummer, keyboard player, and background singers remain at their spots on stage. They’re the bed. The lead singer who prances around and the lead guitarist who uses a wireless system to go into the crowd are the objects.
Metadata and Tracks
Atmos defines up to 128 tracks, including objects, to create the spatial field. For movies, this typically involves mixing 10 tracks for a 9.1 surround bed, and up to 118 objects. However, you can distribute the 128 tracks any way you want. This is where the metadata comes into play. It specifies location or panning data, including how fast an object moves, the level of the audio, and the like. Basically, it’s the audio’s traffic director, and routes audio in the 3D soundfield.
Rendering with Atmos
The Dolby Atmos Renderer included in version 6.5 complements and adds functionality to, not replaces, your usual workflow. It can convert your mix into any of several formats, including stereo or surround. For those without multi-channel speaker systems, Binaural Rendering (fig. 4) reproduces the effect of listening over a multi-channel loudspeaker system using headphones.
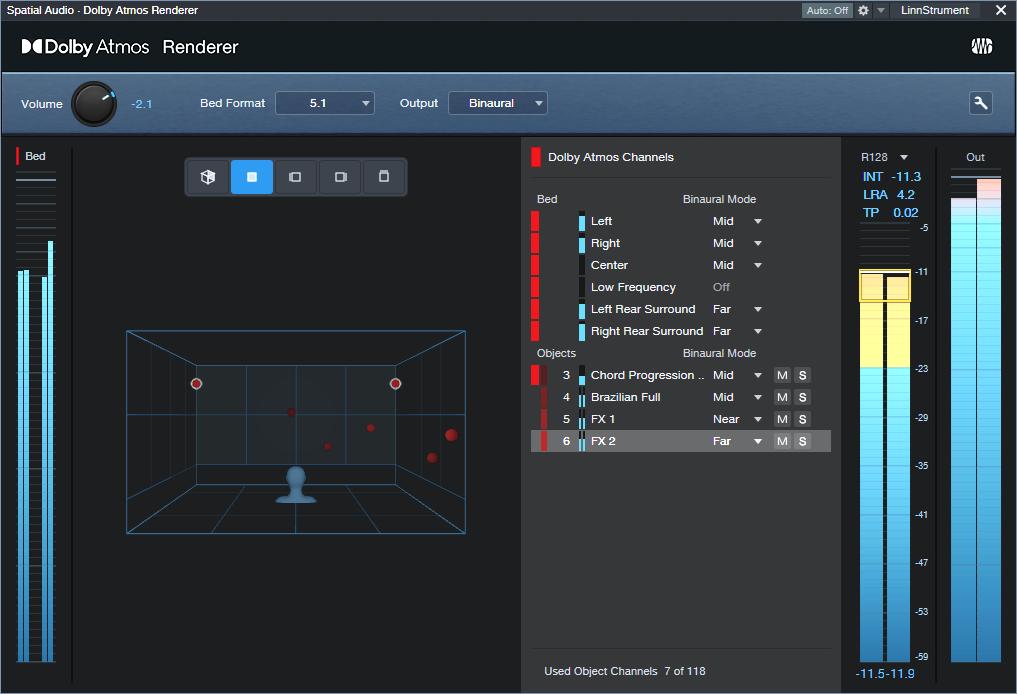
Figure 4: The Dolby Atmos renderer is rendering the mix to binaural.
And we’re back to where we started: just as binaural playback reproduces the spatial sense of a real-world 3D space, it can just as easily reproduce the spatial sense of a 3D space created with Atmos. With Studio One 6.5 and headphones, you can start playing with immersive audio now.