Tag Archives: Learn Studio One
10 Presence XT Techniques
September is winding down, but we still have one week left to celebrate Studio One’s 10th anniversary—so it’s time for another Friday Tip with 10 Tips! Let’s take a look at some practical, convenient techniques you can do with Presence XT. And yes, there’s a fun downloadable preset at the end.
- “Tighten” and “Loosen” Drum Kits

The Artist Instruments folder has a bunch of drum kits. However, I like to fine-tune drum pitches—higher pitches for a tighter, more beatbox/analog drum sound, or lower for a big rock vibe. Although the Sample Shift control can change pitch, it also changes where the drum appears on the keyboard. For example, if you Sample Shift a snare on the F key by +3, then the drum is lower in pitch, but it now plays back on D instead of F.
There’s a simpler way to tune your drums. Set Env 2 to Full Sustain, and modulate Pitch with it. Turn the modulation amount up to tighten the sound, or down to loosen.
- Control Presence Effects with the Mod Wheel

According to Presence, you can’t control effects parameters with the mod wheel—but there are a lot of useful techniques you can do with a mod wheel, other than control vibrato. Here’s one way to control the effects with your keyboard controller’s mod wheel.
- Choose Studio One > Options, and click on External Devices.
- Click on Add, and choose New Control Surface. Set Receive from your keyboard. You’ll get a scary message warning you “This port is already in use,” but just ignore it and click OK.
- Click OK on the Add Device menu, and now Studio One thinks your keyboard is a control surface.
- In the Mix view, click on the External button toward the left. When the External Devices column appears, double-click on New Control Surface.
- Click on MIDI Learn, and move your mod wheel. Name it to make it feel welcome, and then disable MIDI Learn.
Now you can link anything you want with the mod wheel, including effects. For example…
- Control Distortion Drive with the Mod Wheel
Adding distortion to bass is a beautiful thing, and it’s even more beautiful when you can control the distortion amount with the mod wheel.
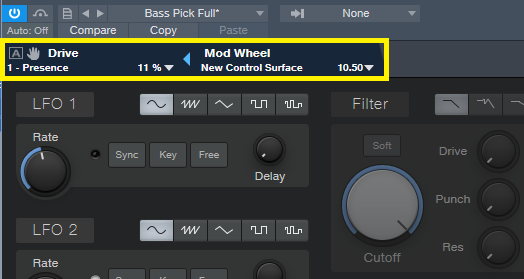
- Click on the Edit Mapping button in Presence’s upper right (the somewhat inscrutable gear symbol). Now you can see the control mapping in Presence—which is really important if your monitor isn’t wide enough to show the Edit Mapping option in the toolbar.
- Contrary to the help, which assumes you’re rational and using a separate hardware control surface, move the Mod wheel and it should show up in the right side of the Edit Mapping section.
- Move the Distortion Drive control, which will show up on the left side of the Edit Mapping section.
- Click the “assign” triangle in the middle of the Edit Mapping section, and now the Mod Wheel will control the Drive control. (Another tip: distortion gourmets recommend “Bad Tube” as the best choice for bass distortion.)
- More Expressiveness
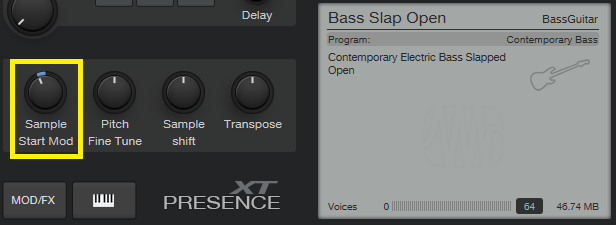
The Sample Start Mod control can add major expressiveness because it lets you control the attack’s character via velocity. Here’s how it works: when Sample Start Mod turned counter-clockwise off-center, with low velocities playback starts further into the sample, past the initial attack. But higher velocities trigger the full attack sound. For example, with an instrument like Slap Bass, this technique can emphasize the slap component with high velocities, while lower velocities bypass the slap. However, Sample Start Mod can affect any instrument with a defined attack.
Because a sample may not start at a zero-crossing, you may hear a click with some velocity values. Adding a little bit of Amp Env attack (usually only a millisecond or two) fixes this.
- Change the Female Choir into Monks
Call up the Vox > Choir > Choir Full preset. Set Transpose to -12, and Sample Shift to Semi-Tone: 12. You might also want to slather on some more reverb by turning up the Size and Mix, but regardless, you’re ready for your next moody movie soundtrack, or Gregorian chants dance remix.
- Get Saxy
Let’s face it, John Coltrane fans—a sampler will never replace a sax player. However, the Winds > Baritone Sax > Baritone Sax Full preset is pretty good, so it seemed like a useful starting point for something a little more expressive. There are several treaks, but the main action is with the modulation.
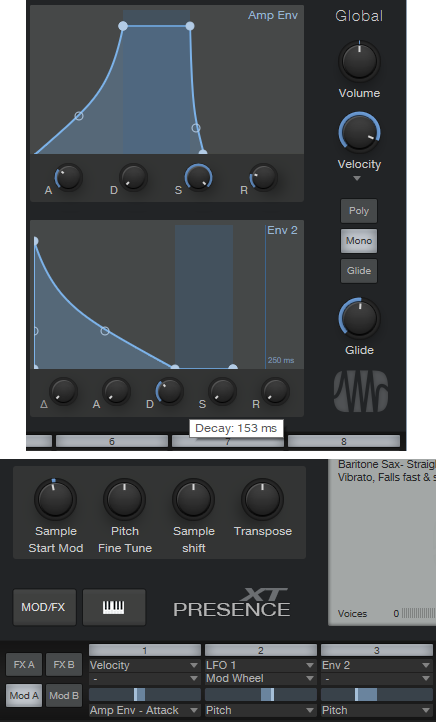
- Set Sample Start Mod to -7000. If you play softly, this starts playback further into the sample, so you don’t hear the attack. However, as mentioned previously, modulating sample start can produce clicks because playback may not start on a zero crossing, so…
- Set the Amp Env Attack to 83 ms. This gets rid of any clicks. However, we want a fast attack with high velocities, so…
- In the Mod section, use Velocity to apply negative modulation to the Amp Env attack (you don’t need much) so that hitting the keys harder gives a faster attack.
- We also want to have notes bend up to pitch somewhat, so set the Decay for Env 2 to 153 ms. Again in the Mod section, use it to apply negative modulation to pitch. This causes the pitch to start off somewhat flat, then slide up to the correct pitch.
The penultimate touch is some vibrato by modulating Pitch. I used LFO set to about 4.5 Hz, with 680 ms of Delay time, controlled by the Mod Wheel (although I think Aftertouch is an even better choice, if your controller supports it). And of course, we want some reverb. The existing reverb is okay, but push the Size to 2.45 seconds, and Mix to 45%. Yeah, that’s the ticket! You might also want to choose Mono, unless you know any saxes that play chords. And yes, I’ve provided a downloadable preset for your playing pleasure—scroll down to the end.
- Foolproof Bass Slides

Set the bend to +7 for bend up, and 0 for bend down. Now when you want to slide down to a note, start at the top of the mod wheel, and then bring it down at whatever rate you want. It’s impossible to “overshoot” the target note, even when using the virtual mod wheel on the instrument GUI, with bend down set to 0.
- Add Analog Synth “Drift”
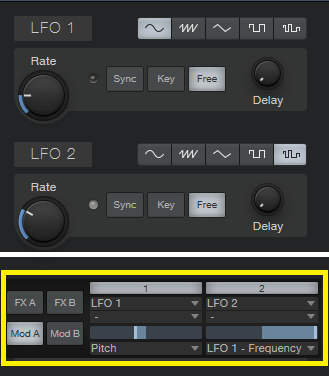
The pitch of analog synths drifts over time. Although Presence XT has a random LFO waveform, it’s stepped, and there’s no way you can “round off” the corners to create smooth variations. But there’s a solution (isn’t there always…). Use the sine waveform for LFO 1 and set it to a low rate, like 0.1 Hz. Select the random waveform for LFO 2, set to a slightly faster rate (like 0.4 Hz), and use it to modulate LFO 1. Meanwhile, use LFO 1 to modulate pitch; you don’t need to use much modulation to obtain a useful effect. Try this with Artist Instruments > Synths > Analog Fifths—you’ll be impressed.
- The Presence XT Editor Is Worth It

There might be a tendency to overlook the editor because Presence XT does enough on its own. And yes, I know the editor is $79.99. But, it’s cheaper than getting another sampler, and the capabilities are impressive. It’s easy to figure out, and it doesn’t take long to add samples—for example, you can specify the root note, high note, and low note by hitting keys. When using per-note samples, you can do fine-tuning, as well as add expressive features like sample start. Presence XT Editor is also a development system, so if you come up with some amazing presets, you can put them into a saleable bundle, and even password-protect it. If you’re into sound design and creating sample-based instruments, I highly recommend unlocking Presence XT’s Editor page.
- But Wait—There’s More!
Presence XT can load sounds from other formats—EXS, Giga, Kontakt version 4 (and below), and Sound Fonts. Finally, check out Tip 1 in the September 13 Friday Tip on using ATOM as an auxiliary keyboard. This makes it easy to access the keyswitching in Presence XT presets that contain this feature, even if you have only a four-octave keyboard.
I hope y’all enjoyed this month’s special editions of the Friday Tip. Happy birthday, Studio One!
Download the saxy sax preset, CA Baritone Sax Full
10 Not-Hitting-Drums ATOM Tips
It’s easy to assume ATOM is an MPC-type pad controller, and ignore it if that’s not of interest. But ATOM is tightly integrated with Studio One for navigation, editing, and more, and also works with third-party software—which even applies to third-party software (like virtual instruments) running inside Studio One.
1. The Auxiliary Keyswitch Keyboard
The problem: you have a 4-octave keyboard, but you’re using a program like SampleTank or Kontakt that uses lower-octave keys for keyswitching. The solution: Add ATOM as an auxiliary keyboard for triggering keyswitches (Fig. 1).

Figure 1: IK SampleTank’s lower keys trigger loops (as identified with arrows), while the upper keys play one-shots. You can set up ATOM to play the lower, keyswitched notes, and play the one-shots from your main keyboard.
1. Select the Instrument track and set it to All Inputs, so it receives notes from the main keyboard and from ATOM.
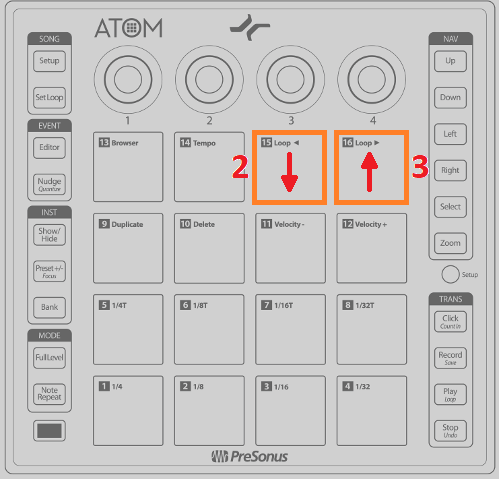
Figure 2: Use Pads 15 and 16 to cover the desired keyboard range for keyswitching.
2. Tap Pad 15 to transpose down an octave (Fig. 2). Each tap transposes down another octave. To keep track of how far down you’ve transposed, Pad 15 is orange at the default octave, tan = -1 octave, purple = -2 octaves, and red = -3 octaves.
3. Tap Pad 16 to transpose up an octave. Each tap transposes up another octave.
Considerate Bonus Feature: ATOM remembers the octave settings for different instrument tracks, even if they’re not instruments bundled with Studio One.
2. “Feel Factor” Changes
Leading or lagging rhythms by only a few milliseconds can make a major difference in the “feel,” the mix, and therefore, the music’s emotional impact (for more about the “feel factor,” please check out this article on my educational site, craiganderton.org). But how can you do that with Studio One, whose highest resolution goes to 64th notes? It’s easy with ATOM—and frankly, this feature alone justifies ATOM to me. The following works with both note and audio data.
1. In Studio One, turn off snap.
2. Select the notes (or audio Events) whose timing you want to shift.

Figure 3: You can lead or lag events in 1 millisecond increments with ATOM.
3. On ATOM, press and hold Nudge (Fig. 3).
4. Tap the Left button to move the selected notes or Events ahead (lead) by 1 ms, and the Right button to move the selected notes late (lag) by 1 ms (Fig. 4).
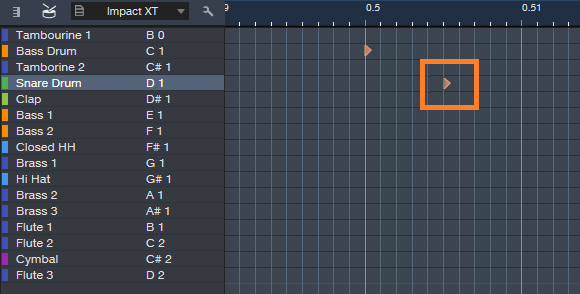
Figure 4: The timeline shows seconds. The note outlined in orange has been nudged 5 ms later.
This is huge. Try moving percussion a few milliseconds ahead of the beat to give a more “urgent” feel, or a snare a few milliseconds after the beat for a “bigger” sound.
3. Don’t Panic!
Stuck notes? No problem—see Fig. 5. (Note: the upper left Setup button needs to be off.)

Figure 5: It’s easy to nuke stuck notes with ATOM.
1. Press and hold the Quick Setup button, and select the track with the stuck notes.
2. Tap Pad 4 to send an All Notes Off command.
4. Tap Your Tempo
This is one of my favorite features for songwriting, because it’s a lot easier to tap a tempo (Fig. 6) than tweak it when you have a song idea.
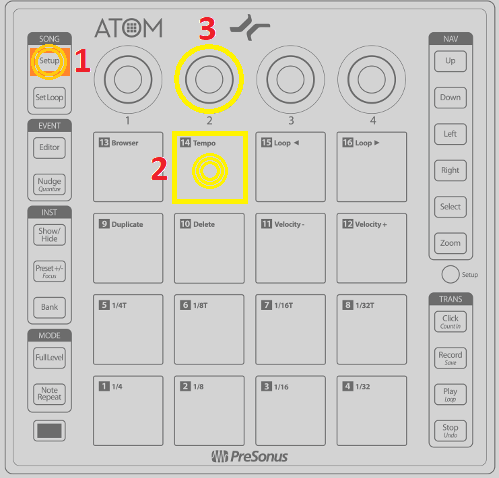
Figure 6: It’s easy to capture a song’s “feel” when songwriting by using tap tempo.
1. Tap the Song Setup button in the upper left.
2. Tap Pad 2 at the desired song tempo; this sets the tempo in the control bar.
3. To fine-tune the tempo, turn Knob 2.
5. The Hands-On Instrument Browser
You can call up instruments and presets quickly with ATOM (Fig. 7).
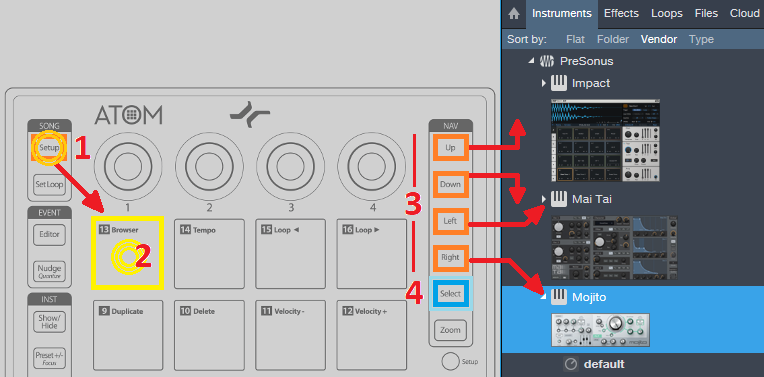
Figure 7: ATOM plays well with the Browser.
1. Press Setup, and it glows orange.
2. Toggle the Browser show/hide by tapping Pad 13 (Browser).
3. When the Browser is open, use the Up and Down buttons to go up and down through the list of instruments and presets. Use the Right button to open a preset list, and the Left button to close the list.
4. When you have the preset or instrument you want, press Select. This creates an Instrument track with the currently selected preset, or the instrument itself if no preset is selected.
6. Wicked Fast Exclusive Solo
There are many times—especially when proofing tracks before mixing–that I want to be able to select tracks quickly, and go into exclusive solo mode (i.e., only that track will be soloed—even other tracks that are soloed will be muted). It’s super fast if the Arrange View or Console has the focus (Fig. 8).
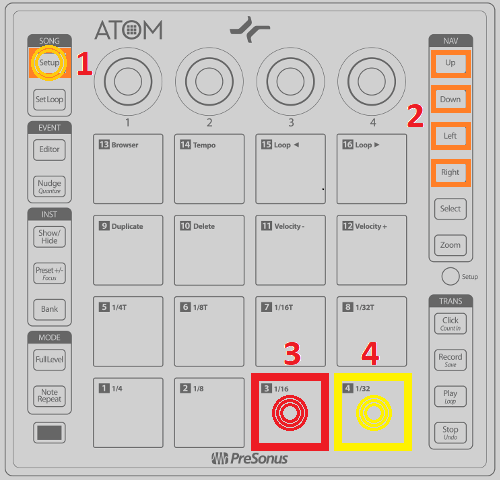
Figure 8: Step through tracks quickly, and “exclusive solo” them, with ATOM.
1. Tap Setup, and it glows orange.
2. Use the Up button or Left button to step up through tracks, and the Down or Right button to step down through tracks. (That’s kinda cool that either one Up/Down or Left/Right works, because it’s natural to use Up/Down in the Arrange view, and Left/Right on the Console).
3. Tap Pad 3 to mute the selected track.
4. Tap Pad 4 to solo the selected track, or Alt+Pad 4 for exclusive solo.
7. Control FX Chain Macro Knobs

Figure 9: Want hands-on control over the various FX Chains I’ve presented in these Friday Tips? ATOM can do it.
This is an easy one. Call up an FX Chain. Move the ATOM knob you want to assign to a Macro control. Right click on the Macro control. Assign it to the ATOM knob (Fig. 9).
8. Faking Studio One as a Third-Party Application
ATOM is happiest when playing with Studio One, because of the tight integration. But I still use Cakewalk’s Rapture Pro in a lot of tracks; I sampled a ton of Gibson basses, and made what I think are some really cool instruments with them. Unfortunately, in theory you can’t use ATOM’s aftertouch or knobs as a generic control surface when running in Studio One…but hey, we laugh at theory around here! You can, by faking Studio One into not recognizing ATOM as ATOM.
1. Go to Studio One > Options > External Devices, and remove ATOM.
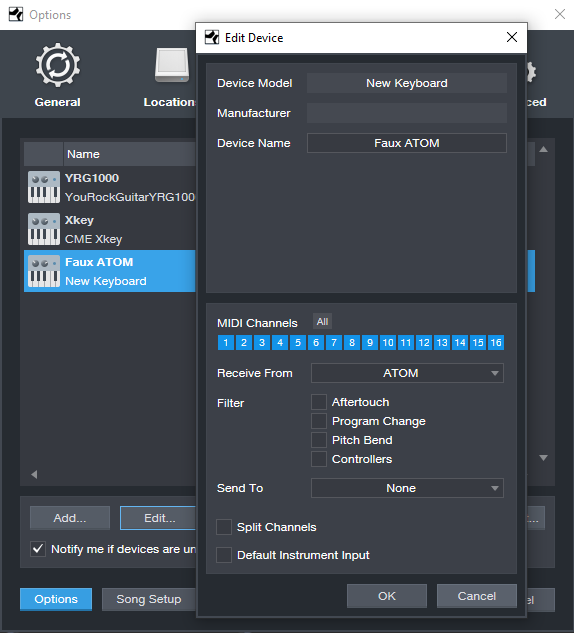
Figure 10: How to fool ATOM into thinking Studio One is a third-party application.
2. Click Add, and choose New Keyboard (I named it Faux ATOM; see Fig. 10). You don’t need to Send To anything. ATOM’s status light at the top will glow green to indicate ATOM isn’t under Studio One’s control.
3. If your instrument has MIDI learn, assign the four controls or aftertouch however you want, and record as you would any automation from a control surface (Fig. 11).
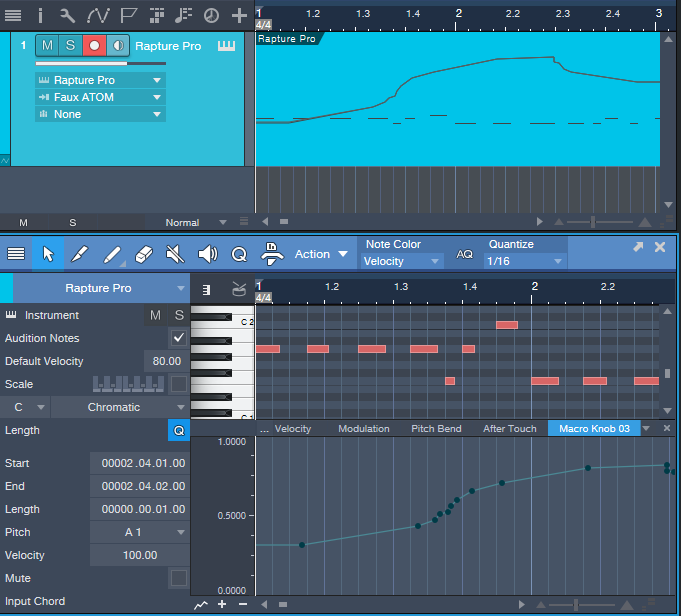
Figure 11: The screen shot shows the results of recording ATOM’s Macro Knob 3 as a control source for a third-party synthesizer.
Don’t worry, you haven’t lost ATOM. Go Studio One > Options > External Devices, and remove Faux ATOM. Click on Reconnect; Studio One finds ATOM, and lists it as an external device. Another option is to close and re-open Studio One (ATOM gets added automatically).
9. Cool Event Editor Stuff
The documentation seems to imply that you can do cool event editor things only with the Instrument track, but that’s not quite true—you can do plenty with audio tracks as well.
1. Press the Editor button (in the left side, under Event). It doesn’t matter if Song Setup is on, because if it is, hitting Editor turns it off. The Edit view appears.
2. To hide the Edit view, hold Shift and tap Editor.
While in the Editor (or with audio tracks, the Arrange view):
10. The More Ways to Undo, the Better
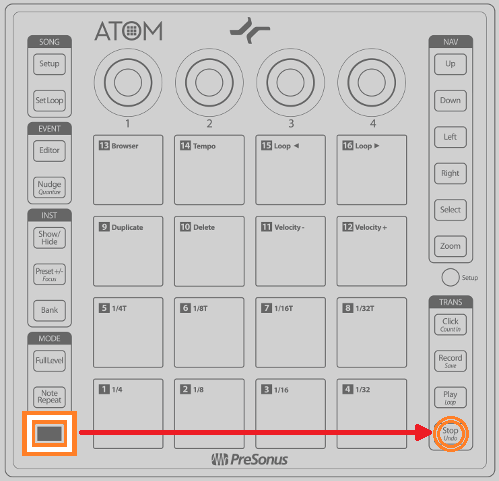
Figure 12: No one will ever know you made that horrible mistake if you undo.
Hold Shift and tap Undo (Fig. 12) to undo your last mistake…because there are never enough ways to undo!
The Bigness of Huge Drum Sound
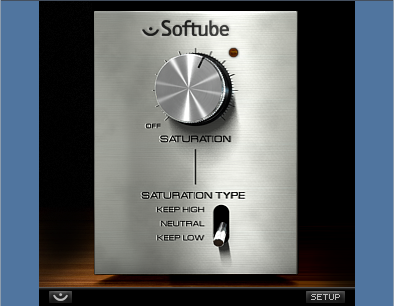
So…you want some huge drum sounds? Here you go. This is super well-suited to hip-hop and EDM, but can also give a monster drum sound for rock. The star of this show is the Softube Saturation Knob and FX Chain Splitter.
Drums lend themselves well to a little crunch, but there are limitations. If you apply a bitcrusher or distortion effect, the sound will become indistinct—which may be what you want, but I prefer a monster low end and a more defined high end. This usually requires a couple tracks with a crossover (or a track/bus combo with filtering), but the Splitter module makes it easy to do this in a single FX Chain.
Here’s the overall view of the FX Chain.

The first effect is a limiter, which is optional—but it can add a nice bit of squashing. The signal then proceeds to a Splitter set for a Frequency Split, with a crossover point around 220 Hz. The low-frequency split (to the left) goes to the Saturation Knob. You have some choices here; the Keep Low setting gives a boomier bass (hip-hop fans take note), while the Neutral and Keep High settings give a tighter sound—good for rock and dance, where you’ll often want the kick to make room for the bass part.
Meanwhile, the high frequencies split off to a Pro EQ and Mixverb. The Pro EQ helps compensate for the low-frequency split’s hugeness by boosting the highs with a broad peak. The Mixverb is a cheap ’n’ cheerful reverb that’s happy to provide a bit of room ambiance.

Finally, the Mixtool at the end provides a Trim control so you can match the enabled level to the bypassed one.
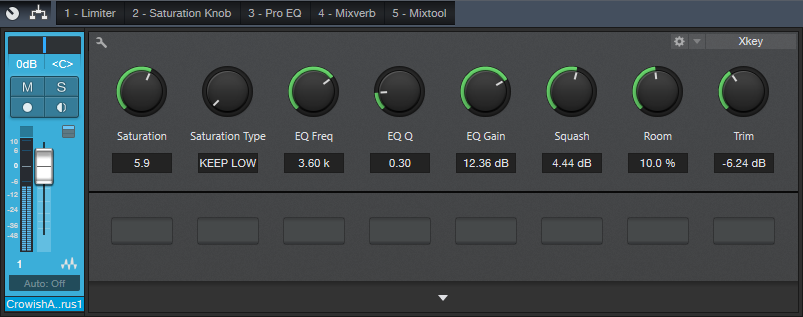
The Channel Editor brings out the crucial controls and is pretty self-explanatory. There are controls for the Saturation Knob’s two parameters, Frequency/Q/Gain controls for the high-frequency EQ stage, a Squash control to push the limiter, Room level, and Trim to adjust the final output.
So is it worth the effort to construct this FX Chain? Yes! But you don’t have to…
And you probably want to hear what it sounds like, so check out the audio example. The first half is a straight acoustic drum loop from Studio One’s library, while the second half has been converted into a Bigness of Huge drum loop. They’ve been normalized to the same peak level for a fair comparison.
Friday Tips – Why Mono Matters for Mixing
With the ideal mix, the balance among instruments is perfect, and you can hear every instrument (or instrument section) clearly and distinctly. However, getting there can take a while, with a lot of trial and error. Fortunately, there’s a simple trick you can use when setting up a mix to accelerate the process: Start your mix with all channel pan sliders set to center (Fig. 1).
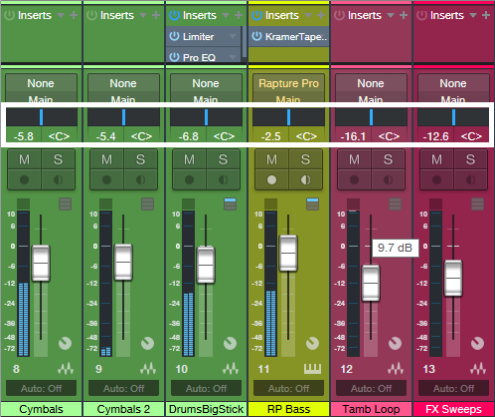
Figure 1: All the pan sliders (outlined in white) are set to center for a reason.
With stereo tracks, changing the track interleave to mono isn’t adequate, because it will throw off the channel’s level in the mix. Instead, temporarily add a Dual Pan set for the -6dB Linear Pan Law, and center both the Left and Right panpots (fig. 2). Now your stereo track will appear in the mix as mono.

Figure 2: Use the Dual Pan, set to the -6dB Linear pan law, to convert stereo channels temporarily to mono when setting up for a mix.
Analysis Time
Now listen carefully to your mix. Are all the instruments distinct? Monitoring in mono will reveal places where one instrument might mask or interfere with another, like kick and bass, or piano and guitar (depending on the note range).
The solution is to use EQ to carve out each instrument’s rightful place in the frequency spectrum. For example, if you want to prioritize the guitar part, you may need to reduce some of the piano’s midrange, and boost the regions above and below the guitar. For the guitar, boost a bit in the region where you cut the piano. With those tweaks in place, you’ll find it easier to differentiate between the two.
For kick/bass issues, the usual solution is to increase treble on one of them—with kick, this brings out the beater sound and with bass, string “zings” and pick noises. Another option is to add saturation to the bass, while leaving the kick drum alone. If the bass is playing relatively high notes, then perhaps a boost to the kick around 50-70 Hz will help separate the two.
Keep carving away, and adjusting the EQ until all the instruments are clear and distinct. Now when you start doing stereo placement, the sound will be open, with a huge soundstage and a level of clarity you might not obtain otherwise—or which might take a lot of tweaking to achieve.
We’re Not Done with Mono Just Yet…
Okay, now you have a great stereo mix. But it’s also important to make sure your mix collapses well to mono, because you have no control over the playback system. It might play from someone’s smartphone, and sounds mostly mono…or play back over speakers that are close to each other, so there’s not real good stereo separation. Radio is another possibility where the stereo might not be wonderful.
Some processors, especially ones that control stereo imaging with mid-side processing, may have phase or other issues when collapsed to mono. Short, stereo delays can also have problems collapsing to mono, and produce comb-filtering-type effects. So, hop on over to the main bus, and click the Channel Mode button to convert the output to mono (Fig. 3).
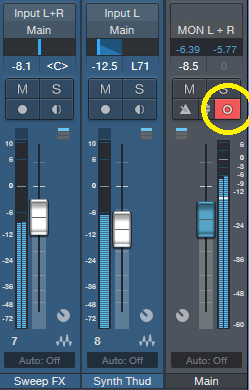
Figure 3: The Channel Mode button (circled in yellow) can switch the output between mono and stereo.
Hopefully, everything will sound correct—just collapsed to mono. But if not, start soloing channels and comparing what they sound like with the Channel Mode button in stereo and mono, until you chase down the culprit. Make the appropriate tweaks (which may be as simple as tweaking the delay time in one channel of a stereo delay processor), make sure the mix still sounds good in stereo, and you’re done.
Friday Tip – Create “Virtual Mics” with EQ
I sometimes record acoustic rhythm guitars with one mic for two main reasons: no issues with phase cancellations among multiple mics, and faster setup time. Besides, rhythm guitar parts often sit in the background, so some ambiance with electronic delay and reverb can give a somewhat bigger sound. However, on an album project with the late classical guitarist Linda Cohen, the solo guitar needed to be upfront, and the lack of a stereo image due to using a single mic was problematic.
Rather than experiment with multiple mics and deal with phase issues, I decided to go for the most accurate sound possible from one high-quality, condenser mic. This was successful, in the sense that moving from the control room to the studio sounded virtually identical; but the sound lacked realism. Thinking about what you hear when sitting close to a classical guitar provided clues on how to obtain the desired sound.
If you’re facing a guitarist, your right ear picks up on some of the finger squeaks and string noise from the guitarist’s fretting hand. Meanwhile, your left ear picks up some of the body’s “bass boom.” Although not as directional as the high-frequency finger noise, it still shifts the lower part of the frequency spectrum somewhat to the left. Meanwhile, the main guitar sound fills the room, providing the acoustic equivalent of a center channel.
Sending the guitar track into two additional buses solved the imaging problem by giving one bus a drastic treble cut and panning it somewhat left. The other bus had a drastic bass cut and was panned toward the right (Fig. 1).
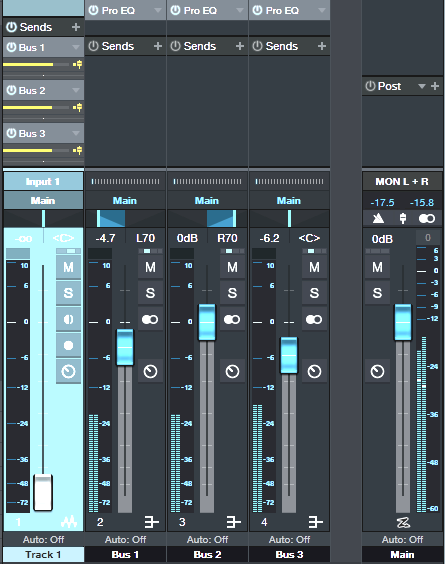
Figure 1: The main track (toward the left) splits into three pre-fader buses, each with its own EQ.
One send goes to bus 1. The EQ is set to around 400 Hz (but also try lower frequencies), with a 24 dB/octave slope to focus on the guitar body’s “boom.” Another send goes to bus 2, which emphasizes finger noises and high frequencies. Its EQ has a highpass filter response with a 24dB/octave slope and frequency around 1 kHz. Pan bus 1 toward the left and bus 2 toward the right, because if you’re facing a guitarist the body boom will be toward the listener’s left, and the finger and neck noises will be toward the listener’s right.
The send to bus 3 goes to the main guitar sound bus. Offset its highpass and lowpass filters a little more than an octave from the other two buses, e.g., 160 Hz for the highpass and 2.4 kHz for the lowpass (Fig. 2). This isn’t “technically correct,” but I felt it gave the best sound.
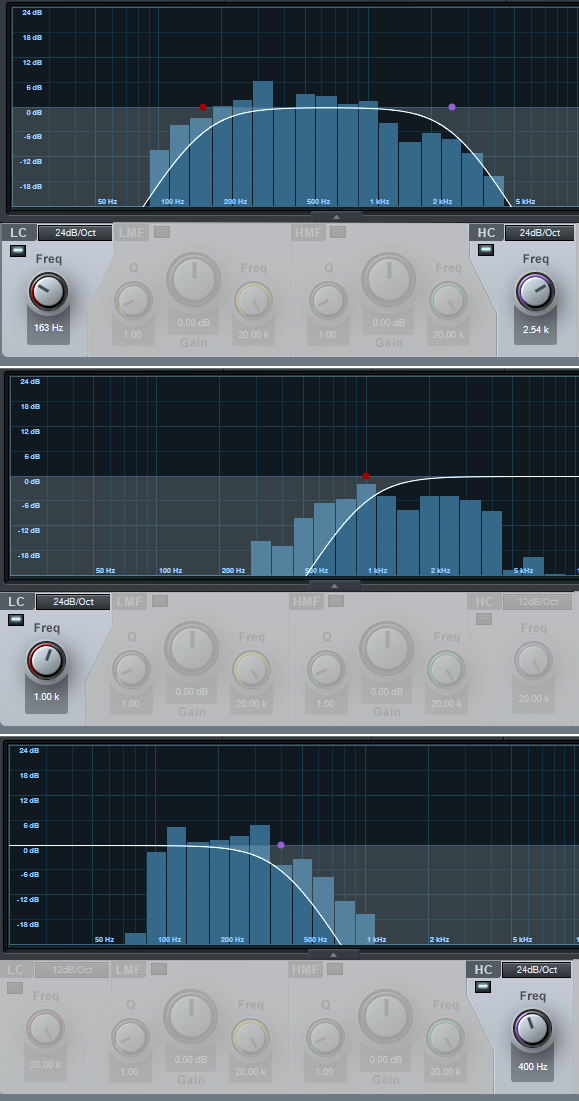
Figure 2: The top curve trims the response of the main guitar sound, the middle curve isolates the high frequencies, and the lower curve isolates the low frequencies. EQ controls that aren’t relevant are grayed out.
Monitor the first two buses, and set a good balance of the low and high frequencies. Then bring up the third send’s level, with its pan centered. The result should be a big guitar sound with a stereo image, but we’re not done quite yet.
The balance of the three tracks is crucial to obtaining the most realistic sound, as are the EQ frequencies. Experiment with the EQ settings, and consider reducing the frequency range of the bus with the main guitar sound. If the image is too wide, pan the low and high-frequency buses more to center. It helps to monitor the output in mono as well as stereo for a reality check.
Once you nail the right settings, you may be taken aback to hear the sound of a stereo acoustic guitar with no phase issues. The sound is stronger, more consistent, and the stereo image is rock-solid.
Video Using VocALign in Studio One Pro!
In this video, producer Paul Drew shows how VocALign seamlessly works inside Presonus Studio One Professional and almost instantly aligns the timing of multiple vocal tracks to a lead using ARA2, potentially saving hours of painstaking editing time.
ARA (Audio Random Access) is a pioneering extension for audio plug-in interfaces. Co-developed by Celemony and PreSonus, ARA technology enhances the communication between plug-in and DAW, and gives the plug-in and host instant access to the audio data. This video shows Studio One but the workflow is very similar in Cubase Pro & Nuendo, Cakewalk by Bandlab and Reaper.
Purchase VocALign today right out of the PreSonus Shop!
Friday Tips: The Best Flanger Plug-In?
Well…maybe it actually is, and we’ll cover both positive and negative flanging (there’s a link to download multipresets for both options). Both do true, through-zero flanging, which sounds like the vintage, tape-based flanging sound from the late 60s.
The basis of this is—surprise!—our old friend the Autofilter (see the Friday Tip for June 17, Studio One’s Secret Equalizer, for information on using its unusual filter responses for sound design). The more I use that sucker, the more uses I find for it. I’m hoping there’s a dishwashing module in there somewhere…meanwhile, for this tip we’ll use the Comb filter.
Positive Flanging
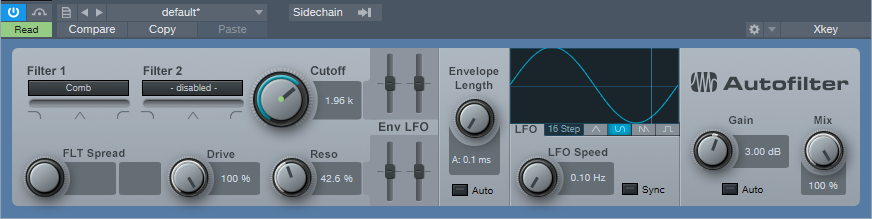
Figure 1: When set properly, the Autofilter’s comb filter can make a superb flanger.
Flanging depended on two signals playing against each other, with the time delay of one varying while the other stayed constant. Positive flanging was the result of the two signals being in phase. This gave a zinging, resonant type of flanging sound.
Fig. 1 shows the control settings for positive flanging. Turn Auto Gain off, Mix to 100%, and set both pairs of Env and LFO sliders to 0. Adding Drive gives a little saturation for more of a vintage tape sound (or follow the May 31 tip, In Praise of Saturation, for an alternate tape sound option). Resonance is to taste, but the setting shown above is a good place to start. The Gain control setting of 3 dB isn’t essential, but compensates for a volume loss when enabling/bypassing the FX Chain.
Varying the Cutoff controls the flanging effect. We won’t use the Autofilter’s LFO, because real tape flanging didn’t use an LFO—you controlled it by hand. Controlling the flanging process was always inexact due to tape recorder motor inertia, so a better strategy is to automate the Cutoff parameter, and create an automation curve that approximates the way flanging really varied (Fig. 2)—which was most definitely not a sine or triangle wave. A major advantage of creating an automation curve is that we can make sure that the flanging follows the music in the most fitting way.
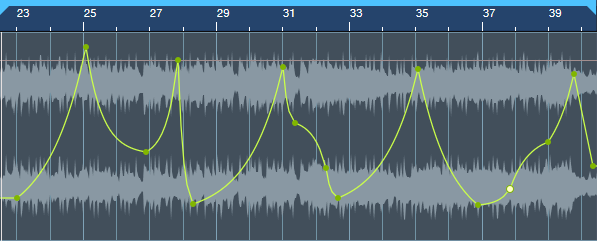
Figure 2: The Cutoff frequency automation curve used for the audio examples.
Negative Flanging
Throwing one of the two signals used to create flanging out of phase gave negative flanging, which had a hollower, “sucking” kind of sound. Also, when the variable speed tape caught up with and matched the reference tape, the signal canceled briefly due to being out of phase. It’s a little more difficult to create negative flanging, but here’s how to do it.
- Set up flanging as shown in the previous example, and then Duplicate Track (Complete), including the Autofilter.
- Turn Resonance all the way down in both Autofilters (original and duplicated track). This is important to obtain the maximum negative flanging effect. Because of the cancellation due to the two audio paths being out of phase, there’s a level drop when flanging. You can compensate by turning up both Autofilters’ Gain controls to exactly 6.00 dB (they need to be identical). This gain increase isn’t strictly necessary, but helps maintain levels between the enabled and bypassed states of the Negative Flanging FX Chain.
- In the duplicated track’s Autofilter, turn off the Autofilter’s Automation Read, and turn Cutoff up all the way (Fig. 3).
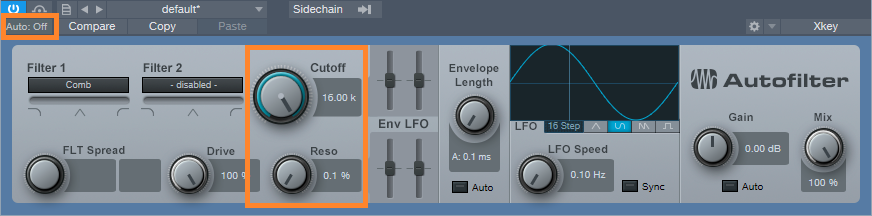
Figure 3: Settings for the duplicated track’s Autofilter.
- Insert a Mixtool after the Autofilter in the duplicated track, and enable both Invert Left and Invert Right (Fig. 4). This throws the duplicated track out of phase.

Figure 4: Mixtool settings for the duplicated track.
- Temporarily bypass both Autofilters (in the original and duplicated tracks). Start playback, and you should hear nothing because the two tracks cancel. If you want to make sure, vary one of the track faders to see if you hear anything, then restore the fader to its previous position.
- Re-enable both Autofilters, and program your Cutoff automation for the original track (the duplicated track shouldn’t have automation). Note that if you mute the duplicate track, or bring down its fader, the sound will be positive flanging (although with less level than negative flanging, because you don’t have two tracks playing at once).
So is this the best flanger plug-in ever? Well if not, it’s pretty close…listen to the audio examples, and see what you think.
Both examples are adapted/excerpted from the song All Over Again (Every Day).
The Multipresets
If you like what you hear, download the multipresets. There are individual ones for Positive Flanging and Negative Flanging. To automate the Flange Freq knob, right-click on it and choose Edit Knob 1 Automation. This overlays an automation envelope on the track that you can edit as desired to control the flanging.
Download the Positive Flanging Multipresets Here!
Download the Negative Flanging Multipresets Here!
And here’s a fine point for the rocket scientists in the crowd. Although most flangers do flanging by delaying one signal compared to another, most delays can’t go all the way up to 0 ms of delay, which is crucial for through-zero flanging where the two signals cancel at the negative flanging’s peak. The usual workaround is to delay the dry signal somewhat, for example by 1 ms, so if the minimum delay time for the processed signal is 1 ms, the two will be identical and cancel. The advantage of using the comb filter approach is that there’s no need to add any delay to the dry signal, yet they can still cancel at the peak of the flanging.
Finally, I’d like to mention my latest eBook—More Than Compressors – The Complete Guide to Dynamics in Studio One. It’s the follow-up to the book How to Record and Mix Great Vocals in Studio One. The new book is 146 pages, covers all aspects of dynamics (not just the signal processors), and is available as a download for $9.99.
End Boring MIDI Drum Parts!
I like anything that kickstarts creativity and gets you out of a rut—which is what this tip is all about. And, there’s even a bonus tip about how to create a Macro to make this process as simple as invoking a key command.
Here’s the premise. You have a MIDI drum part. It’s fine, but you want to add interest with a fill in various measures. So you move hits around to create a fill, but then you realize you want fills in quite a few places…and maybe you tend to fall into doing the same kind of fills, so you want some fresh ideas.
Here’s the solution: Studio One 4.5’s new Randomize menu, which can introduce random variations in velocity, note length, and other parameters. But what’s of interest for this application is the way Shuffle can move notes around on the timeline, while retaining the same pitch. This is great for drum parts.
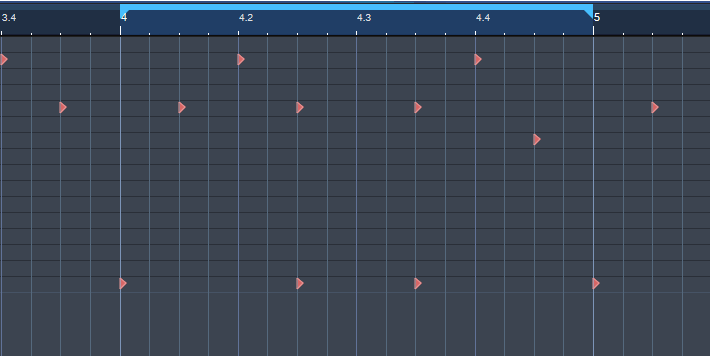
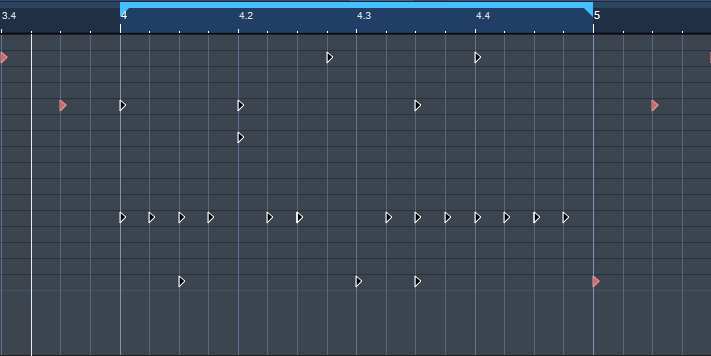
The following drum part has a really simple pattern in measure 4—let’s spice it up. The notes follow an 8th note rhythm; applying shuffle will retain the 8th note rhythm, but let’s suppose you want to shuffle the fills into 16th-note rhythms.
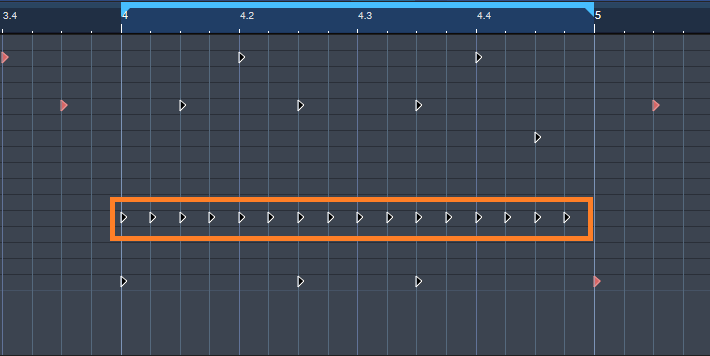
Here’s a cool trick for altering the rhythm. If you’re using Impact, mute a drum you’re not using, and enter a string of 16th notes for that drum (outlined in orange in the following image). Then select all the notes you want to shuffle.
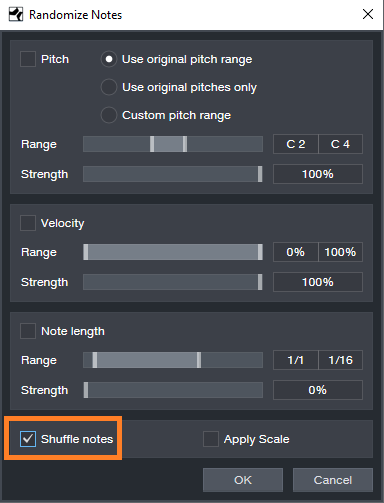
Go to the Action menu, and under Process, choose Randomize Notes. Next, click the box for Shuffle notes (outlined in orange).
Click on OK, and the notes will be shuffled to create a new pattern. You won’t hear the “ghost” 16th notes triggering the silent drum, but they’ll affect the shuffle. Here’s the pattern after shuffling.
If you like what you hear from the randomization, great. But if not, adding a couple more hits manually might do what you need. However, you can also make the randomizing process really efficient by creating a Macro to Undo/Shuffle/hit Enter.
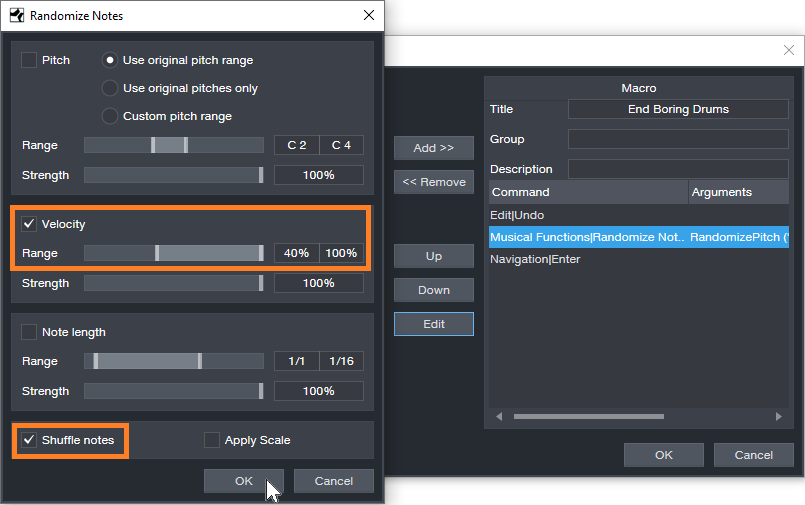
Create the Macro by clicking on Edit|Undo in the left column, and then choose Add. Next, add Musical Functions|Randomize. For the Argument, check Shuffle notes; I also like to randomize Velocity between 40% and 100%. The last step in the Macro is Navigation|Enter. Finally, assign the Macro to a keyboard shortcut. I assigned it to Ctrl+Alt+E (as in, End Boring Drum Parts).
With the Macro, if you don’t like the results of the shuffle, then just hit the keyboard shortcut to initiate another shuffle…listen, decide, repeat as needed. (Note that you need to do the first in a series of shuffles manually because the Macro starts with an Undo command.) It usually doesn’t take too many tries to come up with something cool, or that with minimum modifications will do what you want. Once you have a fill you like, you can erase the ghost notes.
If the fill isn’t “dense” enough, no problem. Just add some extra kick, snare, etc. hits, do the first Randomize process, and then keep hitting the Macro keyboard shortcut until you hear a fill you like. Sometimes, drum hits will end up on the same note—this can actually be useful, by adding unanticipated dynamics.
Perhaps this sounds too good to be true, but try it. It’s never been easier to generate a bunch of fills—and then keep the ones you like best.
Friday Tips: Attack that Autofilter!!
Studio One’s Autofilter has a sidechain, which is a good thing—because you can get some really tight, funky sounds by feeding a drum track’s send into the Autofilter’s sidechain. Then, use the Autofilter’s sidechain to modulate a track’s audio in time with the beat. Funky guitar, anyone?
But (there’s always a “but,” or there wouldn’t be a Friday Tip of the Week!), although this is a cool effect, a real wah pedal doesn’t start instantly in the toe-down position before sliding back to the heel-down position. Your foot moves the pedal forward, then back, and it takes a finite amount of time to do both.
The “decay-only” nature of autofilters in general is certainly useful with drums. After all, drums are a percussive instrument, and a percussive filter sweep is usually what you want. But the other day I was working on a song, and really wanted an attack/decay filter effect that was more like a real wah pedal—where the filter moved up to the peak, before moving back down again. Here’s the result.
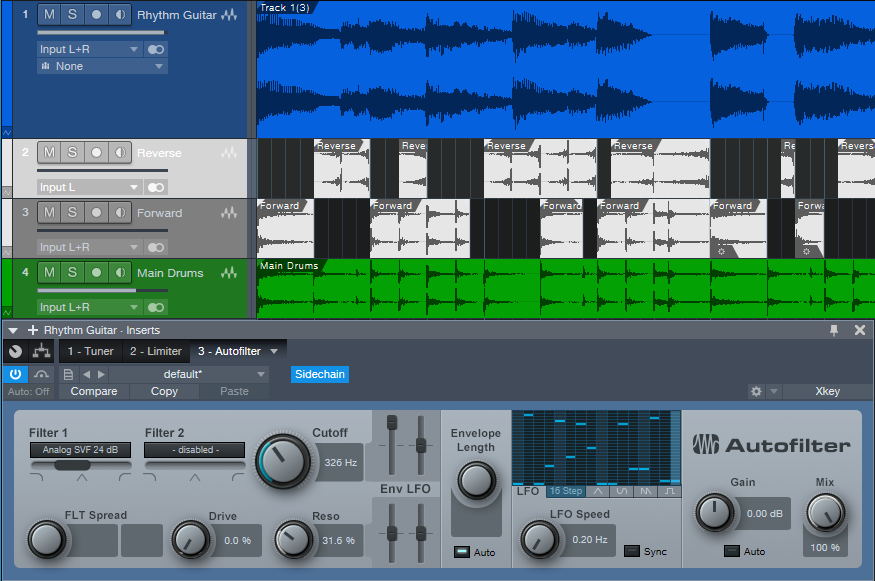
On the Autofilter, ctrl+click on the LFO sliders to zero them out, so that the LFO isn’t adding its own signal (although of course, you can do that if you want—the 16 Step option is particularly useful if you do). The screen shot gives a good idea of a typical initial setting.
The dark blue track is the guitar, and the green track, the drum part. I often cut up tracks are that modulating other tracks, and Track 3—a copy of the main drum track—is no exception. This track’s pre-fader send goes to the Autofilter’s sidechain input. The track’s channel fader is down, so that the audio doesn’t go through the mixer. We’re using this track only to provide a signal to the Autofilter’s sidechain.
Track 2 is a reversed version of the drum part. It also has a pre-fader send that goes to the Autofilter sidechain (conveniently, you don’t need to bus signals together to send signals from multiple tracks into a Studio One effect’s sidechain). Like Track 3, the track’s channel fader is down, so that the audio doesn’t go through the mixer
The end result is that the reversed drums provide an attack time that sweeps the filter up, while the forward drums provide a decay that sweeps the filter down. So is the sound more animated than using only the forward drum part? Listen to the audio example, and decide for yourself. The first section uses the forward trigger only, while the second section adds in the attack trigger—the effect is particularly noticeable toward the end.
Friday Tips: How to Normalize Comped Takes
Comping’s goal is to piece together the best parts of multiple Takes (vocals, guitar, etc.) into a single, cohesive part. This involves Studio One’s loop recording, which repeats a section of music over and over during a looped section. You record another Take during each pass, while previous Takes are muted. Doing multiple takes without having to stop lets you get comfortable, and try different approaches. Once you have multiple versions, you audition and select the best sections.
However, when auditioning the Takes to decide which sections are best, it’s helpful to compare levels that are as similar as possible. Normalization is the right tool for this—but while it’s not yet possible to normalize individual Takes, there’s a simple solution.
- Right-click on the main, parent Track for the Takes and choose Unpack Layers to Tracks (Fig. 1).

Figure 1: The four Takes right immediately below the parent vocal have been unpacked into four Tracks (color-coded blue).
- Next, select all the audio in the new Tracks.
- Type Ctrl+B and then Alt+N. This normalizes all the Tracks.
- Right-click on each Take’s audio and choose Delete (do not delete the Take itself; see Fig. 2).
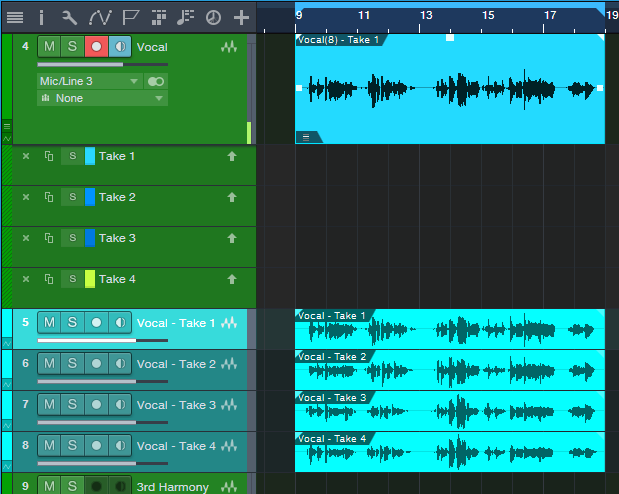
Figure 2: The Takes have been deleted. The four normalized tracks are below.
- Select the audio in the new Tracks.
- Drag the audio from the new Tracks up, so that they replace where the Takes were (Fig. 3).
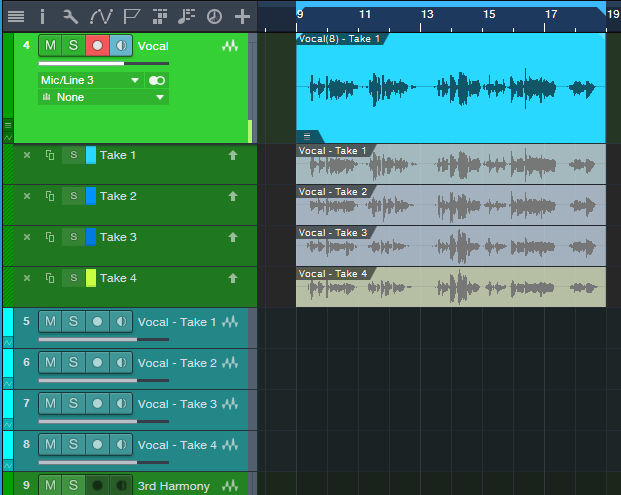
Figure 3: The normalized Track audio now occupies the Take Lanes.
- The empty Tracks are no longer needed, so remove them.
- And that’s all there is to it—now you can take advantage of Studio One’s Take-oriented comping tools, as well as the Listen tool (keyboard shortcut 8), with normalized audio.