Tag Archives: Learn Studio One
Tremolo: Why Be Normal?
Tremolo (not to be confused with vibrato, which is what Fender amps call tremolo), was big in the 50s and 60s, especially in surf music—so it has a pretty stereotyped sound. But why be normal? Studio One’s X-Trem goes beyond what antique tremolos did, so this week’s Friday Tip delves into the cool rhythmic effects that X-Trem can create.
TREMOLOS IN SERIES
The biggest improvement in today’s tremolos is the sync-to-tempo function. One of my favorite techniques for EDM-type music is to insert two tremolos in series (Fig. 1).

Figure 1: These effects provide the sound in Audio Example 1. Note the automation track, which is varying the first X-Trem’s Depth parameter.
The first X-Trem runs at a fast rate, like 1/16th notes. Square wave modulation works well for this if you want a “chopped” sound, but I usually prefer sine waves, because they give a smoother, more pulsing effect. The second X-Trem runs at a slower rate. For example, if it syncs to half-notes, X-Trem lets through a string of pulses for a half-note, then attenuates the pulses for the next half-note. Using a sine wave for the second tremolo gives a rhythmic, pulsing sound that’s effective on big synth chords—check out the audio example.
BUILD YOUR OWN WAVEFORM
X-Trem’s waveforms are the usual suspects: Triangle, Sine, Upward Sawtooth, and Square. But what if you want a downward sawtooth, a more exponential wave (Fig. 2), or an entirely off-the-wall waveform?
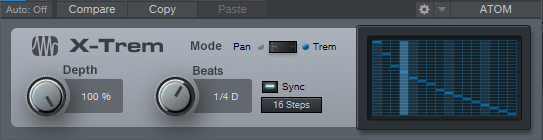
Figure 2: Let’s have a big cheer for X-Trem’s 16 Steps option.
This is where the 16 Steps option becomes the star (Fig. 2) because you can draw pretty much any waveform you want. It’s a particularly effective technique with longer notes because you can hear the changes distinctly.
But for me, the coolest part is X-Trem’s “Etch-a-Sketch” mode, because you can automate each step individually, choose X-Trem’s Automation Write, and go crazy. Just unfold X-Trem’s automation options, choose all the steps, add them to the track’s automation, and draw away (Fig. 3).
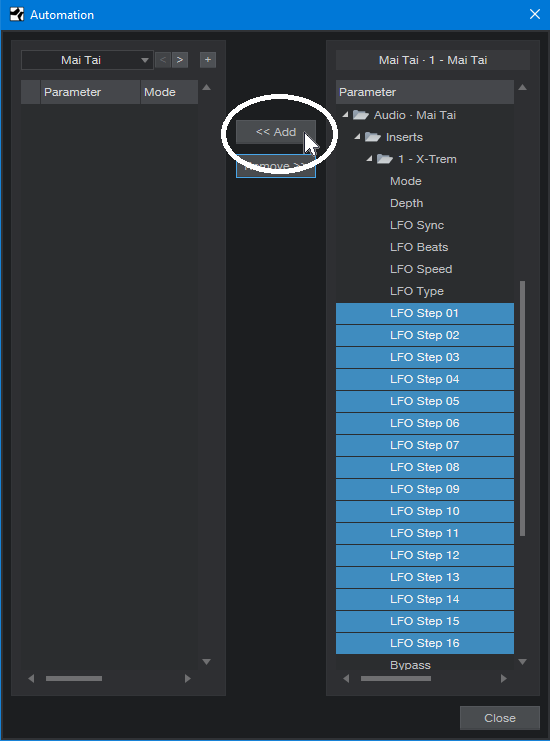
Figure 3: Drawing automated step changes in real-time takes X-Trem beyond “why be normal” into something that may be illegal in some states.
Of course, if you just draw kind of randomly, then really, all you’re doing is level automation. Where this option really comes into its own is when you have a basic waveform for one section, change a few steps in a different section and let that repeat, draw a different waveform for another section and let that repeat, and so on. Another application is trying out different waveforms as a song plays, and capturing the results as automation. If you particularly like a pattern, cut and paste the automation to use it repetitively.
And just think, we haven’t even gotten into X-Trem’s panning mode—similarly to its overachieving tremolo functions, the panning can do a lot more than just audio ping-pong effects. Hmmm…seems like another Friday Tip might be in order.
The “Double-Decker” Pre-Main Bus
This Friday tip has multiple applications—consider the following scenarios.
You like to mix with mastering processors in the Main bus to approximate the eventual mastered sound, but ultimately, you want to add (or update) an unprocessed file for serious mastering in the Project page. However, reality checks are tough. When you disable the master bus processors so you can hear the unprocessed sound you’ll be exporting, the level will usually change. So then you have to re-balance the levels, but you might not get them quite to where they were. And unfortunately, one of the biggest enemies of consistent mixing and mastering is varying monitoring levels. (Shameless plug alert: my book How to Create Compelling Mixes in Studio One, which is also available in Spanish, tells how to obtain consistent levels when mixing.)
Or, suppose you want to use the Tricomp or a similar “maximizing” program in the master bus. Although these can make a mix “pop,” there may be an unfair advantage if they make the music louder—after all, our brains tend to think that “louder is better.” The only way to get a realistic idea of how much difference the processor really makes is if you balance the processed and unprocessed levels so they’re the same.
Or, maybe you use the cool Sonarworks program to flatten your headphone or speaker’s response, so you can do more translatable mixes. But Sonarworks should be enabled only when monitoring; you don’t want to export a file with a correction curve applied. Bypassing the Sonarworks plug-in when updating the Project page, or exporting a master file, is essential. But in the heat of the creative moment, you might forget to do that, and then need to re-export.
THE “DOUBLE-DECKER,” PRE-MAIN BUS SOLUTION
The Pre-Main bus essentially doubles up the Main bus, to create an alternate destination for all your channels. The Pre-Main bus, whose output feeds the Main bus, serves as a “sandbox” for the Main bus. You can insert whatever processors you want into the Pre-Main bus for monitoring, without affecting what’s ultimately exported from the Main bus.
Here’s how it works.
- Create a bus, and call it the Pre-Main bus.
- In the Pre-Main bus’s output field just above the pan slider, assign the bus output to the Main bus. If you don’t see the output field, raise the channel’s height until the output field appears.
- Insert the Level Meter plug-in in the Main bus. We’ll use this for LUFS level comparisons (check out the blog post Easy Level Matching, or the section on LUFS in my mixing book, as to why this matters).

Figure 1: The Pre-Main bus, outlined in white, has the Tricomp and Sonarworks plug-ins inserted. Note that all the channels have their outputs assigned to the Pre-Main bus.
- Insert the mastering processors in the Pre-Main bus that you want to use while monitoring. Fig. 1 shows the Pre-Main bus with the Tricomp and Sonarworks plug-ins inserted.
- Select all your channels. An easy way to do this is to click on the first channel in the Channel List, then shift+click on the last channel in the list. Or, click on the channel to the immediate left of the Main channel, and then shift+click on the first mixer channel.
With all channels selected, changing the output field for one channel changes the output field for all channels. Assign the outputs to the Main bus, play some music, and look at the Level Meter to check the LUFS reading.
Now assign the channel outputs to the Pre-Main bus. Again, observe the Level Meter in the Master bus. Adjust the Pre-Main bus’s level for the best level match when switching the output fields between the Main and Pre-Main bus. By matching the levels, you can be sure you’re listening to a fair comparison of the processed audio (the Pre-Main bus) and the unprocessed audio that will be exported from the Main bus.
The only caution is that when all your channels are selected, if you change a channel’s fader, the faders for all the channels will change. Sometimes, this is a good thing—if you experience “fader level creep” while mixing, instead of lowering the master fader, you can lower the channel levels. But you also need to be careful not to reflexively adjust a channel’s level, and end up adjusting all of them by mistake. Remember to click on the channel whose fader you want to adjust, before doing any editing.
Doubling up the Main bus can be really convenient when mixing—check it out when you want to audition processors in the master bus, but also, be able to do a quick reality check with the unprocessed sound to find out the difference any processors really make to the overall output.
Acknowledgement: Thanks to Steve Cook, who devised a similar technique to accommodate using Sonarworks in Cakewalk, for providing the inspiration for this post.
Melodic Percussion
This week’s tip shows how to augment percussion parts by making them melodic—courtesy of Harmonic Editing.
The basic idea is that setting a white or pink noise track to follow the chord track gives the noise a sense of pitch. Although having a long track of noise isn’t very interesting, if we gate it with a percussion part, then now we’ve layered the percussion part’s rhythm with the tonality of the noise. Add a little dotted 8th note echo, and it can sound pretty cool.
Step 1: Bring on the Noise
Noise needs to be recorded in a track to be affected by harmonic editing, so open up the mixer’s Input section, and insert a Tone Generator effect in tracks 1 and 2. Set the Tone Generator to Pink Noise, and trim the level so it’s not slamming up against 0 (Fig. 1).
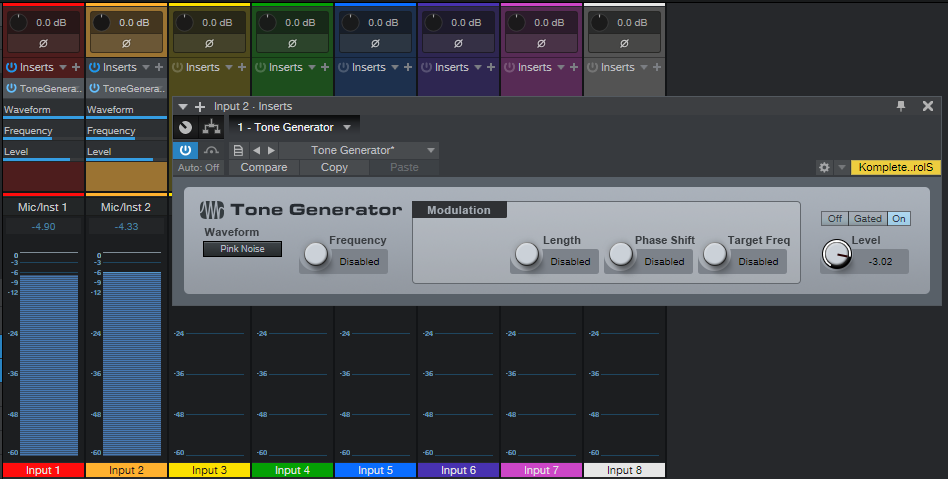
Figure 1: We need noise in each channel to implement this technique.
Record-enable both tracks (set them to Mono channel mode), enable Input Monitor, and start recording noise into the tracks. The reason for recording into two tracks is we want to end up with stereo noise, so the tracks can’t be identical.
Step 2: Make the Noise Stereo
Now that the noise is recorded, you can remove the Tone Generator effects from the track inputs. At the mixer, pan one channel of noise left, and one right. In each track’s Inspector, choose Universal Mode for Follow Chords, and Strings for Tune mode (Fig. 2).
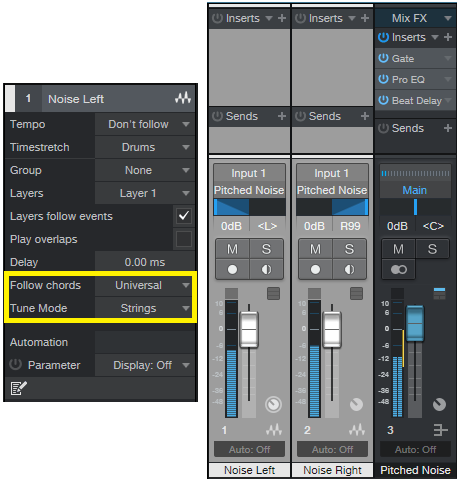
Figure 2: How to set up the tracks for stereo noise. The crucial Inspector settings are outlined in yellow.
Set each track’s output to a Bus, and now we have stereo noise at the Bus output. Insert a Gate in the Bus, and any other effects you want to use (I insert a Pro EQ to trim the highs and lows somewhat, and a Beat Delay for a more EDM-like vibe—but use your imagination).
Step 3: Control the Gate’s Sidechain
Choose the percussion sound with which you want to control the Gate sidechain, insert a pre-fader send in the percussion track, assign the send to the Gate, and then adjust the Gate parameters so that the percussion track modulates the noise percussively. Fig. 3 shows the track setup.
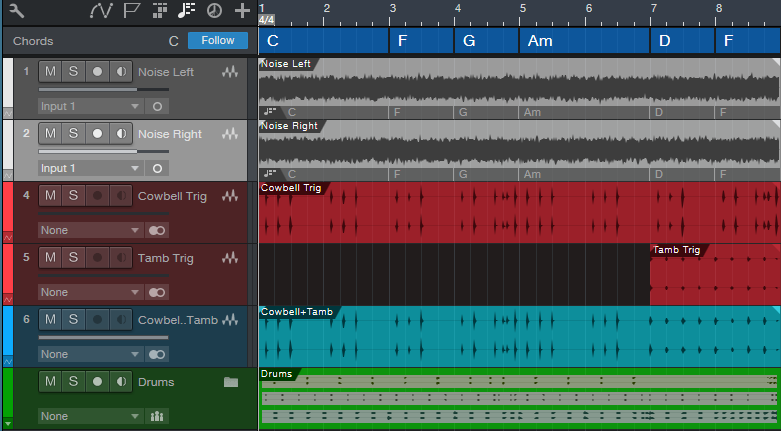
Figure 3: Track layout used in the audio example.
Tracks 1 and 2 are the mono noise tracks that follow the Chord Track, and feed the Bus. Tracks 4 and 5 both have pre-fader sends to control the Gate, so that for the first 7 measures only the cowbell controls the gate, but at measure 8, a tambourine part also modulates the Gate.
Track 6 has the cowbell and tambourine audio, which is mixed in with the pitched noise, while the folder track has the kick, snare, and hi-hat loops. (The reason for not using post-fader sends on the percussion tracks is so that the tracks controlling the Gate are independent of the audio, which you might want to process differently.)
But Wait…There’s More!
With a longer gate, the sound is almost like the rave organ sound that was so big at the turn of the century. And there are options other than gating, like using X-Trem…or following the Gate with X-Trem. Or draw a periodic automation level waveform for the bus, and use the Transform function to make everything even weirder. In any case, now you have a new, and unusual tool, for percussive accents.
Keyboard Meets Power Chords
Hey keyboard players!
Do you feel kind of left out because of the cool guitar amps that Studio One added in version 4.6? Well, this week’s tip is all about having fun, and bringing power chord mentality to keyboard, courtesy of those State Space amps. Listen to the audio example, and you’ll hear what I’m talking about.
And so you can get started having fun, you don’t even have to learn what’s going on to get that sound you just heard. Download Power Chordz.instrument, drag it into the track column, feed it from your favorite MIDI keyboard, and start playing.
Now, I know some of you prefer just to download a preset and get on with your life, and that’s fine—but for those who want some reverse engineering, here’s what’s under the hood.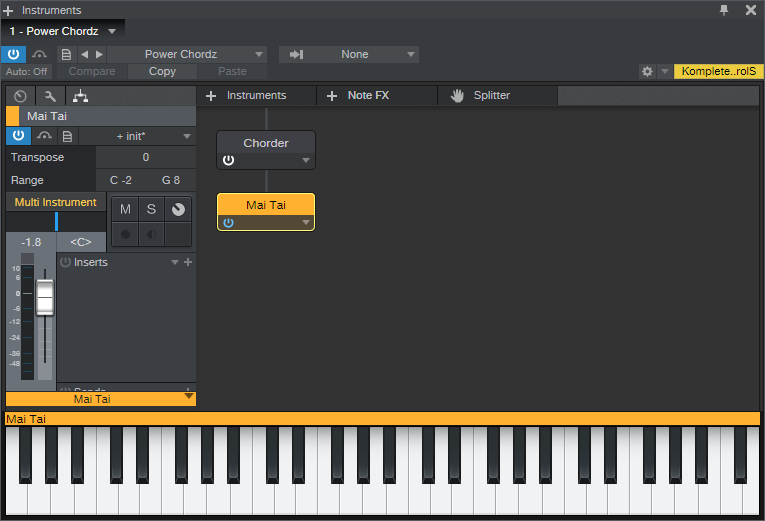
Figure 1: The Multi-Instrument is pretty basic—it just bundles a Chorder Note FX and Mai Tai together.
The preset starts with a Multi-Instrument (Fig. 1) that consists of the Chorder Note FX, and Mai Tai synthesizer. The Chorder plays tonic, fifth above, an octave above, octave+fifth above, and two octaves above when you hit a keyboard key—your basic “it’s not major, and it’s not minor” type of power chord.
The Mai Tai uses a super-simple variation on the Init preset. In Fig. 2, anything that’s not relevant is grayed out. Turn off Osc 2, Noise, LFO 1, and LFO 2. There’s no modulation other than pitch bend, and no FX. Envelope 2 and Envelope 3 aren’t used. I set Pitch Bend to 7 semitones to do whammy bar effects, but adjust to taste. Also, you might want to play around with the Quality parameter. I’m allergic to anything called “normal,” so if you are as well, try the 80s, High, and Supreme settings to see if you like one of those better.
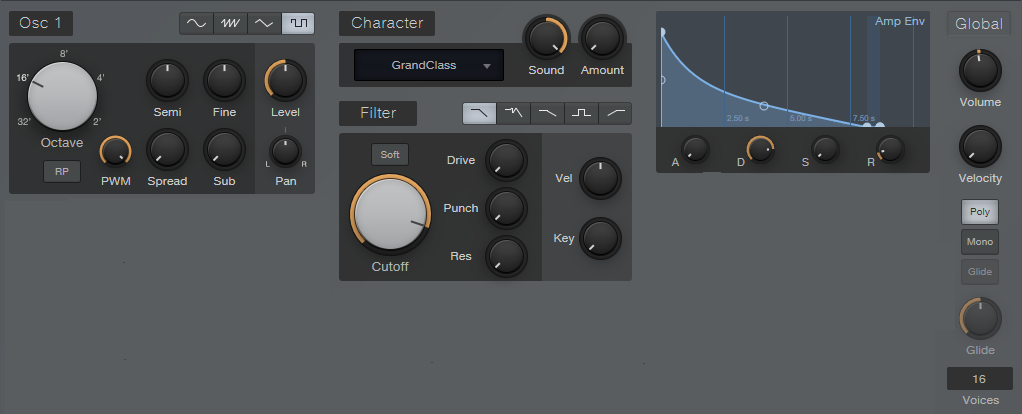
Figure 2: The Mai Tai preset uses simple waveforms, which is what you want when feeding amp sims and other distortion-oriented plug-ins.
Look in the instrument’s mixer channel, and you’ll see four Insert effects: Pro EQ, Ampire, Open Air, and Binaural Pan. You can check out their settings by opening them up, but the Ampire settings (Fig. 3) deserve a bit of explanation.
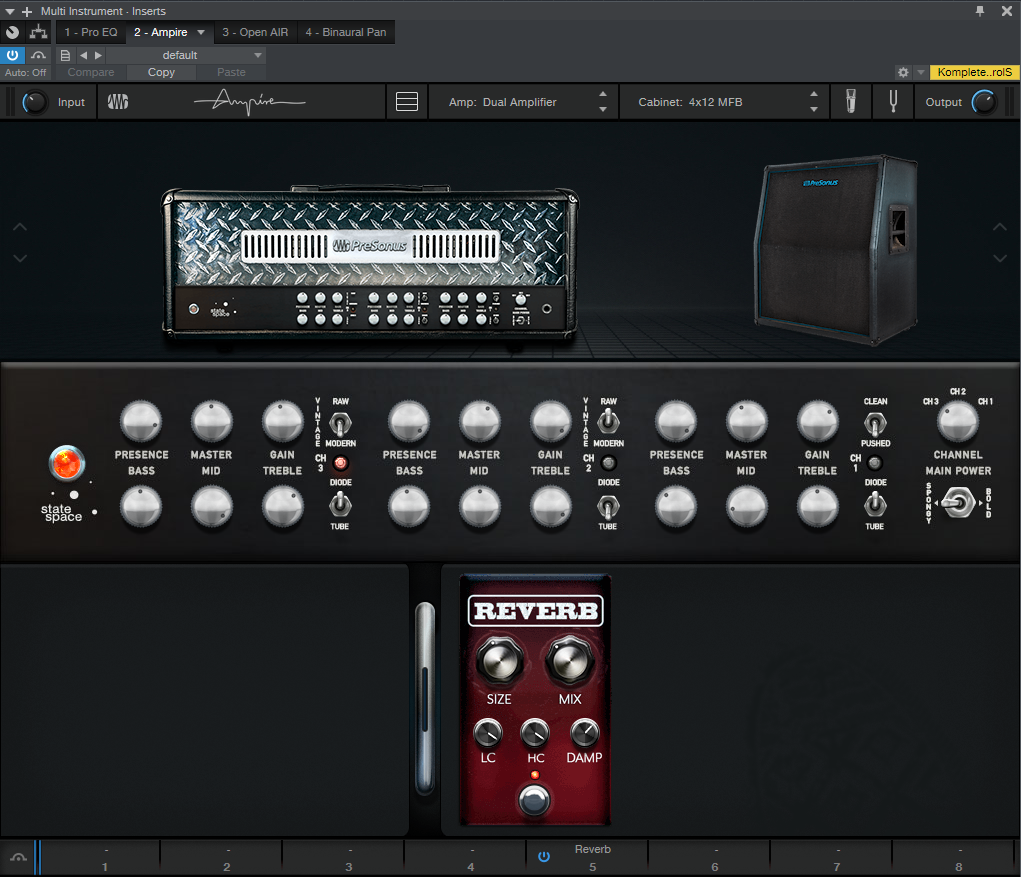
Figure 3: Ampire is using the Dual Amplifier and 4×12 MFB speaker cabinet, but just about any amp and cab has their merits.
The reason for choosing the Dual Amplifier is because it’s really three amps in one, as selected by the Channel knob on the right—I figured you’d appreciate having three separate sounds without having to do anything other than adjust one knob. Try different cabs and amps, but be forewarned—you can really go down an Endless Rabbit Hole of Tone, because there are a lot of great amp and cab sounds in there. I’ll admit that I ended up playing with various permutations and combinations of amps, effects, and cabs for hours.
You can also get creative with the Mai Tai, specifically, the Character controls. I didn’t assign any controls to a Control Panel, or set up modulation because having a pseudo-”whammy” bar pitch wheel was enough to keep me occupied. But, please feel free to come up with your own variations. And of course…post your best stuff on the PreSonus Exchange!
LA Based Singer-Songwriter Talks Studio One: Luke Sital-Singh
Luke Sital-Singh is a British singer-songwriter based in Los Angeles. He sings and writes songs of love, loss, longing, grieving, hope, and basically the whole gamut of the human experience. His voice is haunting and personal… and his lyrics? Profound. With three studio albums, one live album, seven EPs, a ton of singles and a TED Talk in 2018, Luke’s gift is exceptional and rare, and we’re glad he’s sharing it with us.
We connected with Luke on Instagram and immediately became huge fans. What’s made this friendship better is that he’s new to the Studio One family. We took some time to get to know him better and hear how his experience with Studio One has been so far.

Give us some background on yourself. How long have you been making music?
I’m an artist and songwriter from the UK currently based in LA. I released my first EP in 2012 and have been making and releasing music ever since. My latest album came out in 2019, and right now I’m currently working on writing my fourth album whilst trying my hand as a songwriter working with other artists and writers on their projects.
How has the music industry changed since your early days?
In so many ways but I think the most obvious to me day-to-day at the moment is the impact of social media and keeping your online persona updated every second of the day. It’s a horror show and if I were starting out again today it would be enough to send me running for the hills.

Watch Luke’s TED Talk
Describe the first time you wrote a song? Produced it?
Hmm, I don’t remember details but I can imagine it was an easy, pure, uncomplicated. I most probably thought nothing of it. It was almost definitely a rip off of the Goo Goo Dolls (who were my favs at the time). I never had a lightbulb moment in where I knew I was gonna write songs. It was such a gradual process. I just wanted to give it a try, and I kept trying and trying… and I’m still trying today.
Who has been a musical influence in your life?
I would say my eldest brother Matt was the first major musical influence in my life. He introduced me to some cool music when he was a teenager and it was his guitar I stole when I started learning. He was also a bit of a computer geek so he helped me record some early demos and covers in his bedroom. I still have some of those recordings. Truly awful songs! But it got the ball rolling.
Have you ever wanted to give up on music? What keeps you going?
Yes, many times. It’s often overwhelming and ever-changing. So you once you feel like you get a handle on a way forward, the industry changes and you’re left scrambling around again. Also the pressures of always being on. I always feel guilty when I’m not writing or gigging or posting on social media. It’s hard to find downtime without feeling like you’re losing time and opportunities. Unfortunately and fortunately it still pays all my bills and I’ve got no other life skills to fall back on. Also when it’s good. It’s really good.
 So you’re new to Studio One. When did you first hear about Studio One?
I was looking for a change from the DAW I was using. And I started to see a lot more people talking about Studio One online. I found myself watching loads of YouTube videos about the features and reasons why it’s better than the other DAWs. It piqued my interest enough to try a demo and see what I thought of it myself.
What features are you most impressed with?
As a jobbing artist, the price was pretty compelling, for one thing. Perhaps that sounds a little unexciting, but it matters for people like me. I don’t have tons of cash to drop on all this software whenever I want.
I’m still learning Studio One, but I’m finding it a lot faster than what I’ve used before. The drag and drop functionality is so great. In general, and incoming from another DAW, I’m just finding it more intuitive. Studio One is faster and compliments the workflow habits I’ve developed using other software. As I use it more I’m excited to see how my workflow develops around Studio One’s unique functionally. As of now, I’ve only produced a handful of tracks using it and I’m loving it and I’m excited to keep learning.
I also find the chord track functionality brilliant for songwriting and trying out ideas I would never think of on the guitar.
 How easy/difficult was Studio One to learn?
Very easy. I especially found that the ability to map the keyboard shortcuts to match other DAWs made it so much faster to get up and running. Now I’m slowly transitioning to the Studio One keyboard shortcuts.
Where do you go for support?
I haven’t had to yet! Knocks on wood…
Any other thoughts on Studio One or PreSonus gear?
I just think PreSonus is great! For whatever reason, it’s not the sexiest name in music gear but it should be. I feel like I wish I’d tried Studio One years ago. I find I go into sessions with other people these days and tell them I use Studio One and they turn their nose up. When I tell them the kind of functionality it offers, everyone is impressed and surprised. It’s one of those unfortunate things about the music recording culture and I suppose just general culture when it comes to brands etc. People like the cool stuff even if it’s actually no better or perhaps it’s worse than lesser-known brands. I hope more people start to see how great Studio One is and PreSonus in general!
Recent projects? What’s next for you?
I’ve got a new EP dropping in April, a few tracks are available online. Also, I’m going on tour in Europe and the UK in April/May and I’m hoping to play some more shows around the US later this year. Other than that I’m busy writing my next record and working with other artists as a songwriting collaborator.
Check out Luke’s Tour Dates
Follow Luke on Instagram here
Subscribe to Luke’s YouTube here
Stream Luke’s Music
Watch Luke’s TED Talk!
Join the Studio One family today!
Using 3rd-Party Cabs with Ampire XT
There’s an old joke about guitarists:
“How many guitars does a guitar player need?”
“Just one more!”
…and sometimes I feel the same way about amp sims, because all of them are different. Ampire XT benefits from PreSonus’s “State Space” technology, and if you have no other amp sims, its collection of amps has pretty much all the essentials.
What’s more, you can load thrid-party cabinet impulse responses (IRs) that re-create the sound of various cabinets, mics, and mic positions. These go into the User Cabinet, whose unique feature compared to typical IR loaders is being able to load individual IRs for the three mics.
But you can take impulses even further by turning off an amp’s cabinet altogether, and following Ampire XT with the Open Air convolution processor. Although most people probably think of Open Air as a way to create a variety of reverb and other space-based effects, it’s also a flexible impulse response loader that plays nice with cabinet impulses.
There are many free cabinet impulses on the web to get you started. Admittedly, the sound quality varies—some are fine, some aren’t, but there’s also a middle ground where tweaking the Open Air controls can give the sound you want. http://cabs.kalthallen.de is a popular source for free impulses (click on the Free tab), but there are many other companies that offer free samples, or sell impulses commercially.
The Setup
Create an FX Chain with Ampire XT followed by Open Air. The Impulse Responses are only for cabinets, so set up Ampire XT’s amp and effects however you want, but turn off the cabinet section (Fig. 1).

Figure 1: Click the cabinet bypass button (middle left, outlined in white) and the cabinet field will show None (upper right, outlined in white).
Follow Ampire XT with the Open Air, and start with its Default preset. Drag an impulse into the Open Air waveform display window (or click on the impulse name field to open the file selector, and then navigate to the impulse you want). Turn Mix to 100% so that you hear only the cabinet output, and none of the pre-cabinet amp sound (Fig. 2).
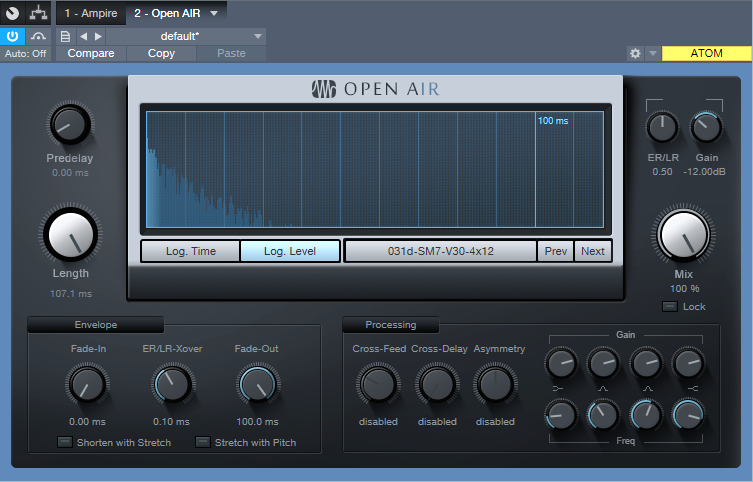
Figure 2: Make sure you set the Open Air Mix control to 100%, so that you don’t hear the pre-cabinet amp sound.
Tweaking the Tone
The Kalthallen impulse shown in the screenshot above didn’t need tweaking to sound good, but you’ll find that with a lot of the free impulse responses, you’ll need to tweak the Gain and Frequency controls. Often the main problem is a “thin” sound and Fig. 3 shows some tweaks that help remedy this issue—pull back on the highs, and boost the low end for a bigger, beefier tone.
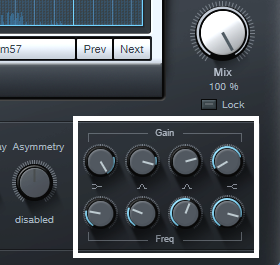
Figure 3: These EQ settings can help tame free impulse responses that sound too thin.
But the most dramatic tweaks come by enabling Shorten with Stretch and Stretch with Pitch, then varying the Length control. This can produce sounds that are similar to different mikings, or even cab sounds you’ve never heard before. The Predelay, ER/LR-Xover, and ER/LR controls can also affect the sound, although the differences aren’t as dramatic as stretching with the Length control.
Finally, although it’s great to have options, you don’t want to suffer from option overload (“maybe trying just one more impulse will give the sound I want…”). If you download a bunch of impulses, create a folder of favorites in a place where it’s easy to open it up, and drag-and-drop impulses into Open Air. If you find one you really like, save it as an Open Air preset for future use.
How to Save CPU Power with Amp Sims
You’ll often see this kind of comment in forums: “There must be something wrong with Studio One! I can run only a couple amp sim instances before the program can’t handle any more!” But you’ll also see this comment about other DAWs—because the “problem” isn’t the DAW, it’s the amp sims and current computer technology. Fortunately, Studio One has anticipated these issues, and offers three effective solutions.
Remember, an amp sim is processing a dry guitar track in real time—not playing back processed audio. Amp sim sound quality has improved dramatically over the past few years, but the trade-off is the CPU power needed to do the serious number-crunching required for realistic amp sounds. Studio One’s CPU-saving options are great with virtual instruments, which can sometimes suck even more power than amp sims—but guitar players who are discovering the fun of amp sims need to know about these options, too.
The Old-School Fix
Although some people recommend the general-purpose, old-school fix of increasing latency to reduce stress on your CPU, that makes playing guitar much less fun. Another solution is to buy a much faster computer. Studio One’s solutions work at lower latencies, as well as older, slower computers.
Solution 1: Bounce to New Track
Select one or more Events. Right-click on any of them, and choose Event > Bounce to New Track (Fig. 1). This creates a new audio track that incorporates the sound created by the original track’s processing, but without any inserted plug-ins—the sound is “baked into” the new audio track. Audio tracks require far less CPU power than a track whose effects are being created in real time. Bouncing leaves the original track in place but mutes it, so you can unmute it to return to the original track’s audio and effects if needed.

Figure 1: If you use Bounce to Track (outlined in white) as much as I do, it will show up in the Recent Items section of your right-click context menu.
To conserve the CPU used by the original track’s effect(s), either turn off power to the effect(s), or right-click on the original track in the track column and choose Disable Track. To return the track to its initial status, right-click on the track in the Track column, and choose Enable Track.
Note that when signing off on a project, this is also an excellent way to “future-proof” the project against future operating system (or other) changes that may render a plug-in unusable. If the sound has been preserved as an audio file, you’ll at least be able to open the processed sound.
Solution 2: Transform to Rendered Audio
Right-click on the track in the Track column, or choose Track > Transform, and then choose Transform to Rendered Audio. This renders the effect sound so that it becomes part of the existing audio track. Unlike bouncing, this operation doesn’t create a new track, and it automatically disconnects the effect from the CPU to save power.
When you choose Transform to Rendered Audio, a dialog box appears with two options (Fig. 2).
![]()
Figure 2: The Transform to Rendered Audio dialog box.
You can always undo if you change your mind, but Preserve Realtime State (which I highly recommend checking) preserves the original, real-time state so you can always return to the original track settings and effects. Preserve Realtime State also persists through saves and copies. To return to the original track, right-click on the track in the Track column, or choose Track > Transform, and then choose Transform to Realtime Audio.
The second dialog box option renders any effects tail, such as a long trail of echoes or delay, that extends past the length of the existing Events. You can choose Auto Tail, where Studio One detects how long the tail lasts and renders according, or specify a fixed tail of a particular length. (A fine point: Studio One fades out the Event over the tail’s duration, but it’s an editable envelope.)
Render Event FX
Event FX, as accessed through an Event’s Inspector, are invaluable. With Ampire XT (and many other amp sims), you can’t automate amp or cabinet changes—only parameters within amps and cabinets. So, if the verse’s guitar part is one Event and the chorus’s guitar part is a different Event, each can have its own amp sim sound.
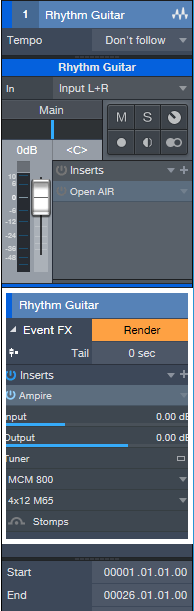
Figure 3: Here, Ampire XT is an Event FX, and can be rendered to save CPU power. Note that you can also choose different amps and cabinets, see a tuner thumbnail, and turn the Stomps section on or off.
The trade-off is that more amp sims draw more CPU power. Fortunately, Event FX have a Render button (Fig. 3). Immediately upon rendering, the sound becomes part of the audio, the effect itself disconnects from the CPU, and the Render button changes to Restore. Similarly to transforming an audio track, you can revert to the original state at any time by clicking Restore.
Multiple Renders in One Operation
Suppose a track has two Events, each with their own Ampire XT inserted via an Event FX, and there’s a CPU-hungry reverb processing the entire track. If you apply Transform to Rendered Audio to the track, it will Render the Event FX and the Track effect automatically. But if you then need to make changes and transform the Track back to realtime audio, the Track and Event FX will be restored to their initial states.
Bounce to New Track with both Events selected will produce the same results in the bounced track, i.e., all the effects will be rendered. If you want to return from where you started, delete the bounced Track, and unmute the two Events in the original Track (which will still have its effects inserted).
Once you bounce or transform tracks and reclaim all that CPU power, you can continue going cRazY with amp sims—without stressing out your computer, or Studio One.
Komplete Kontrol Integration, Part 3: Controlling Non-NKS Plug-Ins
Our prep work is in order: in part 1 we integrated the Komplete keyboard as a DAW navigation control surface, and in part 2, explored how to create general-purpose MIDI control surface templates. In the thrilling conclusion of this trilogy (soon to be a major motion picture!), we’ll now find out how to control non-NKS instruments and effects, running within Studio One, from the Komplete keyboard hardware control surface.
BUT FIRST: FOCUS VS. GLOBAL MAPPING
Because we’ll be mapping hardware controls to software parameters, it’s important to understand the difference between Studio One’s Focus and Global control mapping functions. When you program a controller in Global mode, it affects aspects common to all songs, like faders, pan, etc. In Focus mode, you program a controller for a specific instrument or effect. Focus mode has two wonderful attributes: You can program different settings on the same instrument or effect in the same project, and Studio One remembers this assignment for other songs. For example, I made a Komplete keyboard Mojito template so whenever I call up Mojito in any song or any instance in a single song, it has a hardware control surface.
To choose Focus mode (Fig. 1), click the gear button toward an instrument or effect’s upper right. From the drop-down menu to the right of the gear symbol, choose MIDI-OX (the MIDI utility we installed back in Part 1 of the series because it lets the Komplete keyboard talk to non-NKS plug-ins). You’ll also need to choose Focus mode for an instrument or effect when you want to use a previously created template.
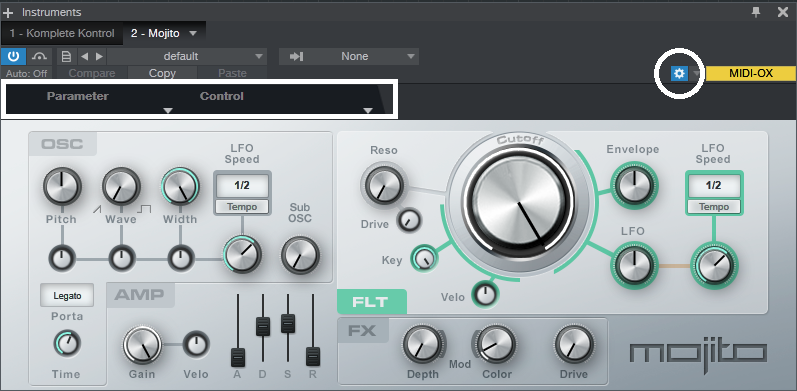
Figure 1: The Gear button (circled in white, upper right) opens the Focus mode Control Link functionality (outlined in white rectangle).
After entering Focus mapping mode, parameter and Control fields appear between the header and plug-in. This is where we do our hardware-control-to-parameter Control Link assignments. To complete a Control Link assignment, click on the arrow that points from a control to a parameter. This causes the arrow to flash yellow in Focus mode, or blue in Global mode.
Okay, let’s return to creating our control surface. To start with a clean slate, close MIDI-OX and Studio One if open, and turn off the Komplete Kontrol keyboard.
- Turn on the Komplete Kontrol keyboard. After it “boots,” open MIDI-OX, and verify that it shows the correct MIDI devices (see Fig. 1 in Part 2). Leave MIDI-OX open, although it can be minimized.
- Open the Komplete Kontrol stand-alone application. Click the application’s MIDI button in the upper-right corner, verify that you’ve chosen the desired template, and then click the MIDI button again to de-select the MIDI mode.
- Open Studio One, and Create a new song. Press the Komplete keyboard’s MIDI button so that it’s lit brightly (if it isn’t already).
- Click on Studio One’s Mix tab, and then on the External button toward the left. A column with External Devices appears.
- Click the MIDI-OX arrow under External Devices. Choose Setup, and verify that it’s sending to and receiving from the correct Komplete Kontrol ports, as described in Part 2 (Receive From = Komplete Kontrol -1, Send To = Komplete Kontrol Ext-1). Click OK.
- Now click on the MIDI-OX arrow again, and choose Edit. Click MIDI Learn, and prepare for an orgy of knob twiddling.
- Turn your attention to the Komplete Kontrol keyboard, whose MIDI button should be brightly lit. Choose the control surface’s Page 1 with the left/right arrow buttons (if it isn’t already selected; check the keyboard’s right display, in the lower right, to confirm that it shows 1/4).
- Turn all 8 keyboard knobs, below the display. Studio One’s External Devices window will sprout 8 controls. Widen the External Devices window so the 8 take up exactly one row, then choose page 2 with the keyboard’s right arrow button. Again, turn all 8 controls.
- Similarly, choose page 3 and turn all 8 controls, then page 4. You’re now populating the External Devices window with all the available controls.
- Similarly, do the same for the four pages of switches.
- Fig. 2 shows our masterpiece of total control. The Komplete keyboard’s controls, switches, and pages are now recognized as a control surface for Studio One.
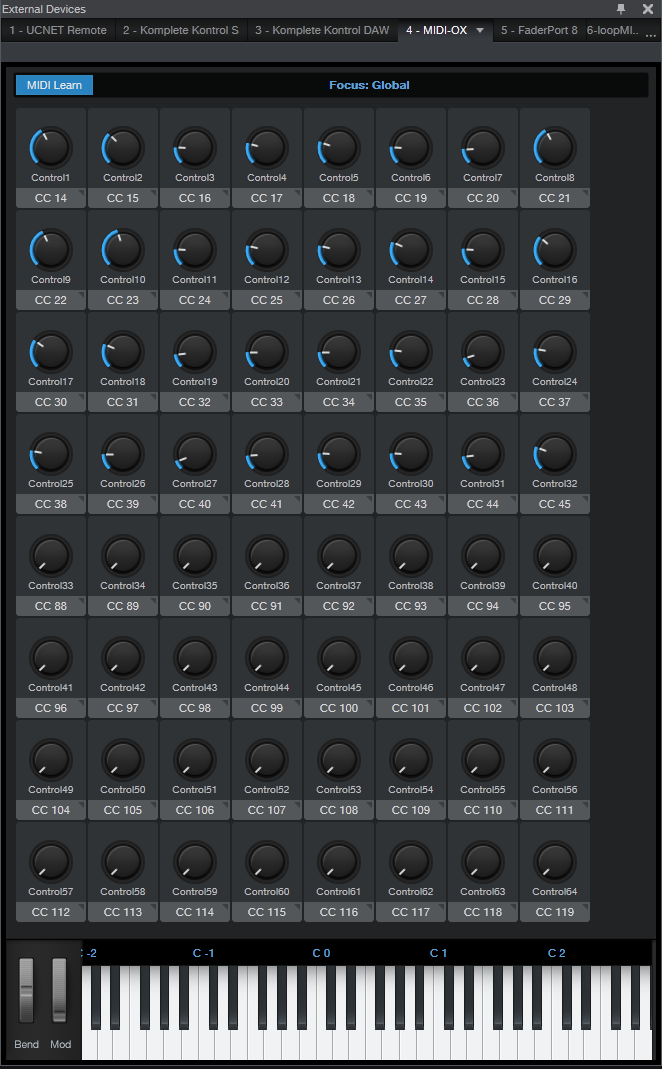
Figure 2: Studio One now recognizes the Komplete keyboard controls and switches as a control surface.
- While in MIDI Learn mode, you can change the control graphic to (for example) a switch instead of a knob. To do so, click on the arrow in the CC label below the knob, and choose the desired graphic.
- After setting up the control surface, turn off MIDI Learn (so you don’t brush up against a control and change something accidentally).
- We’ll use Mojito as an example. Bring Mojito into an Instrument track, and strategize what control layout would be best for each page. Fig. 3 shows what I chose; in the labels, the first number is the page, the second the physical control or switch.
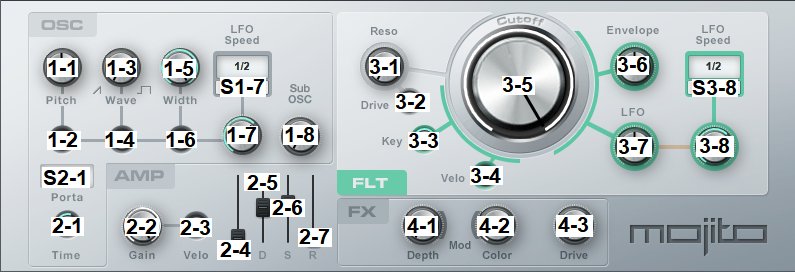
Figure 3. Komplete keyboard hardware assignments for Mojito.
- Next, use Control Link to link the control surface knobs with the Mojito parameters. With Mojito in Focus mode as described above, move Control 1 on the keyboard or the external devices page, click on (or move) the Mojito Pitch control, and then click on the Arrow between them. The arrow turns yellow to confirm the link. Proceed similarly through all the controls and switches until they’re all assigned. (It’s a little complicated with the LFO Speed, because when you switch between the two LFO Sync options, you would actually need two knobs – one to vary frequency, the other to vary beats. I figured I’d use beats 99% of the time, so I used the hardware to control the LFO when in beats mode. For frequency, you can use your mouse to move the knob, or program a couple of the spare knobs that will be available on page 4.)
- After programming your knobs, return to the Komplete Kontrol stand-alone app, click the MIDI button, and label the template’s knobs (Fig. 4). Now, when you choose the template, the knobs on the Komplete keyboard will show the parameters they affect. Done!
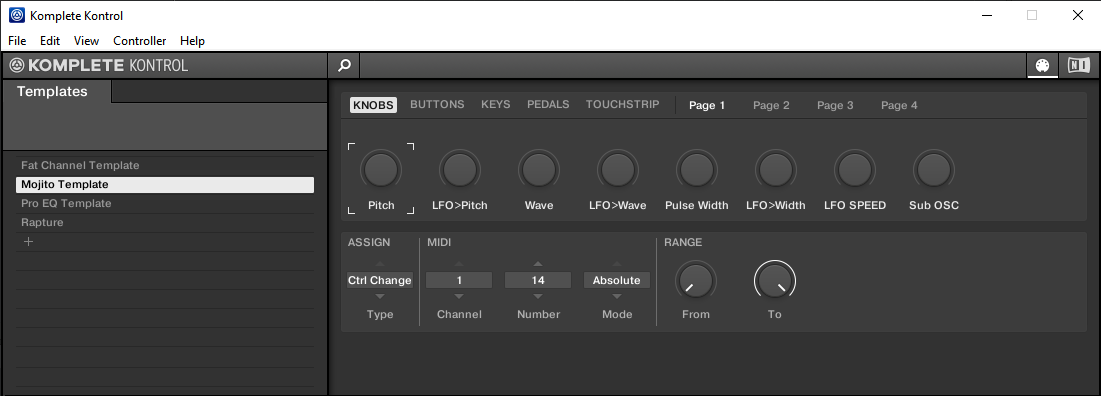
Figure 4: Labeling the template’s controls adds labels to the keyboard’s control surface.
After creating these templates, you won’t want to lose them—which you will if your hard drive crashes. Or maybe you’re going to do a re-install, or want your templates on a different computer. For more information, a helpful document on the NI web site tells where to find the Komplete Kontrol MK2 settings.dat file so you can copy it, or back it up.
NATIVE INSTRUMENTS/STUDIO ONE SYNERGY
If you have multiple templates and want to switch among them to control various instruments and effects while you work in a song, here’s the procedure.
- Make sure the stand-alone Komplete Kontrol application is open (a Komplete Kontrol instrument can be open at the same time in Studio One, there will be no conflicts).
- Enable the stand-alone Komplete Kontrol application’s MIDI button, choose the template, and then disable the MIDI button. (I usually minimize the Komplete Kontrol app after this, but it’s not necessary.)
- Open the instrument or track you want to tweak, and press the keyboard’s MIDI button to enable communication. The keyboard’s MIDI button must be shining brightly to control instruments or effects in Studio One.
You can switch between controlling an instrument loaded in Komplete Kontrol, and a Studio One instrument that uses the currently selected template. This is pretty much automatic; when you select a track with Komplete Kontrol, the PLUG-IN button toward the keyboard’s upper right lights. When you select a non-NKS track, the MIDI button lights. However, you do need to change templates if you switch to an instrument or effect that doesn’t use the currently selected template.
Note that when you want to use the Komplete keyboard as a hardware controller, or to test your programming, the stand-alone app’s MIDI button must be turned off. Then you can press the keyboard’s MIDI button to communicate with the instrument or effect.
GETTING CREATIVE WITH YOUR TEMPLATES
If you’re tweaking one parameter at a time, arguably just grabbing the mouse, clicking on a parameter, and dragging is easier. But where hardware control really comes into its own is being able to adjust multiple parameters at the same time, like varying filter gain and frequency, envelope parameters, or compressor controls that interact, like threshold and ratio.
Also note that knobs can control drop-down menus. For example, in the Pro EQ, you can choose the LC and HC slopes, or the LF and HF filter types, with knobs. Another trick is redundancy. With my Pro EQ template, the filter parameters are spread over different pages. However, the 7 active/bypass switches for the filter stages are available on every page. That way, no matter which filter stage I’m adjusting, it’s possible to bypass or enable any other stage for diagnostic or comparative purposes.
Yes, it takes a bit of effort to program templates for everything you might want to control. While this may seem arduous at first, you need to create a template only once (although of course you can edit it if needed). After a while it becomes second-nature to switch over to the Komplete Kontrol stand-alone application, choose the desired template, minimize Komplete Kontrol, and carry on tweaking parameters. And, a particularly outstanding feature is that you don’t need to switch templates when controlling the same plug-in. A good use case is adjusting EQ during the mixing process. Call up your Pro EQ template, and it can apply to whichever EQ you select.
So now we can use the Komplete keyboard’s control surface not only to tweak NKS-format plug-ins, but virtually any plug-ins from any manufacturer—it even works with prehistoric wrapped DX and DXi plug-ins. Pretty cool!
Friday Tip: EZ Multiband Processing
The February 1, 2019 tip covered a multiband processing “development system.” Instead of using the Splitter’s frequency split option, it added sends and buses to make everything accessible in the Mix view. The Multiband Dynamics processor created the bands, which made it easy to add compression or expansion to some of the bands. After creating the desired sound with this development system, I’d port it over to an FX Chain, use the Splitter, and bring out the controls to a macro.
Reader Sagi Sinai came up with a brilliant application for mixing that showed the value of the “development system” approach. But I realized that the Friday Tip has never covered a basic multiband processing application with the Splitter, which can split at up to four different frequencies to create five different bands. So, let’s correct that oversight.
Multiband processing is particularly effective with guitar distortion when you want a more defined, articulated sound, with the potential for a wide stereo image. Of course, that’s not always the desired result—sometimes a spawling, dirty sound is what you want. But a track processed with the multiband distortion can sound more focused, and often, fit better into a mix. The audio example plays through single-band distortion, then through multiband distortion. Both use the same post-distortion effects (Pro EQ, Binaural Pan, Open Air) with the same settings. Note the difference in the stereo imaging and articulation.
Let’s look at the Splitter-based FX Chain setup (Fig. 1).
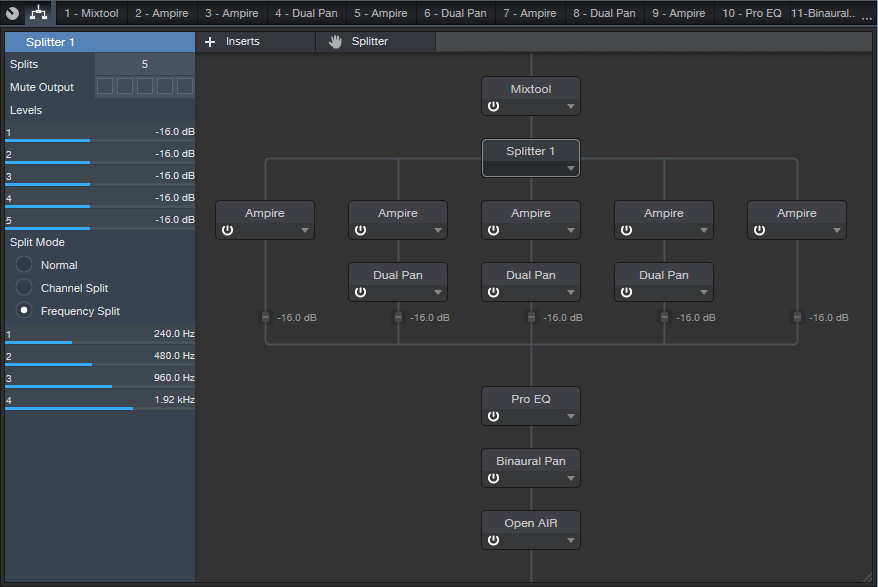
Figure 1 The Splitter is set up to do multiband processing.
The Splitter is using its Frequency Split superpowers to create five bands; each band feeds an Ampire (using the Crunch Boutique amp, no stomps, and the 1 x 12 American cabinet). The Mixtool at the beginning gives about 10 dB of gain—because we’re filtering out so much sound in each band going into each Ampire, the extra gain helps hit the amp a little harder. The Pro EQ at the end (Fig. 2) produces one of my favorite amp sim curves: Rolling off the lows tightens up the sound (like going through an open-back cabinet), while shaving off the extreme highs produces a sweeter sound. The upper midrange lift adds some definition.

Figure 2: Mixtool and Pro EQ settings.
One of the Splitter’s cool features is that you can mute splits. This makes it easy to focus on, and optimize, one split at a time. For the audio example, I used the same Ampire sound for each split so you could hear the “raw” contrast between the single-band and multiband versions. You can always take this further, and optimize each band for its specific frequency range. The Dual Pans on the mids help create the stereo image; the highs and lows are centered to “anchor” the part.
Of course, it’s possible to apply multiband processing to any effect. For example, with delay you might not want to delay all frequencies—delaying low frequencies can add “mud” that doesn’t happen when you delay only the upper mids and treble. Also, long delays on the higher frequency bands and shorter, slapback-type delays on low-frequency bands may create a delay effect that fits better in a track. And splitting an instrument into multiple bands, then chorusing each one separately, can give gorgeous, lush chorusing effects.
So give multiband processing a try—the Splitter makes it easy, and there’s a ton of potential.
Singer, Beat-Maker, Producer EMMAVIE Talks Studio One!

Emmavie can be summed up in one word… COOL!
She’s also talented, brave, stylish, expressive, funny, creative, gifted, innovative, hip, original… OK, we’ll stop now. She’s a singer, songwriter, producer, and DJ from London. Specializing in what she describes as “limitless, soulful, future R&B,” her music is an amalgamation of 90s RnB influences and her love for digital audio experimentation. Emmavie has credits with a number of artists both in the UK and internationally, including collaborations with IAMNOBODI, Budgie, ROMderful, Jarreau Vandal, Dornik, Alfa Mist, Barney Artist and Jay Prince.
We connected with her on Instagram after we noticed her love for Studio One, and she quickly became an office favorite. Read more about Emmavie, her music and career and love for Studio One here.
Give us some background on yourself. How long have you been making music?
I’ve been making beats since I was 11 years old, but I started playing around with sounds a little younger. I remember, I started teaching myself how to play basic melodies and chords on a Casio keyboard my dad bought me from Argos in primary school. I used this to play with the built-in drum sounds too, and when I moved to secondary school, I needed a way of recording this. I started teaching myself how to make beats after school. There were no YouTube tutorials back then, so it was a calamitous process. I think that would explain why my sound is so experimental now.
 How has the music industry changed since your early days?
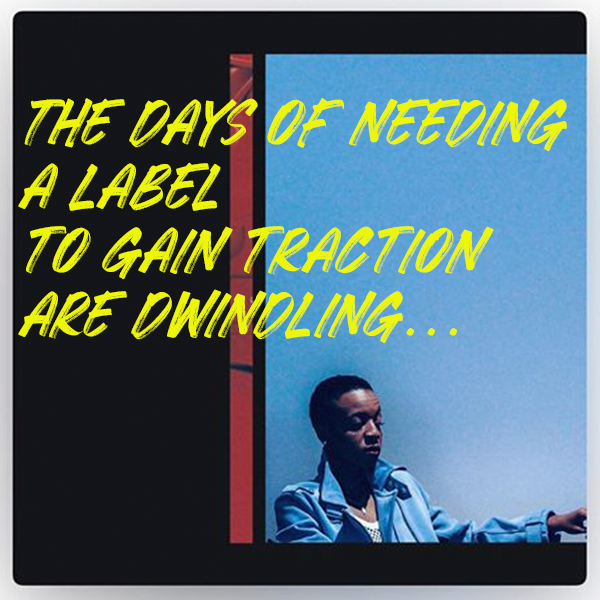
When I first decided I was confident enough to share my music, MySpace was the number one social media platform for independent artists to be seen… and even then, the only way to professionally release and sell your music was to be distributed through a record label. These days, you can top the charts with a song you’ve made in your bedroom/home studio! The days of needing a label to gain traction are dwindling. In fact, the perception of releasing independently without industry backing but gaining a lot of traction and virality is possibly an even more attractive narrative, nowadays. When I started making music, being signed and moving to a million-dollar studio was at the top of my list of goals. Now, I can make music anywhere. I make beats on the plane and outside in the park. My new focus is the groundwork: studying, practicing, becoming the best at what you do and building your own core following. Without these, a label will rarely sniff in your direction.
Describe the first time you wrote a song? Produced it?
I wrote my first song at eight years old with my younger brother using a karaoke machine. I can’t remember how that went but we used to practice and perform it for our parents, haha! I was a quiet kid, and I discovered writing lyrics was a good guise to get my thoughts out. My dad played so much old-skool R&B and Neo soul where everyone sang about being in love, and I guess a part of me wanted to feel like that too so I started writing about love but at 11, what did I know about it? The earliest song I can remember producing was called “Are you okay?” and it was a song asking my imaginary love interest to tell me what’s up when things aren’t smooth between us. Clearly, I was listening to music beyond my years. It was an intense eight-bar R&B loop with The Neptunes-style drums and ridiculously loud synths. I recorded the vocals on a £10 Logitech microphone from Argos!
Who has been an influence in your life?
The most influence I’ve had in my life has been from my friendships and adverse life experiences. I’ve had the same best friends for 18 years and it shocks me how much we’ve grown with each other. We both spend so much time working out all the issues of the world and working through all of thoughts together, we’re each other’s therapists. After all this intense self-analysis and critical thought, you end up in a place of understanding. And when you know something you can confidently talk, write and convert it into art; and that’s what’s kept me writing hundreds of songs over the years.
Musically, it’s been artists like Missy Elliott, Pharrell, Timbaland, Jon B, and Musiq Soulchild. I became obsessed with electronic music listening to Dorian Concept, Hudson Mohawk and Monte Booker on Soundcloud and because I couldn’t play an instrument, I learned how to manipulate samples like they do in order to get the desired effect.
Have you ever wanted to give up on music? What keeps you going? 
I’ve wanted to give up on music many times! At times, it’s difficult to stay motivated when you’re working away, making and sharing music and your bills are piling up. It’s difficult not to compare yourself to others because you need examples of success in order to set goals for yourself, but the comparison is the thief of joy. In my career, I’ve had a lot of people make me huge promises and then let me down but later on, I learned that the direction and trajectory of my life and career is no one else’s responsibility but mine. Confidence and self-belief is what keeps me going. When you have confidence, it allows you to act and send out messages of intent to others which causes them to believe and invest in you. The confidence comes from practicing and knowing that now I can make a song without difficulty.
What do you like about PreSonus? What caught your eye?
It just works for my brain. I need to be able to work fast when inspiration hits. I have used every DAW, and so many things about the layout of other programs just didn’t lend itself well to my brain. All of the functions are so easily accessible and placed where it just makes sense. It feels like I can do everything I need to ever do by just right clicking.
When did you first hear about Studio One?
Approximately three years ago, I was introduced to Studio one by a studio engineer who was mixing and mastering a single of mine. I watched him using it and he was adamant I should try it and then a few months after that, whilst I was running a music production demonstration, two producers approached me at the end and told me that they thought I would love it. This piqued my interest.
Any tips or tricks or interesting stories based on your experience with Studio One?
One of my tricks is I automate the tempo to do a slight increase or decrease when my beat is about to do a flip. It’s so subtle and might only change by as little as 3bpm but it makes such a difference to the feel. I might make the climb/descent happen in a space of three seconds, so it’s quick… but it’s felt.
An obvious piece of advice but somebody needs to hear this because so many of us experience the devastation of losing all of our music at least once in our careers. DOUBLE BACK UP ALL OF YOUR PROJECT FILES! Make sure not just your .MP3s and .WAVs exist in three places but your entire project file. On your computer, on an external hard drive and online e.g DropBox, Google Drive.
 How easy/difficult was Studio One to learn?
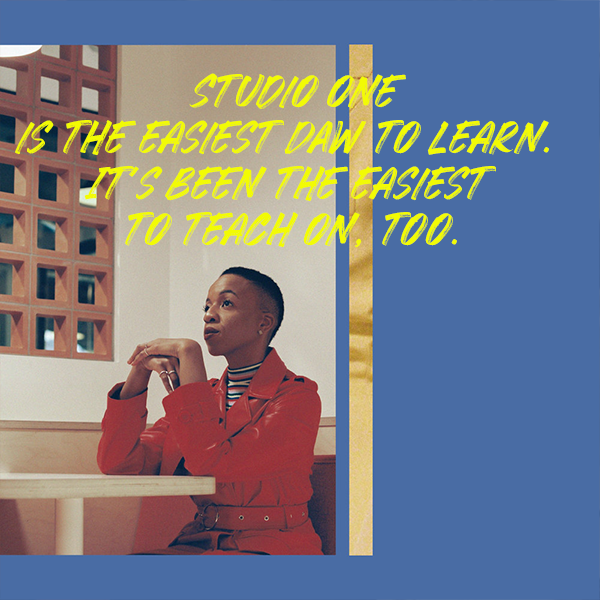
In my experience, Studio One is the easiest DAW to learn. It’s been the easiest to teach on, too.
Where do you go for support?
YouTube tutorials, mostly. And luckily, I have access to producers who’s work I admire that also use Studio One so I go to them for tips.
Where do you go for inspiration?
I go outside. Eventually, the intense pull to create will draw me back inside. I listen to and study old music – Cuban Jazz and 90s R&B are my go-tos right now.
Recent projects? What’s next for you?
I just recently released my debut album, Honeymoon. 13 songs all written, produced and recorded by me in my home studio. It’s had national and international radio play, including being played on the countries top radio station, BBC Radio 1. Next, I will be working with Native Instruments and Nike to present “School of Bop,” a workshop for young artists to learn more about music production and writing and during these demonstrations, I always use Studio One.

FOLLOW, LISTEN!
Join the Studio One family at a very special promo price today!