Tag Archives: Craig Anderton
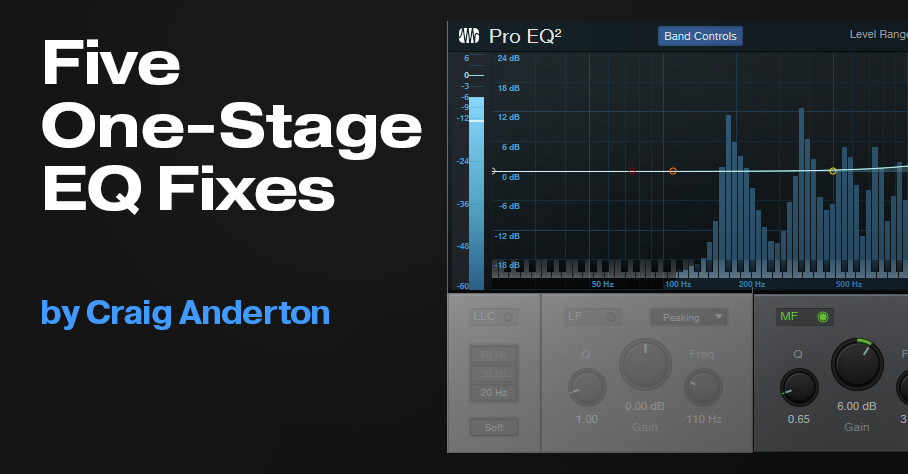
Five One-Stage EQ Fixes
These simple EQ settings can fix a variety of issues. Just remember that often, a little goes a long way. When boosting or cutting with EQ, try the “rule of half”—boost or cut by what you think is the correct amount, then cut it in half and live with the sound for a while before deciding you need more.
1. Magic Fairy Dust
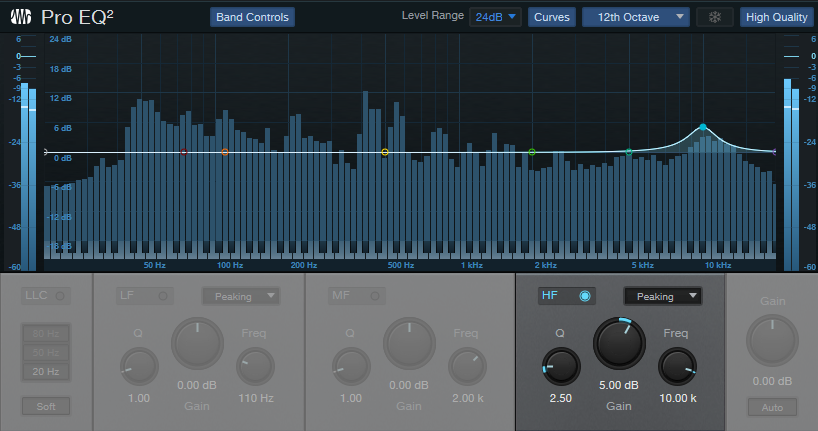
This trick dates back to the days of tape, when multitrack projects would start to lose high frequencies due to constant playback and self-erasure. Adding some high-frequency spice on the stereo mixes or masters helped compensate for any dullness. Although we don’t need to add as much compensation with DAWs, a somewhat narrow, moderate boost at 10 kHz (fig. 1) adds sparkle and brightness that gives a sheen to cymbals, percussion, and even vocals.
2. Clean Out Mud from Your Reverb
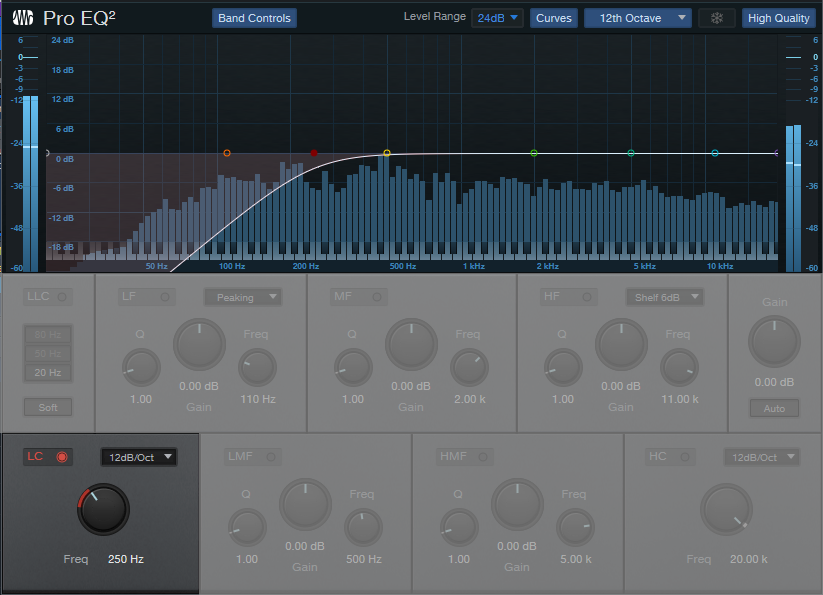
This is especially useful for drum reverb. Reverberated kick can produce a muddy, indistinct sound that interferes with clarity in the bass range. Rolling off some low frequencies (fig. 2) prior to going into reverb eliminates the mud, and tightens the reverb. Note that you don’t need to use the linear-phase EQ for this application, because it doesn’t matter if there are some phase shifts about the cutoff frequency—it’s just going through reverb anyway. Also, if your CPU is straining, you don’t need to use the Pro EQ2’s High Quality mode.
3. Make Vocals More Intelligible
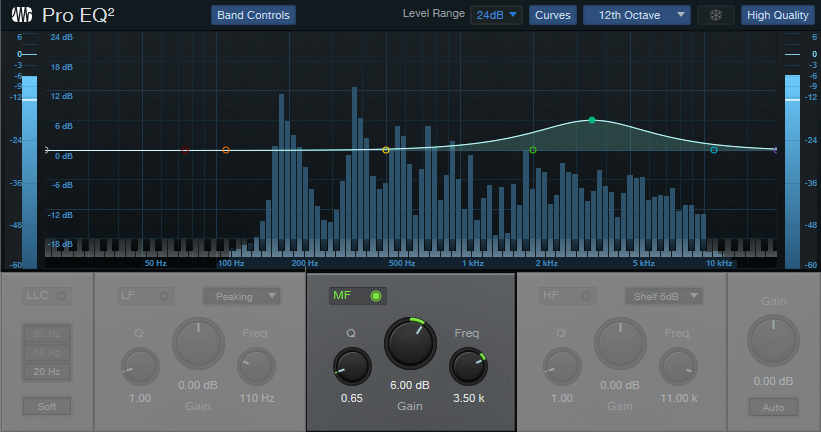
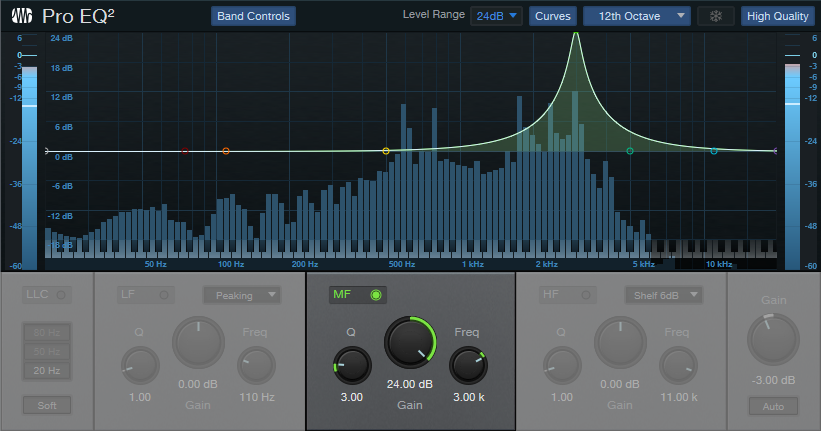
This tip applies not just to singing, but to narration, voiceovers, and podcasts. A fairly broad boost in the 3 to 5 kHz range (fig. 3) increases intelligibility and adds brightness that helps lift a vocal in the mix. The optimum frequency depends on the voice and mic, but don’t overdo the boost. The human ear is most sensitive in this region, so too much boosting leads to listener fatigue—and you don’t want listeners to get tired of your vocals.
4. Tighten Your Master

For a brighter, tighter pop sound when mastering, a slight dip in the 250-300 Hz region (fig. 4) reduces any potential muddiness. This can occur because many instruments have energy in this region, which unbalances the sound. Again, though, you be sparing. This region also contributes “warmth” to the sound, and you don’t want to reduce that too much.
5. Selectively Push Frequencies into Processing
This tip is most relevant with dynamics processing and amp sims. The sound of dynamics processors depends on whether audio goes above a threshold or not, while amp sims depend on a signal level being high enough to go into distortion.
Fig. 5 shows settings that precede an amp sim set for lead sounds. With these settings, the guitar’s high notes go into distortion more readily than low notes. The lead notes sustain longer, and you don’t have to hit the strings as hard to get the same amount of level as the lower strings. Although this goes against the conventional wisdom of placing EQ after compression, we’re using the EQ to modify the subsequent effect, not specifically to change the tone. Besides, conventional wisdom is overrated 😊
Heads-up: Version 1.3 of The Huge Book of Studio One Tips and Tricks is now available! This 637-page book with 230 innovative tips is a free update to owners of previous versions ($19.95 to new buyers). Download the update from your PreSonus or Sweetwater account the same way you downloaded your previous version. For more information, check out the series of Studio One eBooks. Also, there’s a dedicated support forum if you have questions about the tips, or suggestions for future revisions.
Two Crucial Tips for Quantizing Rhythm Guitar
Quantizing audio works best with short, percussive sounds—like drums. Rhythm guitar is more of a challenge, because the attacks aren’t always defined well, and volume fluctuations can add spurious transients as a chord decays. I know quite a few guitarists who set up their quantize parameters, hit “Apply,” and then wonder why the guitar part sounds worse, not better. So, they hit “Undo” and assume quantizing doesn’t work well for guitar. But it can, if you know the two tips in this week’s blog post.
To start the quantization process, select the event, open it in the Edit view, right-click on it, and choose Detect Transients. Do not choose Quantize, because we’ll need to edit some of the transient markers prior to quantizing. Then open the Audio Bend panel. The default transient detection is Standard analysis, with a Threshold of 80% (fig. 1). These are good initial settings for guitar.

Tip #1: First, Do No Harm
With complex chords and lots of strings vibrating, Studio One may dutifully identify each attack with a transient marker. However, when listening, you might not hear any attacks in those places. Applying quantization to places that don’t need to be quantized can degrade the sound.
In fig. 2, after playing back the part, it didn’t seem the markers colored red (top view) needed to be there—only the marker between the two chord attacks correlated to an audible transient.
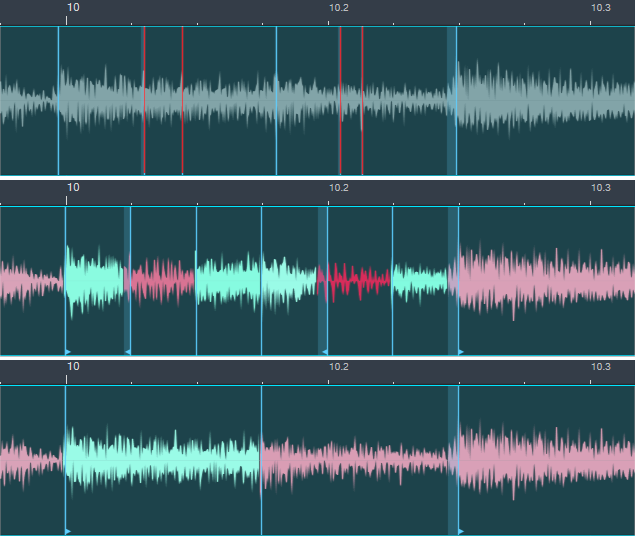
Quantizing with all the markers in place created awkwardly stretched audio (middle view). After removing the markers in red and quantizing (bottom view), the quantization occurred exactly as desired.
Bottom line: If a transient marker doesn’t correlate to a transient you can hear, you’re probably better off deleting it. Sometimes, lowering the Threshold percentage in the Audio Bend panel takes care of removing unneeded markers for the entire Event.
Tip #2: Simplify Double Attacks
This is a big problem with rhythm guitar, because it’s physically impossible to hit all 6 strings at the same time. In fig. 3’s top view, note the doubled attack just before 3.4 (one of the attacks is colored red for clarity).
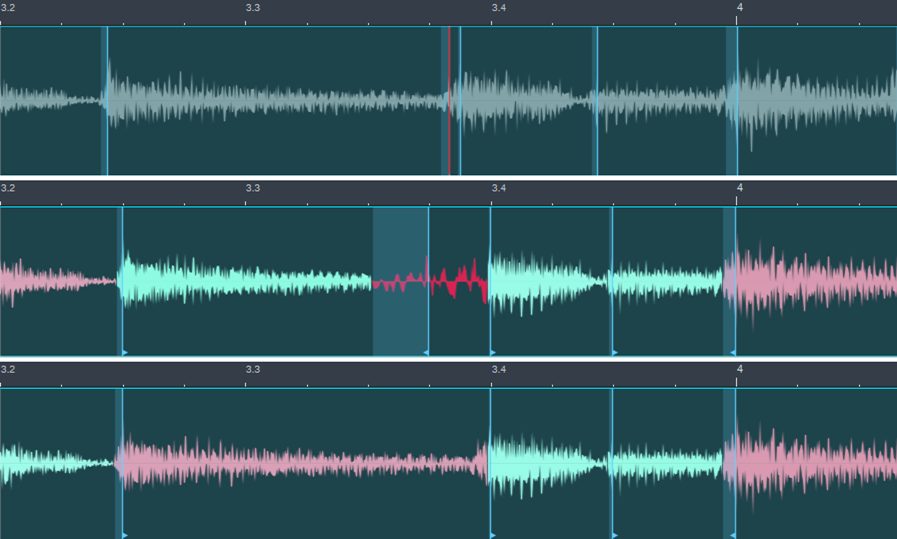
The middle view applies quantization. Studio One has dutifully shifted the two transients to 16th notes, as instructed by the quantization parameters. But this overstretches the audio between the two transients, and doesn’t sound good.
The bottom view shows the audio after removing the transient shown in red in the top view, and then applying quantization. Studio One has shifted the remaining attack transient to the nearest 16th note, which is what we want.
Here’s another tip that relates to fig. 3. Note how the quantized transients at 3.4 and 4 seem a little late, like they missed the first part of the attack. However, I’ve found that if Studio One doesn’t have to deal with double attacks, it makes good judgment calls about where to define the chord’s attack. I’ve tried placing the transient closer to where the attack starts and quantizing, but most of the time, the chord then sounds a little late. Trust the force.
In any case, a little manual tweaking prior to quantization can make the difference between a natural-sounding part that doesn’t seem quantized, and quantized audio with unwanted glitches. I never quantize a rhythm guitar part without looking over the transients first, and making sure they don’t exhibit any of the issues described here.
Magic Stereo

For me, the gold standard for sound isn’t what comes out a studio, but live music. One of the reasons is that mono sound does not exist in an acoustic environment—it’s always interacting with the acoustic environment.
Sure, we can add reverb to give a mono instrument like electric guitar a static position in a stereo field. However, that will always require some kind of time-based manipulation. For a recent song project, I wanted a background guitar part to have motion within a stereo field—but without using any kind of delay, reverb, panning, or EQ. In other words: dry, electric, mono-output guitar with a stereo image. Impossible? Let’s find out.
The Track Setup
The way this works is so simple I’m surprised I never figured it out before. Fig. 1 shows the track layout. The guitar (with added chorus, as required by the song) pans full left, and has two sends. One send provides the guitar’s audio to a bus. The other send controls the sidechain of a Compressor inserted in the bus. The bus is panned full right.
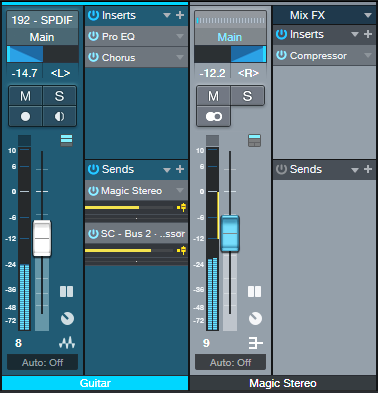
As the Compressor’s level changes, there’s a sense of motion as the dynamics and levels in the left and right channels change. Even better, these changes are tied to the instrument’s dynamics. This makes for a more natural effect.
This audio example plays the guitar by itself, panned to center, and going through the PreSonus chorus.
Now let’s hear the magic stereo effect. Although it’s most obvious on headphones, you’ll hear the effect on speakers as well.
The final audio example plays it in context with the mix. It adds a sense of animation to the guitar you can’t get in any other way. I also included this example because the drums are following the chord track. It has nothing to do with this tip, but I love the cool melodic quality it adds.
Compressor Settings
The Compressor settings are crucial. The ones shown in fig. 2 are a good place to start.
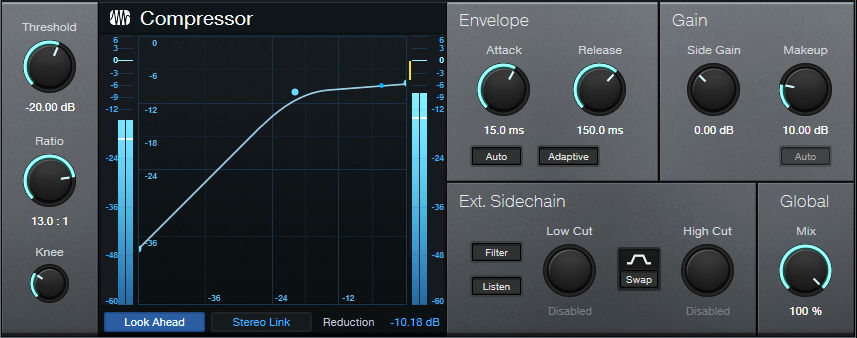
Adjust the settings by panning the source track full left. Increase the processed track’s level until both channels are at about the same level. Experiment with the Compressor’s Threshold to find the sweet spot between the compressor having no effect, or having too much of an effect. The Release can also affect this—too short or too long a release neuters the effect. You’ll likely have to readjust the processed channel’s level quite a bit as you zero in on the ideal settings.
With 15 ms Attack, both channels have their attacks hit at the same time and with the same intensity. So, the attack sound appears in the center, has the advantage of center-channel buildup, and helps anchor the part. As the audio decays and the channels are more dissimilar, the audio “wanders” more in the stereo field.
This technique is also great with background vocals. I didn’t use it in this song because there was so much motion going on overall I wanted the background vocals to be a constant. However I’ve used this technique with other songs, and it’s very effective—especially if you have multiple tracks of background vocals, and you apply individual magic stereo processing to each one.
Instant Inspiration!
The MIDI-oriented Songwriter’s Assistant tip makes it easy to play around with chord progressions. This new tip is about experimenting with, and recording, audio chord progressions in real time—keep the sections you like, discard the rest, and build your song from there. It’s a simple, eight-step process.
1. Start with an empty Song. Enable the Chord Track, then use the Paint tool to create a Chord Track that runs the length of how long you expect to be trying out different chord progressions. The chord itself doesn’t matter.
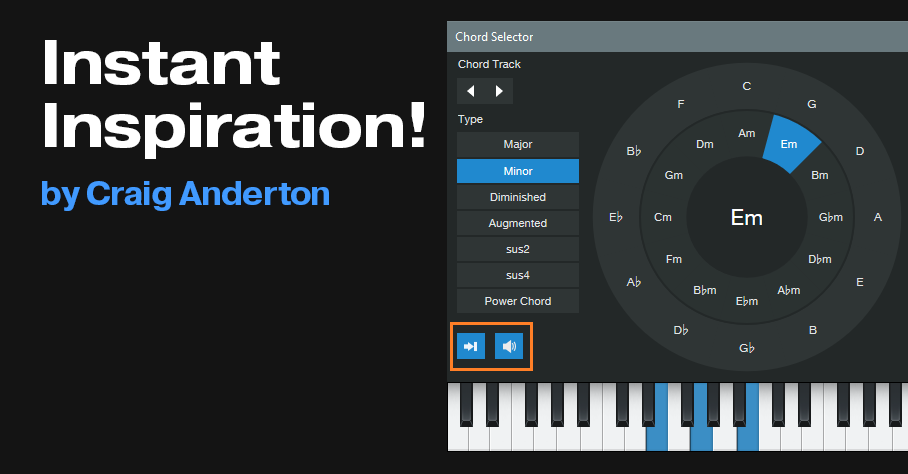
2. Double-click on the Chord Track, then enable the Chord Selector’s Instrument Input and Speaker buttons (fig. 1).
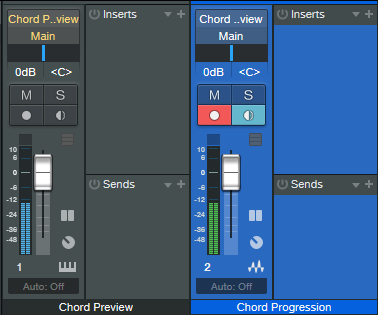
3. Create a stereo audio track. Assign its input to Instruments > Chord Preview, and record-enable it. We’ll call the track Chord Progression (fig. 2).
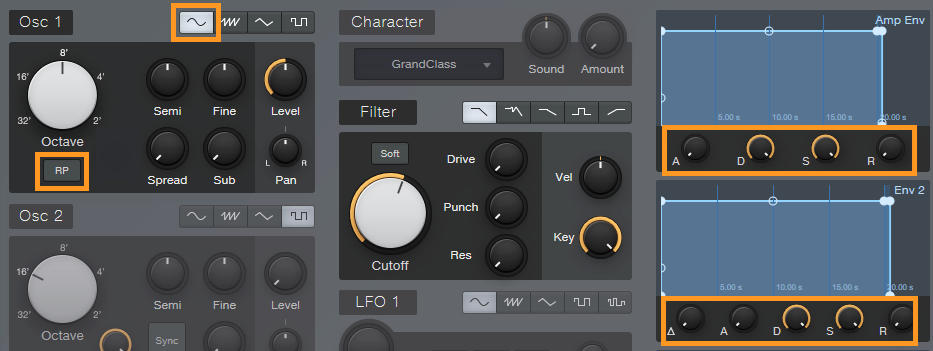
4. Click on the Instrument Editor button in the Chord Preview mixer channel to open Mai Tai. This is the sound used for the Chord Track preview. For this tip to work correctly, it’s crucial to make the edits in fig. 3 to the Chord Preview preset. (After making the edits, I overwrote the original preset.)
5. At this point, you’ll usually enter a rough tempo (you can always tweak the tempo later), enable the metronome, and select a 1-bar precount.
6. With the Chord Selector visible, start recording in the Chord Progression track. Click on a chord in the Chord Selector (however, the first chord must be different than the one that’s currently selected) to record its sound into the Chord Progression track. Continue selecting chords to create various chord progressions. Note: the chord will play for only a finite amount of time after you click on it, and it won’t play if you click on it again. To extend a chord’s playback, my workaround is to alternate clicking between the original chord and Power Chord (under Type).
7. Some of the progressions you try might be useful, some might not be—no problem. Keep the chord progressions that work, delete the rest, move them around on the timeline…whatever.
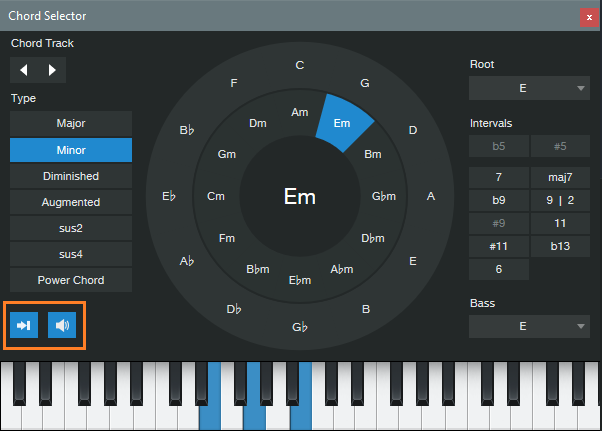
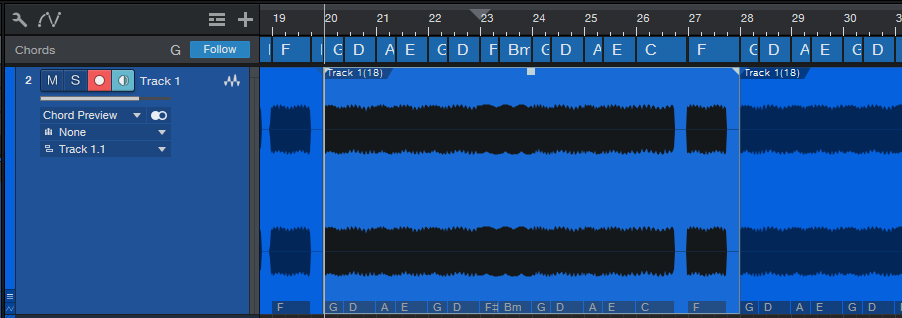
10 . At this point, you’ve probably forgotten which chords you played and when. Right-click on the recorded Event, and choose Audio > Extract to Chord Track. This automagically shows your chord progression (fig. 4). You may need to do a little cleanup, like extending a chord over where there’s silence—but your song is on its way.
If you extended a chord’s length by using the workaround described in step 6, when you extract to the Chord Track, the chord extends for the time you clicked between the chord and Power Chord. Furthermore, it retains the chord type. For example, if you click on Dm, Power Chord, Dm, Power Chord, Dm, all of those will be represented as a single Dm chord “bar” in the Chord Track when extracted. Nice.
Now you can record other parts on other tracks, and have them follow the Chord Track. And here’s an extra tip: Read over the Chord Track documentation when you get a chance, and re-visit my previous Chord Track tips—the Chord Track is an incredibly powerful feature.
Heads-up: Version 1.3 of The Huge Book of Studio One Tips and Tricks is now available! This 637-page book with 230 innovative tips is a free update to owners of previous versions ($19.95 to new buyers). Download the update from your PreSonus or Sweetwater account the same way you downloaded your previous version. For more information, check out the series of Studio One eBooks. Also, there’s a dedicated support forum if you have questions about the tips, or suggestions for future revisions.
Instant Soundtrack!

Who reading this wouldn’t want to make a little more money from their music? Okay, dumb question.
When people think “soundtrack,” images of Hollywood scoring stages come to mind. But soundtracks are a much broader topic now. YouTube videos, podcasters, corporate presenters, educational videos, and local businesses doing radio or TV ads all need soundtracks.
In 1992, I wrote an article called “Subtractive Sequencing” for Keyboard magazine that described filling a piece of music with loops, and then cutting out sections to make an arrangement. It didn’t get much attention. But over 20 years later (!), a blog post called “Subtractive Arranging—Novel Production Method from Danny J Lewis” presented the same technique. This time, it did get attention, to the point where the inevitable “Why I Don’t Use Subtractive Arranging” appeared in someone else’s blog.
Why? He didn’t like how this technique created static arrangements. But those “static arrangements” are actually ideal for… wait for it… soundtracks.
A good soundtrack fills space behind visuals or narration, but always plays a supporting role. So, I use subtractive arrangements to create soundtracks. I just take a song, and remove anything with a human voice, lead lines, some of the layers in layered parts, and most ear candy unless it complements the visuals (fig. 1). Then I render the mix, and compress the heck out of it—not to win the loudness wars, but to maintain a constant level that can happily sit -12 to -15 dB or so below the narration or dialogue.

In fig. 1, subtracted events are filled in with white for clarity. The tracks Lead Vocal and Smile (some ear candy) were muted. So was a layered, Nashville tuned guitar track, because the high frequencies stood out too much. The layered Standard tuning part was left in, but extra tempo-synched echo for both were cut. Similarly, there were two tracks of “Beat Filters,” loops from my AdrenaLinn Guitars loop library. They were panned to center and side for a cool stereo effect—that no one would care about. So, I muted one of them. Sections of a house bass loop were also removed.
The final, mixed soundtrack is exactly 1.5 minutes, and consists of drums, rhythm guitar triggered by a drum sidechain signal, bass in some parts, a beat filter loop in some parts, and a little acoustic guitar. That’s all that was needed. One last tip: You can mix bass up pretty high, because it helps drive a song and is out of the speech range.
Every now and then, I go through some of my older projects, strip out anything distracting, create a soundtrack, and save it into my “Soundtracks” folder. Whenever I need a soundtrack, there’s always something suitable in there. And even better, if you get into creating soundtracks, you might find some interesting opportunities to make money from them.
Here’s the finished soundtrack:
For more tips on how to get the most out of Studio One, check out the series of Studio One eBooks that cover tips & tricks, creative mixing, recording/mixing vocals, dynamics processors, and recording/mixing guitar. Remember, just like software, eBook owners can download the latest “point” updates for free from their PreSonus account (or Sweetwater account, if purchased from there). Owners are also eligible for new editions at a reduced price.
Play Faster with Tape Stretch
How to Play Faster—By Playing Slower covered how to slow down tempo of non-MIDI based music without changing pitch. This allows playing a difficult part at a slower speed, and then speeding the part back up to the desired tempo. However, this method may produce artifacts, because time-stretching algorithms aren’t perfect (yet…).
With tape, musicians used variable-speed recorders to implement the same technique. However, because this approach locked pitch and tempo together, slowing down the tempo also lowered pitch. So, you’d need to learn the song in a different key, or retune your instrument to match the lower pitch. Speeding the tape back up to its original tempo sped up the slower overdub, and raised its pitch as well.
Studio One’s “Tape” stretch mode works the same way as variable-speed tape, and unlike other stretch methods, produces zero artifacts. You still need to learn the part in a different key, but sometimes this is a good thing. When you play along at the slower tempo and then speed the part back up again, the instrument’s timbre becomes brighter—which might be just what a song needs. Similarly, you can record at a faster speed, and then slow back down for a sound that’s more like downtuning. What’s more, with stringed instruments, it’s possible to record with a different voicing that might be more effective, or provide additional contrast if you’re layering parts.
How to Do It
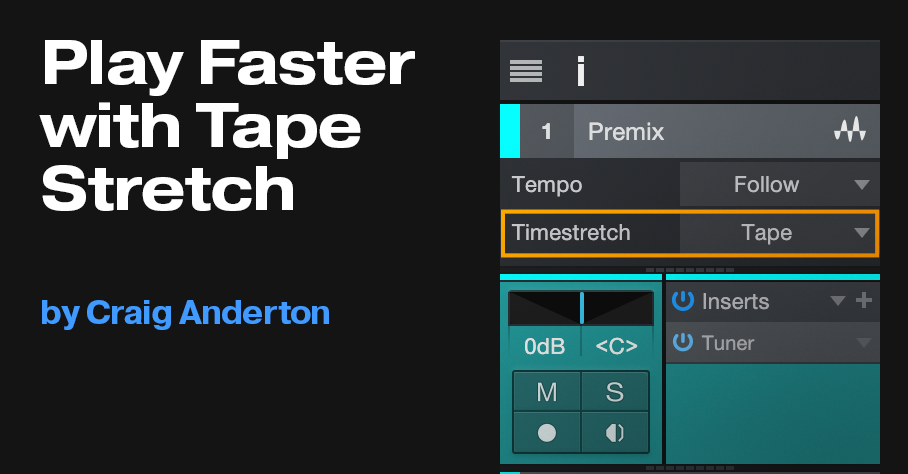
1. Rather than try to slow down an entire Song, position the loop markers at the beginning and end. Choose Song > Export Mixdown to create a premix of the Song. Under Export Range, choose “Between Loop.” Under Options, check “Import to Track” (fig. 1).
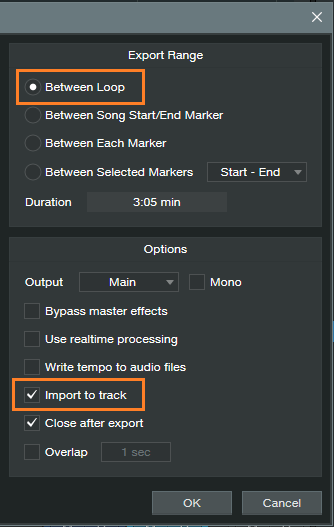
2. Mute all Song tracks except the imported premix.
3. Select the premix, and open its Inspector (F4).
4. For Timestretch mode, choose “Tape” (fig. 2).
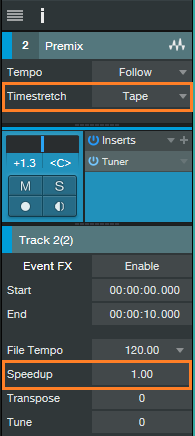
5. Further down in the Inspector, locate the “Speedup” parameter.
6. Enter a Speedup value that “lands” on a key, as shown in fig. 3. For example, a Speedup setting of 0.89089 slows the tempo to 89% of its current value, and transposes pitch down 2 semitones. Enter all 6 digits for correct tuning, even though Speedup displays only 3 digits (Studio One knows the extra digits are there). Hit Return.
7. Create a new track, and record your overdub at the slower tempo, in the different key.
8. When you’re done, make sure your overdub extends to the song’s beginning. If there’s a gap, use the Paint tool to create a blank event that extends from the song’s beginning to the overdub. Select the blank clip and overdub, and then type Ctrl+B to turn them into a single event.
9. Click on the overdub event, and set Timestretch to Tape. transpose it up by as much as it was transposed down. For example, if the track was transposed down 2 semitones, enter a Speedup time of 1.12246 to transpose it back up two semitones. Hit return.
10. Done!

That Vintage Airy Sound
…as in, 10cc’s “I’m Not In Love.” Back in those days, to minimize tape hiss, noise reduction compressed and increased highs when recording, then expanded and reduced highs on playback. Many recordings of that era enhanced the highs on some tracks (especially vocals) by using noise reduction when they printed to tape, but then they didn’t “undo” the sound on playback. Once you’ve heard that sound, you’ll recognize it—a present, bright, yet not overbearingly trebly sound.
You may remember the “cassette,” a primitive form of audio recording invented over half-century ago, and intended for dictation. If so, you may also remember that when you turned off noise reduction, the cassette sounded brighter and more present. It’s the same principle.
How It Was Done
The early days, “studio standard” noise reduction was a broadband unit that applied the noise reduction process in four separate bands. The “hack” was to disable two of the bands, and use only the high bands (basically, shelving EQ around 3 and 9 kHz) to compress and increase highs.
But the reason why this worked so well is because lower-level, high-frequency signals were compressed the most. The higher the level, the lower the compression ratio. This is why the treble increase wasn’t overbearing when you used noise reduction to enhance the highs. Amazingly, we can obtain a very similar effect with stock plug-ins.
How to Do It
We’re not constrained to trying to sound like the original hardware unit, so we can optimize our approach for musical applications in Studio One instead of noise reduction with tape recorders. The Multiband Dynamics plug-in is well-suited for the “more-compression-at-low-levels” trick (fig. 1).
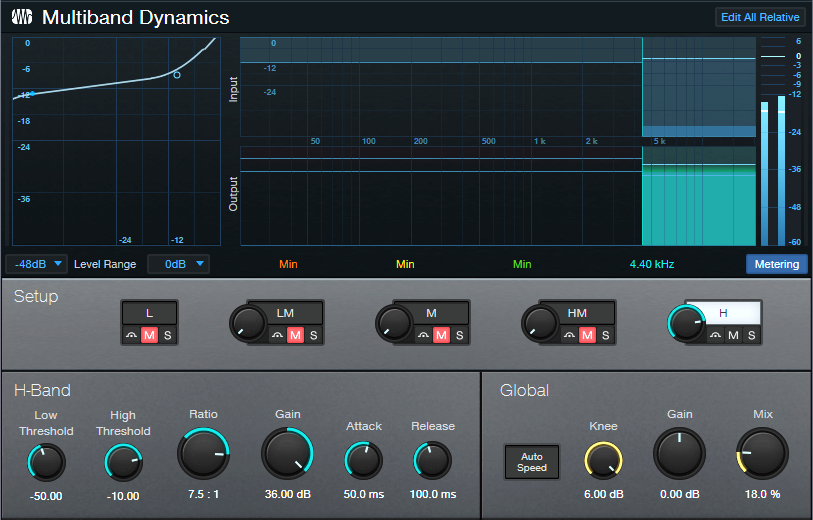
As the curve shows, there’s a lot of compression at lower levels, but as the input gets higher, the ratio approaches 1:1. That’s exactly the effect we want. A maximum Knee setting makes for a smooth transition along the compression curve.
These are not necessarily the optimum settings for your application, so feel free to experiment. My intention was to create settings that avoided having too much or too little of a compression curve.
The Mix control determines the amount of the effect. Note that the Low Threshold, High Threshold, and Ratio controls all interact. The settings shown (which are also used in the downloadable preset) worked for me and give a pretty obvious effect. For something more subtle, set the Ratio to 3.0:1, and the Low Threshold to around -63. As to the preset, after downloading, import it into the Multiband Dynamics, or just drag it on top of the plug-in’s interface.
Anyway, hearing is believing, so listen to the audio example. I’ve added a fair amount of the effect so that it’s obvious. In a full mix, you might use less. The following audio demo alternates between an unprocessed version and processed version. The sounds are choir, 12-string guitar, vocal, and piano. I dug up a scratch vocal with loud sibilants because it really gets the point across—the sibilants are not more pronounced in the processed version, even though the overall sound is much brighter. Also, the piano is interesting. The portions with soft dynamics still have increased brightness, but the brightness doesn’t get out of hand when the dynamics hit hard (which even when unprocessed, are brighter anyway). You can hear the music these came from at youtube.com/thecraiganderton.
So download the preset, drag it to your Multiband Dynamics, and…be happy you didn’t have to buy a piece of hardware to get this sound!
Download the CA_Vintage Airy preset here!
Unlock the Power of Impact XT’s Multiple Outs
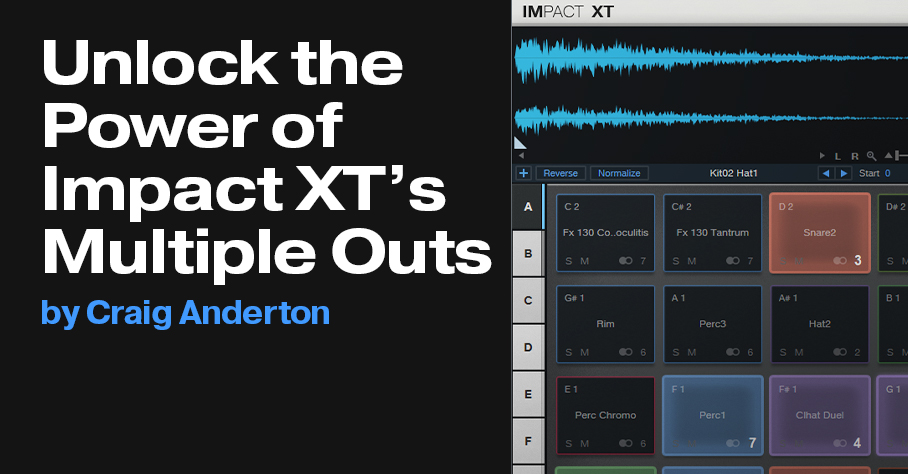
We all know Impact XT is cool—but it’s at its coolest when you use the individual audio outputs, because then you can add exquisite effects to individual drums.
How Multiple Outputs Work, Part 1: Impact Setup
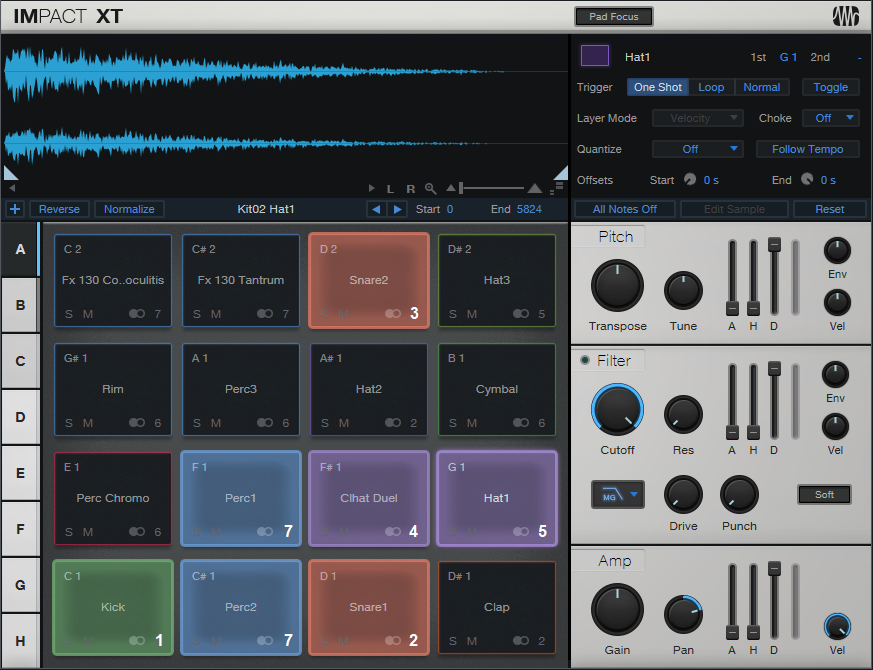
Let’s zoom out. Impact has 16 potential outputs, which can be mono or stereo. The reason for saying “potential” is that you can use as many as you want, in whatever configuration you want—all stereo, all mono, or a mix of mono and stereo outputs.
You assign a drum to one of the 16 outputs by clicking on the little number in a pad’s lower right, and choosing from one of the 16 outputs, either stereo or mono. More than one drum can feed a single output. For example, fig. 1 shows an Impact layout for a recent song. All the drums go to their own outputs, except that Perc1 and Perc2 feed the same output because they’re going to be processed, and have their levels adjusted, simultaneously.
Part 2: Console Setup
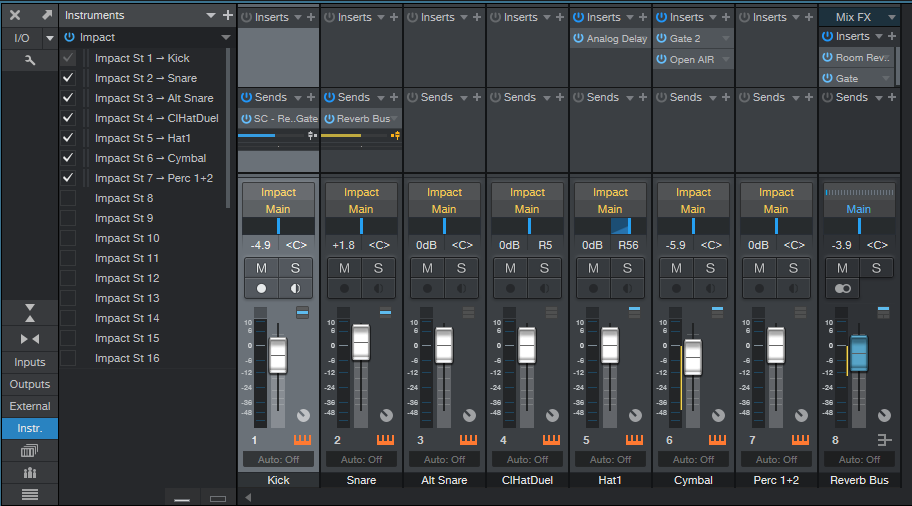
Now we’ll have the drums show up in the console. Open the Instruments panel, click on the downward arrow, and choose Expand to see Impact XT’s outputs. You’ll see all the Impact outputs (you may have to scroll to see more than the 16 stereo outputs). They’ll have an St (stereo) or M (mono) prefix, followed by the output number. Check the box that corresponds to each output that you’re using. It doesn’t hurt to check outputs you’re not using, but they’ll take up space in the console, and serve no purpose.
Next, simplify your life by renaming the console channels to reflect the drum names (fig. 2). The names will then show up in the Instruments panel. This lets you think of the console channels as sounds instead of just outputs.
Part 3: The Payoff
So why bother doing all this instead of just using a stereo output? Because we can do all kinds of fun processing. In this example:
- The Snare channel is going to a bus with Room Reverb, set for a loooong decay. It’s followed by a Gate.
- The Kick channel has a send that feeds the Gate’s sidechain, so when the kick hits, it lets through the snare’s reverb.
- The Hat1 sound’s Analog Delay adds some motion.
- The Cymbal goes through another Gate, set for a long attack time to give an attack delay effect. This is followed by the Open Air convolution reverb, which uses the “8.00s Thin” idealized reverb impulse from my Surreal Reverb Impulse Responses pack.
This processing transforms a dancehall-type beat into something more chill. The audio example’s first half plays what the loop would be like without processing, while the second half includes the processing—and that’s just the tip of the iceberg of what multiple outputs can do.
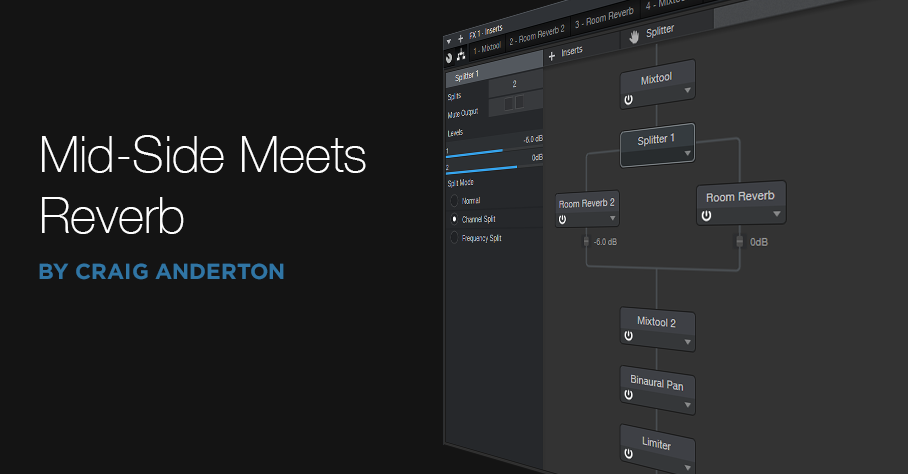
Mid-Side Meets Reverb
The post on using mid-side processing with the CTC-1 garnered a good response, so let’s follow up with one of my favorite mid-side techniques: M-S reverb.
To recap, mid-side processing separates sounds in the center of a stereo file from sounds panned to the sides, processes them individually, then puts them back together again into stereo. It isn’t a perfect separation, because the mid is the sum of the left and right channels. Although this boosts the center somewhat, the mid still includes the sides. However, the side channel is quite precise, because it’s derived from putting the right and left channels out of phase—so the center cancels.
Applying Mid-Side Reverb
Before getting into how to make M-S reverb, here’s why it’s useful. Some productions have an overall reverb to provide ambiance, and a second reverb (often plate) dedicated to the vocal. The vocal is usually mixed to center, so it’s competing for space with the bass, snare, and kick. If they’re contributing to the overall reverb, and the vocal is creating its own reverb, that’s a lot of reverb in the center.
One popular fix is adding a highpass filter prior to the overall reverb, set to around 300 Hz. This keeps the bass and kick from muddying the reverb. However, it doesn’t take care of midrange or high-frequency sounds that are panned to center, like snare. These can compete even more with the vocal if they’re in the same frequency range.
While some reverbs let you tailor high- and low-frequency reverb times with a crossover, this doesn’t cover all the processing you might want to do, nor does Studio One’s Room Reverb include these parameters. Mid-side reverb, with different reverbs on the mid and sides, is a more flexible solution for customizing an overall reverb ambiance.
Assembling the Mid-Side Reverb
Download the FX Chain, or if you want to roll your own, start by dragging the MS-Transform FX Chain into a bus (of course, this also works for individual channels). Then drag a Room Reverb into each split (Fig. 1). The default reverb preset is a good place to start, but if the FX Chain is in a bus, remember to set the Mix controls for 100% wet sound. I also like to insert a Binaural Pan after the second MixTool to widen the overall stereo image.

Figure 1: Mid-Side Reverb FX Chain, which adds two Room Reverbs and a Binaural Pan to the MS-Transform FX Chain.
The reverb on the left handles the center, while the reverb on the right processes the sides. Lower the fader after the left reverb; Fig. 1 shows -6 dB, but adjust to taste. This alone will open up some space in the center for your vocal and its reverb. However, where this effect really comes into its own is when you tweak the reverb parameters for each reverb. For example…
- If you still want reverb on the kick and low end, vary the mid reverb’s Length parameter. Shorter lengths tighten the kick more, while longer lengths give that Kick of Doom reverb sound.
- Increase Length on the sides for a more atmospheric reverb sound.
- Increase pre-delay on the sides, to make space for attacks on the vocal track. Consonants benefit from the extra clarity.
- For this application, Eco mode sounds fine but try HQ as well.
- Turn up the Binaural Pan after the second Mixtool. I often turn it up all the way, because it sounds great in stereo, and there aren’t any phasey issues of the output collapses to mono.
By adjusting the two reverbs, you can sculpt them to give the desired overall reverb sound. If you then place a vocal in the center with a sweet plate, I think you’ll find that the vocal and overall reverb create a smooth, differentiated, and conflict-free reverb effect.
Mid-Side Meets the CTC-1
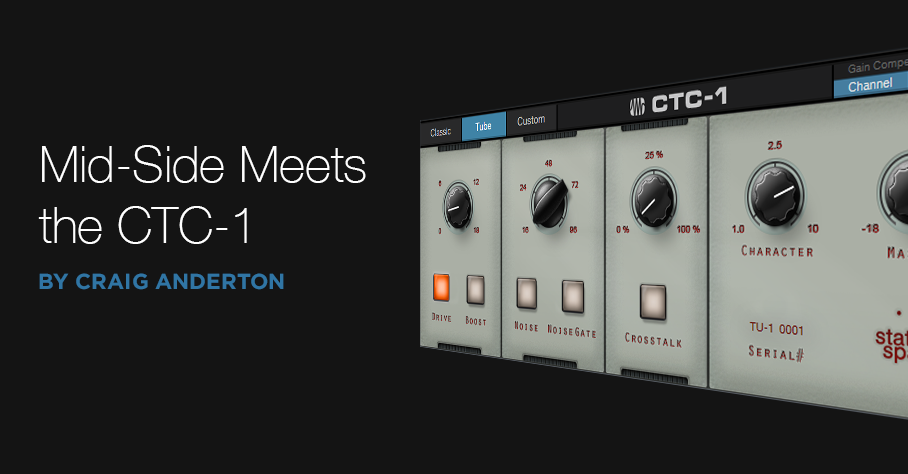
I’ve often said it’s more fun to ask “what if I…?” than “how do I?” “What-if” is about trying something new, while “how do I” is about re-creating something that already exists. Well, I couldn’t help but wonder “what if” you combined the CTC-1 with mid-side processing, and sprinkled on a little of that CTC-1 magic? Let’s find out. (For more information on mid-side processing, check out my blog post Mid-Side Processing Made Easy. Also, note that only Studio One Professional allows using Mix Engine FX.)
One stumbling block is that the CTC-1 is designed to be inserted in a bus, and the Mid-Side Transform FX chain won’t allow inserting Mix Engine FX. Fortunately, there’s a simple workaround (see Fig. 1).
- Copy the stereo track you want to process, so you have two tracks with the same stereo audio. One will provide the Mid audio, and the other, the Sides audio.
- Insert an MS-Transform FX Chain into each track (you’ll find this FX Chain in the Browser’s Mixing folder, under FX Chains)
- Create a bus for each track.
- Assign each track output to its own bus (not the main out). However, the bus outputs should go to the Main out.
- Add a CTC-1 Mix Engine FX in each bus.
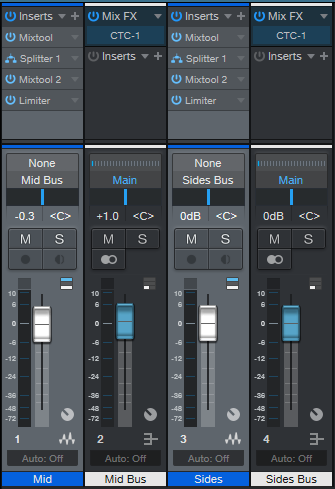
Figure 1: Setup for adding mid-side processing with the CTC-1 to a mixed stereo file.
- To dedicate one bus to the mid audio, and the other to the sides, open up the Splitters in the MS-Transform FX Chains.
- Mute the sides output for the Mid track (top of Fig. 2, outlined in orange). Then, mute the mid output for the Sides track (bottom of Fig. 2, also outlined in orange).

Figure 2: One bus is Mid only, the other is Sides only.
Now you can add the desired amount of CTC-1 goodness to the mids and sides. And of course, you can vary the bus levels to choose the desired proportion of mid and sides audio.
Audition Time!
The following example is an excerpt from the original file, without the CTC-1.
Next up, CTC-1 with the Custom option on the Mid, and the Tube option on the Sides. Fig. 3 shows their settings—a fair amount of Character, and a little bit of Drive.
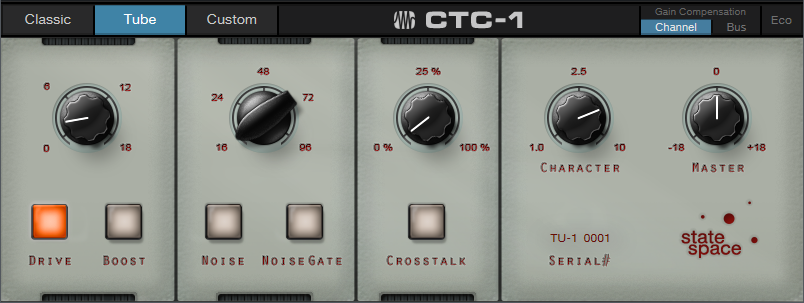
Figure 3: CTC-1 settings for the audio example.
If you didn’t hear much difference, trying playing Audio Example 1 again after playing Audio Example 2. Sometimes it’s easier to tell when something’s missing, compared to when something’s been added.
The more you know about the CTC-1, the more effectively you can use it. The bottom line is I now know the answer to my “what if” question: get some buses into the picture, and the CTC-1 can be hella good for processing mid and sides!