Tag Archives: Craig Anderton
Better Reverb with Frequency Splitting
It’s convenient that Studio One has three significantly different reverbs, but none of them has separate decay times for high and low frequencies. This is one of my favorite reverb features, because (for example) you can have a tight kick ambiance, but let the hats and cymbals fade out in a diaphanous haze…or have a huge kick that sounds like it was recorded in a gothic castle, with tight snare and cymbals on top. Also with highly percussive drums, sometimes I’d like a little more diffusion than what’s available so that reflections aren’t perceived as discrete echoes, but rather, as a smooth wash of sound.
So let’s build the ideal Room Reverb for drums (other instruments, too). There’s a downloadable FX Chain that provides a big drum sound template, but note that the preset control settings cover only one sound out of a cornucopia of possible effects. Once you start modifying the reverb sounds themselves, as well as some of the parameters in the Routing window itself, anything’s possible.
ROUTING AND MACRO CONTROLS
Here’s the FX Chain routing.
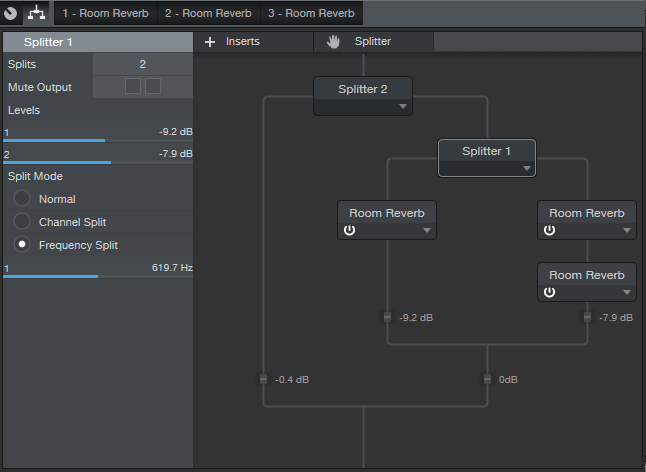
Splitter 2 provides a Normal split. One split handles the dry signal, while the other goes to the reverbs. Splitter 1 does a Frequency split, with one split going to a single Room Reverb dedicated to the low frequencies, and the other split going to two Room Reverbs in series for the high frequencies. The Split point (crossover frequency) is set around 620 Hz, but varying this parameter provides a wide variety of sounds.
You might wonder “why not just feed two reverbs, and EQ their output?” EQing before going into the reverb gives each reverb more clarity, because the low and high frequencies don’t interact with each other in the process of being reverberated.
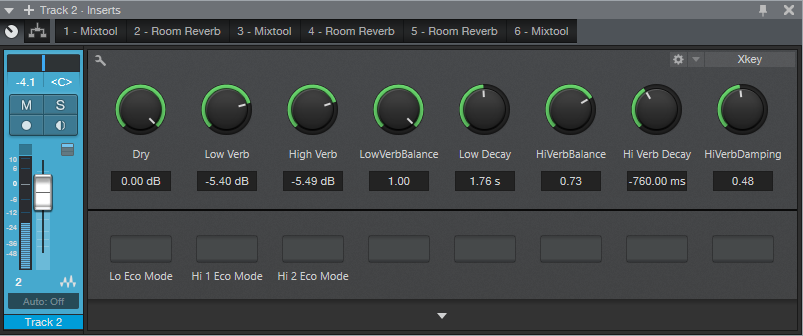
The three Mixtool modules provide mixing for the dry, low reverb, and high reverb sounds, as represented by the first three Macro controls. The other controls modify reverb parameters, but of course, these are only some of the editable parameters available for adjustment within the Room Reverb.
HOW TO USE IT
Here’s one option, although I don’t claim that it’s necessarily “best practices” (suggestions are welcome in the Comments section!).
Start with the Dry, Low Verb, and High Verb controls at minimum. Bring up the Low Verb, and adjust Low Verb Balance and Low Decay for desired low end. Then turn down Low Verb, bring up High Verb, and adjust its associated controls (Hi Verb Balance, Hi Verb Decay, and Hi Verb Damping). With both Low Verb and High Verb set more or less the same, go into the Routing section and vary Splitter 1’s crossover frequency (the slider below Frequency Split). After finding the optimum crossover point, re-tweak the mix if necessary.
Finally, choose a balance of all three levels, and you’re good to go.
WHAT ABOUT THE REVERBS THEMSELVES?
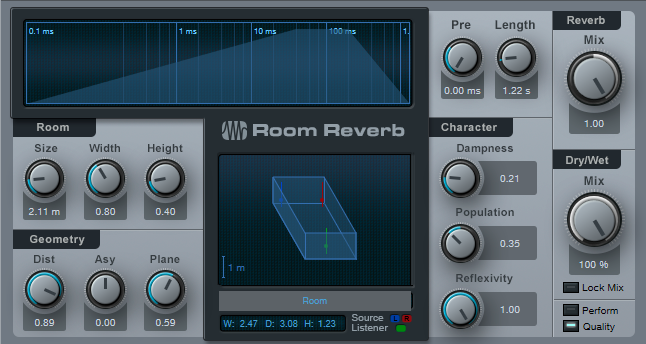
For the default FX Chain preset, the Low Verb has a shorter delay than the High Verbs, but still gives a big kick sound.
The reason for using two Room Reverbs in series for the high reverb component is to increase the amount of diffusion, and provide a smoother sound.
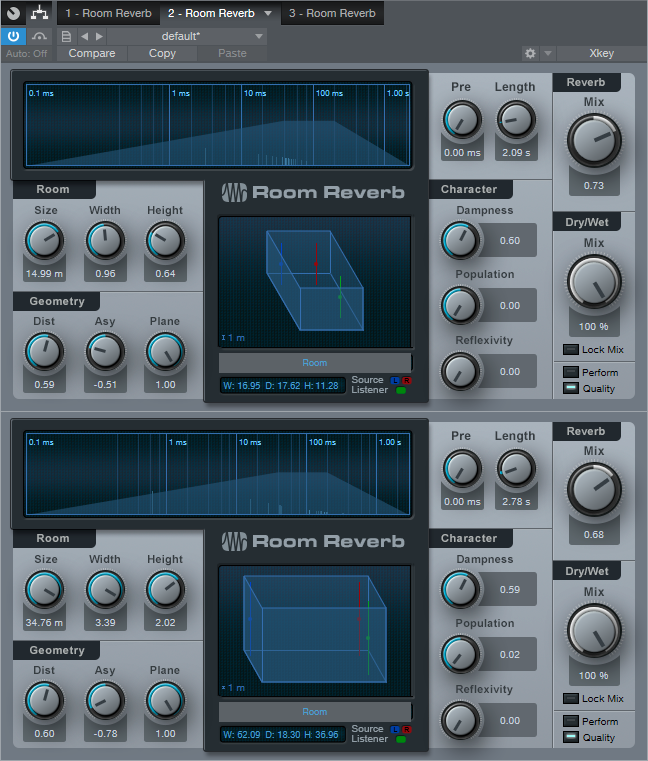
You want fairly different settings for the two reverbs so that they blend, thus giving the feel of more diffusion. There’s not really a lot of thought behind the above settings; I just copied one of the reverbs and changed a few parameters until the sound was smooth.
Incidentally, three Room Reverbs requires a decent amount of CPU, so there are switches at the bottom of the Macro Controls to enable the “eco” mode for each reverb. Choosing eco for the low frequency reverb impacts the sound less than choosing eco for the two high frequency reverbs.
IT’S A WRAP
Download the FX Chain and check out what this FX Chain can do—I think you’ll find that when it comes to reverbs, third time’s a charm.
Click here to get the FX Chain preset!
Friday Tip: Better Vocals with Phrase-by-Phrase Normalization
Unless you have exceptional vocal control, some vocal or narration phrases will likely be softer than others—not intentionally due to natural dynamics, but as a result of sketchy mic technique, running out of breath, or not being able to hit a note as strongly as other notes. Using compression or limiting to even out a vocal’s peaks has its place, but the low-level sections might not be brought up enough, whereas the high-level ones may sound “squashed.”
A more natural-sounding solution is to edit the vocal to a consistent level first, before applying any compression or limiting, by using phrase-by-phrase gain changes that even out variations. The advantage of adjusting each phrase’s level for consistency is that you haven’t added any of the artifacts associated with compression, or interfered with a phrase’s inherent dynamics. Furthermore if you do add compression or limiting while mixing, you won’t need to use as much as you normally would to obtain the same perceived volume and intimacy. A side benefit of phrase-by-phase normalization is that you can define an event that starts just after an inhale, so the inhale isn’t brought up with the rest of the phrase.
Ready to tweak that vocal to perfection? Let’s go.
- Open the vocal event in the Edit view, and open the Audio Bend view.
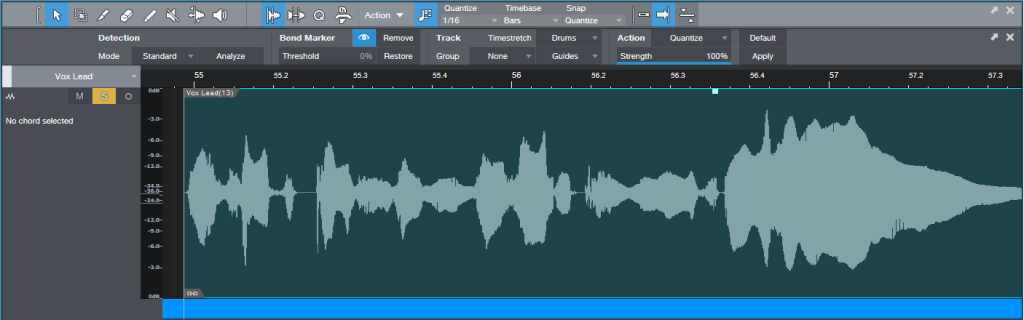
- Click on the Event, and choose Action > Detect Transients. Then click on Remove Bend Markers to start with a clean slate. Your event will look like the above screen shot. (Note: If the vocals have phrases that are separated by spaces, you can choose Transient Detection, Standard Mode, and then click on Analyze. Lower the threshold so that the Bend Markers fall only at the beginning of phrases. However, you’ll may need to move, delete, or add some markers with complex parts, which is why I find it easier just to place Bend Markers where needed.)
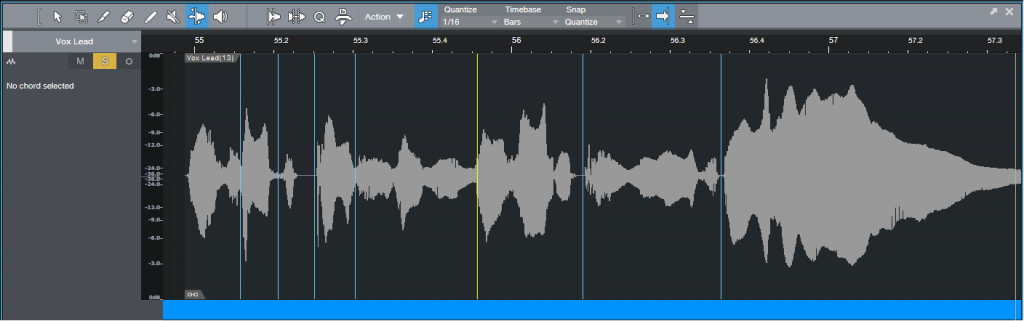
- You can now close the Audio Bend view if you want more room for the waveform height. Choose the Bend tool, and click at the beginning of each phrase to add a Bend Marker. If a section that needs to be adjusted starts in the middle of a phrase, you can add a Bend Marker before the section that needs tweaking anyway, even if there isn’t silence (we’ll explain why later).
- Once you’ve separated the phrases with Bend Markers, select the event in the Edit view by clicking on it with the Arrow tool. Then, choose Action > Split at Bend Markers. Now each phrase is its own event.
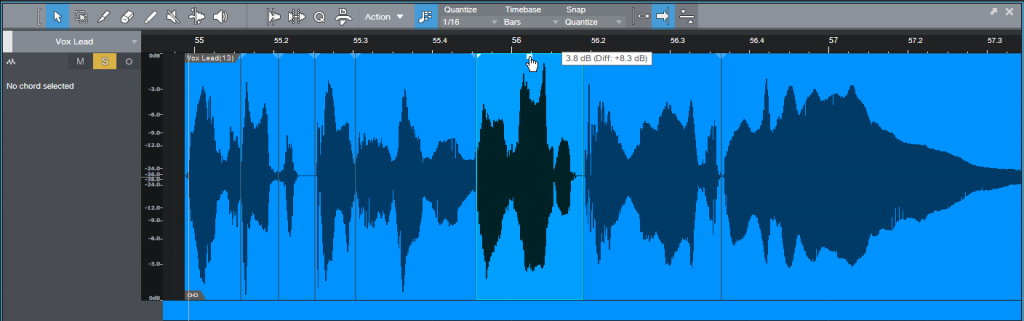
- Click on an event, and then adjust the gain so the event reaches the desired level. Do this with each event that needs tweaking—done!
Note that if audio continues before and after the Bend Marker so the Bend Marker can’t land on silence, Studio One generally handles this well if you place the Bend Marker on a zero-crossing. But if an abrupt level change causes a click at a transition, simply crossfade over it by dragging the end of one event and the beginning of the next event over the transition, and type X to create a crossfade. Adjust the curve for the most natural sound. In extreme cases, fading out just before the click and fading in just after the click can solve any issues.
So why not just do this kind of operation in the Arrange View? Several reasons. First of all, the Edit view is a more comfortable editing environment. But also, sometimes detecting transients will place the Bend Markers accurately enough that all you need to do is split and change levels—it’s much easier than doing a series of splits in the Arrange view. And if you count keystrokes, clicking to drop Bend Markers that define where to split and doing all the splits at once is easier than clicking and splitting at each split. Finally, while in Edit view, you can take advantage of the Bend Markers to adjust phrasing.
While this is a highly effective technique (especially for narration), be careful not to get so involved in this process that you start normalizing, say, individual words. Within any given phrase there will be some dynamics that you’ll want to retain—never lose the human element.
Friday Tips: Keyswitching Made Easy
As the quest for expressive electronic instruments continues, many virtual instruments incorporate keyswitching to provide different articulations. A keyswitch doesn’t play an actual note, but alters what you’re playing in some manner—for example, Presence’s Viola preset dedicates the lowest five white keys (Fig. 1) to articulations like pizzicato, tremolo, and martelé.
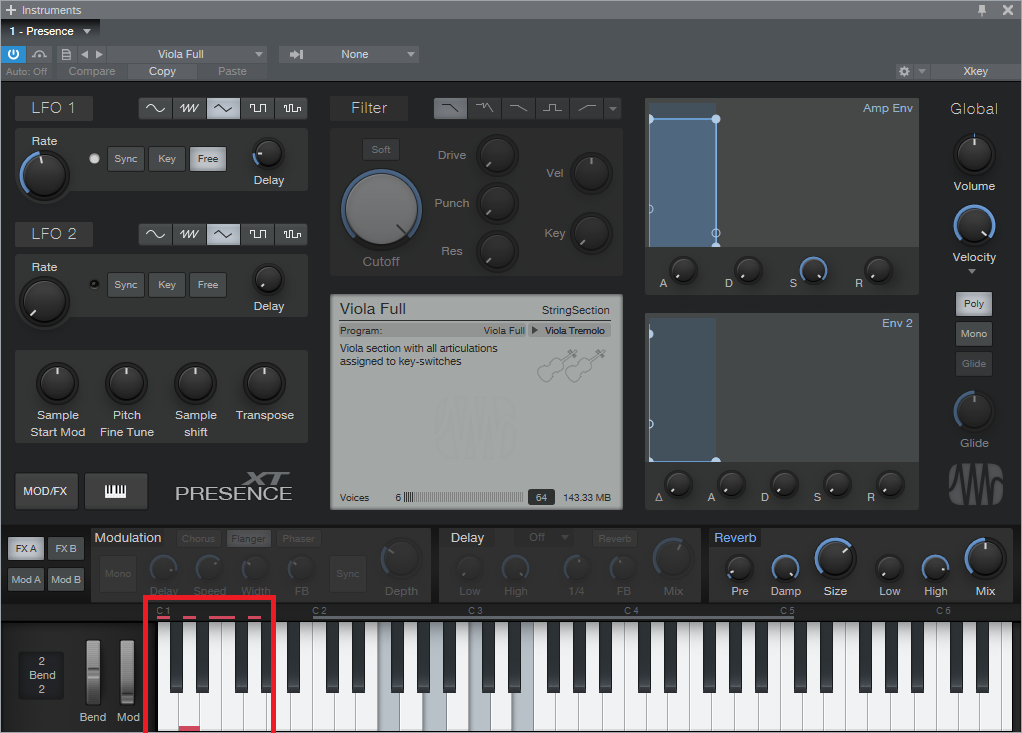
Fig. 1: The five lowest white keys, outlined in red, are keyswitches that provide articulation options. A small red bar along the bottom of the key indicates which keyswitch is active.
This is very helpful—as long as you have a keyboard with enough keys. Articulations typically are on the lowest keys, so if you have a 49-key keyboard (or even a 61-note keyboard) and want to play over its full range (or use something like a two-octave keyboard for mobile applications), the only way to add articulations are as overdubs. Since the point of articulations is to allow for spontaneous expressiveness, this isn’t the best solution. An 88-note keyboard is ideal, but it may not fit in your budget, and it also might not fit physically in your studio.
Fortunately, there’s a convenient alternative: a mini-keyboard like the Korg nanoKEY2 or Akai LPK25. These typically have a street price around $60-$70, so they won’t make too big a dent in your wallet. You really don’t care about the feel or action, because all you want is switches.
Regarding setup, just make sure that both your main keyboard and the mini-keyboard are set up under External Devices—this “just works” because the instrument will listen to whatever controllers are sending in data via USB (note that keyboards with 5-pin DIN MIDI connectors require a way to merge the two outputs into a single data stream, or merging capabilities within the MIDI interface you’re using). You’ll need to drop the mini-keyboard down a few octaves to reach the keyswitch range, but aside from that, you’re covered.
To dedicate a separate track to keyswitching, call up the Add Track menu, specify the desired input, and give it a suitable name (Fig. 2). I find it more convenient not to mix articulation notes in with the musical notes because if I cut, copy, or move a passage of notes, I may accidentally edit an articulation that wasn’t supposed to be edited.
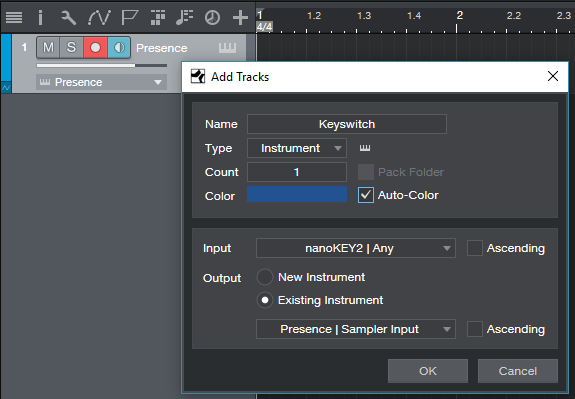
Fig. 2: Use the Add Track menu to create a track that’s dedicated to articulations.
So until you have that 88-note, semi-weighted, hammer-action keyboard you’ve always dreamed about, now you have an easy way take full advantage of Presence’s built-in expressiveness—as well as any other instrument with keyswitching.
Friday Tip—The “Glue” Compressor FX Chain
If you’ve heard people talking about adding “glue” to a mix, this usually involves a bus compressor. But you can also “glue” tracks together in a subtle way by placing two standard compressors in series with high thresholds and low ratios. The result is dynamics control that’s so gentle, you won’t really hear that a compressor is working—but you will hear the benefits.
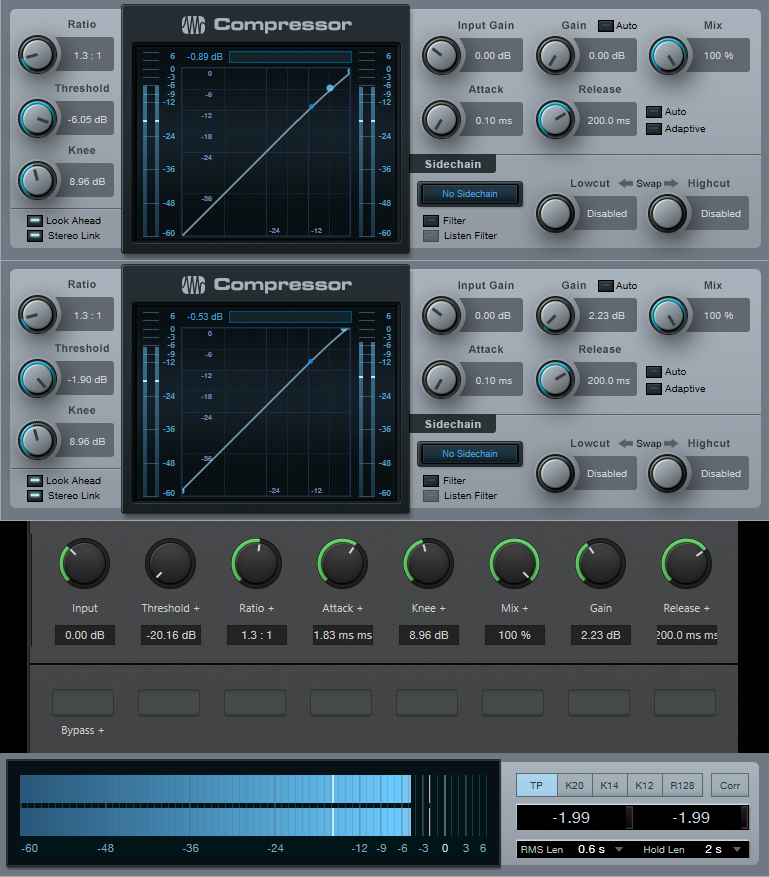
Start by inserting two Compressors in series. I also like adding the Level meter plug-in afterward so it’s easy to compare peak and RMS levels when enabling/bypassing the Glue Compressor. Set the controls that aren’t affected by the FX Chains as follows:
- Compressor 1, Gain 0.00 dB
- Compressor 2, Input Gain 0.00 dB
- Turn off Auto Gain, Auto Release, and Adaptive Release
- Turn on Look Ahead and Stereo Link
Program the FX Chain controls that affect both compressors as follows:
- Ratio: 1:1 to 1.6:1
- Attack: 0.10 to 10 ms
- Knee: 0.10 to 20 dB
- Mix: 0 to 100%
- Release: full range (set to 200 ms default)
Program the remaining controls as follows:
- Input: Compressor 1, full range
- Threshold: Compressor 1 (-20 to 0), Compressor 2 (-6 to 0)
- Gain: Compressor 2, 0 to 6 dB
As to choosing the optimum settings, this one is easy to get wrong. It’s designed for subtle effects, so keep the Input at 0.00 dB unless the incoming signal is very low or high. With an input signal that’s close to maximum, a threshold of -3.0 (as indicated by the Threshold control, because the threshold will differ for the two compressors) and a low ratio (like 1.3:1) are good starting points, with Mix set to 100%.
Adjust Attack (minimum attack clamps down harder on the signal), Knee, and Release based on the input signal characteristics and desired result. Use Gain to match peaks between the bypassed and enabled states. Bypassing and enabling is a good way to hear the difference the Glue Compressor contributes to the sound.
The Glue Compressor is not intended to work like a conventional compressor that flattens an input with a highly variable level, although you can always increase or lower the ratio or threshold for the best sound. Set the controls to give a mild, subtle lift that… well, “glues” the tracks together. You won’t hear a huge difference…and you shouldn’t. But you will hear an improvement that gives the mix a welcome “lift.”
Download the FX Chain preset here.
Friday Studio One Tips: The Guitar Sustainer
This signal processing setup is optimized for single-string guitar solos where you want a lot of sustain—but it has a secret ingredient that puts it ahead of typical guitar stompbox sustainers.

The compression aspect is pretty straightforward. A sustainer is all about a high compression ratio and low threshold, which are set to 20:1 and -35 dB, respectively. The sharp knee keeps the sustain going as long as possible, and a short attack time clamps down the attack. The release time isn’t too critical, although this depends on your playing style; a relatively long one (300-500 ms) usually works best.
This is one of those rare instances where you don’t want to enable the compressor’s Auto or Adaptive feature, because the goal here isn’t the most natural sound—it’s an effect. However, enable Lookahead because it helps to tame the attack.
Because of the extreme amount of compression, you’ll need about 30 dB of makeup gain to compensate for the gain reduction due to compression.
And now, the secret ingredient! With most sustainers, after the release time ends, if there’s a pause between notes you’ll hear a loud “pop” when you play a new note because of the compression kicking back in. A fast attack and lookahead helps, but it’s almost impossible to avoid some kind of nasty transient. If you follow the compressor with an amp sim, the distortion will hide the pop somewhat but it can still lead to an ugly attack.
Enter the noise gate. This doesn’t just remove hum, noise, and other low-level signals from being sustained, but the 55 ms attack time (coupled with the enabled lookahead button) means that when you hit a note after a pause, the note attack ramps up more slowly, so the compressor can “grab” the note without creating a pop (or if it does, the pop will be greatly reduced). If there’s an amp sim involved, you’ll hear a cleaner attack, and better overall sound. Note that depending on how fast you play and the compressor’s release time, you may need to shorten the Noise Gate’s Release and Hold times. In any event, when you want serious ssssssuuuuussssstttttaaaaaiiiiinnnnn for your single-note guitar solos, this is the ticket.
Friday Tips: Studio One’s Transient Shaper for Kick and Snare
As with so many aspects of audio, the subject of compression presets polarizes people. The purists say there’s no point in having presets, because every signal is different, and the same compressor settings will sound very different on different sources. On the other hand, software comes with presets, and there are plenty of recording blogs on the web that dispense advice about typical preset settings. So who’s right?
And as with so many aspects of audio, they all are. If a preset works “out of the box,” that’s just plain luck. However, there are certain ranges of settings that work well in many cases for particular types of signals. In any case, the effects of compression are totally dependent on the input signal level anyway—if the threshold is set to -10, then signals that peak at 0 will sound very different compared to signals that peak at -10.
The most effective way to approach compression is to decide what effect you want the compression to accomplish, then adjust the compression settings accordingly. It’s also important to remember that compression isn’t just some monolithic effect that “squashes things.” For example, with kick and snare, compression can act just like a transient/decay shaper due to a drum’s rapid decay.
The usual goal for compressing kick is an even sound, yet one that doesn’t reduce punch. However, you have a great deal of latitude in deciding how to implement that goal.
Figure 1: A starting point for kick (and snare) compression.
The preset in Fig. 1 uses a fairly high ratio, and hard knee, to even out the highest levels. You want the compression to take hold relatively rapidly, but not take away from the punch. The best option is to start with the attack time at 0, and increase it until you hear the initial hit clearly (but don’t go past that point). Because a kick decays fast, release can be fast as well.
For transient shaping, slowing the attack time softens the attack. Raising the ratio increases the sustain somewhat, while making space for the attack (assuming an appropriate attack time). Between the attack and ratio controls, you can pretty much tailor the kick drum’s attack and sustain characteristics, as well as even out the overall sound. A higher threshold is another way to emphasize the attack, by letting the decay occur naturally. Lowering the threshold reduces the level difference between the attack and decay.
Snare responds similarly to kick, however with an acoustic drum kit, the kick is more isolated physically than the snare. As a result, compressing the snare has the potential to emphasize leakage. Fortunately, the snare is often the focus of a drum part. As a result, you can simply compress the snare, and accept that leakage is part of the deal. With individual, multitracked drums (including electronic drums) where leakage is not a problem, it’s still usually the snare and kick that get compression.
With snare, you may want to use a lower ratio (2:1 – 3:1) for a fuller snare sound. Or, increase the ratio to emphasize the attack more. Again, use the attack time to dial in the desired attack characteristics.
With both kick and snare, you’ll usually want a hard knee. However, the knee control is a fantastic way to fine-tune the attack—and once you have that dialed in, you’ll be good to go.
Friday Tips: Rhythmic Reverb Splashes
Summer may be over in the northern hemisphere, but we can still splash around. This is one of those “hiding in plain sight” kind of tips, but it’s pretty cool.
The premise: Sometimes you don’t want reverb all the time, so you kick up the send control to push something like a snare hit into the reverb for a quick reverb “splash” (anyone who’s listened to my music knows this is one of my favorite techniques). The reverb adds a dramatic emphasis to the rhythm, but is short enough that it doesn’t wear out its welcome—listen to the audio example, which demos this technique with Studio One’s Crowish Acoustic Chorus 1 drum loop.
However, although this technique is great with drums, it also works well with rhythm guitar, hand percussion, synths, you name it… even kick works well in some songs. I’m not convinced about bass, but aside from that, this has a lot of uses.
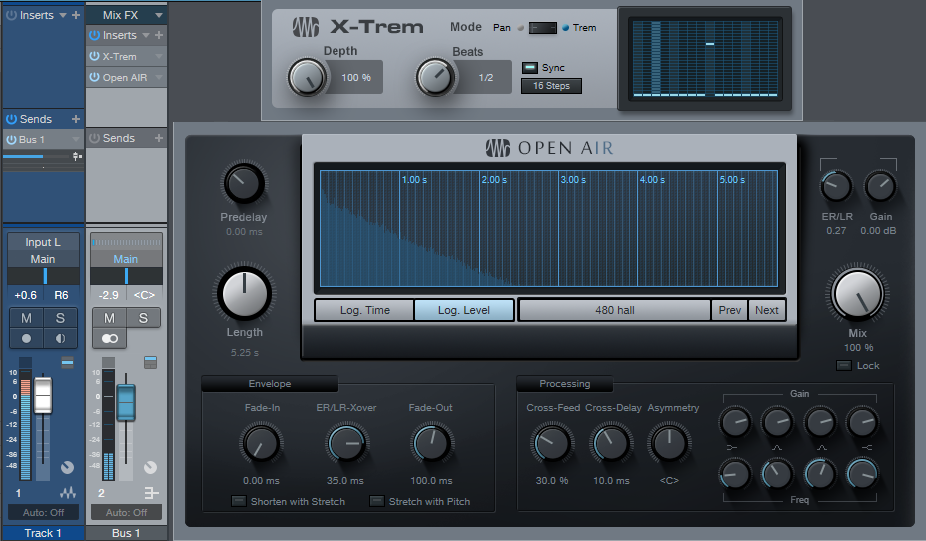
Studio One offers an easy way to produce regular splashes automatically (like on the second and fourth beats of a measure, where an emphasizing element hits). Insert X-Trem before the reverb, select 16 Steps as the “waveform,” click Sync, and choose your rhythm. The screenshot shows Beats set to 1/2 so that the reverb splash happens on 2 and 4, which in the case of the audio example, adds reverb to the snare on 2, and to the closed high-hat on 4.
And that’s pretty much it. Because the reverb is in a bus, set Mix to 100%. The 480 Hall from Halls > Medium Halls is one of my faves for this application, but hey… use whatever ’verb puts a smile on your face.
Friday Tips: Multiband Dynamics for Bass? Yes!
I’m not one of those people who wants to do heavy compression all the time, but I do feel bass is an exception. Mics, speakers, and rooms tend to have response anomalies in the bass range; even if you’re using bass recorded direct, compression can help even out the response for a smoother, rounder sound.
Although stereo compressors are the usual go-to for bass, I often prefer a multiband dynamics processor because it can serve simultaneously as a compressor and EQ. Typically, I’ll apply a lot of compression to the lowest band (crossover below 200 Hz or so), light compression to the low-mid bands (as well as reduce their levels in the overall mix), and medium compression to the high-mid band (from about 1.2 kHz to 6 kHz). I often turn down the level for the band above 5-6 kHz or so (there’s not a lot happening up there with bass anyway), but sometimes I’ll set a ratio below 1.0 so that the highest band turns into an expander. If there’s any hiss in the very highest band, this will help reduce it. Another advantage of using Multiband Dynamics is that you can tweak the high and low band gain parameters so that the bass fits well with the rest of the tracks.
The preset in the following screenshot gives a sound like “Tuned Thunder,” thanks to heavy compression in the lowest band. To choose a loop that’s good for demoing this sound, choose Rock > Bass > Clean, and then select 08 02 P Ransack D riff.audioloop. Insert the Multiband Dynamics processor, and start with the default preset.
As with most dynamic processing presets, the effect is highly dependent on the input level. For this preset, normalize the bass loop. Then change the L band to 125 Hz, with a ratio of 15:1, and a Low Threshold of -30 dB. Mute the LM band.
With the Multiband Dynamics processor bypassed, observe the peak value for the bass track. Now enable Multiband Dynamics, and adjust the Low band’s Gain until the peak value matches the peak value with the Multiband Dynamics bypassed-—you’ll hear a big, fat, round sound that sort of tunnels through a mix.
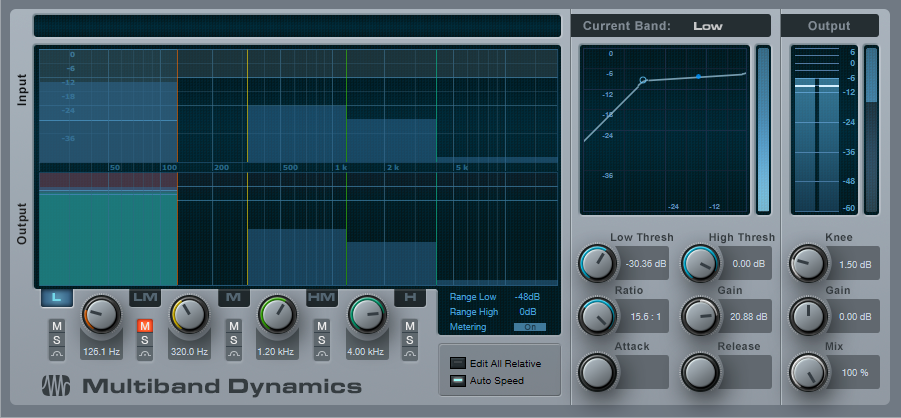
Now let’s go to the other extreme. A significant treble boost can help a bass hold its own against other tracks, because the ear/brain combination will fill in the lower frequencies. The next screen shot shows settings for extreme articulation so the bass really “pops,” and cuts through a track. Again, start with the default preset but set the Low band frequency to 110 Hz or so.
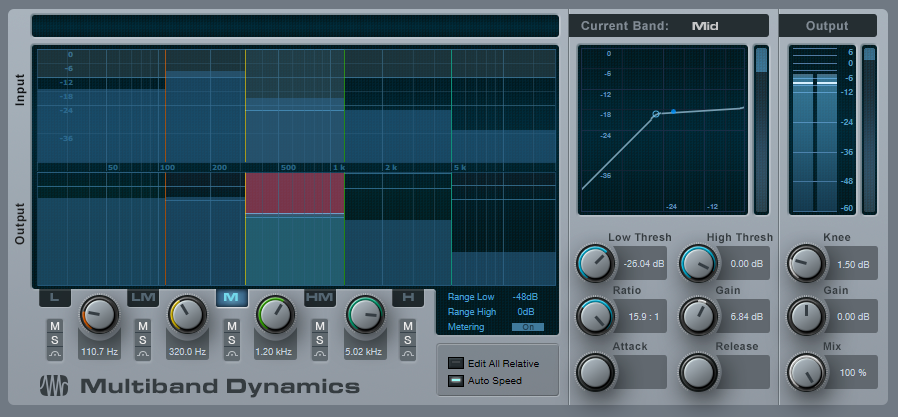
The only band that’s compressed is the Mid band (320 – 1.2 kHz, with parameter settings shown in the screen shot). A bit of gain for the High Mid band emphasizes pick noise and harmonics—5 dB or so seems about right—and to compensate for the extra highs, add some gain to the low band below 110 Hz. Again, about 4-5 dB seems to work well.
When adjusting the Multiband Dynamics processor, note that you can zero in on the exact effect you want for each band by using the Solo and Mute buttons on individual stages. So next time you want to both compress and equalize bass, consider using Multiband Dynamics instead—and get the best of both worlds.
Friday Tips: Pumping Drums—With No Sidechain!
The “pumping” effect is a cool EDM staple that also works with other intense forms of music. One of the best-known examples is Eric Prydz’s seminal EDM track from 2004, “Call on Me.” Usually, this technique requires sidechaining, but with the PreSonus Compressor sidechain filter, we’re covered. The effect works best if there are some sustaining sounds with which it can work—like cymbals for drum parts, or pads if you want to pump a non-drum track. Listen to the audio example to hear how the pumping effect alters a drum track.
To start, let’s try pumping some drums. Insert the Compressor in the track, and click on the Compressor’s Filter and Listen Filter buttons. To have the kick create the signal that provides the pumping, set the Lowcut frequency to off, and lower the Highcut filter until you hear pretty much nothing but kick. Once you’ve isolated the kick (or snare, or whatever you want to isolate), turn off Listen Filter but leave Filter on.
The control settings are quite crucial; the screenshot shows some potential initial settings, but you’ll need to edit the controls based on the source audio and the desired effect.
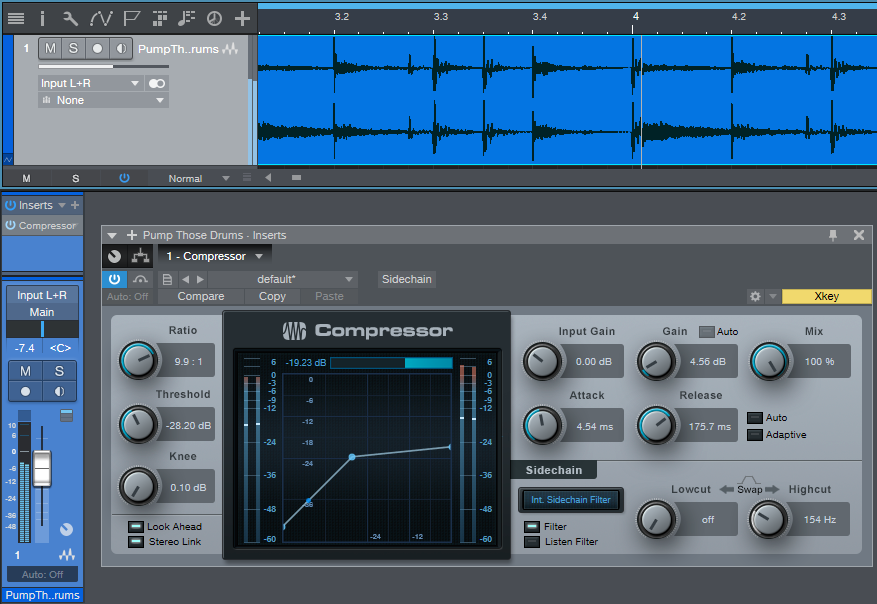
The effect’s depth, like any compression effect, depends on the Threshold and Ratio settings. For a pretty heavy-duty effect, set Threshold between -20 and -30 dB and Ratio around 10. You’ll want to tweak this depending on the program material, but it’s a good place to start.
Now for the pumping. Start with Attack at minimum, and set Release for the desired amount of pumping—you’ll probably want a time between 100 and 300 ms, depending on the song and the material. To restore some of the attack at the start of the pumping, increase the Attack time. Even a little bit, like 5 ms, restores most of the attack’s effect.
Finally, note that because this effect does in fact compress, you’ll probably want to add some makeup gain. And once you do, there you have it—the pumping sound.
Friday Tips: What’s a Phase Meter—And Why Should I Care?
I’ve always appreciated Studio One’s analytics—the spectrum analyzer, the dynamic range meter in older versions and the more modern LUFS metering in Studio One 4, the K-Scale meters based on Bob Katz’s research, the strobe tuner, and the ability to stretch the faders in the Mix view when you want to couple high resolution with long fader travel. But I wonder if the Phase Meter and its companion Correlation Meter get the props they deserve, so let’s look at what this combo can do for you.
Phase Meters—Not Just for Mixdowns!
Most people consider a tool like the Phase Meter as being only for checking final mixes. However, one very useful technique is putting it in the master output bus, and soloing one track at a time (remember, you can Alt+click on a track’s Solo button for an “exclusive solo” function). This gives some insights into the phase, level, and stereo spread of individual tracks in a way that’s more revealing than just looking over panpots.
Correlation Meter Basics
In brief, the Correlation meter (the bar graph at the Phase meter’s bottom) indicates a stereo signal’s mono compatibility. This was of crucial importance when mastering for vinyl, because it could indicate if there were out-of-phase audio components in the audio that could possibly cause the stylus to jump out of its groove. These days, it’s largely a stereo world but it’s still important to check for mono compatibility—after all, when listening to speakers, you don’t have perfect stereo separation. You’ll usually monitor correlation in the master bus, but for individual tracks, it can indicate whether (for example) a signal processor is throwing a track’s left and right channels out of phase.
The Correlation meter reading spans the range between -1 (the right and left channels are completely out of phase, with no correlation) and +1 (the right and left channels are identical, and correlate completely). With most mixes, the bar graph will fluctuate between 0 and +1.
Mono Readings
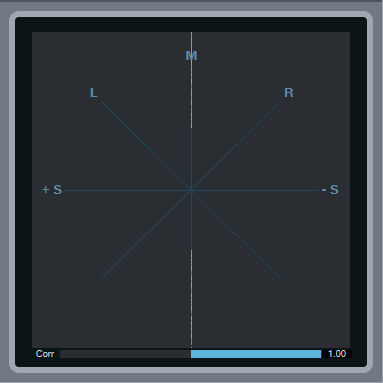
If the Phase meter displays a single vertical line, then the left and right channels are identical, and the track is mono. The Correlation bar graph meter at the bottom confirms this with its reading of 1.00, which means the left and right channels correlate completely—in other words, they aren’t just similar, but identical.
Left and Right Readings
If there’s a single, diagonal line on the L axis, that means that all the signal’s energy is concentrated in the left channel. Similarly if there’s a single, diagonal line on the R axis, then all the signal’s energy is concentrated in the right channel. If you pan a track where the left and right channels are identical (as shown by the Correlation meter displaying 1.00), then the line will move from one channel to the other.
Stereo Signals
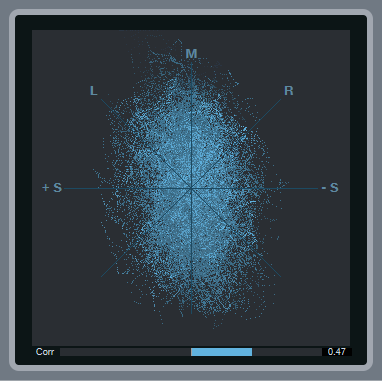
With stereo, you’ll see an excellent visual representation of how much the signal extends into the stereo field. The vertical size indicates the level. As you pan the signal left or right, the stereo field will become narrower around the line that moves from left to right until at one extreme or the other, you’ll see only a diagonal line on the L or R axis.
Note the correlation meter is showing +0.47. This means that there’s about an equal amount of similarity between the left and right channels as there are differences, but nothing is out of phase.
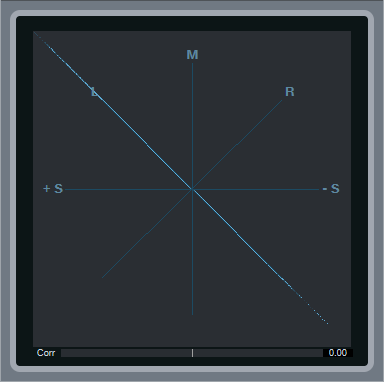
Mid-Side Encoded Audio

With Mid-Side encoded audio, you’ll see amplitude around the L and R axes, as well as along the M axis. Because the L signal is the center and the R signal the sides, you’ll see a lot more level along the L axis. Also, note the Correlation meter setting of 0.00—this means that there’s no similarity between the right and left channels, which is what you’d expect with a Mid-Side encoded signal.
Binaural Pan Signal

Studio One’s Binaural Pan processor widens the stereo image so that there’s much more energy in the right and left sides than in the center; this image shows what happens when you set the widening to maximum. Compare this to the reading for stereo signals—you can see that in this case, the energy extends further out to the right and left. Furthermore, the Correlation meter shows that there are no significant similarities between the right and left channels, which is a result of the Binaural Pan processor being based on Mid-Side processing.
Phase Issues
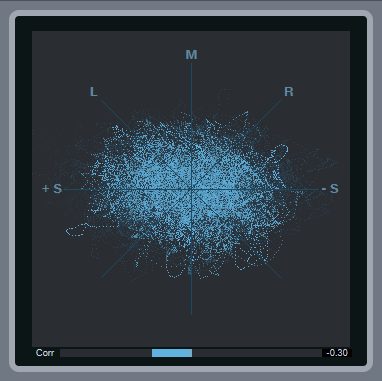
Here, the Correlation meter shows a negative number, which means there are out-of-phase elements within the stereo mix. Occasional negative blips aren’t a problem, but if the Correlation meter spends a substantial amount of time to the left of 0, then there’s a phase issue that will interfere with mono compatibility.