Tag Archives: Craig Anderton
Friday Tips: What’s a Phase Meter—And Why Should I Care?
I’ve always appreciated Studio One’s analytics—the spectrum analyzer, the dynamic range meter in older versions and the more modern LUFS metering in Studio One 4, the K-Scale meters based on Bob Katz’s research, the strobe tuner, and the ability to stretch the faders in the Mix view when you want to couple high resolution with long fader travel. But I wonder if the Phase Meter and its companion Correlation Meter get the props they deserve, so let’s look at what this combo can do for you.
Phase Meters—Not Just for Mixdowns!
Most people consider a tool like the Phase Meter as being only for checking final mixes. However, one very useful technique is putting it in the master output bus, and soloing one track at a time (remember, you can Alt+click on a track’s Solo button for an “exclusive solo” function). This gives some insights into the phase, level, and stereo spread of individual tracks in a way that’s more revealing than just looking over panpots.
Correlation Meter Basics
In brief, the Correlation meter (the bar graph at the Phase meter’s bottom) indicates a stereo signal’s mono compatibility. This was of crucial importance when mastering for vinyl, because it could indicate if there were out-of-phase audio components in the audio that could possibly cause the stylus to jump out of its groove. These days, it’s largely a stereo world but it’s still important to check for mono compatibility—after all, when listening to speakers, you don’t have perfect stereo separation. You’ll usually monitor correlation in the master bus, but for individual tracks, it can indicate whether (for example) a signal processor is throwing a track’s left and right channels out of phase.
The Correlation meter reading spans the range between -1 (the right and left channels are completely out of phase, with no correlation) and +1 (the right and left channels are identical, and correlate completely). With most mixes, the bar graph will fluctuate between 0 and +1.
Mono Readings
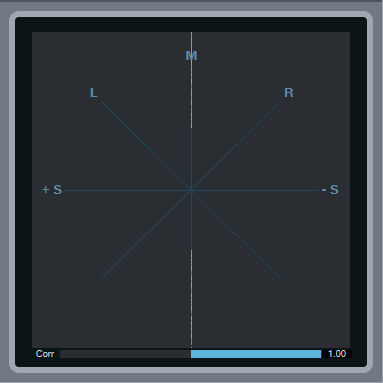
If the Phase meter displays a single vertical line, then the left and right channels are identical, and the track is mono. The Correlation bar graph meter at the bottom confirms this with its reading of 1.00, which means the left and right channels correlate completely—in other words, they aren’t just similar, but identical.
Left and Right Readings
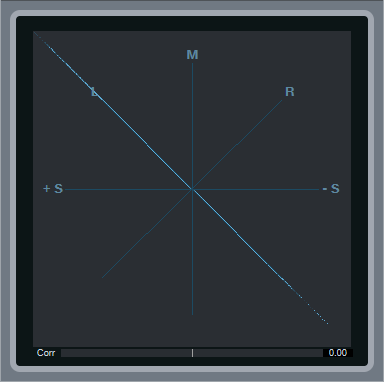
If there’s a single, diagonal line on the L axis, that means that all the signal’s energy is concentrated in the left channel. Similarly if there’s a single, diagonal line on the R axis, then all the signal’s energy is concentrated in the right channel. If you pan a track where the left and right channels are identical (as shown by the Correlation meter displaying 1.00), then the line will move from one channel to the other.
Stereo Signals
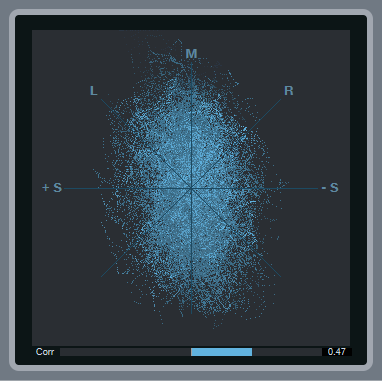
With stereo, you’ll see an excellent visual representation of how much the signal extends into the stereo field. The vertical size indicates the level. As you pan the signal left or right, the stereo field will become narrower around the line that moves from left to right until at one extreme or the other, you’ll see only a diagonal line on the L or R axis.
Note the correlation meter is showing +0.47. This means that there’s about an equal amount of similarity between the left and right channels as there are differences, but nothing is out of phase.
Mid-Side Encoded Audio

With Mid-Side encoded audio, you’ll see amplitude around the L and R axes, as well as along the M axis. Because the L signal is the center and the R signal the sides, you’ll see a lot more level along the L axis. Also, note the Correlation meter setting of 0.00—this means that there’s no similarity between the right and left channels, which is what you’d expect with a Mid-Side encoded signal.
Binaural Pan Signal

Studio One’s Binaural Pan processor widens the stereo image so that there’s much more energy in the right and left sides than in the center; this image shows what happens when you set the widening to maximum. Compare this to the reading for stereo signals—you can see that in this case, the energy extends further out to the right and left. Furthermore, the Correlation meter shows that there are no significant similarities between the right and left channels, which is a result of the Binaural Pan processor being based on Mid-Side processing.
Phase Issues
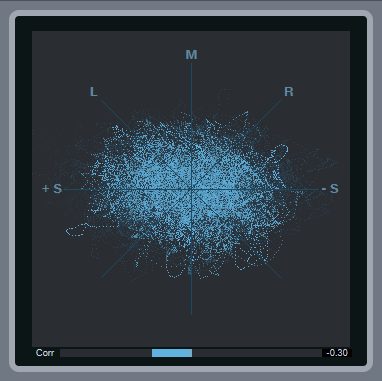
Here, the Correlation meter shows a negative number, which means there are out-of-phase elements within the stereo mix. Occasional negative blips aren’t a problem, but if the Correlation meter spends a substantial amount of time to the left of 0, then there’s a phase issue that will interfere with mono compatibility.
Friday Tips: Create the “Barberpole” Audio Illusion
The Shepard Tone (aka Barberpole) is an audio illusion where a tone always seems to keep rising (or falling). You may have heard it before—to build tension in music by Swedish House Mafia, Beatsystem, Data Life, and Franz Ferdinand, as the sound effect for the endless staircase in Super Mario 64, for the sound of constant acceleration for the Batpod in The Dark Knight and The Dark Knight Rises, at the end of Pink Floyd’s “Echoes” from the Meddle album, or in the soundtrack for the film Dunkirk in sections where the goal was to produce a vibe of increasing intensity. Check out the audio example, and you’ll hear how the tone just goes on forever.
Thanks to Studio One’s Tone Generator, it’s easy to produce a Shepard Tone loop—just follow the step-by-step instructions, in a song with the tempo set to 120 BPM.

- Insert the Tone Generator in the Input L+R insert section so that you can record its tone, and edit the Tone Generator generator’s settings as shown in the screen shot. The goal is the longest possible sine wave sweep from 20 Hz to 22 kHz.
- Start recording, then click the Tone Generator’s On button. After recording the file, trim the beginning and end respectively to just before and just after you can hear a tone, and add a short fade in and fade out.
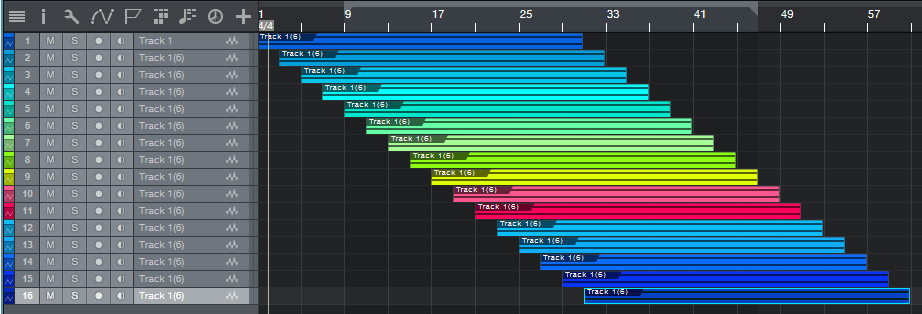
- As shown above, copy the track, and offset each track’s beginning by two measures compared to the track above it. Keep copying and offsetting until the start of the last track is at the same measure as the end of the first track.
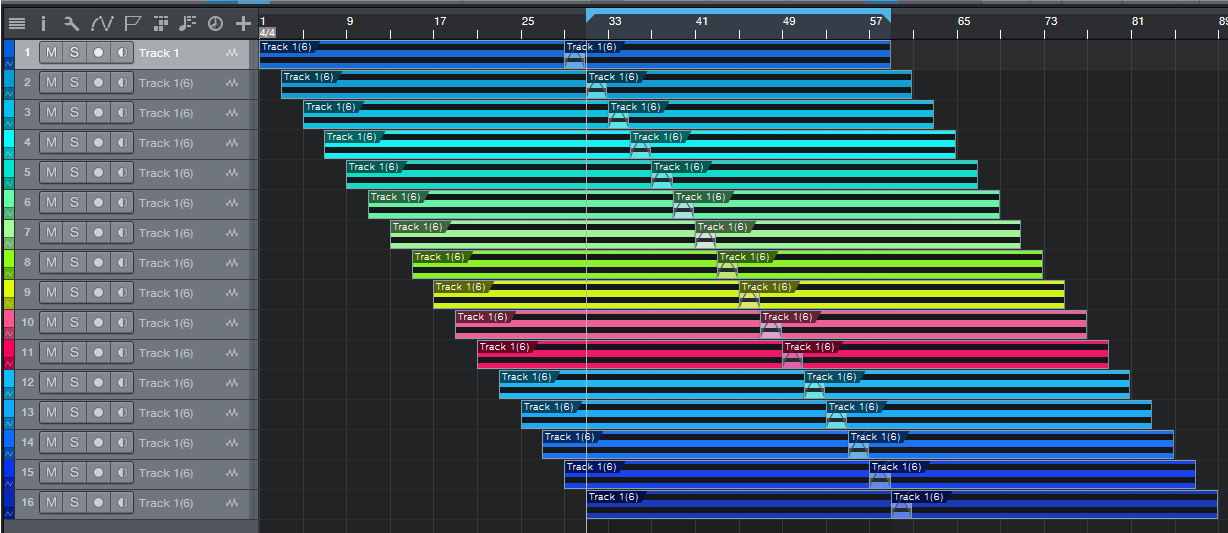
- Now select all, and drag the entire group to the right so that there’s a bit of an overlap between the two groups. Select everything, then type X to turn the overlap into a crossfade with a linear curve. Next, create a loop that extends from the start of the lowest track to the end of the highest track.
- Choose Song > Export Mixdown, set the Export Range to Between Loop, and under Options, check Import to Track and Close After Export. Solo the mixed track, and play it—you’ll hear a continuously rising tone. Now we need to turn it into a loop.

- Follow the instructions in the July 27 Friday Tip of the Week on how to create pads that loop perfectly. The above screen shot shows the basic concept; Track 1 shows the first steps. Copy the clip, move the copy to the right so it overlaps the last four measures of the original clip, and then crossfade the overlap with a linear crossfade.
- Track 2 in the screen shot shows the next step. Bounce the two clips together, then split at the end of measure 4 to remove the first four measures, and at the end of the crossfade to remove everything after the crossfade. Loop the section that remains, and you have your never-ending upward Shepard Tone, as a glitchless loop. Note that when you bring it into a project, don’t stretch it to conform to tempo—there is no tempo. And if you want it to go on forever…just keep typing D!
Bonus Tips:
- I recommend adding a Pro EQ—reduce the high frequencies somewhat with the HC (High Cut) filter, and boost the low frequencies with a bit of a shelf, to increase the illusion’s effectiveness.
- The “classic” Shepard Tone requires that the tones be one octave apart. However, offsetting them by 2 measures at 120 BPM seems close enough.
The Virtual “How Does It Sound in a Car?” Tester
This tip is for those who won’t sign off on a mix until they’ve heard it in a car. There may be a scientific reason why this is beneficial: Noise tends to mask sounds, so if one instrument you want to hear gets lost in the noise and another jumps out, try a mix that raises and lowers those levels, respectively.
The ear doesn’t discriminate level differences as accurately as pitch differences, so without noise masking a sound, the level may seem okay. But as soon as you mix in noise, an important sound may disappear. If you increase the level just a bit so you can hear it, when you remove the noise there’s a very good chance you’ll like the new level setting better. Think of this as doing something similar to compression, but without applying any actual dynamics. You’re just making sure that the levels needing parity, have parity.
Of course this doesn’t mean you want everything jumping out of the noise—those tambourine and shaker parts are probably just fine as they are. The main sounds to listen to here are vocals, leads, drums, and bass, as well as their relationship to each other.
This also doesn’t mean you should mix consistently with noise, as it will bias your hearing (and besides, it’s truly annoying). I add noise in with a mix as a last diagnostic step. If the mix has sounded fine up until then and passes this final test, I consider it ready to master. And I don’t need to go driving anywhere, either.
Setup
Just follow the steps, and you’ll be good to go.
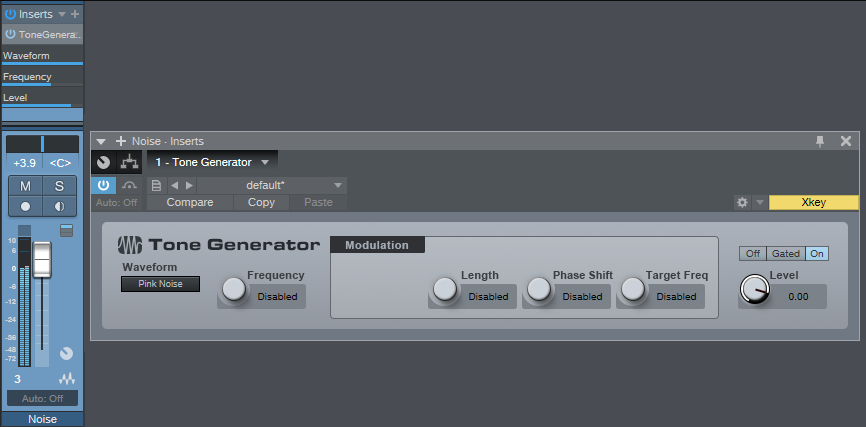
- Create a stereo audio track, and insert the Tone Generator effect. Turn the track’s fader all the way down.
- Choose Pink Noise as the waveform.
- Click On to start generating noise.
- Turn up the track’s fader to add noise to the mix.
One very cool aspect of the Tone Generator’s noise is that it’s true stereo where the left and right channels don’t correlate, so you don’t get any center channel buildup (as would happen with a mono noise signal).
As to how much noise to add, it’s kind of like maximizing. Set it 6 dB below the mix’s peaks, and you’ll hear what occupies the upper 6 dB of dynamic range. Set it 12 dB below the mix’s peaks, and you’ll hear what’s in the upper 12 dB of dynamic range. This isn’t an exact spec per se, but it provides a rough standard of comparison.
As crazy as this idea sounds, try it sometime and tweak your mix. Then turn off the noise, take a short break so your ears get acclimated back to normal hearing, and then check the mix again. I won’t be surprised if you hear an improvement!
Songwriting with Impact XT
This tip is for those of you who didn’t see my Studio One workshop at Sweetwater GearFest 2018, were turned away because of that pesky fire marshal’s rules about crowds, or who didn’t realize Studio One 4 has some pretty advanced looping capabilities—as well as the ability to trigger pitch transpositions for loops.
With Impact XT, you can load loops on pads, and then trigger them (on and off) in real time via MIDI notes. Assign each output from an Impact XT pad to a track input (in the screen shot, Track 5 is recording the output of Impact XT M4), set all the tracks to record, and you can record the results of your improvisations.
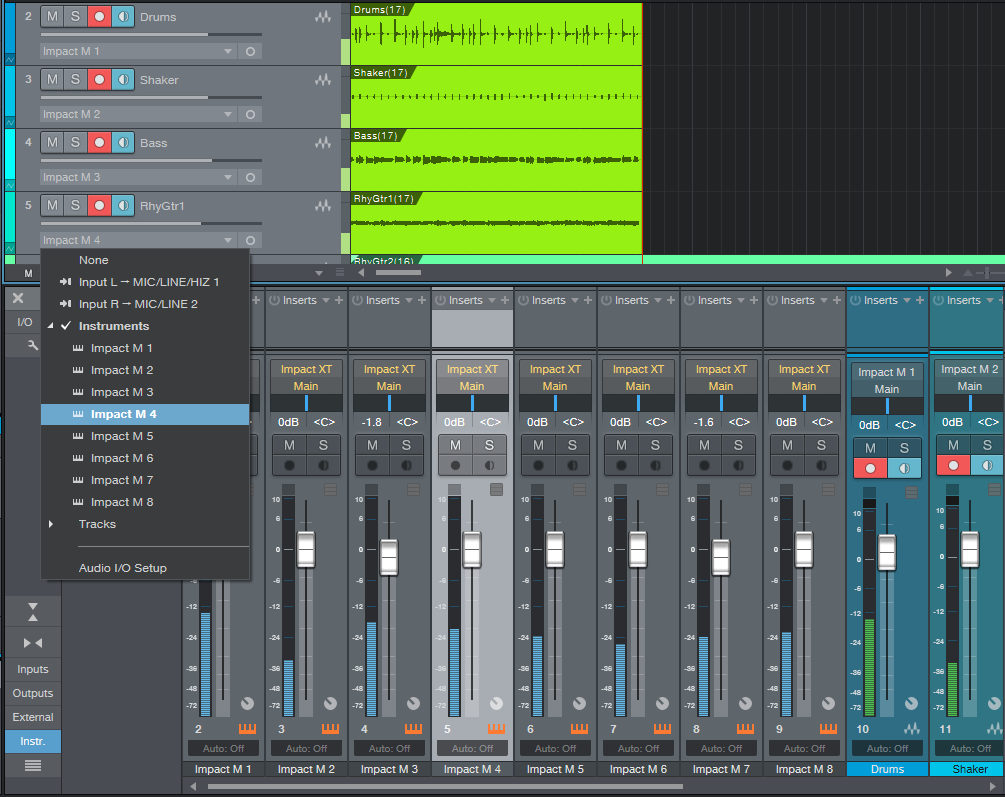
The following screen shot shows the results of recording the first part of a potential song. Note how some tracks have sounds that extend the length of the recording, while other tracks had their sounds brought in at specific times by triggering an Impact XT pad.
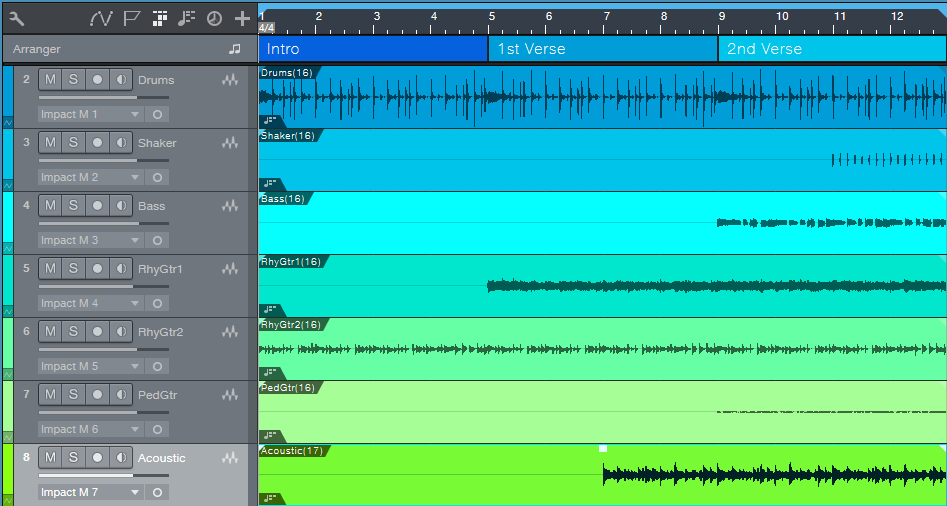
This by itself is pretty cool, because you can weave loops in and out to create an arrangement. The song goes longer than this, but the above shows what you’re hearing in the following audio example. Granted, it’s not much of a song—it just kinda drones on and on. But keep reading…this is just the start.
The process becomes far more interesting when you bring the chord track into play, because you can transpose the loops to create a chord progression that becomes the basis for a song. All the tracks, even the drums, were set to follow the chord track. Listen to how although some of the original loops added a fourth to the tonic, when this was synched to the chord track, all of the loops followed a tonic-to-fourth chord progression. In other words, it wasn’t just one loop adding a fourth, but the entire song transposing to the fourth. We also gained an intro; here’s the chord progression that was used.
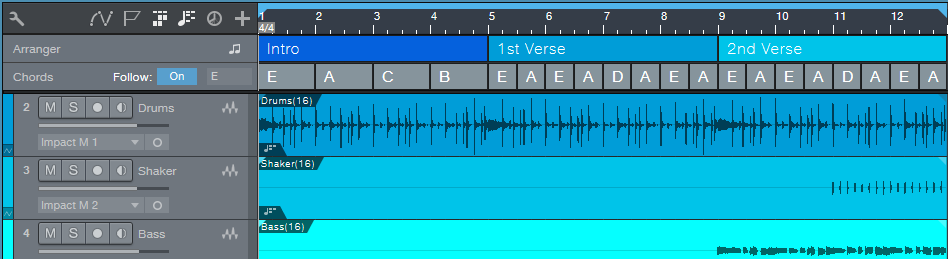
And here’s what the chord progression sounded like after harmonic editing. The major difference is in the intro, and transposing to D to kick off the second half of each verse.
Working this way can be very inspirational because you can create a basic arrangement with loops, and then use the Chord Track to create a chord progression. Although PreSonus is careful to point out that Harmonic Editing is more for “prototyping” songs and they expect that you’ll want to replace the “scratch” parts, I’ve found that many times the scratch parts end up being keepers—and I gotta say, I love what happens when you tell drums to follow the chord track!
Friday Tip of the Week – Trolling for Slices
So there you are, with your shiny new Impact XT virtual instrument. You want to populate the pads with some fun drum sounds, and although you like the included kits, you’re itching to get creative and come up with some kits of your own. Fortunately, it’s easy to use Audioloops to populate your Impact XT with a custom selection of drum sounds.
Open the Browser, and under Loops, look for files with the .audioloop suffix. The reason why .audioloop files stretch elegantly is because the loop is cut into slices, with each slice representing an individual “block” of sound—kick, snare, clap, kick and cymbal hitting at the same time, snare and high-hat hitting at the same time…whatever.
When you expand an .audioloop, you’ll see each slice listed individually. Some have only one or two slices, but others—for example, the Combo Beat loops under Electronic > Drums > Loop (Fig. 1)—are rich sources of slices.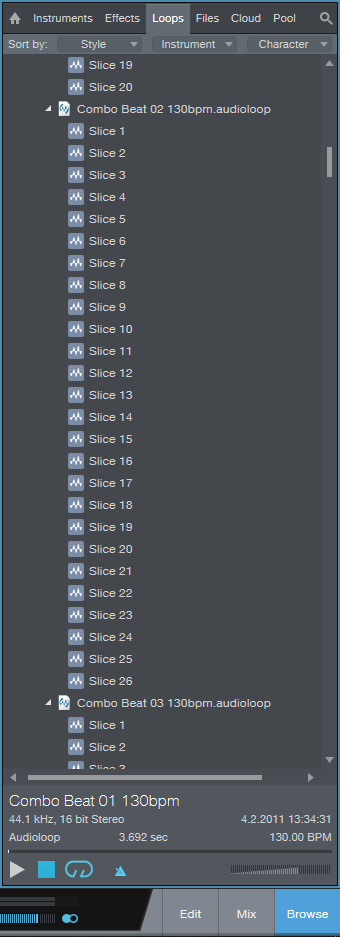
Figure 1: The Browser’s Loop tab is loaded with slices, just waiting to be used with Impact XT to create custom kits.
Next, open up Impact XT. To audition the slices, toward the bottom of the browser turn off the loop and metronome options, select a slice, and then click on the Play > button. Click on various slices and when you hear something you like, drag it over to an Impact XT pad (Fig. 2). You won’t have to click the Play button again to audition slices until after you drag a slice over.

Figure 2: Drag slices over to Impact XT pads.
The real fun begins when you start to use Impact XT’s sound-shaping options. For example in Figure 2, one of the kick slices has been dropped in pitch, truncated, filtered, and given a new Amp decay setting to sound more like an explosion. Note that the pad’s name will be the same as the .audioloop, so if you’re using multiple slices from the same .audioloop, rename the pad to avoid confusion (right-click on the pad and choose Rename).
And remember, you’re not limited to dragging over slices from the Browser—you can split any file in the Edit window at the Bend markers, and drop those slices into Impact XT.
Sure, Impact XT comes with a lot of preset, ready-to-go kits when you just want to load something and start grooving. But you might be surprised how doing a little mixing and matching with the Browser slices can create something new and different—and each new pad sound is only a click + drag away.
Friday Tip: Rotating Speaker Emulator FX Chain
A rotating speaker is an extremely complex signal processor (as most mechanical signal processors are—like plate reverbs). It combines phase shifts, Doppler shifts, positional changes, timbral variations, and more. And of course, Studio One includes the Rotor processor, which does a fine job of capturing the classic rotating speaker sound.
However, I’ve always felt that rotating speakers have a lot more potential as an effect than just emulating physical versions—hence this FX chain. By “deconstructing” the elements that make up the rotating speaker sound, you can customize it not only to tweak the rotating speaker effect to your liking, but to create useful variations that don’t necessarily relate to “the real thing.” What if you want a speed that’s between slow and fast? Or a subtler effect that works well with guitar? Or simulate the way that the horn spins faster when changing speeds because it has less inertia than the woofer? This FX chain provides a useful, more subtle variation on Rotor’s rotating speaker sound—check out the audio example—but the best way to take advantage of this week’s tip is to download the multipreset, roll up your sleeves, and start playing around.
Rotating speaker basics. There are two rotating speakers—one high-frequency driver, and one low-frequency drum. A crossover splits the signal to these two paths, so we’ll start the emulation by setting the Splitter to Frequency Split mode around 800 Hz. Here’s the routing.
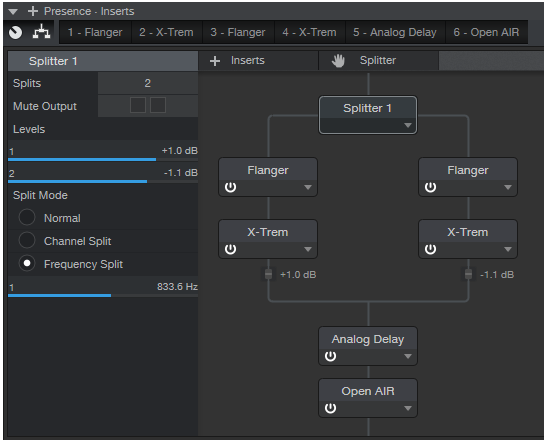
The high-frequency and low-frequency paths each go into a Flanger to provide Doppler and phase shifts, and an X-Trem for subtle panning to provide the positional cues. Let’s look at the individual module settings.
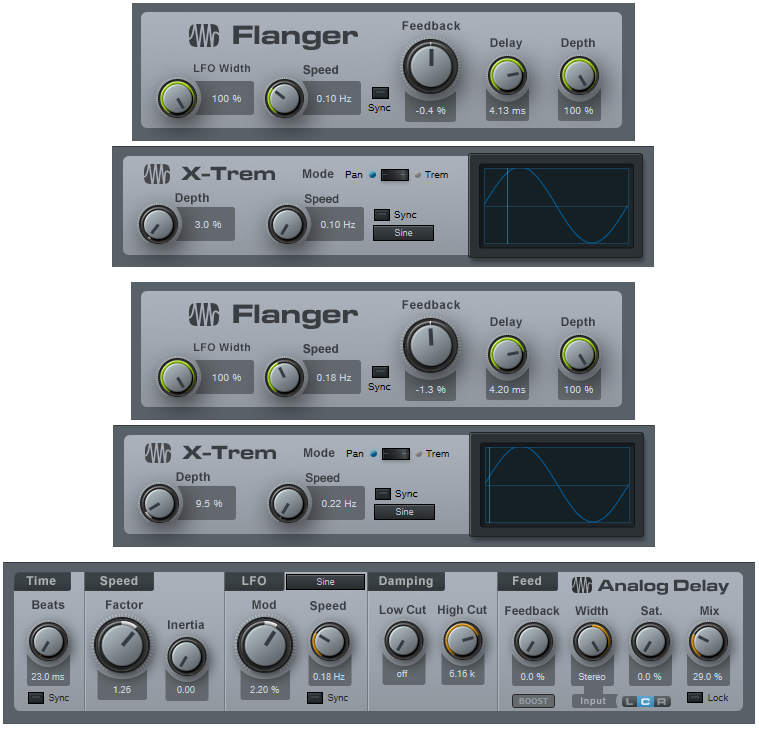
The Analog Delay adds a 23 ms reflection for a bit of a room sound vibe, with some modulation to add a Doppler shift accent. Finally, an Open Air reverb (using the 480 Hall from Medium Halls) creates a space for the rotating speaker.
Knob Control. This was the hardest part of the emulation, because changing speed has to alter (of course) Flanger speed, but also the Flanger’s LFO Width because you want less width at faster LFO speeds. The X-Trem speed and Analog Delay LFO speed also need to follow the range from slow to fast.
However, the curves for the control changes are quite challenging because the controls don’t all cover the same range. Fortunately you can “bend” curves in FX Chains, but you can’t have more than one node. As a result, I optimized the knob settings for the lowest and highest speeds—besides, a real rotating speaker switches to either speed, and “glides” between the two settings as it changes from one to the other. An additional subtlety is that the high-frequency “speaker” needs to rotate just a little faster than the low-frequency one. Also, they shouldn’t track each other exactly when going from the slowest to the fastest speed because with a physical rotating speaker, the low-frequency drum has more inertia.
All these curves do complicate editing any automation, because you need to write-enable each parameter when you turn the knob. So if you need to change some automation moves you made, I recommend not trying to edit each curve—just try another performance with the knob.
Oh, and don’t forget to try this on instruments other than organ!
CLICK HERE TO DOWNLOAD!
Listen here:
Friday Tip: Smoother, Gentler Sidechain Gating
I’ve always been fascinated with using one instrument to modulate another—like using a vocoder on guitar or pads, but with drums as the modulator instead of voice. This kind of processing is a natural for dance music, and using a noise gate’s sidechain to gate one instrument with another (e.g., bass gated by kick drum) is a common technique.
However, the sound of gating has always seemed somewhat abrupt to me, regardless of how I tweaked a gate’s attack, decay, threshold, and range parameters. I wanted something that felt a little more natural, a little less electro, and gave more flexibility. The answer is a bit off the wall, but try it—or at least listen to the audio example.
Setup requires copying the track you want to modulate (the middle track below), and then using the Mixtool to flip the copy’s audio 180 degrees out of phase (i.e., enable Invert Phase). This causes the audio from the original track and its copy to cancel. Then, insert a compressor in the copy, and feed its sidechain with a send from the track doing the modulating. In this case, it’s the drum track at the top.
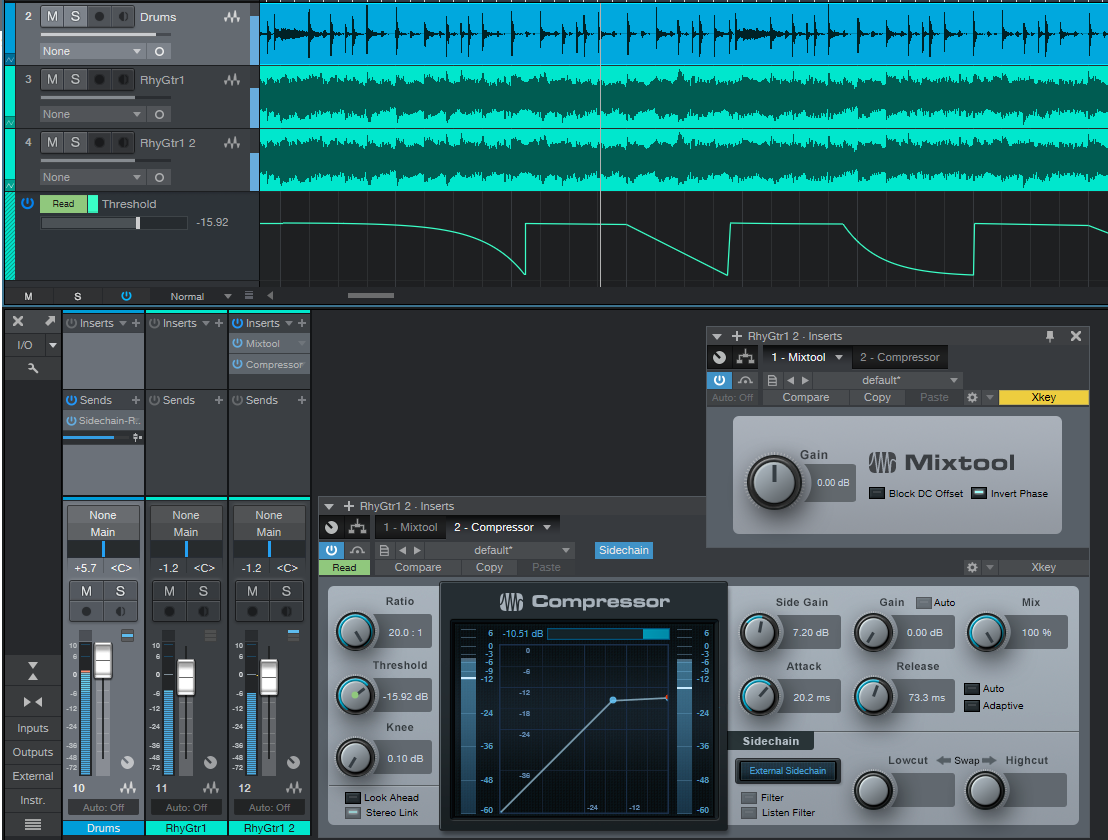
When the compressor kicks in, it reduces the gain of the audio that’s out of phase, thus reducing the amount of cancellation. However, as you’ll hear in the example, the gain changes don’t have the same character as gating.
You can also take this technique further with automation. The screen shot shows automation that’s adjusting the compressor’s threshold; the lower the threshold, the less cancellation. Raising the threshold determines when the “gating” effect occurs. Also, it’s worth experimenting with the Auto and Adaptive modes for Attack and Release, as well as leaving them both turned off and setting their parameters manually.
Using a compressor for “gating” allows for flexibility that eluded me when adjusting a standard noise gate. If you want super-tight rhythmic sync between two instruments, this is an unusual—but useful—alternative to sidechain-based gating.
Friday Tip: Back to the 60s with Preverb
Reverse audio was a common technique back in the days when doing it was a challenge (flipping tape reels over, recording, flipping them back). Now that reverse audio is easy to do, it’s uncommon…go figure. But let’s revive reverse audio with preverb—reverb that swells up to a sound, instead of decaying after it. We’ll first look at a method that requires having some silence before the clip to which you want to add preverb, then cover what to do if the clip starts at the beginning of a song. Note: the screen shot shows each step, but you’ll end up with only the two yellow clips to create preverb—the other clips are for illustration only (i.e., you don’t need to keep copying the clip).

Step 1. Start by copying the clip or track to which you want to add preverb. Use the Paint tool to draw a silent section in front of the copied clip that’s equal to or longer than the anticipated reverb decay tail you’ll add in the next step, then bounce the silent part and the copied clip together. Tip: Consider rolling off some of the low end on the copy so the kick is less prominent. Kicks don’t get along with reverb all that well, and preverb is no exception.
Step 2. Select the bounced clip and type Ctrl+R, or right-click and choose Audio > Reverse Audio. Insert your reverb of choice (the Open Air 480 Hall preset from Halls > Medium Halls is a good place to start) into the copied/reversed track or clip, then set the reverb’s Mix control to 100% for an all-wet mix.
Step 3. After your reverb sound is as desired, right-click on this clip and choose Mixdown Selection. This clip contains only the reverb sound.
Step 4. Reverse this clip, and now you’ll preverb when you play it along with the original clip. You can also try nudging the preverb left or right to play with the timing—for example if the reverb has pre-delay, the kick and reverberated kick might argue with each other.
To add preverb before the entire song starts so that the preverb leads up to the first sound, select all tracks and shift them to the right to open up a few measures at the song’s beginning. Now you can extend the copy of the track or clip you want preverbed to the project start so it includes silence. Continue by copying the original track, reversing, and following the steps detailed previously to add preverb, then shift the tracks back to the their original position.
To hear preverb in a musical context, go to https://store.cdbaby.com/cd/craiganderton and click on the free preview of song 2, “The Gift of Goodbye.” The preverb is on the guitar solo toward the middle of the song and then occurs again at the end, during the fadeout.
Friday Tip: Reverb Chord Progressions? Why Not!
The more I play with Harmonic Editing, the more I find it can do things I never expected. Check this out…
One very useful Studio One feature is being able to record a track output into another track’s input. I take advantage of this sometimes by recording effects like reverb or envelope filter (set to effect sound only) into a track. This allows using Inspector features like transpose and delay, as well as have easier control during the mix.
So imagine my surprise when I set the reverb-only track to follow the Chord Track—and ended up with a tuned reverb chord progression! The following audio example gets the point across. The first four measures have the original reverb sound, the second four measures have the reverb processed by the Chord Track…pretty amazing.
There’s one caution: The only Follow chords mode that works for this is Universal. The Tune Mode doesn’t seem to matter, so I just use Default.
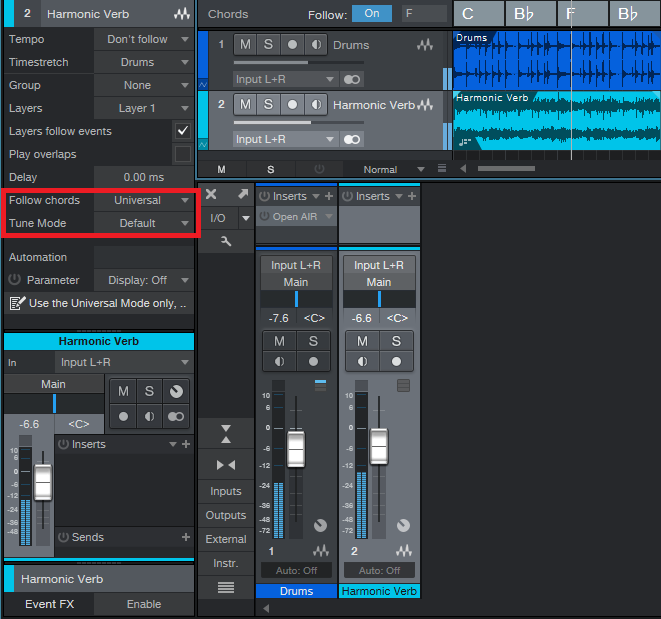
Extra bonus coolness tip! Drums can follow the Chord Track, again in Universal Mode, for a “drumcoded” effect (i.e., similar to drums “vocoding” something like a pad). Although there’s no way to do a wet/dry balance of the melodic and non-melodic components, you can copy the track, have only the copy follow the Chord Track, and adjust the mix between the dry and Chord-Track-following track.
The mind boggles.
Friday Tip: The Secret of Virtual Octave-Divider Bass
Seems simple enough, right? Copy the bass track, edit with Melodyne, and drop all those adorable little orange blobs down an octave. So you do that and… well, it just doesn’t sound all that impressive.
The secret to a great octave-divider bass sound is EQ. Insert a Pro EQ in the track you octave-divided with Melodyne, and edit the settings as shown in the screen shot. The goal is to remove most of the high frequencies that have pick and finger noises—we already have enough in the primary bass track, so adding more artifacts just clutters the sound.
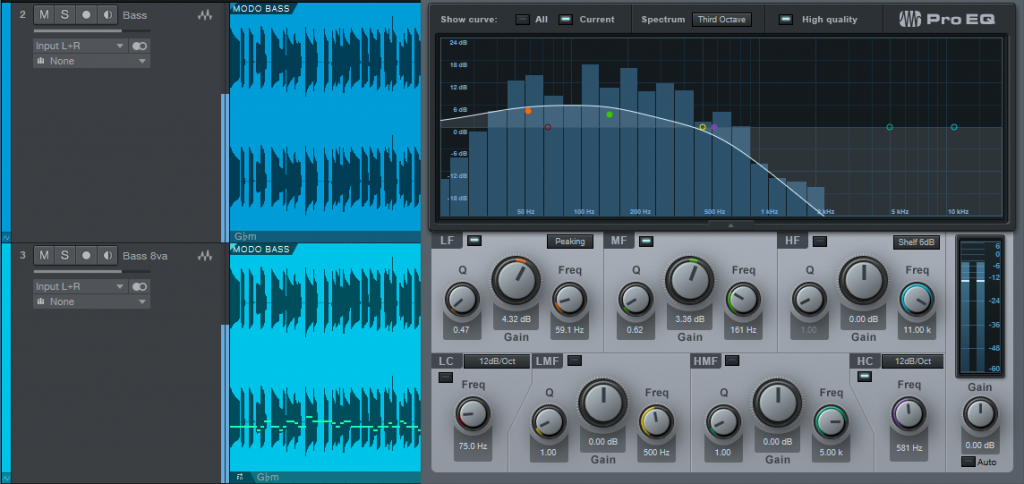
The screen shot shows a High Cut setting of about 600 Hz; you can take it down further, but when the frequency reaches about 200 Hz or so it sounds more like a synth sub-bass (not necessarily a bad thing, especially if you add a little limiting).
And that’s really all there is to it. When you bypass the EQ as a reality test, you’ll hear for yourself why EQ is indeed the secret of virtual octave-divider bass.