Metal Guitar Attack Pro
In June 2021, the blog post Metal Guitar Attack! described how to create a big sound for guitar power chords using Studio One Artist. Since then, I’ve ended up using this technique quite a bit. So, I wanted a version for Studio One Pro with an FX Chain that could fit in a single track, have a Macro Controls panel, and include some quick tone switches. Fig. 1 shows the FX Chain signal flow, which you can download at the end of this post. (Note that you need the High Intensity Pack for this tip.)
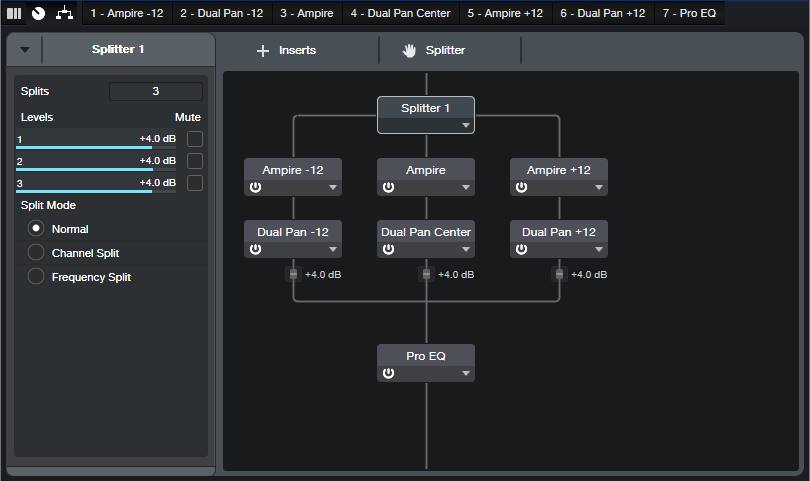
First of all, set the guitar channel’s mode to stereo, even if you recorded the guitar in mono. The Splitter will turn the mono into stereo anyway, which is necessary for the various Dual Pan modules. I also recommend using the neck pickup and rolling down your tone control, but see what works best for you.
The Splitter splits into three Ampires. In this FX Chain, all three use the default MCM 800 amp and 4×12 M65 cab. Feel free to substitute whatever amp/cab you want, but note that the Macro Controls for Dynamics on/off, Comp/Limit, OD on, Reverb On, Reverb Mix, and Preamp Gain all tie in to the main Ampire in Split 2. You’ll need to re-assign the macros if you substitute different stomp boxes. However, if you leave the stomp boxes in place, you can change the cab without altering the macro controls. For the amp itself, you’ll need only to re-connect the macro’s Preamp Gain control to the new amp’s preamp gain.
Split 1 goes to an Ampire with two pre-amp effects. The first is a 10-band EQ to condition the audio going into a Pitch Shifter, which transposes the audio -12 semitones. Split 3 goes to an identical setup, except that the EQ settings are different, and the Pitch Shifter transposes +12 semitones. All three splits then go to Dual Pans, so you can place the splits anywhere in the stereo field. The Pro EQ at the chain’s end connects to four Macro switches for Bass Cut, Bass Boost, Scoop, and Bright.
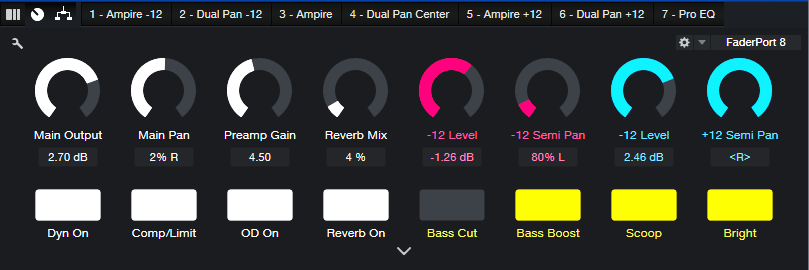
Speaking of the Macro Controls, fig. 2 shows how they’re laid out.
Because this FX Chain uses three Ampires and two Pitch Shifters, it eats up a lot of processing power. You’ll probably want to Transform to Rendered Audio after nailing your settings. (By the way, someone commented in a previous tip that transforming Ampire to save CPU doesn’t work, because it doesn’t return to your settings if you later decide it needs editing. This is not true! As long as you remember to check “Preserve Realtime State,” you can transform and return to real-time audio as many times as you want.)
Panning
The same tips apply here as in the June 2021 blog post. We’ll close out with an audio example that has panning set for the biggest sound—standard pitch full left, +12 center, -12 full right. The first half is chords, the second half is more single-note oriented. Remember, this is only one guitar—no overdubs
download Metal Guitar Attack Pro.multipreset