Deconstructed Guitar—a New Approach to Tone
Maybe you’ve seen food done as a deconstructed dish, where ingredients typically put together are served separately. For example, a deconstructed spring roll would plate all the ingredients inside it separately, with a dipping sauce on the side. You could wrap up the ingredients in whatever way you liked to construct your spring roll.
Wait—what does this have to do with guitar? Well, I had an opportunity to talk with Chris Jenkins, who won an Academy Award for the sound in “Mad Max – Fury Road” and worked on the documentary “The Beatles: Eight Days A Week — The Touring Years.” He mentioned how for the surround mix of ancient Beatles concert footage, instead of upmixing, they deconstructed it by sending pre-equalized sound into special-purpose, acoustical spaces optimized for different instruments. Re-recording the ”acoustified” sounds created the 5.1 mix. This is why footage from the 60s could sound natural and organic in 5.1 surround.
Sound effects sometimes use a related approach. If they don’t sound right laid into a film’s soundtrack, they’re sometimes played back in an acoustic space, re-recorded, and then added to the film. This makes them sound more “real world.”
So…what if you took a dry guitar sound, pre-equalized the sound, split it into stereo, and fed it into two virtual cabinets from Ampire (no amps, no effects) for a deconstructed guitar sound? Listen to the audio example, and judge for yourself. Audio Example 1 is direct-injected, dry Tele.
Audio Example 2 is also DI Tele, but split into two cabs. Note how the deconstructed guitar opens up space in the center, and no longer has that flat “DI sound.” What’s more, every time you change one of the cabs, you end up with a totally different tone. This approach is also ideal for LCR mixes, and the stereo image collapses well to mono.
Let’s look at how to set this up in Artist, and then how to make an FX Chain in Professional (go to the end to download the FX Chain).
Artist Setup
Fig. 1 shows the setup for Artist. The dry guitar track’s Pro EQ3 pre-conditions the sound going into the cabs. This is done to taste; there’s no specific “desirable” curve. Just create a curve that sounds good with the cabs you use.
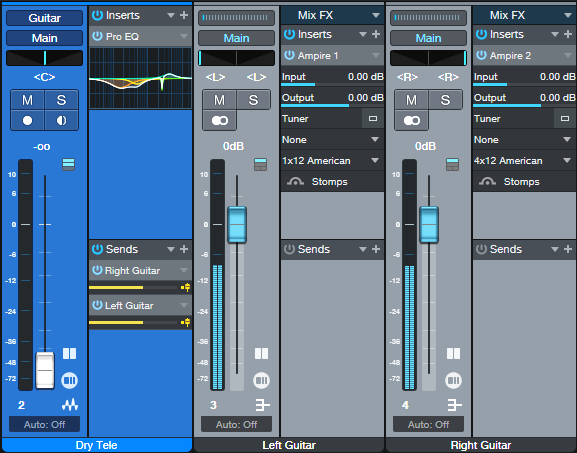
Each of the dry guitar track’s pre-fader sends goes to a bus. Each bus has an Ampire inserted, but with no amp or effects—only a cab. One bus has a 1×12 American cab, while the other has a 4×12 American cab. But there’s nothing magic about those particular cabs, they just gave a sound I liked. In developing this tip, I tried a lot of cab combinations, and there were plenty of great-sounding options. Pre-conditioning with the EQ extended the options even further. For example, if a cab emphasized the bass too much, just trim the EQ’s low frequencies.
The Bus panpots are set to the Dual Pan option. That gives more imaging choices, although in the screen shot, they’re panned oppositely (hard left and hard right). To bring up the center, mix in some of the dry guitar track.
Pro Version FX Chain
With the Pro version, all this can fit into an FX Chain (fig. 2).
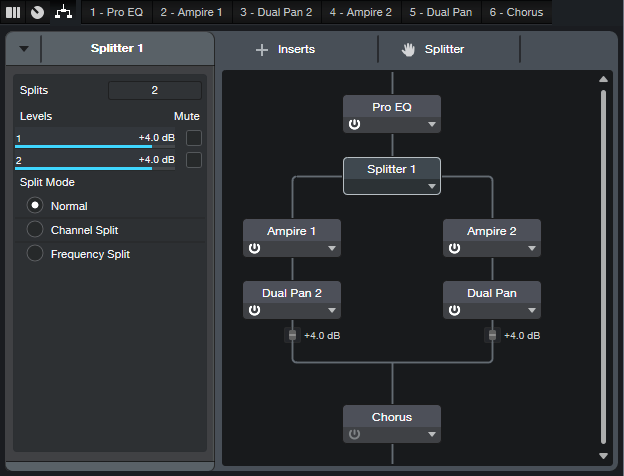
The Splitter uses Normal mode. The comments above about the Pro EQ3 and Ampires apply here. The Dual Pans are set to pan hard left for one cab and hard right for the other one, but you can use these plug-ins to “weight” the sound more to one side or the other. For example, in one Dual Pan, the left panpot could go could full left, and the right panpot to center. The other Dual Pan could pan the left panpot to center, and the right panpot hard right.
The Chorus at the end is just an extra little goodie. The .multipreset has it turned off, but feel free to enable it. So, simply download the .multipreset, insert it in your dry guitar track of choice…and have fun with deconstructing your guitar.