Friday Tip: The Customizable Phaser
Studio One’s Phaser is quite sophisticated, especially because you can set the number of stages from 2 to 20. This can emulate many classic phasers, as well as go beyond what was done with typical analog phase shifters. So why do we need yet another phase shifter?
As explained last week, a phaser’s response is like an EQ with multiple notches, because a pair of phase shift stages produces one notch. So for example, if you set Studio One’s Phaser to 8 stages, it produces four notches. The Customizable Phaser differs from standard phasers because every filter stage can be either a notch or peak, to any degree you want. Mixing resonant peaks in with notches produces a sound that recalls a phase shifter, but has a uniquely resonant quality.
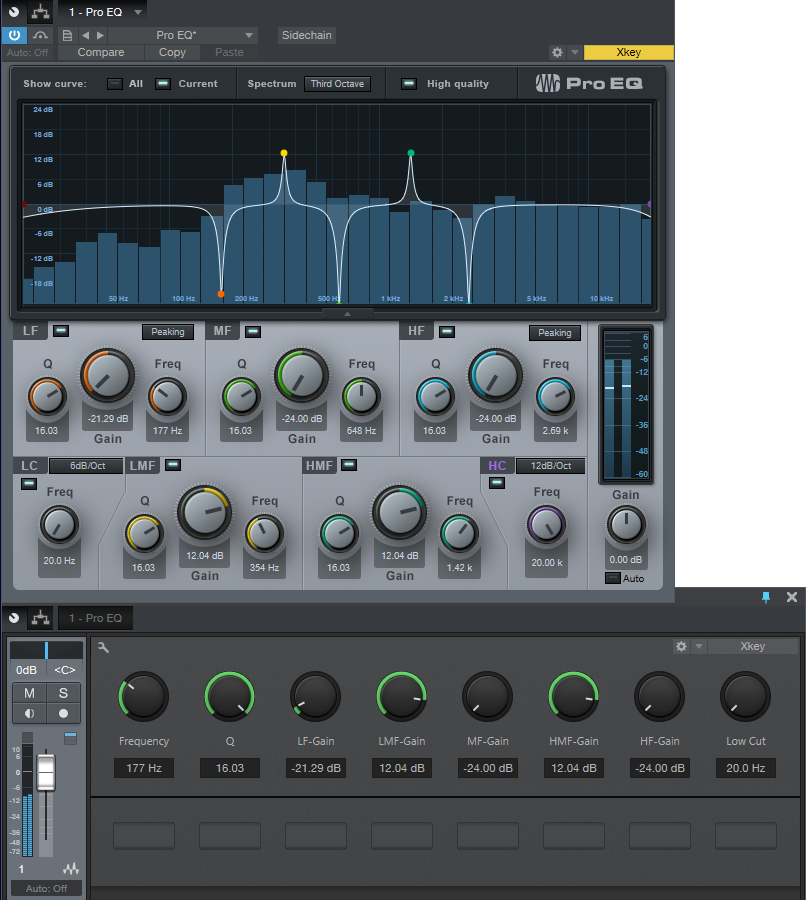
Again like last week, the Pro EQ is the star of the show. The five parametric stages are spaced an octave apart and cover a four-octave range. The trick is having a single Frequency control alter all five stages simultaneously… here’s how.
Creating the FX Chain
Although there’s a downloadable preset, delving into how this effect works is instructive. Mapping a control panel knob to a stage’s gain control is easy; open up the control panel to access the Macro Controls Mapping, and for the five Gain knobs, chose the respective Gain parameter as a target. I limited the knob’s range to -24 dB and +18 dB, because a +24 dB peak can be too much gain. After adjusting one knob as desired, copy the graph and paste it into the graph for the other knobs. Map Q similarly; a range of 4 to 16 works well.
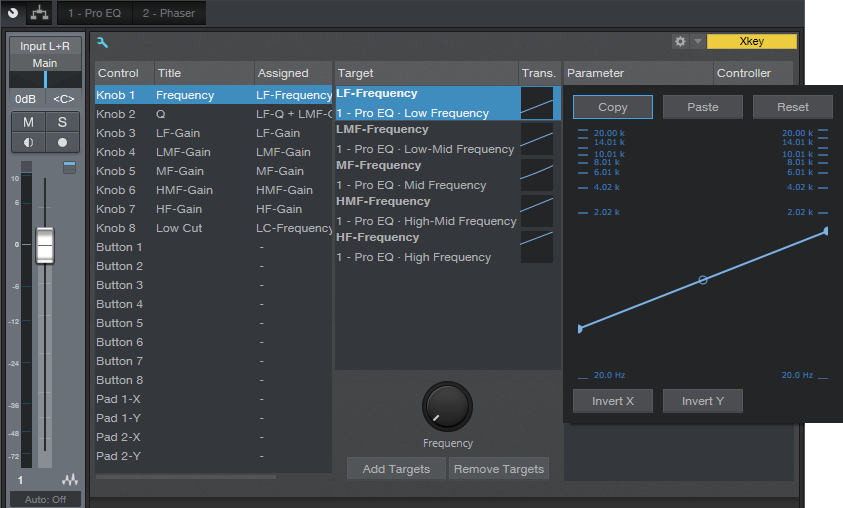
Mapping and offsetting multiple parameters from a single knob is a little more difficult. Start by pinning both the Pro EQ and the Macro Controls Mapping windows. I chose the initial frequencies for the five stages as 75, 150, 300, 600, and 1200 Hz. For the Knob 1 macro, add each stage’s Frequency control as a target.
Suppose you want to map the LF-Frequency target. Set the Frequency knob full counter-clockwise, click on the target’s graph, and while looking at the LF Freq knob on the Pro EQ, adjust the graph’s low node so that the LF Freq knob is at 75 Hz (or thereabouts). Now turn the Freq control fully clockwise, and set the graph’s high node four octaves higher (1.2 kHz) according to the LF Freq knob.
Proceed to the next filter Freq knob and use the same general procedure. For example for the LMF stage, the initial frequency would be 150 Hz, and the highest frequency would be 2.4 kHz. Continue mapping the remaining stages until all the filters cover the desired range when you move the Frequency control.
You’ll also note the Low Cut control is mapped to a knob that covers the range of 20 Hz to 1 kHz. Use this if the signal becomes too “boomy” with the frequency control set to a lower range.
In use
With all the Gain controls set to minimum and a fairly sharp Q, you have the equivalent of a 10-stage phaser. Now try increasing the LMF and HMF gains to around 8 or 9 dB—you’ll hear an immediate difference in the sound. Vary the Q for even more variations. You’ll find that between the Q and Gain controls, it’s possible to obtain phase-shifter sounds, but more importantly, you’ll be able to dial in combinations of resonant peaks and notches that aren’t quite like anything you’ve heard before. Ready for a new phase in phaser sounds? Check out this FX Chain.