Category Archives: Studio One
Friday Tips: Crazee Snare Enhancements!
You never know where you’ll find inspiration. As I was trying not to listen to the background music in my local supermarket, “She Drives Me Crazy” by Fine Young Cannibals—a song from over 30 years ago!—earwormed its way into my brain. Check it out at https://youtu.be/UtvmTu4zAMg.
My first thought was “they sure don’t make snare drum sounds like those any more.” But hey, we have Studio One! Surely there’s a way to do that—and there is. The basic idea is to extract a trigger from a snare, use it to drive the Mai Tai synth, then layer it to enhance the snare.
Skeptical? Check out the audio example.
ISOLATING THE SNARE
If you’re dealing with a drum loop or submix, you first need to extract the snare sound.
- Create an FX Channel, and insert a Pro EQ followed by a Gate.
- Add a pre-fader send from your mixed drums to the FX Channel. Aside from providing a more consistent level for triggering, a pre-fader send lets you turn down the main drum track. This way you hear only the FX Channel, which makes it easier to tweak the EQ and isolate the snare.
- With the Gate bypassed, tune the Pro EQ to the snare frequency. Use the LC and HC with a 48 dB/octave slope to provide the preliminary isolation, then use a super-sharp bandpass setting to zero in on the snare frequency (Figure 1). The EQ’s background spectrum analyzer can help by making sure the bar in the range you’re boosting goes as high as possible. In stubborn cases, you may need to double up the bandpass filter with a second sharp bandpass filter.
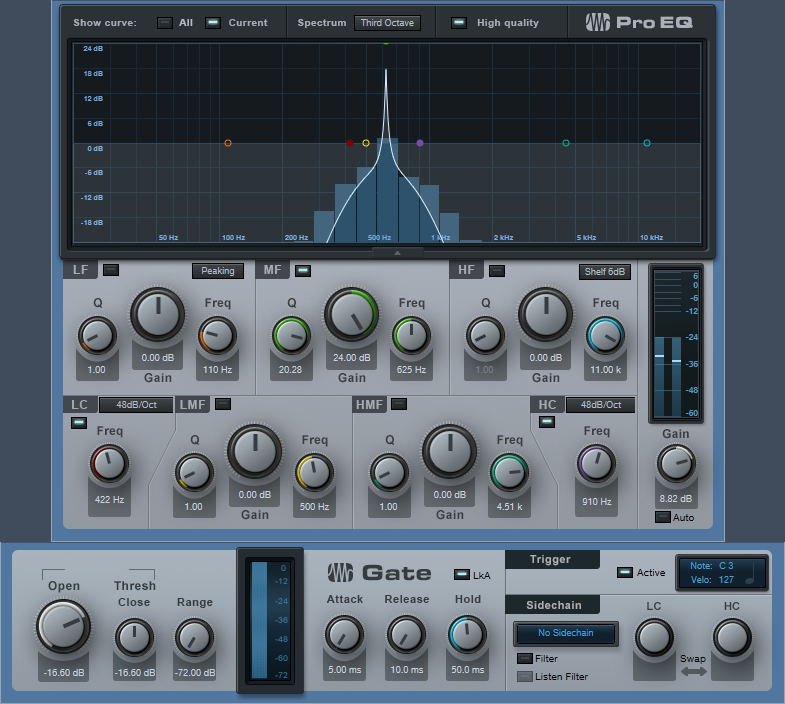
Figure 1: Use the Pro EQ and Gate to extract a snare drum trigger.
- Enable the gate, and click on Active to enable the trigger output. Set the Note and Velocity as desired (however when using noise with Mai Tai, the specific Note isn’t that critical). Adjust the Gate’s settings so that it triggers on the snare hits. Like the Pro EQ, the controls here are critical as well.
- A short attack is usually best.
- Keep release relatively short (e.g., 10 ms), unless you want to mix in some of the peaked/gated sound from this channel along with the Mai Tai and drums.
- Hold times around 50 ms can help prevent false triggering. But you can also get creative with this control. If you don’t want to trigger on hits that are close together (e.g., fills), a long Hold time will trigger on the first snare of the series, but ignore subsequent ones that fall within the hold time.
- Insert the Mai Tai. Set its input to Gate, and enable the mixer’s Monitor button. Figure 2 shows the finished track layout.

Figure 2: Track layout for snare drum extraction.
TWEAKING THE MAI TAI
Now the fun begins! Figure 3 shows a typical starting point for a snare-enhancing sound.
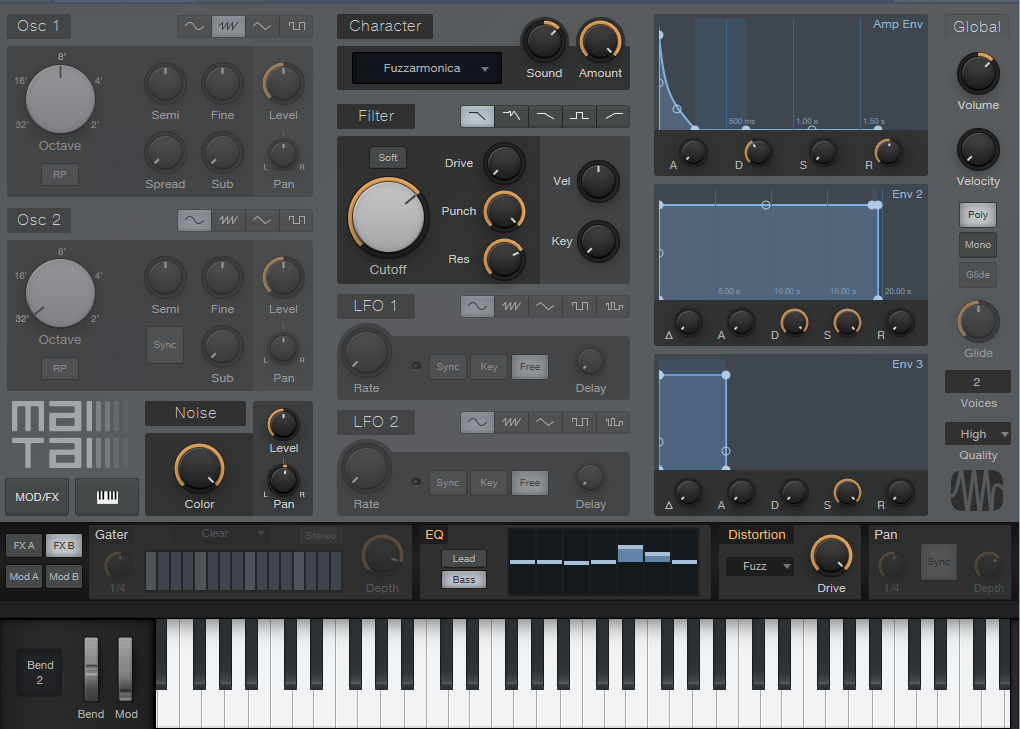
Figure 3: Starting point for a cool snare drum sound with Mai Tai.
The reason for choosing Mai Tai as the sound source is because of its “Character” options that, along with the filter controls, noise Color control, and FX (particularly Reverb, EQ, and Distortion), produce a huge variety of electronic snare sounds. The Character module’s Sound and Amount controls are particularly helpful. The more you play with the controls, the more you’ll start to understand just how many sounds are possible.
BUT WAIT…THERE’S MORE!
If the snare is on a separate track, then you don’t need the Pro EQ or FX Channel. Just insert a Gate in the snare track, enable the Gate’s trigger output, and adjust the Gate Threshold controls to trigger on each snare drum hit. The comments above regarding the Attack, Release, and Hold controls apply here as well.
Nor are you limited to snare. You can isolate the kick drum, and trigger a massive, low-frequency sine wave from the Mai Tai to give those car door-vibrating kick drums. Toms can sometimes be easy to isolate, depending on how they’re tuned. And don’t be afraid to venture outside of the “drum enhancement” comfort zone—sometimes the wrong Gate threshold settings, driving the wrong sound, can produce an effect that’s deliciously “right.”
Friday Tips: The Limiter—Demystified
Conventional wisdom says that compared to compression, limiting is a less sophisticated type of dynamics control whose main use is to restrict dynamic range to prevent issues like overloading of subsequent stages. However, I sometimes prefer limiting with particular signal sources. For example:
- For mixed drum loops, limiting can bring up the room sound without having an overly negative effect on the drum attacks.
- With vocals, I often use a limiter prior to compression. By doing the “heavy lifting” of limiting peaks, the subsequent compressor doesn’t have to work so hard, and can do what it does best.
- When used with slightly detuned synth patches, limiting preserves the characteristic flanging/chorusing-like sound, while keeping the occasional peaks under control.
- Limiting is useful when following synth sounds with resonant filters, or with instruments going through wah or autofilter effects
THE E-Z LIMITER
Some limiters (especially some vintage types) are easy to use, almost by definition: One control sets the amount of limiting, and another sets the output level. But Studio One’s limiter has four main controls—Input, Ceiling, Threshold, and Release—and the first three interact.
If the Studio One Limiter looked like Fig. 1, it would still take care of most of your needs. In fact, many vintage limiters don’t go much beyond this in terms of functionality.
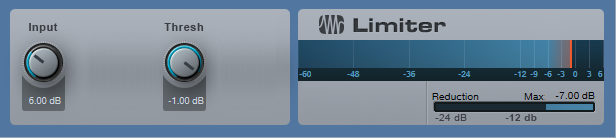
Figure 1: If Studio One’s Limiter had an “Easy Mode” button, the result would look something like this.
To do basic limiting:
- Load the Limiter’s default preset.
- Turn up the input for the desired limiting effect. The Reduction meter shows the amount of gain reduction needed to keep the output at the level set by the Threshold control (in this case, -1.00 dB). For example, if the input signal peaks at 0 dB and you turn up the Input control to 6 dB, the Limiter will apply 7 dB of gain reduction to keep the Limiter output at -1.00.
Note that in this particular limiting application, the Threshold also determines the maximum output level.
THE SOFT CLIP BUTTON
When you set Threshold to a specific value, like 0.00 dB, then no matter how much you turn up the Limiter’s Input control, the output level won’t exceed 0.00 dB. However, you have two options of how to do this.
- With Soft Clip off, gain reduction alone prevents the waveform from exceeding the ceiling.
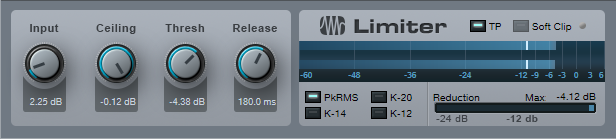
- With Soft Clip on, clipping the peaks supplements the gain reduction process to keep the waveform from exceeding the ceiling (Fig. 2).
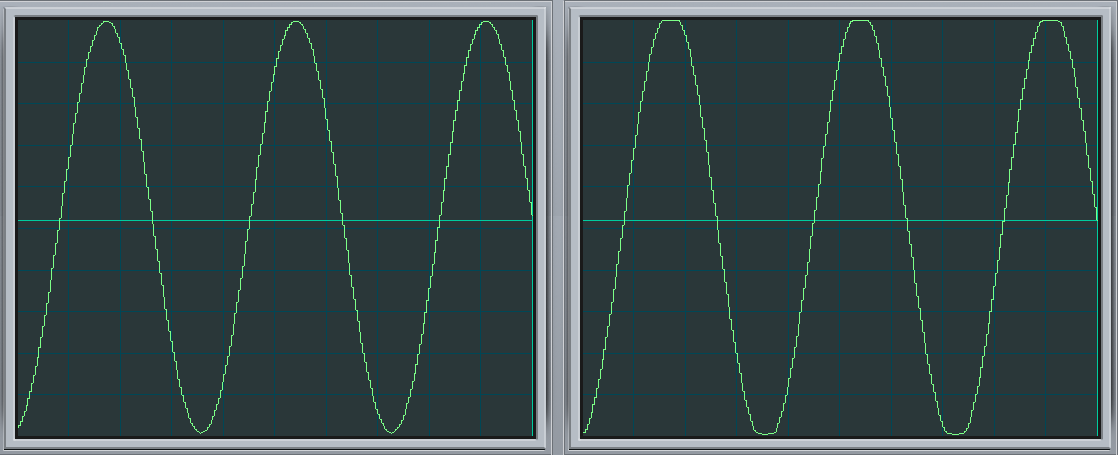
Figure 2: The left screen shot shows the waveform with the input 6 dB above the Threshold, and Soft Clip off. The right screen shows the same waveform and levels, but with Soft Clip turned on. Note how the waveform peak is flattened somewhat due to the mild saturation.
While it may sound crazy to want to introduce distortion, in many cases you’ll find you won’t hear the effects of saturation, and you’ll have a hotter output signal.
ENTER THE CEILING
There are two main ways to set the maximum output level:
- With the Threshold set to 0.00, set the maximum output level with the Ceiling control (from 0 to -12 dB).
- With the Ceiling set to 0.00, set the maximum output level with the Threshold control (from 0 to -12 Db).
It’s also possible to set maximum output levels below -12.00 dB. Turn either the Ceiling or Threshold control all the way counter-clockwise to -12.00 dB, then turn down the other control to lower the maximum output level. With both controls fully counter-clockwise, the maximum output level can be as low as -24 dB.
SMOOTHING THE TRANSITION INTO LIMITING
Setting the Ceiling lower than the Threshold is a special case, which allows smoothing the transition into limiting somewhat. Under this condition, the Limiter applies soft-knee compression as the input transitions from below the threshold level to above it.
For example, suppose the Ceiling is 0.00 dB and the Threshold is -6.00 dB. As you turn up the input, you would expect that the output would be the same as the input until the input reaches around -6 dB, at which point the output would be clamped to that level. However in this case, soft-knee compression starts occurring a few dB below -6.00 dB, and the actual limiting to -6.00 dB doesn’t occur until the input is a few dB above -6.00 dB.
The tradeoff for smoothing this transition somewhat is that the Threshold needs to be set below 0.00. In this example, the maximum output is -6.00 dB. If you want to bring it up to 0.00 dB, then you’ll need to add makeup gain using Mixtool module.
Studio One’s Limiter is a highly versatile signal processor, so don’t automatically ignore it in favor of the Compressor or Multiband Dynamics—with some audio material, it could be exactly what you need.
Friday Tips: Frequency-Selective Guitar Compression
Some instruments, when compressed, lack “sparkle” if the stronger, lower frequencies compress high frequencies as well as lower ones. This is a common problem with guitar, but there’s a solution: the Compressor’s internal sidechain can apply compression to only the guitar’s lower frequencies, while leaving the higher frequencies uncompressed so they “ring out” above the compressed sound. (Multiband compression works for this too, but sidechaining can be a faster and easier way to accomplish the same results.) Frequency-selective compression can also be effective with drums, dance mixes, and other applications—like the “pumping drums” effect covered in the Friday Tip for October 5, 2018. Here’s how to do frequency-selective compression with guitar.

- Insert the Compressor in the guitar track.
- Enable the internal sidechain’s Filter button. Do not enable the Sidechain button in the effect’s header.
- Enable the Listen Filter button.
- Turn Lowcut fully counterclockwise (minimum), and set the Highcut control to around 250 – 300 Hz. You want to hear only the guitar’s low frequencies.
- You can’t hear the effects of adjusting the main compression controls (like Ratio and Threshold) while the Listen Filter is enabled, so disable Listen Filter, and start adjusting the controls for the desired amount of low-frequency compression.
- For a reality check, use the Mix control to compare the compressed and uncompressed sounds. The high frequencies should be equally prominent regardless of the Mix control setting (unless you’re hitting the high strings really hard), while the lower strings should sound compressed.
The compression controls are fairly critical in this application, so you’ll probably need to tweak them a bit to obtain the desired results.
If you need more flexibility than the internal filter can provide, there’s a simple workaround.
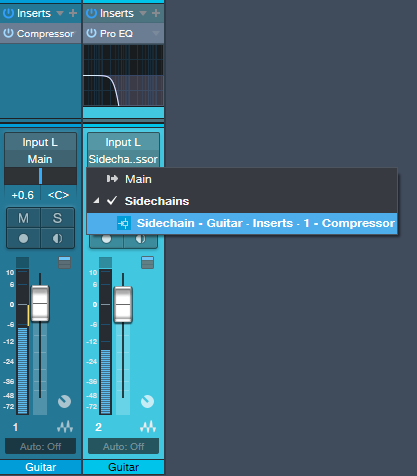
Copy the guitar track. You won’t be listening to this track, but using it solely as a control track to drive the Compressor sidechain. Insert a Pro EQ in the copied track, adjust the EQ’s range to cover the frequencies you want to compress, and assign the copied track’s output to the Compressor sidechain. Because we’re not using the internal sidechain, click the Sidechain button in the Compressor’s header to enable the external sidechain.
The bottom line is that “compressed” and “lively-sounding” don’t have to be mutually exclusive—try frequency-selective compression, and find out for yourself.
Friday Tips: The Sidechained Spectrum
You’re probably aware that several Studio One audio processors offer sidechaining—Compressor, Autofilter, Gate, Expander, and Channel Strip. However, both the Spectrum Meter and the Pro EQ spectrum meter also have sidechain inputs, which can be very handy. Let’s look at Pro EQ sidechaining first.
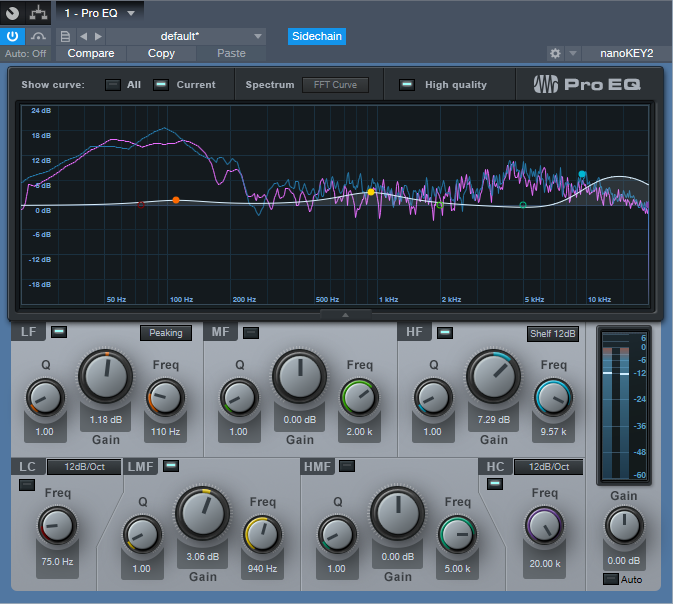
When you enable sidechaining, you can feed another track’s output into the Pro EQ’s spectrum analyzer, while still allowing the Pro EQ to modify the track into which it’s inserted. When sidechained, the Spectrum mode switches to FFT curve (the Third Octave and Waterfall options aren’t available). The blue line indicates the level of the signal going through the Pro EQ, while the violet line represents the sidechain signal.
As a practical example of why this is useful, the screen shot shows two drum loops from different drum loop libraries that are used in the same song. The loop feeding the sidechain loop has the desired tonal qualities, so the loop going through the EQ is being matched as closely as possible to the sidechained loop (as shown by a curve that applies more high end, and a slight midrange bump).
Another example would be when overdubbing a vocal at a later session than the original vocal. The vocalist might be off-axis or further away from the mic, which would cause a slight frequency response change. Again, the Pro EQ’s spectrum meter can help point out any differences by comparing the frequency response of the original vocal to the overdub’s response.
The Spectrum Meter
Sidechaining with the Spectrum Meter provides somewhat different capabilities compared to the Pro EQ’s spectrum analyzer.
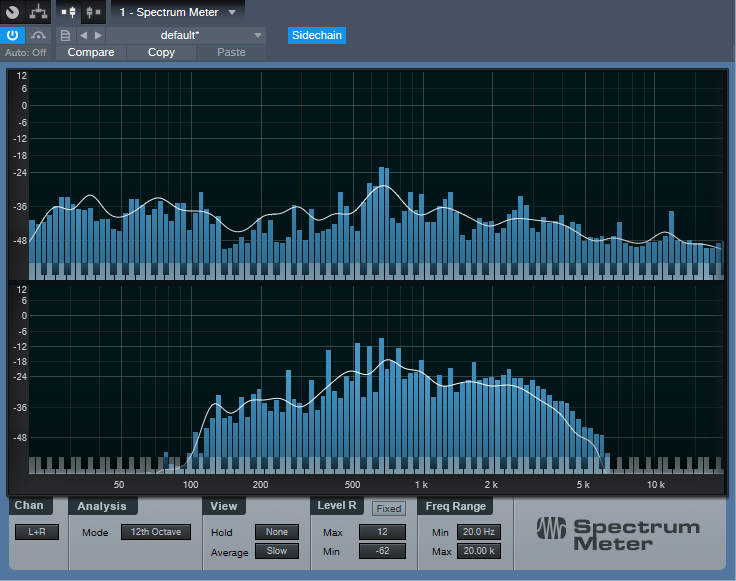
With sidechain enabled, the top view shows the spectrum of the track into which you’ve inserted the Spectrum Meter. The lower view shows the spectrum of the track feeding the sidechain. When sidechained, all the Spectrum Meter analysis modes are available except for Waterfall and Sonogram.
While useful for comparing individual tracks (as with the Pro EQ spectrum meter), another application is to help identify frequency ranges in a mix that sound overly prominent. Insert the Spectrum Meter in the master bus, and you’ll be able to see if a specific frequency range that sounds more prominent actually is more prominent (in the screen shot, the upper spectrum shows a bump around 600 Hz in the master bus). Now you can send individual tracks that may be causing an anomaly into the Spectrum Metre’s sidechain input to determine which one(s) are contributing the most energy in this region. In the lower part of the screen shot, the culprit turned out to be a guitar part with a wah that emphasized a particular frequency. Cutting the guitar EQ just a little bit around 600 Hz helped even out the mix’s overall sound.
Of course, the primary way to do EQ matching is by ear. However, taking advantage of Studio One’s analysis tools can help speed up the process by identifying specific areas that may need work, after which you can then do any needed tweaking based on what you hear. Although “mixing with your eyes” isn’t the best way to mix, supplementing what you hear with what you see can expedite the mixing process, and help you learn to correlate specific frequencies with what you hear—and there’s nothing wrong with that.
Friday Tips: Synth + Sample Layering
One of my favorite techniques for larger-than-life sounds is layering a synthesizer waveform behind a sampled sound. For example, layering a sine wave along with piano or acoustic guitar, then mixing the sine wave subtly in the background, reinforces the fundamental. With either instrument, this can give a powerful low end. Layering a triangle wave with harp imparts more presence to sampled harps, and layering a triangle wave an octave lower with a female choir sounds like you’ve added a bunch of guys singing along.
Another favorite, which we’ll cover in detail with this week’s tip, is layering a sawtooth or pulse wave with strings. I like those syrupy, synthesized string sounds that were so popular back in the 70s, although I don’t like the lack of realism. On the other hand, sampled strings are realistic, but aren’t lush enough for my tastes. Combine the two, though, and you get lush realism. Here’s how.
- Create an instrument track with Presence, and call up the Violin Full preset.
- Drag Mai Tai into the same track. You’ll be asked if you want to Replace, Keep, or Combine. Choose Combine.
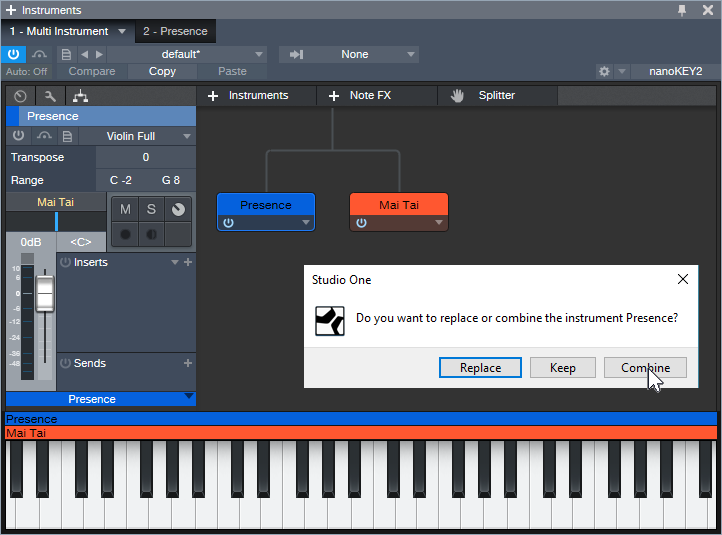
- After choosing Combine, both instruments will be layered within the Instrument Editor (see above).
- Program Mai Tai for a very basic sound, because it’s there solely to provide reinforcement—a slight detuning of the oscillators, no filter modulation, very basic LFO settings to add a little vibrato and prevent too static a waveform, amplitude envelope and velocity that tracks the Presence sound as closely as possible, some reverb to create a more “concert hall” sound, etc. The screen shot shows the parameters used for this example. The only semi-fancy programming tricks were making one of the oscillators a pulse wave instead of a sawtooth, and panning the two oscillators very slightly off-center.

- Adjust the Mai Tai’s volume for the right mix—enough to supplement Presence, but not overwhelm it.
That’s all there is to it. Listen to the audio example—first you’ll hear only the Presence sound, then the two layers for a lusher, more synthetic vibe that also incorporates some of the realism of sampling. Happy orchestrating!
ATB on Studio One

Producer, DJ and songwriter ATB—also known as Andre Tanneberger, is a 25-year veteran of the international music business. His sharp rise began when he founded his first project, Sequential One, in 1993. After a string of hits until 1998, Andre moved on to focus on his own music as ATB. When his debut single “9 PM (Till I Come)” shot to the very top of the UK charts and scored top 10 successes in many other countries around the globe. He followed with an impressive string of hits like “Ecstasy”, “Let U Go,” “What About Us,” “Move On,” “When It Ends It Starts Again,” and “Connected.” Gold and platinum awards in numerous territories underlined his status, mirrored by his constant presence in the prestigious DJ Mag Top 100 rankings for a decade and a half. ATB is one of just a handful of musicians to have emerged from the German club scene to become worldwide superstars–from Australia to Asia, Mexico to Poland, Russia and, above all, in the USA.
Given his impressive resume, we’re really glad to report that ATB is an enthusiastic Studio One user. We were able to have a Q&A session with him recently where he talked about his use of Studio One.
What PreSonus products have you used and which do you currently use?
Presonus Studio One is by far my favorite PreSonus product. I switched from Apple Logic Pro years ago. The other PreSonus tool I’m using is the Classic Faderport which is absolutely essential for me.
For what applications are you using Studio One Professional?
I’m Using Studio One Professional for the entire process of creating music. Starting with composing, sound design, going over to recording, editing, mixing and also mastering, I simply do everything in Studio One. I do have three workspaces so I can work from everywhere. Most of the times I’m in my main studio in Bochum, Germany to write and produce songs for my project ATB.
What led you to choose Studio One? Was it the company’s reputation, audio quality, ease of use, specific features, price, other factors?
Honestly, I never thought about the price. 🙂 I found this demo CD of Studio One in a friend’s office at Musicstore Germany back in 2013 and asked him “What the hell is this?” He told me some things about Studio One and that he really likes some features. I went back in my studio, checked the demo version and the next day I switched over from Logic Pro to Studio One. The reason was the speed of creating music. The personalized folders with my favorite plugins and favorite plugin settings, the audio editing, the speed and look of the GUI, and the audio quality which sounded awesome. So many features… like dragging and dropping ideas to my “faves” folder including MIDI and all plugins made me so much faster while creating music. And this is absolutely essential to me. Tools are there for pushing your creativity, not to outbreak it.
What Studio One features have proven particularly useful and why? 
I love the scratchpad as it makes arranging super easy. This is something which helps me to be very fast in trying new arrangements and in cutting out or copying entire parts of a track. Also, many drag & drop functions are really helpful, like saving channel strips via drag & drop. The macros are great tools to speed up steps while editing.
How does Studio One compare to other DAWs you have used?
Studio One is faster than most other DAWs and also very intuitive. How often did I think, “How great it would be to simply do this and that to reach my goal like cutting my master, doing fades and just drag and drop it to my master folder in Studio One…” and it worked! Also, the integration of Melodyne is the ultimate weapon. I’m saving so much time and I can change things on the run without any bridge or without using it as a stand-alone app. It feels like I have an “all-in-one” solution.
Which Studio One feature or concept doesn’t get enough spotlight (or isn’t talked about enough) in your opinion?
What we mentioned while talking to other producers like the JUNKX team—Robin Schulz, etc.: they worked on Ableton Live and never thought that Studio One gives you the amount of speed you need to use your creativity as much as possible. It can be so fast and may other producers don’t know about it!! The integration of Melodyne and other apps via ARA is something which is really amazing and some producers might not know about it.
Also, most guys we’ve talked about Studio One over the last three years thought that it’s a DAW for rock music producers. Not a very modern and fast developing producer tool also for electronic music and pop etc.
Any useful tips/tricks or interesting stories based on your experience with Studio One that would be of interest to our user base?
Using the drag & drop function for MIDI files in case you’re having an idea or sound which doesn’t fit to the track you’re actually working at but which could really be amazing and inspiring for another one is a great tool. You’ll never forget any idea you once had, as you can create an acoustic note in a second.
Any final comments about PreSonus and Studio One?
I’m really looking forward to new developments in Studio One. I’m sure you guys will have the next surprise already in your pocket 😉
Follow ATB!
Friday Tips: Studio One’s Amazing Robot Bassist
When Harmonic Editing was announced, I was interested. When I used it for the first time, I was intrigued. When I discovered what it could do for songwriting…I became addicted.
Everyone creates songs differently, but for me, speed is the priority—I record scratch tracks as fast as possible to capture a song’s essence while it’s hot. But if the tracks aren’t any good, they don’t inspire the songwriting process. Sure, they’ll get replaced with final versions later, but you don’t want boring tracks while writing.
For scratch drums on rock projects, I have a good collection of loops. Guitar is my primary instrument, so the rhythm and lead parts will be at least okay. I also drag the rhythm guitar part up to the Chord Track to create the song’s “chord chart.”
Then things slow down…or at least they did before Harmonic Editing came along. Although I double on keyboards, I’m not as proficient as on guitar but also, prefer keyboard bass over electric bass—because I’ve sampled a ton of basses, I can find the sound I want instantly. And that’s where Harmonic Editing comes in.
The following is going to sound ridiculously easy…because it is. Here’s how to put Studio One’s Robot Bassist to work. This assumes you’ve set the key (use the Key button in the transport, or select an Instrument part and choose Event > Detect Key Signature), and have a Chord Track that defines the song’s chord progression.
- Play the bass part by playing the note on a MIDI keyboard that corresponds to the song’s key. Yes, the note—not notes. For example, if the song is in the key of A, hit an A wherever you want a bass note.
- Quantize what you played. It’s important to quantize because presumably, the chord changes are quantized, and the note attack needs to fall squarely at the beginning of, or within, the chord change. You can always humanize later.
- Open the Inspector, unfold the Follow Chords options, and then choose Bass (Fig. 1).

Figure 1: Choose the Bass option to create a bass part when following chords.
- Now you have a bass part! If the bass part works, choose the Edit tab, select all the notes, and choose Action > Freeze Pitch. This is important, because the underlying endless-string-of-notes remains the actual MIDI data. So if you copy the Event and paste it, unless you then ask the pasted clip to follow chords, you have the original boring part instead of the robotized one.
- After freezing, turn off Follow Chords, because you’ve already followed the chords. Now is the time to make any edits. (Asking the followed chords to follow chords can confuse matters, and may modify your edits.)
The bottom line: with one take, a few clicks, and (maybe) a couple quick edits—instant bass part (Fig. 2).
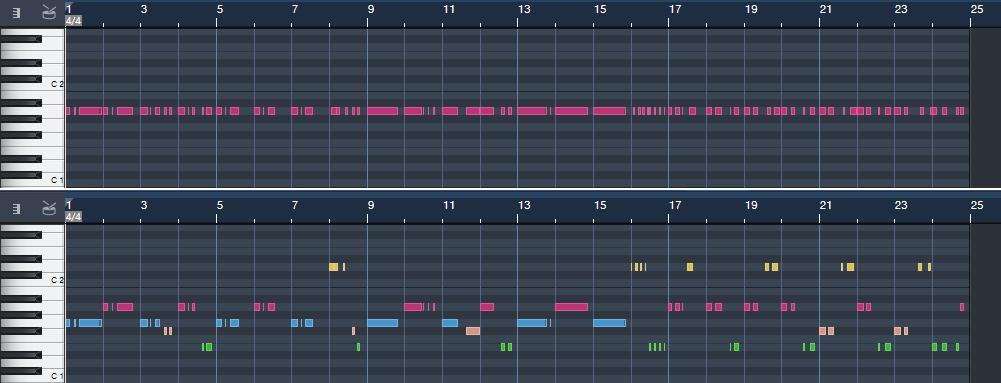
Figure 2: The top image is the original part, and yes, it sounds as bad as it looks. The lower image is what happened after it got robotized via Harmonic Editing, and amazingly, it sounds pretty good.
Don’t believe me? Well, listen to the following.
You’ll hear the bass part shown in Fig. 2, which was generated in the early stages of writing my latest music video (I mixed the bass up a little on the demo so you can hear it easily). Note how the part works equally well for the sustained notes toward the beginning, and well as the staccato parts at the end. To hear the final bass part, click the link for Puzzle of Love [https://youtu.be/HgMF-HBMrks]. You’ll hear I didn’t need to do much to tweak what Harmonic Editing did.
But Wait! There’s More!
Not only that, but most of the backing keyboard parts for Puzzle of Love (yes, including the piano intro) were generated in essentially the same way. That requires a somewhat different skill set than robotizing the bass, and a bit more editing. If you want to know more (use the Comments section), we’ll cover Studio One’s Robot Keyboardist in a future Friday Tip.
Studio One in the City of Angels with Josh Cumbee!
If you’re not following PreSonus on Instagram, you’re missing out!
We post the latest things going on around the office, photos of our products in action, reviews, and we also connect with our users one on one. Most recently we connected with Singer/Songwriter/Producer Josh Cumbee from Los Angeles, CA. Josh is a diehard Studio One fan, and often shares his expertise with his Instagram following, and we are quick to share. We took the opportunity to talk to him more about his craft, Studio One, and what’s on the horizon for him.
 Give us some background on yourself. How long have you been making music?
Fully professionally, it has only been about 4 years—that was the first time a song came out with my name in the credits where I had to pinch myself. I had been playing piano and guitar since I was a kid, which drew me to USC for their music business degree as I figured there was no way to make the creative side into an actual job. I started moonlighting with composing for TV backing tracks concurrently with my day job—a couple twists of fate, a lot of hard work, and a few key helping hands later and it blossomed into a full-time profession.
What do you like about PreSonus?
PreSonus to me exemplifies accessible, no-compromises quality. With a lot of brands in the audio space, you either have to shell out a lot of hard-earned cash to get a high-end product, or the budget product sounds/feels/functions like a cheap imitation of the real thing. To me, Studio One is a top-shelf program that I’d be willing to pay a lot more forthe fact that it’s priced low enough for me to recommend to my peers, shoot, even my little brother who’s getting into making music… now, that’s cool.
What PreSonus products do you use?
I’m a die-hard Studio One evangelist. I also have a tried and true Central Station in my studio that I’d guess has been rocking for a solid 400 years at least.
Describe the first time you wrote a song? Produced it?
I’m not even sure what the first song I wrote/produced would have been… but it was probably done on the ridiculous combination of Sony Acid 3 and a four-track Tascam tape recorder I stole from my dad’s electronics drawer. It was generally a misshapen cacophony of loops, poorly played guitar and tape hiss until I got into Garageband a while later in high school.
When did you first hear about Studio One?
A great producer from Nashville mentioned it to me. Pro Tools was the first serious DAW I learned, which I promptly abandoned for Logic because at the time working with MIDI was extremely difficult in PT. I had spent several years in Logic, but the updates (particularly in the GUI department) personally didn’t jive with me. Studio One was there in my moment of software weakness, and became one of very few tools I feel like I can’t live without.
What features are you most impressed with in Studio One?
Working with audio is a dream in Studio One. It is so easy to render, stretch, pitch shift, chop, Melodyne, change the BPM of the whole song at the drop of a hat… you name it. VST3 integration is a great CPU saver. The dual buffer is genius. Shout-out to those string samples. And Fat Channel. OK, someone stop me…
 Any user tips or tricks or interesting stories based on your experience with Studio One?
With the stems feature being as rock solid as it is, I am a big believer in setting up your template with stems in mind—that way you learn to work within that structure and if/when it comes time to export them for a collaboration, mixer, delivery, etc., you can really take full advantage of Studio One’s built in set up for that. I think everyone should at least know how to use the routing feature in the channel editor—you’ll be surprised when it might come in handy. If you’re a Logic refugee you can bring all the .SDIR’s from Space Designer into Open Air AND the .EXS instruments into Presence, which is great if there’s sounds you just can’t let go of. Also, I built a macro that removes all unused audio files, copies all external ones to the session folder, then saves it—highly recommended. Big fan of VST3’s, they’re way easier on your CPU and cross-platform compatible if you need to move a session across OS’s.
How easy/difficult was Studio One to learn?
It’s a great cross between almost every DAW; mix window feels like PT, main window reminds me of Logic, arranger functions feel like Ableton… sort of all the best parts of each plus some sauce all of its own. Porting and recreating my key commands was a hassle, and the depth of sub-menus can be a little intimidating at first. There’s a lot of genius features but sometimes you have to dig for them! So all that to say, easy at points, hard at others, worth it… 100x over.
Where’d you go for support?
Where else? Straight to the support ticket portal (once I have exhausted the forums of course).
What features do you want to see next in Studio One?
MIDI capture to complement the existing armed audio track capture feature. Mid-side mode for pan knobs. A native Auto Tune competitor for when I’m too lazy to tune backing vocals in Melodyne. Native WASAPI driver for Windows similar to FL Studio’s (which rocks). More control over multicore/threading. Dare I say… integration with UAD Hardware monitoring just to have the option.
Any other thoughts on Studio One?
Of course, if I were starting to make music now, knowing what I know, I’d definitely start with Studio One. But personally, having to start over in a new program proved an even greater gift for my creative process. It made me rethink all of my go-tos, presets, channel strips, templates, etc., even a preference to MIDI over audio or vice versa. Of course, you get set back a week or two in productivity as you’re relearning everything, but that process of education at this stage in my career definitely took the music to the next level for me. I’d recommend it no matter how entrenched you might be in your program of choice, even if just for that.
Recent projects? What’s next for you?
Just co-wrote and produced on Adam Lambert’s latest single, Feel Something (about which I’m very excited), and also a single for a band called Flawes entitled Don’t Count Me Out that I feel really jams. I’ve got a couple other things cooking as a writer/producer that I’m stoked on but my baby is definitely my artist project, for which I’ve written and produced an album on the heels of a feature with Armin Van Buuren that did pretty well. We have an upcoming feature slated (so excited) and going to start rolling out tracks as a solo artist this year once the partnership side is finalized.

SonalSystem Dream Pop Guitars – new in the shop!
Immerse yourself in the rich sonic palette that is Dream Pop. Characterized by its slow-moving atmospheres and textures, SonalSystem’s Dream Pop Guitars will most certainly fill your track with good vibes.
Through the use of spacious guitars, evolving synth parts, and tasteful drum sequences SonalSystem’s Dream Pop Guitars captures the moodiness of this alt-rock subgenre.
Split across five titles, all of which are presented in song format (Intro, Verse, Chorus, Bridge, etc), SonalSystem’s Dream Pop Guitars is available in individual packs or as a complete bundle.
Click here to hear the demos and shop!
New Add-ons from Bingoshakerz

New at shop.presonus.com… Add-ons from Bingoshakerz! This is the first batch of add-ons we’ve received for the shop from this formidable production team… and from the sounds of things, we’re looking forward to more! These add-ons cover some diverse sonic territory—from contemporary, soulful vocals to late 1970s funk—and don’t overlook the Afro House Collection!
But enough talk. What you really need to do is hear these, am I right?
Click here to listen to the demos and shop!
These Add-Ons are compatible with Studio One Prime, Artist, and Professional (Versions 3.5.5 and higher.)