Friday Tips: Studio One’s Zero-Latency/Zero-Artifact Transient Shaper
Studio One doesn’t have a transient shaper plug-in…in theory. In practice, there’s a zero-latency, artifact-free transient shaper that’s ideal for emphasizing the attack in drum parts (and other percussive sounds as well, from bass to funky rhythm guitar). Here’s how to do it.
- Copy the clip to which you want to add transient shaping.
- Right-click in the copy, and choose Detect Transients.
- Right-click in the copy again, and choose Split at Bend Markers. The copy now has slices at each transient.
- With all the slices still selected, click on any slice’s fadeout handle, and drag it all the way to the left so that each slice has a sharp decay. Tip: De-select one slice before doing this, because once you drag all the fadeouts to minimum, it’s very difficult to change them. By de-selecting a slice, you can select all the slices, and use the de-selected slice’s fadeout handle to change all the slice fadeouts at once, regardless of the other slices’ settings.
- Click the node in the middle of the fadeout curve, and drag the node down to make all the slices even more percussive.
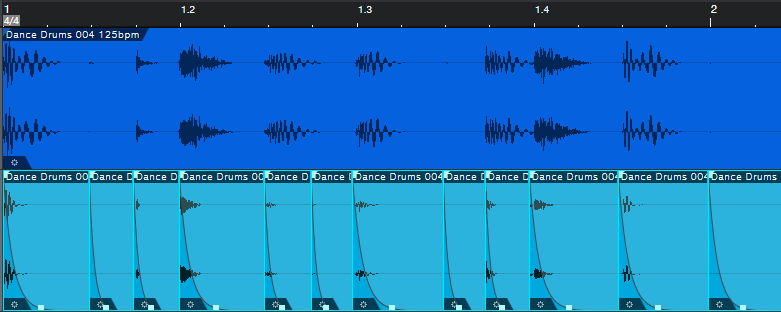
The top waveform is the original drum part, while the lower waveform adds a sharp decay to each drum transient.
The copy now has the transients isolated from the rest of the loop. Vary the mix of the copied track and the original track to set the balance of the emphasized attack with the loop’s “body.” (Studio One programmer Arnd Kaiser suggests this process might be a good candidate for a macro—that’s an excellent point.)
This technique is particularly effective with acoustic drum loops, because the drums tend to ring longer—so creating a copy as described makes for a super-percussive sound compared to the original loop.
Try this, and you’ll be shocked at how this can make drum parts become more vibrant and “alive.” However, there is one unfortunate side effect: now I wish I could go back and remix all my songs that have drum tracks!
Friday Tips: Keyswitching Made Easy
As the quest for expressive electronic instruments continues, many virtual instruments incorporate keyswitching to provide different articulations. A keyswitch doesn’t play an actual note, but alters what you’re playing in some manner—for example, Presence’s Viola preset dedicates the lowest five white keys (Fig. 1) to articulations like pizzicato, tremolo, and martelé.
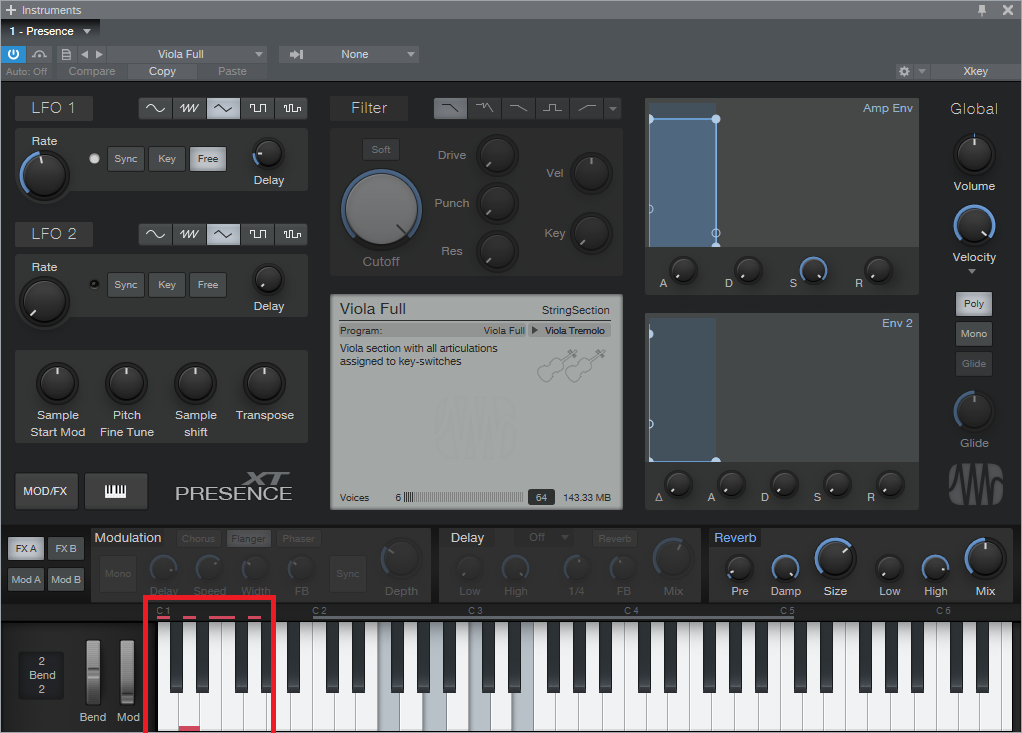
Fig. 1: The five lowest white keys, outlined in red, are keyswitches that provide articulation options. A small red bar along the bottom of the key indicates which keyswitch is active.
This is very helpful—as long as you have a keyboard with enough keys. Articulations typically are on the lowest keys, so if you have a 49-key keyboard (or even a 61-note keyboard) and want to play over its full range (or use something like a two-octave keyboard for mobile applications), the only way to add articulations are as overdubs. Since the point of articulations is to allow for spontaneous expressiveness, this isn’t the best solution. An 88-note keyboard is ideal, but it may not fit in your budget, and it also might not fit physically in your studio.
Fortunately, there’s a convenient alternative: a mini-keyboard like the Korg nanoKEY2 or Akai LPK25. These typically have a street price around $60-$70, so they won’t make too big a dent in your wallet. You really don’t care about the feel or action, because all you want is switches.
Regarding setup, just make sure that both your main keyboard and the mini-keyboard are set up under External Devices—this “just works” because the instrument will listen to whatever controllers are sending in data via USB (note that keyboards with 5-pin DIN MIDI connectors require a way to merge the two outputs into a single data stream, or merging capabilities within the MIDI interface you’re using). You’ll need to drop the mini-keyboard down a few octaves to reach the keyswitch range, but aside from that, you’re covered.
To dedicate a separate track to keyswitching, call up the Add Track menu, specify the desired input, and give it a suitable name (Fig. 2). I find it more convenient not to mix articulation notes in with the musical notes because if I cut, copy, or move a passage of notes, I may accidentally edit an articulation that wasn’t supposed to be edited.
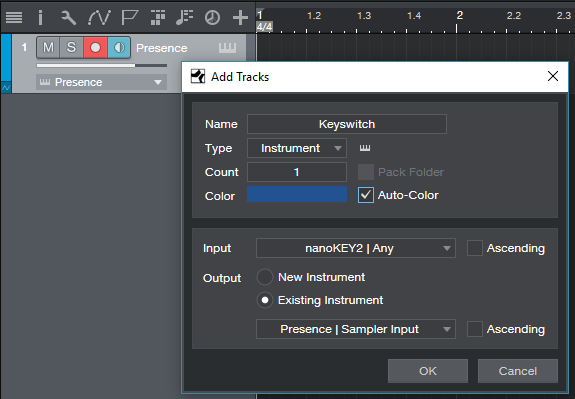
Fig. 2: Use the Add Track menu to create a track that’s dedicated to articulations.
So until you have that 88-note, semi-weighted, hammer-action keyboard you’ve always dreamed about, now you have an easy way take full advantage of Presence’s built-in expressiveness—as well as any other instrument with keyswitching.
PreSonus Atom Workflow in SampleOne XT
This just in from Craftmaster Productions—a good look at the PreSonus ATOM workflow using SampleOne XT in Studio One.
CMP has been producing excellent Studio One content for years. Head on over to YouTube and give him a Subscribe for more!
Friday Tip—The “Glue” Compressor FX Chain
If you’ve heard people talking about adding “glue” to a mix, this usually involves a bus compressor. But you can also “glue” tracks together in a subtle way by placing two standard compressors in series with high thresholds and low ratios. The result is dynamics control that’s so gentle, you won’t really hear that a compressor is working—but you will hear the benefits.
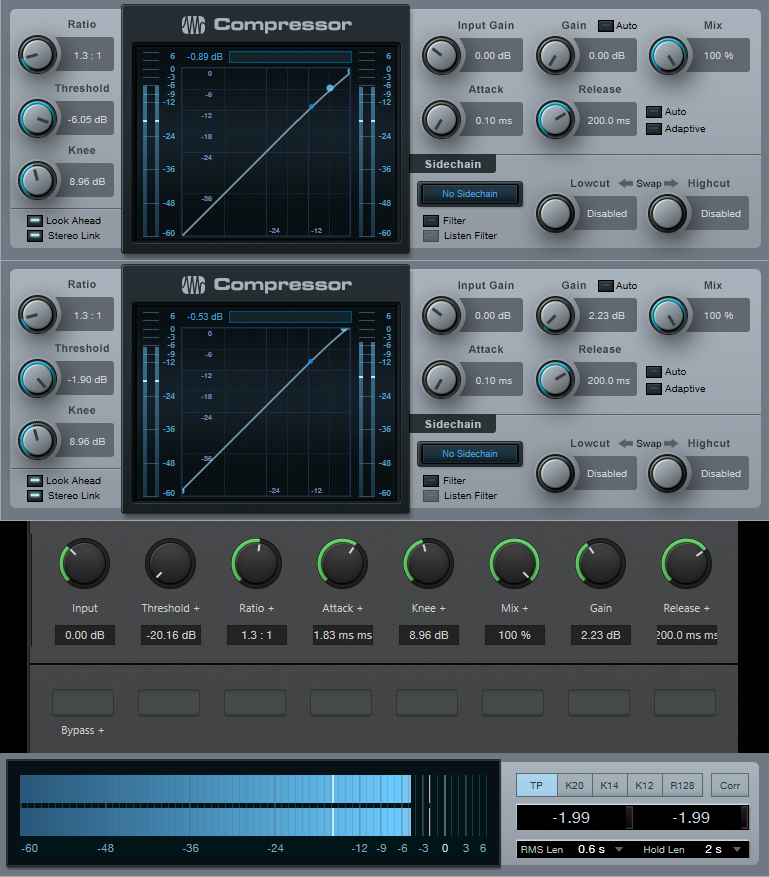
Start by inserting two Compressors in series. I also like adding the Level meter plug-in afterward so it’s easy to compare peak and RMS levels when enabling/bypassing the Glue Compressor. Set the controls that aren’t affected by the FX Chains as follows:
- Compressor 1, Gain 0.00 dB
- Compressor 2, Input Gain 0.00 dB
- Turn off Auto Gain, Auto Release, and Adaptive Release
- Turn on Look Ahead and Stereo Link
Program the FX Chain controls that affect both compressors as follows:
- Ratio: 1:1 to 1.6:1
- Attack: 0.10 to 10 ms
- Knee: 0.10 to 20 dB
- Mix: 0 to 100%
- Release: full range (set to 200 ms default)
Program the remaining controls as follows:
- Input: Compressor 1, full range
- Threshold: Compressor 1 (-20 to 0), Compressor 2 (-6 to 0)
- Gain: Compressor 2, 0 to 6 dB
As to choosing the optimum settings, this one is easy to get wrong. It’s designed for subtle effects, so keep the Input at 0.00 dB unless the incoming signal is very low or high. With an input signal that’s close to maximum, a threshold of -3.0 (as indicated by the Threshold control, because the threshold will differ for the two compressors) and a low ratio (like 1.3:1) are good starting points, with Mix set to 100%.
Adjust Attack (minimum attack clamps down harder on the signal), Knee, and Release based on the input signal characteristics and desired result. Use Gain to match peaks between the bypassed and enabled states. Bypassing and enabling is a good way to hear the difference the Glue Compressor contributes to the sound.
The Glue Compressor is not intended to work like a conventional compressor that flattens an input with a highly variable level, although you can always increase or lower the ratio or threshold for the best sound. Set the controls to give a mild, subtle lift that… well, “glues” the tracks together. You won’t hear a huge difference…and you shouldn’t. But you will hear an improvement that gives the mix a welcome “lift.”
Download the FX Chain preset here.
Friday Tips: Easy Song Level Matching
As you’ve probably figured out, these tips document something I needed, and the solution. If you’ve ever put together an album or collection of songs, you know how difficult it can be to match levels—which I was reminded of all too clearly while preparing the album Joie de Vivre for upload to my YouTube channel. It’s rock-meets-EDM, and is done as a continuous mix that includes not just songs, but transitions. So, all the levels had to be matched very carefully. Fortunately, Studio One’s Project Page made it easy.
The key was using the Project Page’s LUFS meter readings; for a complete explanation of LUFS, please check out the article I wrote for inSync magazine. In a nutshell, it’s a way to measure audio’s perceived level that’s more sophisticated than the usual average, VU, or peak readings. If two songs have the same LUFS reading, they’ll be perceived as having a similar (if not the same) level.
This measurement standard was created in response to issues involved in broadcasting and streaming services, and also in part as a backlash against “the loudness wars.” For example, YouTube doesn’t want you to have to change the level every time a video changes, so they’ve standardized on making all audio -13 LUFS. It doesn’t matter if you squash your master recording until it looks like a sausage, YouTube will adjust the perceived level so that it can slip into a playlist with something like a live acoustic jazz recording.
In Studio One’s Project Page, the Loudness Information section for each song (Fig. 1) shows a song’s LUFS as well as readings for the RMS average level (somewhat like a VU meter) and True Peak, which indicates not just peaks, but whether any peaks are exceeding the maximum headroom on playback, and by how much. The Loudness Information can come from before or after the track’s effects, so to see how editing these alters the LUFS reading, choose the Post FX tab.
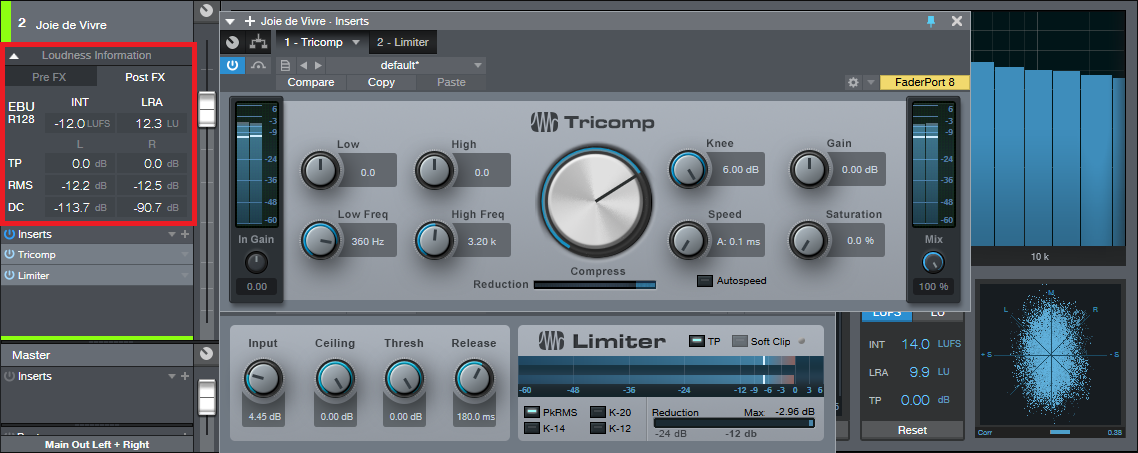
Fig. 1: The Tricomp/Limiter combination makes it easy to “fine-tune” the perceived loudness of your songs in the Project Page, as shown by the Loudness Information section (outlined in red).
Leveling the Levels
Now that we know how to measure levels, here’s one way to tweak them for consistency. We’ll assume you want something fairly compressed/limited, but not enough to become collateral damage in the loudness wars.
For each track (likely all of them) that needs to be set to a certain LUFS measurement, insert the Tricomp compressor followed by the Limiter. The screen shot shows my preferred Tricomp settings, but note that the optimum Compress knob setting depends on the material. You don’t want to compress too much, because the limiter will do most of the leveling anyway. If the gain reduction peaks reach the last “s” in “Compress” on the Limiter’s Reduction meter, you probably won’t hear too many artifacts, but you might not want to go any higher.
Next, decide what your target LUFS reading should be. As a very general rule of thumb, most rock songs are around -8 to -10 LUFS. -11 to -14 LUFS is considered as having a decent amount of dynamics, while classical music hangs out around -23 LUFS. Of course, this is all subjective—you can choose whatever level sounds “right.”
Now turn up the Limiter’s input control. The Loudness Information label will change to “Update Loudness.” Click on this; Studio One will analyze the track, and show the LUFS reading. (Note: You can force a reading by right-clicking on the song in the track column, and choosing “Detect Loudness.”)
Adjust the limiter Input level, then update the loudness. If the LUFS is below your target, turn up the Input. If the result is higher than the desired LUFS, turn down the Input. It takes a little trial and error, but eventually you’ll hit the target.
With the Tricomp and Limiter, once you get much above -13 LUFS you can “hear” the limiter because it’s stereo. With a phase-linear multiband maximizer like the Waves L3 Multimaximizer, you can push for higher LUFS readings while still sounding reasonably free of artifacts. Still, I wouldn’t want to go much above -10 LUFS—but as always, that’s a subjective call and there are no rules. If you like the way it sounds, that’s what matters.
However, be aware that even slight tweaks can make a difference, especially with the Tricomp. The Tricomp and the Limiter work together, and you can fine-tune the sound by fine-tuning each processor. For example, having Knee up all the way on the Tricomp gives more perceived loudness, and a narrower dynamic range…which may or may not be what you want. Turning on Autospeed also makes a difference.
When you listen to Joie de Vivre, I think you’ll hear that it benefited considerably by being adjusted in Studio One to a consistent LUFS reading. There’s a decent amount of dynamics, but the average perceived level of all the cuts is very consistent…and that’s what this tip all about.
Sonal Synth Pop—New at shop.presonus.com

Now available at shop.presonus.com: TEN new Add-ons from SonalSystem, all part of the Sonal Synth Pop family. These Add-ons are available in a complete bundle, or individually—at very low prices!
SonalSystem took on a unique approach with Sonal Synth Pop. Unlike a lot of other Add-ons, each Sonal Synth Pop construction kit is arranged as a complete multi-track Song for Studio One. Each of these songs can be used as a sonic foundation for your next project, or you can cherry-pick your favorite parts to embellish your existing songs. The choice is yours! Consider Sonal Synth Pop to be a rich palette of colors with which you can do whatever you like.
Click here to hear Sonal Synth Pop… and shop!
Rent-to-Own Studio One Pro on Splice!
Click here to learn more!
PreSonus Symphonic Orchestra—Even More Powerful with Chord Track and Harmonic Editing
The PreSonus Symphonic Orchestra is something of a secret weapon over at shop.presonus.com. With over 14 gigs of samples and musicloops, it combines a complete symphonic orchestra instrument library with ready-to-use Studio One Musicloops for lightning-fast arranging and production. The instruments not only comprise a full symphony orchestra, but also a contemporary strings library. More than 1,200 Musicloops allow for creating full arrangements on the fly while retaining complete control over tempo, key, chords and sound character.
If you’re currently running Studio One 4 and have passed on the PSO before, now is a great time to give it another look—because with the release of the new Chord Track and Harmonic Editing features, the PSO becomes a lot more versatile and powerful with no increase in price!
PreSonus beta tester and content creator Lukas Ruschitzka recently created some new videos and audio demos showcasing not only the PSO’s sound quality and ease-of-use, but also how much stronger it has become when paired with Studio One’s new Chord Track and Harmonic editing. Check out these videos below, and…
…Click here to get the PreSonus Symphonic Orchestra!
PSO Construction Kits
PreSonus Symphonic Orchestra contains more than 1,200 Musicloops organized into 28 Construction Kits that cover various musical styles like classical film music but also contemporary genres like ambient, pop, groove and hip-hop. This video provides a short overview of the included Construction Kits.
Working with PSO Construction Kits
Being creative with the PSO Construction Kits is pretty straightforward. Just drag some Musicloops into your own songs and take advantage of Studio One’s Chord Track to change chords and try different harmonic patterns with just a few clicks. This video shows how easy it is to access PSO Construction Kits, preview different Musicloops in the song tempo and adapt them to the song via Harmonic Editing.
New PSO Audio Demos
Andrea Bocelli and Studio One at the Top of the Billboard Charts!

“In 2017, I was invited by Pierpaolo Guerrini of PPG Studios to be a part of the preproduction of Sí alongside guitarist Daniele Bonaviri,” he continues. “The album production was given to the great producer Bob Ezrin who’s worked with Pink Floyd, KISS and Peter Gabriel.”

“We met several times in my studio—JGRStudio in Rome—and Pierpaolo’s Studio PPGStudio in Tuscany for the sound design process with Studio One and Pro Tools. During these sessions, I recorded all the acoustic guitars and sound design for the pre-production process of several tracks on the record. I also used Studio One for drum editing for some yet-unreleased acoustic versions… and we were quite impressed by how fast and accurate drum editing with Studio One is.”
“So now, Studio One is officially our DAW of choice and the most active in PPGStudio—Andrea’s main recording studio. It’s been an honor to work with Bob Ezrin, and I’m so proud to work with Andrea Bocelli, the most famous singer ever.”
Follow Jurij on Facebook here!
Join the Studio One Family here!

Friday Tips: Humbucker to Single-Coil Conversion with EQ
Humbuckers are known for a big, beefy sound, while single-coil pickups are more about clarity and definition. If you want the best of both worlds, you can warm up a soldering iron, ground the junction of the humbucker’s two coils, and voilà—a single coil pickup. But there’s an easier way: use the Pro EQ, which gives the added benefit of not losing the pickup’s humbucking characteristics.
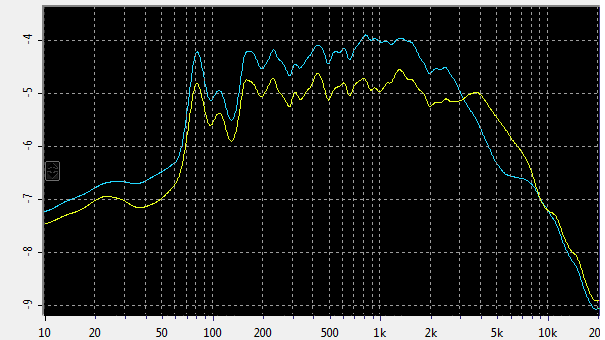
Fig. 1: Humbucker and single-coil response compared.
The main difference between humbucker and single coil pickups is the frequency response. The blue line in Fig. 1 shows a humbucker’s spectral response, while the yellow line shows the same humbucker split for single-coil operation. Unlike the single-coil’s response, which is essentially flat from 150 Hz to 3 kHz, the humbucker has a bump in the 500 Hz to 2 kHz range that contributes to the “beefy” sound. Starting at 3 kHz the humbucker response drops off rapidly, while the single coil produces more high-frequencies than the humbucker from 3 kHz to 9 kHz.
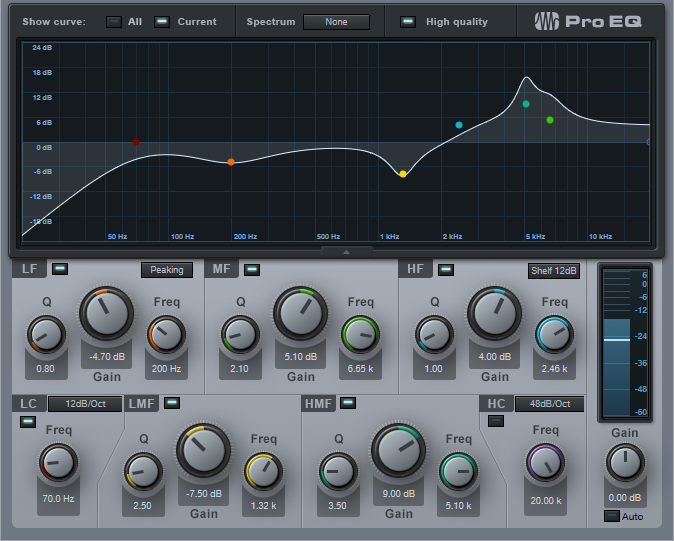
Fig. 2: Bridge humbucker to single-coil conversion EQ curve.
Fig. 2 shows an equalizer curve that modifies a bridge humbucker for more of a single-coil response. Of course different humbucker and different single-coil pickups sound different, so this kind of EQ-based “modeling” is an inexact science. However, I think you’ll find that the faux single-coil sound delivers the distinctive, glassy character you want from a single-coil pickup. Feel free to tweak the EQ further—you can come up with variations on the single-coil sound, or “morph” between the humbucker and single-coil characteristics.
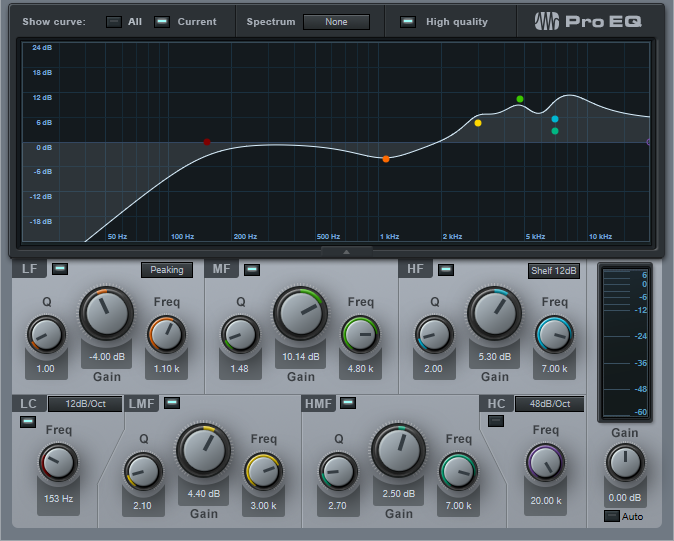
Fig. 3: Neck humbucker to single-coil conversion EQ curve.
The difference between a neck humbucker and single-coil response isn’t as dramatic, but the curve in Fig. 3 replicates the neck single-coil character, and provides yet another useful variation for your guitar tone.
The bottom line is that you don’t need to break out a soldering (or void your guitar’s warranty) to make your humbucker sound more like a single-coil type—all you need is the right kind of EQ.