Monthly Archives: January 2022
Cool Reverb Trick, Bro!
 Let’s go right to the audio examples, because they’re worth a thousand words.
The problem: You want a big, lush reverb on drums. But that overpowers the drums, and turns them into a reverby mess…like this.
So sadly, you turn down the reverb, and give up your dream. But wait! Here’s the solution.
We haven’t changed the reverb settings at all, so there’s still plenty of reverb. But now it sounds tight, instead of like a reverby mess. The secret is creating a bus, and inserting X-Trem before the reverb (fig. 1).
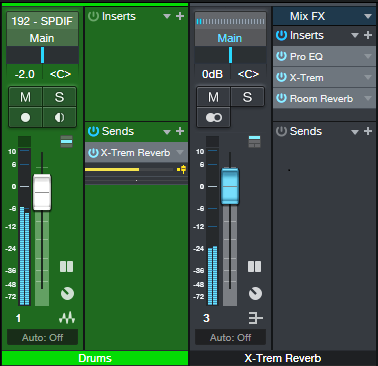
Figure 1: Setup for cool reverb drums.
You can ignore the Pro EQ, it’s there only because I usually insert a low-frequency rolloff prior to drum reverb (this prevents the kick drum from misbehaving). Fig. 2 shows the X-Trem settings. Make sure X-Trem and the drums are synced to the tempo.
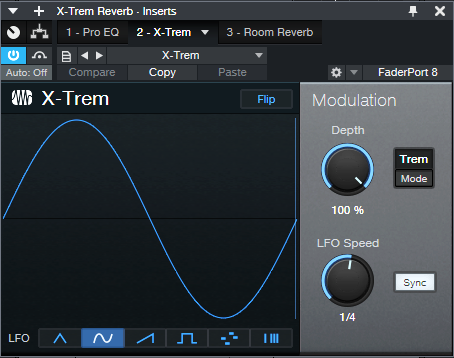
Figure 2: The X-Trem is using sine wave modulation, set for 1/4 note sync. 1/8 note sync can also work well for faster tempos, and 1/4 for slower tempos.
If you have other tracks feeding the Reverb bus, you might not want them subjected to the X-Trem (or you might). If not, then see fig. 3.
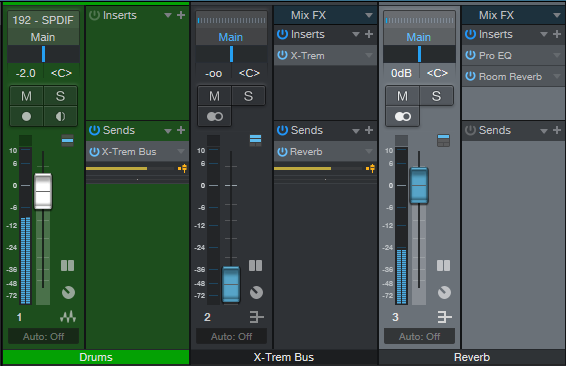
Figure 3: How to apply this effect only to drums, when you want other tracks to feed the reverb bus.
Use a pre-fader send from the drums to a bus, insert the X-Trem in that bus and turn down its fader, then create a pre-fader send from the X-Trem bus to the Reverb bus. Now you can feed other tracks directly into the Reverb bus.
Cool reverb trick, eh?
Don’t Ignore the Free VU Meter Plug-In
It may seem like VU meters are a relic of the past. However, the VU Meter plug-in that’s available for free in the PreSonus Shop is well worth the download—it’s more than just meter-based eye candy (fig. 1). This plug-in is particularly useful for mastering or as a master bus effect while mixing, because it shows several crucial aspects of a stereo mix.
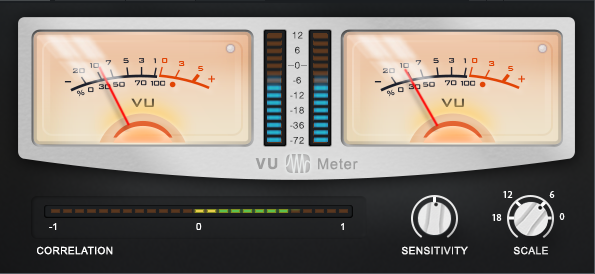
Figure 1: This VU meter isn’t just free, it’s useful. Grab it before someone at PreSonus decides they should probably charge something for it.
The LED meters in the middle indicate peak signal levels, while the VU meters indicate average signal levels. These can provide useful clues about your music. If the average levels are high compared to the peaks, then there may be too much compression or limiting being used. Conversely, if the peak levels are high and the average levels are low, you may need some dynamics processing to even out the dynamic range somewhat.
The Sensitivity control acts like a damping control on the meters, where lower sensitivity averages out the readings over a longer time period. Turning up Sensitivity tracks the average level over shorter periods. Turning down Sensitivity for the slowest response provides a good way to compare average song levels, or sections within a song.
Scale correlates peak levels to your preferred amount of headroom. For example, for 18 dB of headroom, set Scale to 18. Then, signals that hit -18 dBFS will register as 0 on the meter. Setting Scale to 6 can be a good way to trick yourself into respecting headroom a little more, because signals at -6 dBFS will show as 0.
Finally, the Correlation meter indicates if there are any potential phase issues with stereo audio. A correlation reading of 1 means the audio is mono, or with stereo, that the audio in both channels is in phase. A correlation reading of -1 means the audio streams in the left and right channels are 180 degrees out of phase with each other (oops). Although it’s not a problem to dip into the red (negative reading) from time to time, if the readings are often negative, then phase issues may be a problem. These could be caused by an effect on a track that generates an out-of-phase output signal, stereo miking where the XLR cables were wired incorrectly (yes, it happens), or other gremlins. It’s generally best if the Correlation meter reading fluctuates between 0 and 1.
It never hurts to be able to get different perspectives on your audio, and this isn’t only a useful tool…it’s free, which is everyone’s favorite price. What’s more, if you have PreSonus Hub installed, you can also use the VU Meter with other VST/AU/AAX-friendly programs. And finally, let’s hear it for software—no matter how hard you hit the VU meter, you won’t break the needle!
Studio One 5.5 Mastering with Perry Sorensen (Head of Mastering, NAXOS of America)
Perry Sorensen, Head of Mastering for NAXOS of America, gives us his favorite features of the updates in Studio One 5.5 on the Project Page. NAXOS is the largest distributor for classical jazz and world music.
Perry uses Studio One to master and in this video he gives a walk-thru of how he uses track automation plus more!
Learn more about Studio One
Learn more about NAXOS of America
Listen to Perry’s musical expressions with Jessie Kol
Join PreSonus Sphere today!
Only $14.95 per month for Studio One Professional, Notion, and so much more.
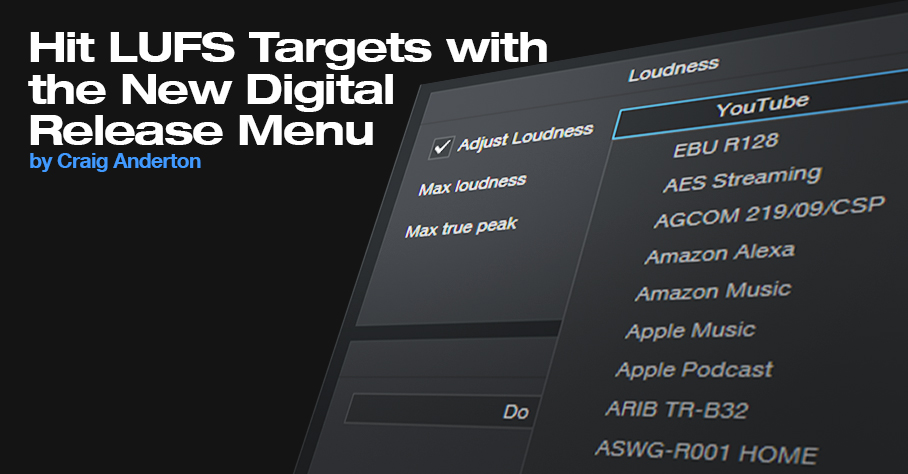
Hit LUFS Targets with the New Digital Release Menu
It’s a streaming world—and streaming services have their own audio standards with respect to LUFS and True Peak levels. LUFS is not the same as peak or average loudness. Instead, it measures perceived sound levels. In theory, if two songs have the same LUFS readings—whether it’s Billie Eilish whispering or hardcore 1999 Belgian techno—you won’t feel the need to get up and adjust the volume.
True peak measures the peak value after D/A conversion, which can be higher than the peak value prior to D/A conversion. Having a peak value below 0 minimizes the chance of distortion when transcoding a WAV file into a data-compressed format. For more about LUFS, see Understanding LUFS, and Why Should I Care?
The Easy Song Level Matching tip tells how to use the Tricomp and Limiter to match song levels in a collection of songs or an album, and it remains viable. However, if you’ve already mastered your songs the way you like, Studio One version 5.5 has added an export function to the Digital Release menu that can export your songs to any LUFS and true peak level you want. What’s more, it includes presets for all the most popular streaming services (fig. 1).
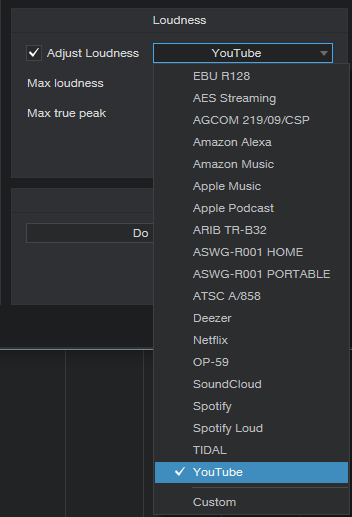
Figure 1: To meet the specs for particular streaming services, simply choose a preset, and export. Here. YouTube has been chosen.
Another convenient aspect is that once you release the drop-down menu, you can see a particular streaming service’s recommended specs (fig. 2). This is also where you can specify custom settings for LUFS and True Peak.
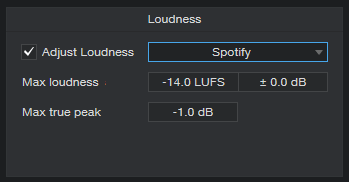
Figure 2: Choosing a streaming service shows its desired file specs. This shows that Spotify wants files with a max loudness of -14.0 LUFS, and Max true peak of -1.0 dB.
Let’s do a real-world test to check the effectiveness. Consider two songs in the Project Page, one at -6.8 LUFS with a true peak reading of +0.7, and the other at -12.2 LUFS with a true peak reading of +0.1 (fig. 3). We’ll export them to Spotify’s standard mode, which wants -14.0 LUFS and -1.0 true peak, and then load them back into the Project Page to see what happens.
The -6.8 LUFS file had to be turned down a lot to hit -14.0 perceived level. Turning down the level lowers the true peak reading; in this case, it ended up at -6.5. The -12.2 LUFS file didn’t need to be turned down much at all to hit -14.0 LUFS, and its true peak reading is now -1.7. When played back, even though the waveform levels look very different, they sound like they’re at the same level.
However, it’s important to note that this process won’t raise the level if the peaks already hit 0. For example, if one of the files was normalized and its LUFS reading was -15.0, it wouldn’t have increased to -14.0 LUFS because that would have required processing (e.g., limiting) to raise the level. Otherwise, any peaks would have exceeded the headroom.
The export function simply does what most (but not all) streaming services do—turn down levels above the target LUFS to reach the desired LUFS reading. This makes sense, because the main reason streaming services adopting LUFS targets was to prevent songs that were mastered “hot” from having a level advantage over songs mastered with more reasonable (and more listenable) dynamics.

Figure 3: The two files on the left are the original files. The versions on the right now have LUFS readings of ‑14.0.
Finally, you don’t have to master everything to hit a specific service’s specifics, because this new Studio One function does it for you. Master the music so it sounds good to you—go ahead and compress that rock track, or maximize an EDM set. If it has the right sound but its LUFS reading is -9 or whatever, don’t worry about it. When you export it to a specific target, the song will meet that service’s specs.
Happytwobehere with PreSonus
Happytwobehere is a duo from Covington, Louisiana comprised of two young ladies: Isabel Mathes (vocals) and Lillian Stegen (drums, keyboard, programming, production).
Here is their story…
Lillian: Isabel and I met in high school back in 2016 and became friends through our shared love of music. I can remember one day getting a ukulele and showing Isabel. We would always mess around, but one day we were like, “let’s write a song.” I can remember Isabel’s dad was picking her up and we had not finished the song. He arrived at my house and we were so excited to share it. We played it for him and he loved it. From there we knew that we could write. We began going to open mics at a local coffee shop and played our songs there. After we wrote a few songs, our friends started hearing them. We grew a following and support from our friends and family. We competed in our school’s talent show with an original and got so many positive reviews.

(Happytwobehere photographed by Margaret Killeen, New Orleans Botanical Gardens)
Being in high school, it was hard to get a gig. Our town is small and there are not many opportunities for kids like us. After we had gone to the open mic multiple times, the coffee shop owner reached out to us and wanted to book us to play our music there for two hours. This was the opportunity of a lifetime for us. When the show came, we packed the place out. Our friends and family came to support us and we had the best time ever. It was such an awesome moment to play our songs and have people sing them with us.
This was something Isabel came up with and it stuck. The phrase “Happy to be here” is something that we are whenever we go to play shows. We are so grateful for the opportunities we are given, so the name is fitting. The only difference between the phrase and our name is that the word to is spelled “two” because there are two of us!
To date, we have written about six or seven songs in total, and we plan to write many more in the future! We both have a passionate obsession with music and songwriting, so it’s always easy for us to collaborate.
The spring of 2020 was like no other. Isabel and I had been at different schools by this time, but wanted to release a song. I remember Isabel posted something on Instagram and I heard a groove with it. I sent her a demo and we got to writing. We would send voice memos back and forth because of the lockdown. In the end we created a song and music video all from home. The song, “Stay,” and its music video can be found on our individual Instagram accounts (Isabel) and (Lillian).

(Lillian, photographed by Margaret Killeen, New Orleans Botanical Gardens)
I have been living in Nashville for about two years now and love it. I am a student at Belmont University and have been truly blessed by PreSonus and what they have done. While it might seem small, their help has made me a better musician and opened many doors. Creating this project with PreSonus stuff helped be gain more knowledge with recording software. I was able to use what I learned in my own experiences and from audio engineering classes to start a job as a touring musician. The Quantum 2626 has traveled with me around the States! I have been able to drum at multiple music festivals with headliners like Miranda Lambert and Luke Bryan, using PreSonus’ gear for all of my needs during my set. Without their help, I could have easily been passed up for the gig. I am so grateful for their support!

(Isabel, photographed by Margaret Killeen, New Orleans Botanical Gardens)
Isabel: Working with PreSonus was such an amazing opportunity for us. Due to the pandemic and the fact that we attend different colleges, we’ve struggled with continuing our songwriting and performing as a band. PreSonus decided to assist by providing us with audio tools (Revelator USB Mic, HD9 Headphones, Quantum 2626, DM-7 Drum Mics and Studio One recording software, via PreSonus Sphere memberships) to begin creating our music via online collaboration. We wrote “Never Met,” which was something we never finished in 2019 — and it will be available for the general public on Spotify, Apple Music, YouTube, and more soon!
Thanks PreSonus!
Join PreSonus Sphere today!
Only $14.95 per month for Studio One Professional, Notion, and so much more.
Studio One 5.5 is here!
Studio One 5.5 has arrived, adding a ton of new mastering power to the Project Page — including Automation — as well as plenty of other features, including a strum notes feature, .MID file support for the Chord Track, Fast Ampire switching, and more!
Here’s our Studio One 5.5 video playlist below. But if you want the full story and all the nitty-gritty details…
…head on over to the What’s New Page to see it all!
Learn more about Studio One
Shop Studio One
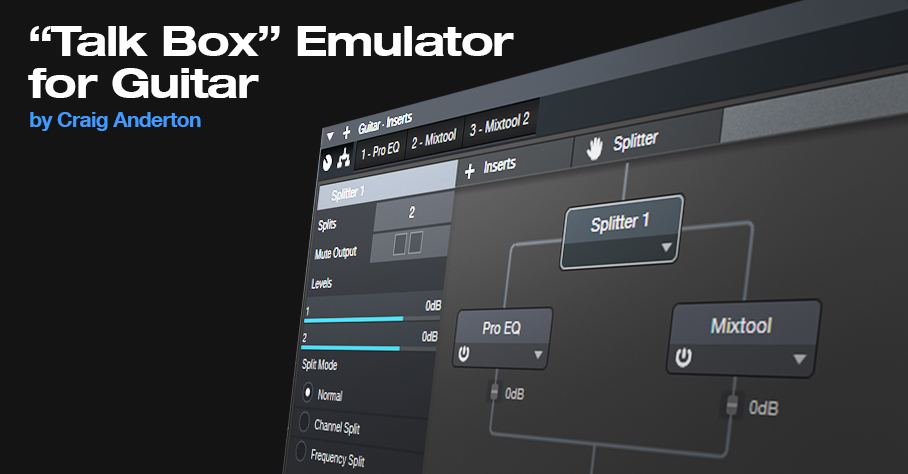
“Talk Box” Emulator for Guitar
Although this isn’t an actual talk box, it does give humanized mouth sounds with Studio One Professional. This is possible because the human mouth is a filter, and Studio One has filters…so let’s do it! Check out the audio example, then download the .multipreset to try it out for yourself.
Talk Box.multipreset – Click to download
The Talk Box works by splitting the guitar (fig. 1). One split goes to a Pro EQ2, which uses a Channel Editor knob to sweep three bandpass filters simultaneously over the vocal range. The other split goes through a Mixtool that flips the phase, so it cancels all the audio from the Pro EQ2 except for the bandpass filter peaks.
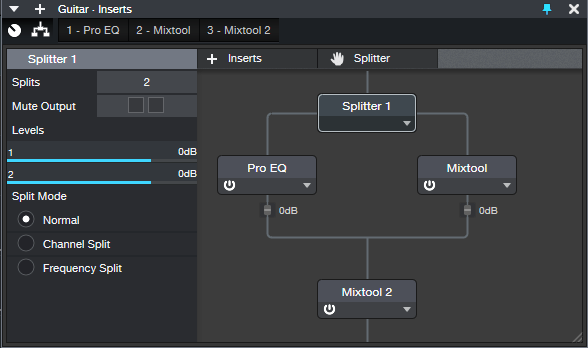
Figure 1: The Talk Box’s “block diagram.”
EQ Settings
The Pro EQ2 uses three stages (fig. 2). The LF stage, in Peaking mode, sweeps from about 250 to 500 Hz. The LMF stage sweeps from around 750 Hz to 1.5 kHz, while the MF stage sweeps from 1.5 to 3.0 kHz.
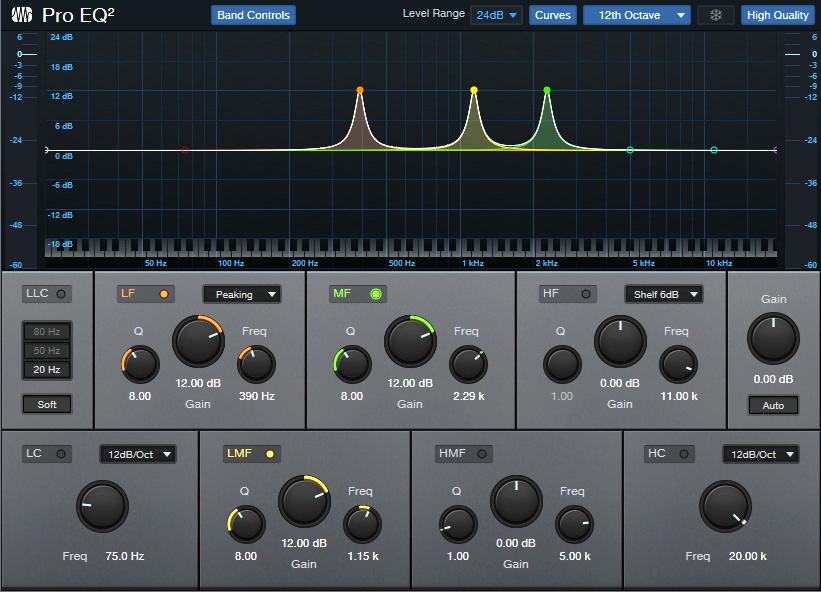
Figure 2: Pro EQ2 stages being used for the filtering.
Channel Editor Settings
Use the Channel Editor to assign the filter frequencies to a Macro control knob (fig. 3).
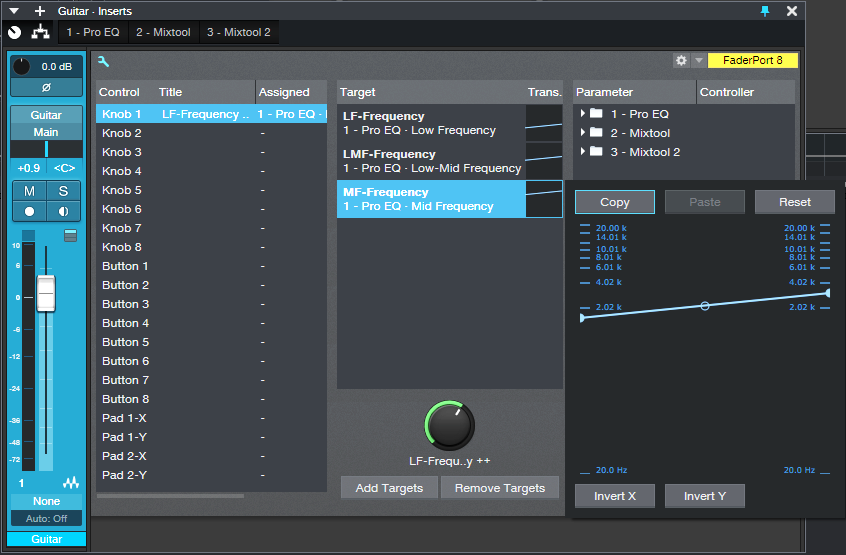
Figure 3: The Macro knob’s range has been edited to cover the Mid Frequency stage’s frequencies. Edit the other targets similarly
The second Mixtool at the output increases the level by 6 dB. This is necessary because one of the splits is out of phase. Because only the filter peaks come through, the output level is considerably lower than the input.
Everything described so far is included in the multipreset, but assigning the Macro knob to a MIDI controller or pedal is up to you. I did a blog post on a way to do this, and the information is also in The Huge Book of Studio One Tips and Tricks. (A heads-up for current owners of the book: a free update will be available soon with more tips, presets, and content, so stay tuned.)
Just remember that you can’t automate the Macro knob per se. You’ll need to add three Automation tracks, assigned to the Low, Low Mid, and Mid frequency parameters. Then, make sure they’re in Write mode when you move the Macro knob control, and they’ll automate the “talk box” changes.