Tag Archives: Studio One
Friday Tips: Easy Song Level Matching
As you’ve probably figured out, these tips document something I needed, and the solution. If you’ve ever put together an album or collection of songs, you know how difficult it can be to match levels—which I was reminded of all too clearly while preparing the album Joie de Vivre for upload to my YouTube channel. It’s rock-meets-EDM, and is done as a continuous mix that includes not just songs, but transitions. So, all the levels had to be matched very carefully. Fortunately, Studio One’s Project Page made it easy.
The key was using the Project Page’s LUFS meter readings; for a complete explanation of LUFS, please check out the article I wrote for inSync magazine. In a nutshell, it’s a way to measure audio’s perceived level that’s more sophisticated than the usual average, VU, or peak readings. If two songs have the same LUFS reading, they’ll be perceived as having a similar (if not the same) level.
This measurement standard was created in response to issues involved in broadcasting and streaming services, and also in part as a backlash against “the loudness wars.” For example, YouTube doesn’t want you to have to change the level every time a video changes, so they’ve standardized on making all audio -13 LUFS. It doesn’t matter if you squash your master recording until it looks like a sausage, YouTube will adjust the perceived level so that it can slip into a playlist with something like a live acoustic jazz recording.
In Studio One’s Project Page, the Loudness Information section for each song (Fig. 1) shows a song’s LUFS as well as readings for the RMS average level (somewhat like a VU meter) and True Peak, which indicates not just peaks, but whether any peaks are exceeding the maximum headroom on playback, and by how much. The Loudness Information can come from before or after the track’s effects, so to see how editing these alters the LUFS reading, choose the Post FX tab.
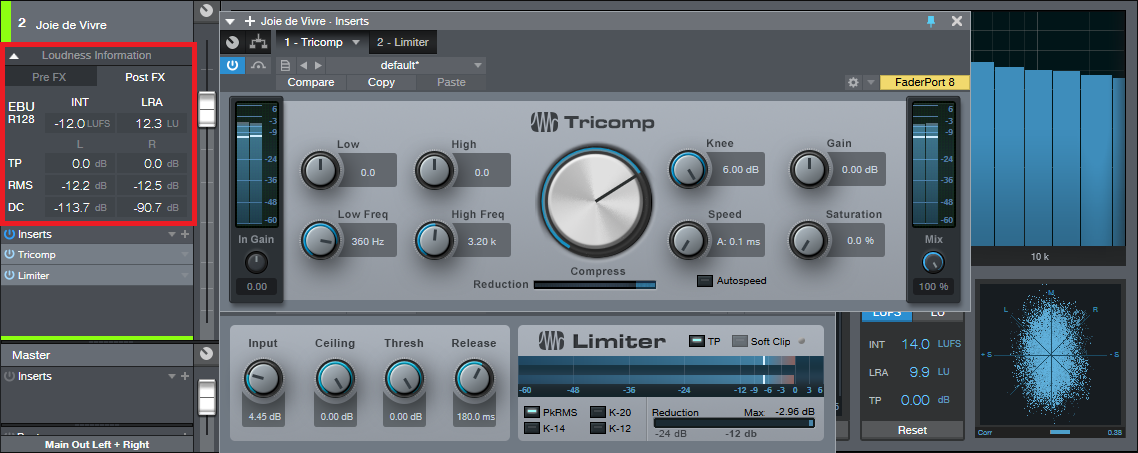
Fig. 1: The Tricomp/Limiter combination makes it easy to “fine-tune” the perceived loudness of your songs in the Project Page, as shown by the Loudness Information section (outlined in red).
Leveling the Levels
Now that we know how to measure levels, here’s one way to tweak them for consistency. We’ll assume you want something fairly compressed/limited, but not enough to become collateral damage in the loudness wars.
For each track (likely all of them) that needs to be set to a certain LUFS measurement, insert the Tricomp compressor followed by the Limiter. The screen shot shows my preferred Tricomp settings, but note that the optimum Compress knob setting depends on the material. You don’t want to compress too much, because the limiter will do most of the leveling anyway. If the gain reduction peaks reach the last “s” in “Compress” on the Limiter’s Reduction meter, you probably won’t hear too many artifacts, but you might not want to go any higher.
Next, decide what your target LUFS reading should be. As a very general rule of thumb, most rock songs are around -8 to -10 LUFS. -11 to -14 LUFS is considered as having a decent amount of dynamics, while classical music hangs out around -23 LUFS. Of course, this is all subjective—you can choose whatever level sounds “right.”
Now turn up the Limiter’s input control. The Loudness Information label will change to “Update Loudness.” Click on this; Studio One will analyze the track, and show the LUFS reading. (Note: You can force a reading by right-clicking on the song in the track column, and choosing “Detect Loudness.”)
Adjust the limiter Input level, then update the loudness. If the LUFS is below your target, turn up the Input. If the result is higher than the desired LUFS, turn down the Input. It takes a little trial and error, but eventually you’ll hit the target.
With the Tricomp and Limiter, once you get much above -13 LUFS you can “hear” the limiter because it’s stereo. With a phase-linear multiband maximizer like the Waves L3 Multimaximizer, you can push for higher LUFS readings while still sounding reasonably free of artifacts. Still, I wouldn’t want to go much above -10 LUFS—but as always, that’s a subjective call and there are no rules. If you like the way it sounds, that’s what matters.
However, be aware that even slight tweaks can make a difference, especially with the Tricomp. The Tricomp and the Limiter work together, and you can fine-tune the sound by fine-tuning each processor. For example, having Knee up all the way on the Tricomp gives more perceived loudness, and a narrower dynamic range…which may or may not be what you want. Turning on Autospeed also makes a difference.
When you listen to Joie de Vivre, I think you’ll hear that it benefited considerably by being adjusted in Studio One to a consistent LUFS reading. There’s a decent amount of dynamics, but the average perceived level of all the cuts is very consistent…and that’s what this tip all about.
Rent-to-Own Studio One Pro on Splice!
Click here to learn more!
PreSonus Symphonic Orchestra—Even More Powerful with Chord Track and Harmonic Editing
The PreSonus Symphonic Orchestra is something of a secret weapon over at shop.presonus.com. With over 14 gigs of samples and musicloops, it combines a complete symphonic orchestra instrument library with ready-to-use Studio One Musicloops for lightning-fast arranging and production. The instruments not only comprise a full symphony orchestra, but also a contemporary strings library. More than 1,200 Musicloops allow for creating full arrangements on the fly while retaining complete control over tempo, key, chords and sound character.
If you’re currently running Studio One 4 and have passed on the PSO before, now is a great time to give it another look—because with the release of the new Chord Track and Harmonic Editing features, the PSO becomes a lot more versatile and powerful with no increase in price!
PreSonus beta tester and content creator Lukas Ruschitzka recently created some new videos and audio demos showcasing not only the PSO’s sound quality and ease-of-use, but also how much stronger it has become when paired with Studio One’s new Chord Track and Harmonic editing. Check out these videos below, and…
…Click here to get the PreSonus Symphonic Orchestra!
PSO Construction Kits
PreSonus Symphonic Orchestra contains more than 1,200 Musicloops organized into 28 Construction Kits that cover various musical styles like classical film music but also contemporary genres like ambient, pop, groove and hip-hop. This video provides a short overview of the included Construction Kits.
Working with PSO Construction Kits
Being creative with the PSO Construction Kits is pretty straightforward. Just drag some Musicloops into your own songs and take advantage of Studio One’s Chord Track to change chords and try different harmonic patterns with just a few clicks. This video shows how easy it is to access PSO Construction Kits, preview different Musicloops in the song tempo and adapt them to the song via Harmonic Editing.
New PSO Audio Demos
Interview with Tim Flohrer, CTO and founder of zplane
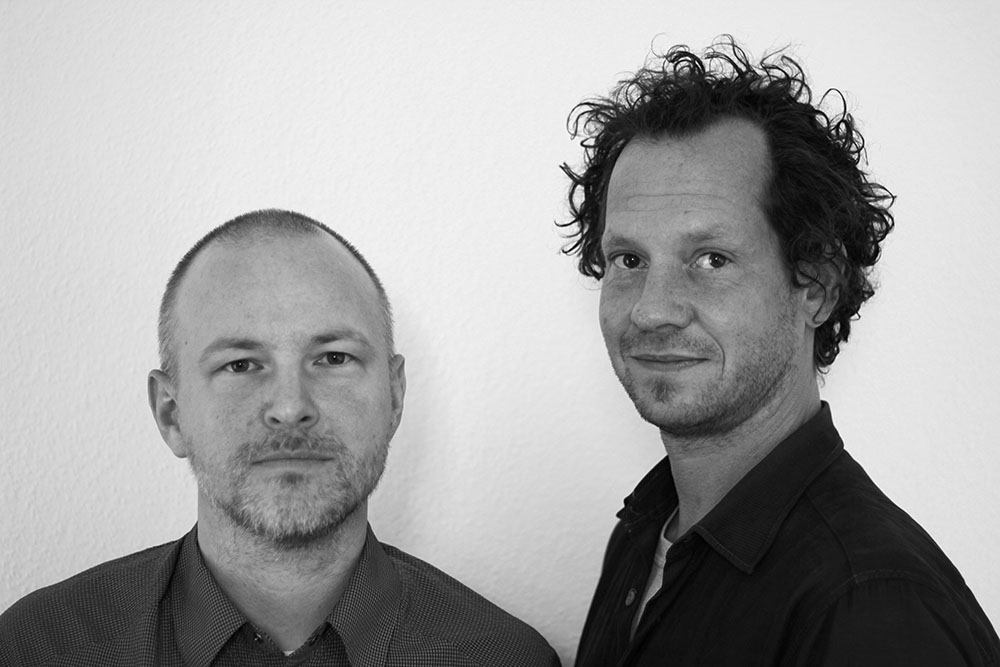
Martin Schwerdtfeger and Tim Flohrer of zplane
zplane is a provider of audio processing and music analysis technology operating out of Berlin. Studio One takes advantage of several powerful zplane technologies—our new Chord Detection feature takes advantage of zplane’s KORT, and our Harmonic Editing features leverage a combination of KORT and reTune. Furthermore, their élastiquePro time stretch has been in Studio One since the very beginning!
We were able to get some time with Tim Flohrer, CTO and founder, and ask him a few questions about zplane.
How and when did zplane come to be?
We started off as a three-man company in 2000 directly from University. Martin, Alexander and me, we all studied electronic engineering but we were always into music. Our start was kind of naive to say the least: our business plan was basically ‘let’s have a company that offers development services for something with computer and music’. So, as you might imagine, it took us a while to find our business model. Back in 2003 we had a customer who needed a high quality and performant time stretching but didn’t want to pay the whole development costs. So, we developed the time stretching for him at a much lower rate but kept the rights for the algorithm. That could be considered the start of our current licensing business. We still had to learn a lot about the business but the foundation was laid back then. From that point on we continued to develop more and more audio algorithms for licensing such as beat tracking, key and chord recognition, auto segmentation and monophonic as well as polyphonic pitch manipulation.
Later we started our own consumer product line so we could make our algorithms available in a way that we thought they should be used.
Tell me a bit about the current zplane team.
In 2013 Alexander retired from the active business at zplane since he was offered a professorship at Georgia Tech, Atlanta and moved to the USA. Now, there is Martin and me left as original founders, 4 employees and currently one intern.
Martin mainly handles the business side of things while I keep track of the technical stuff. Maik and Daniel do the hardcore programming and application development. Holger and Till take care of the research and science. Jonas – our current intern – helps the latter two. And everybody does customer support and internal testing.
All our employees did either do their master thesis at our company or at least had an internship before.
The Partner List on zplane.de is quite impressive. I see a few names of companies that a musician or producer using Studio One may not immediately associate with music, like Konami and Vinyl Dreams. What do you feel are some of the lesser-known applications of zplane technology that some users might not expect? I can see a use case for audio restoration in forensic audio, for example.
Thanks! It certainly took a while to grow this partner list. The first thing that comes to my mind when thinking about the less obvious applications is games – board games to be precise. Last year Harmonix and Hasbro released a board game using ELASTIQUE called Dropmix. It lets you construct music played by your smartphone by dropping playing cards on a game board. So, as you might guess elastique is running on the smartphone – but still the use case is kind of unusual.
Concerning forensic audio we currently have no customer using it for something comparable but we’re certainly open for that. Besides audio restoration even time stretching or pitch shifting may be very useful in that area.
Electronic music in particular is rife with happy accidents, where a technology developed for one purpose eventually finds its home in another. The most notable example being perhaps the Roland TB-303, or Auto-Tune’s obtuse origins in interpreting seismic data. Have the zplane team experienced anything like this in the development and subsequent application of their own technologies? Any surprising uses of the technologies that were not in mind in the development cycle?
Well, to be honest, I was always waiting for something like this to happen: people doing something completely different than what they were supposed to do. It didn’t happen as in the mentioned examples so far. But I was seriously impressed when I saw what people did with the chord tracks in Studio One: they applied the chord progressions to the reverb tail of other tracks. Obviously really didn’t expect that use case. However, it is truly amazing how musicians adapt new technology and convert it creatively into some new kind of expression.
How has your experience been working with the PreSonus Software team?
We’ve been working with the PreSonus Software team already for a long time even before they belonged to PreSonus. So, we have a very good and open relationship. Especially when implementing new technologies you need a lot of communication in order to get the most out of the technology but also to explain the limits of what is possible technology-wise. This communication back and forth does not only help on the implementation side but also gives us a lot of feedback and in the end improves the technology. So, especially with the implementation of the chord track and the harmonic editing this has been a very fruitful co-operation and it doesn’t end here. We’re working on the future already.
Can you talk about the difference between élastique as a plug-in and the different versions of élastique used in DAWs? Anything special in Studio One?
In fact, as long as the DAWs are using the latest version of ELASTIQUE PRO they are all using the same algorithm. Sometimes people still think that it sounds different in different hosts. This is partly voodoo and partly due to implementation differences: so in one host you have a fixed time stretch factor in others this is adapted continuously which will obviously cause audible differences. But still the base algorithm is the same everywhere. Our plugin Elastique Pitch takes the algorithm to only do pitch shifting which is mostly due to the limitations of a real-time plugin interface which is unable to handle time stretching.
Where do you see audio chord detection and harmonic editing go in the future?
Of course, I see that the accuracy of the chord detection will go up as well as the quality of the polyphonic pitch manipulation. It’s all already in the making. We’re currently moving away from classic signal processing and experimenting with modern deep learning and artificial intelligence approaches. And our first results for the chord detection look very promising. Currently, we see the most potential in the chord detection to improve the overall performance of the harmonic editing – wrong assumptions on the original chord have a major negative impact on the result. That being said, one should always be aware that this will never be perfect – even professional musicians disagree on certain chord transcriptions and so will computers generate debatable results from time to time.
Also, the RETUNE algorithm still has a long way to go but improving the internal pitch detection using the above-mentioned techniques will most probably take us giant steps ahead. But we haven’t started to work on this yet.
One should never forget though that all of this is just a tool to help people to get creative.
There was a time when making edits to pitch and length independently of one another seemed impossible. The same could be said about isolating a single voice from a chord for independent editing. As barriers like these continue to be broken down… what’s the next big sonic quandary for a company like zplane to solve?
The holy grail of music signal processing has always been ‘demixing’ and that hasn’t been solved yet. There are new approaches but all of them don’t get close to studio quality. So that’ll stay on our roadmap.
However, we think that taking it step by step rather than only searching for the holy grail is the way to go. So, we’ll continue to improve the existing algorithms using new techniques and learn from that ourselves.
Also, it is not always about the new algorithm, sometimes it’s ‘just’ combining existing algorithms to something new. Similar to what we did with PreSonus in Studio One: we had the chord detection and the RETUNE algorithm and put it to together to create harmonic editing.
Similarly, we’re currently working on a new product combining a lot of our technologies to support musicians with their daily practice, train their ear and eventually help them become better musicians. So, keep your eyes and ears open for that next year.
Big thanks to Tim for taking the time for this interview! Learn more about zplane at the following links:
Friday Tips: Studio One’s Transient Shaper for Kick and Snare
As with so many aspects of audio, the subject of compression presets polarizes people. The purists say there’s no point in having presets, because every signal is different, and the same compressor settings will sound very different on different sources. On the other hand, software comes with presets, and there are plenty of recording blogs on the web that dispense advice about typical preset settings. So who’s right?
And as with so many aspects of audio, they all are. If a preset works “out of the box,” that’s just plain luck. However, there are certain ranges of settings that work well in many cases for particular types of signals. In any case, the effects of compression are totally dependent on the input signal level anyway—if the threshold is set to -10, then signals that peak at 0 will sound very different compared to signals that peak at -10.
The most effective way to approach compression is to decide what effect you want the compression to accomplish, then adjust the compression settings accordingly. It’s also important to remember that compression isn’t just some monolithic effect that “squashes things.” For example, with kick and snare, compression can act just like a transient/decay shaper due to a drum’s rapid decay.
The usual goal for compressing kick is an even sound, yet one that doesn’t reduce punch. However, you have a great deal of latitude in deciding how to implement that goal.
Figure 1: A starting point for kick (and snare) compression.
The preset in Fig. 1 uses a fairly high ratio, and hard knee, to even out the highest levels. You want the compression to take hold relatively rapidly, but not take away from the punch. The best option is to start with the attack time at 0, and increase it until you hear the initial hit clearly (but don’t go past that point). Because a kick decays fast, release can be fast as well.
For transient shaping, slowing the attack time softens the attack. Raising the ratio increases the sustain somewhat, while making space for the attack (assuming an appropriate attack time). Between the attack and ratio controls, you can pretty much tailor the kick drum’s attack and sustain characteristics, as well as even out the overall sound. A higher threshold is another way to emphasize the attack, by letting the decay occur naturally. Lowering the threshold reduces the level difference between the attack and decay.
Snare responds similarly to kick, however with an acoustic drum kit, the kick is more isolated physically than the snare. As a result, compressing the snare has the potential to emphasize leakage. Fortunately, the snare is often the focus of a drum part. As a result, you can simply compress the snare, and accept that leakage is part of the deal. With individual, multitracked drums (including electronic drums) where leakage is not a problem, it’s still usually the snare and kick that get compression.
With snare, you may want to use a lower ratio (2:1 – 3:1) for a fuller snare sound. Or, increase the ratio to emphasize the attack more. Again, use the attack time to dial in the desired attack characteristics.
With both kick and snare, you’ll usually want a hard knee. However, the knee control is a fantastic way to fine-tune the attack—and once you have that dialed in, you’ll be good to go.
Splice now supports Studio One

We’re proud to announce that we’ve partnered with Splice to make it easier for you to backup and share your Studio One project files. Splice Studio now supports Studio One project files—meaning once you’ve downloaded the Splice Studio Desktop application, you’ll be able to automatically back up your project files, access any saved version, and collaborate with others on your tracks!
Click here to learn more and sign up!
Why Splice?
- Smarter Backup: Automatically back up every version of your project, without using up hard drive space. It’s secure, reliable, and free.
- Collaborate Anywhere: Work with other artists on the same project files. See the changes they make when they make them.
- Go Back to Any Version: Experiment without consequences. Splice remembers. Go back in time at any time.
UPDATE 11-15-18: Studio One is now available on Splice via rent-to-own!
Click here to learn more about getting Studio One Professional via rent-to-own on Splice!
Friday Tips: Rhythmic Reverb Splashes
Summer may be over in the northern hemisphere, but we can still splash around. This is one of those “hiding in plain sight” kind of tips, but it’s pretty cool.
The premise: Sometimes you don’t want reverb all the time, so you kick up the send control to push something like a snare hit into the reverb for a quick reverb “splash” (anyone who’s listened to my music knows this is one of my favorite techniques). The reverb adds a dramatic emphasis to the rhythm, but is short enough that it doesn’t wear out its welcome—listen to the audio example, which demos this technique with Studio One’s Crowish Acoustic Chorus 1 drum loop.
However, although this technique is great with drums, it also works well with rhythm guitar, hand percussion, synths, you name it… even kick works well in some songs. I’m not convinced about bass, but aside from that, this has a lot of uses.
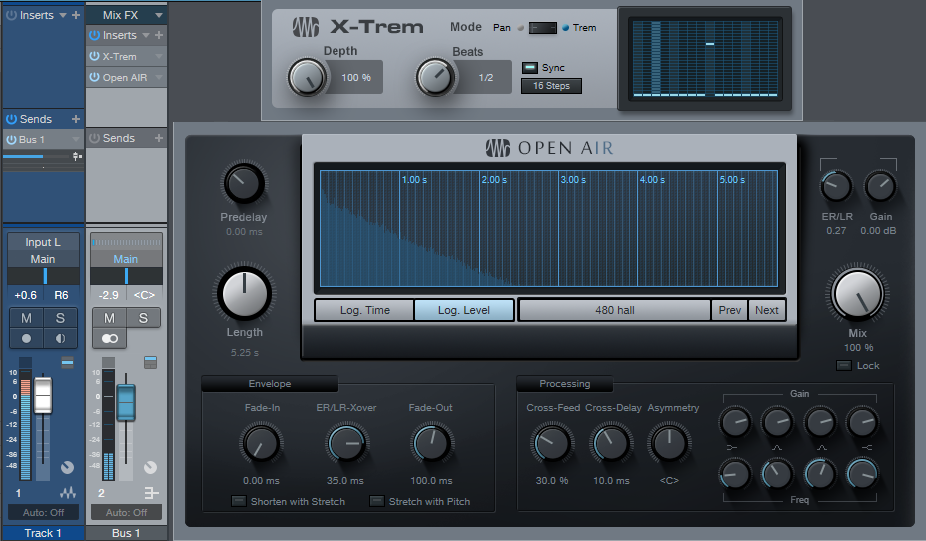
Studio One offers an easy way to produce regular splashes automatically (like on the second and fourth beats of a measure, where an emphasizing element hits). Insert X-Trem before the reverb, select 16 Steps as the “waveform,” click Sync, and choose your rhythm. The screenshot shows Beats set to 1/2 so that the reverb splash happens on 2 and 4, which in the case of the audio example, adds reverb to the snare on 2, and to the closed high-hat on 4.
And that’s pretty much it. Because the reverb is in a bus, set Mix to 100%. The 480 Hall from Halls > Medium Halls is one of my faves for this application, but hey… use whatever ’verb puts a smile on your face.
Friday Tips: Multiband Dynamics for Bass? Yes!
I’m not one of those people who wants to do heavy compression all the time, but I do feel bass is an exception. Mics, speakers, and rooms tend to have response anomalies in the bass range; even if you’re using bass recorded direct, compression can help even out the response for a smoother, rounder sound.
Although stereo compressors are the usual go-to for bass, I often prefer a multiband dynamics processor because it can serve simultaneously as a compressor and EQ. Typically, I’ll apply a lot of compression to the lowest band (crossover below 200 Hz or so), light compression to the low-mid bands (as well as reduce their levels in the overall mix), and medium compression to the high-mid band (from about 1.2 kHz to 6 kHz). I often turn down the level for the band above 5-6 kHz or so (there’s not a lot happening up there with bass anyway), but sometimes I’ll set a ratio below 1.0 so that the highest band turns into an expander. If there’s any hiss in the very highest band, this will help reduce it. Another advantage of using Multiband Dynamics is that you can tweak the high and low band gain parameters so that the bass fits well with the rest of the tracks.
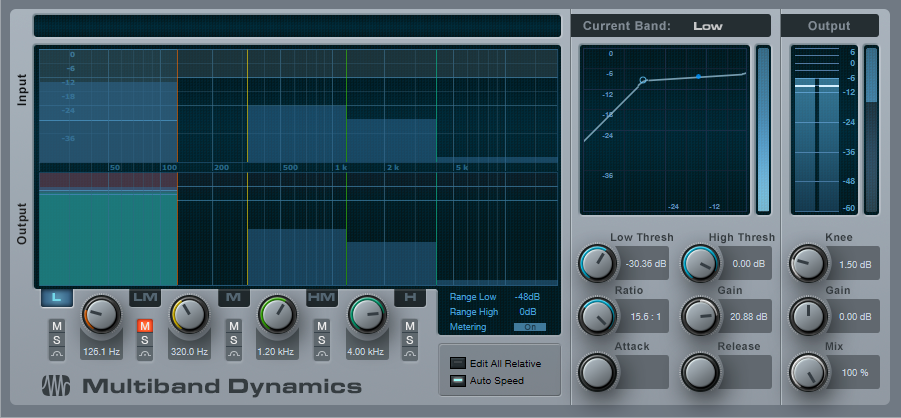
The preset in the following screenshot gives a sound like “Tuned Thunder,” thanks to heavy compression in the lowest band. To choose a loop that’s good for demoing this sound, choose Rock > Bass > Clean, and then select 08 02 P Ransack D riff.audioloop. Insert the Multiband Dynamics processor, and start with the default preset.
As with most dynamic processing presets, the effect is highly dependent on the input level. For this preset, normalize the bass loop. Then change the L band to 125 Hz, with a ratio of 15:1, and a Low Threshold of -30 dB. Mute the LM band.
With the Multiband Dynamics processor bypassed, observe the peak value for the bass track. Now enable Multiband Dynamics, and adjust the Low band’s Gain until the peak value matches the peak value with the Multiband Dynamics bypassed-—you’ll hear a big, fat, round sound that sort of tunnels through a mix.
Now let’s go to the other extreme. A significant treble boost can help a bass hold its own against other tracks, because the ear/brain combination will fill in the lower frequencies. The next screen shot shows settings for extreme articulation so the bass really “pops,” and cuts through a track. Again, start with the default preset but set the Low band frequency to 110 Hz or so.
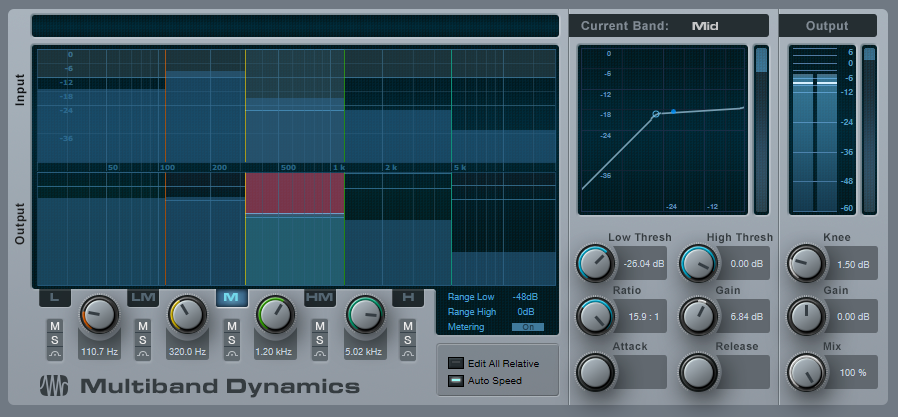
The only band that’s compressed is the Mid band (320 – 1.2 kHz, with parameter settings shown in the screen shot). A bit of gain for the High Mid band emphasizes pick noise and harmonics—5 dB or so seems about right—and to compensate for the extra highs, add some gain to the low band below 110 Hz. Again, about 4-5 dB seems to work well.
When adjusting the Multiband Dynamics processor, note that you can zero in on the exact effect you want for each band by using the Solo and Mute buttons on individual stages. So next time you want to both compress and equalize bass, consider using Multiband Dynamics instead—and get the best of both worlds.
Recording in Studio One Made Easy with David Vignola!
 Learn Studio One from David Vignola!
This series is intended for first-time owners of the AudioBox and Studio One Artist and covers everything you will need to know to record your first song. Hit the ground running!
And when you’re ready for the Advanced course, hit up David at his website and get a discount with promo code: PRESONUS25
Watch the whole video series here:
Learn more about the AudioBox here!
Not sure which interface works for you? Well help you find one here!
Studio One Remote 1.4 Available Now
New in version 1.4:
- Support for Studio One 4 dark and light UI themes (selectable from the Start Page)
- Updated mixer graphics
- Several bugfixes and performance improvements