Category Archives: Uncategorized
PreSonus COO talks Notion, Career and PreSonus!
Here are three cool things you may not know about PreSonus’ notation software Notion.
- Notion was featured in an Apple commercial and photos featured in Apple Stores… True story. Watch the commercial HERE!
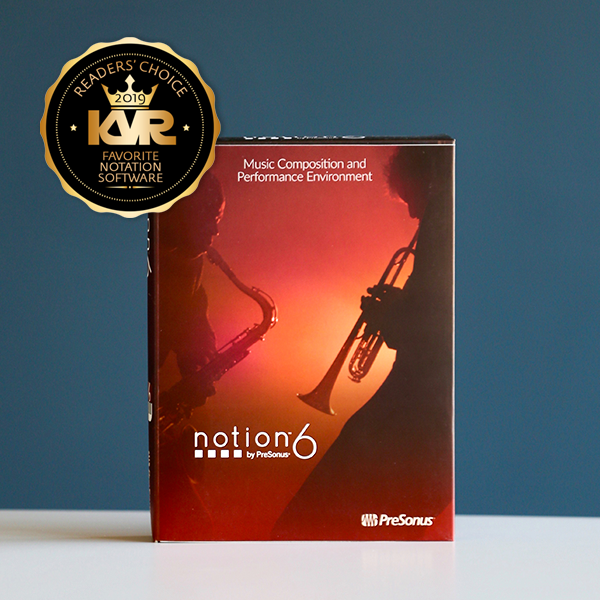
- Notion has won several awards, including a prestigious music industry NAMM TEC Award for Best Smartphone/Tablet App.
- Notion has a 4 out of 5 rating in the Apple App Store.
In 2013, we acquired the assets of Notion Music, adding Notion™ music notation and composition software and their other solutions to our product line-up. This innovative product was the first notation app to run on iOS in addition to Mac and Windows, one of the most downloaded music creation apps. Notion and their team were a natural fit in the PreSonus culture of inventive technology development. When PreSonus acquired Notion Music not only did we score an award-winning software, we also got the one and only Jim Boitnott. All year we’re celebrating 25 years of PreSonus so it’s only fitting to celebrate Notion and hear more from one of the creators and current COO of PreSonus Jim Boitnott!

What were you doing before PreSonus?
I was the CEO of Notion Music.
Was owning a business something you dreamed of doing or just fell into it as the products came along?
I never actually owned Notion Music, it was owned by several people and started by Lori and Jack Jarrett. When I was brought in I was in various management positions, and then became CEO. I never dreamed of being a CEO, I just wanted to make a great product that we were proud of. One day after working very hard for years I found myself sitting in that role. I tried to make the best choices I could for our team and customers.
What’s the process of having a great idea to getting it out the door?
This could be a book… There are so many pieces of this massive puzzle no one ever thinks about! Most importantly, commitment from incredibly talented people is crucial. Hard work, focus, and simply finding a way to make it happen. And that’s just getting it out the door… There are many more obstacles after that to make “it” successful.
What need was the Notion intended to meet?
An easy-to-use notation software product with great playback. We always wanted to lead with the sound results, others always lead with the printed results.
At the time, did you have any data supporting the need for this product?
Kind of, but none that would have made a difference. It was more of a “we want to build this and we are” mentality. However, when we released Notion for iPad we did have more data that helped us realize the opportunity. We knew there was a great opportunity for the iPad version and it did pay off with great results, as well as being featured in an Apple ad campaign… one of our proudest moments.
What was the biggest challenge? Major roadblocks?
I’ll be honest, at different times in our company history, it was different issues, such as; ego’s, red tape, lack of experience, internal politics, indecision, cooperation, budgeting, forecasting, etc. It felt like everything at different times, but when it came to making Notion the product, that sometimes felt like the easiest and clearest part. Once we finally got a team that was focused in one direction we were pretty incredible for such limited resources. Then, our biggest roadblocks became time, resources, really good competitors, and market factors.
At the time of its conception, how did you define success?
I think that was part of the problem early on, I think everyone had a different opinion of what success was. Some would have said revenue, others would say a great product, and some were just worried about other things. However, for the first iPad version of Notion, we had a clear goal “Be the first-ever notation app for iOS and make it as solid as the desktop version that it worked alongside of.”
How did you guys come together to build it?
Notion Music from 2003-2013 had some incredible people involved in it, at different times and in different ways. We had people from all over the world come together in Greensboro, NC and created something special. All played a role in getting us where we are today. I was teaching guitar and film scoring classes at Elon University using competitor notation products and then met a co-founder, we randomly struck up a conversation one day. Once she found out I was very knowledgeable with Finale and Sibelius I found myself working at Notion Music just a few weeks later. However, like many businesses, there are highs and lows, and unfortunately, after Notion v2 we had to make some major changes and lost a great number of our team and redesigned the product. The final team, which basically stayed totally intact for the last 5-6 years and all the way through the PreSonus acquisition, were put together based on their versatility, skills, and work ethic. An amazing team: Ben, Chris, Eric, Kyle, Richard, Brian and Brian, Josh, Patrick, Kris, Allison…we all worked hard and had fun.
How did you feel when it was complete?
Like most software products… Notion is not complete, and will never be complete.
When you think about the last 25 years, how does it make you feel seeing how far PreSonus has come?
Just looking at the last 6+ years I have been here it makes me very proud to see what we all have accomplished. The PreSonus team is remarkable, and the stories I have heard about the previous 20 years can go from one extreme to the other. I’ve given responses to those stories like, “How did you even stay in business?” to, “Amazing, how did you accomplish that?”..and of course “Rick did what!?” But looking at 25 years, I’m proud of PreSonus and the amazing team here, and I’m proud of the Notion team that worked through so much adversity to have an opportunity to even be here.
Interested in Notion? Check it out here.
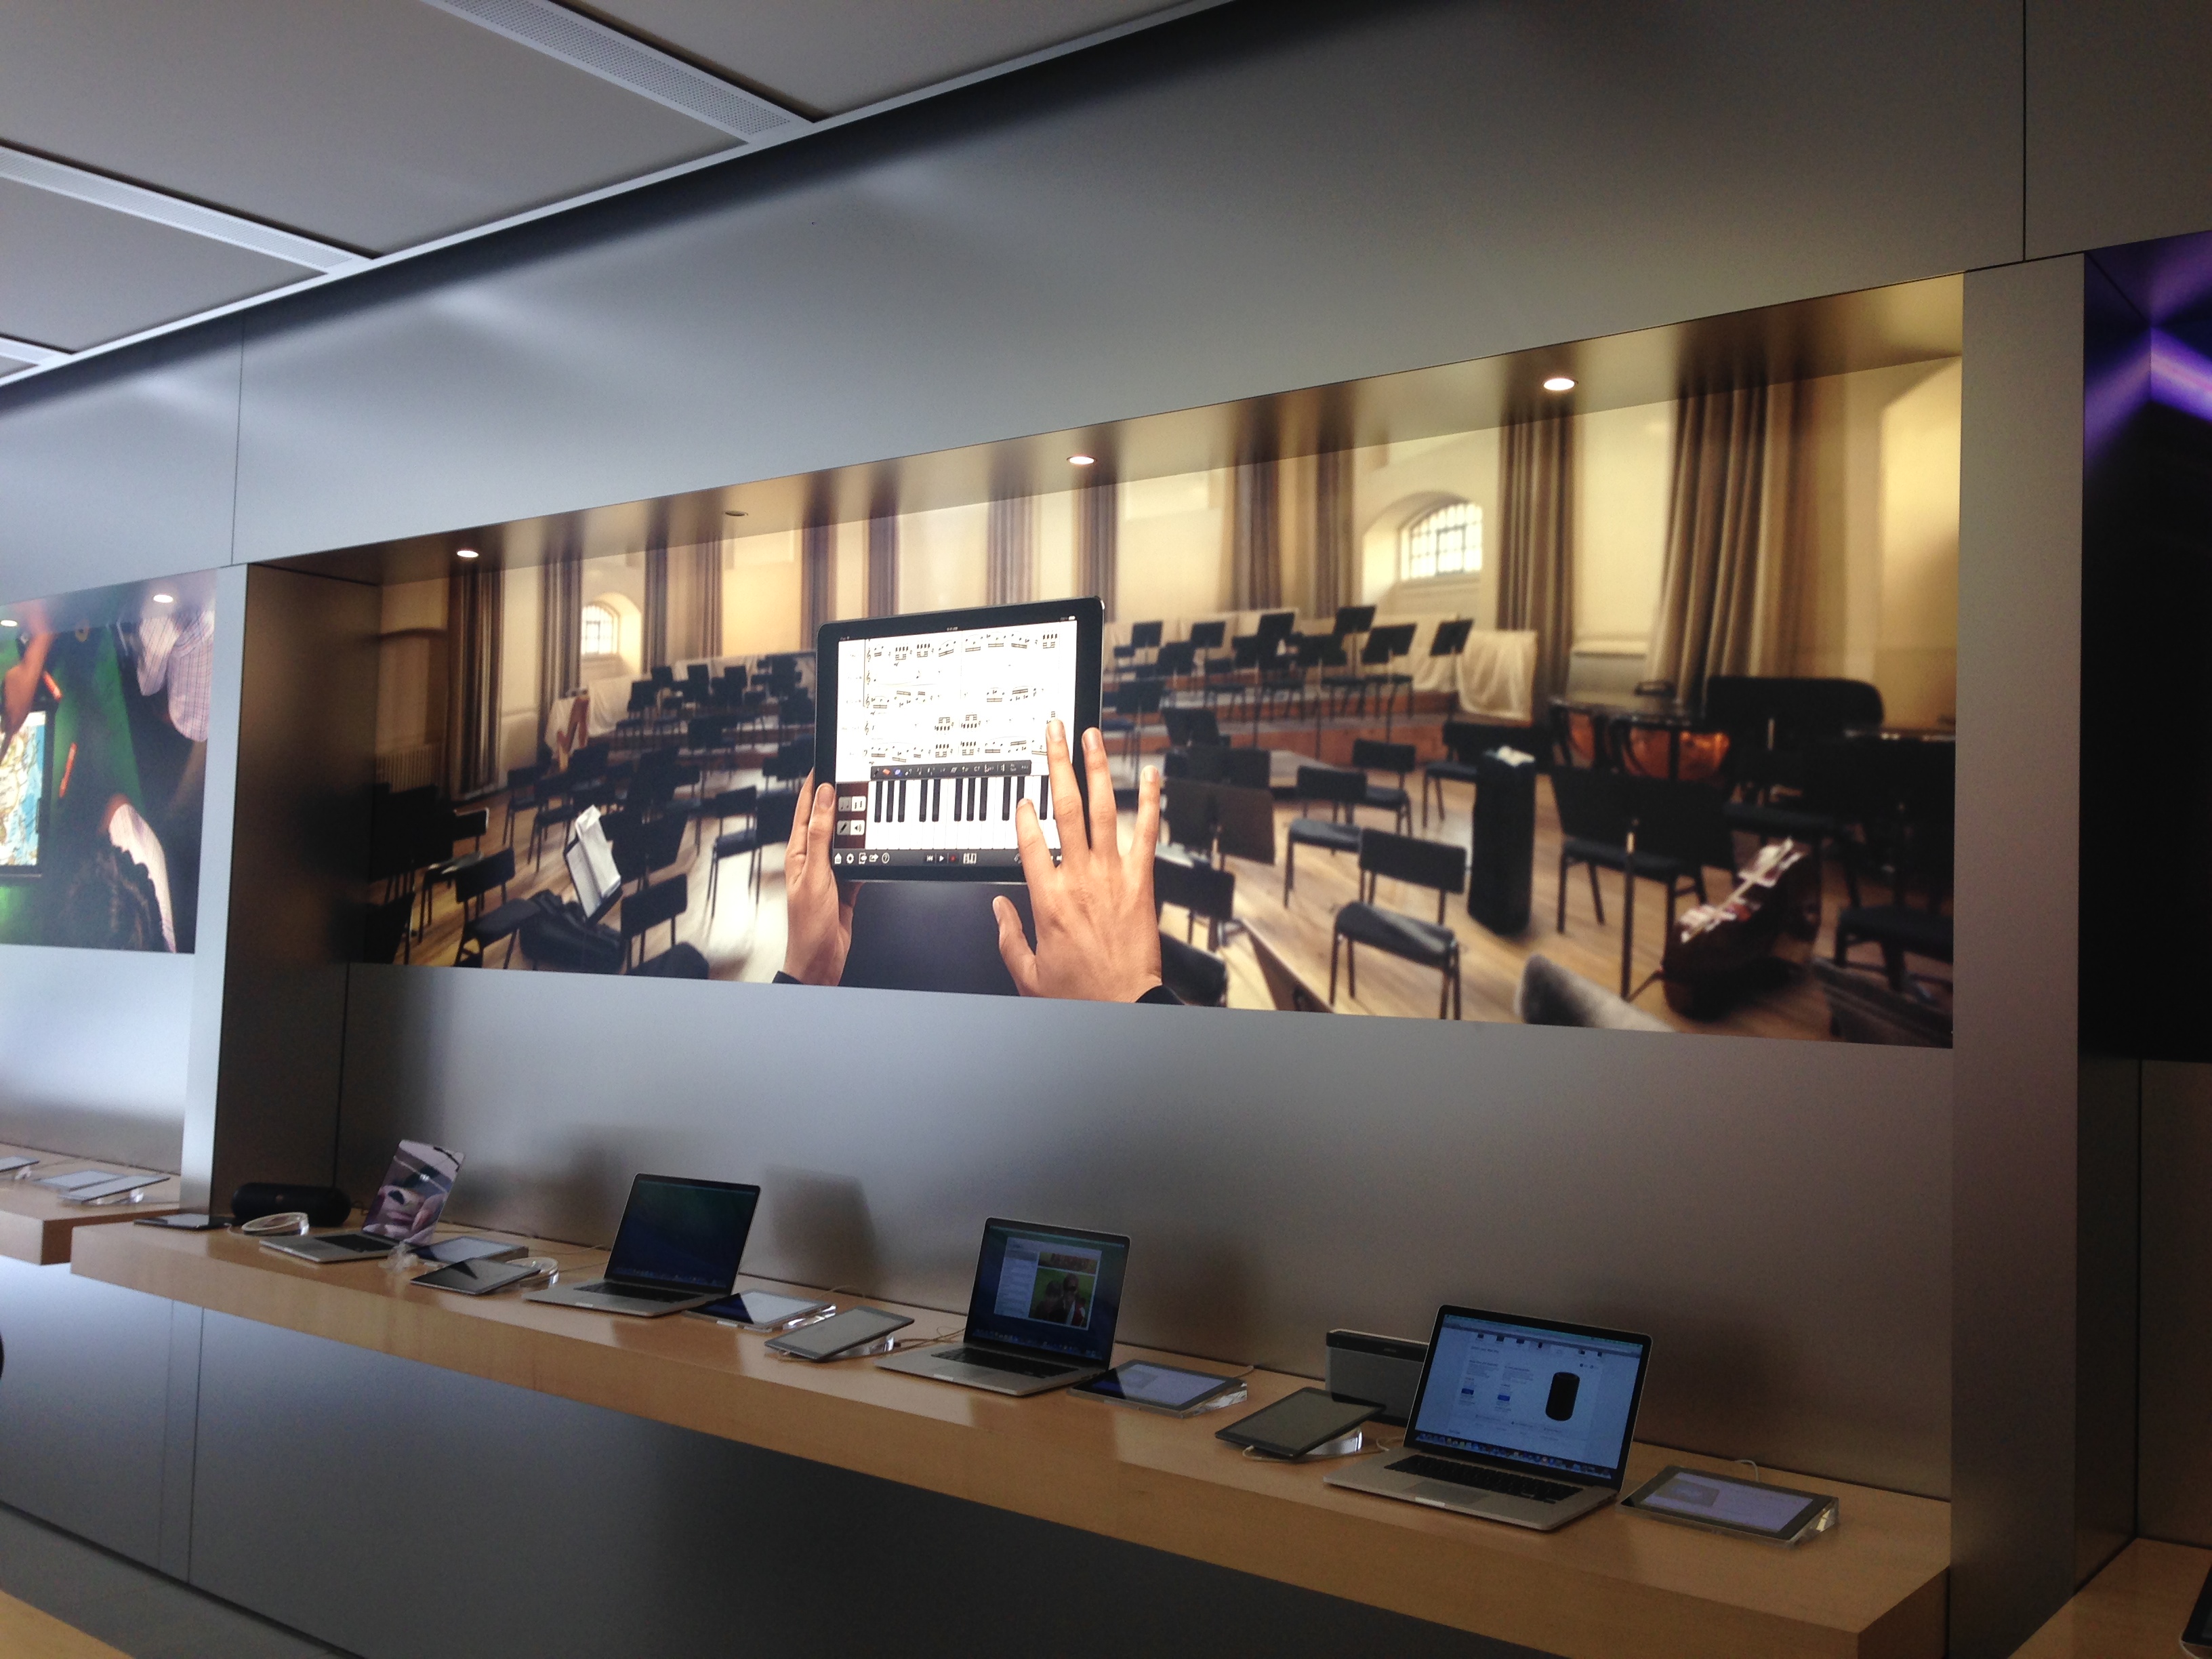
Notion Music featured in Apple Stores across the world!
2019 Rep and Distributor Awards from NAMM
In preparation for the Winter NAMM show, PreSonus hosted our sales reps and international distributors for a series of very exciting kick-off meetings. In the US, our sales reps play a big part in interfacing with our dealers and customers to help them reach their creative goals.


In recognition of outstanding performance during the year awards were presented to the following reps for their achievement:
- The Rep Firm of The Year was presented to Sonic Sales, which serves the Northern California, Northern Nevada Hawaii, Washington, Oregon, Montana, and Alaska Territory.
- The Individual Rep of the Year award was presented to Tim Dykes of Bencsik associates in Florida.
- The Demo God award went to Dave Batson of Cowser Marketing for his work in Arkansas, Oklahoma, and Eastern Texas.
- The E-Commerce Excellence award went to Chris Hutnick and Lienau AV, in Metro New York and New Jersey.
- Cadon Technical Sales was presented with the Studio One Champions award for their hard work and inspiration in Iowa, Missouri, Kansas, Nebraska and Southern Illinois.


Bi-Amping the Ampire
I’m still wrapping my head around PreSonus giving us amp sims that are light years beyond the original Ampire in a free update…and also making them available for use in other programs. But now that they’re here, let’s take advantage of them before PreSonus’s accounting department changes its mind.
The new amp sims do not supplement the old Ampire, but replace it. New Studio One owners will have only the new amps; existing users will find that the legacy presets were removed. If you need to get the older presets back because you used them in pre-4.6 projects, simply install the Ampire XT Classics extension—but I’d recommend redoing any presets with the new amps, because they sound so much better. (The Ampire XT Metal Pack works with the new Ampire, but you may need to re-install it.) The PreSonus Knowledge Base has an article with everything you need to know about making the conversion from the old Ampire to the shiny new Ampire XT.
Why Bi-Amp?
Bi-amping a guitar amp is useful for the same reason that most studio monitors are bi-amped—just as you can optimize the speakers for high and low frequencies, you can optimize the amps for high and low frequencies. For example, with heavily-distorted chords, the high strings will be equally distorted and relatively indistinct. With bi-amping, the lower notes can have a big, beefy distortion sound, while the high notes ring out on top—which is the subject of this Friday tip.
Let’s take a bi-amped preset apart to find out how it works. This preset is available on the PreSonus Exchange, so if you just want a cool, crunchy rhythm sound, go ahead and download it. But the real value here is learning how to make your own presets, because this preset was made using my guitar, pickups, strings, playing style, pick, and follows my musical tastes. It’s unlikely you play guitar in exactly the same way, so it’s worth tailoring any amp sim preset—not just this one—to your own playing style and gear.
Recording the Guitar
Guitars are mono, but to play stereo games, we need to convert a mono track to dual mono. This allows using processors like the Binaural Pan.
- Record a mono guitar track with Channel Mode set to Mono.
- Change Channel Mode to Stereo.
- Select what you recorded.
- Choose Bounce Selection (ctrl+B). Now your guitar part is dual mono (e.g., the same part in both the left and right channels), so Studio One recognizes it as stereo.
The FX Chain Multipreset
Fig. 1 shows the FX Chain “block diagram.” The Splitter is doing a Frequency split; frequencies below 924.7 Hz go to the left split, while frequencies above that go to the right split.

Figure 1: Bi-amp Multipreset block diagram.
Next up is choosing the amps, and setting their parameters (Fig. 2). The left split uses the MCM 800, a revered British amp that can marshall its resources to give big, beefy sounds. The right split’s VC30 amp is known amongst the vox populi for its bright, ringing high end, so the two amps are ideal for delivering the desired result.
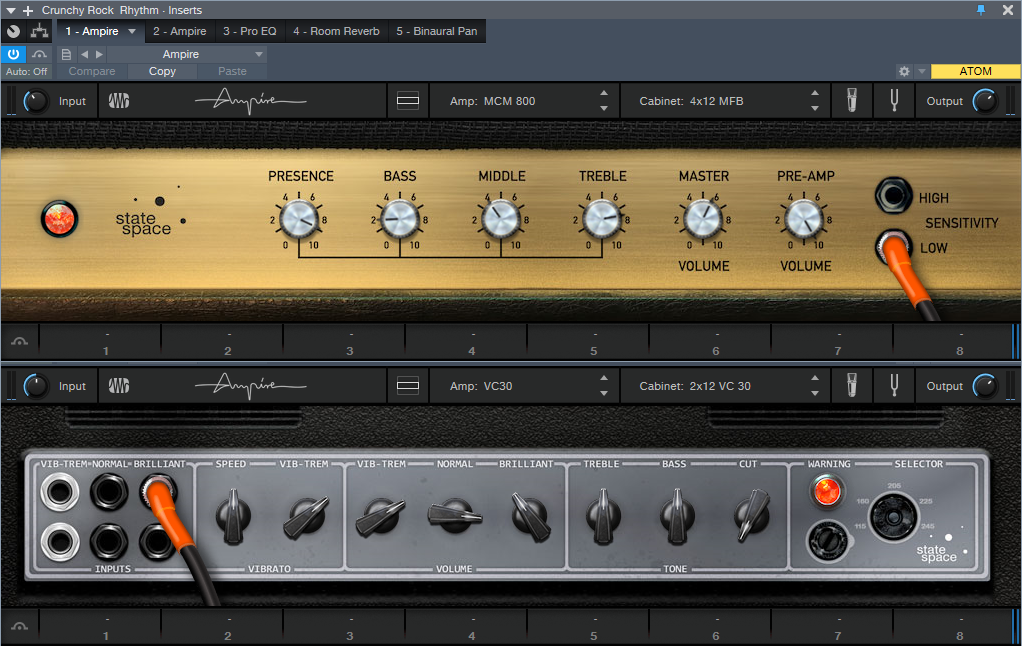
Figure 2: Left split (on top), right split (below).
Now let’s enhance the amp sound with some EQ, reverb, and stereo imaging to spread out the reverb a bit more (Fig. 3).
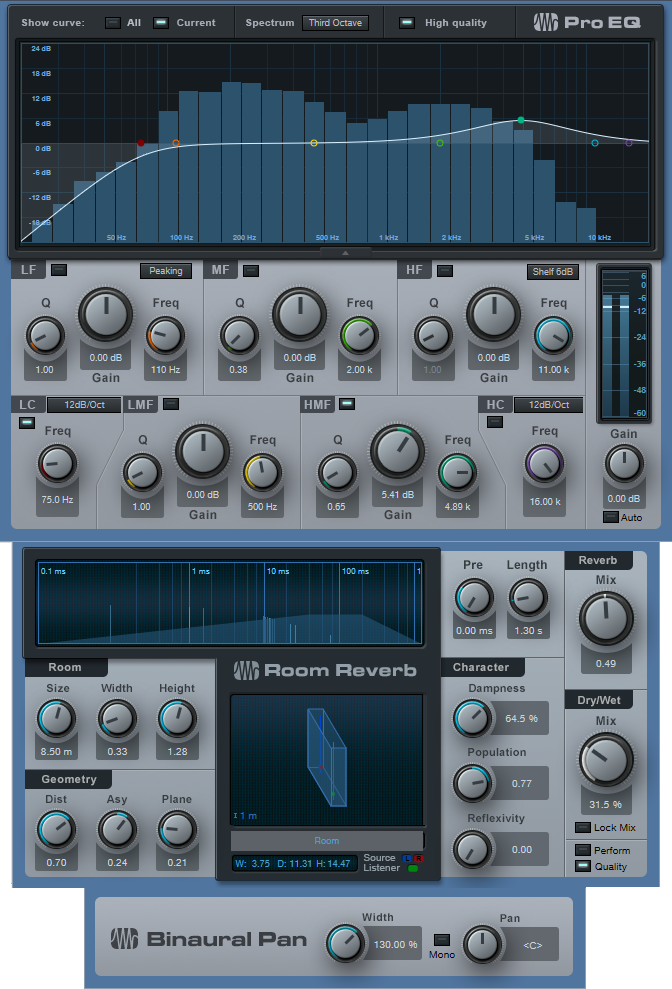
Figure 3: Final touches for the bi-amp multipreset.
The EQ adds the equivalent of an amp’s “bright” switch. With a non-bi-amped preset, you have to be very careful about adding brightness because it can emphasize any artifacts caused by intermodulation distortion. But that’s not an issue here, because of the VC30’s a clean high end. The gentle low-frequency roll off simulates more of an open-back cabinet sound. The reverb is sort of a cross between a spring and room sound, while the Binaural Pan spreads out the reverb signal for a wider stereo image. The pan setting is fairly conservative; feel free to widen things further.
This multipreset makes an excellent template for further adventures with bi-amplification. Of course, this just scratches the surface of what’s possible with these new amps—so stay tuned to the Friday Tip of the Week for more applications.
Download the Crunchy Rock Rhythm preset here!
Notion WINS KVR Readers’ Choice Award!
We’re honored to close out the decade with a win from KVR Audio for Favorite Notation Software voted on by their readers! Thanks to everyone who voted. Cheers to 2020!
Read more about Notion’s win here.
Read the full list of winners here.
Shop Notion here!
Resonator FX Chain
This FX Chain complements the Tightener FX Chain presented in the October 25, 2019 Friday Tip. Whereas the Tightener reduces the presence of the key center in a piece of audio, the Resonator enhances the key center by adding resonance. The download at the end includes twelve Resonators—one for each key.
The heart of each Resonator FX Chain is two delay lines whose period correlates to a particular key, and are tuned an octave apart from each other. Mixing the delayed, resonant sound with the dry sound imparts a sense of pitch, which can be useful with unpitched instruments (such as percussion) to blend in better with melodic instruments. It can also help create a sense of pitch for drums that aren’t tuned properly, as well as emphasize any instrument’s key center.
For example, suppose it’s hard to get a shaker part to fit in a mix because its level is either too high and stands out, or is too low and sinks into the track. Adding a feeling of pitch may allow mixing the part a bit higher, while also having it blend into a mix more seamlessly. If taken to an extreme (and the FX Chain allows for that!), the Resonator has special effects potential for sounds like “cylon” voices, or tuning reverb.
The Controls
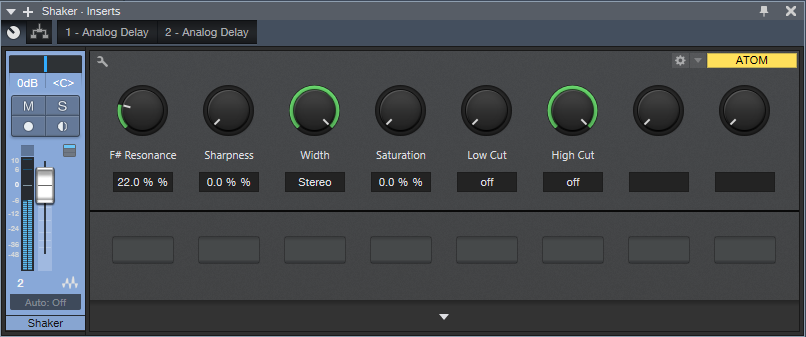
Figure 1: Each Resonator has six controls; the Resonance control is the most important one.
The controls (Fig. 1) are pretty straightforward, and cover the full travel of the Analog Delay controls. There’s no need to tweak any Transform curves.
- [key name] Resonance varies the mix of the resonant and dry sounds. Most of the time, mixing in even a bit of resonance may be all you need.
- Sharpness adds feedback to create more intense resonance.
- Width determines whether the resonance is stereo or mono. Most of the time, you’ll probably want to leave this control fully clockwise.
- Saturation, Low Cut, and High Cut controls are “because we can” controls. You may not use them much, but hey, an FX Chain allows for eight controls…so why not?
Striking the Right Chord
You can also use the Resonators to impart the sense of a chord by sending a sound to FX Channels, loaded with appropriate Resonators. Fig. 2 shows a shaker part acquiring a more melodic vibe via resonators for the keys of D, F#, and A. This produces a D major chord tonality.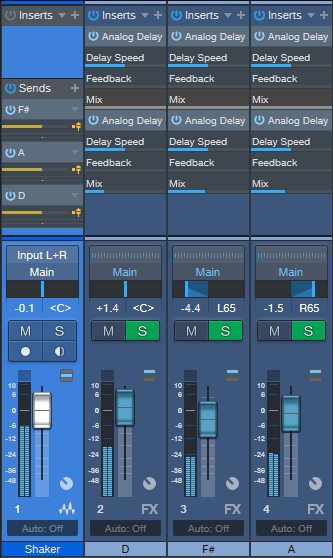
Figure 2: Sending the audio from a shaker to three FX Channels “tunes” the shaker to a D major chord.
Although I came up with this mostly to process unpitched sounds, I’ve found it has other uses as well. For example, with an acoustic guitar part, a Resonator can add a vibe that’s not unlike the drone strings on a sitar. The best implementation I’ve found for this is putting the Resonator in an FX Channel, and automating a send so that the resonance is added only in certain strategic parts. And of course, if you want to get crazee, you can always turn up the resonance and sharpness, and do cylon voices. Fun stuff!
Download the 12 Resonator FX Chains Here.
Track Matching with the Project Page
Okay, this is an unusual one. Please fasten your seat belts, and set your tray tables to the upright and locked positions.
Personal bias alert: With pop and rock music, for me it’s all about vocals, drums, and bass. Vocals tell the story, drums handle the rhythm, and bass holds down the low end. For a given collection of songs (formerly known as an “album”), I want all three elements to be relatively consistent from one song to the next—and that’s what this week’s tip is all about. Then the other instruments can weave in and out within the mix.
It’s fantastic that you can flip back and forth between the Project page and a Song that’s been added to the Project page, make tweaks to the Song, then migrate the updated Song back to the Project page. But it’s even better when you can make the most important changes earlier in the process, before you start down the final road of mastering.
Here’s a way to match bass and vocal levels in a collection of songs. This takes advantage of the Project page, but isn’t part of the mastering process itself. Instead, you’ll deploy this technique when the mix is in good shape—it has all the needed processing, automation, etc.—but you want a reality check before you begin mastering.
We’ll cover how to match vocal levels for the songs; bass works similarly, and in some ways, more effectively. Don’t worry, I’m not advocating robo-mixing. A mathematically correct level is not the same thing as an artistically correct level. So, you may still need to change levels later in the process—but this technique lets the voice and bass start from a “level” playing field. If you then need to go back and tweak a mix, you can keep the voice and bass where they are, and work the mix around them.
(Note that it’s important to know what the LUFS and LRA metering in the Project page represent. Rather than make this tip longer, for a complete explanation of LUFS and LRA, please check out this article I wrote for inSync magazine.)
- Create a test folder, and copy all your album’s Songs into it. Because this tip is about a diagnostic technique, you don’t want to overwrite your work-in-progress songs.
- Create a new test Project.
- Open a copied Song, remove any master bus processing, and Choose Add to Project for the test project. Add all the other songs on the album to the test project. Do not normalize the songs within the test project.
- Open the Loudness Information section for each song, and select the Post FX tab. Adjust each song’s individual level fader (not the master fader) so all songs have the same LUFS reading, then save the Project. The absolute LUFS value doesn’t matter; choose a target, like -20 LUFS. (When adjusting levels, 1 dB of level change alters the LUFS reading by 1. For example, if a song registers at -18.4 dB, decrease the level by 1.6 dB to reach -20 LUFS. Check and re-check by clicking on Update Loudness as needed until the LUFS readings are the same.)
- Choose a Song to edit (click on the wrench next to the song title). When the Song opens, solo only the vocal track. Then choose Song > Update Mastering File. Note: If a dialog box says the mastering file is already up to date, just change a fader on one of the non-soloed tracks, and try again. After updating, choose View > Projects to return to the test project.
- Repeat step 5 for each of the remaining Songs.
- Select all the tracks in the Project page, then click on Update Loudness.
- Check the Loudness Information for each song, which now consists of only the vocal (Fig. 1). For example, suppose the readings for six songs are (1) -24.7, (2) -23.8, (3) -24.5, (4) -22.7, (5) -23.1, and (6) -24.3. Those are all pretty close; we’ll consider -24.5 an average reading. The vocals on songs (1), (3), and (6) have consistent levels. (2) and (5) are a tad high, but song (4) is quite a bit higher. This doesn’t mean there’s a problem, but when you go back to using the original (not the copied) Songs and Project, try lowering the vocal on that song by 1 or 2 dB, and decide whether it fits in better with the other songs.
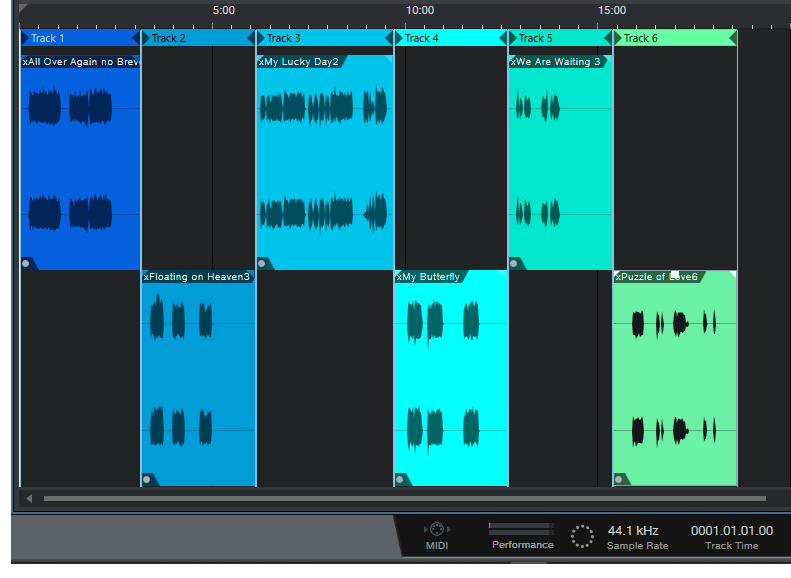
Figure 1: The songs in an album have had only their vocal tracks bounced over to the Project page, so they can be analyzed by the Project page’s analytics.
The waveforms won’t provide any kind of visual confirmation, because you adjusted the levels to make sure the songs themselves had a consistent LUFS reading. For example, if you had to attenuate one of the songs by quite a bit, visually the vocal might seem louder but remember, it’s being attenuated because it was part of a song that was louder.
Also try this technique with bass. Bass will naturally vary from song to song, but again, you may see a lager-than-expected difference, and it may be worth finding out why. In my most recent album, all the bass parts were played with keyboard bass and generated pretty much the same level, so it was easy to use this technique to match the bass levels in all the songs. Drums are a little dicier because they vary more anyway, but if the drum parts are generally similar from song to song, give it a try.
…But There’s More to the Story than LUFS
LRA is another important reading, because it indicates dynamic range—and this is where it gets really educational. After analyzing vocals on an album, I noticed that some of them had a wider dynamic range than others, which influences how loudness is perceived. So, you need to take both LUFS and LRA readings into account when looking for consistency.
For my projects, I collect all the songs I’ve worked on during a year, and release the completed project toward the end of the year. So it’s not too surprising that something mixed in February is going to sound different compared to something mixed in November, and doing something as simple as going back to song and taking a little compression off a vocal (or adding some in) is sometimes all that’s needed for a more consistent sound.
But let me emphasize this isn’t about looking for rules, but looking for clues. Your ears will be the final arbiter, because the context for a part within a song matters. If a level sounds right, it is right. It doesn’t matter what numbers say, because numbers can’t make subjective judgments.
However, don’t minimize the value of this technique, either. The reason I stumbled on it was because one particular song in my next album never seemed quite “right,” and I couldn’t figure out why. After checking it with this technique, the vocal was low compared to the other songs, so the overall mix was lower as well. Even though I could use dynamics processing to make the song reach the same LUFS reading as the other songs, this affected the dynamics within the song itself. After going back into the song, raising the vocal level, and re-focusing the mix around it, everything fell into place.
The Studio One Stereo Separator
A couple previous tips dealt with how to give mono instruments, like guitar, a stereo image that won’t degrade when collapsed to mono. Widen Your Mono Guitar—Sans Problems used delay, but in a way that minimized phase issues. Delay-Free Stereo from Mono used two Multiband Dynamics, set for no compression, to separate the audio into bands that you could then pan left or right.
This tip takes the process even further—it’s versatile, relatively simple, easily customizable, and also, has no phase issues when collapsed to mono. I’ve even used it to create a subtle, artificial stereo image from old mono records.
The Stereo Separator is particularly effective with power chords and rhythm guitar, especially as an alternative to layering parts in search of a “bigger” sound—you can obtain a stereo spread with a single track, so the sound is more defined compared to using multiple layers. And of course, if you scroll to the end there’s a downloadable FX Chain, so you can start playing with this immediately.
This example assumes a mono, distorted guitar track, like what you’d obtain by using a single mic on an amp. To create a stereo image, we first need need to convert this to a stereo track. So, set the track’s Channel Mode to stereo, and bounce the track to itself (Ctrl+B) to convert it into a dual mono (i.e., stereo, but with the same audio in the left and right channels). Now we can start playing with the stereo imaging.
- Open the track’s Channel Editor, and select the Routing Window. Drag a Splitter into the Channel Editor. Choose 5 splits, and Frequency Split for the Split Mode. The defaults split frequencies are fine, at least for now.
- Add a Dual Pan processor to the four high-frequency splits. You usually want the bass frequencies centered, so we’ll forego a split in the lowest-frequency split. You now have a Channel Editor that looks like Fig. 1.
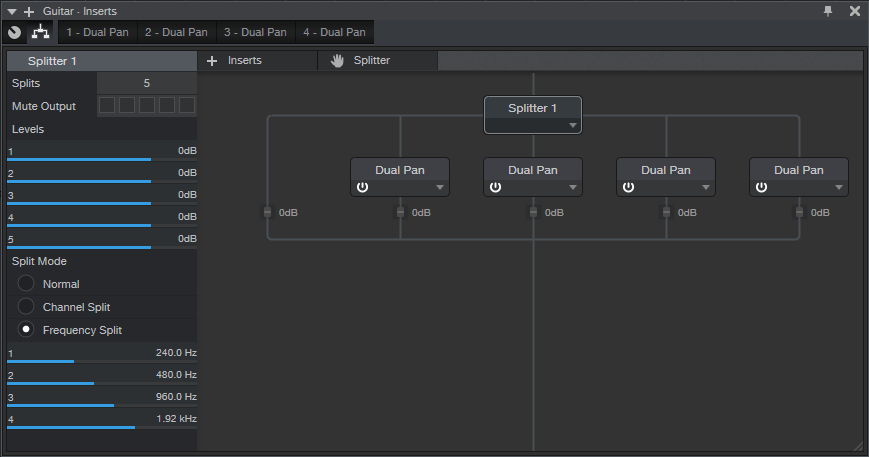
Figure 1: The Channel Editor, with Frequency Split selected, and the Dual Pan effects inserted.
- Fig. 2 shows the macro control assignments. It’s pretty straightforward—the four pairs of knobs are for the Low (L), Low Mid (LM), High Mid (HM), and High (H) frequencies. Each section has left and right Pan controls, which are assigned to the Pan knobs. The left Pan knob is also assigned to the linked Width control, and the right Pan knob ties to the linked Pan control as well. Each section’s buttons are assigned to Link and Bypass.

Figure 2: The Macro control assignments.
- When Linked, the Left Pan knob becomes the Linked Width control, and the Right Pan knob becomes the Linked Pan control. The labels for the controls (Fig. 3) show the default control first, while the = sign shows the function when Link is enabled.
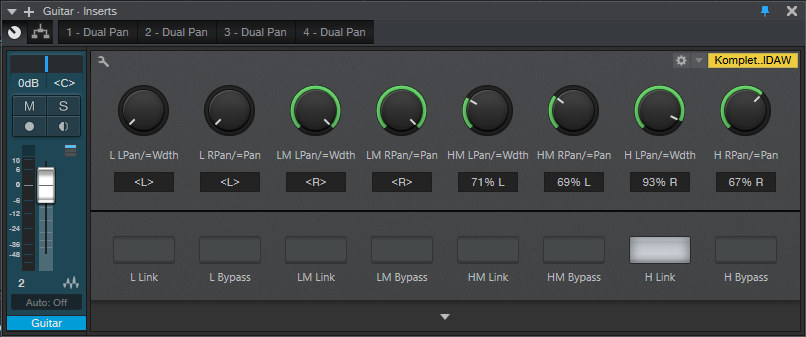
Figure 3: The Macro control panel. All the knobs and buttons are used.
And now, the fun begins! Play with the Pan controls to spread the different frequency bands in the stereo field—the audio example gives a good idea of the type of effect this FX Chain can do. The first example is mono, the second widens the image a bit, and the final example does a somewhat more radical stereo image.
Of course, you can go into the routing window, and change the levels of the various splits. Or, add FX in the splits…change the split frequencies…there’s enough to keep you busy for a while. Happy stereo!
Download the Stereo Separator.multipreset here!
Double Guitar with “Faux Bass”
This technique dates back to when I was doing live gigs with Brian Hardgroove from Public Enemy—me on guitar, him on drums. Since there was no bass player, we needed a way to fill out the bottom end. I’ve come up with a bunch of ways to do that over the years, but the technique presented here is the easiest one yet to implement. We’ll extract a bass line from an existing guitar track, without using MIDI or virtual instruments—here’s how.
Start by copying the guitar’s audio to a new track, which will become our faux bass track. Call up the Inspector, and transpose the faux bass track down by -12 semitones (Fig. 1). This technique works best with relatively articulated guitar notes, not rhythm guitar chords.

Figure 1: Start by transposing the Faux Bass track down an octave.
Now, it may seem like transposing down an octave is enough, and we can all go home now. No! The faux bass track needs three processors to sound right (Fig. 2).
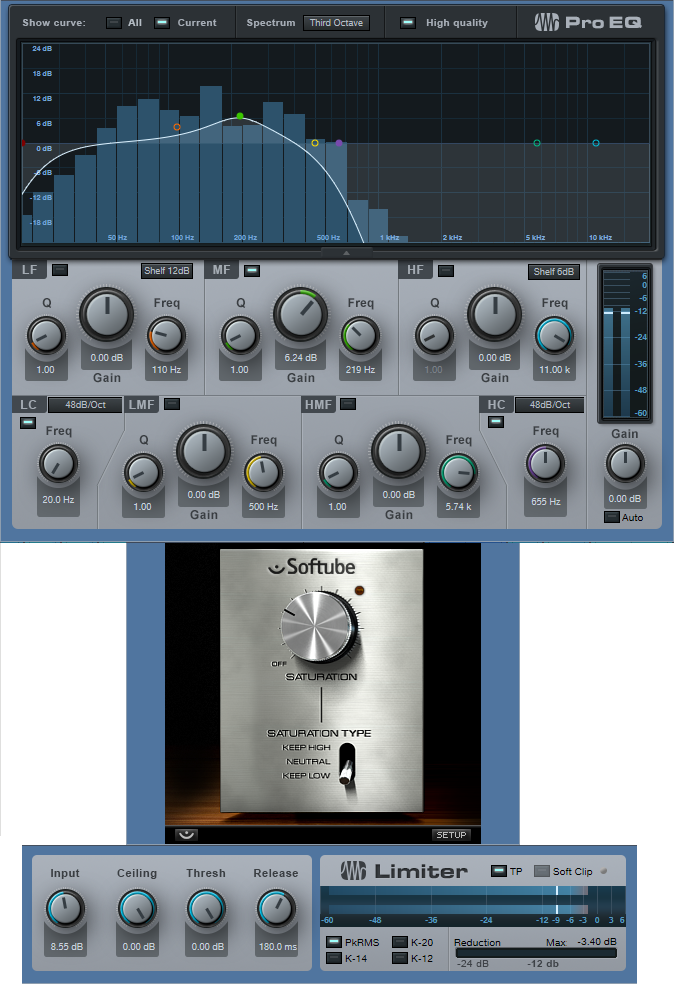
- Pro EQ. This takes off the high end. If you transpose the high frequencies down by ‑12 semitones, you end up with midrange frequencies, and that’s not what we want. We want to transpose the low frequencies, to make them lower.
- Saturation Knob. If you’ve ever played bass, and pushed the sound through a vintage 1964 Ampeg B-15 bass amp, then you know why we need a bit of saturation. The object is to give the bass some “growl,” not only so it stands out a bit compared to the guitar, but also so it has a somewhat aggressive edge.
- People tend to limit or compress bass…who am I to argue? Again, this helps differentiate the faux bass track from the guitar and provides a more solid low end.
But as they always say, the proof is in the pudding. However, since we’re not providing a recipe about how to make pudding, check out the audio example instead.
The first two measures are the guitar by itself, while the second two measures have the faux bass playing along. Pretty cool, eh? Oh…and if you’re in a Cream tribute band, this will definitely come in handy for “Sunshine of Your Love.” Have a great weekend!
Special Event THIS Friday at 10 am CST!

We have celebrated 10 years of Studio One all month long and we plan to keep the party going this Friday at 10 am CST!
Tune in on Facebook or YouTube for a special event hosted for your friends at PreSonus!
Also, this is your last reminder to enter to win from PreSonus. Read more about the #StudioOneGiveaway going on NOW on Instagram and Facebook HERE.
Widen Your Mono Guitar—Sans Problems
Your guitar is most likely mono. But sometimes you want a wide, full, stereo image. I can relate.
One technique is to send the guitar track to an FX channel, insert a delay set for a relatively short delay (like 25 ms), and then pan the original track and FX channel oppositely. But if you sum the signals to mono, then there’s the possibility of cancellation. In fact, I saw a guy in an internet video who said this was a terrible idea, and you should just overdub the part again and pan that oppositely if you want stereo.
Well, overdubbing is an option, assuming you can play tightly enough that the parts don’t sound sloppy. But don’t forget Studio One has that wonderful Channel Mode button on the Main output, so you can test stereo tracks in mono—simply adjust the delay time for minimum cancellation. You won’t be able to avoid cancellation entirely, but tweaking the time may keep it from being objectionable (especially once the delay time gets above 25 ms or so, because that’s more into doubling range). To make any phase issues even less noticeable, lower the delayed sound’s level a little bit to weight the sound more toward the dry guitar.
But I wouldn’t be writing this tip if I didn’t have a better option—so here it is.
- Pan your main guitar track to center.
- Send it to two FX Channels.
- Insert an Analog Delay in each channel, with Mix set for 100% delay, Factor to 1.00, Mod to 0.00, and Width fully counterclockwise. Pan them oppositely. Set the damping as desired. The screenshot shows a good starting point for your settings.

- Set different delay times, preferably somewhat far apart, for the two delays. I prefer prime number delays (3, 5, 7, 11, 13, 17, 19, 23, 29, 31, 37, 41 ms) so the delay timings don’t interfere with each other. For example, set one delay to 11 ms, and the other to 29 ms.
- Bring up the levels of the two delayed channel to create a pleasing stereo spread. It won’t be as dramatic a spread as using one dry and one delayed sound panned oppositely…but frankly, that “super stereo” effect sounds gimmicky compared to a full, robust stereo image. However, if you do want a more dramatic stereo separation, drop the center channel guitar by 6 dB in relation to the FX Channels that are panned right and left—you’ll still get most of the benefits of this approach. (You may need to group all three channels, and raise their levels a bit to compensate for the drop from lowering the center channel level.)
Now, here’s where the magic happens. Set the Main output mode to mono, and you’ll hear virtually no difference between that and the “faux stereo” signal, other than the stereo imaging. The reason why is that now, we have a guitar in the center channel—so choosing mono creates a center channel buildup. This raises the main guitar’s level above the delayed sounds, so there’s virtually no chance of audible cancellation, and it balances the level better between the stereo and mono modes.
Now you have a wide guitar that sounds equally loud, and is phase-issue free, in mono or stereo—happy Friday!