Bigger, Wider Sounds: Try Stereo Miking
If you haven’t experimented yet with mid-side stereo miking, you’ll be in for a treat when you do. Here’s why:
- Record background singers with gorgeous stereo imaging
- Capture a guitar amp with stereo room sound
- Run synths and drum machines through a PA or amp, and obtain the vibe of recording electronic instruments in an acoustic space
- Capture full stereo with choirs, plays, podcasts, seminars…you name it
Even better, mid-side stereo miking collapses perfectly to mono, and Studio One Professional bends over backward to make the recording process easy.
Wait—Is This Déjà Vu?
The post Mid-Side Processing with Artist covered mid-side processing for Studio One Artist, and Mid-Side Processing Made Easy did the same for Studio One Professional. However, these were only about processing mid and sides audio extracted from an already recorded stereo track.
This post is about recording with mid-side miking, and monitoring the result as it’s being recorded. This lets you achieve optimum mic placement by hearing the results of changes in mic positioning, in real time. You don’t have to record the audio first, and then play it back to see if you got it right. And on playback, there’s no need to extract the mid and sides, because you already recorded them as separate tracks.
Mid-Side Recording? I’m Already Intimidated!
You needn’t be. You might have heard about mid-side recording requiring math, phase changes, encoding, decoding, a degree in physics, etc. Nope! As I said, Studio One Professional makes it easy.
There are many ways to record in stereo. The most common is X/Y miking, where one directional mic points toward the left, and one toward the right. But this technique is not ideal. Directional mics color sound coming in from outside the pickup pattern, and the two signals don’t play nice when collapsed to mono.
Mid-side miking uses a mic with a cardioid pickup pattern to capture the center of a stereo sound, and a mic with a bi-directional (aka figure-8) pickup pattern to capture the left and right sides. Ribbon mics inherently have a figure-8 pickup pattern, but there are also multi-pattern condenser mics that can be switched to a figure-8 pickup pattern. With this pickup pattern, the mic’s front and back pick up sound, while the sides don’t pick up any sound.
Fig. 1 shows how you’d set up the two mics for mid-side stereo recording. Pretend you’re a guitar amp looking at the mics. The top, figure-8 mic is mounted upside down because the diaphragms of the two mics need to be as close together as possible. The figure-8 mic’s side faces you. Its front faces to the left, and its rear faces to the right. Meanwhile, the cardioid mic is pointing at you.
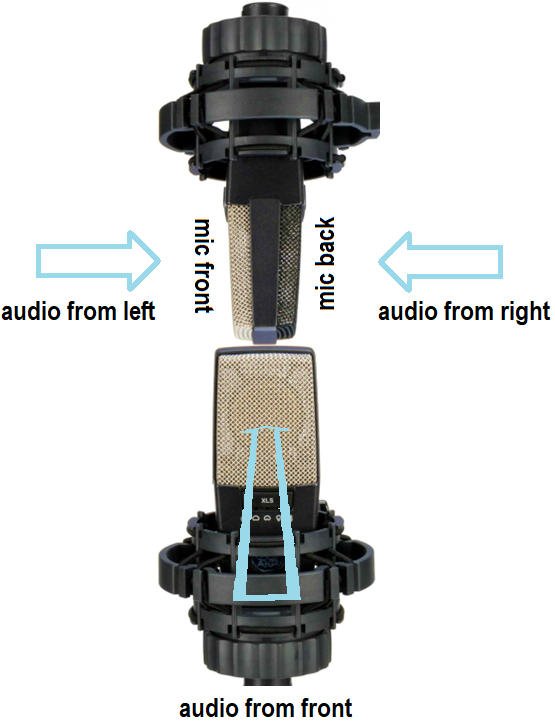
Figure 1: Mid-side miking setup. (Mic images courtesy Sweetwater Publishing)
The Studio One Connection
You need two tracks and mixer channels, one for the cardioid (mid) mic and one for the figure-8 (sides) mic. Record the two mics like you would any other mics. However, this is where many people get lost—it’s counterintuitive that the single mic cable coming from the figure-8 mic can turn into right and left channels in Studio One. Fortunately, Studio One knows how to do this.
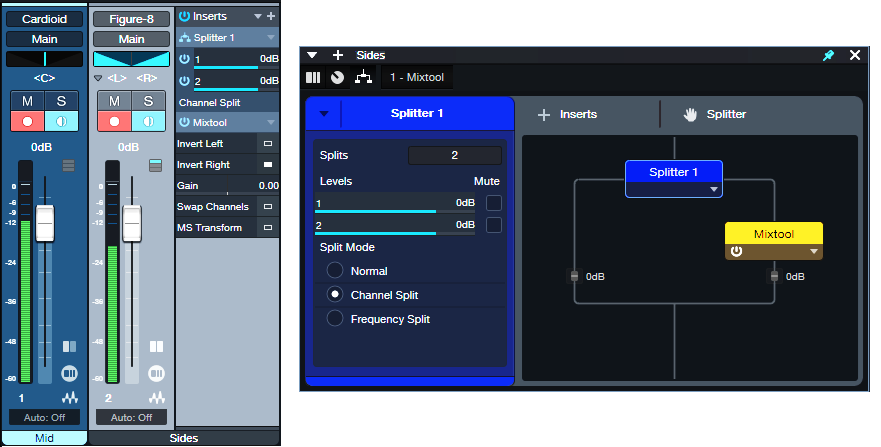
Figure 2: Studio One FX Chain for mid-side recording.
Fig.2 shows audio being recorded. Pan the Cardioid mic to center for your mid (center) audio. For the Sides mic, set the track input to mono, but set the track mode to stereo (important!). This combination allows recording in mono, but playing back in stereo.
A Splitter in Channel Split mode splits the mono audio into two paths. All the Mixtool plugin does is invert the right channel path’s polarity. Now the left and right channels are out-of-phase, so there’s a wide stereo spread. At the mixer, set the Sides channel’s Pan mode to Dual Pan. Pan the controls hard left and right. Now we have the Splitter’s left channel audio panned to the left, and the right channel’s audio panned to the right.
You might think “wait a second…if the left and right channels are out-of-phase, then if they play back in mono, they’ll cancel.” Exactly! And that’s why mid-side miking offers superb mono compatibility. When the sides cancel, you’re left with the mono audio from the cardioid mic, which also picks up sounds that are in front of the mic to the left and right. So, you’re not losing the audio that ends up being stereo—just the stereo imaging. And of course, mono audio has no problem being played back in mono.
Now, Here’s the Really Cool Part
You don’t have to understand how all this works, just create the setup described above. The Sides channel varies the level of the stereo image, and the Mid channel varies the mono center. So, you can make the stereo image wider by raising the level of the Sides channel, and lowering the level of the Mid channel. Or, lower the Sides channel for a narrower image. Or, process the two separately, and gain the advantages of mid-side stereo processing.
Go ahead—bathe your ears with stereo recording instead of mono. As long as you have one mic with a directional pickup pattern, one mic with a figure-8 pickup pattern, and two mic stands, you’re good to go. And there’s a bonus: if you start getting involved with Atmos mixing, having stereo audio gives you more fun options than mono.