Tag Archives: Craig Anderton
A Slick Trick for Thick Kicks
Imagine if you had a mold for sound, the same way you can have a mold for Jell-O—and whatever you poured into your “sonic mold” took on those particular characteristics. Well, that’s pretty much what convolution processors do. When they load their “mold,” which is called an impulse response, it shapes whatever sound they’re processing.
Studio One has two convolution processors. Ampire uses one to load speaker cabinet impulse responses. For example, when Ampire wants to sound like it’s going through a 2 x 12 speaker cabinet, it loads a 2 x 12 cabinet impulse response. The other convolution processor, Open Air, is optimized for creating acoustic spaces. So if the impulse is of a concert hall, sound processed through Open Air sounds like it’s in a concert hall. If the impulse is a blues club, the the sound takes on the characteristics of being in a blues club.
What’s perhaps not as well known is that you can load pretty much any WAV file into Open Air and use that as your sonic mold. So, this month’s tip is for the EDM and hip-hop crowd, because we’re going to load big-sounding kick drums into Open Air. Then, we’ll use them as molds to turn wimpy kicks into giant, thick kicks that smash through a mix, while leaving a trail of sophisticated destruction in their wake. But don’t take my word for it—check out the audio example, which has no EQ or compression.
There are five two-measure examples. The first example is from a kick track. The second, third, and fourth examples process the kick using this technique. The fifth example repeats the first example, as a reminder of how the sound started.
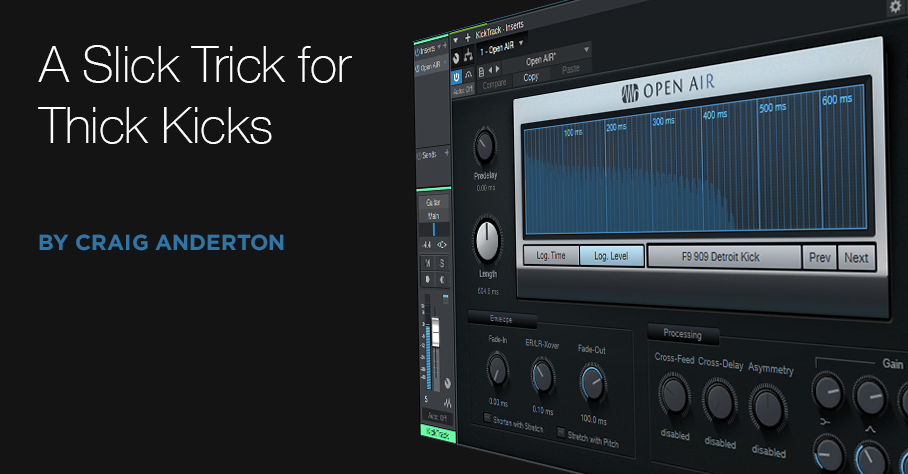
The secret is processing the kick track through the Open Air reverb, using a kick drum sample as the impulse (Fig. 1). Just like how a cabinet impulse response imparts the sound of a cabinet onto a guitar amp, these kick drum impulses shape the kick track to have an entirely different character.

Figure 1: The Open Air reverb has a kick impulse loaded, and imparts that sound to the kick track.
Studio One’s Sound Sets have lots of kick drum samples. Here are the ones I used for the second, third, and fourth two-measure examples. The Open Air Mix control hovered around 30% for these.
Acoustic Drum Kits and Loops > Samples > TM Pop Rock Kit > DW 20.24 Pop Rock Kick > DW 20.24 Pop Rock Kick 1.wav
Acoustic Drum Kits and Loops > Samples > TM Thuddy 70’s Kit > Gretsch 14×22 Vintage Thuddy Kick > Gretsch 14×22 Vintage Thuddy Kick 1.wav
909 Day Studio One Kits > Samples > F9 909 Detroit Kick.wav
So What’s the Catch?
Kick drum impulses can overload the Open Air pretty easily. The first two examples used the softest-velocity kick, but the F9 909 Detroit Kick was way too loud (well, unless you like horrific distortion). Most convolution reverbs are happiest with impulses that peak at around -12 dB.
So, the solution is simple. Drag the kick drum impulse into a Studio One track, use the gain envelope to cut the gain to about -12 dB peak, hit ctrl+B to make the change permanent, and then you can drag this impulse from the Studio One track right into the Open Air reverb.
Of course, you don’t have to limit yourself to kick, but it does seem kicks are where this technique shines the brightest. I also fooled around with using a floor tom as an impulse, and open hi-hat impulses on closed hi-hat tracks. The results aren’t always predictable…but that’s what makes it fun, right?
Fun Facts about FX Chains

Whenever I write a blog post with a downloadable FX Chain, it seems there are always questions about how to load it, save it, or use it. Well, there’s no time like the present to consolidate a bunch of answers.
Artist vs. Pro
An FX Chain combines several effects, which for convenience, you can save and load as a single “virtual multi-effects.” For example, if you come up with a cool kick drum sound based on limiting, EQ, and saturation, you can save the combination of effects as an FX Chain. The next time you want that sound, instead of loading the three effects and tweaking them, just load the FX Chain.
Studio One Professional enhances FX Chains with the ability to bring out macro controls to a control panel (Fig. 1).

Figure 1: Control panel for the Vintage Tape Flanging FX Chain.
Macro controls are extremely powerful—they can control multiple parameters at once, as well as scale control ranges. If you have Artist and see that one of my FX Chains has a control panel, you can still tweak the parameters, but you’ll have to do so at the chain’s individual effects. Often, a lot of effort goes into programming the macro controls, so using these FX Chains in Artist can be a challenge. However, I do try to save FX Chains so that the default settings are useful, and may not require too much tweaking.
Where FX Chains Live
FX Chains are stored in two locations, but the Browser combines these. So, it appears there’s only one place where FX Chains are stored. The factory default FX Chains are located in:
- [Windows] C:\Program Files\PreSonus\Studio One 5\Presets\PreSonus\FX Chains
- [macOS] Applications\Studio One 5 (right-click, and choose Show Package Contents)\Contents\Presets\PreSonus\FX Chains
The User Presets section in this location is for preferences like color schemes and such, not FX Chains. Don’t store your custom FX Chains in the factory default location, because it’s overwritten when you install a new version of Studio One. Instead, store your FX Chains in the location specified in the program’s options for User Data. To find this location from within Studio One:
- [Windows] Studio One > Options > Locations tab > User Data tab
- [macOS] Studio One > Preferences > Locations tab > User Data tab
The default for the user data is:
- [Windows] C:\Users\[user name]\Documents\Studio One\Presets\PreSonus
- [macOS] Macintosh HD\Documents\Studio One\Presets\PreSonus
In either case, the PreSonus folder has a folder for user FX Chains. When you save an FX Chain (click on the down arrow to the right of “Inserts”), you’ll have the opportunity to save it to a particular folder. Any folders you created for your chains in User Data will be shown, and so will the factory default folders. However, if you save into what appears to be a factory default folder, like Drums, your preset will not go into that factory folder. Instead, it will be placed in a Drums folder in your user FX Chain folder (if a Drums folder doesn’t exist in there, Studio One will create it). But remember, only one Drums folder will appear in the Browser, because it’s smart enough to group together the default and user FX Chains from their respective folders.
Moving Your User Data
With either Windows or Mac, I prefer not to keep too much stuff on the main system drive. For example, with Windows I avoid saving to the C drive’s Documents folder. I’ve dedicated drive D: to music, so everything relating to music—songs, projects, and custom presets—is in one place, for easy backup. So, I cut the Studio One folder from the default user location given above, pasted it at the root of my music drive, and re-directed the User Data tab in Studio One’s Options [Windows] or Preferences [macOS] to this new location (Fig. 2).
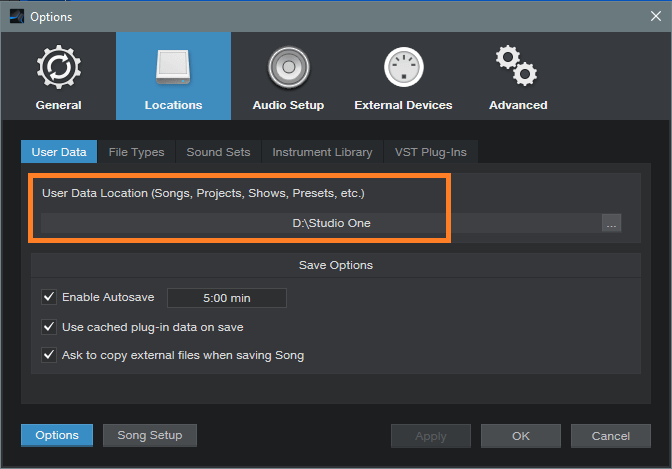
Figure 2: All my user data is now in the Studio One folder at the root of my music drive.
For Windows, my custom FX Chains now live at:
- D:\Studio One\Presets\PreSonus\FX Chains\CA Chains
Is that a User or Factory FX Chain?
If you’re not sure whether an FX Chain is a factory one or a user one, right-click on the FX Chain and choose Show in Explorer [Windows], or Show in Finder [macOS]. You’ll then see whether the FX Chain lives in your User Data folder, or the factory defaults folder.
How to Evaluate an FX Chain
You might not want to add one of my FX Chains to your permanent collection, unless you think it’s something you’ll use. To evaluate an FX Chain after downloading it, drag the chain from the download folder to a Channel, Bus, or FX Channel insert. Check it out and if you want to keep it, store it in your User Data folder, as described above.
Here’s Where to Get My Friday Tip FX Chains
You won’t have to go through years of blog posts anymore! Thanks to the unceasing efforts of Ryan Roullard and the web team to make life easier, they’ll soon be posting my FX Chains on PreSonus Exchange, and you’ll be able to drag and drop them into your Songs right from Studio One’s Browser.
Quad Image Enhancer
Studio One’s Binaural Pan processor can widen, or narrow, an instrument’s stereo image. Aside from making “bigger” sounds that fill out the stereo spread, it also has practical applications. For example, you can spread out a thick stereo synth pad, or a guitar feeding two cabs in stereo, by turning the width control clockwise from the center position. This opens up more room for vocals, kick, snare, bass, and other centered elements. Binaural Pan can also do the reverse—like narrowing a wide, stereo synth bass part to focus it more—by turning the Width control counter-clockwise from the center position.
For mastering, Binaural Pan can make mixes seem larger than life. However, it’s not necessarily a “one-size-fits-all-frequencies” solution, because you might want to spread the highs as far as possible, but narrow the bass, and add only a little bit of spreading to the upper mids—so let’s make ourselves a multiband image enhancer.
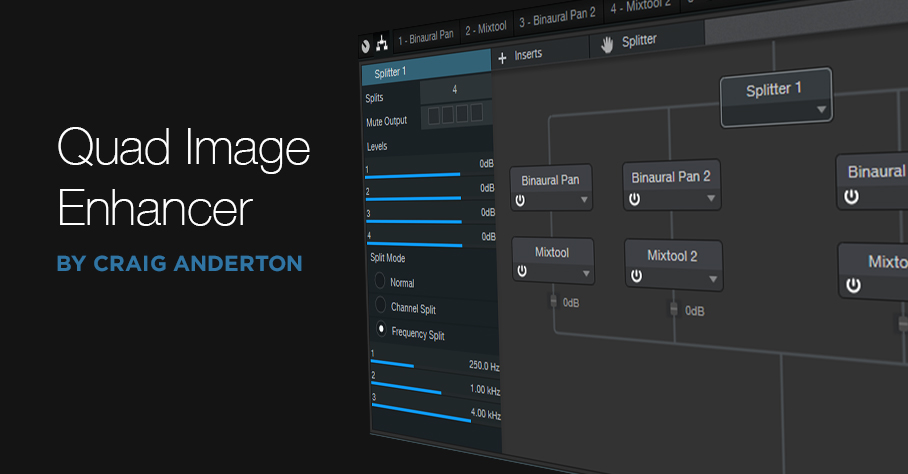
This Quad Image Enhancer FX Chain is ideal for mastering, as well as for working with individual instruments. Fig. 1 shows the modules. The Splitter splits the audio into four bands: Low (below 250 Hz), Low Mid (250 Hz – 1 kHz), Hi Mid (1 kHz – 4 kHz), and High (above 4 kHz). Each of these goes to a Binaural Pan to control the image, and a Mixtool to trim the level (-6 dB to +6 dB).
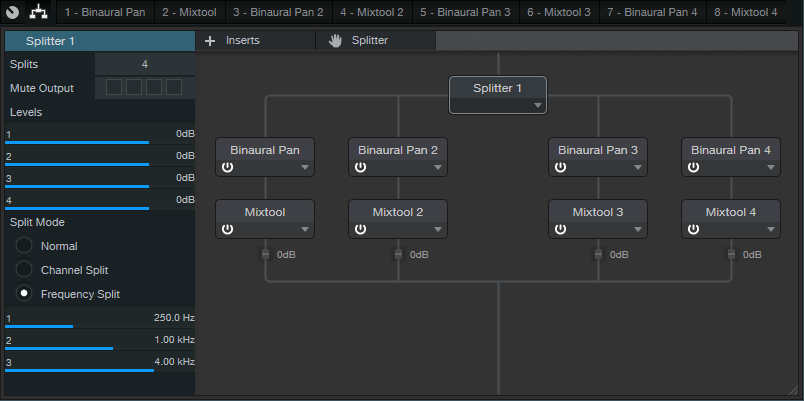
Figure 1: Modules used in the Quad Image Enhancer multipreset.
The split frequencies are arbitrary. You might want to move them around, although the ones in the default multipreset work well with a variety of music.
The Control Panel (Fig. 2) accesses all the needed parameters. Enabling the Mono button is like turning Width fully counter-clockwise, but being able to switch this provides a convenient diagnostic tool for quickly comparing a band’s sound in stereo or mono. Similarly, enabling Bypass makes it easy to hear the effect that widening (or narrowing) has on a particular band. If you need to mute individual bands so you focus completely on one or two bands while editing them, open up the FX Chain, select the Splitter, and mute the desired output(s) in the edit window’s upper-left corner.
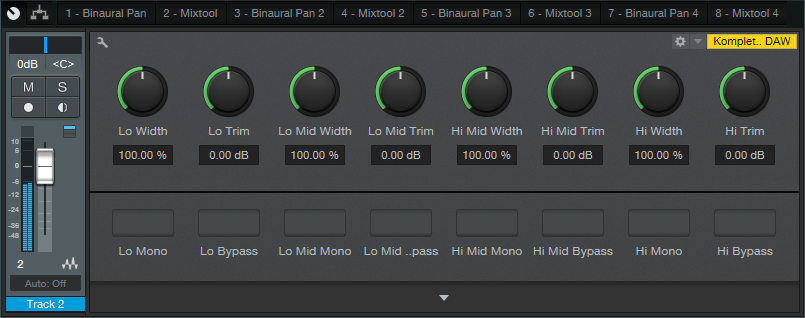
Figure 2: Quad Image Enhancer control panel.
How to Use It
When the Width controls are centered, they don’t affect the sound. You can crank up the widths for a wider sound, but you can also be a little more strategic. The following audio example plays an excerpt of mixed but unmastered audio, followed by the same excerpt going through the Quad Image Enhancer. For this application, the Lo band is narrowed, Lo Mid unchanged, Hi Mid widened slightly, and Hi widened all the way.
Note that unlike some delay-based widening solutions, this FX Chain doesn’t cause any comb filtering-induced “phaseyness” if collapsed to mono.
To widen a sound even further, turn up the Trim control for the Hi Mid or Hi bands by 1-2 dB. Because high frequencies are more directional than low frequencies, emphasizing the high frequencies increases the illusion of width.
Although there are some excellent third-party multiband imaging plug-ins available, you don’t need to go outside the Studio One ecosystem—just download the multipreset, and you’ll be ready to widen, or narrow, your stereo image.
DOWNLOAD THE QUAD IMAGE ENHANCER PRESET HERE
Pro Tools Multi-Mono Mode with Studio One
A fundamental difference between Pro Tools and Studio One is effects handling, which can be confusing for Pro Tools users switching to Studio One (and yes, this tip is based on a true story). When you add an effect with Pro Tools’ mixer insert, you’ll see options for Multichannel and Multi-Mono effects—which Studio One doesn’t have.
Or does it? Actually, not only can Studio One emulate the Pro Tools Multi-Mono mode for people who’ve switched, but there are some advantages that are relevant to Studio One users.
In Pro Tools, Multichannel effects are like what we’re used to in Studio One (and other programs), where the effect processes a mono or stereo track. However, Multi-Mono effects insert separate effects for a stereo track’s left and right channels. Normally this is transparent to the user because the effects are linked, and have a single interface, so they seem like a Multichannel effect. However, Multi-Mono’s particular talent is that you can unlink the effects from each other, switch between the two channels in the interface, and process the two channels (or more, for surround) separately.
My Pro Tools friend was disappointed, because he would often use this feature when mastering, restoring tracks, working with two-track audio sources, and the like. For example, when prepping a file for mastering, he sometimes limited one channel to tame peaks, left the other channel with minimal limiting, then added a master limiter at the output to provide overall limiting (this isn’t the same as using a conventional stereo limiter, and unlinking the two channels). On occasion, the different channels needed different EQ as well.
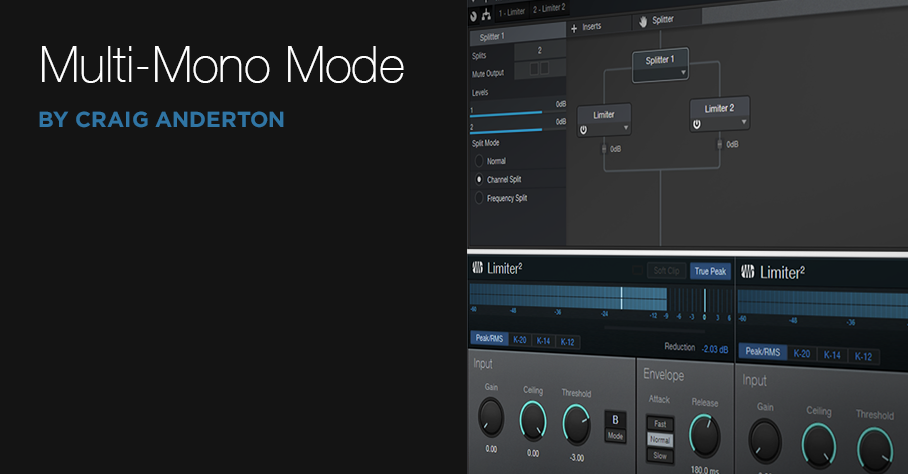
He knew about my Stereo to Virtual Mono blog post, but wanted to have everything in a single track, like Pro Tools. Fortunately, there’s a simple solution (Fig. 1). As an example, let’s use his scenario of wanting different limiters in each channel.
Figure 1: How to implement Pro Tools’ Multi-Mono effects functionality in Studio One.
- Open the Channel Editor, then click on the Routing button.
- Drag a Splitter into the Routing window.
- Set the Split Mode to Channel Split.
- Insert a Limiter2 into each split.
- (Optional) Insert a Limiter2 at the output, to provide the final limiting function.
Done! Now the left and right channels have their own limiters. But the Pro Tools guy also realized there was an advantage to Studio One’s pseudo-Multi-Mono mode: he didn’t have to switch between Limiter interfaces. Instead, he could pin them, and see both at the same time. When I reminded him he could bring out the Gain, Threshold, Ceiling, and Release controls for each Limiter to Macro knobs, save that as an FX chain, and use less screen real estate…let’s just say he was a happy camper.
This isn’t to diss Pro Tools, which (like any DAW) does some things well, and some things not so well. But it does show that when switching from one program to another, concerns you may have about needing to give up a favorite feature could be irrelevant.
Create Ampire Cabs with Pro EQ2
IR-driven cabs are often the weak link with amp sims Fortunately, cab emulations have improved dramatically over the years. Yet like samples, they remain “frozen” to a particular cab—they have their sound, and that’s it.
Although some guitar players think that a cab is a magical device, it’s really just a filter. To be sure, it can be a magical filter…but it’s still a filter. So, we can use filters to create our own cabs. They won’t be able to replicate a specific cabinet down to the smallest detail, but that’s not the point. Using the Pro EQ2 filter to create your own cabinet can give responses that IRs can’t give, with a different sound that can be satisfyingly smooth, and…well, “analog.”
I analyzed the frequency response of several cabs, using the Tone Generator’s pink noise along with the Spectrum Analyzer plug-in, then tried to replicate the response as closely as possible with the Pro EQ2. Although sometimes I was shocked at how close this could come to the cab, more often than not I couldn’t help but make some tweaks—it’s almost like I had taken that cab, brought it into a woodworking shop, and made specific changes for my needs.
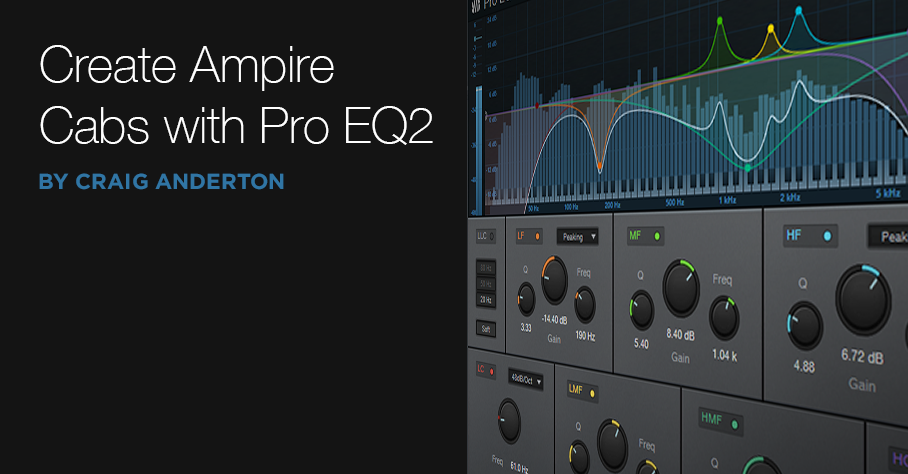
If you want to experiment…be my guest! Insert Ampire, choose your amp (I particularly like the following curves with the VC30), select no cab in Ampire (important!), insert the ProEQ2 afterward, and rock out. Here are some ideas to get you started. Note that the white curve is the sum of all the other curves, so that’s the curve you actually hear.
This curve is based on a 1 x12 cabinet that’s designed for leads, but works with rhythm parts as well (Fig. 1).
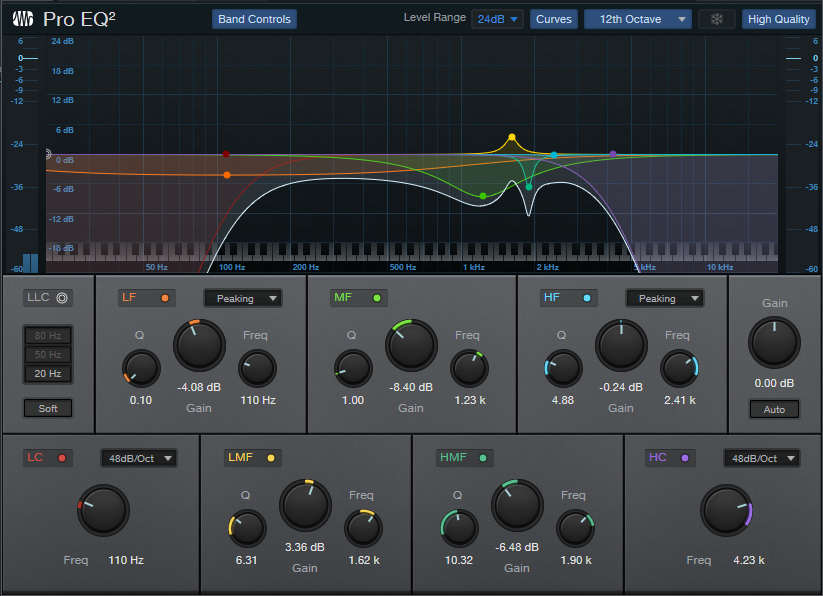
Figure 1
Here’s a curve that’s more “Tweedish” (Fig. 2)
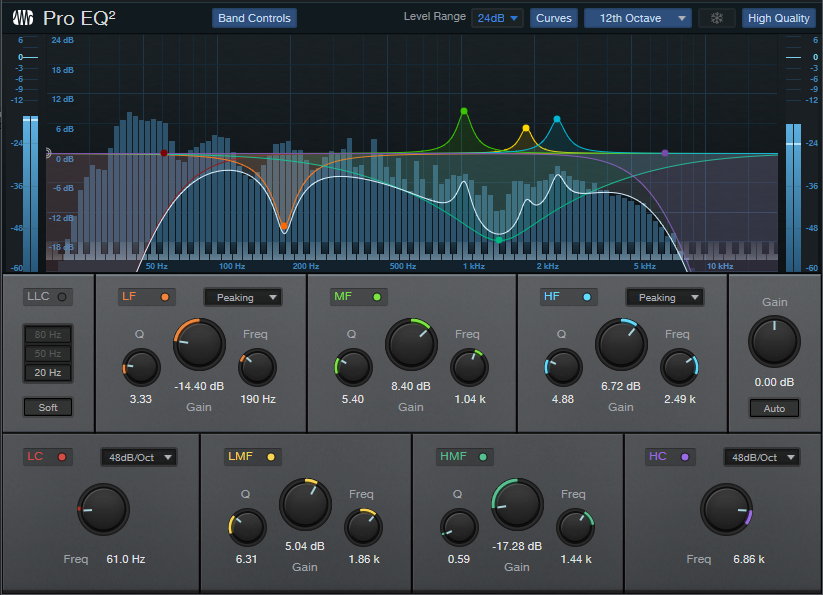
Figure 2
This curve (Fig. 3) is based on an amp by a company that no longer makes amps, but whose name I better not mention so that I don’t have to deal with lawyers. Suffice it to say they’re known mostly for making guitars that are popular with rock guitarists.

Figure 3
And here’s one more…just because we can (Fig. 4)! It’s based on a 2 x 12 cab.
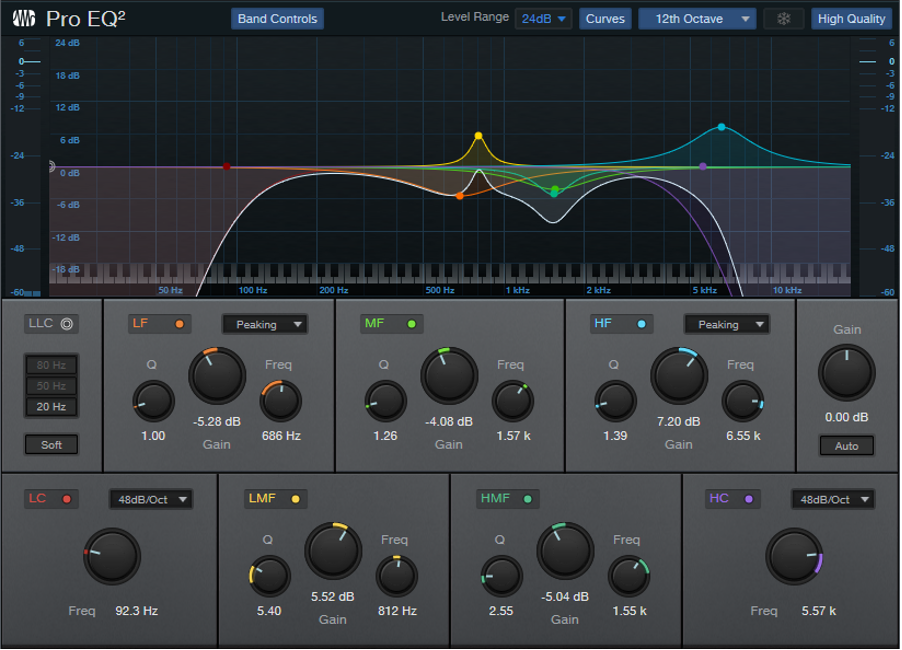
Figure 4
These all have two elements in common: high-frequency rolloffs, and interesting resonances. Although “EQ cabs” may not replace IRs, they’re not supposed to—this is about augmenting your options. Nonetheless, in many of my current productions, I prefer using the Pro EQ2-based cabs because it’s easier to tailor them to fit in with a specific mix.
For this week’s tip, I’m not providing presets because this isn’t about presets—it’s about editing an “analog” cab to give the sounds you need for your productions. So, the “best” curve will depend on what works best with your guitar, playing style, and production goals. In any event, I think you’ll find that constructing your own cabinet can provide a musically useful, and novel, way to expand on what IR-based cabinets can do.
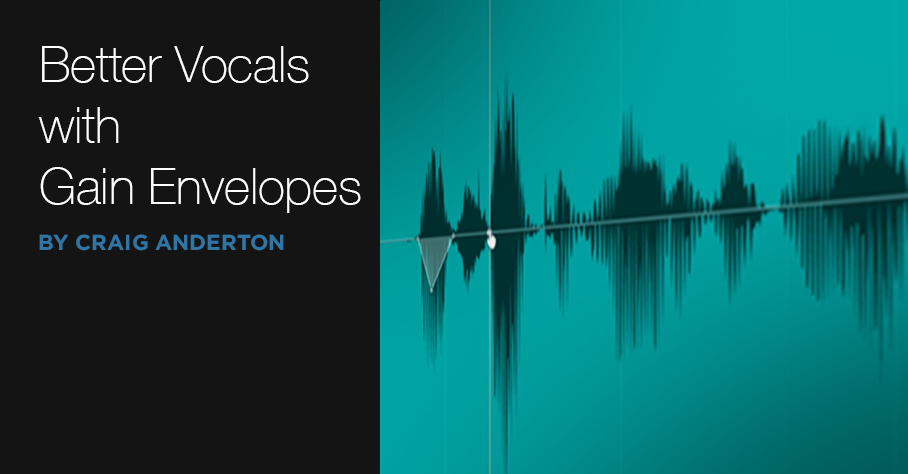
Get Better Vocals with Gain Envelopes
Several of the comments have mentioned wanting me to do some video tips, and this week’s tip is well-suited to a video treatment—so here you go.
Gain envelopes have many uses, but one of my favorites is using them to bring down peaks with vocal and narration to allow boosting the overall level. This is a further refinement of the phrase-by-phrase normalization technique I’ve mentioned in the past, which is basically like compressing without a compressor. As a result there are none of the artifacts associated with compression or limiting, so the resulting sound is totally natural.
Showing this with a video makes it easy to see how placing nodes strategically simplifies taming peaks, and how clicking and dragging on a single node can control your dynamics, quickly and efficiently.
View this post on Instagram
If you like the video, let me know in the comments section, and I’ll do more videos in the future if I think they can convey a concept better or more efficiently than text.
And while we’re on the subject of videos…if you’re not aware of Gregor Beyerle’s playlist of Studio One video tips, they’re well worth watching. Unlike so many YouTube “tips” videos, after watching his videos you’ll feel you learned useful techniques that will help you use Studio One more efficiently—not wasted several minutes of your life you’ll never get back ?. Even when I’ve known much of what he covers, there are always some little gems I hadn’t discovered before.
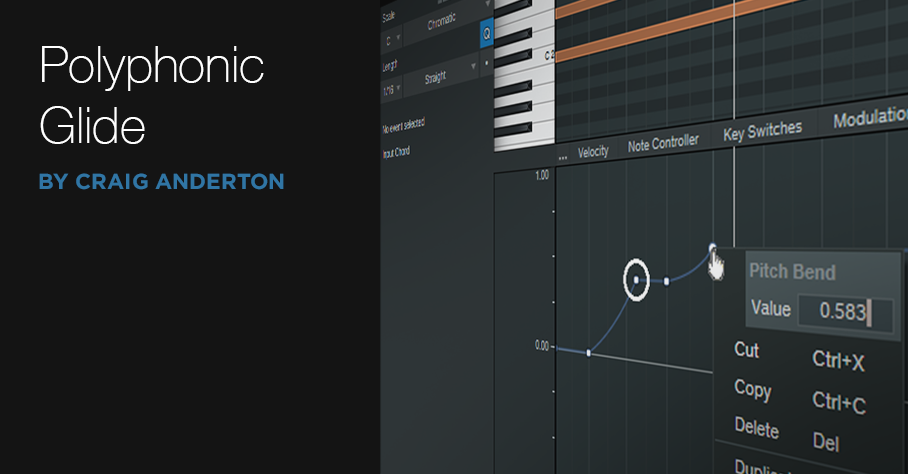
Polyphonic Glide with Any Synth
 Before getting into this week’s tip, here’s some news.
First, thank you for your continued support of the Studio One eBooks. The goal was to make sure that the books remain current—so there are revisions, as well as new editions.
Revisions are like software “point” updates. They’re free to registered users of the original book, and also make sure new buyers get the latest information. A revision for “How to Make Compelling Mixes with Studio One” will be available next week. New editions expand substantially on the original (like how software advances from one version to the next). The latest is More than Compressors: The Complete Guide to Dynamics in Studio One – 2nd Edition, available now in the PreSonus shop (available to owners of the first edition for half-price).
Second, remember that if you have any questions, comments, corrections, or additional ideas about the books, there’s a support thread where you can ask questions and I’ll answer them. The thread also announces when revisions and new editions are available.
And now…on to the tip!
Why Polyphonic Glide is Cool
Creating steel or slide guitar sounds with keyboards is difficult, because few soft synths have polyphonic glide. If they do, sometimes the results are unpredictable.
For my first, admittedly pathetic attempt at “steel synth,” I tried setting the synth bend range to 12 semitones and using the pitch bend wheel to slide entire chords up or down in pitch. However, hitting an exact pitch with the wheel is really difficult. I tried editing the parts to have correct tuning…but that took forever.
Fortunately, there’s a simple answer. It’s not a real-time solution (you’ll need to use the note data edit view), but it works really well—check out the audio example.
A Studio One Pitch Bend “Secret”
The basic idea for slide emulations is you sustain a note, and then use pitch bend to slide the sustained note(s) up (or down). In Fig. 1, a C major chord is gliding up to F and then G, to create the ever-popular I-IV-V progression.
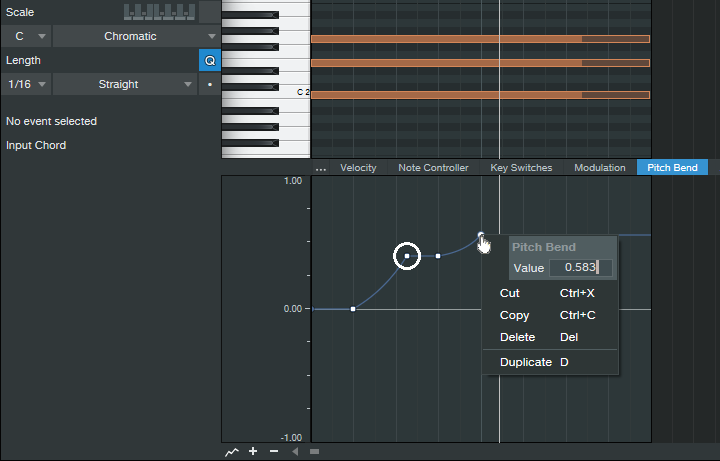
Figure 1: A C major chord is sliding up to an F major, and then a G major.
To ensure correct tuning, create a pitch bend node where you want the new pitch to begin. Right-click on it, and then enter a number that corresponds to the number of semitones you want to “glide” (see the table below). This assumes the synth’s pitch bend range is set to 12 semitones. If you want to bend down by a certain number of semitones, use the same pitch bend amount—just make it negative.

Remember that pitch bend is based on a percentage scale, so in Fig. 1, the first pitch bend node (circled in white to make it more obvious) is set to 0.417 (5 semitones). The second node for the fifth is 0.583 semitones. Lines from one node to the next create the actual glide.
When you right-click on a node to enter a number, the resolution appears to be only two digits to the right of the decimal point, which isn’t good enough for accurate tuning. However, you can enter a three-digit number, as shown above. Even though it won’t be displayed, if you enter that third digit, the dialog box accepts it and Studio One will remember it—so now, you can glide to the exact right pitch.
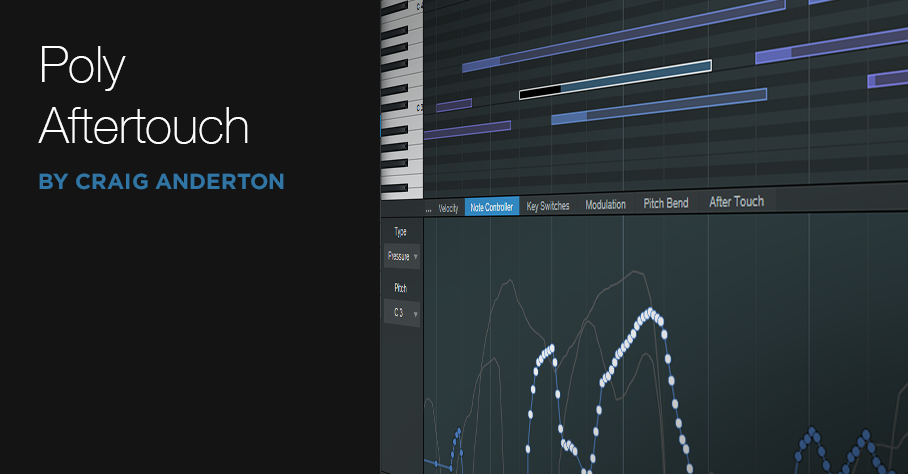
Poly Aftertouch: Ready for Prime Time
One of the complaints about electronic music instruments and controllers is that they lack the expressiveness of acoustic instruments. Although future instruments will take advantage of MIDI 2.0’s enhanced expressiveness, two options are available right now: polyphonic pressure, and MPE (MIDI Polyphonic Expression). Studio One 5 can record/edit both, and ATOM SQ generates polyphonic pressure…so let’s dig deeper.
Language Lesson
First, there’s some confusion because people call the same function by different names. Channel Aftertouch = Channel Pressure = Mono Aftertouch = Mono Pressure. Polyphonic Aftertouch = Polyphonic Pressure = Poly AT = Poly Aftertouch = Poly Pressure. Okay! Now we’ve cleared that up.
Aftertouch: Two Flavors
Aftertouch generates a control signal when you press down on a keyboard key after it’s down, or continue pressing on a percussion pad after striking it. Aftertouch is a variable message, like a mod wheel or footpedal—not a switch. A typical application would be changing filter cutoff, adding modulation, or doing guitar-like pitch bends by pressing on a key.
There are two aftertouch flavors. Mono pressure has been around since the days of the Yamaha DX7, and sends the highest controller value of all keys that are currently being pressed. Polyphonic pressure sends individual pressure messages for each key. For example, when holding down a chord for a brass section, by assigning poly pressure to filter cutoff, you can make just one note brighter by pressing down on its associated key. The other chord notes remain unaffected unless they’re also pressed.
Controllers with polyphonic aftertouch used to be fairly expensive and rare, but that’s changing—as evidenced by ATOM SQ.
Synth Requirements
As expected, you need a synth that responds to poly pressure. Many hardware synths respond to it, even if they don’t generate it. As to soft synths, although I haven’t tested all of the following, they reportedly support poly pressure: several Korg Collection synths, Kontakt, Reaktor, all Arturia instruments, all U-He instruments, XILS-Lab synths, TAL-Sampler, AAS synths, Albino 3, impOSCar2, Mach5, and Omnisphere. If you know of others, feel free to mention them in the comments section below. (Currently, Studio One’s bundled instruments don’t respond to polyphonic aftertouch.)
The Controller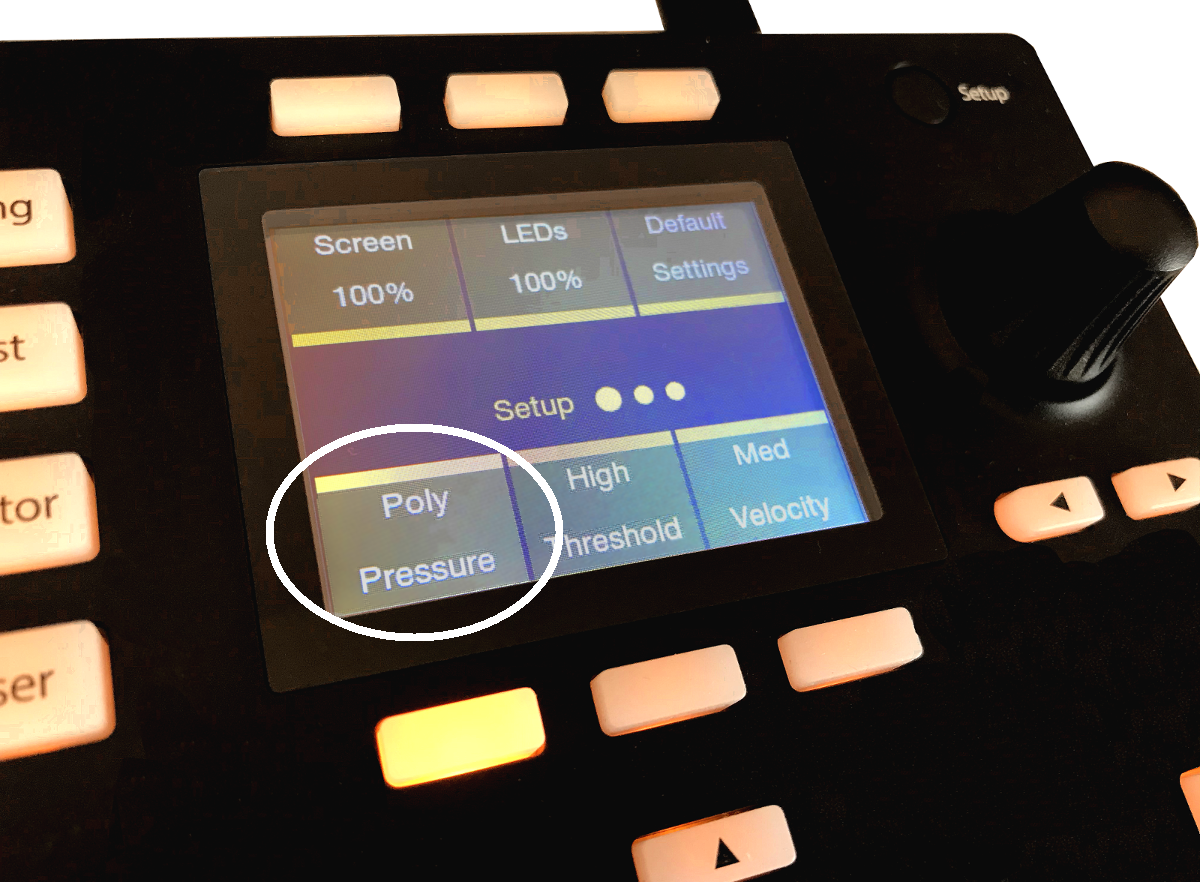
Figure 1: ATOM SQ being set up to generate Poly Pressure messages.
With ATOM SQ, press the Setup button. Hit the lower-left “pressure” button below the display, then spin the dial to choose Poly (Fig. 1). Note that if ATOM SQ outputs poly pressure, most instruments that respond only to channel (mono) aftertouch will ignore these messages.
Recording and Editing
Record poly pressure in Studio One 5 as you would any MIDI controller. To edit pressure messages, use the Edit window’s Note Controller tab. Select Pressure for the Type, and then the Pitch of the note you want to edit. Or, click on a note to select its corresponding note Pitch automatically. You can then edit that note’s poly pressure controller as you would any other controller (Fig. 2).
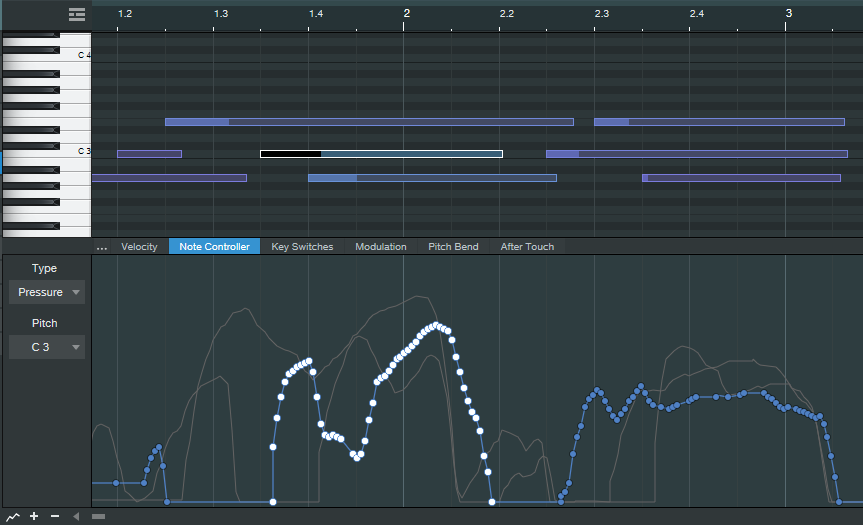
Figure 2: The selected Note’s data is white; unselected notes of the same pitch are blue. The gray lines in the background show the poly pressure controller messages for notes with other pitches.
It may seem that editing data for individual notes would be tedious, and it can be. However, because poly pressure allows for more expressive real-time playing, you might not feel the need to do as much editing anyway—you won’t need to use editing to add expressiveness that you couldn’t add while playing.
A fine point is that it’s currently not possible to copy Note Controller data from one note, then paste it to a note of a different pitch (probably because the whole point of poly AT is for different notes to have different controller data). However, if you copy the note itself to a different pitch, the Note Controller data will go along with it.
Although ATOM SQ can adopt a layout that resembles a keyboard, it would be a mistake to see it as a stripped-down version of a standard keyboard. Controllers with polyphonic pressure tend to think outside the usual keyboard box, by incorporating pads or other transducers that are designed for predictable pressure sensitivity. Poly pressure has been around for a while, but a new generation of MIDI controllers (like ATOM SQ) are making the technology—and the resulting expressiveness—far more accessible for those who want to wring more soul out of their synths.
Control Ableton as a ReWire Client with ATOM SQ

It’s not surprising a lot of Studio One users also have Ableton Live, because they’re quite different. I’ve always felt Studio One is a pro recording studio (with a helluva backline) disguised as software, while Ableton is a live performance instrument disguised as software.
Fortunately, if you like working simultaneously with Live’s loops and scenes and Studio One’s rich feature set, Studio One can host Live as a ReWire client. Even better, ATOM SQ can provide full native integration with Ableton Live when it’s ReWired as a client—once you know how to set up the MIDI ins and outs for both programs.
Studio One Setup
- Under Options > Advanced > Services, make sure ReWire Support is enabled.
- Insert Ableton Live (from Instruments > ReWire). Click “Open Application” in the dialog box, but if Live won’t open (it doesn’t for me), open Live manually. Note that Live must be version 10.1.15 or higher.
- In Studio One, go Options > External Devices. Click on ATOM SQ, and then click on Edit.
- Select None for both Receive From and Send To. Click OK, then click OK again to leave the Options menu.
- In the ReWire track, set the MIDI input to ATOM SQ so that ATOM SQ’s knobs can control Ableton Live.

Ableton Live Setup
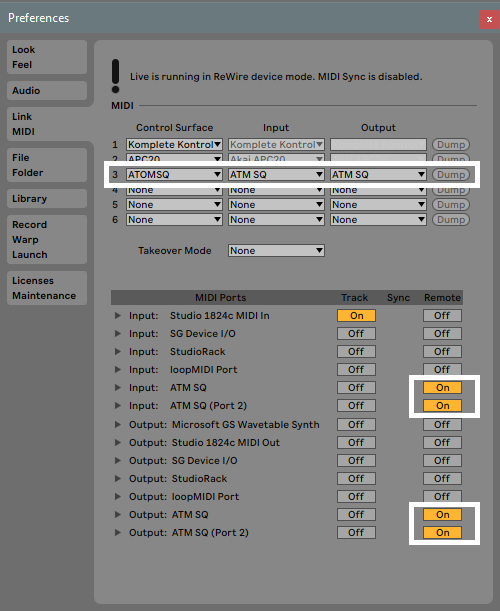
- Choose Options > Preferences > Link MIDI tab.
- Set the MIDI and Ports connections as shown.
Now ATOM SQ will act as an integrated controller with Ableton Live while it’s ReWired into Studio One. Cool, eh?
Returning to Studio One
To return control to Studio One, reverse the process—in Live, set Control Surface to None, and toggle the MIDI Ports that relate to ATOM SQ from On to Off. In Studio One’s Options > External Devices, For ATOM SQ, reconnect ATOM SQ to Receive From and Send To.
Note that with ATOM SQ controlling Studio One, the Transport function still controls both Live and Studio One. Also, if Live has the focus, any QWERTY keyboard assignments for triggering Clips and Scenes remain valid. So even while using ATOM SQ in the native mode for Studio One, you can still trigger different Clip and Scenes in Live. If you switch the focus back to Studio One, then any QWERTY keyboard shortcuts will trigger their assigned Studio One shortcuts.
Note: When switching back and forth between Live and Studio One, and enabling/disabling Studio One and Ableton Live modes for ATOM SQ, to return to Live you may need to “refresh” Live’s Preferences settings. Choose None for the Control Surface and then re-select ATOM SQ. Next, turn the various MIDI Port options off and on again.

Learn more about the ATOM SQ here!
Studio One 5’s Tape Emulator
Although Studio One 5 doesn’t have a tape emulator plug-in per se, it can emulate some of the most important characteristics that people associate with “the tape sound.” Truly emulating tape can go down a serious rabbit hole because tape is a complicated signal processor; no two vintage tape recorders sounded the same because they required alignment (influenced by the engineer’s preferences), used different tape formulations, and were in various states of maintenance. However, emulating three important characteristics provides what most people want from tape emulation.
- Tape saturates, which rounds off waveform peaks and affects dynamic range. This gives a higher average level, which is part of why tape sounds “punchy.”
- Head “bump.” The frequency of a bass range peak (around 2 dB) depends on the tape speed and the tape machine. At 15 IPS, a typical peak is in the 40-70 Hz range, and at 30 IPS, in the 70-150 Hz range. However, at 30 IPS, the bass response drops off below the bump—sometimes drastically, sometimes gently. Even though in theory 30 IPS offered better fidelity, many engineers preferred to work at 15 IPS due to the bass response characteristics (and they saved money by using half as much tape for the same recording time).
- Tape is a flawed recording medium that trades off noise, high-frequency response, and distortion. For example, some engineers aligned their machines to underbias the tape, which increased distortion but gave more highs; other engineers did the reverse and made up for the lack of highs with subsequent equalization.
Check out the audio example to hear what this FX Chain can do. The first part is unprocessed, while the second part uses the default FX Chain control settings with a little underbiasing and head bump. The difference is subtle, but it adds that extra “something.”
The Tape Emulator FX Chain
This FX Chain starts with a Splitter, which creates three signal paths: one for saturation, one for hiss, and one for hum (Fig. 1).
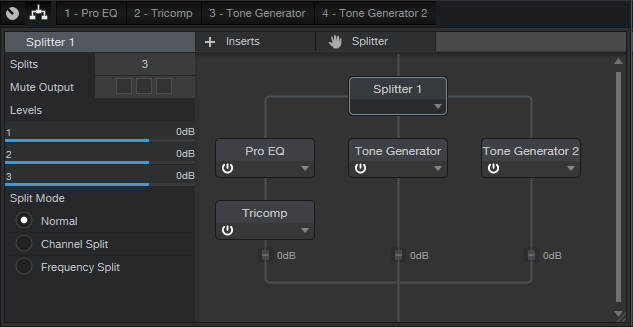
Figure 1: FX Chain block diagram.
After auditioning all available Studio One 5 saturation options, I liked the TriComp best for this application. The Pro EQ stage preceding the TriComp provides the head bump EQ and has a control to emulate the effect of underbiasing tape (more highs, which pushes more high-frequency level into the TriComp and therefore increases distortion in that range) or overbiasing (less highs, less distortion).
At first, I wasn’t going to include tape hiss and hum, but if someone needs to use this FX Chain for sound design (i.e., an actor starts a tape in a theatrical production), then including hiss and hum sounds more authentic. An additional knob chooses 50 or 60 Hz hum, which represents the power standards in different countries. (Note that the closest you can get to these frequencies is 50.4 and 59.1 Hz, but that’s good enough). However, I draw the line at including wow and flutter! Good riddance to both of them.
Because creating three splits reduces each split’s level, the TriComp Gain control provides makeup gain.
Turning Bump on adds a boost at the specified frequency, but also adds a 48 dB low-cut filter around 23 Hz to emulate the loss of very low frequencies due to the head bump. As a result, depending on the program material, adding the bump may increase or decrease the total apparent bass response. For additional flexibility, if you turn Bump Amount down all the way, the Bump On/Off switch enables or disables only the 48 dB/octave low-cut filter.
Fig. 2 shows some typical spectra from using the FX Chain.
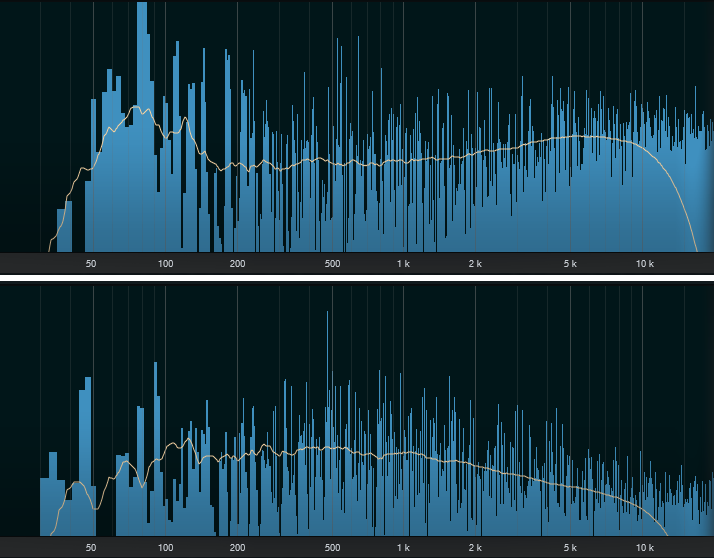
Figure 2: The top curve shows the head bump enabled, with underbiasing. The lower curve shows minimal added bump, but with the ultra-low cut filter enabled, and overbiasing.
Roll Tape!
The controls default to rational settings (Fig. 3), which are used in the audio example. But as usual with my FX chains, the settings can go beyond the realm of good taste if needed.
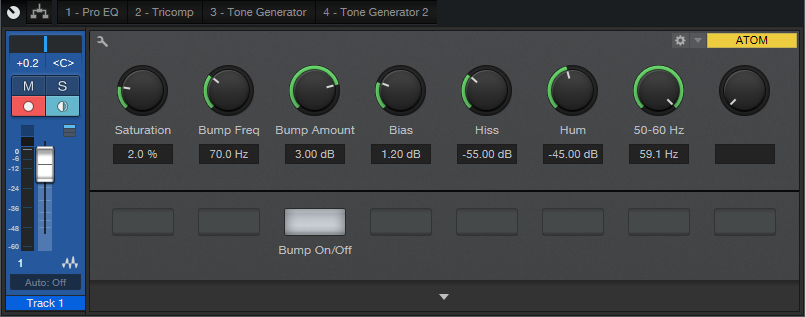
Figure 3: Control panel for the Tape Emulator.
For example, I rarely go over 2-3% saturation, but I know some of you are itching to kick it up to 10%. Ditto tape hiss, in case you want to emulate recording on an ancient Radio Shack cassette recorder—with Radio Shack tape. Just remember that the Bias control is clockwise to overbias (less highs), and counter-clockwise to underbias (more highs).
There’s a lot of mythology around tape emulations, and you can find some very good plug-ins that nail the sound of tape. But try this FX Chain—it may give you exactly what you want. Best of all, I promise you’ll never have to clean or demagnetize its tape heads.
Download the Tape Emulator.multipreset here!