Monthly Archives: March 2022
EZ 80s Gated Mixverb Drums
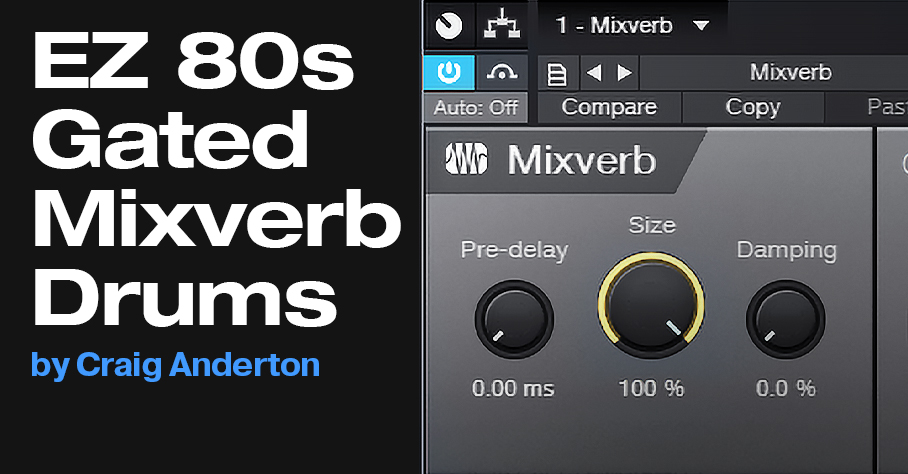
The gated reverb effect on drums was one of the signature sounds of the 80s, with probably the most famous example being Phil Collins’ “In the Air Tonight.” The dramatic moment when the drums came crashing in was all about gated reverb.
It may seem like this is an easy effect to create, but it’s not as easy as it might seem. Not just any reverb sound will do, and the gate parameters are critical.
Fortunately, the Mixverb is reasonably good at doing gated drum sounds, especially with drums like toms that have a decent amount of sustain or ring.
The downside is that the Mixverb’s gate section doesn’t have a sidechain, which is needed for the most flexible and authentic gated reverb effects. Because the gate is after the reverb, its gating action tracks the reverb’s decay, not the drum’s decay. Also, if a couple hits happen in quick succession, they’ll keep the reverb going. This keeps the gate opens, and forfeits the gated effect.
For best results, each drum whose reverb you want to gate will need a separate output, processed by its own Mixverb. Fortunately, it doesn’t draw much CPU, so your computer won’t complain. For next week’s tip, we’ll cover a more traditional (albeit more complex) solution for gated drum effects. Meanwhile, let’s hear what the Mixverb can do.
The first half is unprocessed drums, the second half has gated Mixverb on the toms and snare.
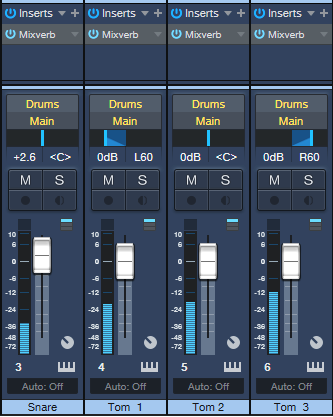
The mixer setup (fig. 1) is straightforward.
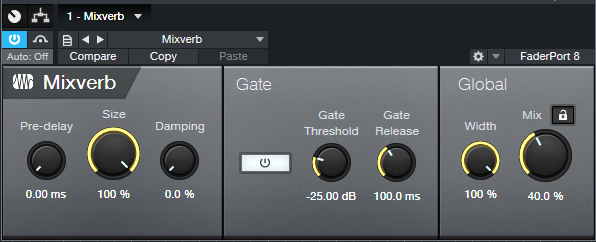
Start with the initial settings shown in fig. 2, which are fairly crucial. Because the Gate is post-reverb, the Size, Gate Threshold, and Gate Release interact.
Next, vary the Gate Threshold to alter how long the gated reverb effect lasts. The optimum settings will depend on the drum sound itself, and the incoming level to the Mixverb. Even a 1 or 2 dB change in the threshold can have a major influence. Then, vary the Mix control to obtain the desired blend of dry and gated reverb sound.
Finally, play around with the Size and Gate Release controls to see if you can optimize the sound any further. Note that the snare in the audio example had the same settings, except the Gate Threshold was at the lowest possible level, and the Gate Release was 50 ms.
After trying this, you might think “Nice try, Craig…it sounds okay in the audio example, but my drums don’t sound like that.” Well, remember that we just got lucky with the Mixverb, and it’s not equally accommodating to all drums. So tune in next week, when we’ll show a more universal way to do gated reverb drums—which can also be very cool with gated delay.
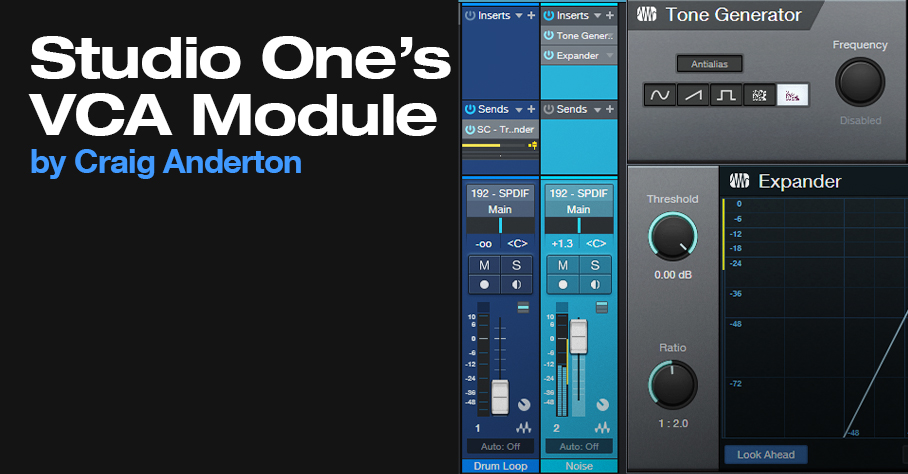
Studio One’s VCA Module
A modular synthesizer’s VCA (Voltage-Controlled Amplifier) changes gain in response to an input control voltage. One of my favorite applications is controlling a VCA with an envelope follower—for example, using an envelope follower on drums, and running power chords, pads, or sustained synth sounds through the VCA. Then, these sounds take on the percussive characteristics of the drum part. But Studio One doesn’t have a VCA, right?
Actually, it does—the Expander. You can set up the Expander to act like a VCA, with its gain controlled by a sidechain signal. So, in the example above, you can run sounds like guitar chords through the Expander, and feed the Expander’s sidechain from a drum track. Here’s what it sounds like.
[Caption] The first four measures, drums modulate the guitar. The second four measures use the Analog Delay to provide an additional 1/8th-note rhythm.
Test Setup
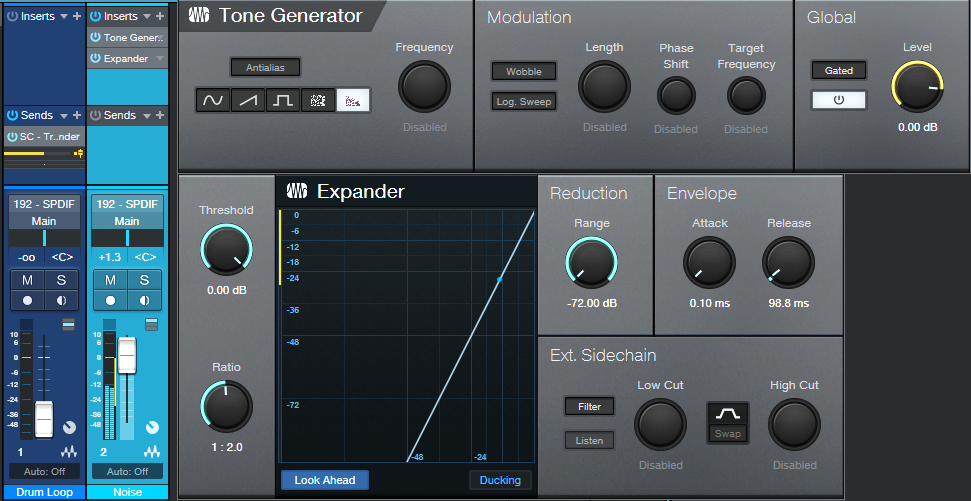
Fig. 1 shows a test setup to play around with this process, and hear how it works. Insert a drum loop in one track. Normalize it so the signal level is consistent. The drums provide the sidechain signal.
In another track, insert the Tone Generator set for pink noise, followed by the Expander. Using pink noise makes it easy to hear how adjusting Expander parameters alters the pseudo-VCA’s response to drums.
Start with the Expander settings shown in fig. 1, and assign a pre-fader send from the drum track to the Expander’s sidechain. Note that when you assign a sidechain to the Expander, it automatically selects Ducking mode. You don’t want this, so de-select Ducking.
Start playing the drum loop, and you should hear the white noise’s amplitude being modulated by the drums. If not, make sure the drum track send provides enough level to the expander sidechain. Here’s how the Expander controls affect the sound.
- Release: Start by varying the Release. Longer times add a decay to the pink noise.
- Attack: This isn’t as useful with percussive sounds, because the sound is over before the attack can complete. But if the sidechain signal is coming from something like a pad, you’ll hear an attack time superimposed on the noise.
- Range: This acts like a bias voltage for the VCA, that always keeps it somewhat open. It’s good for when you want the VCA to be affected only by the drum peaks.
- Threshold: Lower this to pick up more of the peaks. It’s kind of like compressing the sidechain signal.
- Ratio: Higher ratios make the effect more percussive, to the point where the sound is so percussive you might not hear the drums anymore. Lower ratios create a less percussive sound, somewhat like changing the ratio.
Now that you know what this technique can do, start running other signals through the Expander. And by the way—automating Threshold and Release can add some serious animation to the percussive effects. Check it out!
Parallel? Narrow? Bass? Say What?!?
It’s probably obvious that I love the Chords track. It’s so useful that if you haven’t made friends with it yet, look over the Reference Manual…then take it out for lunch. Meanwhile, here’s a way to have it create a rhythmic keyboard part—with very little effort.
One of the Chords track’s (many) talents is generating a chord chart from your playing. Play an acoustic instrument like guitar (yes, chords are allowed) or a MIDI instrument like Presence, then drag the audio or MIDI data up to the Chords track. It automagically maps out your chord progression.
Tip: Quantize the part before you drag it up, so that chord changes happen on the beat where they’re supposed to change. Or quantize the Chords track after it’s extracted, so that the chord changes line up on the beat.
Once the Chords track extracts the progression, any subsequent audio or MIDI parts you record can follow the chord progression. Audio has more options than MIDI, so for this blog post, we’ll just consider the MIDI aspect.
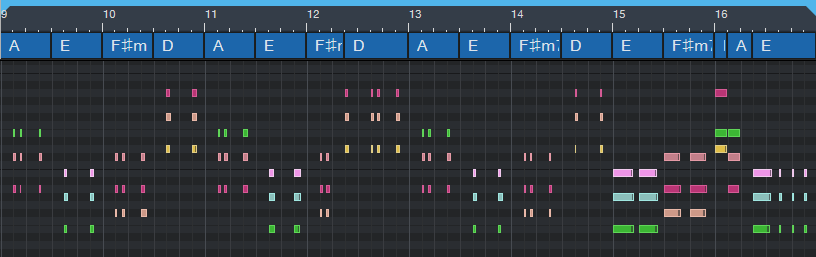
The keyboard overdub shown in fig. 1 is not following the chord track that was extracted from guitar. Actually, all it’s doing is playing the same chord with different rhythms. But we’ll fix this.
It sounds as useless as it looks—and to prove it, check out the following audio example. I’ve left the guitar, bass, and drums in for context. The keyboard part is panned right, and mixed up fairly high so you can hear the part easily.
Tip #2: When using the Chords track as a songwriting partner, don’t be too concerned about the notes you play—the Chords track will fix them. Just nail the timing, and play in the general vicinity of the note range you want the final part to cover.
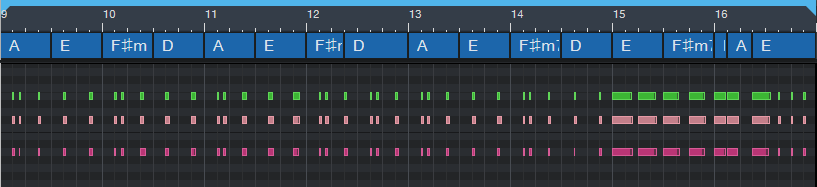
To have the MIDI notes follow the Chords track, click on the track, open the Inspector (F4), and from the Follow Chords drop-down menu, choose Narrow. This moves the notes to the nearest note that conforms to the chord specified in the Chords track (fig. 2). Looks a lot better, doesn’t it?
And it sounds a lot better, too, as you’ll hear in the next audio example.
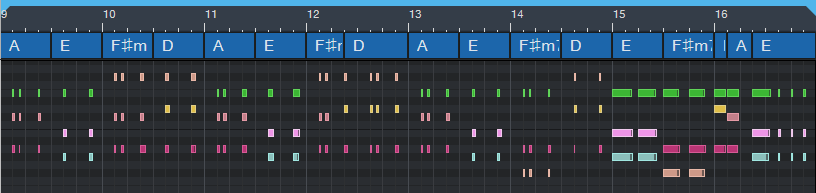
The Parallel option shifts the notes in parallel, so that a chord’s root notes line up with the root note of the chord in the Chords track. This typically creates voicings that cover a wider pitch range, which may or may not be what you want. However, occasionally this will transpose some notes so they’re not in the right key. If so, you’ll need to do a little manual editing. Here’s what Parallel mode created (fig. 3).
And here’s what it sounds like.
Following the chord track in Bass mode isn’t relevant here, because it just aligns the chord’s lower note with the Chords track chord—the end result is the same as choosing Parallel, which definitely doesn’t generate a fun bass line. But as described previously in the blog post Studio One’s Session Bass Player, combining the Chords track with the Fill Notes option can create some pretty amazing bass parts.
Oh, and if someone wants to spoil the fun and say you’re “cheating,” remind them the only thing that matters about music is the emotional impact on the listeners—and if they like what they hear, they won’t care what you did to get there.
Lively Up Your Drums
One element that can help make drums exciting is including the room sound where the drums were recorded. If you don’t believe me, listen to the drum part in Led Zeppelin’s “When the Levee Breaks.”
I rest my case.
When mixing drums, if there wasn’t a separate track of miked room sound, or you’re using a pre-recorded loop, you do have options. You can add a room sound with reverb, but that won’t be the same as the room where you recorded the drums. Or, you can compress the drums, which will bring up the room sound—but also squash the peaks.
The best option would be bringing up the room sound without squashing the peaks. Fortunately, with parallel compression, you can do this. The trick is to set a super-low threshold, then add some compression. This brings down the peaks, but keeps the low-level audio intact. Turning up the Mix control just a bit brings in the low-level sounds, but because most of the mix contains the dry drums, you won’t squash any of its peaks. Now you have full peaks and room sound—as you’ll hear in the audio example. The first half is the drums by themselves. The second half enhances the room sound using this technique.
How It Works
Insert the Compressor in your drum track, and set the compressor parameters as shown in fig. 1 (or just download the preset). Here’s what the controls do.
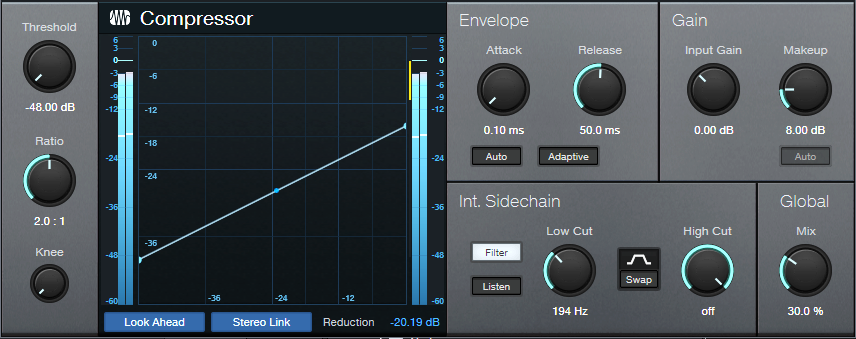
-48.00 is the lowest possible threshold. A 2.0:1 ratio adds enough compression to bring down the peaks so they don’t interfere with the dry signal, without sounding too compressed.
A tight compression sound is important for drums, so set the attack to minimum and about 50 ms of release. Don’t click Auto, because we’re not using the compressor in a standard way.
The Low Cut filter reduces the kick’s effect on the compression, so the lower-level sounds aren’t “pumped” by the kick. You’ll probably need to add some makeup gain; the preset uses 8.00 dB. The Mix control dials in the desired amount of room sound. With the settings shown, and a drum track that’s normalized to maximum, 30% seems about right.
And that’s all you need to do to lively up your drums. If you still want to squash the peaks too, then insert a Limiter2 after the compressor. But also note that this technique can bring up the body sound of acoustic guitars, bowing sounds with string sections, mouth sounds with vocals, and the like. Experiment!