Monthly Archives: November 2021
Why You Want to Level Ampire Presets
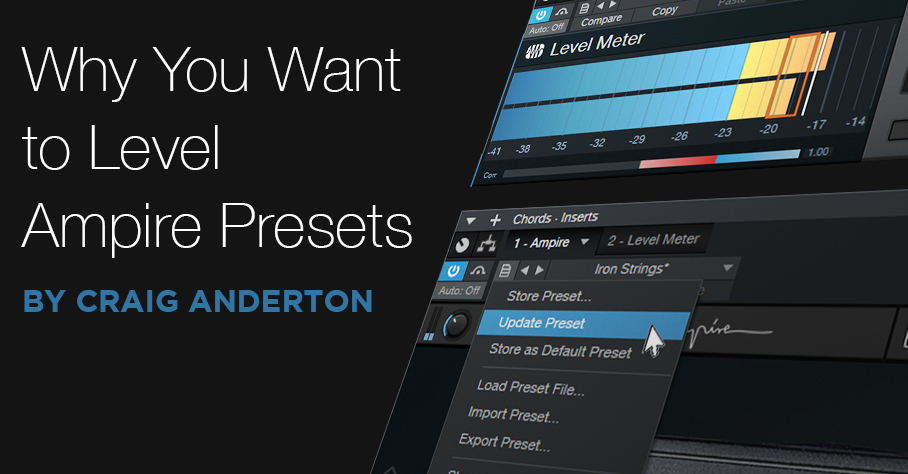
It’s great we can store presets, trade them with other users, and download free ones. But…when selecting different Ampire presets to decide how they fit with a track, you want their levels to match closely. Then, your evaluation of the sound will be based on the tone, not by whether the preset is softer or louder. However, consistent preset levels are not a given.
Having a baseline level for presets, so you don’t need to change the level every time you call up a new one, is convenient. You can’t really use VU meters for this, because you want sounds to have the same perceived level, which can be different from their measured level. For example, a brighter sound may measure as softer, but be perceived as louder because it has energy where our ears are most sensitive.
My standard of comparison is a dry guitar sound, because I want the same perceived level whether Ampire is enabled, or bypassed. You might prefer to have Ampire always be a few dB louder than your dry guitar—whatever makes you happy.
Enter LUFS
The LUFS (Loudness Unit Full Scale) measurement protocol measures perceived loudness. LUFS measurements allow streaming services like YouTube, Spotify, Apple Music, and others to adjust the volume of various songs to the same perceived level. This is why you don’t have to change the volume every time a different song shows up in a playlist. The system isn’t perfect, but it’s better than dealing with constant level variations. Fortunately, Studio One has a Level Meter plug-in that gives LUFS readings (fig. 1).
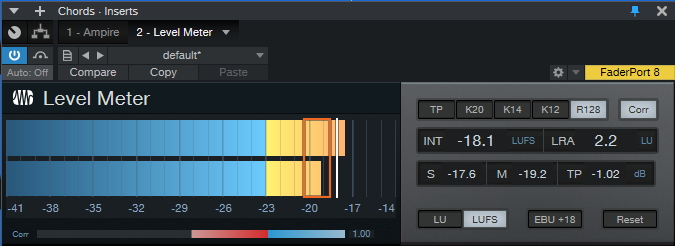
Figure 1: The Level meter can measure levels based on a variety of standards, including LUFS.
The Process
- Record at least two Events—one for chords, and one for single-note leads. If you use bass presets, you’ll also want an Event with a bass line. Record about a 15 second clip of continuous guitar chord progressions, and another clip with 15-30 seconds of single notes (and/or bass lines), also without pauses.
- Insert the Level meter after Ampire, and enable its LUFS and R128 buttons. Set the appropriate event to loop, and start playback.
- With Ampire bypassed, adjust the Event’s level for a nominal LUFS reading. I use -18 dB because that works well with Ampire, Helix, and other amp sims. After setting your standard level, it’s a good idea to lock the Events from editing (context menu > Toggle Edit Lock).
We interrupt these steps to bring you an important bulletin: The Level Meter reading that matters is the INT field. This averages out the audio, so you’ll see the reading change at first, and then settle down to a consistent LUFS reading. When you change levels, call up a different preset, or make any changes, click on the Reset button to re-start the averaging process. When doing any LUFS measurements, you can’t be sure the reading is correct until you’ve a) hit Reset, and b) played the event several times, which is why we want to loop it.
We now return to the step-by-step procedure.
- Enable Ampire, and call up a preset. Hit the Level Meter’s Reset button, and after the Event has played through a couple times, check the LUFS meter reading.
- In my case, an LUFS reading of -20 would mean the preset level is about 2 dB lower than my standard -18 dB level. So, I’d raise Ampire’s output control (fig. 2) by 2 dB. On the other hand, if the LUFS reading was -14 dB, it would be about 4 dB louder than my standard. I’d instead need to lower the output level control by 4 dB.

Figure 2: Use the output control to obtain similar levels from different presets.
- After adjusting the level, hit Reset on the Level Meter, and play the loop a few times. If the reading is the same as the nominal value…done! Otherwise, re-tweak.
- The final step is to click on Update Preset (fig. 3), so you don’t have to do this again.
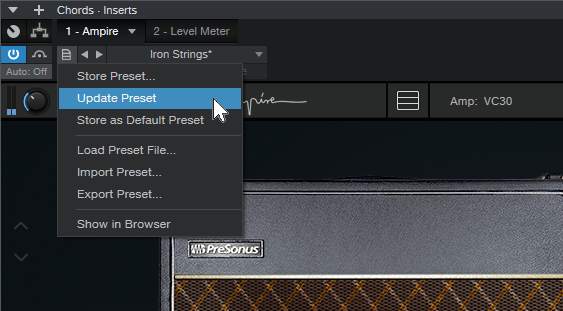
Figure 3: Save your work for future sessions.
And while you’re at it, save the Song you used to do this testing. Then you can call it up again in the future, when you want to match preset levels.
Okay, so it took a little time to balance all your presets. But when deciding what preset to use in the future, you’ll be glad you set them all to a baseline level.
Brody Tullier on using Studio One for Video Game Soundtracks
Brody Tullier (aka Zeno) is a 17 year-old composer based in Baton Rouge, Louisiana who has been composing and arranging original music for the past four years.
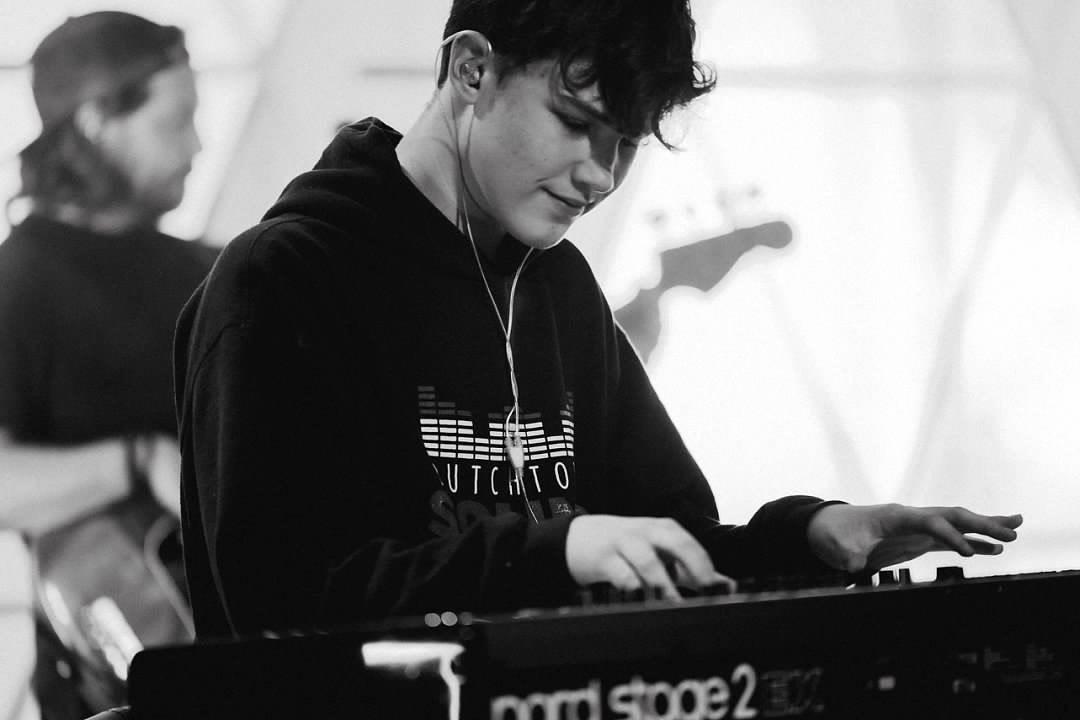 His main style of composition is often through complex midi-mapping and programming, although he is also a studying pianist and vocalist.
Delving into advanced audio production more and more in recent years, his music has become the lively, energetic, and polished arrangements that you can hear in his recent Bandcamp releases here.
Brody’s preferred style of compositions lean heavily towards video-game inspired tracks and he aspires to one day seek a career in the video game music industry.
We wish him great success in his ongoing growth as a musician, composer and producer!
Follow Brody’s path in discovering the creative power of Studio One, Notion and the PreSonus software add-ons available.
Join PreSonus Sphere today!
Only $14.95 per month for Studio One Professional, Notion, and so much more.


Instant Rebate! Get the AudioBox 96 Studio Blue Edition for just $149.95 in the U.S. and Canada!

Click here to find a dealer!
Now through the end of December, get an instant rebate on the AudioBox 96 Studio Blue Edition at participating dealers in the USA and Canada!
Start recording today with this complete, all-PreSonus package! Based on the AudioBox USB 96 audio/MIDI interface and award-winning Studio One recording and production software, PreSonus AudioBox 96 Studio is great for creating multitrack recordings, demos, live recordings, podcasts, field recordings for video and sound effects, and much more. Learn more about the AudioBox 96 Studio here.
You get our best-ever selling AudioBox interface, the M7 Condenser microphone, comfy HD7 headphones, Studio One Artist, the Studio Magic Suite (over $1000 worth of software) and all the cables you need to hook it up. It’s everything you need to record and produce in a single purchase—and for a limited time it’s more affordable than ever!
This is an instant rebate, live at the point of purchase. No forms to fill out.
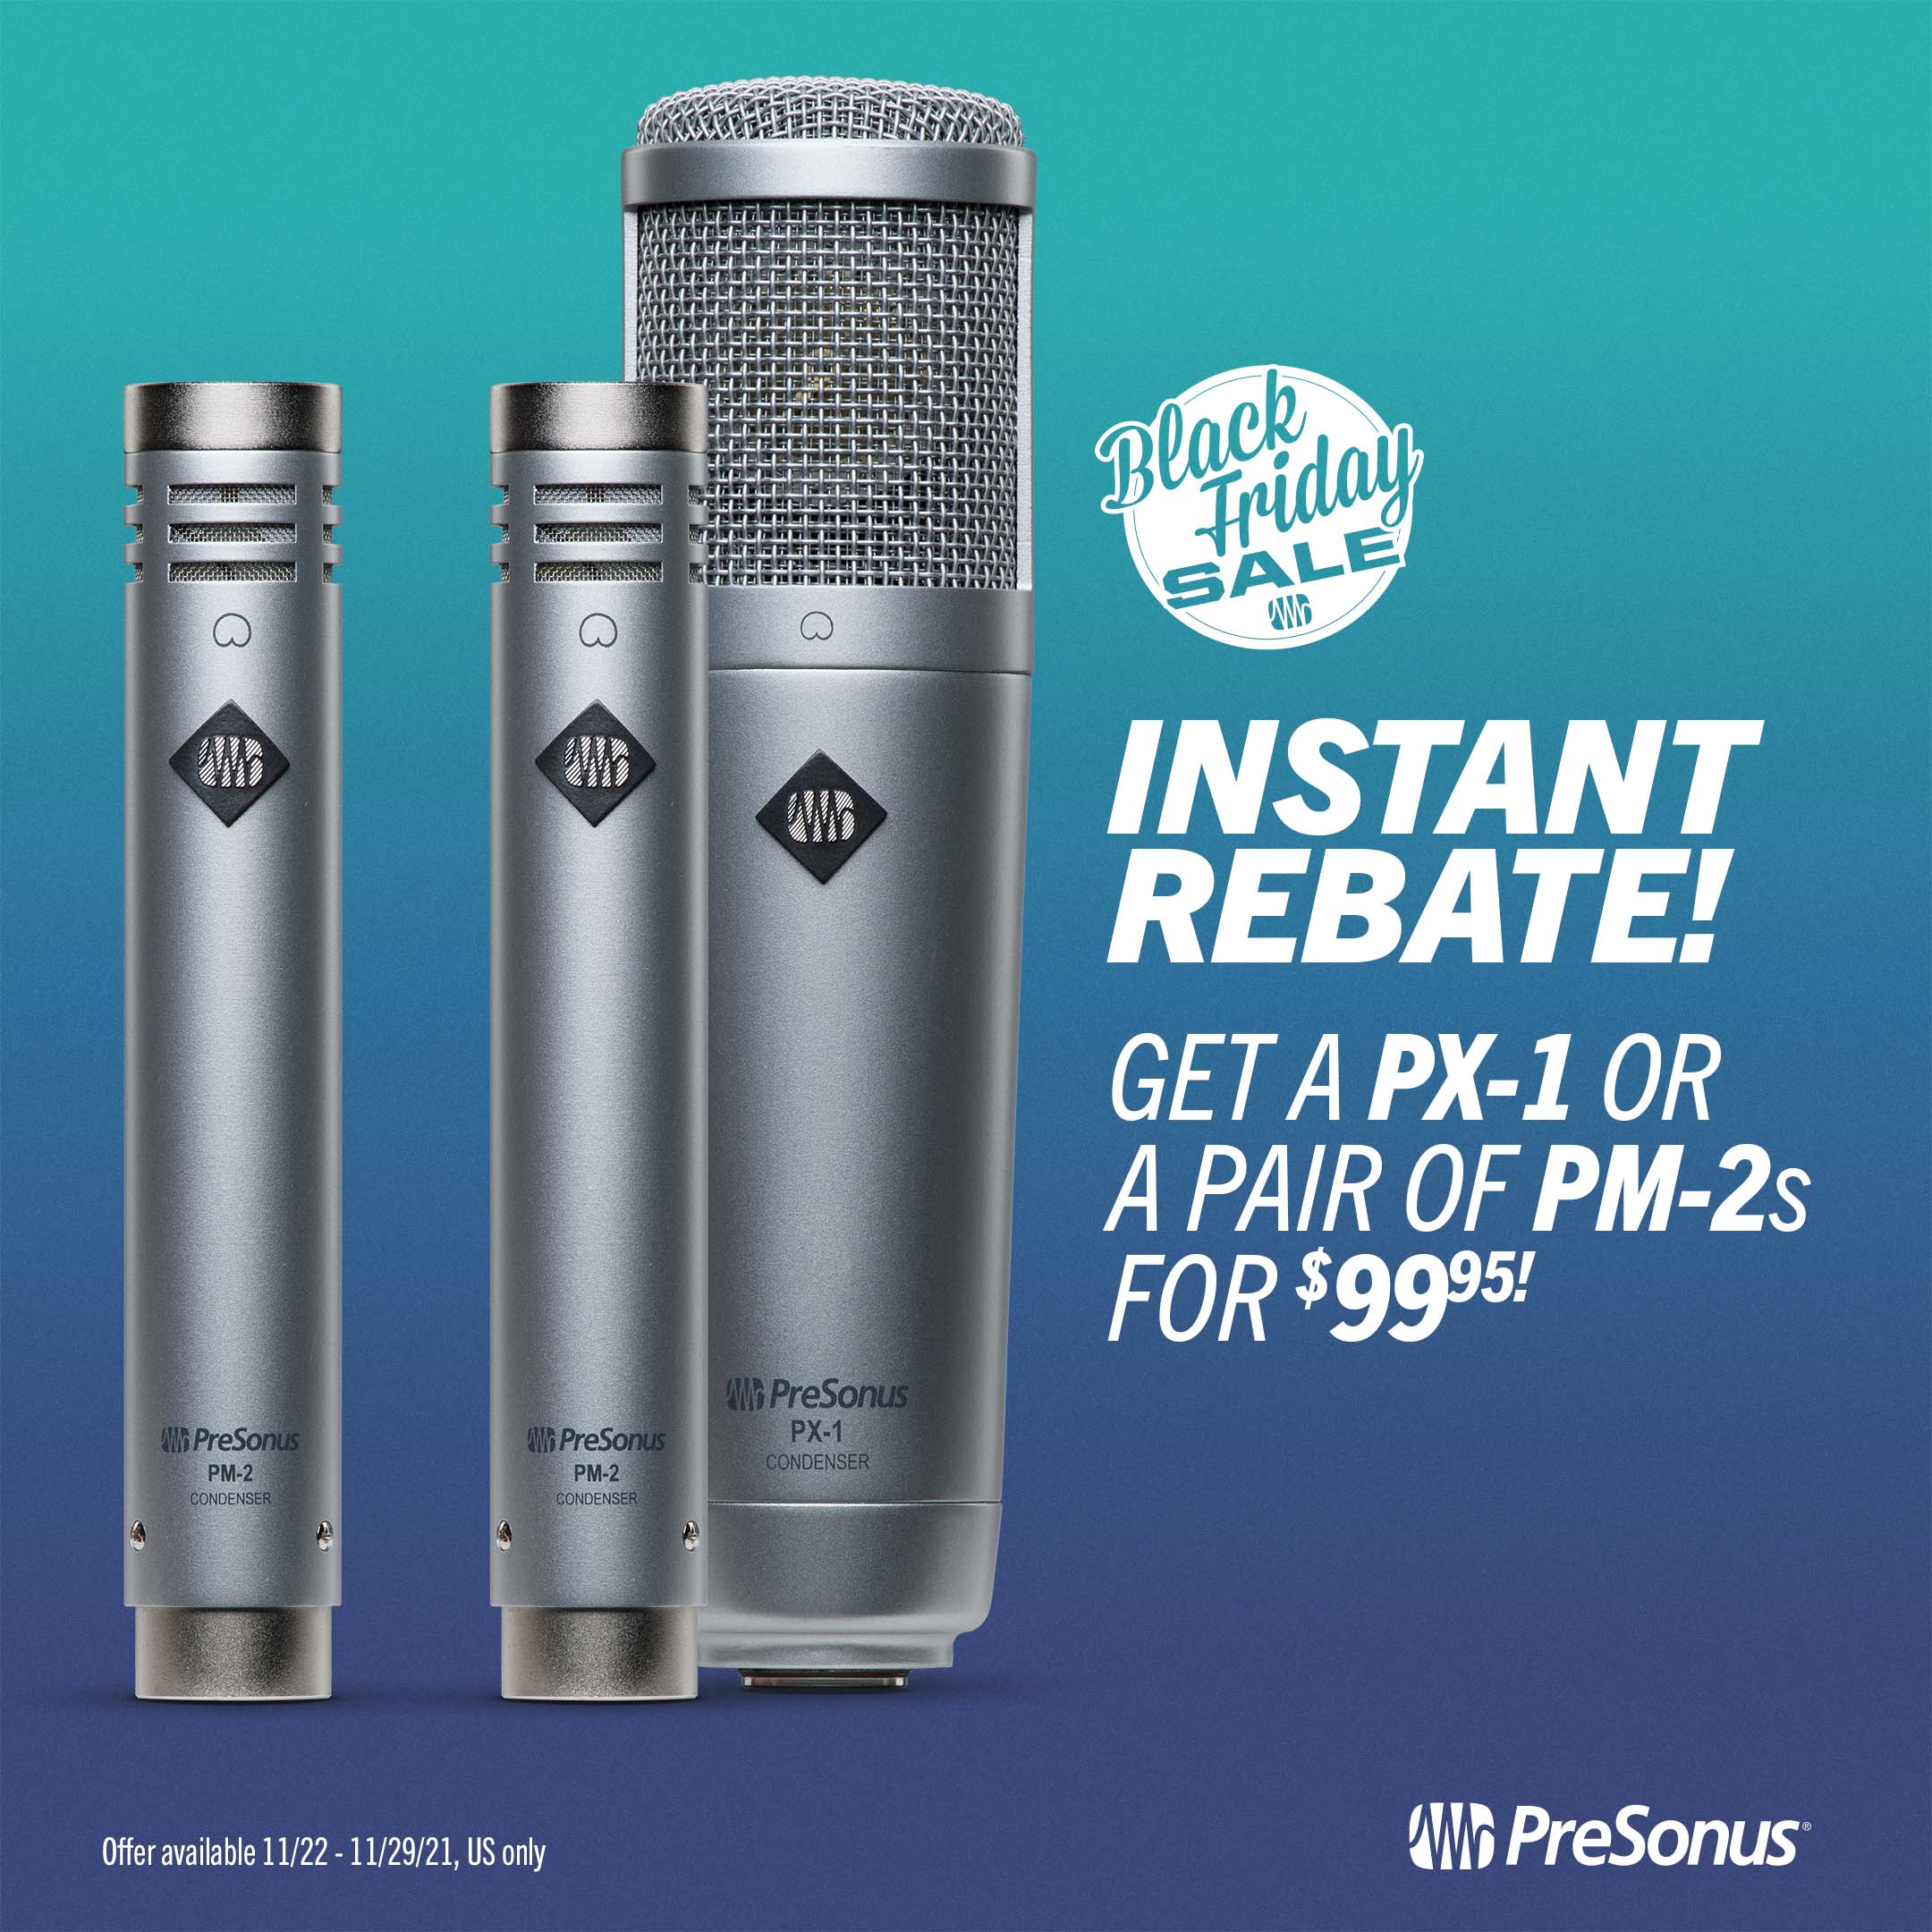
Instant Rebate! Get a PX-1 or a pair of PM-2s for $99.95 in the USA until November 29th 2021!
Click here to find a dealer!
Instant Rebate! Now through the November 29th 2021, get the PX-1 or a pair of PM-2s for $99.95 at participating dealers.
Start recording today with the PX-1 or a pair of PM-2s. The PX-1 large-diaphragm cardioid condenser microphone is an ideal solution for recording vocals, guitar, podcasts, and much more! Learn more about the PX-1 here. The PM-2 stereo mic set provides 2 matched, pro-quality, small-diaphragm condenser mics with XY mounting bar. Ideal for drum overheads, ensembles, etc. Learn more about the PM-2 set here.
This is an instant rebate, live at the point of purchase. No forms to fill out.
Studio One’s Session Bass Player
Studio One includes multiple algorithmic composition tools, but I’m not sure how many users are aware of them. So, let’s look at the way some of these tools can help expedite the songwriting process.
I’ve always prioritized speed when songwriting, because inspiration can disappear quickly. But, I’ve also found that good guide tracks (e.g., cool drum loops instead of metronome clicks) increase the inspiration factor. The trick is to create good guide tracks, without getting distracted into editing a guide tack into a “part.”
A solid bass line helps drive a song, but when songwriting, I don’t want to take the time to grab a bass and do the necessary setup. The blog post Studio One’s Amazing Robot Bassist describes a simple way to create a bass part by hitting notes on the right rhythm, and then conforming them to the Chord track. This week’s tip builds on that concept to let Studio One’s session bass player get way more creative, and generate parts even more quickly.
Fig. 1 shows a chorus being written. The process started with a rhythm guitar part (track 3), which I dragged up to the Chord track so it could parse the chord changes. I made a few changes to the Chord Track, then dragged it into a piano instrument track. This deposited MIDI notes for the chords, so now the piano played the chord progression. I then had the guitar follow the new Chord track, and the guitar and piano played together. Next up was adding a drum loop.
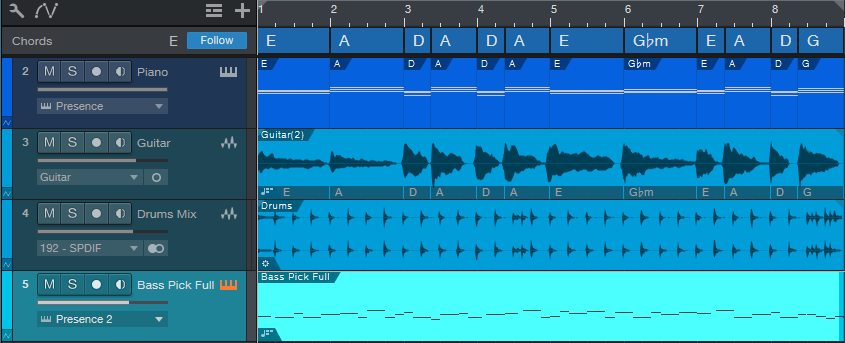
Figure 1: Studio One is set up for songwriting, and has just generated a bass part.
As to the bass part, there are three elements to having Studio One create a bass part.
1: Fill With Notes
After selecting the bass’s blank Note Event, open the Edit Menu and choose Action > Fill with Notes. You’ll want to customize the settings for best results (fig. 2).
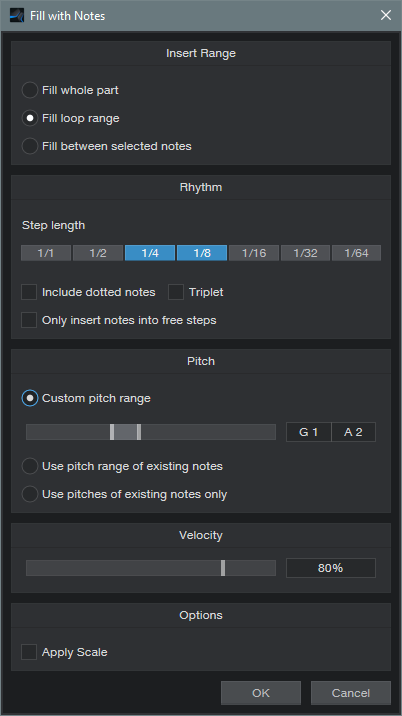
Figure 2: Studio One’s session bass player is thinking about what to play.
For example, choose a bass-friendly pitch range. For this song, I also wanted a fairly bouncy part, so the rhythm is made up of 1/4 and 1/8 notes. You might also want some half-notes in there. Click on OK, and you have a part.
Every time you invoke Fill with Notes, the notes will be different. If you don’t like the results, delete the notes, and try again. But don’t agonize over this—all you really want is notes with a rhythm you like, because the Chord Track and Scale will take care of the pitches.
Also note that if you don’t like the notes in, for example, the second half but like the first half, no problem. Delete the notes in the second half, set the loop to the second half, and try again.
2: Chord Track
Now have the part follow the Chord Track. Your follow options are Parallel, Narrow, and Bass. I usually prefer Narrow over Bass, but try them both. Now the notes follow the chord progression.
3: Choose and Apply Scale
This may not be necessary, but if the part is too busy pitch-wise, specify the scale note and choose Major or Minor Triad. Then, choose Action > Apply Scale. Now all the notes will be moved to the first, third, or fifth. Of course, you can also experiment with other scales—but remember, the object is to get an acceptable bass part down fast, so you can move on to songwriting.
Fig. 3 shows a bass part that Studio One’s session bass player “played.” This was on the second try.
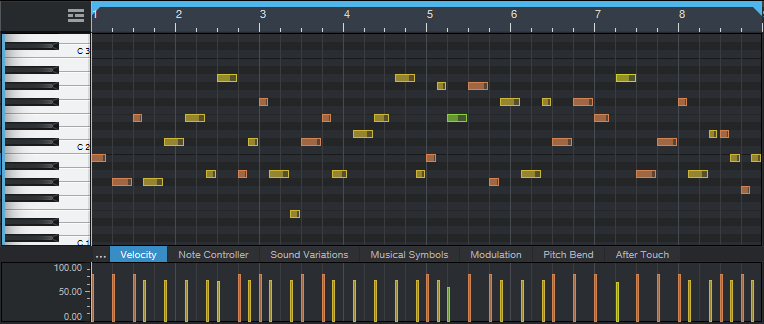
Figure 3: The session bass player came up with a pretty cool part. I applied Humanize to the velocities so it didn’t sound too repetitive.
Finally, let’s hear the results. The vitally important point to remember is that all this was created, start to finish, in under four minutes (which included tuning and plugging in the guitar). The end result was some decent guide tracks, so I could start work on the ever-crucial vocal lead line and lyrics. Thank you, session bass player!
Percussion in Motion

I’m a fan of hand percussion. Tambourines, cowbells, claves, guiros…you name it. But mixing it just right is always tricky. When mixed too high, the percussion becomes a distraction. Too low, and it might as well not be there. The object is to find the sweet spot between those extremes.
My solution is simple: use X-Trem’s Autopan function to give motion to percussion. The following audio example has cowbell (no jokes, please) and tambourine. The cowbell keeps a rock-solid hit on quarter notes, and is panned to an equally rock-solid center. But the tambourine is a different story. I’ve mixed both of them higher than normal, so you can clearly hear how they interact.
In the first half, both the tambourine and cowbell are panned to center. After a brief gap, the section repeats, with X-Trem moving the tambourine back and forth in the stereo field. In a real mix, both percussion parts would be mixed lower, so the tambourine’s motion would be something you sensed rather than heard. The end result is a feeling of more motion with the percussion, because the tambourine’s wanderings keep it from becoming repetitive.
X-Trem Setup
First things first: the track must be stereo. If you recorded it in mono, set the Channel Mode to stereo, select the clip, and type ctrl+B to bounce the clip to itself. This converts it to stereo.
I prefer not to have a regular, detectable panning change. A random LFO waveform would be ideal, but the X-Trem’s 16 Steps waveform is equally good. Slower pan rates are better, because you don’t want the pan position to change so fast that a percussion hit pans while it’s still sustaining or playing. I’d recommend 2 beats (changes every 1/8th note, as in the audio example) or every 4 beats for slower tempos or percussion that sustains.
Draw a pattern that’s as close as possible to seeming random (fig. 1). This prevents the panning from becoming repetitive.
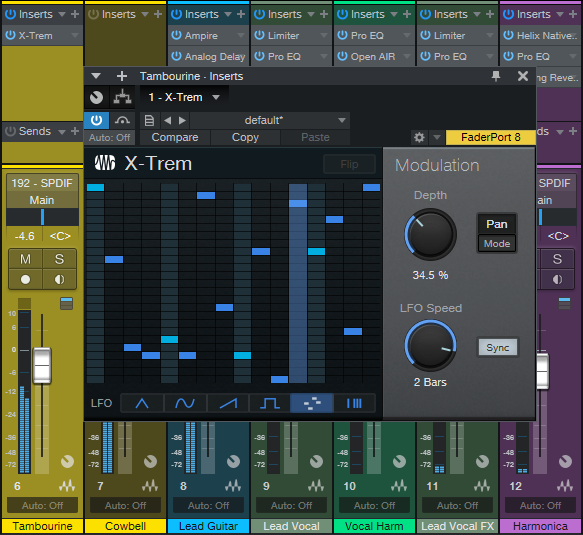
Figure 1: The 16 Steps option lets you create a custom LFO waveform.
Placement
If you want the panning to move around the center, fine—pan the track to center, and you’re done. But if you want the panning to move (for example) between hard left and center, remember that the pan control becomes a balance control in stereo. So if X-Trem pans the audio more toward the right, it will become quieter. To get around this, pan the channel to center, but follow the X-Trem with a Dual Pan that sets the actual panning range. Fig. 2 shows settings for panning between the left and center, while maintaining a constant level.
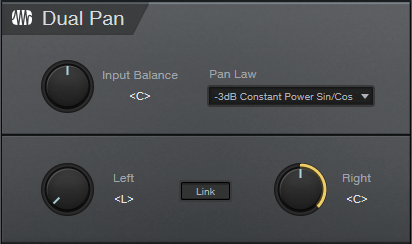
Figure 2: Dual Pan settings for varying the auto-panned position between the left and center.
As to the amount of X-Trem modulation depth…it depends. If you’ve been to my seminars where I talk about “the feel factor” with drum parts, you may recall that I like to keep the kick right on the beat, and change timings around it. A similar concept holds true with panning percussion. In the audio example, the cowbell is the anchor, and the tambourine dances around it. If both are moving, the parts can become a distraction rather than an enhancement.
Now you know how to make your percussion parts tickle the listener’s ears just a little bit more…and given the audio example, I’m proud of all of you for not stooping to a “more cowbell” joke!
Sneaky Mastering Page Tip
For this tip to make sense, I need to be upfront about two personal biases.
Personal bias #1: Drums should sound percussive. I can’t remember the last time I used compression on drums (although limiting or saturation is helpful to shave off extreme peaks).
Personal bias #2: I avoid using bus processors. The mix has to sound great without any bus processors, so the mastering process can take the mix to the next level.
Why I have these biases would take up a whole other tip. Besides, if your music sounds great with bus processors and compressed drums, then by all means—keep using bus processors, and compress your drums!
But There’s a Problem: “Super Peaks”
As a result of my biases, I send mixes with a wide dynamic range to the Mastering page, because that’s where I can control the precise amount of dynamic range processing in context with other related pieces of music. But, not restricting dynamics means that from time to time, there are “super peaks”—for example, if the kick, snare, cymbal, keyboard stabs, and a guitar power chord all hit at the same time (fig. 1).
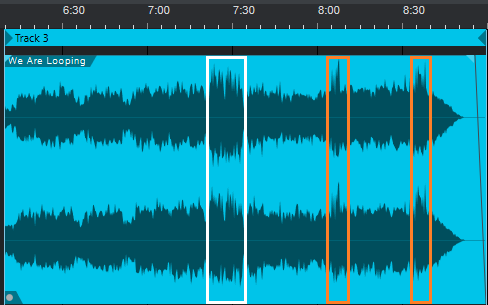
Figure 1: The super peaks are outlined in orange. Lower peaks are outlined in white.
These super peaks go way higher than most peaks, so if you normalize, the super peaks prevent any significant peak level increase. Using limiting or compression on the track works, but alters the percussive character. Of course, the beauty of the Song/Mastering page synergy is that you can tweak the mix in the Song page, and the Mastering page will reflect the results. However, with super peaks that combine multiple instrument sounds occurring simultaneously, tracking down which tracks to reduce, and by how much, gets complicated—especially if you have to deal with a dozen or so super peaks.
The Gain Envelope is the perfect tool for dealing with super peaks. You can bring down the peak and the area immediately adjacent to it, without neutering the percussive waveform (fig. 2). The Gain Envelope just lowers the peak’s level a bit—it doesn’t flatten the peak.
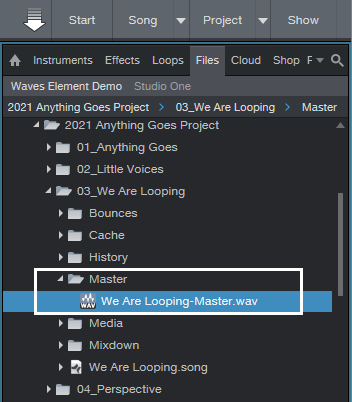
Figure 2: The super peak on the left has been lowered by -3 dB on the right.
Although the Mastering page doesn’t have Gain Envelopes, there’s still a way to apply that Song page advantage to the Mastering page. Usually, audio goes from the Song page to the Mastering page. In this case, we’ll do the reverse.
- Create a new Song.
- Open the Browser, and unfold the Project’s folder. Then, unfold the Song with the file that needs editing, and open the Song’s Master folder to expose the file used by the Mastering page (fig. 3).

Figure 3: Locate the Master file. Note the -Master.wav suffix.
- Drag the Master file into the new Song, and start editing.
- Use the Gain envelope to bring down the super peaks. While the file is open, you can make any other needed changes (e.g., increasing the level slightly at the beginning to pull listeners into the music).
- After making your changes, rename the existing Master file to something like “Song-Master Old.wav.” Then, drag the edited file from the Song into the Master folder, and rename it with the original name, like “Song-Master.wav.” Now your project will think the modified file is the Master file (fig. 4). Once it checks out as okay, you can delete the old Master file.
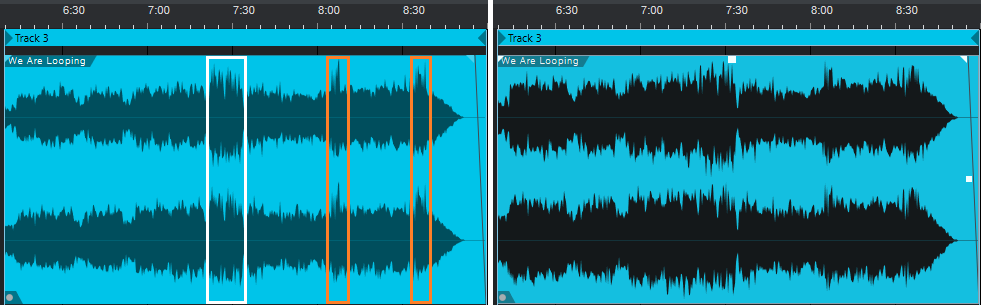
Figure 4: The original file is on the left. The version on the right had the super peaks reduced, and was then re-normalized.
Mission accomplished! Both files in fig. 4 were normalized, but compare the file on the right—it’s more consistent and louder, yet the dynamics remain intact. It was necessary to change only the levels of ten super-peaks by about -3 dB. I also brought up the level in the beginning section, to make a stronger entrance after the end of the previous song. The end result was about a +2.0 LUFS increase.
So there you have it: you can win the loudness wars—but with a bloodless coup that doesn’t squash your audio.
Save $30 on AudioBox 96 Studio 25th Anniversary in the USA and Canada in November 2021!
Click here to find a dealer!
Now through the end of November 2021, save $30 on the AudioBox 96 Studio 25th Anniversary Edition at participating dealers in the USA and Canada!
Start recording today with this complete, all-PreSonus package! Based on the AudioBox USB 96 audio/MIDI interface and award-winning Studio One recording and production software, PreSonus AudioBox 96 Studio is great for creating multitrack recordings, demos, live recordings, podcasts, field recordings for video and sound effects, and much more.
You get our best-ever selling AudioBox interface, the M7 Condenser microphone, comfy HD7 headphones, Studio One Artist, the Studio Magic Suite (over $1000 worth of software) and all the cables you need to hook it up. It’s everything you need to record and produce in a single purchase—and for a limited time it’s more affordable than ever!
This is an instant rebate, live at the point of purchase. No forms to fill out.
Get $30/€30 instant rebates on the Revelator Microphone!
Now through the end of Dec. 2021, — save $30/€30 on the Revelator USB microphone at participating dealers!
Stand out from the crowd! Revelator is the first USB microphone to deliver voice processing to polish your sound and an easy-to-use loopback mixer to bring in multiple sources from other software applications—all built into a studio-grade microphone that connects right to your computer, Chromebook, and iOS/iPadOS devices. It’s ideal for singer/songwriters, podcasters, or just regular ol’ Zoom calls for the work-from-home crowd.
You also get Studio One Artist and the Studio Magic software suite—over $1000 worth of software!
Here’s a great review of the Revelator from Production Expert!
The fine print:
USA and Canadian customers can get their $30 off instantly at participating dealers.
European customers need to use the rebate form linked below. Qualifying territories include: Germany, UK, Netherlands, Belgium, Luxembourg, Austria, Ireland, Hungary, France, Spain, Portugal, Latvia, Lithuania, and Estonia.
To find a dealer outside of the USA, click the links below!
- Alfasoni
- Amazon DE
- Amazon ES
- Amazon FR
- Amazon GB
- Amazon IT
- Amazon NL
- Amazon SE
- Bax
- Delta Audio
- Egitana
- Future Sound
- GAK
- Gear4Music
- Guitar Guitar
- Huigens Music
- Just Music
- Knight Sound
- Madrid HiFi
- Michenaud.com
- Music Matter
- Music Store
- Musikhaus Kirstein
- PMT
- Scan
- Scotto
- Session Music
- Sonovente
- Sounds Around
- Stars Music
- Thomann
- Woodbrass
- X Music