Keyswitching with Smaller Keyboards
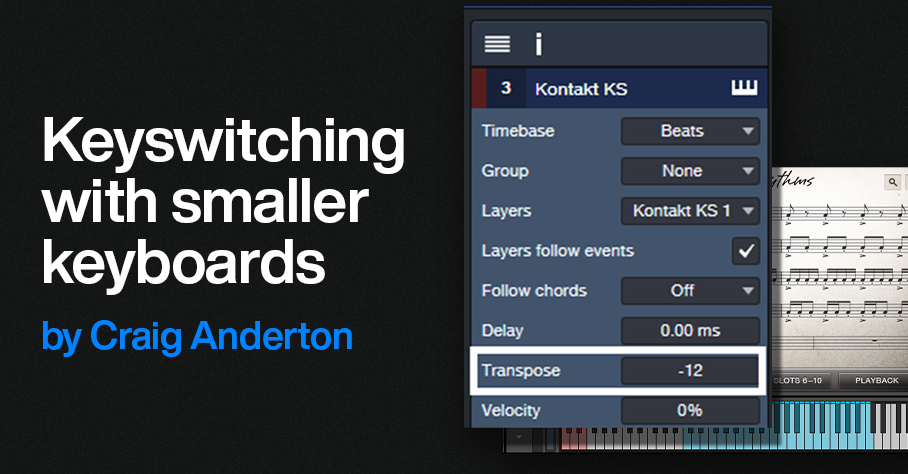
By Craig Anderton
Keyswitch keys enhance expressiveness by letting you trigger various real-time articulations for instruments like strings, brass, guitars, and so on.
A previous blog post covered Studio One’s Sound Variations. This protocol incorporates and enhances traditional keyswitching. However, some instruments (e.g., Kontakt, SampleTank) don’t implement Sound Variations. An issue with standard keyswitching is that the keyswitches are often placed on the keyboard’s lowest octaves, so the instruments assume you have at least a 5- or 6-octave keyboard. With a 4-octave keyboard, you may not be able to access the keyswitches and all the available notes at the same time.
Overdubbing keyswitch notes defeats the goal of real-time expressiveness. Dedicating an external mini-keyboard or pad controller like ATOM can generate keyswitch notes in real time, but may not be as convenient as triggering keyswitches from your keyboard controller. (Previous blog posts on using a mini-keyboard or ATOM for keyswitching are no longer available online, but see The Huge Book of Studio One Tips & Tricks, 2nd Edition for updated versions of these tips.) Fortunately, there are ways to do traditional keyswitching with keyboards that may not seem to have enough range.
The TL;DR Overview
1. Assume the virtual instrument’s keyswitch keys are C0 to E0.
2. Create two instrument tracks, a “Notes” track and a “Keyswitch” track. Assign both to your virtual instrument. These will essentially end up being keyboard splits.
3. Transpose the Keyswitch track down so that the keyboard’s lower keys (e.g., C1 to E1) trigger the C0 to E0 keyswitch range.
4. In the Keyswitch track, insert an Input Filter Note FX that covers the keyboard range C1 to E1 (the same range as the keys that trigger the keyswitches).
5. In the Notes track, insert an Input Filter Note FX that extends from the first key above the highest keyswitch (in this case, F1) to the top of the instrument’s note range.
Now you have a split keyboard, with the lower split triggering keyswitches and the upper split playing notes. Read on for details on how/why this works, and real-world applications.
Basic Use Case: Simple Keyswitch Fix
Keyswitches usually start at C0. Many acoustic instruments don’t extend down this low. If there are unused keys between the keyswitches and the available notes (fig. 1), the fix is simple.
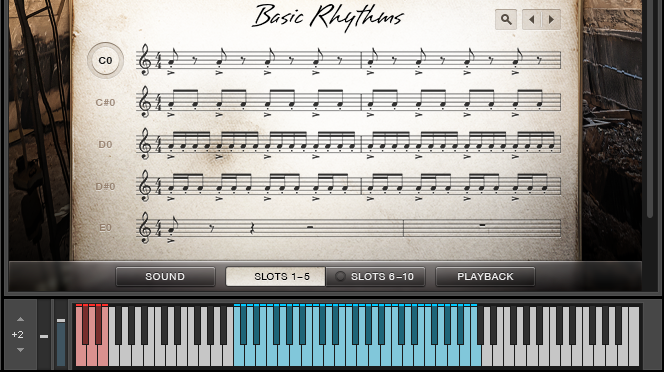
Figure 1: Native Instruments’ Action Strings has three octaves of notes (colored blue) starting at C2, and five keyswitched notes (colored red) starting at C0.
Moving the keyswitches up an octave so that they start at C1 fits the notes and keyswitches in a four-octave keyboard. To do this with a virtual instrument like Action Strings:
1. As mentioned above, create Keyswitch and Notes Instrument tracks. Assign them to the virtual instrument.
2. Open the Keyswitch track’s Inspector. Set Transpose to -12 (fig. 2).Now, C1 to E1 will cover the C0 to E0 keyswitch range.
Figure 2: This transposes C1-E1 in the Keyswitch Instrument track down to the keyswitch range.
3. However, there’s a problem. If you play (for example) C4, the Notes Instrument track will send a C4 to the virtual instrument. That’s fine, but simultaneously, the Keyswitch Instrument track will send a C3 to the virtual instrument because it transposes its input down -12 semitones. To avoid unintentional notes, insert an Input Filter Note FX in the Keyswitch instrument track. Set the Input Filter range as C1 – E1 (fig. 3). The Input Filter blocks any notes from reaching the virtual instrument unless they trigger keyswitches.
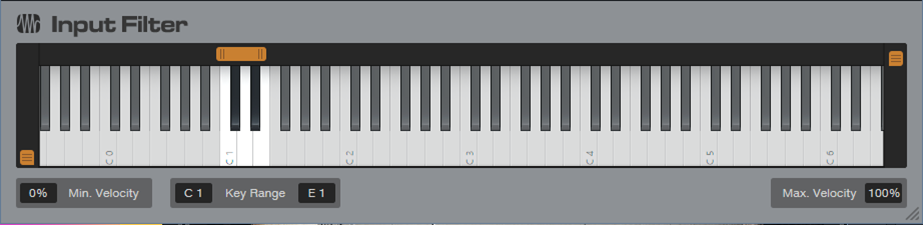
Figure 3: The Input filter passes only notes in the range of C1 to E1.
Now, C1 to E1 trigger the C0 to E0 keyswitches, while C2 to C5 trigger notes. Everything fits in a four-octave keyboard (fig. 4).

Figure 4: By moving the keyswitches to C1 – E1, it’s possible to play all notes and all keyswitches within a four-octave range.
Note that in this case, the Notes track doesn’t need an Input Filter Note FX. Although the C1 to E1 keys also trigger notes C1 through E1 via the Notes track, this doesn’t matter because the Kontakt preset doesn’t assign anything to these notes.
Advanced Use Case: Keyswitch Fix that Requires a Tradeoff
SampleTank’s Violins Multi preset (fig. 5) has over an octave of keyswitches and over 3 octaves of notes. Fortunately, I rarely (if ever) use the notes above C5. By limiting the highest note to C5, everything can squeeze into a four-octave keyboard by creating a Keyswitch Instrument track and transposing it down an octave. The goal is to create a split where C1 through F#2 play keyswitches, while G2 through C5 play notes.
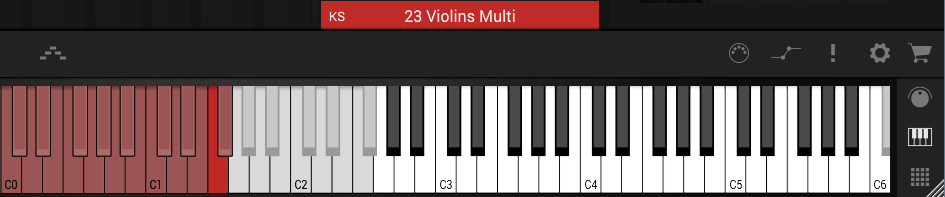
Figure 5: SampleTank’s 23 Violins Multi preset has over an octave of keyswitches (colored red) starting at C0. Shifting the keyswitches to C1 makes all the keyswitches available, with the tradeoff of not being able to play notes above C5.
As with the previous example, the virtual instrument receives Note data from two tracks. Transpose the Keyswitch track down by -12 semitones so keyboard keys C1 – G#2 trigger the keyswitches at C0 – G#1. However, because the keyswitches cover more than an octave, transposing these new keyswitch assignments downward means keyswitch notes can overlap. For example, if you play C1, the Keyswitch Instrument track will transpose it down to hit the keyswitch at C0. That’s what we want. But the Notes Instrument track will also let the C1 through, so it will trigger the C1 keyswitch.
The solution is to insert an Input Filter Note FX in the Notes Instrument track that restricts its range to notes above the keyswitches. Similarly to the previous example, the Keyswitch Instrument track will transpose any note down by -12 semitones. This means that if you play C4, the Keyswitch Instrument track will play C3. So, insert an Input Filter Note FX in the Keyswitch Instrument track that restricts notes to the range C1 to F#2. Then it will transpose only notes that trigger keyswitches (fig. 6).
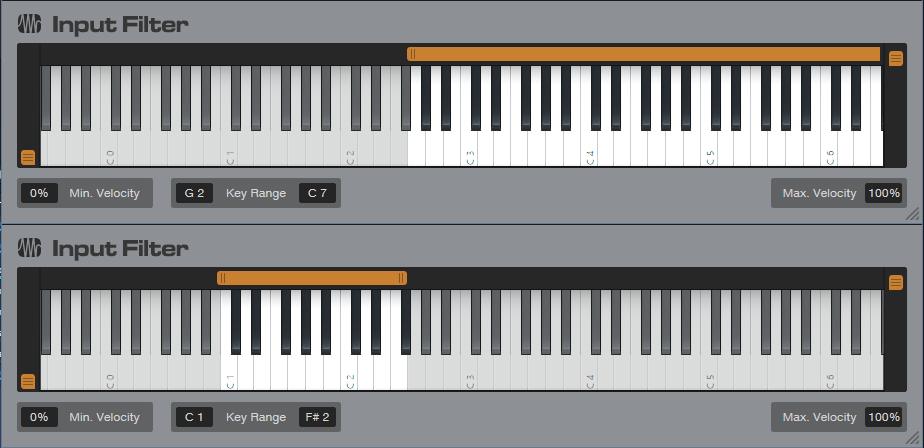
Figure 6: Restricting the note range on the Notes Instrument track (upper Input Filter) prevents doubled keyswitch keys. Restricting the range on the Keyswitch track (lower input filter) means only the keyswitch notes play back an octave lower, and don’t trigger any higher notes.
This may seem complex, but once you try this technique in a real-world situation, it will make sense. Granted, Sound Variations dramatically simplify keyswitching, but at least there are alternatives for instruments that use traditional keyswitching.
How to Get the Most Out of the Channel Editor
By Craig Anderton
The Channel Editor places all of a mixer Channel’s elements—level fader, inserts, sends, individual effects, input controls, routing, macro controls, and more—right at your fingertips. The Channel Editor has three sections: Overview, Macro Controls, and FX Routing, all of which have a useful Toolbar. Let’s explore the many ways the Channel Editor improves workflow.
To show/hide the Channel Editor, click on the Channel Editor button (fig. 1)in a mixer Channel or the Inspector. In the Arrange view, click on the Track number.
Figure 1: The white outlines surround the show/hide Channel Editor buttons.
The Toolbar
The Toolbar (top of fig. 2) has icons to select the three main Channel Editor sections. Tabs are also available to select any of the Channel’s effects. From left to right, the options are:
Channel Overview (three vertical bars icon). This consolidates track parameters, inserts, sends, cue mixes, and more in a single GUI. It also accommodates Micro View expand/collapse option for effects, and Fader Flip. If you like to work mostly in the Arrange View, the Channel Overview offers deep, per-channel editing without needing to open the Mix View.
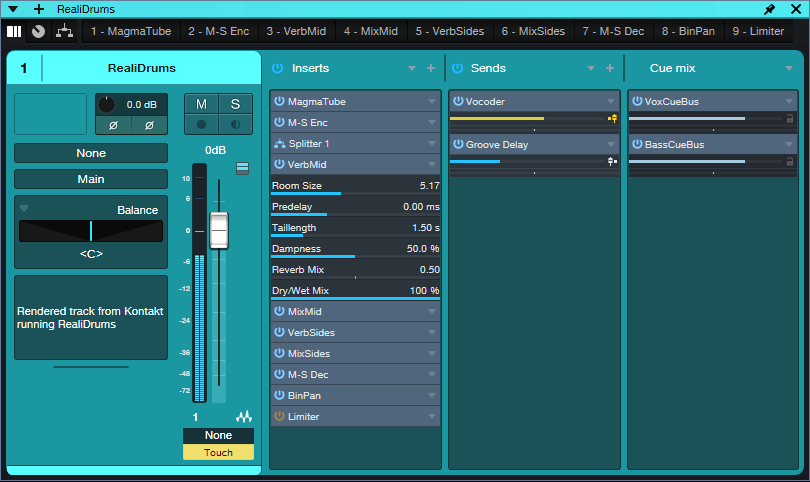
Figure 2: Channel Editor Overview. Note the Toolbar at the top.
Macro Controls (knob icon). Click to open a Panel where you can add up to 8 virtual knobs, 8 virtual buttons, and two X/Y pads. Assigning these controls to effect parameters can consolidate your most-used parameters in a single GUI, which reduces or eliminates the need to open individual effects interfaces. Macro controls can also modify multiple parameters simultaneously, like turning up gain when adding more compression. This is much easier than going back and forth among multiple knobs to tweak an effect.
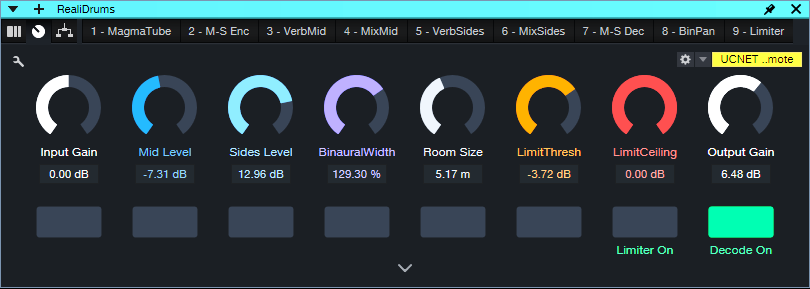
Figure 3: Macro Controlsused for my M-S Room Reverb Extended FX Chain.
Routing Window. For series effects, this shows the effects order. Additional controls cover input and output levels to the insert effects. However, the Routing Window’s most useful feature is being able to show and edit the routing for parallel and series/parallel effects.
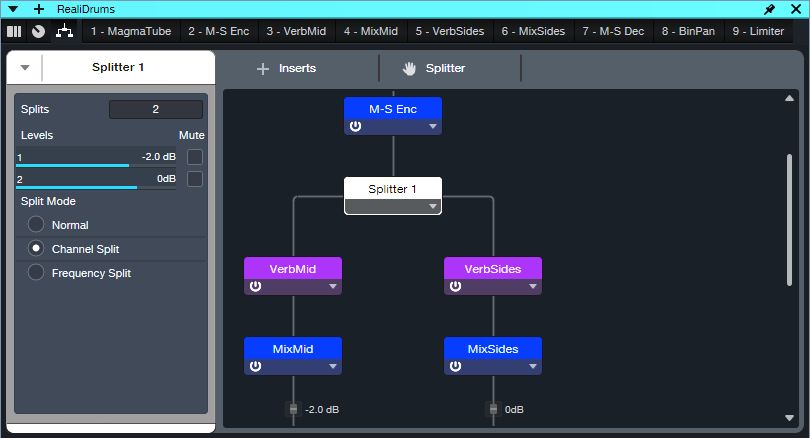
Figure 4: Routing Window for the M-S Room Reverb Extended FX Chain. Not all the effects are visible in this image, but the Routing Window is resizeable, and there’s also a vertical scroll bar. Only two splits are shown, but a Splitter can create up to five splits.
Insert Effects Tabs. These select individual effects for editing.
- Click on an effects tab (or double-click on an effect in the Routing Window), and the effect’s UI replaces the Channel Overview.
- Rearrange the order of series insert effects by clicking on an effect’s tab, and dragging left or right to the desired position. With parallel effects, use the Routing Window to rearrange the order of effects.
- If an effect is selected in the Toolbar, you can skip left and right in the effects chain to select a different effect. Use the keyboard shortcuts Ctrl+Page Up and Ctrl+Page Down, respectively.
Tab Drop-Down Menus. Several plugin management functions are available directly from the Channel Editor. Fig. 5 shows the tab drop-down menu for a third-party effect, which includes one more option than native effects.

Figure 5: With third-party plugins, an additional option allows updating the effect thumbnail.
- Rename is super-helpful when there are several instances of the same effect. For example, fig. 2 shows the insert effects for mid-side reverb. It uses four Mixtools. Normally, their tabs would just say Mixtool. Renaming allows differentiating in the Toolbar between the Mixtool Encoder, Decoder, and level controls for the Mid and Side audio.
- Choosing Favorite adds the current effect to the list of Favorites.
- The drop-down menu also lets you Disable, Enable, Remove, and select Plug-in Nap.
- Show in Console highlights the channel hosting the effect. This is handy when you have pinned instances of the same plugin that are hosted in different channels. If the channel is hidden, choosing Show in Console makes it visible. Show in Routing opens up the Routing Window.
- Update Plug-in Thumbnail appears only with third-party plugins. It updates the thumbnail that the effects Browser displays if Show Thumbnails is selected(the icon to the right of the effects Browser Wrench button).
Channel Overview Applications
When the Channel Editor is open, it follows Channel selection. This is particularly useful in three scenarios.
- A Narrow mixer view with lots of tracks. To start, open any Channel Editor. Now when you click on a narrow channel, the Channel Editor follows your selection. This makes it easy to edit a Narrow channel’s parameters without having to expand the channel. Note that a Narrow channel doesn’t expose the Channel Editor’s show/hide button, so either click on a track number, or double-click on a narrow channel to change its mode to Normal and reveal the Channel Editor button.
- When you need to see as many tracks as possible in the Arrange view. Opening the Channel Overview makes it easy to edit Channels without opening the Mixer view. This is ideal for those who like to work primarily in the Arrange view.
- Handling Channels with many insert effects. A single click in the Channel Editor opens an effect, compared to double-clicking on insert effects in a mixer Channel.
Visibility Tip
If Tracks or Channels are hidden, and a Channel Editor is open, click on a hidden Channel in the Channel List (or a hidden Track in the Track List) to open the associated Channel Editor.
Fig. 6 shows a song where I was working primarily on keyboard and vocal parts, so the guitar tracks were hidden. But I could still do quick edits on the hidden guitar Channels if they affected the keyboard or vocal parts. Also, to retain as much Arrange View real estate as possible, you can “hide” the Sends and Cue Mix sections by moving part the Channel Overview past the right side of the screen.
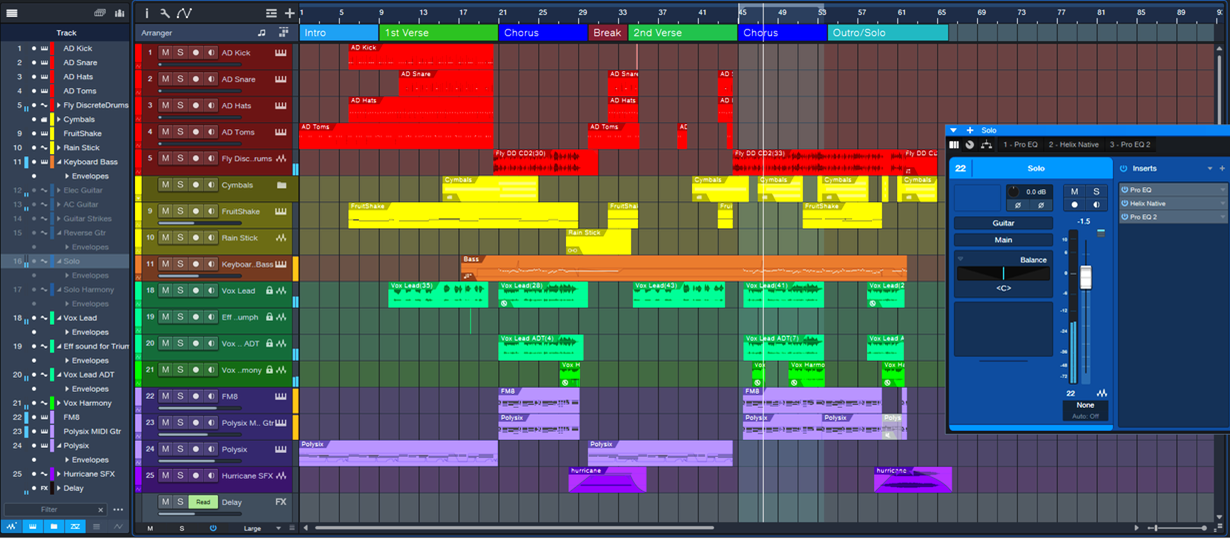
Figure 6: If you’re working primarily in the Arrange View, the Channel Editor gives you deep Channel editing without having to open the mixer.
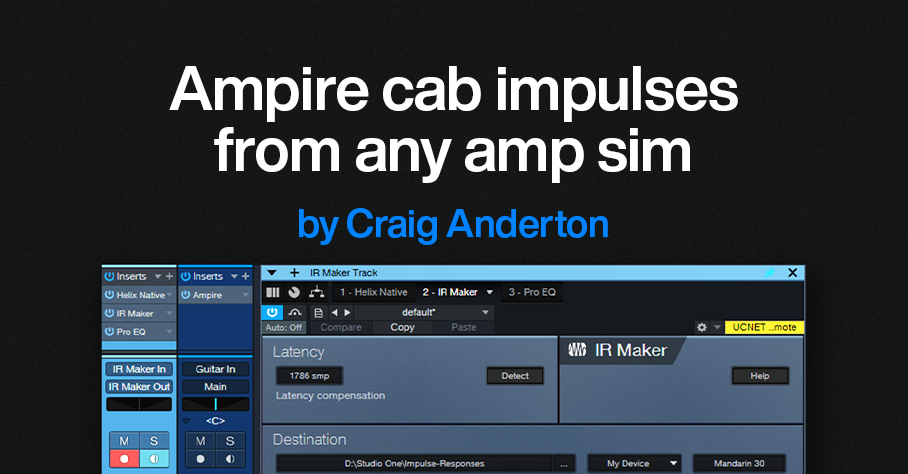
Free Download: 25 “Analog” Cab IRs!

By Craig Anderton
Yes, just click here to download 25 Analog Cab IRs.zip. The IRs are 1024 samples long, 48 kHz, 24-bit, and mono, so they work with pretty much any amp sim. In addition to Ampire, I tested them with BIAS FX and BIAS Amp, Blue Cat Audio Axiom, Headrush ReValver, IK AmpliTube, Line 6 Helix, NI Guitar Rig, Overloud TH-U, STL Tones Howard Benson, and Waves PRS Supermodels.
The Backstory
Hopefully some of you were brave enough to try the technique in Grab Cab Impulses for Ampire from Any Amp Sim, or became interested in EQ-based cabs from the tip “Create Ampire Cabs with Pro EQ3”(no longer available online, but included in The Huge Book of Studio One Tips and Tricks, 2nd Edition). However, it takes a lot of EQ to create a convincing cabinet—I often use as many as 20 Pro EQ3 stages. So, because y’all have been so supportive of these blog posts, I thought you might appreciate downloading some cool IRs rather than having to roll your own.
The IRs are EQ-based versions of the stock Ampire cabs (the names are the same, but the IRs have _EQ as a suffix). As to why I’d bother making IRs of existing cabs, the FIR (Finite Impulse Response) digital filters used for amp sim IRs have a particular sonic character. Although accurate, they can have a “thin” sound quality. I sometimes prefer the fatter “analog” sound of EQ-based cabs. The more neutral response also lends itself well to additional editing with EQ and other processors.
Using the IRs
1. Unzip 25 Analog Cab IRs.zip.
2. Select Ampire’s User Cab. (Other amp sims will have some kind of IR loader feature.)
3. Drag the IR on top of the User Cab, or into the Cab’s Mic A slot.
4. Although you won’t have the miking options of the stock cabs, you can use more than one IR to modify the sound (fig. 1). The result is essentially a morph of the loaded IRs. The Mic Edit Mute, Phase, Delay, and Volume controls are all active. Note that there must be an IR in the Mic A slot. A second IR would go in the Mic B slot, and a third in the Mic C slot.

Figure 1: Two IRs are providing an analog-sounding cabinet for the MCM 800 amp.
Of course, you may prefer the sound of Ampire’s stock IRs. But give the analog cabs a try, and compare the stock sound with the EQ-based sound. Some sounds are close, some are different, but the EQ-based cabs provide useful—and at least to my ears, often preferable—variations.
How It Works: Creating the Impulses
If you’re curious about the process, I sent pink noise to two channels. One had the source Ampire Cab. The other had three or four Pro EQ3 plugins in series. Both channels were followed by spectrum analyzers. The goal was to match the stock cab’s curve as closely as possible with EQ, with a few exceptions for personal preferences. Fig. 2 shows curves for the 4×12 Gazoline cab.
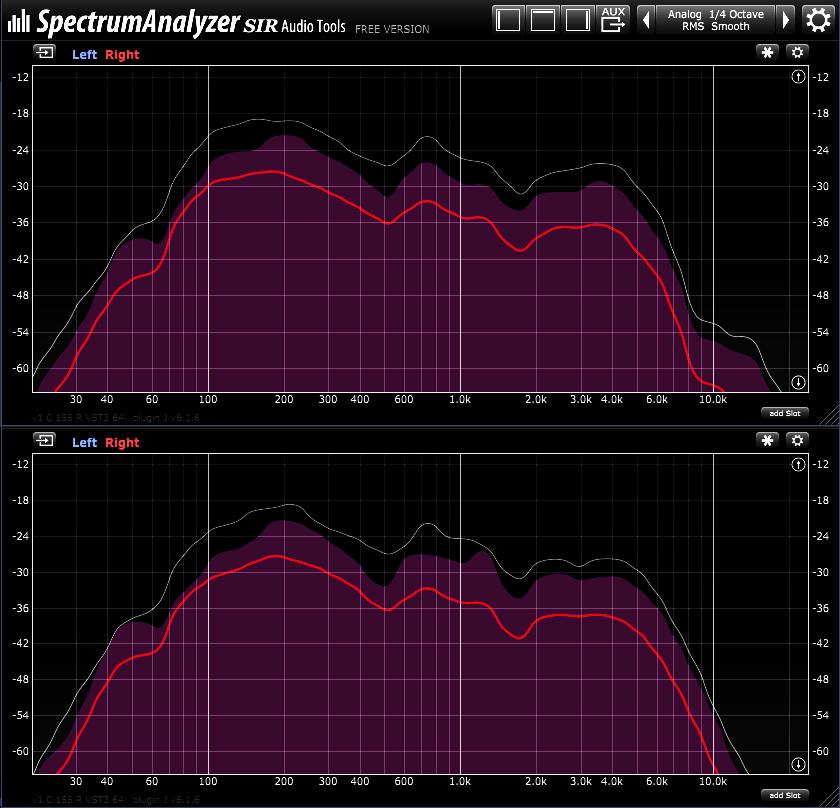
Figure 2: Stock cab’s response curve (top) and EQ-based cab’s response curve (bottom).
Fig. 3 shows the curves from three Pro EQ3s needed to create a curve for the 2×12 Boutique cab.
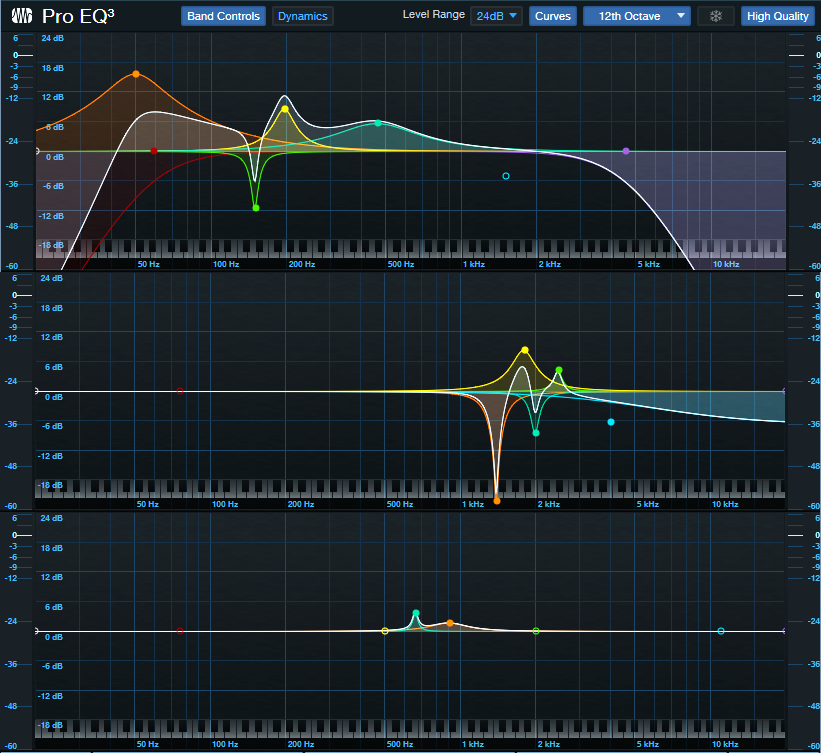
Figure 3: These EQ curves emulate the 2×12 Boutique cab.
To create the actual IR, another channel used the IR Maker, preceded by copies of the EQs needed to create the cabinet’s response curve. For more information on creating EQ-based IRs, see Grab Cab Impulses for Ampire from Any Amp Sim. Instead of inserting a cab prior to the IR Maker, insert the EQ stages needed to create the sound you want.
Creative FX Sound Design

By Craig Anderton
It’s been a while since we’ve had a post for sound design fans. So, let’s create some crazy FX for sci-fi/suspense/horror movies, DJ breaks, or even background sounds for weird social media videos. We’re going to convince Studio One that feedback is good, and in the process, nail some of the early electronic music sounds from the 50s—before synthesizers walked the face of the earth. Check out the audio examples at the end.
It’s All About the Feedback
Inserting processors in a feedback loop allows altering the feedback effects. Note that I didn’t say “controlling” the feedback effects, because feedback is a highly unpredictable process. So, part of this tip involves real-time recording of the effects you create. Then, you can cut the best parts, process them further, do transposition, crossfade different sections to cut out the unusable parts, and so on.
It’s helpful to create a dedicated sound design Song Setup (fig. 1). This setup requires a patch cord to connect an audio interface output to the same-numbered audio interface input. In this case, the output is mono but it could also be stereo. That would require two patch cords connecting like-numbered audio interface inputs and outputs.
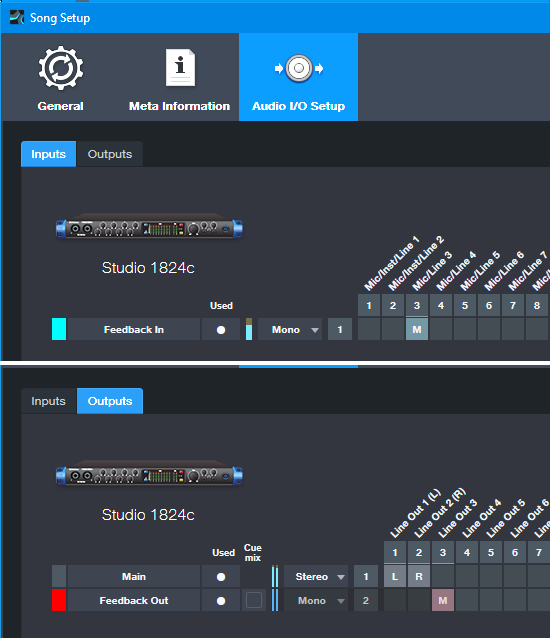
Figure 1: Song Setup for creating a feedback loop inside Studio One. This uses the Studio 1824c’s Mic/Line 3 for the Input and Line Out 3 for the output.
The Channel Layout
Fig. 2 shows the channel layout. Here’s how it works.
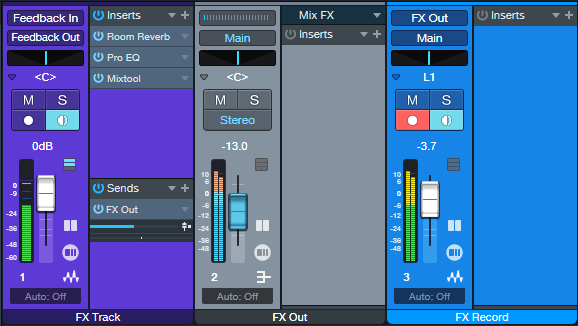
Figure 2: Channel layout to create feedback-based sound effects.
The sound creation occurs in the FX track’s channel. Set the channel input to the Sound Setup’s Feedback In, and the output to Feedback Out. So, the output feeds back to the input through the physical patch cord. Note that the Input Monitor must be on.
Insert effects to process the feedback. Some effects are more useful than others. The Pro EQ3 is one of my favorites, but Rotor, Reverb, using the Tone Generator to initiate feedback, and several others are also fun. Also try using the Vocoder, with a separate track of white noise feeding its sidechain.
Feedback effects generate a lot of signal level. Normally we’d just set up a track to record the FX Track’s channel, but the FX channel fader also affects the feedback. It’s best to keep it at a fixed level. So, a Send from the FX channel goes to the FX Out bus. The FX Out bus’s output goes to the FX Record channel’s input. This gives two ways to vary the recording level: The Send from the FX Channel, and the FX Out bus fader.
Recording Time
Now it’s time to get crazy. It takes a while to get the feel of how to control this, so keep the monitor levels way down. Seriously. You don’t want to damage your ears.
Start off with just the Pro EQ3. At first, you probably won’t hear anything because the feedback hasn’t started up yet. Increase the gain of various EQ stages, and the feedback will kick in. Change gain, frequency, and other parameters of various EQ stages to change the feedback’s character.
Once you get a sense of how the process works, start recording. One cool trick is to do multiple automation passes. Record one pass varying one stage’s parameters, then in Touch mode, do a second pass varying a different stage’s parameters.
The Final Process
After recording your sound sources, process them further. Time- and pitch-stretching is helpful, but so is flanging, various impulses for the Open Air, Ampire’s amps and effects, and so on. You’ll get sounds you can’t obtain any other way…like the following 1-minute audio example, which plays five short snippets of different sound effects.
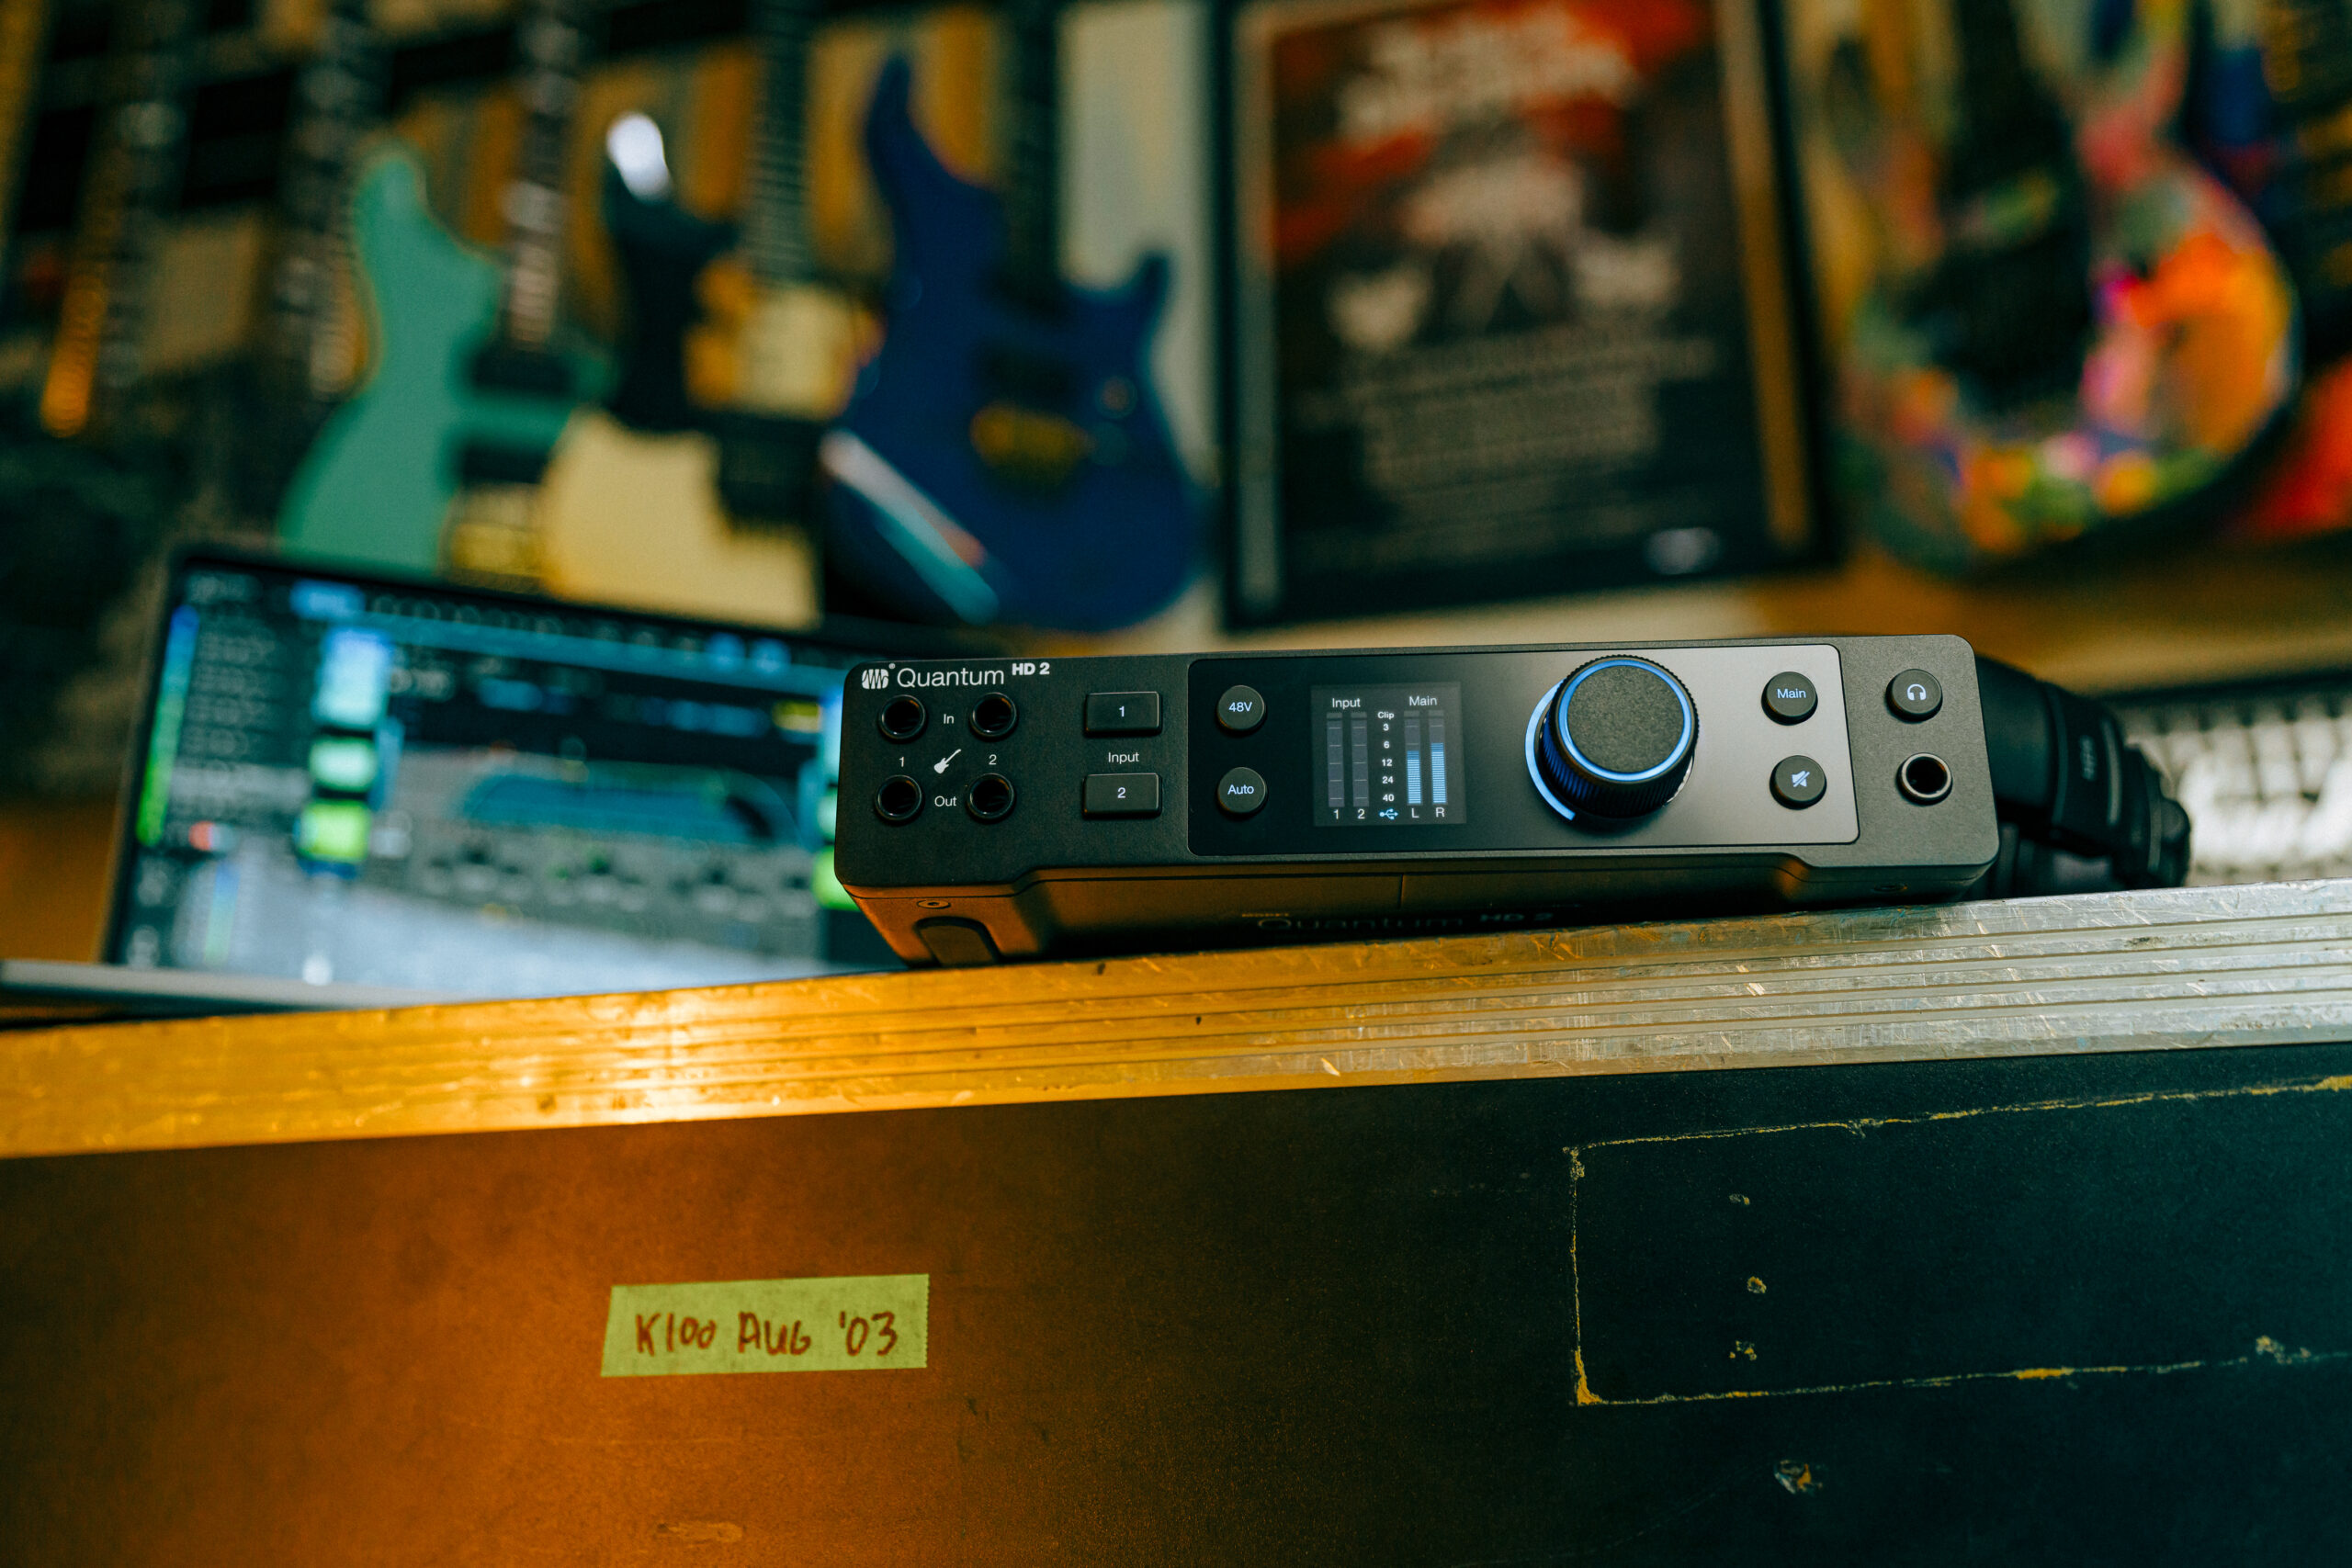
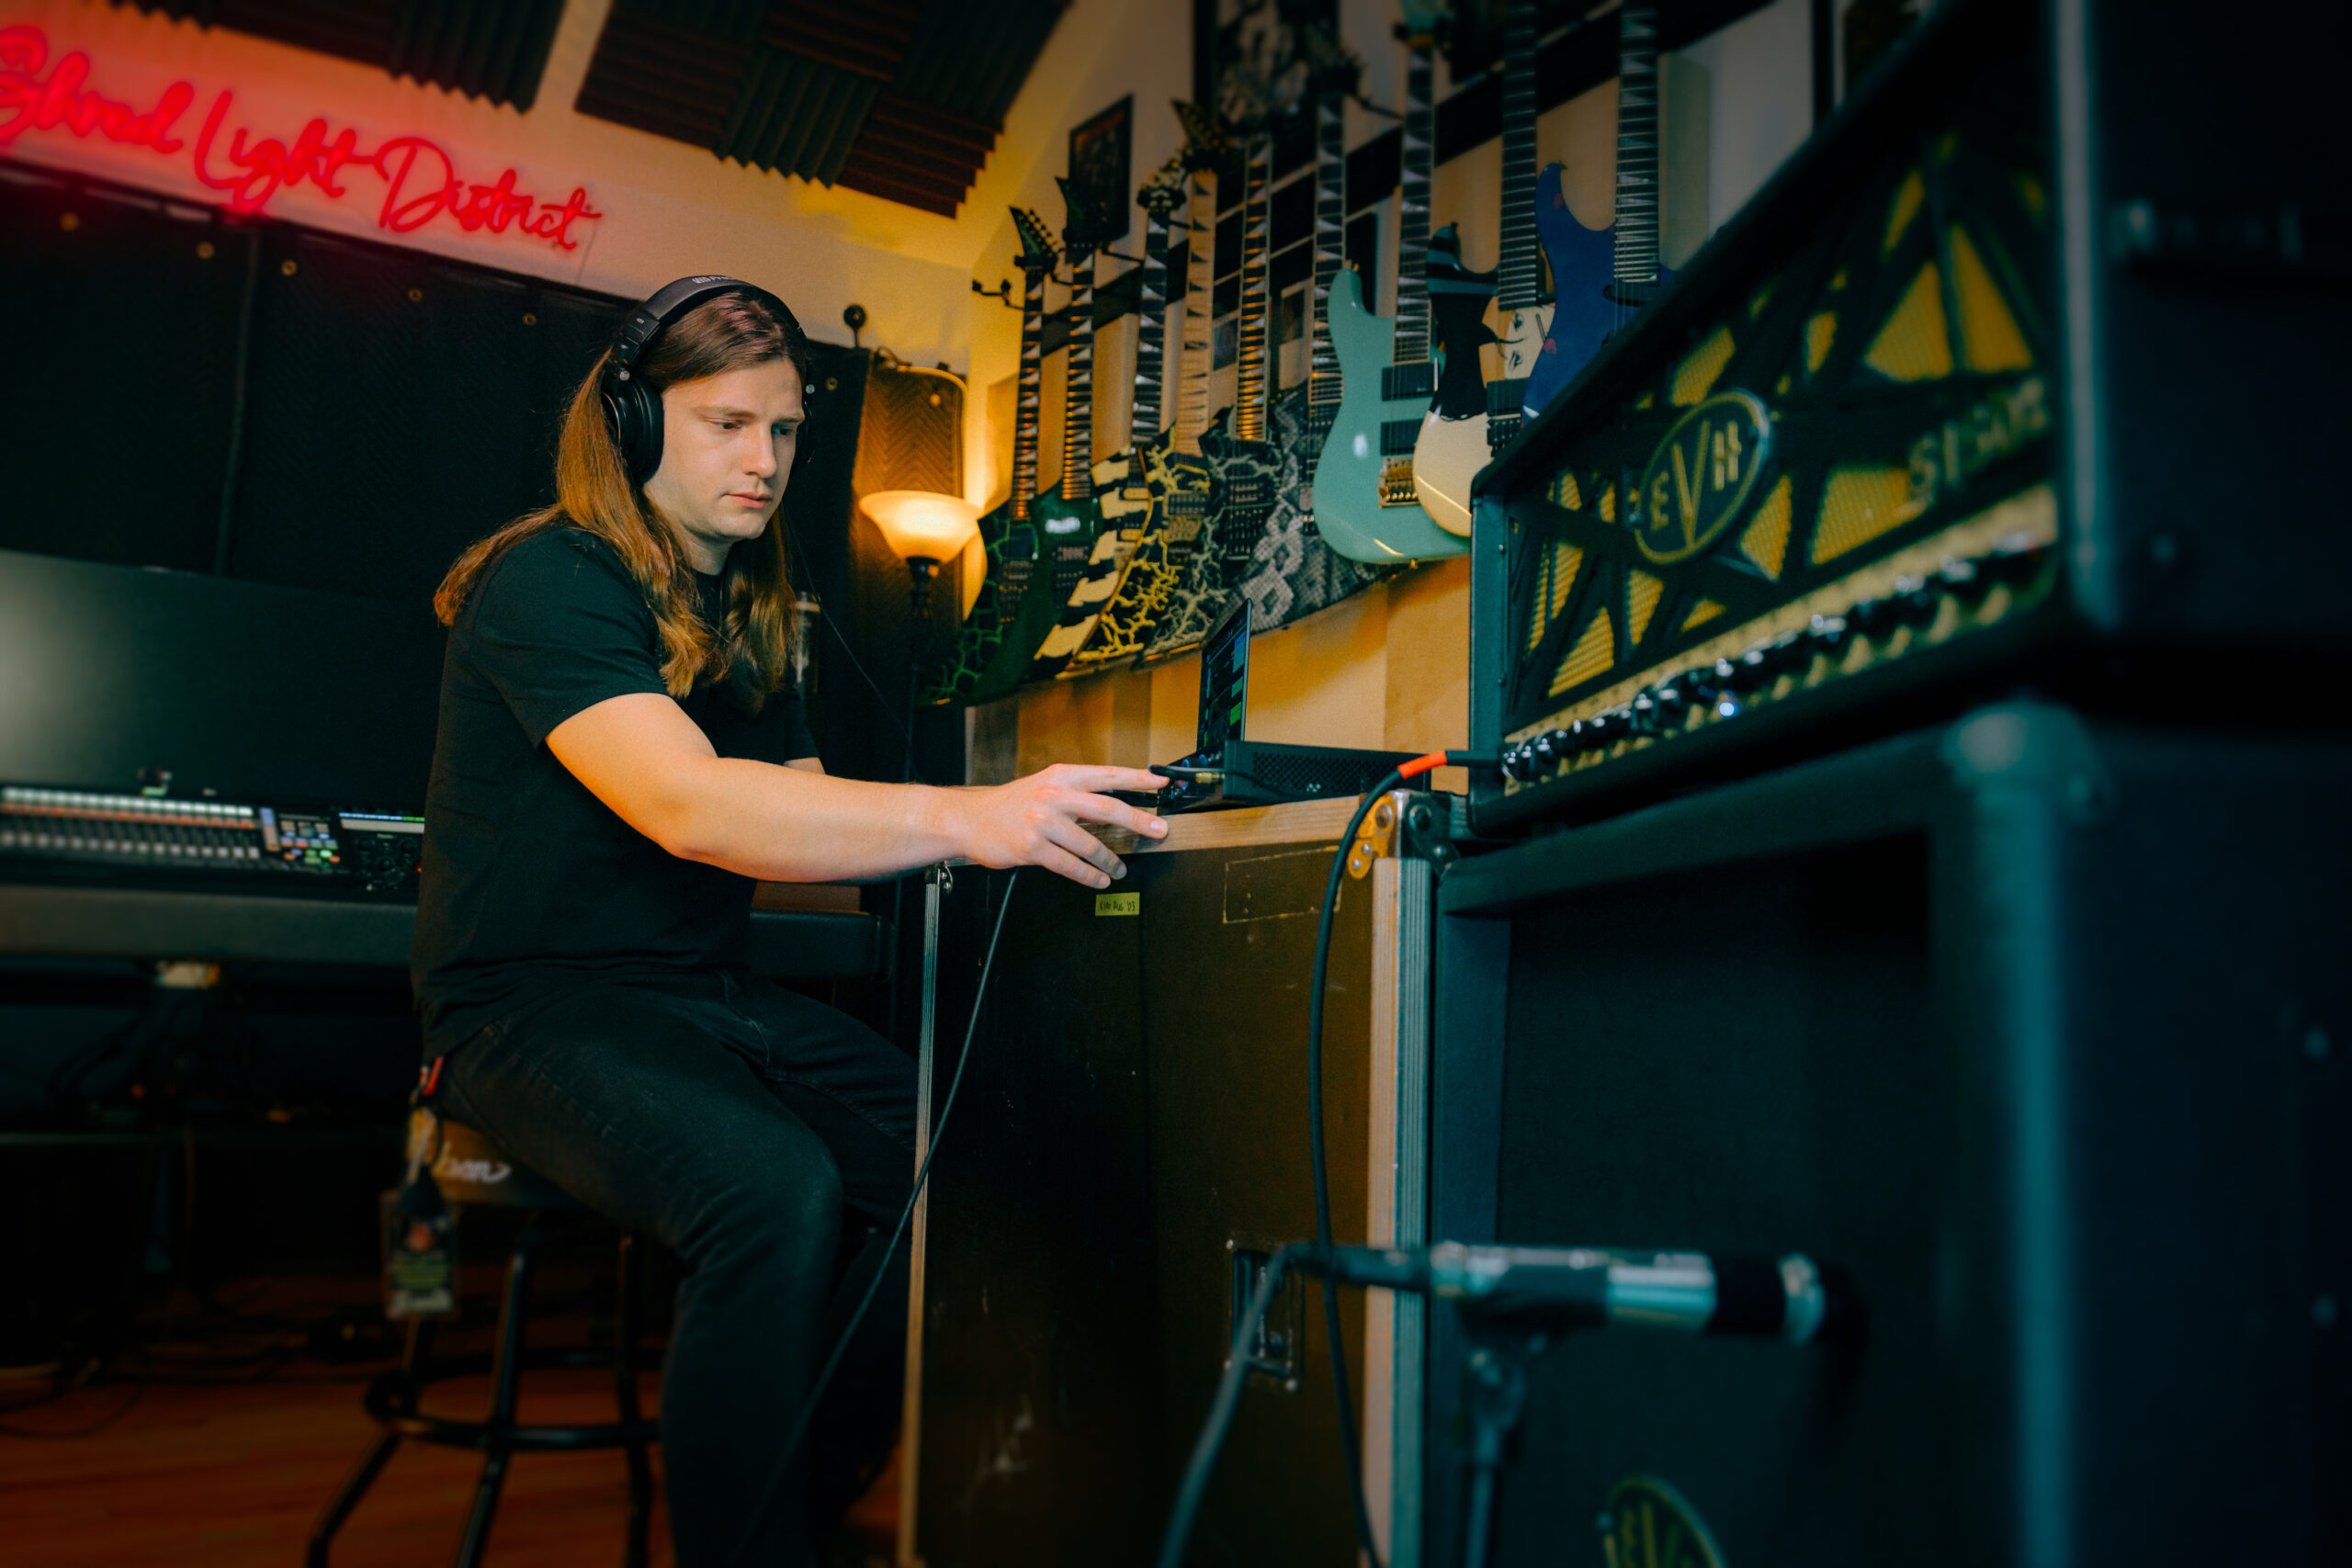
Brandon Ellis | Take the Leap | Quantum Audio Interfaces
The Black Dahlia Murder guitarist and New Jersey native talks about taking his leap.
A life in music requires passion, creativity, dedication – and for many creators, their trajectory can be traced back to a defining moment that changed everything: the moment they took the leap.
New Jersey native Brandon Ellis is the lead guitarist for the legendary American melodic death metal band, The Black Dahlia Murder. Renowned for his technical prowess and blisteringly fast solos, Brandon’s virtuosic style is a rich sonic tapestry of classical influences, archetypal 80s shred, and mind-bendingly modern techniques that continue to push the boundaries of extreme metal into uncharted territory.
Watch as Brandon records and re-amps a scorching new riff through the all-new PreSonus Quantum HD 2 Audio Interface, and talks about his early experiences with music, the necessity of discipline, and paying tribute to the greats that came before him.
“Since before I can even remember, I’ve been doing whatever I could to experience rhythm and music.” These words from Brandon Ellis encapsulate the essence of his musical journey: an innate and indomitable passion for expression. As a child, he drummed beats around the house, even using his teeth as makeshift percussion instruments, all while immersing himself in classic rock that sparked his desire to pick up the guitar.
“I was using music to escape. To experience new emotions. I wanted to know why a certain chord or scale could make me feel the way it did.” Ellis’s curiosity and thirst for understanding ultimately led him to seek out the secrets of guitar virtuosos like Eddie Van Halen, Yngwie Malmsteen, Mattias Eklundh, and Blues Saraceno. He pursued music theory rigorously, jammed with fellow musicians who shared his passion, and sought mentorship from some of the greatest guitarists in the world.
In spite of his passion, Ellis wasn’t planning on pursuing it as a career. So he enrolled in college, initially studying business. But as time went on, Ellis couldn’t ignore his calling. “All I wanted to do was play music, so when I was a freshman in business school and got the call to go on tour, the decision was obvious. I took the leap.” The opportunity to tour catapulted him from academia to the stage, and he never looked back.
From his humble beginnings drumming beats on his teeth to commanding stages worldwide, Ellis’ journey is a testament to perseverance and passion. His path, paved with music theory and hard won wisdom from guitar legends, embodies the spirit of relentless pursuit. Whether shredding with The Black Dahlia Murder or creating exclusive guitar lessons via his Shred Light District Patreon, Ellis continues to mesmerize with his technical prowess and deeply emotive solos.
Brandon’s story reminds us that pursuing our passions often requires courage and determination. It’s a journey where each chord strummed and every note played becomes a part of a larger narrative—a narrative of rhythm, melody, and the unwavering pursuit of musical mastery.
PreSonus products used: PreSonus Quantum HD 2 USB-C Audio Interface.
Meet the all-new family of Quantum USB-C Recording Audio Interfaces, and get in-depth information about the entire product line here.
A Dive Into Inside-Out Mixing
By Craig Anderton
There’s no “right” or “wrong” way to mix. For example, many successful engineers adjust individual tracks, and then mix groups of tracks. That’s fine, but as much as possible, I prefer to mix with sounds in context. I also no longer mix linearly, from start to finish, as was done with tape.
There’s a mixing technique that works well for me with typical songs that don’t have huge amounts of tracks. “Inside-out” mixing starts more in the middle of a song, and works its way out toward the beginning and end. This maintains a consistent sound quality through a song, and speeds up the mixing process. Maybe this method will work for you, too.
Part 1: Mix the “Big Chorus”
Start by placing a loop around the busiest, densest part of the song where the greatest number of tracks are playing at once (fig. 1). With a traditional mix, this will often be “the big chorus.” This is the “inside” part of inside-out mixing. In fig. 1, note that this loop (outlined in white) captures the drums, percussion, cymbals, bass, dual guitars, doubled lead vocals, harmony vocal, the first part of a solo that goes to the end, and dual keyboards.
Balancing all these crucial elements at once guarantees mixing in context. Also, if they work well together, they’ll almost certainly work well together with parts of the mix that are less dense. The objective is to tame the most difficult part of the mix early in the mixing process, which makes the rest of the mix flow more easily.
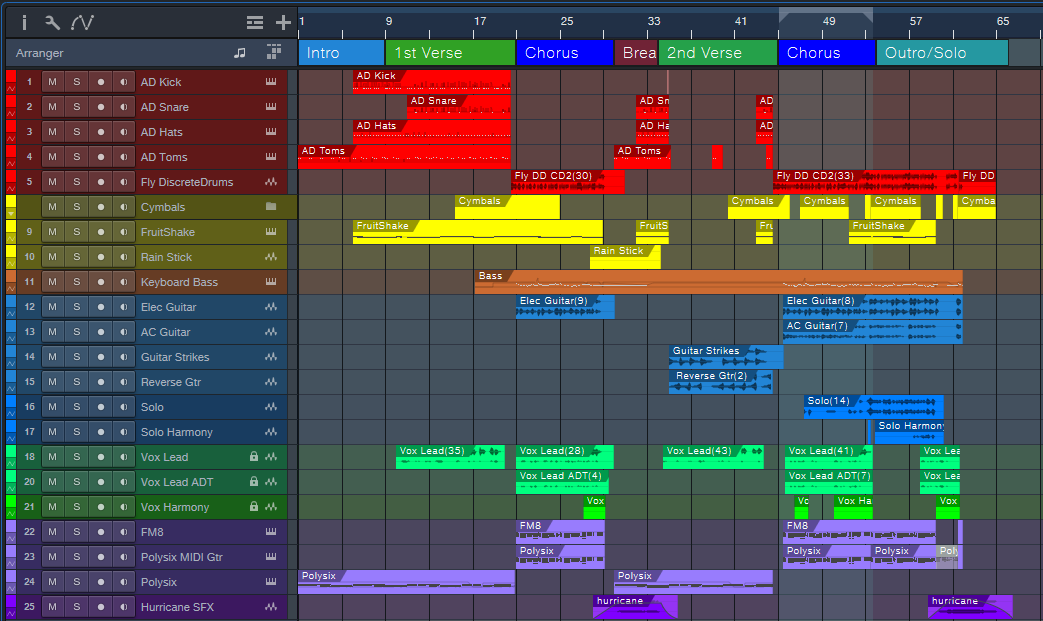
Figure 1: Tracks for my latest YouTube release, Inside the Eye of the Hurricane. The looped section that starts the mixing process is outlined in white.
Furthermore, I begin with minimal effects except for EQ. There are no sends or automation. The goal is to have a reference mix of as many tracks as possible that play simultaneously, yet be able to hear them all distinctly. (As usual, I start with everything panned to center. The reason why was described in a blog post from 2019, but the PreSonus archives no longer go back that far. You can find a revised version of the post on page 18 in The Huge Book of Studio One Tips & Tricks, 2nd Edition.)
After setting the reference levels, I add EQ and then re-adjust the levels. The looped section should now sound closer to what you want.
Part 2: Mix the Other Chorus(es)
Now loop an earlier chorus. It’s likely this will have a sparser arrangement, so that the later chorus can have more impact. The odds are excellent that the reference mix will still work for this chorus. If not, I usually use an Event envelope if any levels need to go up or down a bit. Automation doesn’t get added until the very end.
Part 3: Mix the Verse Between the Choruses
Next, loop the last measure or two of the previous chorus, the first two measures of the big chorus, and the verse between the choruses. Now you can mix the verse in context with coming out of the first chorus and going into the second one. This makes it easier to have a good flow from section to section.
Part 4: Loop Other Sections
Maybe there’s a bridge, a solo, another verse, whatever. By now, you get the idea: Loop sections of the song for mixing, and incorporate a little bit of what leads into the loop, as well as what follows it. I mix the beginning and end last, because with the rest of the song in place, it’s easy to figure out how to have them introduce and exit the song.
Part 5: Decorate the Mix with Ear Candy
At this point, you should have a solid, if not necessarily spectacular, mix. Insert some buses for reverb, delay, and various other effects, then route sends to them. Insert other processors, like dynamics, chorusing, more radical types of EQ, etc. Add the elements that make a mix interesting, and introduce elements of surprise.
Part 6: Automation
You’re in the home stretch. Now it’s time to think of the entire mix, not just the individual sections. For now, avoid the temptation to use master bus processing. Make the entire mix as wonderful as possible, and use master bus processing only for occasional reality checks.
Part 7: Finalize Your Mix
Finalize the mix with master bus processors if that’s your workflow, or transfer over to the Project Page to do your mastering.
About Some of the Ear Candy
The song “Inside the Eye of the Hurricane” also uses many of the techniques covered in previous blog posts. I thought you might enjoy hearing them in context.
Authentic ADT (Automatic Double-Tracking) is the only technique I use for double-tracking vocals because it sounds more like physical double-tracking than anything else I’ve found. It’s used on the choruses, but not the verses, so it’s easy to hear the difference.
Authentic 60s Flanger for Artist processes the crazy drum break, which also uses reversed audio. This happens just before the song’s second chorus.
A Guitar Solo Trick You’ve Never Heard Before was about solos, but this part of the song uses the reversed technique with chords to create pseudo-feedback effects.
Why I Don’t Use Compressors Anymore is certainly true here. The only compressor provides a special effect on the reversed guitar chords. There’s about 4 dB of limiting on vocals and 3 dB of drums. The vocal dynamics processing relies almost exclusively on phrase-by-phrase normalization and gain envelope dynamics. These techniques were also covered in blog posts that are no longer available. However, they’re described starting on page 484 in the eBook referenced above.
The techniques described in Fix Boring Acoustic Drum Loops is one reason why the acoustic drum loops in the choruses sound played instead of programmed. (The electronic drums in the verses are played in real time.)
Finally, there are two versions of the song posted online. One is conventional stereo. The other is binaural stereo that gives a more immersive sound when heard over headphones. Many people still don’t realize that you don’t need a surround system to take advantage of Atmos. As described in the blog post Easy Atmos: Grab Headphones, Mix, Have Fun, you can use Atmos to render your music in a binaural two-channel format designed for headphones. The sound is fuller and more satisfying than conventional stereo.
As just one example of what Atmos can do, there are synth filter sweeps in both versions of the song. However, the binaural version allows processing the filter spatially by making the sound more distant, and wider, as the filter cutoff increases. It’s a subtle effect, but far more expressive than simply turning up the filter’s cutoff frequency. For me, inside-out mixing also works well with Atmos. Because you’re mixing the densest part of the song first, you’re also creating a space that translates to the rest of the mix.
5 Session-Saving Tips for Studio One
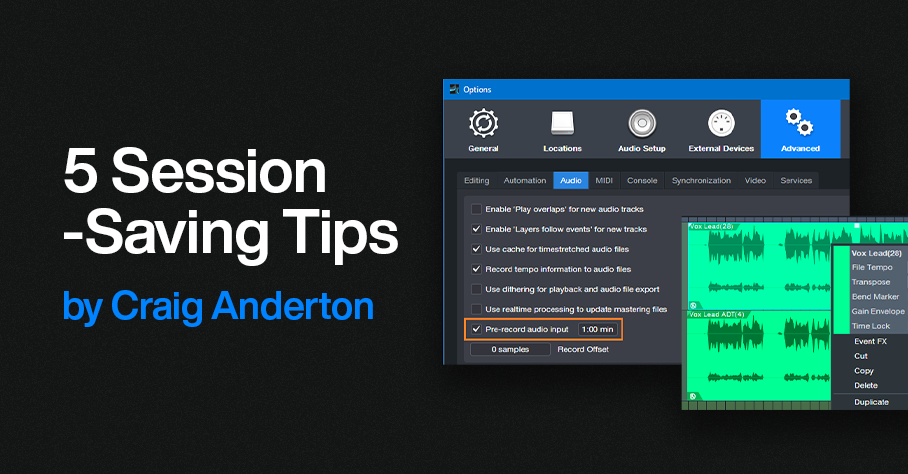
By Craig Anderton
I admit it: the following tips are based on personally embarrassing experiences. I like to work fast to keep the creative juices flowing, but that can lead to occasional mistakes. Fortunately, these tips can help prevent a session from accidentally going south.
Track Lock
To lock track Events to their timeline positions, right-click on the track’s header and choose Time Lock (fig. 1). One application is locking tracks before mixing. Although the mixing console has full functionality, if you switch over to the Arrange window to set up loop points, confirm which tracks are in folders, and the like, a slip of the mouse won’t cause accidental edits.
I also use this with my “authentic ADT” technique, which requires placing two tracks at precise timeline positions. Locking both tracks maintains those positions. (Note: Even when locked, some non-critical editing functionality, like renaming, remains available.)

Figure 1: Right-click on a track and then choose to lock or unlock it. When locked, a lock symbol appears in the track header’s upper right.
Time Lock and Edit Lock
These are more granular locking options (fig. 2). Right-click on an Event or Events, and choose one or both:
- Time Lock prevents the Event from moving on the timeline. You can still do edits like alter fades.
- Edit Lock prevents making accidental edits.
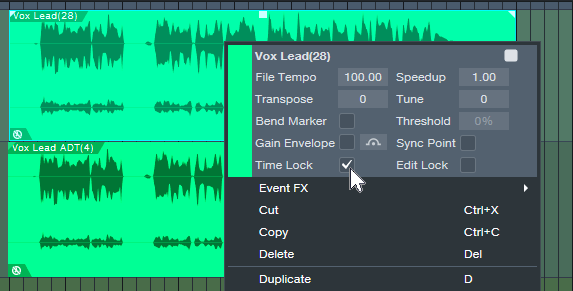
Figure 2: Protect an individual Event or Events from being edited, having timeline positions changed, or both.
Pseudo-Retrospective Recording for Audio
Although not as sophisticated as Retrospective Recording for MIDI Events, Studio One 3 introduced a similar function for audio. When enabled, Studio One is always listening to your audio inputs, and capturing the audio in buffers. When you start recording, the file includes audio that occurred before you clicked on record. After recording, you don’t see the captured audio. However, slip-editing the beginning of the audio to the left reveals the “pre-record” audio.
To set up Pre-Record audio, choose the Advanced Options, and select the Audio tab. Check Pre-Record Audio Input, and specify the number of seconds you want to capture (fig. 3). The maximum is one minute, but with lots of inputs this uses quite a bit of buffer memory. 10 or 15 seconds usually suffices.
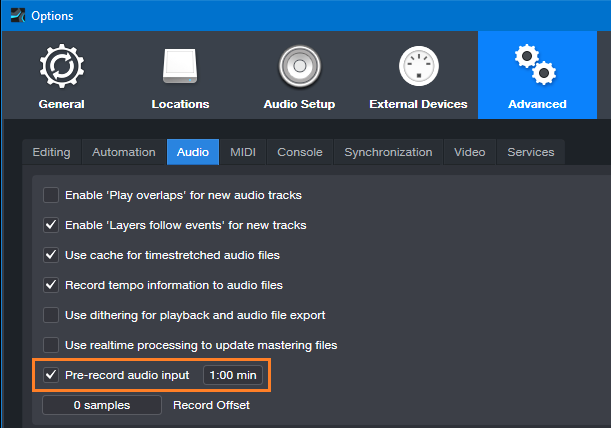
Figure 3: Missed the first few seconds of a take? Relax—you had Pre-Record Audio Input checked.
Two other cool features include:
- Pre-Record saves the audio for any track that’s record-enabled. So, suppose a drum set has five miked tracks, and the drummer plays some amazing intro but you were late clicking on record. You can slip-edit all five recorded tracks to recover the audio.
- Pre-Record can handle interruptions. Let’s assume a guitarist plays some great riff and then stops, but you missed it. So, you click on record, and pre-record captures the sound you missed. But then the guitarist says “hey, don’t record me yet, I’m not ready.” So, you click out of record, with the transport still going while you wait. Unexpectedly, the guitarist plays an even better version of the riff. So, you hit record again. Now the guitarist is settled in and plays for real. When you stop recording, the file will include both of the pre-record riffs, as long as the combined length didn’t exceed the buffer time.
Prevent Ripple Edit Mishaps
Ripple Editing allows edits like removing a section of a track, and having the track close up to fill the hole created by deletion. Or, insert an Event, and have it push the track later to make space for the addition. That’s cool, but if you leave Ripple Edit on accidentally, doing any subsequent cuts or pastes could mess up multiple Event positions in a song. Always disable Ripple Edit immediately after making your edit (fig. 4). Some people delete the keyboard shortcut, so that fat fingers can’t enable ripple editing accidentally.
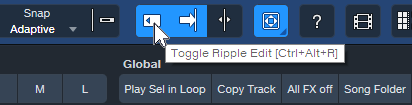
Figure 4: Be sure to toggle Ripple Editing off after you’ve made a ripple edit.
Lock Events to Video “Hit Points”
Time Lock locks Events to bars and beats. However, when working with video, you often want to lock a sound effect to an absolute time in hours and seconds. That way, even if the background music’s tempo needs to change, the intergalactic cosmic explosion will still happen at the exact frame in the video where the planet blows up.
Studio One can ‘t lock Events to the Seconds Timebase, but there’s a workaround. You can lock Markers to specific times by toggling from bars/beats to seconds in the Marker track (fig. 5), and then relate Events to Markers.
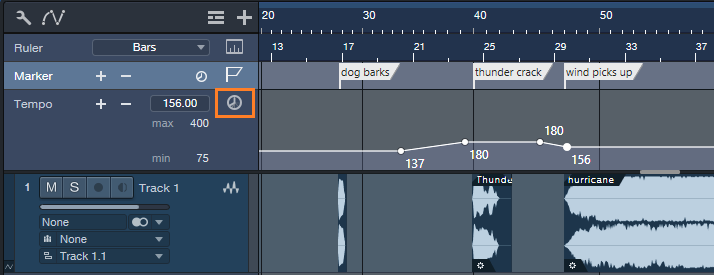
Figure 5: Toggling the Timebase button (outlined in orange) to Seconds locks the markers to minutes and seconds.
Name the Markers after the Events that need to conform to a hit point. If the tempo changes, move the Events to line up with their associated Markers.
I hope that at least one of these tips can help you save a session!
The Ultimate Creative Block Unlock
By Craig Anderton
You’ve probably seen ads for packs of MIDI chords that claim to help you write hits that will make your listeners’ jaws drop in amazement as they bask in the awesomeness of your musical talent. But save your money—Studio One’s Chord Track is a fantastic way to help sketch out songs, as well as smash creative blocks. Best of all, you don’t need to understand music theory like chords, harmonies, and intervals. All you need is ears and the ability to say “I like that” or “I don’t like that, so I’ll try something else.” Let’s explore one way to have the Chord Track work for you.
Setup
1. Create a new Song, and open the Chord track (fig. 1).
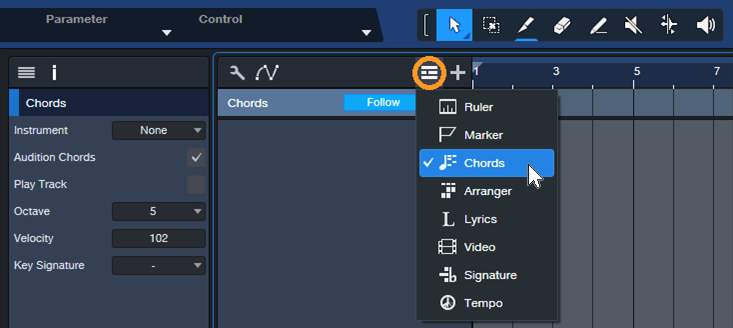
Figure 1: Click on the icon circled in orange and then choose Chords.
2. Choose the Paint tool. The goal is to fill the Chord Track with 1 measure chords. Click in each measure with the Paint tool to enter a C major chord (fig. 2). Tip: You can copy and paste the chords to fill the Chord Track faster.
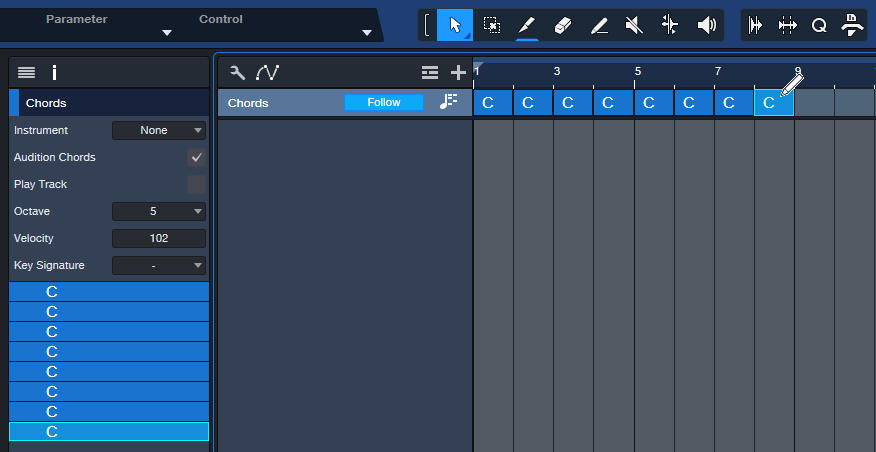
Figure 2: The Paint tool is entering a C chord. The Chord Track’s Inspector shows the chords that have been entered.
3. Insert an Instrument, like Mai Tai. This will be the playback engine for the chord progressions you create. Then, hit F4 to open the instrument’s Inspector and choose “Narrow” for Follow Chords (fig. 3).
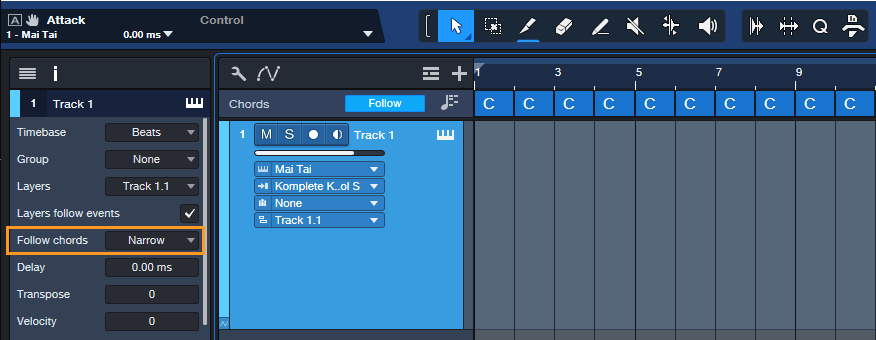
Figure 3: After entering an instrument to play the chords, choose Narrow for the Inspector’s Follow Chords parameter. Also try the Parallel follow mode at some point, which gives different voicings.
4. Drag the chords from the Chord Track into the Instrument track. Now each measure has a C major chord in it (fig. 4).
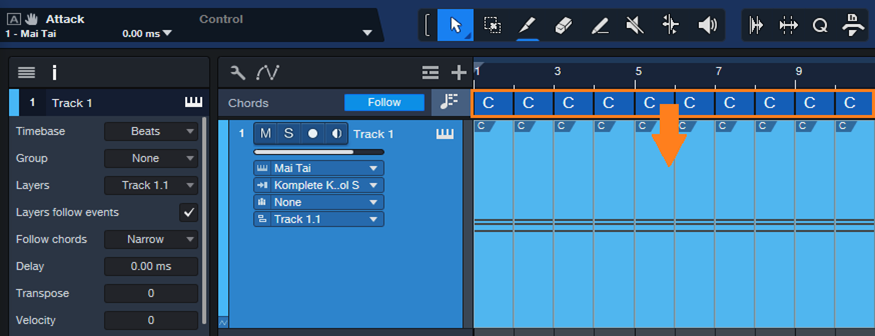
Figure 5: Drag the chords into the Instrument track to create MIDI data that corresponds to the chords.
Playing with Chords
Now we can play around with chord progressions.
5. Double-click on a chord in the Chord Track. When the Chord Selector opens, click on a chord. Fig. 5 shows adding an F Major 7 with an added 11th at the 5th measure. Note that you don’t need to know any theory, just click on options and see if you like the way they sound. And even if you do know theory, clicking around in a spirit of experimentation can free you from creative ruts.
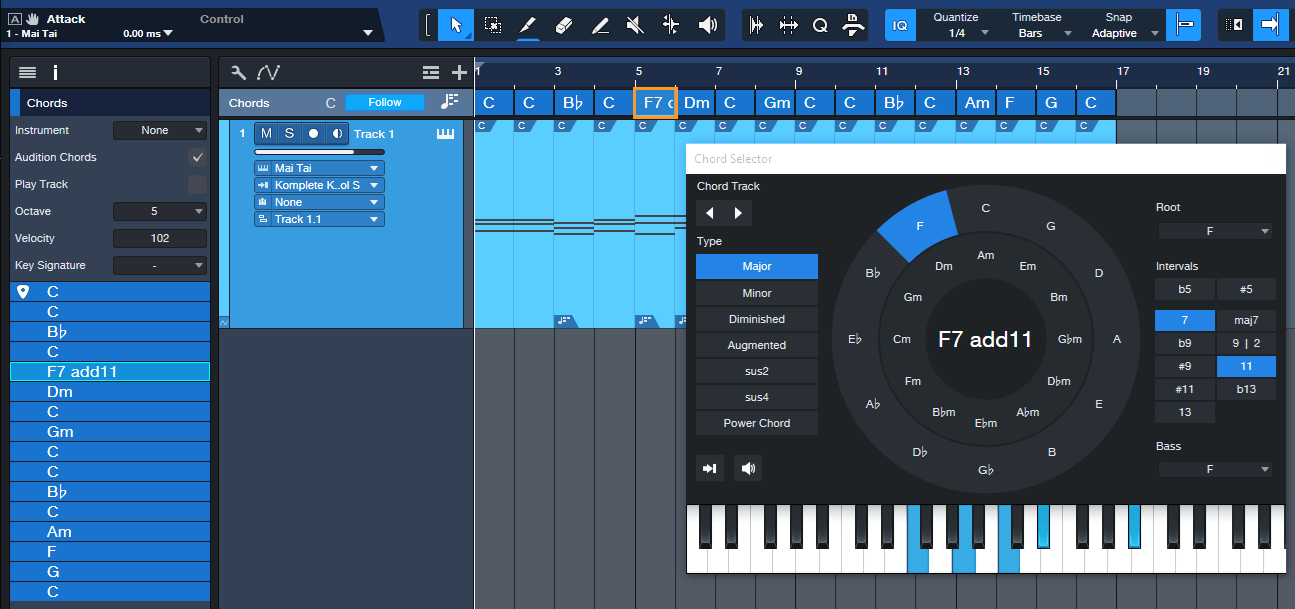
Figure 5: A C major chord is being replaced with an F7 Major Chord that includes an added 11th interval.
6. To move to the next chord, click on the Edit Next Chord arrow (fig. 6). The arrow to its left moves you to the previous chord. You can also modify any chord in the Chord Track just by double-clicking on it. After selecting the chord to edit, click on a new chord from the Chord Selector. Then, play back the progression to hear if you like the new chord. If not, choose a different one.
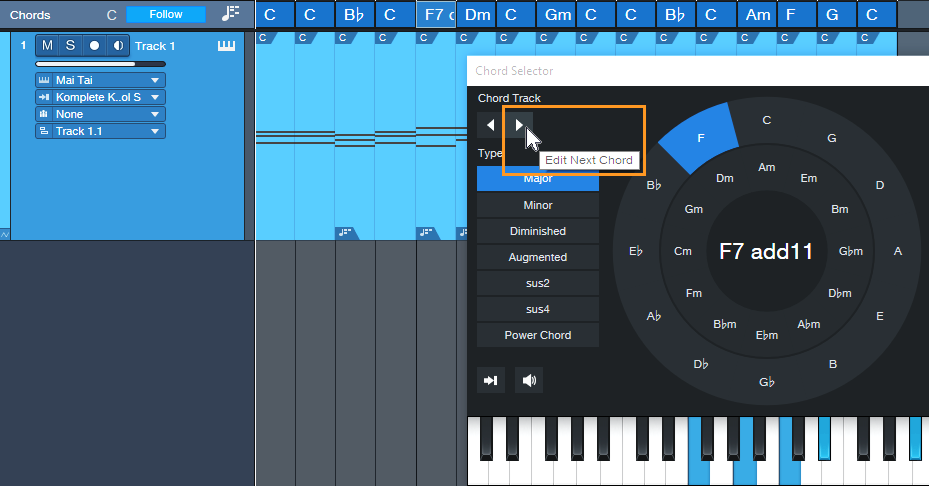
Figure 6: You can navigate through the chord progression by using the next/previous chord arrows.
7. Although the Instrument track notes show the chords from the Chord Track, the underlying notes remain the C major chords that were placed originally. To finalize your progression, select all the measures of MIDI notes, then type G to merge them into a single Event. Next, right-click on the Event and choose Musical Functions > Freeze Pitch (fig. 7). In the Inspector, turn off Follow Chords as it’s not needed anymore. The chord changes are now permanent.
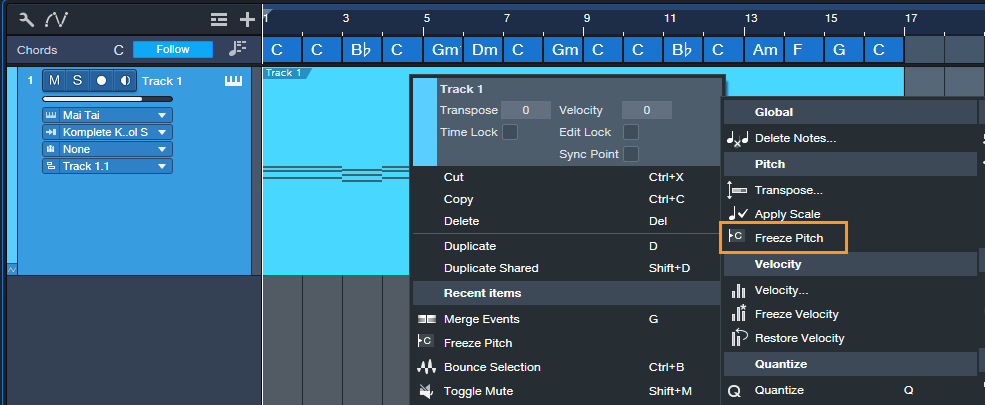
Figure 7: Freezing pitch preserves the Note Event pitches created by the Chord Track.
Additional Tips
- A measure might be too long for a chord change you want. If so, use the Split tool to create a shorter chord by splitting an existing chord. Split the Instrument track in the same place, so that the Event is the same duration as the shorter chord. Now you can change the shortened chord.
- The Chord Selector isn’t limited to major and minor chords. It has multiple chord types (diminished, augmented, etc.) as well as additional intervals if you want, for example, a G Major 6 instead of a standard G Major.
- If you’re a fan of crazy atonal chords, no problem. While the Chord Selector is open for a particular chord, click on any of the Chord Selector keyboard’s notes to add them to the chord.
Grab Cab Impulses for Ampire from Any Amp Sim
By Craig Anderton
Some of my favorite guitar sounds involve using Ampire’s amp, bypassing its cab, and adding a cab from the Helix Native plugin. Others involve creating custom cabs using the Pro EQ, or putting two cabs in parallel and throwing one out of phase. But loading an additional amp sim or EQ, or setting up parallel routings, and then dialing in the right settings is a hassle. It also wastes CPU power. So, I was glad to find an alternative. Thanks to the mysterious IR Maker utility plugin, it’s easy to create IRs for Ampire’s User Cab from other amp sim cabs, equalization, and stacked parallel cabs.
Make sure you download the free IR—the download link and description are at the bottom.
Meet IR Maker
Here’s the overview:
- Choose a mono amp sim cab or cab substitute (e.g., EQ).
- IR Maker’s output sends a frequency-sweep signal to the new cab’s input.
- The new cab’s output feeds the IR Maker’s input.
- IR Maker analyzes the frequency response characteristics of the processed sweep signal, crunches some numbers, automatically places the impulse in an impulse folder, and voilà—a Cab IR you can load in Ampire’s User Cab.
Song Setup
For this to work, a patch cable needs to connect an audio interface output to an audio interface input. It’s helpful to create a Song Setup specifically for grabbing impulses:
1. Export your current Song Setup so you can return to it after grabbing your impulses.
2. Create a new Song Setup. Dedicate a mono input and mono output to IR Maker (fig. 1).
3. Add an audio input for your guitar, and a Main stereo output, so you can test the impulses in Ampire.
4. Export this new Song Setup preset for future use.
5. Patch a physical patch cord between the audio interface input and output selected for the IR Maker (in this case, it’s input 3 and output 3).
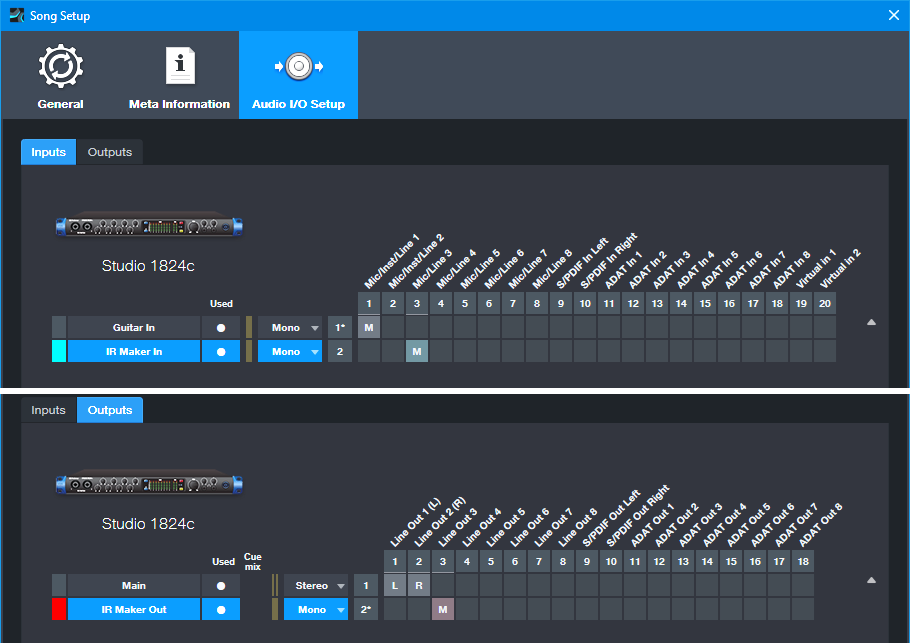
Figure 1: The IR Maker mono input comes from Mic/Line input 3. The IR Maker mono output goes to Line Out 3. An additional audio input allows testing the IRs by playing guitar through Ampire.
Mixer Channels Setup
1. Insert the amp sim or EQ-based cabinet you want to convert to an IR (fig. 2). Insert the IR Maker plugin after the cab. (The additional Pro EQ3 after the IR Maker is optional. We’ll cover that later.)
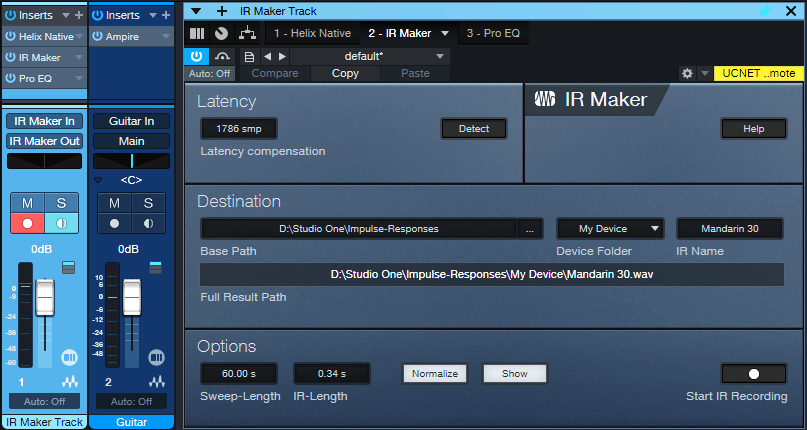
Figure 2: Channel setup and IR Maker UI. The setup is about to generate an IR from an edited Helix Native cab.
2. Assign the IR Maker channel input to IR Maker In, as created previously in Song Setup. Assign the IR Maker channel output to IR Maker Out, also created previously in Song Setup.
3. Record-enable the IR Maker trackand enable the input Monitor.
4. Open the IR Maker UI and test the setup. Click on Detect. If Latency shows 0, there’s a problem with either the physical patch cord, the input/output assignments, and/or the track not being record- and input monitor-enabled. Fix the issue, then proceed when Latency is a non-zero number.
5. Check the Normalize and Show boxes.
6. Options trades off calculation time and fidelity. For cabs, I use a 60 second sweep and 0.34 second IR time. This takes longer to create an IR compared to using a shorter sweep, but captures the best quality.
7. Destination shows where the impulses will be saved. Note: Because Show is selected, as soon as IR Maker creates the impulse, its associated folder opens. Then, you can just drag the impulse into Ampire’s user cab so you can hear what it sounds like.
Ready to Rock!
1. Test the levels. Click on Start IR Recording and check the sim’s or EQ’s input and output levels, as well as the IR Maker channel input. Avoid distortion. Any files are saved, so choose “Test” as an initial IR name. Then you can delete the “test” files easily after you’re finished testing levels. It may take a few tries to get the levels right.
2. Once the levels are set, give the IR a useful name (e.g., the cab’s name). Click on Start IR Recording. Wait for the calculations to complete, and your IR capture is done.
3. Drag the IR into Ampire’s User Cab graphic, and play guitar through the guitar track to hear the results.
About the Free IR Download
The free IR custom cab uses 12 stages of Pro EQ3. The IR is designed to give the VC 30 amp a more open sound, and works very well with power chords. Select the User Cab in Ampire, and drag the IR on top of the User Cab’s graphic.
Doing custom cabs with EQ usually needs more than one EQ’s worth of stages, so being able to preserve that as an IR is convenient. The IR is trimmed to 2048 so that it’s compatible with Helix Native as well as Ampire. I prefer the IR to the Helix Essex A30 amp’s default cab (2 x 12 Silver Bell).
Download the free CA VC 30 2048.wav IR here!
Comments
- The optional Pro EQ3 after the sweep shaves off the very highest frequencies (above 15 kHz, with a 24 dB/octave slope). This reduces high frequencies that could cause aliasing.
- The IR will be longer than needed. Ampire is tolerant of long IRs, but you can reduce the duration considerably. 50 ms is usually enough.
- This process may seem complicated, but it’s foolproof once the setup is correct. Just follow the steps above—and enjoy your alternate cabs!
Mad Keys | Take the Leap | Quantum Audio Interfaces
The self-taught multi-instrumentalist and St. Louis native talks about taking his leap.

A life in music requires passion, creativity, and dedication – and for many creators, their trajectory can be traced back to a defining moment that changed everything: the moment they took the leap.
St. Louis native Mad Keys is a multi-instrumentalist and alt hip-hop producer whose soul-heavy sound has led to two full-lengths, four EPs, and a substantial selection of singles drenched in lush melodics and groove-heavy rhythms. As a self-taught musician, the key takeaways from Mad Keys’ musical journey have been “the importance of perseverance, the value of taking risks, and the power of community.”
Watch as Mad Keys performs his unreleased track “Powered” through the all-new PreSonus Quantum ES 4 audio interface, and talks about his creative process, teaching himself to play piano, and how cooking up a song is a lot like brewing a great cup of coffee.
When it comes to writing music, Brandon McCadney – aka Mad Keys – aims to strike a balance between time-honored processes and a fundamental openness to whatever excites him at the moment. “I’m definitely a process-driven person, and that shows up in a lot of areas in my life. But my process changes a bit each time I sit down to create. It truly depends on what I’m inspired by at the moment.”
It’s a balanced, contemplative approach that Mad Keys is quick to compare with another of his favorite daily processes. “For me, making a great cup of coffee is kind of like sitting down to create a song. In both cases, I have a routine that requires me to have patience and focus.”
Keys was raised in a musical family and learned to play violin when he was just 9 years old – a move that would introduce him to classical elements of discipline and melodic instrumentation at a very early age. But it wasn’t until high school that he discovered hip-hop and jazz. “I was listening to what everyone else was listening to: Gucci Mane, Jeezy, and Lil Wayne. I’m thankful for my brother and sister because they introduced me to artists like OutKast, N.E.R.D., Kanye, Lupe, and Santigold.”
One day, he heard a friend playing Coldplay’s “Trouble” on piano, and was immediately captured by the sound. When he asked his friend how he figured it out, “he told me that he learned how to play that song from a video on YouTube. So, I went home, turned on this old keyboard, opened up the tutorial, and learned that song. It was at that moment when I said ‘Yo, I can learn how to play piano!’”
Being an independent artist certainly has its share of ups and downs, and none more so than during the global pandemic. “There was a pivotal moment in 2020 when I almost gave up on music. My wife and I had just moved to a new city in the middle of the pandemic, and I felt lost. I remember telling bae that I might put music on the back burner. But that same night, I received several signs urging me to persevere. I decided to start creating visuals of myself making music in my room, not knowing where it would lead. I had no idea that the next 4 years would lead to building a growing community of supporters, producers, and creatives.”
Four years and several soulful albums later, Mad Keys continues to grow and develop as a musician. But his aspirations go far beyond mere technical improvement, serving a deeper purpose as a vehicle for personal growth and a daily reminder of the power in community: “My sonic leap wasn’t just about honing my talent: it was about learning to bet on myself and embrace the unknown.”
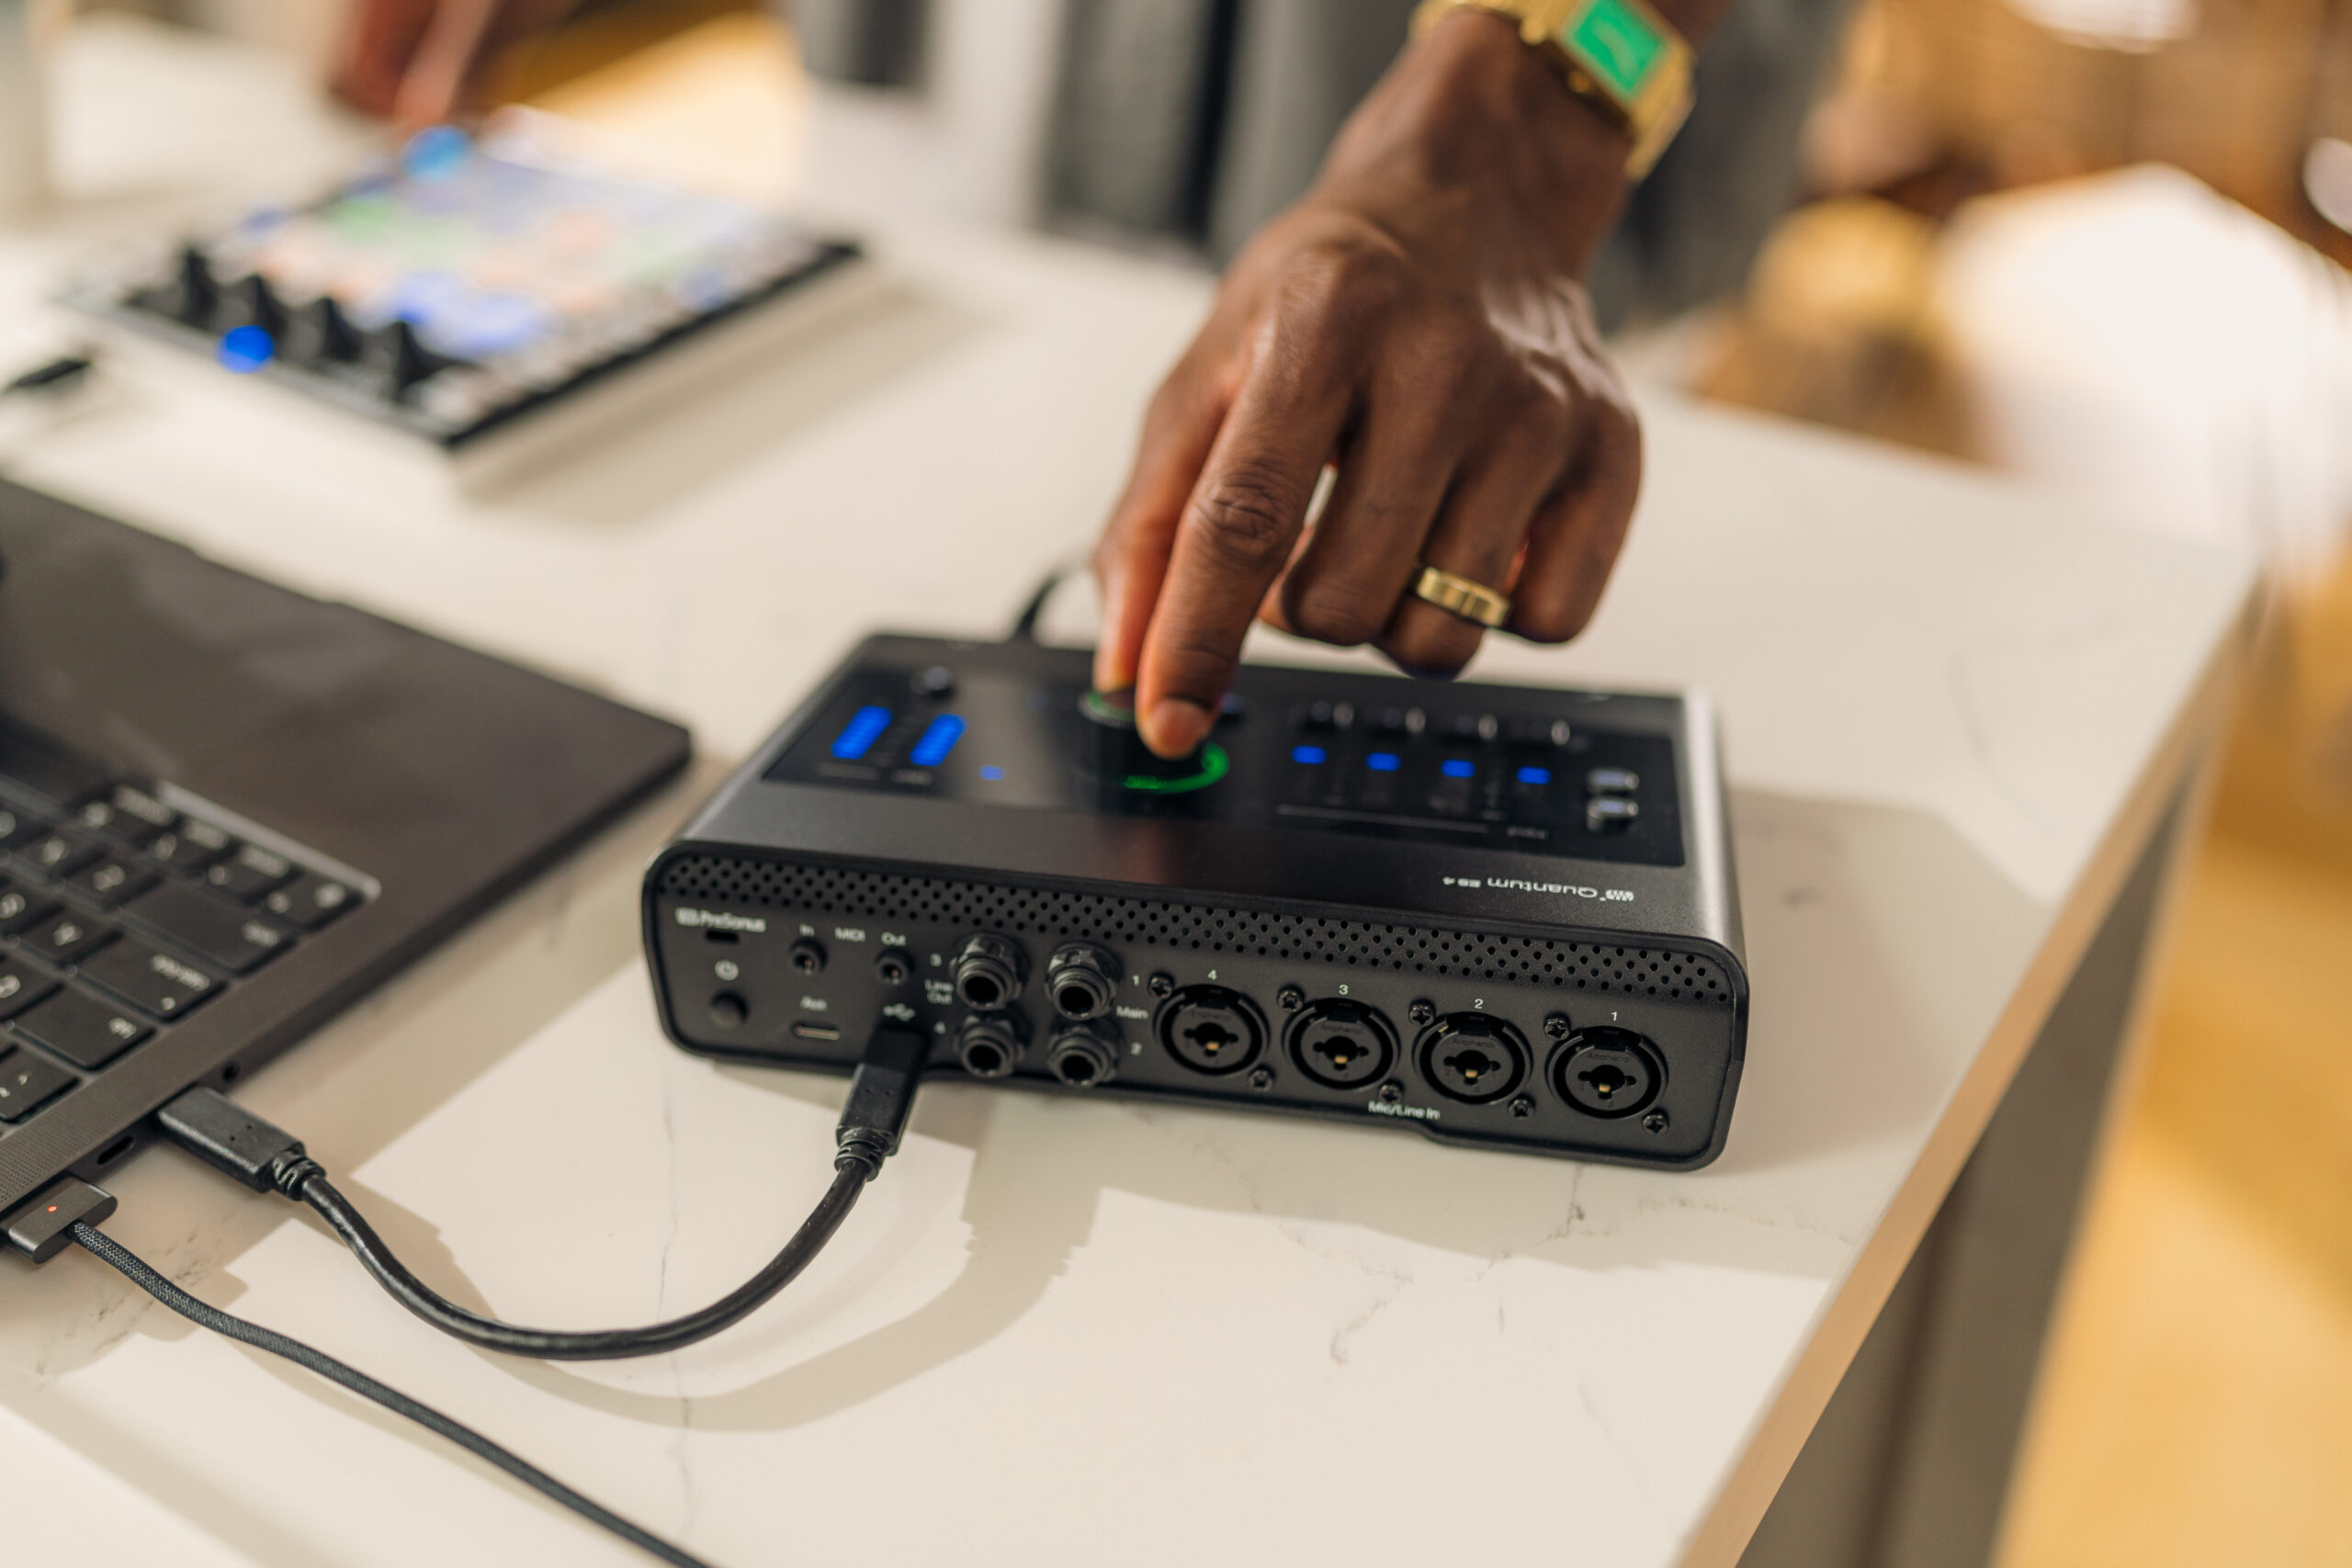
PreSonus products used: PreSonus Quantum ES 4 USB-C Audio Interface, PreSonus ATOM Controller.
Meet the all-new family of Quantum USB-C Recording Audio Interfaces, and get in-depth information about the entire product line here.