The Envelope, Please
Studio One V5 adds Event Gain Envelopes for audio, which joins Event Level Envelopes and Track Automation Envelopes. So, how do you choose the right tool for the right job? Let’s use a paint brush analogy: Event Level Envelopes (ELE) are like broad brushes, Track Automation Envelopes (TAE) are medium brushes, and Event Gain Envelopes (EGE) are the fine-pointed brushes you use for detail work.
EVENT GAIN ENVELOPE BASICS
- To work with EGEs, right-click on an audio Event (EGEs don’t work with Instrument Tracks unless transformed to audio) and check the Gain Envelope box. Unchecking this show/hide function does not remove edits, it just hides the EGE.
- The envelope will be visible on that Event and any copies of the Event.
- Editing an Event’s EGE makes the same edits in any copies.
- If you don’t want a copy to be affected, bounce it to itself before adding an envelope.
- Editing an EGE is like editing a TAE: add nodes, bend curves, type in values, hover over the Event’s upper quarter and drag up or down to alter the envelope gain over a selected range, etc.
- Like TAE, if you move the Event, the EGE moves with it.
Next, let’s turn our attention to which envelope type is best suited to particular use cases.
EVENT LEVEL ENVELOPE
Some people think the EGE replaces the ELE, but I think the ELE remains the fastest way to trim an Event’s level—click and drag. This is particularly useful to change the response of subsequent level-sensitive processors, like compressors, amp sims, limiters, envelope followers, and so on. For details on this technique, check out the Friday Tip Yet Another Use for Event Envelopes. ELEs are also the quickest way to add a fade in or fade out to a group of multiple Events. For example, if you’ve split a series of vocal Events just before an inhale, it’s easy to reduce the inhale on all Events simultaneously.
EVENT GAIN ENVELOPE
I’ve often mentioned that rather than use heavy compression on vocals, I instead adjust levels manually to even out variations, before applying a light amount of compression. This is covered in the Friday tip Better Vocals with Phrase-by-Phrase Normalization. While this technique is still fast and effective with ELEs, EGEs allow for much more detailed editing.
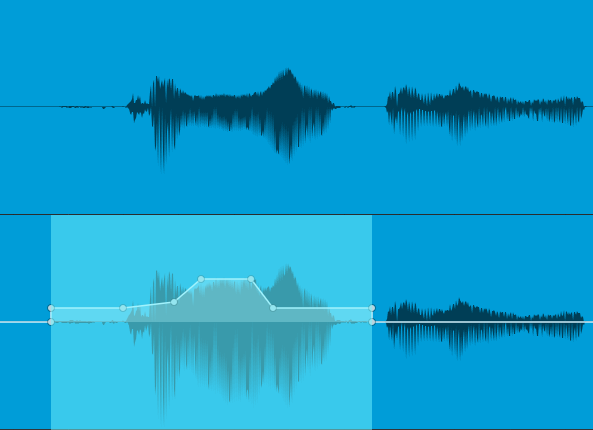
Figure 1: The EGE in the lower view has smoothed out level changes in the upper waveform.
In Fig. 1, the first waveform in the upper image would be difficult to level with an ELE. Splitting would likely cause some discontinuities, resulting in potential pops. Fixing this would then require crossfading across the split.
The EGE makes levelling much easier. Furthermore, selecting the Region containing the envelope allows using the Trim function to bring up the audio’s overall level. (And before proceeding, it’s time for a moment of levity: Microsoft Word automatically writes Alt Text to caption images based on pattern recognition. It determined that Fig. 1 was “a picture containing water, outdoor, dog, lake.”)
The EGE is also great for reducing levels of p-pops, manually editing “ess” sounds, reducing pick noise at the beginning of a guitar attack, minimizing the severity of inhales, and more. It can bring up the decay of a guitar note to provide a more consistent signal to a compression, create extremely precise fadeouts, and more. The bottom line is when you need detailed level control, EGE is the droid you’re looking for.
TRACK AUTOMATION ENVELOPE
Prior to the addition of EGE, this was the preferred way to do what the EGE can do. However, there are three main drawbacks compared to the EGE.
- The waveform graphic doesn’t change to reflect level changes, whereas with the EGE, you can see how level change affect the waveform level.
- Changes made to one Event aren’t duplicated in other Events.
- You’ve now dedicated the TAE to a specific function, so using it for traditional level automation can be more of a problem.
The latter showcases a major advantage of having multiple envelopes: the EGE and ELE can do detailed changes on specific Events, while the TAE does overall level changes for the track. For example, imagine if you had to use the EGE in Fig. 1 to create an overall level fade. It’s doable, but would take a lot more work than just using a TAE to fade out over the duration of the clip.
FINAL COMMENTS
All these envelopes can exist concurrently. However, you may need to change the editing environment. For example, suppose you’ve added an EGE to an Event, and now you want to add an ELE. You can’t do that while the Envelope Gain is showing, because Studio One assumes that any editing you want to do is to the Envelope Gain. So, uncheck the Envelope Gain box, and now you can use the ELE to change the level or fade. The waveform will reflect these changes, as well as any you added with the EGE.
Sometimes it’s a toss-up as to which approach is best. To even out level variations in vocals, if it’s mostly a question of changing the level of phrases, it’s often easiest to split at the beginning and end of the phrase and alter the level with the ELE. But if you need to go granular with changing overbearing consonants, breath noises, mouth clicks, and the like, then the EGE is the way to go.