Useful Features I Totally Missed
First, an announcement: version 1.4 of The Huge Book of Studio One Tips and Tricks is a free update to owners of previous versions. It’s currently available from Sweetwater, and will soon be in the PreSonus shop. Revised to bring it up to date with Studio One 6, this is the most comprehensive update yet, and has over 250 tips. It’s also available to new buyers for $19.95.
Okay, on to the blog post, and let me start by admitting…I’m a little slow sometimes. So now that I’ve admitted it, you don’t need to add comments like “Seriously? You just figured this stuff out? Dude, what’s wrong with you?” But maybe you didn’t know about at least some of these features either, so I hope you find this useful.
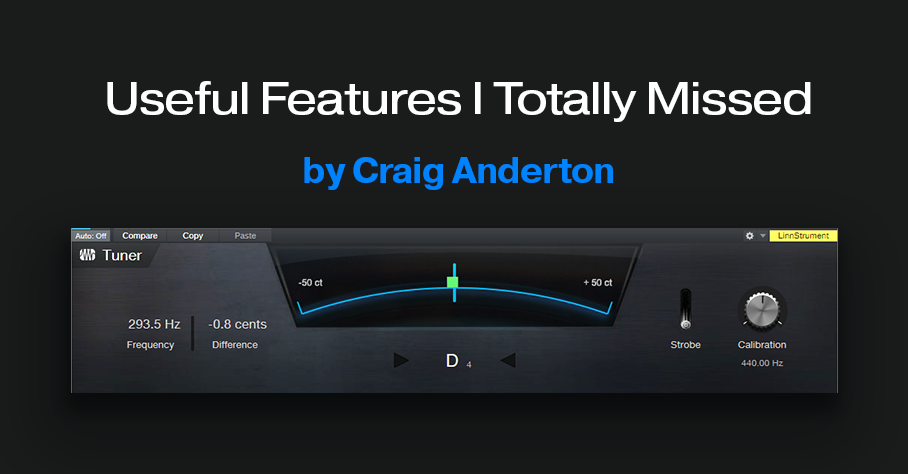
Insert the Tuner in Your Master Bus
Solo the channel you want to tune, and when the tuner (fig. 1) is in the master bus, it’s always available. If there are effects that mess up the tuning (chorus, delay, etc.), turn off the associated Insert rack before tuning.
Colorize Plug-In Headers to Match Channel Colors
Colorizing plug-ins helps when you have several of the same type of processor open. The header color matches the track color. So, if your vocal track is blue and your bass track green, you’ll know the plug-in with the blue header affects the vocal track. To colorize, select the Mix view, and click on the Wrench. Under Visibility, click on Colorize Plug-In Header.
Offset an Automation Envelope Easily
Suppose your automation moves are perfect, but the track’s level needs to be offset up or down. You can’t just move the fader, because it’s following the automation. So, you change the automation envelope. Then you realize you need to make another change in the track, so you go back to the track, zoom in, and adjust the envelope again. Or you insert a VCA channel to change the track gain, while keeping the envelope the same. But it’s simplest just to tweak the output level of a processor in the track (like the Pro EQ3’s Gain control). If there isn’t one, insert a Mixtool. Now you can tweak the level offset quickly and easily. [Cue Homer Simpson saying “Doh!”]
Cut Long Notes at Part End
The world of Studio One > Options > Advanced [Windows] or Studio One > Preferences [Mac] is well worth exploring. Working with MIDI drove me crazy until I understood what this check box did (fig. 2).
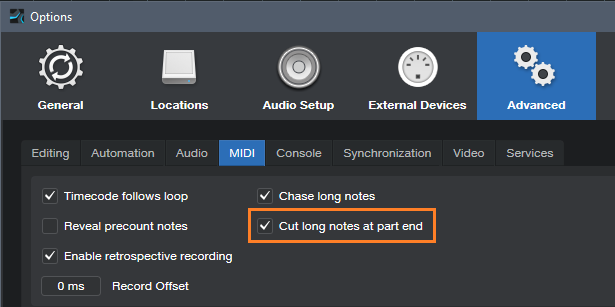
Under the MIDI tab, Cut Long Notes at Part End defaults to being unchecked. This means if you cut a part in the middle of a long note, the section of the note past the cut will continue to play—even though you won’t see it in the part past the cut. This led me to a lot of “where’s that MIDI note coming from?” Checking this option adds a Note Off at the cut, so the note stops playing at the end of the part. But if you want to get it back, no problem. Slip-edit the end of the part back out, and the note will still be there.
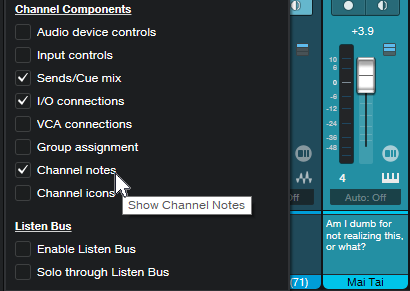
Show Channel Notes
Under Song Information, you can enter Track Notes for the tracks—I use that feature all the time. But you can also open up a space at the bottom of a channel to see Channel Notes, and one day I realized that Channel Note and Track Note are the same thing. Eureka! I didn’t have to open the Song Info or Inspector to see the Track notes. You’ll find the check box to show the Channel Notes, aka Track Notes, under Channel Components in the Mixer view’s wrench options (fig. 3).
Horizontal Scrolling in Edit View
You can scroll horizontally in Edit view by holding Shift and rotating the mouse wheel. I often zoom way in with the Edit view to find little glitches, and this shortcut makes the process easier.
Tab Through Parameters in the Pro EQ3
Click on one of the parameter value labels. Tab to go to the next parameter, or Shift+tab to return to the previous one. This includes the Threshold and Range parameters in the new Dynamics control section. After reaching the last parameter in an EQ stage, hit tab several times to move to the next stage.
Move the Send Rack Vertically in a Channel
There are three ways to move the Send rack vertically in a channel:
- Click on the Splitter bar above the Sends, and drag up and down to move all the Sends together, regardless of where they are vertically.
- Shift-Click on the Splitter bar, and you can move just that Send rack up or down.
- Ctrl/Cmd click on the Splitter bar, and they all jump to the same vertical position.
EZ FX Channel
Drag an effect into the space below a Channel’s Send, and it automatically creates an FX Channel with that effect. Has this always been there and I didn’t know it? Was it added recently? Did I just forget about it? I don’t know, but it’s particularly relevant now that Version 6 FX Buses have Sends.
Insert the Free VU Meter in Your Master Bus
As described in detail in a previous blog post, you can download a free VU meter plug-in (or at least you can until someone at PreSonus realizes it’s really cool, and decides to charge for it). Try it, and you’ll see why I like it—the average reading gives a different perspective on your audio. Also, the clip indicator blinks instead of staying on, so it’s easy to see where peaks are causing problems. You can even check correlation, and set a scale for reference levels. Go ahead, insert it—you can thank me later.
So, what other really great features that “everyone knows about” am I missing? Your comments are welcome!