Lead Guitar Editing Hack
High-gain distortion is great for lead guitar sustain and tone, but it also brings up that “splat” of pick noise at the note’s beginning. Sometimes, you want the gritty, dirty feel it adds. But it can be a distraction when your goal is a gentler, more lyrical tone that still retains the sound of heavy distortion.
This technique gives the best of both worlds for single-note leads, and is particularly effective with full mixes where the lead guitar has a lot of echo. Normally the echo will repeat the pick noise, so reducing it reduces clutter, and gives more clarity to the mix.
1. Open the lead part in the Edit window.
2. Choose Action, and under the Audio Bend tab, select Detect Transients.
3. Zoom in to verify there’s a Bend Marker at the beginning of each note’s first peak (fig. 1). If you need to add a Bend Marker, click at the note’s beginning using the Bend tool. To move a Bend Marker for more precise placement, hold Alt/Opt while clicking on the marker with the Bend tool, and drag.
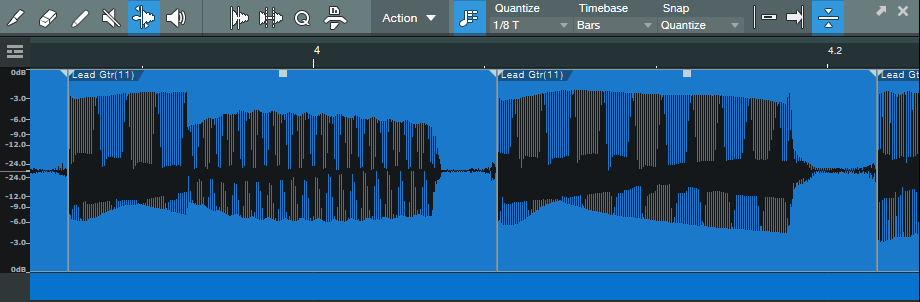
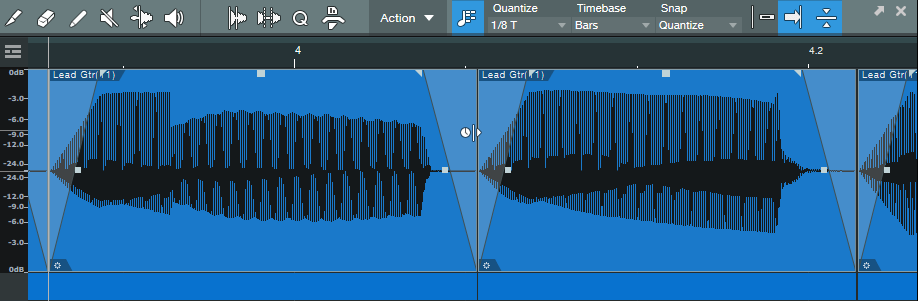
4. Choose Action, and under the Audio Bend tab, select Split at Bend Markers. Now, each note is its own Event (fig. 2).

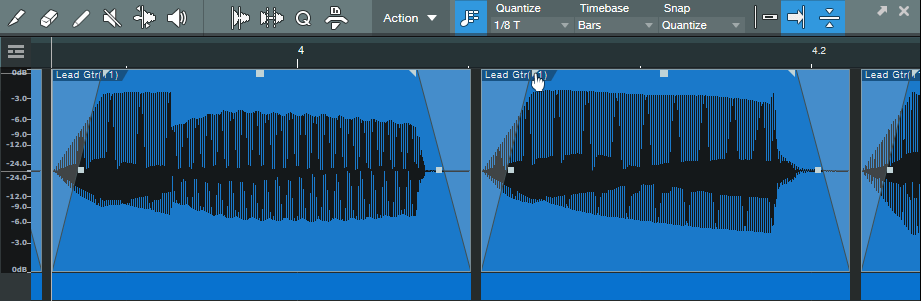
5. Make sure all the notes are selected (fig. 3). The next steps show any needed edits being made to one Event. However, because all the notes are selected, any edit affects all notes equally. To show the edits in more detail, the following steps zoom in on two notes.
6. Trim the note ends to remove some of the pre-note “dirt” (fig. 4).

7. Add a fade-in and fade-out (fig. 5). This doesn’t have to be exact, because you’ll optimize the times in step 9.
8. There’s a gap between notes, so time-stretch the end of the note to cover the gap. Alt/Opt+click on the end of a note, and drag to the right until the note end is up against the beginning of the next note (fig. 6).
9. That may seem like a lot of work, but once you’ve defined the bend markers, having to edit only one note to edit all the notes speeds the process.
Start playback with all the notes still selected, listen, and vary the fade times. Also experiment with the curve shape. A concave curve can work well with attacks. I often try for the minimum amount of attack and decay that gives the desired result, but not always—when taken to extremes, being able to shape notes enables options that sound almost like a synthesizer.
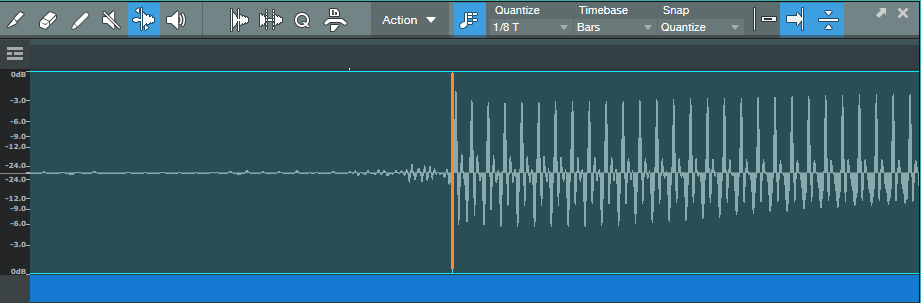
The audio example shows how this tweak affects a single-note lead. The first part is as recorded, the second part uses this tip.