Studio One’s Session Bass Player
Studio One includes multiple algorithmic composition tools, but I’m not sure how many users are aware of them. So, let’s look at the way some of these tools can help expedite the songwriting process.
I’ve always prioritized speed when songwriting, because inspiration can disappear quickly. But, I’ve also found that good guide tracks (e.g., cool drum loops instead of metronome clicks) increase the inspiration factor. The trick is to create good guide tracks, without getting distracted into editing a guide tack into a “part.”
A solid bass line helps drive a song, but when songwriting, I don’t want to take the time to grab a bass and do the necessary setup. The blog post Studio One’s Amazing Robot Bassist describes a simple way to create a bass part by hitting notes on the right rhythm, and then conforming them to the Chord track. This week’s tip builds on that concept to let Studio One’s session bass player get way more creative, and generate parts even more quickly.
Fig. 1 shows a chorus being written. The process started with a rhythm guitar part (track 3), which I dragged up to the Chord track so it could parse the chord changes. I made a few changes to the Chord Track, then dragged it into a piano instrument track. This deposited MIDI notes for the chords, so now the piano played the chord progression. I then had the guitar follow the new Chord track, and the guitar and piano played together. Next up was adding a drum loop.
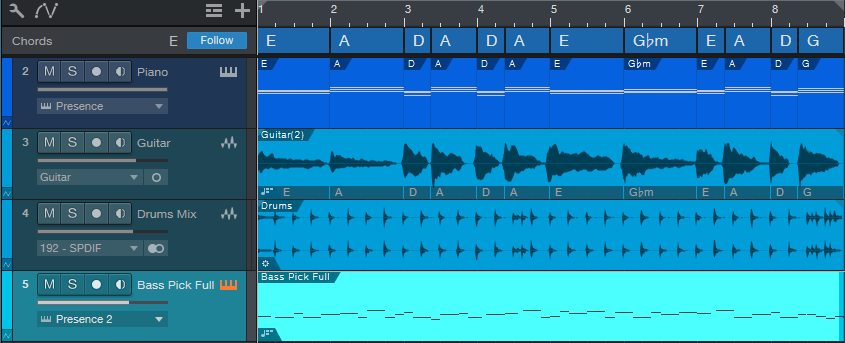
Figure 1: Studio One is set up for songwriting, and has just generated a bass part.
As to the bass part, there are three elements to having Studio One create a bass part.
1: Fill With Notes
After selecting the bass’s blank Note Event, open the Edit Menu and choose Action > Fill with Notes. You’ll want to customize the settings for best results (fig. 2).
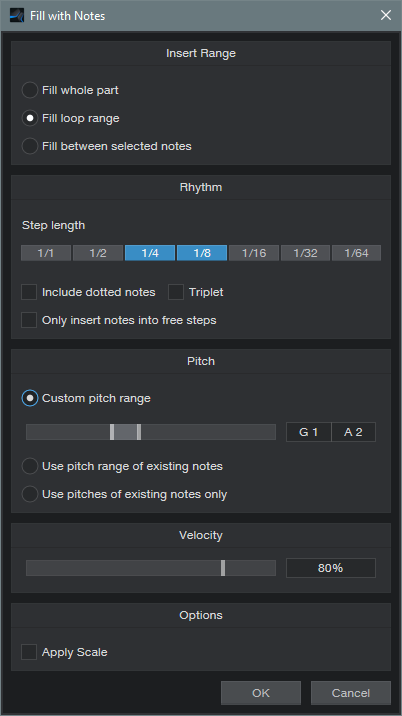
Figure 2: Studio One’s session bass player is thinking about what to play.
For example, choose a bass-friendly pitch range. For this song, I also wanted a fairly bouncy part, so the rhythm is made up of 1/4 and 1/8 notes. You might also want some half-notes in there. Click on OK, and you have a part.
Every time you invoke Fill with Notes, the notes will be different. If you don’t like the results, delete the notes, and try again. But don’t agonize over this—all you really want is notes with a rhythm you like, because the Chord Track and Scale will take care of the pitches.
Also note that if you don’t like the notes in, for example, the second half but like the first half, no problem. Delete the notes in the second half, set the loop to the second half, and try again.
2: Chord Track
Now have the part follow the Chord Track. Your follow options are Parallel, Narrow, and Bass. I usually prefer Narrow over Bass, but try them both. Now the notes follow the chord progression.
3: Choose and Apply Scale
This may not be necessary, but if the part is too busy pitch-wise, specify the scale note and choose Major or Minor Triad. Then, choose Action > Apply Scale. Now all the notes will be moved to the first, third, or fifth. Of course, you can also experiment with other scales—but remember, the object is to get an acceptable bass part down fast, so you can move on to songwriting.
Fig. 3 shows a bass part that Studio One’s session bass player “played.” This was on the second try.
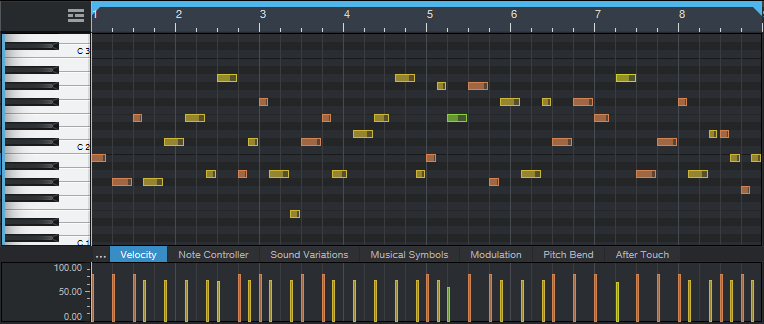
Figure 3: The session bass player came up with a pretty cool part. I applied Humanize to the velocities so it didn’t sound too repetitive.
Finally, let’s hear the results. The vitally important point to remember is that all this was created, start to finish, in under four minutes (which included tuning and plugging in the guitar). The end result was some decent guide tracks, so I could start work on the ever-crucial vocal lead line and lyrics. Thank you, session bass player!