Monthly Archives: February 2023
Higher-Def Amp Sim Sounds
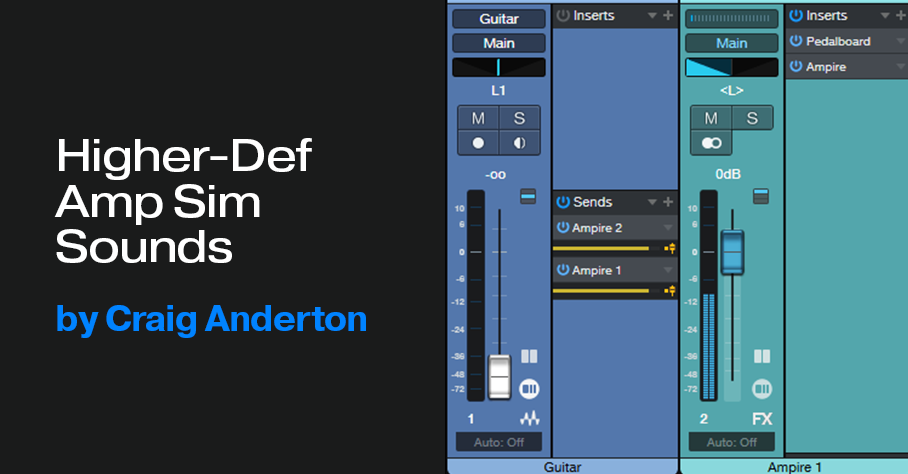
My sonic holy grail is “clean distortion,” which is why I like 3- or 4-band multiband presets. Splitting the audio into bands decreases the potential for nasty intermodulation distortion. This tip’s technique implements a simpler, 2-band option. Yet it increases definition considerably, and reduces the “wooly,” or “splattering” quality that most amp sims have. Of course, this works with Ampire, but you’ll find it benefits other amp sims too. The audio example speaks for itself.
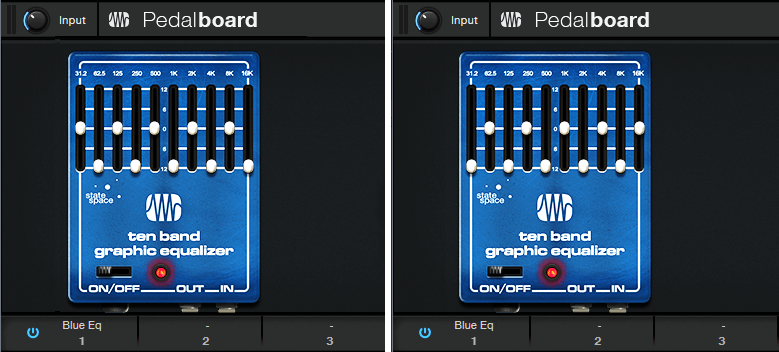
The setup uses two amp sims, with a Pedalboard inserted in front of each one. Each Pedalboard has only one effect—the High Density pack’s Blue EQ graphic equalizer. (You can use the stock graphic equalizer instead, but the results aren’t as good as using the Blue EQ.) Fig. 1 implements this technique with a Splitter and FX Chain in Studio One Pro, while fig. 2 shows the track layout for Studio One Artist.


What makes this technique so effective is that the EQs send alternate bands into the two amps (fig. 3). Usually, the interference among all the frequencies feeding an amp sim creates non-harmonic, intermodulation distortion. Leaving gaps in the frequencies sent to each amp reduces their interference with each other. Mixing the two amp outputs together restores the full frequency response.
Because there’s less overall signal going into the amps, the Mixtool in fig. 1 provides a +6 dB boost to compensate. In fig. 2, setting the Send controls to +6 dB provides the desired boost.
Another cool feature is panning the two amps left and right. With the Splitter in fig. 1, simply use Channel split instead of the Normal split. In fig. 2, note that the two FX Channels are panned hard left and right. This gives a cool stereo image that a single amp can’t deliver.
But, hearing is believing—and I think you’ll be blown away by the audio example. The first part uses this technique with the default VC30 amp sound and the 2 x 12 VC 30 cab. The second part uses identical amp and cab settings, but without the Graphic EQ preceding the amp. Note that it sounds a lot dirtier. The third part uses this tip’s technique, but with the two amps spread in stereo. The sonic benefits are even more apparent when actually playing live, or in context with a mix, but this example should get the point across.
Yes, it really is that easy to transform your amp sims into higher-def versions. Have fun!
How to “Focus” Effects
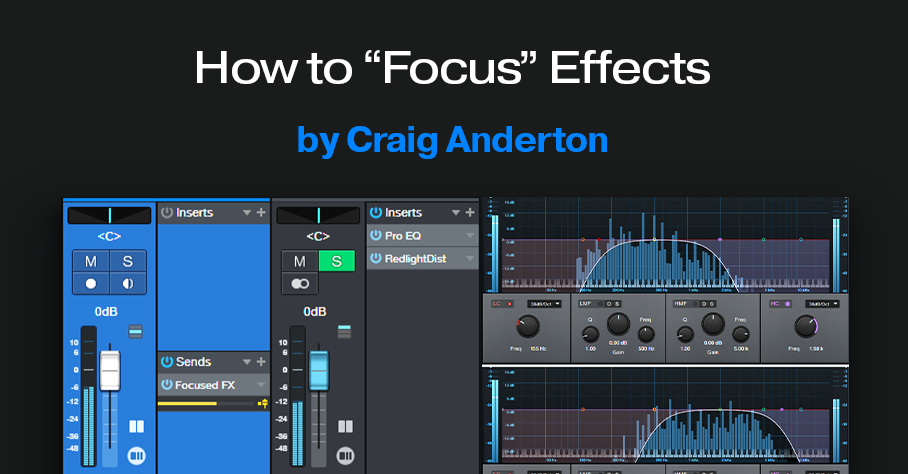
There’s nothing new about using an FX Channel to add an effect in parallel to a main track. But we can make effects even more effective by “tuning” them, to provide more focus.
This process works by inserting a Pro EQ3 before an FX Channel effect or effects (fig. 1). Then, use the EQ’s Low Cut and High Cut filters to tune a specific frequency range that feeds the effect. For example, I’ve mentioned restricting high and low frequencies prior to feeding amp sims, but we can use this focusing technique with any processor.
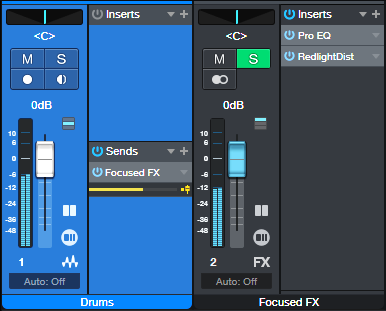
There are several reasons for placing the Pro EQ3 before the effect. With saturation effects, this reduces the possibility of intermodulation distortion. With other effects, reducing the level of unneeded frequencies opens up more headroom in the effect itself. Finally, with effects that respond to dynamics (autofilter, compressor, etc.), you won’t have frequencies you don’t want pushing the frequencies you do want over the processor’s threshold.
Here are some specific examples to help get your creative juices flowing.
Distortion or Saturation with Drums
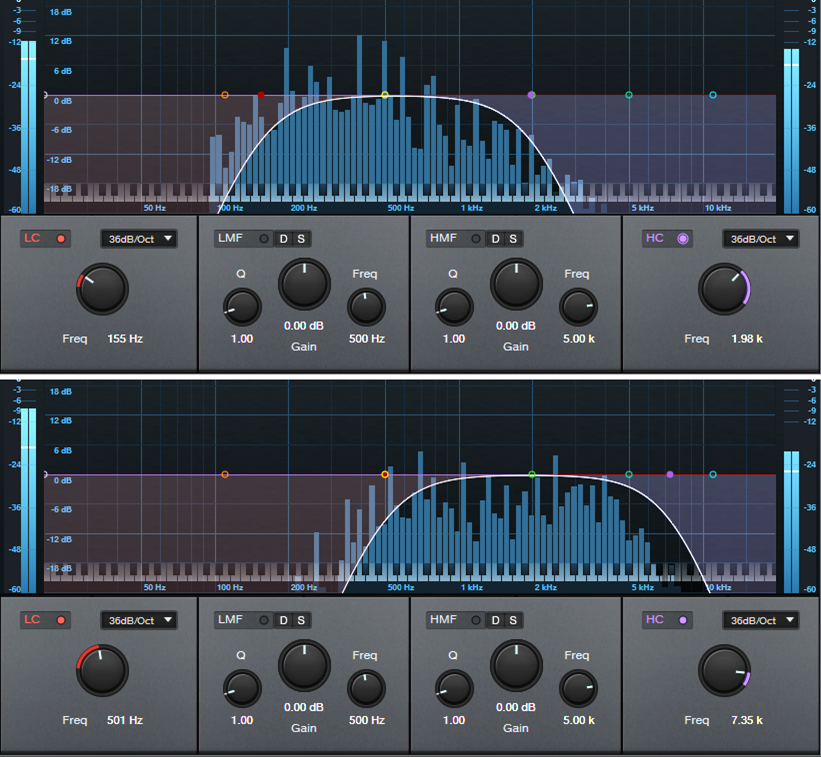
The audio example plays four measures of drums going into the RedlightDist, with no focus. The next four measures focus on the high frequencies. This gives an aggressive “snap” to the snare. The next four measures focus on the low frequencies, to push the kick forward.
Fig. 2 shows the tunings for the high- and low-frequency focus.

Reverb with Guitar
The audio example plays four measures of midrange-frequency focus feeding reverb, then four measures using a high-frequency focus. Focusing is helpful with longer reverb times, because there are fewer frequencies to interfere with the main sound.
Fig. 3 shows the tunings for the midrange- and high-frequency focus filters.
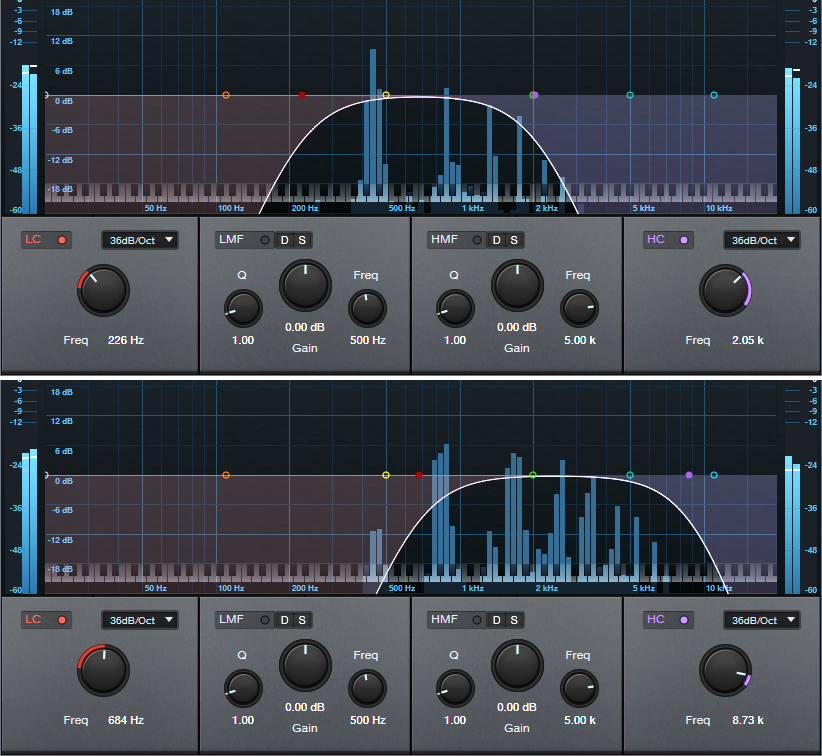
Delay with Synth Solo
For our last example, the first five measures are synth with no focus. The next five measures focus on the lower frequencies. The difference is subtle, but it “tucks away” the reverb behind the solo line. The final five measures focus on the high frequencies, for a more distant echo vibe.
Fig. 4 shows the tunings for the midrange- and high-frequency focus filters.
These are just a few possibilities—another favorite of mine is sending focused frequencies to a chorus, so that the chorus effect doesn’t overwhelm an instrument. Expanders also lend themselves to this approach, as does saturation with bass and electric pianos.
Perhaps most importantly, focusing the effects can give a less cluttered mix. Even tracks with heavy processing can stand out, and sound well-defined.
Better Autofilter Control

The March 2020 blog post, Taming the Wild Autofilter, never appeared in any of The Huge Book of Studio One Tips & Tricks eBook updates. This is because the tip worked in Studio One 4, but not in Studio One 5. However, Studio One 6 has brought the Autofilter back to its former glory (and then some). Even better, we can now take advantage of FX Bus sends and dynamic EQ. So, this tip is a complete redo of the original blog post. (Compared to a similar tip in eBook version 1.4, this version replaces the Channel Strip with the Pro EQ3 for additional flexibility.)
The reason for coming up with this technique was that although I’d used the Autofilter for various applications, I couldn’t get it to work quite right for its intended application with guitar or bass. Covering the right filter cutoff range was a problem—for example, it wouldn’t go high enough if I hit the strings hard, but if I compensated for that by turning up the filter cutoff, then the cutoff wouldn’t go low enough with softer picking. Furthermore, the responsiveness varied dramatically, depending on whether I was playing high on the neck, or hitting low notes on the low E and A strings. This tip solves these issues.
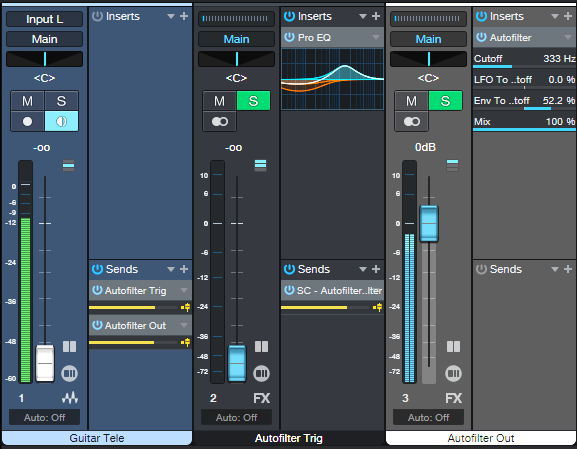
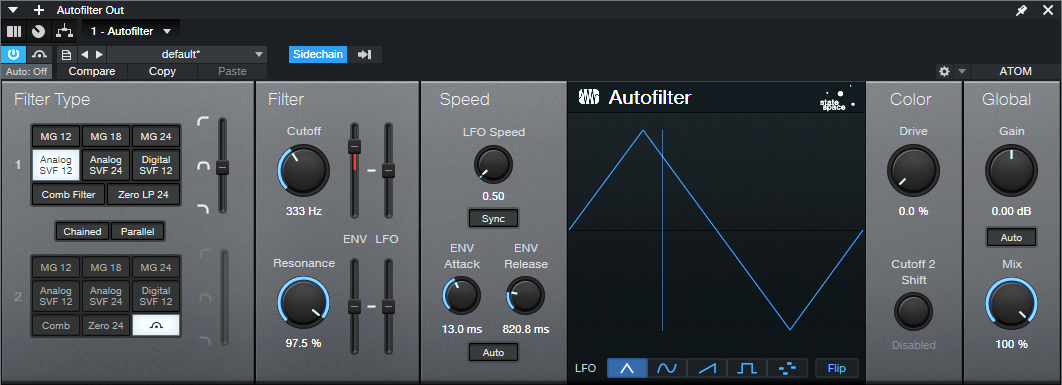
The guitar track’s audio uses pre-fader sends to go to two FX Buses (fig. 1). The Autofilter Out FX Bus produces the audio output. The Autofilter Trig FX bus processes the audio going to the Autofilter’s sidechain. By processing the Guitar track’s send to the sidechain, we can make the Autofilter respond however we want. Furthermore, if needed, you can feed a low-level signal from the Guitar track’s pre-fader send into the Autofilter, to avoid distortion with high-resonance settings. This is possible because the Autofilter Trig bus—which you don’t need to hear, and can be any level you want—controls the Autofilter’s action.
Perhaps best of all, this also means the Autofilter no longer depends on having an input signal with varying dynamics. You can insert an amp sim, overdrive, compressor, or anything else that restricts dynamic range in front of the Autofilter. The Autofilter will still respond to the original Guitar track’s dynamics, as processed by the dynamic EQ.
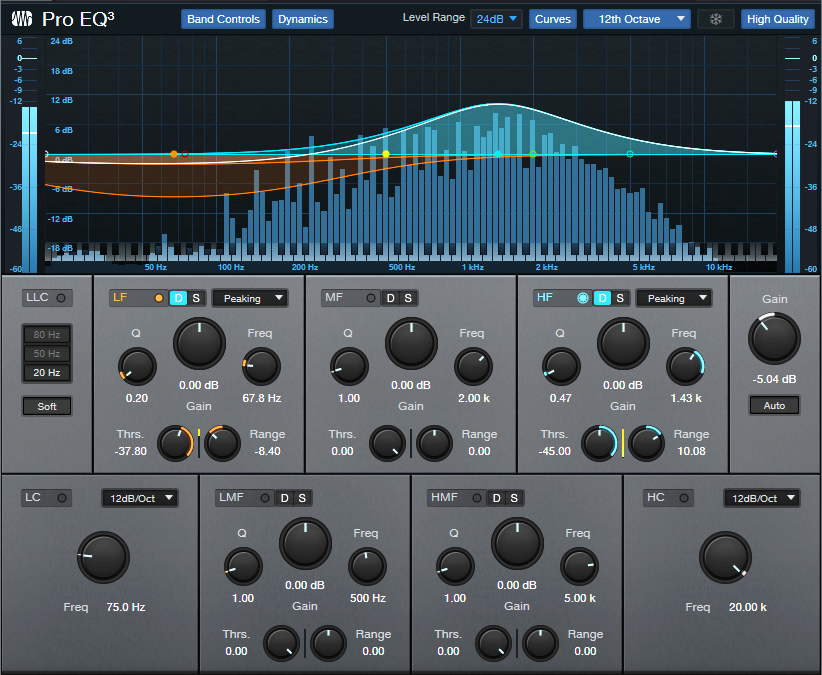
The Pro EQ3 (fig. 2) conditions the send to make the Autofilter happy. The dynamic EQ attenuates lower frequencies that exceed the Threshold, but amplifies higher frequencies that exceed the Threshold. So, the Autofilter’s response to the higher-output, lower strings can be consistent with the upper strings.
The Autofilter (fig. 3) sets the LFO Cutoff Modulation to 0, because I wanted only the envelope to affect the filter. The settings for the Autofilter and Pro EQ3 interact with each other, as well as with the guitar and pickups. In this case, I used a Telecaster with a single-coil treble pickup. For humbucking pickups, you may need to attenuate the low frequencies more.
Like Autofilters in general, it takes some experimenting to dial in the ideal settings for your playing style, strings, pickups, musical genre, and so on. However, the big advantage of this approach is that once you find the ideal settings, the response will be less critical, more consistent, and more forgiving of big dynamic changes in your playing.
And here’s a final tip: Processing the signal going to the Autofilter’s sidechain has much potential. Try using Analog Delay, X-Trem, and other effects. Also, although the original Guitar track and Autofilter Trig faders are shown at 0, no law says they have to be. Feel free to mix in some of the original guitar sound, and/or the equalized Autofilter Trig bus audio.
Lead Guitar Editing Hack
High-gain distortion is great for lead guitar sustain and tone, but it also brings up that “splat” of pick noise at the note’s beginning. Sometimes, you want the gritty, dirty feel it adds. But it can be a distraction when your goal is a gentler, more lyrical tone that still retains the sound of heavy distortion.
This technique gives the best of both worlds for single-note leads, and is particularly effective with full mixes where the lead guitar has a lot of echo. Normally the echo will repeat the pick noise, so reducing it reduces clutter, and gives more clarity to the mix.
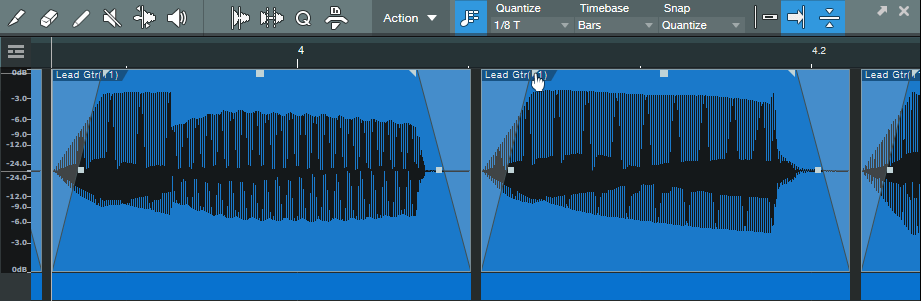
1. Open the lead part in the Edit window.
2. Choose Action, and under the Audio Bend tab, select Detect Transients.
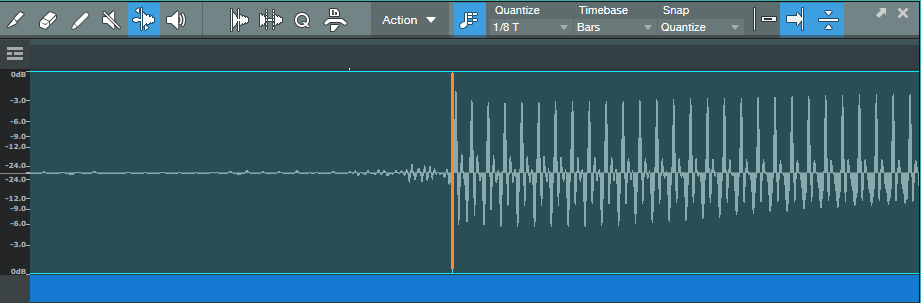
3. Zoom in to verify there’s a Bend Marker at the beginning of each note’s first peak (fig. 1). If you need to add a Bend Marker, click at the note’s beginning using the Bend tool. To move a Bend Marker for more precise placement, hold Alt/Opt while clicking on the marker with the Bend tool, and drag.
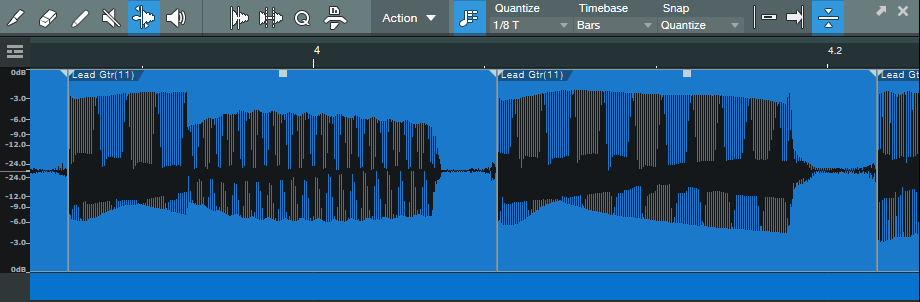
4. Choose Action, and under the Audio Bend tab, select Split at Bend Markers. Now, each note is its own Event (fig. 2).

5. Make sure all the notes are selected (fig. 3). The next steps show any needed edits being made to one Event. However, because all the notes are selected, any edit affects all notes equally. To show the edits in more detail, the following steps zoom in on two notes.
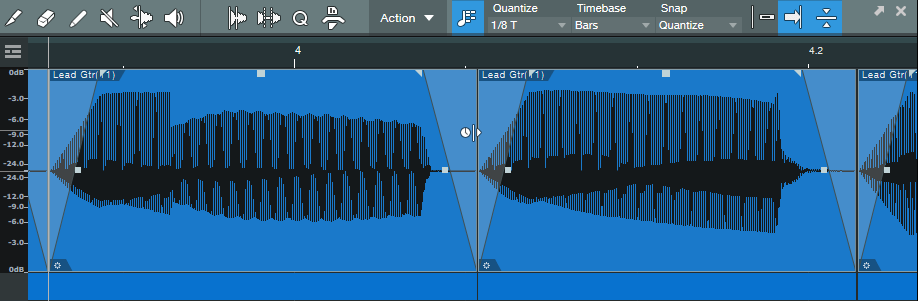
6. Trim the note ends to remove some of the pre-note “dirt” (fig. 4).

7. Add a fade-in and fade-out (fig. 5). This doesn’t have to be exact, because you’ll optimize the times in step 9.
8. There’s a gap between notes, so time-stretch the end of the note to cover the gap. Alt/Opt+click on the end of a note, and drag to the right until the note end is up against the beginning of the next note (fig. 6).
9. That may seem like a lot of work, but once you’ve defined the bend markers, having to edit only one note to edit all the notes speeds the process.
Start playback with all the notes still selected, listen, and vary the fade times. Also experiment with the curve shape. A concave curve can work well with attacks. I often try for the minimum amount of attack and decay that gives the desired result, but not always—when taken to extremes, being able to shape notes enables options that sound almost like a synthesizer.
The audio example shows how this tweak affects a single-note lead. The first part is as recorded, the second part uses this tip.