Better Autofilter Control

The March 2020 blog post, Taming the Wild Autofilter, never appeared in any of The Huge Book of Studio One Tips & Tricks eBook updates. This is because the tip worked in Studio One 4, but not in Studio One 5. However, Studio One 6 has brought the Autofilter back to its former glory (and then some). Even better, we can now take advantage of FX Bus sends and dynamic EQ. So, this tip is a complete redo of the original blog post. (Compared to a similar tip in eBook version 1.4, this version replaces the Channel Strip with the Pro EQ3 for additional flexibility.)
The reason for coming up with this technique was that although I’d used the Autofilter for various applications, I couldn’t get it to work quite right for its intended application with guitar or bass. Covering the right filter cutoff range was a problem—for example, it wouldn’t go high enough if I hit the strings hard, but if I compensated for that by turning up the filter cutoff, then the cutoff wouldn’t go low enough with softer picking. Furthermore, the responsiveness varied dramatically, depending on whether I was playing high on the neck, or hitting low notes on the low E and A strings. This tip solves these issues.
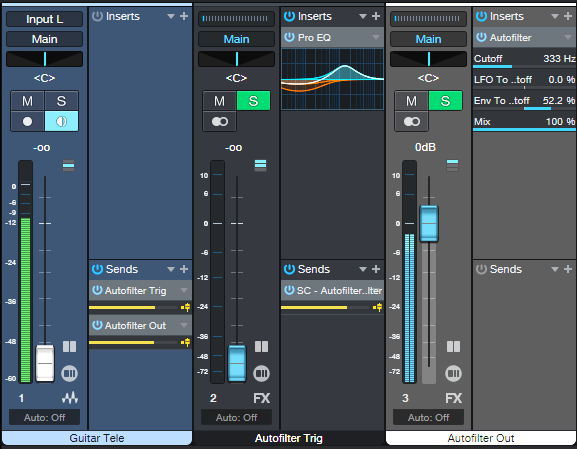
The guitar track’s audio uses pre-fader sends to go to two FX Buses (fig. 1). The Autofilter Out FX Bus produces the audio output. The Autofilter Trig FX bus processes the audio going to the Autofilter’s sidechain. By processing the Guitar track’s send to the sidechain, we can make the Autofilter respond however we want. Furthermore, if needed, you can feed a low-level signal from the Guitar track’s pre-fader send into the Autofilter, to avoid distortion with high-resonance settings. This is possible because the Autofilter Trig bus—which you don’t need to hear, and can be any level you want—controls the Autofilter’s action.
Perhaps best of all, this also means the Autofilter no longer depends on having an input signal with varying dynamics. You can insert an amp sim, overdrive, compressor, or anything else that restricts dynamic range in front of the Autofilter. The Autofilter will still respond to the original Guitar track’s dynamics, as processed by the dynamic EQ.
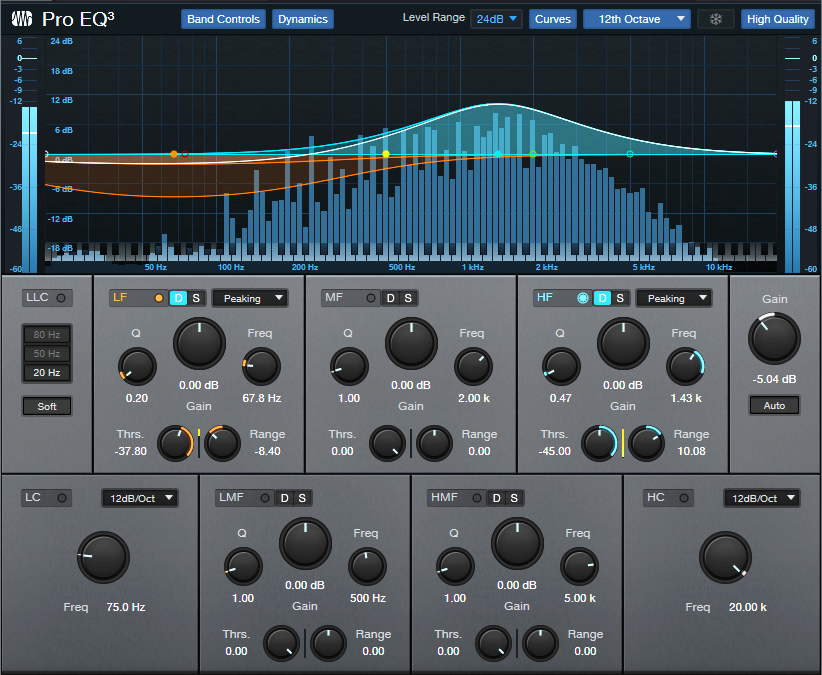
The Pro EQ3 (fig. 2) conditions the send to make the Autofilter happy. The dynamic EQ attenuates lower frequencies that exceed the Threshold, but amplifies higher frequencies that exceed the Threshold. So, the Autofilter’s response to the higher-output, lower strings can be consistent with the upper strings.
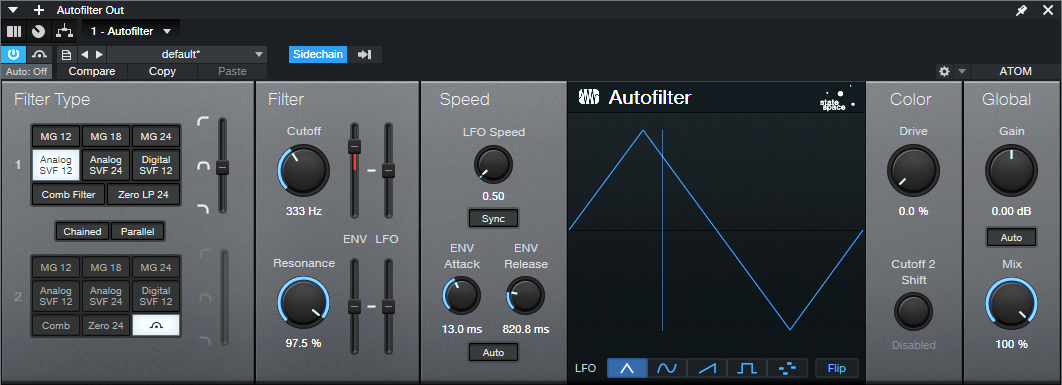
The Autofilter (fig. 3) sets the LFO Cutoff Modulation to 0, because I wanted only the envelope to affect the filter. The settings for the Autofilter and Pro EQ3 interact with each other, as well as with the guitar and pickups. In this case, I used a Telecaster with a single-coil treble pickup. For humbucking pickups, you may need to attenuate the low frequencies more.
Like Autofilters in general, it takes some experimenting to dial in the ideal settings for your playing style, strings, pickups, musical genre, and so on. However, the big advantage of this approach is that once you find the ideal settings, the response will be less critical, more consistent, and more forgiving of big dynamic changes in your playing.
And here’s a final tip: Processing the signal going to the Autofilter’s sidechain has much potential. Try using Analog Delay, X-Trem, and other effects. Also, although the original Guitar track and Autofilter Trig faders are shown at 0, no law says they have to be. Feel free to mix in some of the original guitar sound, and/or the equalized Autofilter Trig bus audio.