Monthly Archives: February 2020
Open Air: Much More Than Just Reverb
After doing some fairly “normal” tips for the last few Fridays, let’s go a little crazy—and explore some interesting sound design and rhythmic possibilities.
Open Air is a wonderful convolution processor, but it’s helpful to remember it can load any audio file, not just room and reverb impulses. I’ve said many times it’s more fun to ask “what if?” than “how do I?”, because “what if” is all about experimentation. So I asked “What if I’m using a drum loop, and also load that same loop into Open Air as an impulse?” You might not use the resulting sound all the time, but give this technique a try—you’ll hear an entirely new type of percussive effect.
- Make sure the loop itself matches the song’s tempo, and it isn’t just stretched to fit. If it was stretched to fit, select the loop and type Ctrl+B to make the length change permanent.
- Copy the loop (e.g., to an empty track). Open Air doesn’t seem to like high-level drum loop impulses, so drag down the top envelope handle to reduce the level by at least -6 dB. Again, select the loop and type Ctrl+B to make this change permanent.
- Drag the copied loop into the Open Air waveform window, and now you have a cool drum impulse.
- The odds are it will sound pretty dreadful; if needed, start by reducing the Open Air Gain control to prevent distortion.
- The EQ settings are really important (Fig. 1). I’ve had the best results by cutting back on the low frequency shelf, and boosting the high frequency one. To adjust EQ, temporarily set the Mix to 100% so you can hear the results of any changes easily; after the EQ is tweaked, adjust the Mix amount to taste.
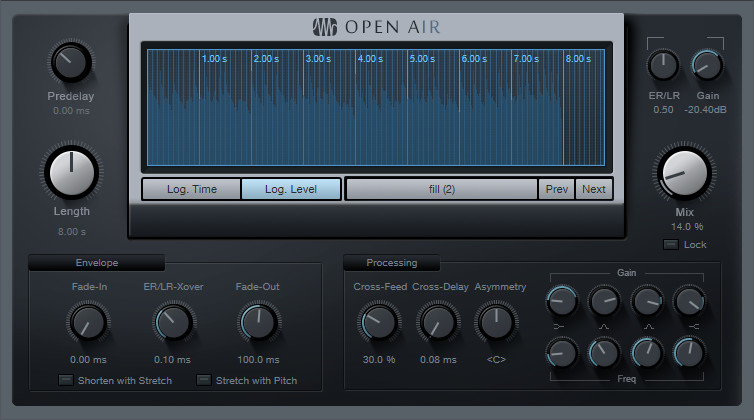
Figure 1: Typical Open Air settings when modulating a drum loop by itself.
Remember that the drum loop is still acting like a reverb, so it will build up a bit over time until the level stabilizes, and the processed sound will have a tail as long as the loop.
Next, there are several ways to add variations. First, you don’t have to convolve a loop with itself—check out the audio example.
The first four measures are a drum loop convolved with itself. The second four measures convolve the original drum loop with a tom loop, while the final four measures convolve the original drum loop with a percussion loop.
Altering the Open Air Length can create interesting effects, especially when using a rhythmically related length—like half or 1/3 the length. With sparse loops, longer lengths can work too, like 1.33, 1.5, or 1.66 the length (get out your calculator, and work with the number that’s shown under the Length control). Additional EQ and processing can add even more interest.
And remember to experiment with other types of impulse as well—pads, voices, guitar chords, whatever! You never know what you’ll discover.
River City Session Episode 2 featuring The Big Burly Man!
In celebration of our 25th anniversary, last month we announced our new YouTube series the River City Sessions. The River City Sessions give us a chance to support the kind of musicians that help build our company and share their work with a global audience. This month features Donald Gelpi aka. The Big Burly Man, performing his song “Holy Ghost.”
You may be curious about where the name “The Big Burly Man” came from (so were we) so we took some time to get to know the man behind the beard and more about his songwriting and this haunting song.

Big Burly Man performs original song “Holy Ghost”
Tell us about yourself. How long have you been making music? Who are some of your inspirations? Who did you grow up listening to?
About 18 years now. My inspirations span all over the place. From Fats Domino, Nick Drake, Van Morrison, Louis Armstrong, Elvis, Bob Dylan, Roy Orbison, The Beatles, Bob Marley, and Led Zeppelin to newer artists like Damien Rice, Gregory Alan Isakov, Ray LaMontagne, Iron and Wine, The Tallest Man On Earth, The Lumineers, Jose Gonzalez, Ben Howard, and many, many more.
Besides my rap and alternative rock stage, I really had my first musical shock listening to Led Zeppelin around 16. I was really into them, and still, love them today. I had also gotten into other classic greats like Jimi Hendrix, which got me into, Bob Dylan from loving “All Along the Watchtower.” That kind of started the whole folk-singer songwriter thing for me.
Where did The Big Burly Man come from? It’s a great name!
Thank you! Some years back I had written a song called “The Big Burly Man.” It was about me, and at the time it was kind of a hidden moniker. It had been on my mind to possibly start performing under it for a couple years. Some of my favorite artists go under stage monikers, and it was a lot more common for artists to do it back in the day. A lot of those old blues players did it too. It’s almost like being a character, as a part of this whole creative idea. I don’t know, it just seemed fun and cool.
Tell us about the song you performed for the River City Session. When did you write it? What’s the inspiration?
I wrote it towards the end of October of 2019. It’s got this haunting sound to it, and it was around Halloween, so naturally, I was thinking about ghosts and things like that. I’ve gotten a lot closer to God over this past year, and I thought how great would it be to have this haunting sounding song referring to the most epic ghost or spirit of all. Holy Ghost, I thought. I love it.
What’s the best song you’ve ever written? Why is it the best?
It’s difficult to say. “Holy Ghost” is up there. Another song that I would naturally think of first is “C’est La Vie.” It’s a very upbeat and catchy song soaked in heartfelt lyrics and truth. It’s a local fan favorite too.
Tell us about a successful show or event you were a part of.
It wasn’t without mishaps, but this past October. I had the honor of putting together my very own music festival. It was called “Baton Magique.” It was an Indie Folk Festival at Tin Roof Brewery. It was a lot of work, but we had a pretty great turnout for its first time around, and I received a lot of fantastic feedback from folks which made it all worth it for me. I was also very fortunate to have a few local musicians who were involved pitch their ideas and help with the process. It’s a beautiful thing.
Who is your dream collaboration?
Just one? Ha! It would have to be Bob Dylan, Van Morrison, Damien Rice, or Gregory Alan Isakov. There are many others, but you don’t have all day.
What do you enjoy most about making music? What do you hate most?
The magic of it all! It truly seems that way. When I write a new song, it’s like getting a new toy or something. I just can’t put it down. It feels like Christmas morning. It’s an absolutely thrilling experience! God is the creator. He loves to create. It’s not too far fetched to imagine why we love to create different things too. Mine just so happens to be simple folk songs.
I wouldn’t say I hate it, but the only part that feels like work is promoting my music, and trying to get folks to come out to a show. There’s also always a lot of “it’s who you know gets the good show” going on behind the scenes. I know that happens everywhere though, but it’s tough sometimes. That’s why I’m super grateful y’all chose me. Y’all didn’t know me, or owe me any favors. Thank you!
If you could change anything about the music industry, what would that be?
I’m not sure I’d change too much. It is what it is. And the way it is is due to many factors and reasons. I’m thankful just to do my small part as big as I can do it.
What advice do you have to anyone getting into the music scene?
Create the kind of music that inspires you! If you feel that lantern being lit and burning from the inside, you’re doing it right.
Watch his performance here:
Learn more about capturing The Big Burly Man’s intimate sound from the engineer Kyle.
PreSonus COO talks Notion, Career and PreSonus!
Here are three cool things you may not know about PreSonus’ notation software Notion.
- Notion was featured in an Apple commercial and photos featured in Apple Stores… True story. Watch the commercial HERE!
- Notion has won several awards, including a prestigious music industry NAMM TEC Award for Best Smartphone/Tablet App.
- Notion has a 4 out of 5 rating in the Apple App Store.
In 2013, we acquired the assets of Notion Music, adding Notion™ music notation and composition software and their other solutions to our product line-up. This innovative product was the first notation app to run on iOS in addition to Mac and Windows, one of the most downloaded music creation apps. Notion and their team were a natural fit in the PreSonus culture of inventive technology development. When PreSonus acquired Notion Music not only did we score an award-winning software, we also got the one and only Jim Boitnott. All year we’re celebrating 25 years of PreSonus so it’s only fitting to celebrate Notion and hear more from one of the creators and current COO of PreSonus Jim Boitnott!

What were you doing before PreSonus?
I was the CEO of Notion Music.
Was owning a business something you dreamed of doing or just fell into it as the products came along?
I never actually owned Notion Music, it was owned by several people and started by Lori and Jack Jarrett. When I was brought in I was in various management positions, and then became CEO. I never dreamed of being a CEO, I just wanted to make a great product that we were proud of. One day after working very hard for years I found myself sitting in that role. I tried to make the best choices I could for our team and customers.
What’s the process of having a great idea to getting it out the door?
This could be a book… There are so many pieces of this massive puzzle no one ever thinks about! Most importantly, commitment from incredibly talented people is crucial. Hard work, focus, and simply finding a way to make it happen. And that’s just getting it out the door… There are many more obstacles after that to make “it” successful.
What need was the Notion intended to meet?
An easy-to-use notation software product with great playback. We always wanted to lead with the sound results, others always lead with the printed results.
At the time, did you have any data supporting the need for this product?
Kind of, but none that would have made a difference. It was more of a “we want to build this and we are” mentality. However, when we released Notion for iPad we did have more data that helped us realize the opportunity. We knew there was a great opportunity for the iPad version and it did pay off with great results, as well as being featured in an Apple ad campaign… one of our proudest moments.
What was the biggest challenge? Major roadblocks?
I’ll be honest, at different times in our company history, it was different issues, such as; ego’s, red tape, lack of experience, internal politics, indecision, cooperation, budgeting, forecasting, etc. It felt like everything at different times, but when it came to making Notion the product, that sometimes felt like the easiest and clearest part. Once we finally got a team that was focused in one direction we were pretty incredible for such limited resources. Then, our biggest roadblocks became time, resources, really good competitors, and market factors.
At the time of its conception, how did you define success?
I think that was part of the problem early on, I think everyone had a different opinion of what success was. Some would have said revenue, others would say a great product, and some were just worried about other things. However, for the first iPad version of Notion, we had a clear goal “Be the first-ever notation app for iOS and make it as solid as the desktop version that it worked alongside of.”
How did you guys come together to build it?
Notion Music from 2003-2013 had some incredible people involved in it, at different times and in different ways. We had people from all over the world come together in Greensboro, NC and created something special. All played a role in getting us where we are today. I was teaching guitar and film scoring classes at Elon University using competitor notation products and then met a co-founder, we randomly struck up a conversation one day. Once she found out I was very knowledgeable with Finale and Sibelius I found myself working at Notion Music just a few weeks later. However, like many businesses, there are highs and lows, and unfortunately, after Notion v2 we had to make some major changes and lost a great number of our team and redesigned the product. The final team, which basically stayed totally intact for the last 5-6 years and all the way through the PreSonus acquisition, were put together based on their versatility, skills, and work ethic. An amazing team: Ben, Chris, Eric, Kyle, Richard, Brian and Brian, Josh, Patrick, Kris, Allison…we all worked hard and had fun.
How did you feel when it was complete?
Like most software products… Notion is not complete, and will never be complete.
When you think about the last 25 years, how does it make you feel seeing how far PreSonus has come?
Just looking at the last 6+ years I have been here it makes me very proud to see what we all have accomplished. The PreSonus team is remarkable, and the stories I have heard about the previous 20 years can go from one extreme to the other. I’ve given responses to those stories like, “How did you even stay in business?” to, “Amazing, how did you accomplish that?”..and of course “Rick did what!?” But looking at 25 years, I’m proud of PreSonus and the amazing team here, and I’m proud of the Notion team that worked through so much adversity to have an opportunity to even be here.
Interested in Notion? Check it out here.
Notion Music featured in Apple Stores across the world!
How to Save CPU Power with Amp Sims
You’ll often see this kind of comment in forums: “There must be something wrong with Studio One! I can run only a couple amp sim instances before the program can’t handle any more!” But you’ll also see this comment about other DAWs—because the “problem” isn’t the DAW, it’s the amp sims and current computer technology. Fortunately, Studio One has anticipated these issues, and offers three effective solutions.
Remember, an amp sim is processing a dry guitar track in real time—not playing back processed audio. Amp sim sound quality has improved dramatically over the past few years, but the trade-off is the CPU power needed to do the serious number-crunching required for realistic amp sounds. Studio One’s CPU-saving options are great with virtual instruments, which can sometimes suck even more power than amp sims—but guitar players who are discovering the fun of amp sims need to know about these options, too.
The Old-School Fix
Although some people recommend the general-purpose, old-school fix of increasing latency to reduce stress on your CPU, that makes playing guitar much less fun. Another solution is to buy a much faster computer. Studio One’s solutions work at lower latencies, as well as older, slower computers.
Solution 1: Bounce to New Track
Select one or more Events. Right-click on any of them, and choose Event > Bounce to New Track (Fig. 1). This creates a new audio track that incorporates the sound created by the original track’s processing, but without any inserted plug-ins—the sound is “baked into” the new audio track. Audio tracks require far less CPU power than a track whose effects are being created in real time. Bouncing leaves the original track in place but mutes it, so you can unmute it to return to the original track’s audio and effects if needed.

Figure 1: If you use Bounce to Track (outlined in white) as much as I do, it will show up in the Recent Items section of your right-click context menu.
To conserve the CPU used by the original track’s effect(s), either turn off power to the effect(s), or right-click on the original track in the track column and choose Disable Track. To return the track to its initial status, right-click on the track in the Track column, and choose Enable Track.
Note that when signing off on a project, this is also an excellent way to “future-proof” the project against future operating system (or other) changes that may render a plug-in unusable. If the sound has been preserved as an audio file, you’ll at least be able to open the processed sound.
Solution 2: Transform to Rendered Audio
Right-click on the track in the Track column, or choose Track > Transform, and then choose Transform to Rendered Audio. This renders the effect sound so that it becomes part of the existing audio track. Unlike bouncing, this operation doesn’t create a new track, and it automatically disconnects the effect from the CPU to save power.
When you choose Transform to Rendered Audio, a dialog box appears with two options (Fig. 2).
![]()
Figure 2: The Transform to Rendered Audio dialog box.
You can always undo if you change your mind, but Preserve Realtime State (which I highly recommend checking) preserves the original, real-time state so you can always return to the original track settings and effects. Preserve Realtime State also persists through saves and copies. To return to the original track, right-click on the track in the Track column, or choose Track > Transform, and then choose Transform to Realtime Audio.
The second dialog box option renders any effects tail, such as a long trail of echoes or delay, that extends past the length of the existing Events. You can choose Auto Tail, where Studio One detects how long the tail lasts and renders according, or specify a fixed tail of a particular length. (A fine point: Studio One fades out the Event over the tail’s duration, but it’s an editable envelope.)
Render Event FX
Event FX, as accessed through an Event’s Inspector, are invaluable. With Ampire XT (and many other amp sims), you can’t automate amp or cabinet changes—only parameters within amps and cabinets. So, if the verse’s guitar part is one Event and the chorus’s guitar part is a different Event, each can have its own amp sim sound.
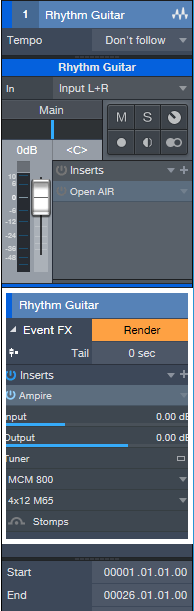
Figure 3: Here, Ampire XT is an Event FX, and can be rendered to save CPU power. Note that you can also choose different amps and cabinets, see a tuner thumbnail, and turn the Stomps section on or off.
The trade-off is that more amp sims draw more CPU power. Fortunately, Event FX have a Render button (Fig. 3). Immediately upon rendering, the sound becomes part of the audio, the effect itself disconnects from the CPU, and the Render button changes to Restore. Similarly to transforming an audio track, you can revert to the original state at any time by clicking Restore.
Multiple Renders in One Operation
Suppose a track has two Events, each with their own Ampire XT inserted via an Event FX, and there’s a CPU-hungry reverb processing the entire track. If you apply Transform to Rendered Audio to the track, it will Render the Event FX and the Track effect automatically. But if you then need to make changes and transform the Track back to realtime audio, the Track and Event FX will be restored to their initial states.
Bounce to New Track with both Events selected will produce the same results in the bounced track, i.e., all the effects will be rendered. If you want to return from where you started, delete the bounced Track, and unmute the two Events in the original Track (which will still have its effects inserted).
Once you bounce or transform tracks and reclaim all that CPU power, you can continue going cRazY with amp sims—without stressing out your computer, or Studio One.
Sir Bob Cornelius Rifo (The Bloody Beetroots)’s Faderport 16
Ahh, yes. The Bloody Beetroots. Led by none other than “NO Mask” clad frontman/musician/producer, Sir Bob Cornelius Rifo.

?☝️Faderport 16 as a centerpiece of Sir Bob Cornelius Rifo’s studio setup
PreSonus: For those who don’t know already, please tell us about yourself and what you’ve been up to?

Sir Bob: Been in the music business since 2006, worked with a lot of artists from Paul McCartney to Tommy Lee, going to Jason Aalon Butler, to Zhu.
I’ve played all the major festivals of the world, multiple times; Coachella, Lollapalooza, Primavera Sound, Rock im Ring, Rock imPark, Sziget, EDC, Summer Sonic, Fuji Rock… I could go forever.
I’m a musician, producer, and photographer—and I go crazy for motors!
PreSonus: So, tell us… how did the Faderport 16 and you become involved?
Sir Bob: I fell in love with the original Faderport almost four years ago and now got crazy with FaderPort 16. I needed a simple and solid machine. This fit the bill nicely!
Long story short—I love mixing and having control of the faders under my fingers. Nothing can replace the human touch and the Faderport 16 somehow returns it back.

PreSonus: What DAW do you use with the Faderport 16?
Sir Bob: Ableton Live 10.
PreSonus: What would you say you like most about PreSonus?
Sir Bob: Your customer service, peripheral installation speed, and ease of product use.
PreSonus: Any tips or tricks with our products you’d like to share?
Sir Bob: As you can imagine, I’m not new to DAW controllers. I’ve played with a lot of them, and I’ve bought many during the years from Mackie to SSL. This is the only one that has never given me any problems… which should be a priority for all controllers out there, just saying.
PreSonus: In closing… what would be on your “wish list” from us in the future?
Sir Bob: I’m dreaming about the Faderport 24. MAKE IT REAL!!!

- The Bloody Beetroots: Homepage
- The Bloody Beetroots: Twitter
- The Bloody Beetroots: Instagram
- The Bloody Beetroots: Facebook
- The Bloody Beetroots: Spotify
Into the Esoteric: Unveiling the World of Oriental Percussion
[This guest blog post comes to us from EarthMoments.]
To journey into the realm of Middle Eastern music is to unveil a tradition that is inextricably linked to religion—a uniting factor that brought together people of several different countries, languages and cultures.
The prevalence of Islam enabled the Arabic influence to spread across areas including Morocco, Iran, Egypt, Turkey and North Africa from the 7th century onward—a cultural influence that also permeated the region’s musical framework. There are various elements that give Arabic music its distinctly otherworldly quality—the music often features quarter tones between notes, the Arabic scale is based on various maqamat or modes, and complex rhythmic patterns play an essential role in the tradition.

In order to connect producers to this region’s exotic spectrum of instruments and rich sonic diversity, EarthMoments has released a bundle that grants them exclusive access to an otherwise elusive musical tradition.
EarthMoments’ Hamsa Vol. 02 – Arabic Percussion showcases several percussion instruments from the Middle East, North Africa, and Arabic musical traditions.
Forming the mainstay of the percussive practice are a variety of hand drums, instruments like the dumbek—a classic goblet-shaped drum traditionally made of ceramic clay and with a deeply resonant sound; the darbuka – also ‘goblet’ shaped, and said to be a modern variation of the dumbek; and the riq—a frame drum with 5 sets of cymbals, usually skinned with goat or fish skin – all of which are included in the bundle.

These traditions are heavily steeped in rhythmic patterns that perhaps at first listen are unusual to the Western-trained ear—complex time signatures that evoke a sense of the mystical realm from which these sounds emerged. In creating the bundle, the EarthMoments team made it a point to go beyond a surface level depiction of the ‘exotic Orient’—and chose instead to showcase both traditional commonly heard rhythms, as well as less conventional, rare folk rhythms that stray far from the mainstream.

Included are rhythms like the Malfuf—a fast pattern that originates in Egypt and Lebanon and is often played as an intro for classical orchestral compositions, specially created for a belly dancer’s entrance and exit;
the Baladi – an urban folk rhythmic style, a derivative of which is the Maqsoum rhythm (the most common rhythm in Arabic belly dance music);
the Shiftateli – a hypnotic rhythm often used for the sensuous movements of the belly dancer such as undulations of the torso, floor work, or when the dancer moves with snake like arms;
and the Karachi – a fast rhythm that originated in Pakistan but is commonly found in modern Egyptian and North African music.
In unlocking this enigmatic world of sound, new doorways open up for the curious producer looking for unusual creative leads – and herein lies great potential to create truly unique, offbeat compositions.
Hamsa Vol. 02 – Arabic Percussion Bundle
The “Table” Filter Response
There are a lot of filter responses: notch, bandpass, peak, allpass, high pass, lowpass, shelf…now let’s add the “table” response to the collection.
Parametric EQs can add peaks and cuts that are broad, narrow, or anywhere in between, but they all have slopes on either side of the filter frequency. The table response described here can boost or cut over a range of frequencies, with a flat response over that range. This avoids having to dedicate several overlapping parametric stages, which still doesn’t achieve quite the same result. The key to this response is combining shelving EQs.
Table Response Boost
To boost a frequency range, set the low- and high-shelf frequencies to the lowest and highest frequencies in the range (Fig. 1). Use the Shelf setting to determine how quickly the boosted section returns to the flat response. I’ve found the 12 and 24 dB settings works well, because the Q control comes into play. This can provide additional modifications to the response, which we’ll cover later. However, for the gentlest effect, 6 dB is valid in many situations as well.
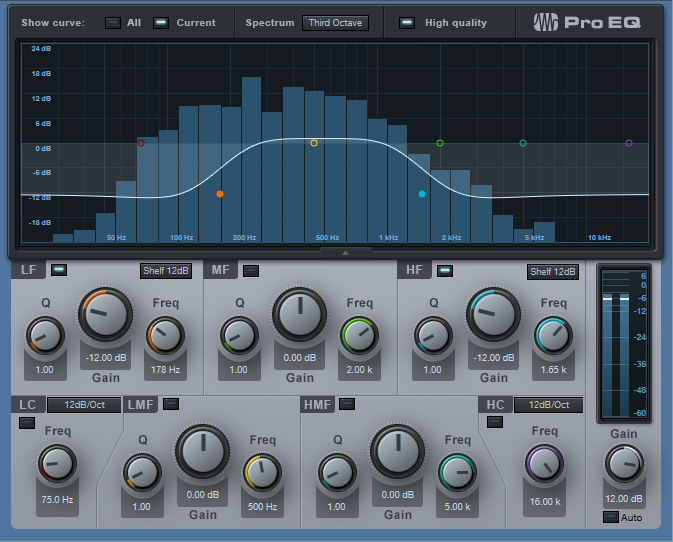
Figure 1: This table response, inserted before a high-distortion amp sim, gives greater sensitivity to midrange notes and also trims the highs and lows for a “tighter” sound.
But we’re not done quite yet. To provide an actual boost, increase the output Gain control for the desired amount of boost. For example, if you want the table response to boost +12 dB, set the high and low shelf Gain settings to -12 dB, and the output Gain control to +12.
Table Response Cut
Similarly to the boost option, set the low- and high-shelf frequencies to the lowest and highest frequencies in the range you want to cut (Fig. 2). Again, use the Shelf setting to determine how quickly the boosted section returns to the flat response; the same general comments about how the shelf slope works with boosting apply here too.
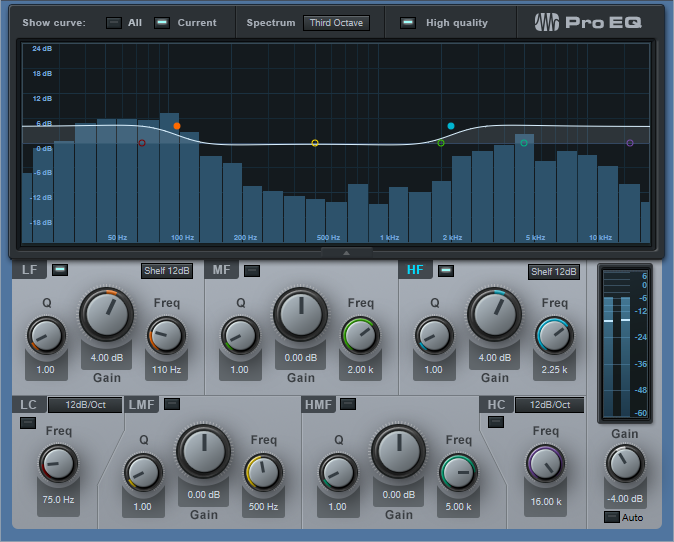
Figure 2: This table response for a drum loop cuts back on the midrange a bit to help emphasize the kick and the snap/sizzle of the share and high-hats; it also reduces any “midrange mud,” and makes space in that frequency range for other instruments.
Cutting requires an equal and opposite approach to what we did for boosting. If you want the table response to cut 4 dB, then boost the shelf controls by +4 dB. Then, set the output gain control to -4 dB. This restores the shelf boosts to flat, and adds the desired amount of cut for the specified frequency range.
Using Q
When cutting with the low shelf or boosting with the high shelf, increasing resonance by turning up the Q control adds a peak just above the shelf’s corner frequency, and a dip below the corner frequency. When boosting with the low shelf or cutting with the high shelf, increasing Q adds a peak just below the shelf’s corner frequency, and a dip above the corner frequency. This emphasizes the extremes of the chosen frequency range, while also increasing the depth of the cuts near the corner frequency. Try adding resonance to the low shelf when using this technique for vocals, particularly narration (Fig. 3).
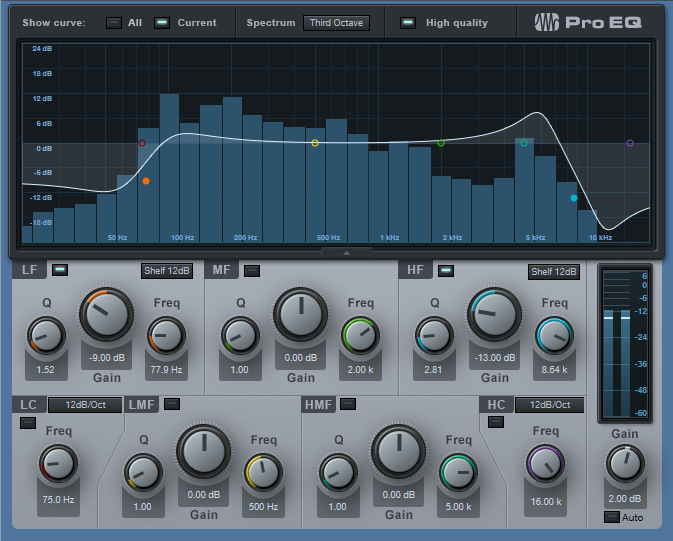
Figure 3: The table response adds a bit of a low-frequency boost (with Q) to give the “late night FM DJ sound,” but also cuts lower frequencies to reduce p-popping. Meanwhile, the high-frequency shelf emphasizes the voice’s articulation, while reducing extraneous highs, hiss, and sibilance.
Of course, the table response doesn’t replace a parametric. But sometimes, it might be just the response you need, and you’ll find it faster to dial in the right frequency range by moving the shelf controls than trying to make multiple stages of peak/boost EQ do what you want.
Remembering Derek Jones

Derek Jones was a Notion fan, expert user, and PreSonus advocate who formerly managed the Notion Users Facebook Group. If you ever had a run-in with Derek on-line, it was guaranteed to be positive—we can’t even begin to count the number of people in the Notion community who benefitted from his help and patience. If you count yourself among them, please feel welcome and encouraged to say something nice in the comments.
Rest easy, Derek, and thanks for your kind time and attention. You’re already missed.
The Notion team are deeply saddened by Derek’s passing. He was hugely valued here, indeed all of our users benefited from the improvements and feedback he contributed over the years on top of the direct help he gave to users within the Notion user group he created. The hundreds of members that built up over time became a really supportive and kind online community, aided of course by Derek’s patient and positive direction. I remain very grateful for his passion for music making, and for his friendship.
Chris Swaffer
Product Manager, Notion
Jonny Lipsham Studios
All About Ampire’s Virtual Miking
A physical guitar amp is more than a box with a speaker—it’s a box with a speaker being picked up by a mic in a room. Both the mic and room contribute to the overall sound. To better emulate the sound of a physical guitar amp, Ampire includes a Mic Edit Controls panel that allows making a variety of virtual mic adjustments.
Ampire doesn’t include room emulation, because you can emulate room sound with several of Studio One’s plug-ins—Room Reverb, Open Air Reverb, Mixverb, and Analog Delay. However, it’s best to avoid adding ambiance until most other tracks have been cut, so that the ambiance achieves the right balance. Too much ambiance can clutter the mix, or hog the stereo field.
The mics you choose, their levels with respect to each other, and whether you add delay can make a major difference in your amp’s sound. So, let’s investigate the Mic Edit Controls panel (Fig. 1).
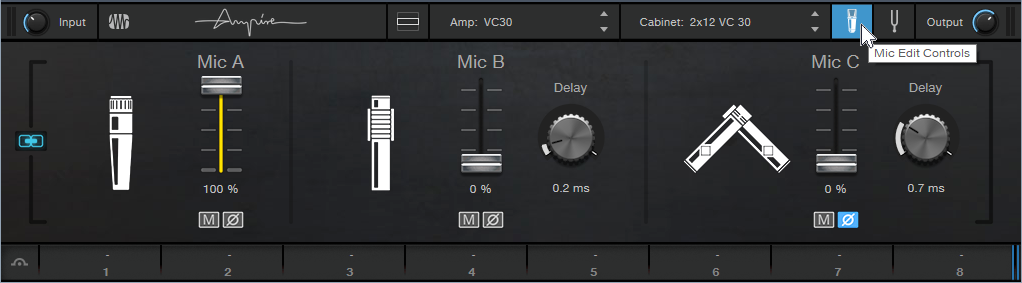
Figure 1: The Mic Edit Controls in Ampire XT.
Choosing the Mic Type
Many guitarists record with their amp cranked to really high levels, to get their “sound.” Dynamic mics are ideal because they can handle high levels, and the inexpensive Shure SM57 is the classic guitar cabinet mic—many engineers choose it even when cost is no object. Although dynamic mics may lack brightness compared to condenser mics (as modeled by Mic C), this doesn’t matter much with amp cabinets, which typically don’t have much energy above 5 kHz or so anyway. Mic A in the Mic Edit Controls panel has the SM57’s sonic character, and will likely be your go-to mic.
Mic B produces the sound associated with ribbon mics, which shows one of Ampire’s benefits: older ribbon mics tended to be fragile—but you can’t blow up a virtual mic. Ribbon mics have an inherently warm midrange. Royer’s R-121 mic is popular for miking cabs, and Mic B models its overall sonic character.
Mic C emulates the PreSonus PM-2 matched pair of condenser microphones. Condenser mics are often too sensitive for close-miking loud amps, but when moved a bit back from the cab, they can give a brighter, more “open” response that handles note attacks well. They’re also commonly used as room mics, which is why these two virtual mics are arranged in an X-Y miking configuration to give a stereo image.
Wait a Minute—Did You Say Stereo?
Guitars are mono signal sources, but taking full advantage of Ampire’s mics, as well as room ambiance plug-ins, requires a stereo signal. To convert the mono guitar into a dual mono signal (i.e., stereo, but with the same audio in the left and right channels), record the guitar with the Channel Mode set to Mono (one circle showing to the right of the Record Input selector). Although this means that any plug-ins will be in mono, that’s acceptable when tracking. After recording the track, change the Channel Mode to stereo (i.e., two circles showing to the right of the Record Input selector), select the event, and bounce it to itself (ctrl+B). Now the mono guitar is dual mono.
Mic Control Applications
Each mic has three controls: level, mute button (which makes it easy to evaluate what a particular mic contributes to the overall sound), and phase switch (the Ø button). Also, Mics B and C have Delay controls.
Often when miking a physical amp with more than one mic, you’ll vary their blend to find the right mix. The Mic Mix Link button toward the extreme left simplifies this process. When enabled, altering one mic’s level adjusts the levels of the other mics oppositely. For example, turning up Mic A turns down Mics B and C, or turning up Mic B turns down Mics A and C.
The Phase buttons and Delay controls can make major differences in the overall sound. There’s no right or wrong phase or delay setting; use whatever sounds best to you. Try the following to hear how these controls affect the sound. (Bear in mind that amp sims do a lot of calculations, so moving the controls will sound “choppy.” This is because Ampire has to recalculate constantly to reflect the changing settings.)
- Turn off Mic Mix Link.
- Mute Mic C.
- Set Mic A’s Level up full, and Mic B’s Level down all the way.
- Enable Mic Mix Link.
- Lower Mic A’s level. Mic B’s level will increase. Note the difference in sound as the levels change.
- Alter Mic B’s Delay time, and again, change Mic A’s level. You’ll hear a sound that’s somewhat like flanging, due to the comb filtering caused by Mic B being out of phase.
- Enable the Phase reverse switch for Mic B, and again, alter Mic A’s level. You’ll hear a wide tonal variation.
Now check out how Mic C creates a stereo spread. With Mic Mix Link off, adjust Mic A and/or Mic B for the desired sound. Bring up Mic C’s Level control slowly, and you’ll hear the stereo image bloom. Again, the Delay control and Phase reverse button make a big difference in the sound.
Clean Sounds, Too
One of my favorite mic applications is with clean guitar sounds (cabinet only, no amp). Mic C is particularly useful, because its brightness gives the cabinet’s tone a useful lift, and creates a stereo image. Finally, note that if you change the Channel Mode from mono to stereo (or the reverse), the sound may mute. Varying one of the Mic level controls restores the sound. Of course, it’s easy enough to call up an Ampire preset, and just start playing… but becoming proficient with the Mic Edit Controls opens up a wealth of possibilities.
How to Use Nektar Panorama in Studio One
This just in from Ralf over at Nektar! This tutorial series shows how Nektar DAW Integration software lets you control Studio One from Panorama T4 and T6 MIDI controllers—everything from setup to mixer mode to instrument mode is covered. Check it out!
Part 1 (Basics and Overview)
Part 2 (Mixer Mode)
Part 3 (Instrument Mode)