Friday Tip: Colorization: It’s Not Just About Eye Candy
Some people think colorization is frivolous—but I don’t. I started using colorization when writing articles, because it was easy to identify elements in the illustrations (e.g., “the white audio is the unprocessed sound, the blue audio is compressed”). But the more I used colorization, the more I realized how useful it could be.
Customizing the “Dark” and “Light” Looks
Although a program’s look is usually personal preference, sometimes it’s utilitarian. When working in a video suite, the ambient lighting is often low, so that the eye’s persistence of vision doesn’t influence how you perceive the video. For this situation, a dark view is preferable. Conversely, those with weak or failing vision need a bright look. If you’re new to Studio One, you might want the labels to really “pop” but later on, as you become more familiar with the program, darken them somewhat. You may want a brighter look when working during daytime, and a more muted look at night. Fortunately, you can save presets for various looks, and call up the right look for the right conditions (although note that there are no keyboard shortcuts for choosing color presets).
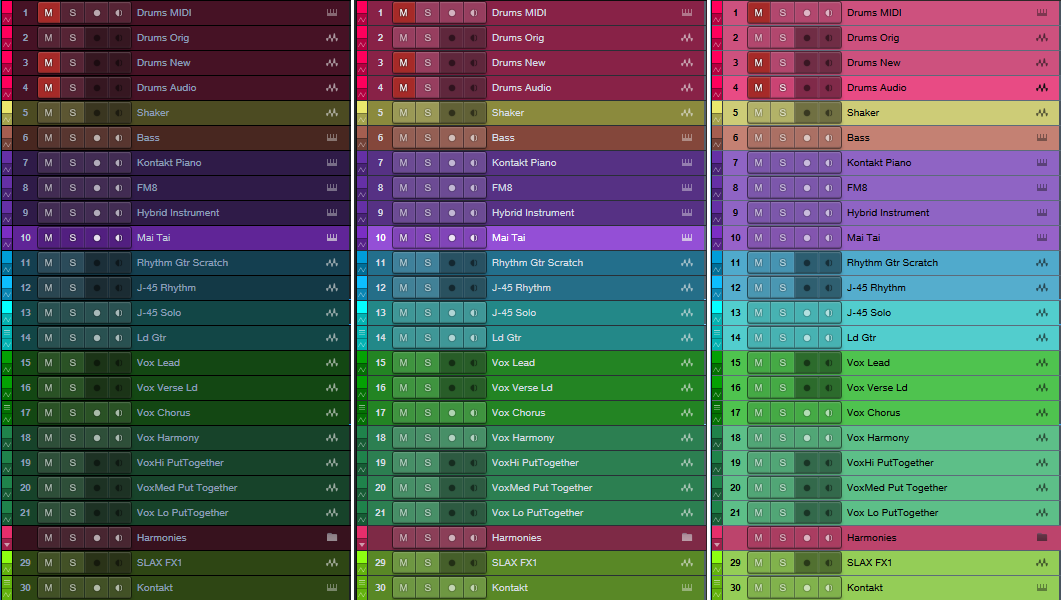
Figure 1: From left to right: dark, moderate, and bright luminance settings.
You’ll find these edits under Options > General > Appearance. For a dark look, move the Background Luminance slider to the left and for a light look, to the right (Fig. 1). I like -50% for dark, and +1 for light. For the dark look, setting the Background Contrast at -100% means that the lettering won’t jump out at you. For the brightest possible look, bump the Background Contrast to 100% so that the lettering is clearly visible against the other light colors, and set Saturation to 100% to brighten the colors. Conversely, to tone down the light look, set Background Contrast and Saturation to 0%.
Hue Shift customizes the background of menu bars, empty fields that are normally gray, and the like. The higher the Saturation slider, the more pronounced the colorization.
The Arrangement sliders control the Arrangement and Edit view backgrounds (i.e., what’s behind the Events). I like to see the vertical lines in the Arrangement view, but also keep the background dark. So Arrangement Contrast is at 100%, and Luminance is the darkest possible value (around 10%) that still makes it easy to see horizontal lines in the Edit view (Fig. 2).

Figure 2: The view on the left uses 13% luminance and 100% contrast to make the horizontal background lines more pronounced.
Streamlining Workflow with Color
With a song containing dozens of tracks, it can be difficult to identify which Console channel strip controls which instrument, particularly with the Narrow console view. The text at the bottom of each channel strip helps, but you often need to rename tracks to fit in the allotted space. Even then, the way the brain works, it’s easier to identify based on color (as deciphered by your right brain) than text (as deciphered by your left brain). Without getting too much into how the brain’s hemispheres work, the right brain is associated more with creative tasks like making music, so you want to stay in that mode as much as possible; switching between the two hemispheres can interrupt the creative flow.
I’ve developed standard color schemes for various types of projects. Of course, choose whatever colors work for you; for example, if you’re doing orchestral work, you’d have a different roster of instruments and colors. With my scheme for rock/pop, lead instruments use a brighter version of a color (e.g., lead guitar bright blue, rhythm guitar dark blue).
- Main drums – red
- Percussion – yellow
- Bass – brown
- Guitar – blue
- Voice – green
- Keyboards and orchestral – purple
- FX – lime green
Furthermore, similar instruments are grouped together in the mixer. So for vocals, you’ll see a block of green strips, for guitar a block of blue strips, etc. (Fig. 3)
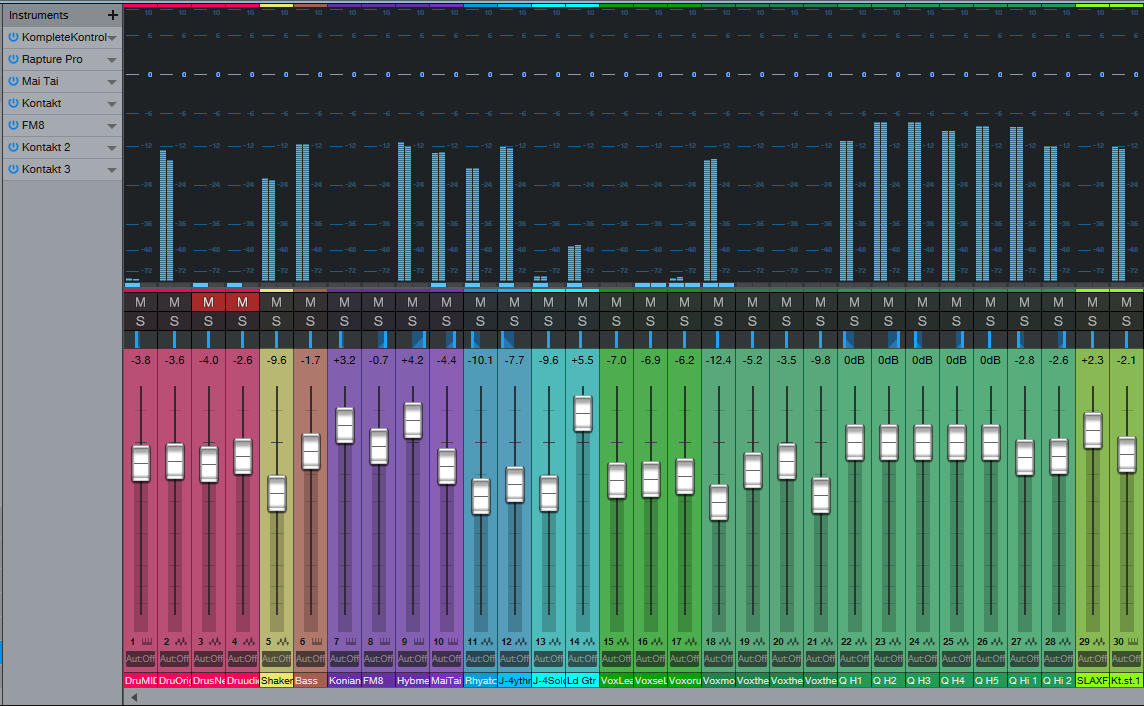
Figure 3: A colorized console, with a bright look. The colorization makes it easy to see which faders control which instruments.
To colorize channel strips, choose Options > Advanced tab > Console tab (or click the Console’s wrench icon) and check “Colorize Channel Strips.” This colorizes the entire strip. However, if you find colorized strips too distracting, the name labels at the bottom (and the waveforms in the arrange view) are always colored according to your choices. Still, when the Console faders are extended to a higher-than-usual height, I find it easier to grab the correct fader with colored console strips.
In the Arrange view, you can colorize the track controls as well—click on the wrench icon, and click on “Colorize Track Controls.” Although sometimes this feels like too much color, nonetheless, it makes identifying tracks easier (especially with the track height set to a narrow height, like Overview).
Color isn’t really a trivial subject, once you get into it. It has helped my workflow, so I hope these tips serve you as well.
Extra TIP: Buy Craig Anderton’s Studio One eBook here for only $10 USD!