Friday Tip: Make Mastered Songs Better with Tempo Changes
We covered tempo changes previously, with an emphasis on using tempo changes to add dramatic pauses, and also doing longer changes that are useful with DJ sets when transitioning from one song to another. This week, let’s go one step further.
In the process of researching an article for Sweetwater.com about what made classic rock sound “classic,” I analyzed tempo variations in songs without click tracks. The consistency of these changes was surprising. Although the changes did not have machine-like precision, they were far from being random or sloppy. They tended to follow particular patterns not only in different songs, but different genres.
The most prominent of these was speeding up a bit in the verse before a chorus. Sometimes there would be a slight slowdown after arriving at the chorus, and sometimes it would revert pretty close to the original tempo over the course of the chorus, but the speeding up was evident in virtually all the music I analyzed—rock, pop, R&B, soul, you name it. Also, songs often sped up imperceptibly over the course of a song.
Although you can record while Studio One is doing a tempo change, sometimes it’s a lot easier to play along with a regular click. Fortunately, there’s a way to add these tempo changes after the fact, to the final stereo mix—consider it a mastering technique done in the Song Page, not a tracking or mixing one.
PREPARATION
Working on the mixed track requires the highest fidelity possible. Choose Options > Advanced > Audio and check “Use cache for timestretched audio files.”
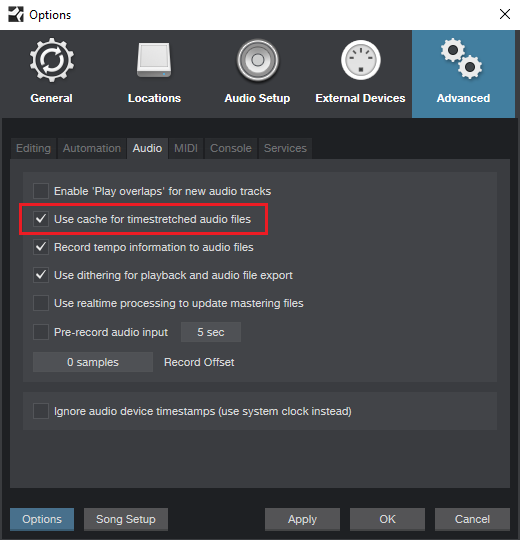
This uses a higher-quality timestretch algorithm than what’s used for real-time disk playback.
Next, open up a new song and load your mixed file into a track. It won’t have tempo information embedded so Studio One won’t know how to stretch it, but that doesn’t matter. Open the Inspector (F4), and enter a tempo under File Tempo, for example 120 BPM. It doesn’t have to match the original file’s tempo because we’re just introducing changes, not dealing with absolute tempos.
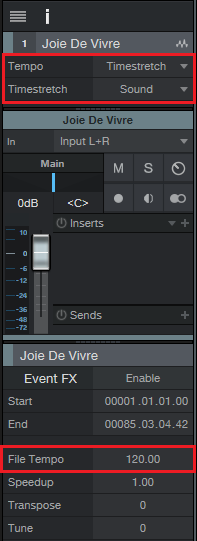
While you’re in the Inspector, choose Tempo = Timestretch, and Timestretch = Sound.
MAKING CHANGES
I generally do a linear speed up, because the changes (e.g., 2-5%) aren’t big enough that you’d notice a log curve anyway. While holding the Alt/Opt key, click with either the Paint or Line tool where you want the tempo to start speeding up, and drag to where you want the speedup to end. Note that you can also drag up or down to fine-tune the end tempo, and if you also hold Shift while doing this, you can change tempo in 0.1 BPM increments.
While the range of tempo changes is still selected, zoom in on the very first change. It will be slightly more than the tempo before it, which is usually what you want. If not, hover over the top of the first tempo change until it turns into a double up/down arrow. Click, and drag downward to even out the first tempo change with the tempo change right before it. The selected changes will follow along to preserve the line’s slope. Remember, we’re talking about small changes here that are more felt than heard as obvious tempo shifts. You can be off by a few tenths of a BPM, or even more—no one will notice.
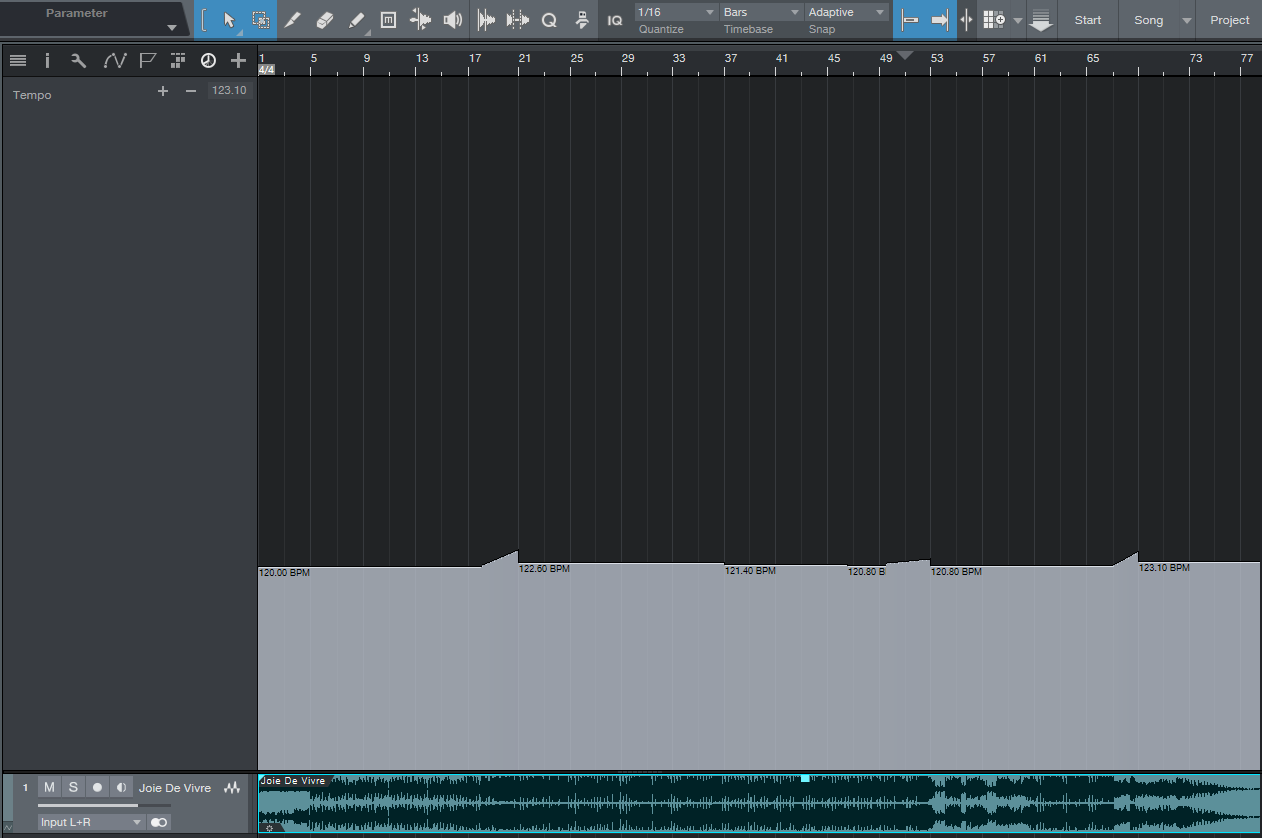
The screen shot shows a mastered song after having tempo changes made. I like to extend the tempo track height as much as possible so it’s easy to make fairly precise changes. Note the linear changes that happen before the two choruses about 1/3 and 2/3 through the song, and then another before the final fadeout on the main riff. In the middle, there’s also a slightly slower tempo change during the solo.
Try this technique on your finished songs—you might be surprised about how these can help a song “breathe” and flow more, even if it was recorded to a click track.