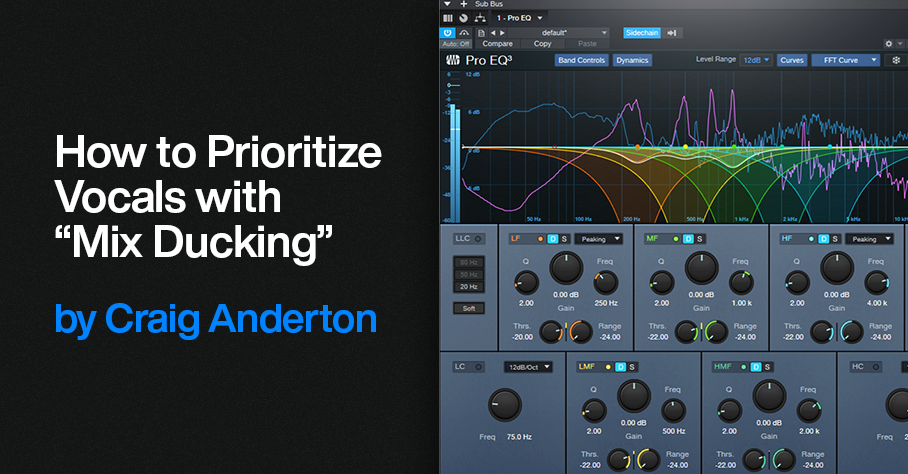
How to Prioritize Vocals with Mix Ducking
This complements the tip Better Ducking for Voiceovers and Podcasts and the tip Why I Don’t Use Compression Anymore. It applies the concept of voiceover ducking to your entire mix. Here’s the TL;DR: Insert the Pro EQ3 in a master bus, feed its sidechain from your vocal track, and adjust the Pro EQ3’s dynamic EQ to reduce the vocal frequencies in the stereo mix. When done subtly, it makes the voice stand out more, because the mix behind it stands out less.
Create a Secondary Main Bus
Inserting the Pro EQ3 in the Main bus won’t work, because the vocal goes to the Main bus. So, any dynamic EQ would affect the voice as well as the mix, which we don’t want. The solution is to create a secondary Main bus. We’ll call it the Sub Bus.
1. Select all your tracks in the mix (click on the lowest-numbered track and shift+click on the highest-numbered track).
2. Ctrl/Cmd click on the vocal track to de-select it. The other tracks should still be selected.
3. Right-click on one of the selected tracks and choose “Add Bus for Selected Channels” (fig. 1).
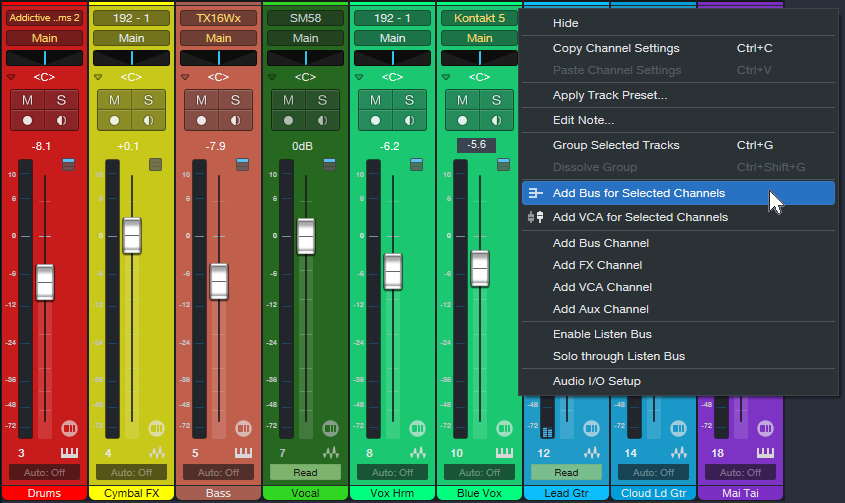
Figure 1: All tracks are selected except for the Vocal track (7). They’re about to be re-assigned from the Main bus to the new Sub Bus.
4. The new Sub Bus feeds the Main bus. Confirm that all track outputs go to the Sub Bus except for the Vocal track, which still goes to the Main bus. Now we can process the Sub Bus independently of the Vocal.
5. Insert a Pro EQ3 into the Sub Bus. Insert a Send from the Vocal track to the Pro EQ3’s sidechain. Fig. 2 is a simplified signal flow diagram.
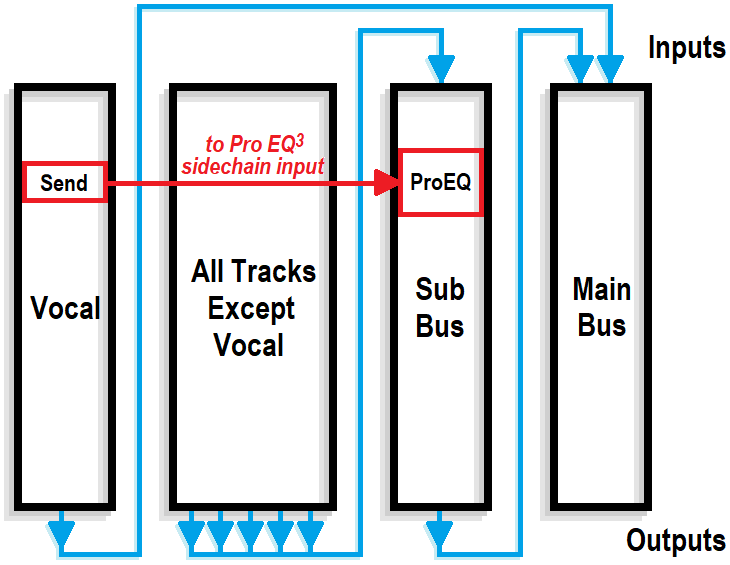
Figure 2: All tracks except the Vocal go to the Sub Bus. The Sub Bus out and Vocal out go to the Main bus. A send from the Vocal track drives the sidechain of a Pro EQ3 inserted in the Sub Bus.
6. Now comes the most important part—choosing the optimum dynamic EQ settings. The goal is to add dynamic cuts at frequency ranges that correspond to the voice. The settings in fig. 3 are a good start for experimenting with this process:
- The Frequencies are set an octave apart
- The Ranges are at their maximum negative values
- The Q settings are 2.0
- The Sidechain is enabled for the signal coming from the vocal
7. Adjust the Threshold for each stage so the vocal peaks trigger a subtle cut. Fig. 3 shows a range of 12 dB, so the cuts shown are around -2 dB to -3 dB. That may not seem like much, but it’s sufficient to open up space for the vocal.
8. Optimize the setting for each Threshold parameter. To compare the processed and unprocessed sound, turn off the Vocal track’s Send. Don’t disable the Sidechain at the Pro EQ3 instead, or the EQ will respond to the mix’s dynamics instead of the vocal’s.
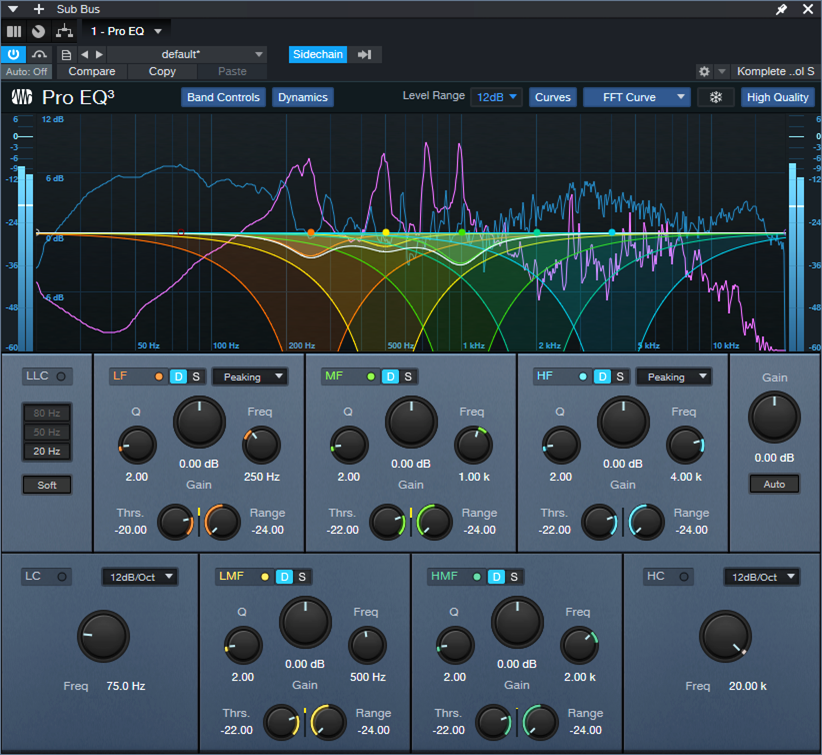
Figure 3: The violet waveform is the Vocal feeding the sidechain. The blue waveform is the stereo mix. The colored curves are the five EQ stages. Set LF and HF to Peaking mode. The wavy white line toward the center shows how much of a cut was occurring when this screen shot was taken.
9. Use the Vocal track’s Send slider to fine-tune the level going to the Pro EQ3’s sidechain.
This technique assumes the vocal has a consistent dynamic range, either from compression or from the techniques in the blog post about why I don’t use compression anymore. Otherwise, loud parts will push the background down further—but a lower level isn’t needed when the vocal is at its loudest. If the vocal’s dynamics are an issue, automate the Vocal track’s Send to reduce the amount of cut for loud vocal sections.
Because there are so many variables, there are many ways to optimize the sound:
- Narrowing the Q may provide much of the benefits of this technique without affecting the submix as much.
- You might not want to set the Range parameter as low as it is in fig. 3, so that there are “guardrails” against the Threshold settings being too low and causing too deep of a cut.
- Broadening the Q makes the effect cover a wider frequency range, so you may not need to cut as much (fig. 4). This is more like the traditional ducking used in voiceovers.

Figure 4: Broader Q settings give less focused cuts.
Remember that this technique’s intention is to add a subtle enhancement—it’s not a cure for a mix, arrangement, or vocal that needs work. However, it can provide that extra little something that makes a vocal stand out a bit more and fit more comfortably into a mix.