Don’t Make This Mixing Mistake!

By Craig Anderton
Do you think of mixes in absolute terms, or relative terms? Knowing the difference, and when to apply which approach, can make a huge difference in how easily mixes come together. This can also affect whether you’re satisfied with your mixes in the future.
Mixing is about achieving the perfect balance of all of a song’s tracks. When you start mixing, or if you mix in parallel with developing a song, your mixing moves are absolute moves because you haven’t set up the relationship among all the tracks yet. For example, the guitar might be soft compared to the drums and bass, so you increase the guitar’s level. At that point, you don’t yet realize that when a piano becomes part of the mix, the guitar will mask it to some degree. So, now you’ll need to readjust the guitar’s level not only with respect to the drums and bass, but also in relation to the piano.
The further your mix develops, the more important the relative balance among all the levels becomes. Remember: Any change to any track has an influence on every other track. I can’t emphasize that enough.
A Different Way to Finish a Mix
At some point, your mix will be “almost there.” That’s when you notice little flaws. The drums are a bit overpowering. The bass needs to come up. The background singers don’t have quite the right balance with the lead vocal. Two keyboard parts are supposed to be the same level, but one is slightly louder.
The absolute approach to addressing those issues would be to make those changes. The kick comes down a bit. The bass comes up. You balance out the background singers and the keyboards. Then you render another mix to see if the problems have been addressed. It’s better, but now the bass is masking the low end of the keyboards. So, you bring up the keyboards a bit, but now they step on the background vocals…
If you’re not concentrating on how the tracks fit together in relative terms, then you’ll constantly be chasing your tail while mixing. You’ll keep making a series of absolute adjustments, and then wonder why relatively speaking, the mix doesn’t gel.
The Relative Approach to Mixing
VCA Channels are the key to relative mix edits, because they can offset tracks easily compared to the rest of the mix. Take the example above of the drums being a bit overpowering, the bass too soft, etc. Rather than try to fix them all at the same time, here’s what I do:
1. Choose the issue that seems most annoying. Let’s suppose it’s the drums being overpowering. I always start with fixing tracks that are too loud instead of too soft, because lowering the level of the loud track will make all the other tracks louder, relatively speaking.
2. Select the drum tracks (or drum bus) and choose “Add VCA for Selected Channels.”
3. Lower the VCA channel for the drums by (typically) -0.5 dB, but no more than -1.0 dB.
4. Not change any other track levels. Now it’s time to render a new version of the mix, and live with it for a day.
Having softer drums will change the relative perspective of the entire mix. Maybe the bass wasn’t that soft after all; maybe it was just masked a bit by the kick. Maybe the rhythm guitar is actually louder than it seemed, because its percussive strums were blending in with the drum hits—but the strums weren’t noticeable until the drums were softer. And so on.
That -0.5 dB of difference will change how you hear the mix. -0.5 dB may not seem like much, but that’s just one perspective. A different perspective is that it’s making every other track +0.5 dB louder than the drums. So, you need to evaluate the mix with fresh ears, because that one change has altered the entire mix.
An advantage of using VCA channels is that when you add the VCA Channel, its initial setting is 0.0. It’s easy to see how much you’ve offset the track level with the VCA, compared to (for example) changing a drum bus fader from -12.6 to -13.1. It’s also easy to get back to where you started in case after listening to the track, you decide other tracks were the problem, and the drums need to return to where they were. Just reset the VCA to 0.0.
Let’s suppose that after listening to the rendered version a few times at different times of the day, it seems like the drums fit in much better with the overall mix. Make the change permanent by de-assigning the tracks to the VCA Channel, and then removing the VCA Channel. (Or, leave it in and hide it if you think you might need more changes in the future.)
Next, let’s suppose the bass still seems a little soft. I’ll repeat the four steps listed above, but this time with the bass track, and raise it by +0.5 dB (fig. 1). Then it’s time to render the track again, and live with it for a day.
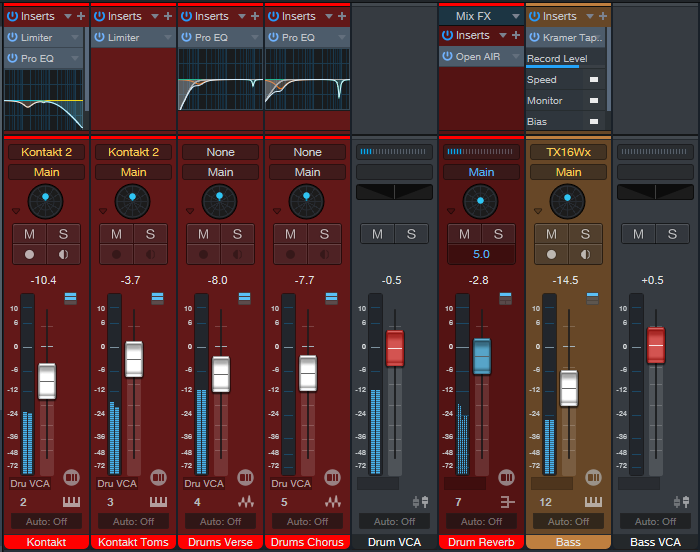
Figure 1: A VCA channel has altered the drum mix by -0.5 dB. That VCA Channel is about to be removed, because -0.5 dB turned out to be the right amount. Meanwhile, a VCA Channel has been added to see if increasing the Bass level by +0.5 dB helps it fit in better with the mix.
It might seem that this one-track-at-a-time approach would take forever, especially because sometimes you may need to revise earlier changes. But it can save time, for two reasons:
- Mixing sessions don’t go on for hours. Because you listened to the rendered mix with fresh ears and know what you need to change, you make the change. After rendering the new mix, you’re done for the day, aside from listening to it several times under various conditions. Your final mixes now become 5 to 10 minutes at a time spread over multiple days. An additional advantage is that you always hear the mix with fresh ears, instead of having listener fatigue set in during a long mixing session.
- Often, after taking care of the most problematic tracks, other issues resolve themselves because they weren’t the problem—their relationship to the problematic tracks was the problem. Fixing those other tracks fixes the relationship.
If after repeated listening over a few days (and being brutally critical!) I don’t hear anything that needs to change, then the song is done.
A Corollary to Relative Mixing
This approach is also one reason why I don’t use dynamics processors in the master bus, except for the occasional preview. All dynamics processors are dependent on input levels. As you change the relationship of the tracks, you’re also changing how a master bus’s dynamics processor influences your mix.
Some people say they need to mix through a dynamics processor, because the mix doesn’t sound right without it. I think that may be due to mixing from an absolute point of view, and the dynamics processor blurs the level differences. I believe that if you achieve the right relative balance without using a master bus dynamics processor, when you do add dynamics processing during the mastering process, the balance will remain virtually identical. Your mix will also gain the maximum benefits from the dynamics processing.
Once you start considering when to employ a relative mixing approach compared to a more absolute approach, I think you’ll find it easier to finish mixes—and you’ll end up with mixes you’re satisfied with years later.