String Arrangements Made Simple
Strings can enhance almost any genre of music—and with a little more effort, you can do string arrangements that go beyond simply adding a string pad preset. So, let’s look at how to create a convincing string section intro for a song. To hear the example used for this tip, go to the end, and check out the stereo mix. There’s also a headphones-only Atmos mix that’s rendered to binaural.
Choose Your Instruments
You don’t need a high-end sample library to create string arrangements. The sounds included in Presence are excellent—I often prefer them to mainstream string libraries. The following presets from Presence’s Strings folder (fig. 1) sound wonderful for a string section: Violins > Violin Full, Violas > Viola Full, Cellos > Cello Full, and Contrabass > Contrabass Full. In the audio example, all used the Sustain keyswitch C1 (except C0 for the Cellos).
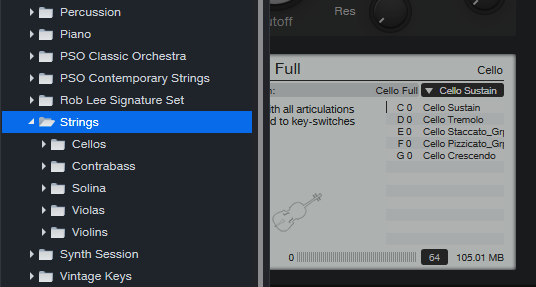
Figure 1: Presence’s Strings folder is your friend for string arrangements.
Group Your Instruments
Place each instrument in its own track, and group them via buses or VCA channels. After setting a balance of the instruments, vary their common bus level to add dynamics while retaining the proper balance. In larger arrangements, you can have individual groups for violins, other strings, brass, percussion, etc. I also use Sends to a common reverb, so that the instruments sound like they’re in the same acoustic space (fig. 2).
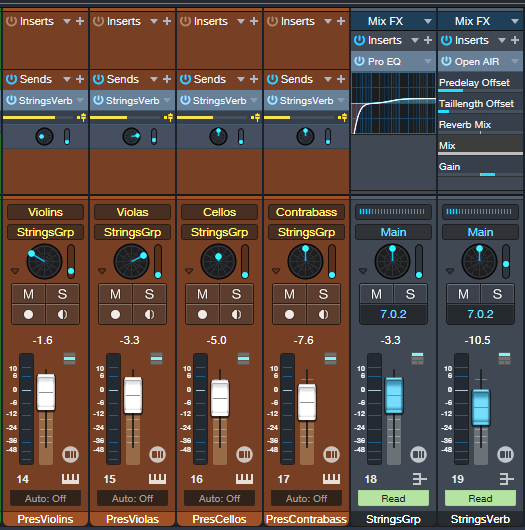
Figure 2: Track layout for the string section, set up for Dolby Atmos. This layout also works with conventional stereo.
Pay Attention to Instrument Note Ranges
The beauty of string arrangements is how the notes from different instruments weave around each other as they create harmonies in the “sweet spots” of their note ranges. (For a crash course in string arrangements, check out Bach’s string quartets.) Players normally don’t play much at the highest and lowest notes of an instrument’s range. Ideally, the notes from different instruments shouldn’t overlap too much. Let each instrument have its own space in the frequency spectrum (fig. 3).
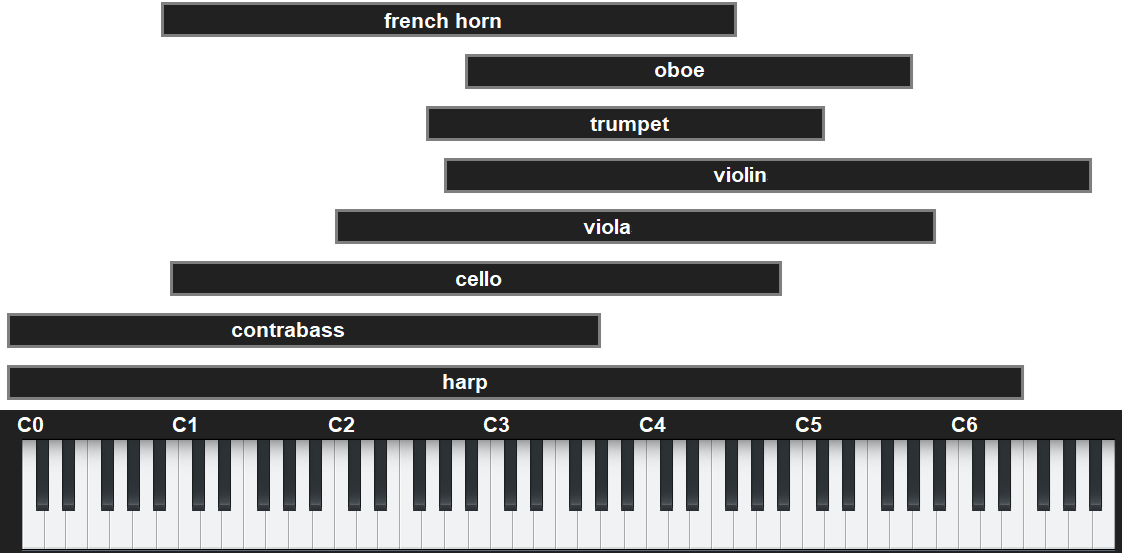
Figure 3: Typical note ranges for various orchestral instruments.
Edit Velocity, Modulation, and Keyswitches
These are all powerful tools for expressiveness. I generally prefer editing velocity rather than level for individual instruments (fig. 4), and edit overall level with the instrument groups.
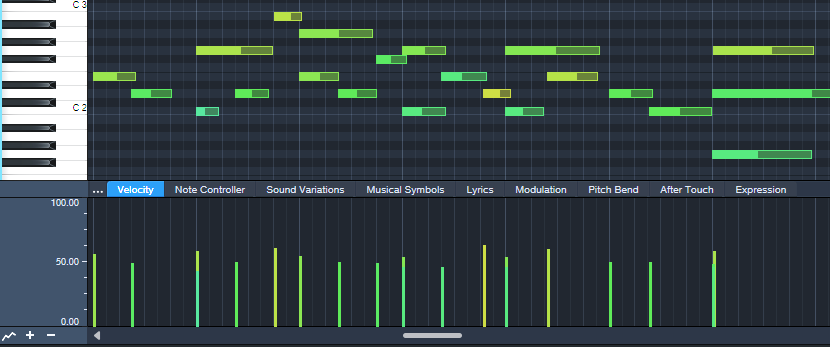
Figure 4: Notes for a violin part, and their velocities.
Modulation and Expression parameters are also essential. Fig. 5 shows vibrato being added to strings. I use the mod wheel for a human touch, but sometimes straighten out modulation changes that “wobble” too much.

Figure 5: Modulation added for violin vibrato.
Keyswitches choose different articulations, which can add variations and expressiveness in longer passages.
Tempo Changes: The Secret Sauce
Ritardandos, accelerandos, and rallentandos are not only important parts of a conductor’s toolbox, they’re the final touch for adding expressiveness in Studio One. Pushing tempo and pulling it back, in conjunction with velocity and modulation changes, gives a sense of realism and sophistication you can’t obtain any other way. Although tempo changes may not be an option if the strings are being added to music cut to a click, in a strings-only section tempo changes are pure gold. Fig. 6 shows the tempo changes used in the audio example.
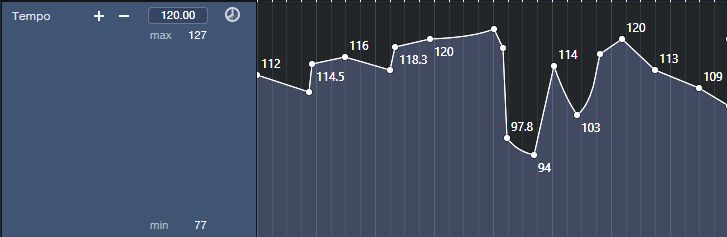
Figure 6: Tempo changes add feel and flow to music.
Let’s listen to all these techniques applied to a string section introduction. Here’s the stereo mix.
And for an extra treat, here’s the Atmos mix, rendered to binaural. You need to listen to it on headphones to preserve the Atmos effect==being rendered to binaural means it won’t sound right over speakers.