Solve Vocal Problems with the De-Esser
Studio One offers several ways to “de-ess” excessive sibilants (“s” sounds). De-essing combines compression and EQ. The EQ focuses on the frequency range where sibilants are most prominent. Then, compression reduces this range’s level when sibilants are present. Prior to version 6, using Multiband Dynamics was the best way to do de-essing.
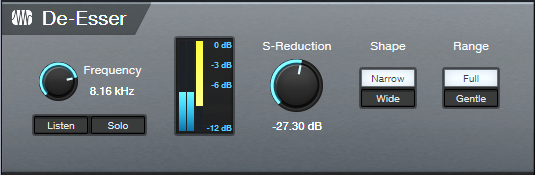
With version 6, the Pro EQ3’s new dynamic EQ functionality is excellent for reducing ess sounds. However, the equally new De-Esser (fig. 1) is designed specifically for the job of fixing excessive sibilance, quickly and effectively.
To get the most out of the De-Esser, note that some of the parameters work together as a team. So, alternating edits between some controls is often the best way to optimize the effect.
Getting Started
Ess sounds tend to be short. By the time you’ve started to tweak a parameter, the ess sound has likely already ended. So, for easy editing, create a short loop on a word with the prominent ess sound.
Frequency and Listen
1. Enable Listen.
2. Vary Frequency until you find the frequency where the ess sound is most prominent.
Solo and S-Reduction
3. After identifying the frequency, enable Solo. You’ll hear only the ess sound whose volume is being reduced.
4. Adjust S-Reduction to get a feel for the optimum ess reduction amount. At 0.00 dB, there’s no reduction. At ‑60.00, sounds in addition to the ess sound will likely be reduced.
5. Next, turn off Solo, and adjust S-Reduction in context with the looped word. Less negative S-Reduction values concentrate on reducing the ess sound’s initial transient. More negative values reduce more of the ess sound past the initial transient.
6. Do a final Frequency parameter check to optimize the high-frequency response with de-essing. For example, you may be able to raise the frequency to retain more highs, yet still have effective ess reduction.
The metering is helpful in optimizing the De-Esser’s settings. The orange meter shows the amount of reduction. The blue meter shows the input level.
How to Use the Shape Parameter
Ess sounds cover a fairly small range of high frequencies. The Narrow Shape is best for this application because it compresses a narrow band. Frequencies above and below that band remain untouched.
In addition to ess sounds, the De-Esser can also reduce “shhh” sounds (e.g., like the shh sound in “action” or “compression”). Shh sounds cover a wider range of frequencies, and often require a lower Frequency setting. For these sounds, the Wide Shape splits the audio into high and low bands, and processes the entire high band.
You may need to do two passes, one with a Wide Shape for shh sounds, and one with a Narrow Shape for ess sounds. Be conservative with the settings for the two passes, because the changes will reinforce each other.
How to Use the Range Parameter
This parameter is the De-Esser’s unsung hero. Setting Range to Full allows the full amount of reduction dialed in by S-Reduction. Gentle Range restricts reduction to ‑6 dB.
The Gentle setting is useful for more than just guaranteeing a subtler effect. With the Gentle Range enabled, you can dial in huge amounts of S-Reduction. This allows processing as much of the ess or shh sound as possible, not just the initial transient. However, limiting the amount of reduction to -6 dB prevents the amount of reduction from being objectionable.
Final Note
The De-Esser is not just for singing, but also podcasts, voiceovers, and narration. It can even reduce harshness with amp sims, as described in De-Esser Meets Amp Sims. And it can probably do other things that are yet to be discovered!