Mic Your Synth—Virtually
You can mic piano, drums, guitar, voice, and other acoustic sources…but you can’t mic a synth, unless you put it through a PA or guitar amp, and then mic that.
Or can you?
Studio One’s Ampire has mic modeling for its various cabs. However, a cab has its own frequency response, which doesn’t sound at all like miking an instrument—it sounds like miking a guitar amp. Sometimes, you want that sound with instruments other than guitar or bass. But usually, you don’t.
Ampire also has a User Cab for loading your own cab impulse responses. So, you could load a room’s impulse response instead, and set up Ampire’s mics. However, then you’re not miking an instrument, you’re miking the instrument in a room. What if you just want the sound of a miked instrument?
Here’s the solution, and I think you’ll be as surprised as I was after pulling up an FX bus fader with the sound of the virtual mics. Check out the audio example: the first half is a plain Mai Tai sound, the second half has the virtual miking. There are no effects, only Ampire’s mics. Of course, this is only one of many possibilities.
How It Works
The trick is to bypass the amp, and load a flat-response impulse into Ampire’s User Cab. Then, the audio doesn’t go through an amp or cab sound before hitting the mics. Simple, right?
The downloadable zip file (link at end) includes three flat-response IRs, each of which has its uses:
- Stereo (dual mono)
- Stereo with reversed left channel phase
- Stereo with reversed right channel phase
Ampire Prep
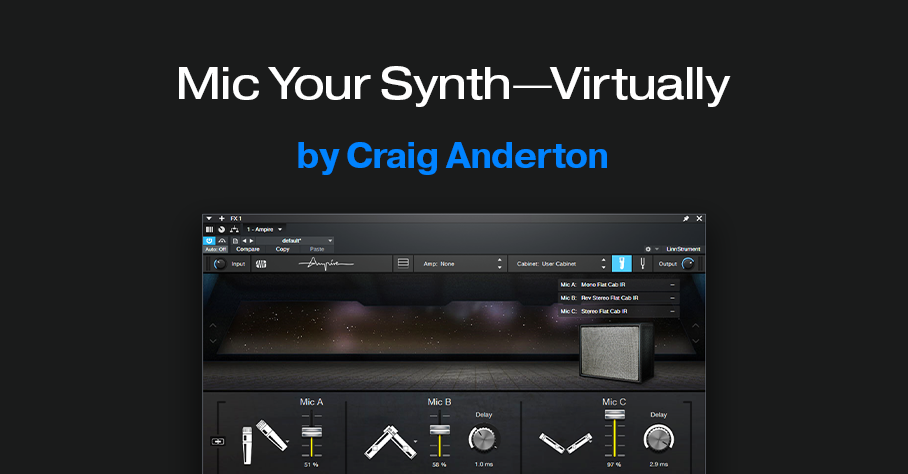
I prefer to set up Ampire in an FX bus, to enable blending the miked sound with the direct sound. However, using the miked sound by itself is viable. See which you prefer. Fig. 1 shows the Ampire settings used for the audio example.

To create the setup:
1. Insert Ampire in an FX bus.
2. Assign a Send to the FX bus from the instrument track you want to “mic.”
3. With Ampire, choose Amp: None and Cabinet: User Cabinet
4. Download and unzip the three impulse responses.
5. Click on the Mic Edit Controls button (the blue button in fig. 1), then click on the + sign next to Mic A. Navigate to your IR of choice, and load it. Or, simply drag the impulse into the Mic’s slot.
6. Similarly, load an IR into Mic B and Mic C. Note: There must be an IR loaded in Mic A, or no sound will pass through Ampire, even if IRs are loaded in Mic B and Mic C. I recommend loading an IR in each one.
7. Go down the fun rabbit hole of mic choices, levels, mic delays, and phase changes.
Extra Tips
- Using an IR with reversed phase for one of the mics can unbalance the stereo image. Compensate by adjusting the Panpot in the Send that goes to the FX Channel.
- In the FX Channel, spreading the stereo image with the panpot’s Binaural function is cool (pre-Studio One 6 owners can use the Binaural Pan plug-in). For the audio example, I turned up the Binaural Pan so the effect would be more dramatic if heard over laptop speakers.
- The audio example mixes the miked sound up quite a bit to get the point across, but subtle settings can add an interesting dimension to synthesized sounds.
- Preceding Ampire with an Analog Delay set for a very short delay (a few milliseconds) and no feedback can enhance the effect further.
- This isn’t just about synths—try this technique with other non-acoustic sounds, like analog drums.
Reminder!
If you bought a previous version of The Huge Book of Studio One Tips and Tricks, you can now download the free version 1.4 update (with 250 tips and 126 free presets) from the PreSonus shop.