How to Get the Most Out of the Channel Editor
By Craig Anderton
The Channel Editor places all of a mixer Channel’s elements—level fader, inserts, sends, individual effects, input controls, routing, macro controls, and more—right at your fingertips. The Channel Editor has three sections: Overview, Macro Controls, and FX Routing, all of which have a useful Toolbar. Let’s explore the many ways the Channel Editor improves workflow.
To show/hide the Channel Editor, click on the Channel Editor button (fig. 1)in a mixer Channel or the Inspector. In the Arrange view, click on the Track number.
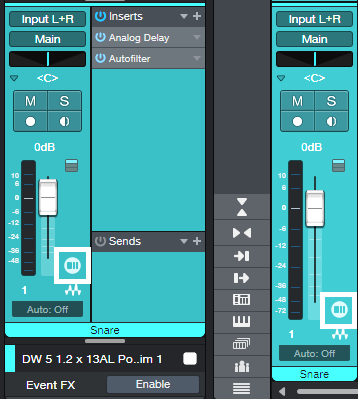
Figure 1: The white outlines surround the show/hide Channel Editor buttons.
The Toolbar
The Toolbar (top of fig. 2) has icons to select the three main Channel Editor sections. Tabs are also available to select any of the Channel’s effects. From left to right, the options are:
Channel Overview (three vertical bars icon). This consolidates track parameters, inserts, sends, cue mixes, and more in a single GUI. It also accommodates Micro View expand/collapse option for effects, and Fader Flip. If you like to work mostly in the Arrange View, the Channel Overview offers deep, per-channel editing without needing to open the Mix View.
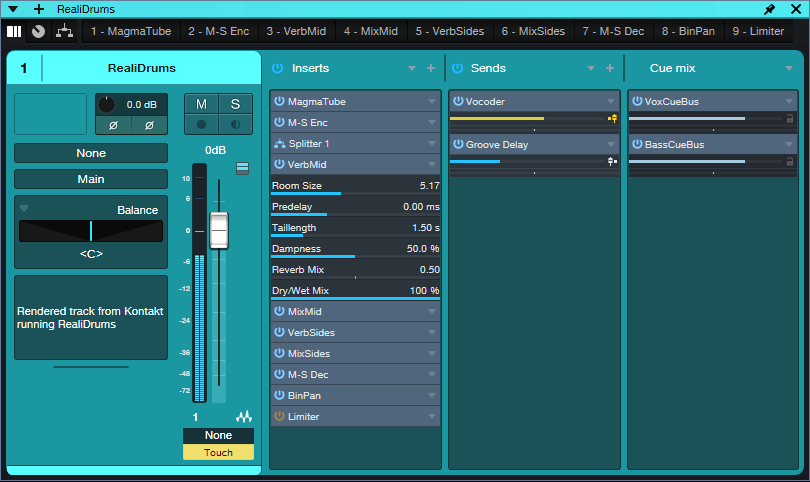
Figure 2: Channel Editor Overview. Note the Toolbar at the top.
Macro Controls (knob icon). Click to open a Panel where you can add up to 8 virtual knobs, 8 virtual buttons, and two X/Y pads. Assigning these controls to effect parameters can consolidate your most-used parameters in a single GUI, which reduces or eliminates the need to open individual effects interfaces. Macro controls can also modify multiple parameters simultaneously, like turning up gain when adding more compression. This is much easier than going back and forth among multiple knobs to tweak an effect.
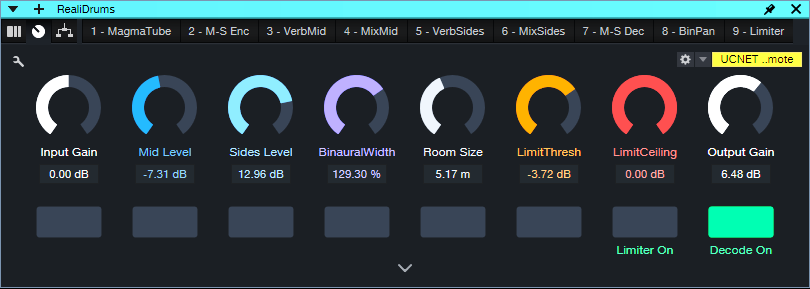
Figure 3: Macro Controlsused for my M-S Room Reverb Extended FX Chain.
Routing Window. For series effects, this shows the effects order. Additional controls cover input and output levels to the insert effects. However, the Routing Window’s most useful feature is being able to show and edit the routing for parallel and series/parallel effects.
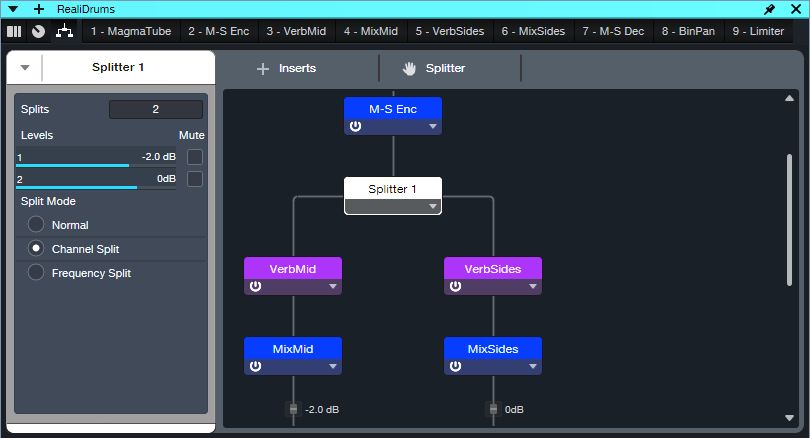
Figure 4: Routing Window for the M-S Room Reverb Extended FX Chain. Not all the effects are visible in this image, but the Routing Window is resizeable, and there’s also a vertical scroll bar. Only two splits are shown, but a Splitter can create up to five splits.
Insert Effects Tabs. These select individual effects for editing.
- Click on an effects tab (or double-click on an effect in the Routing Window), and the effect’s UI replaces the Channel Overview.
- Rearrange the order of series insert effects by clicking on an effect’s tab, and dragging left or right to the desired position. With parallel effects, use the Routing Window to rearrange the order of effects.
- If an effect is selected in the Toolbar, you can skip left and right in the effects chain to select a different effect. Use the keyboard shortcuts Ctrl+Page Up and Ctrl+Page Down, respectively.
Tab Drop-Down Menus. Several plugin management functions are available directly from the Channel Editor. Fig. 5 shows the tab drop-down menu for a third-party effect, which includes one more option than native effects.

Figure 5: With third-party plugins, an additional option allows updating the effect thumbnail.
- Rename is super-helpful when there are several instances of the same effect. For example, fig. 2 shows the insert effects for mid-side reverb. It uses four Mixtools. Normally, their tabs would just say Mixtool. Renaming allows differentiating in the Toolbar between the Mixtool Encoder, Decoder, and level controls for the Mid and Side audio.
- Choosing Favorite adds the current effect to the list of Favorites.
- The drop-down menu also lets you Disable, Enable, Remove, and select Plug-in Nap.
- Show in Console highlights the channel hosting the effect. This is handy when you have pinned instances of the same plugin that are hosted in different channels. If the channel is hidden, choosing Show in Console makes it visible. Show in Routing opens up the Routing Window.
- Update Plug-in Thumbnail appears only with third-party plugins. It updates the thumbnail that the effects Browser displays if Show Thumbnails is selected(the icon to the right of the effects Browser Wrench button).
Channel Overview Applications
When the Channel Editor is open, it follows Channel selection. This is particularly useful in three scenarios.
- A Narrow mixer view with lots of tracks. To start, open any Channel Editor. Now when you click on a narrow channel, the Channel Editor follows your selection. This makes it easy to edit a Narrow channel’s parameters without having to expand the channel. Note that a Narrow channel doesn’t expose the Channel Editor’s show/hide button, so either click on a track number, or double-click on a narrow channel to change its mode to Normal and reveal the Channel Editor button.
- When you need to see as many tracks as possible in the Arrange view. Opening the Channel Overview makes it easy to edit Channels without opening the Mixer view. This is ideal for those who like to work primarily in the Arrange view.
- Handling Channels with many insert effects. A single click in the Channel Editor opens an effect, compared to double-clicking on insert effects in a mixer Channel.
Visibility Tip
If Tracks or Channels are hidden, and a Channel Editor is open, click on a hidden Channel in the Channel List (or a hidden Track in the Track List) to open the associated Channel Editor.
Fig. 6 shows a song where I was working primarily on keyboard and vocal parts, so the guitar tracks were hidden. But I could still do quick edits on the hidden guitar Channels if they affected the keyboard or vocal parts. Also, to retain as much Arrange View real estate as possible, you can “hide” the Sends and Cue Mix sections by moving part the Channel Overview past the right side of the screen.
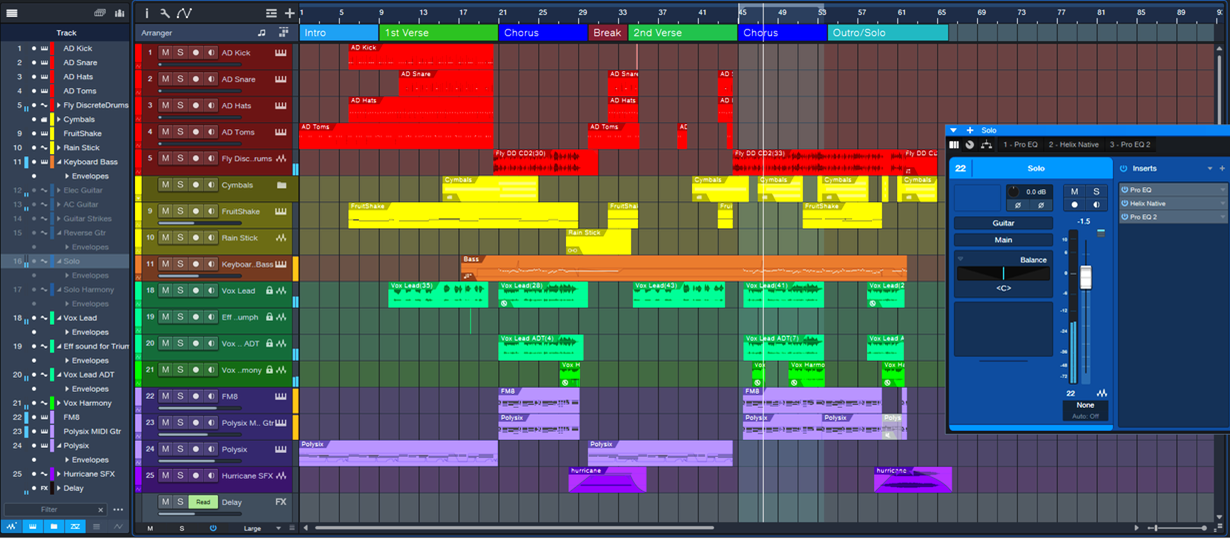
Figure 6: If you’re working primarily in the Arrange View, the Channel Editor gives you deep Channel editing without having to open the mixer.