Monthly Archives: August 2024
Keyswitching with Smaller Keyboards
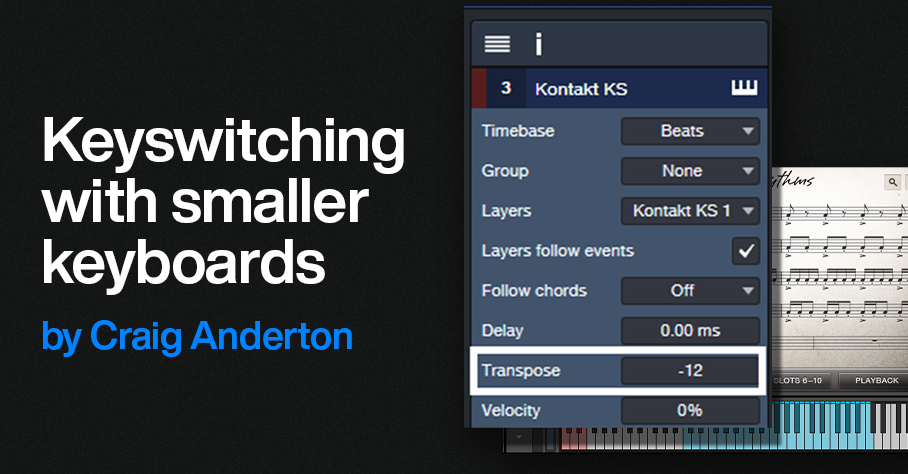
By Craig Anderton
Keyswitch keys enhance expressiveness by letting you trigger various real-time articulations for instruments like strings, brass, guitars, and so on.
A previous blog post covered Studio One’s Sound Variations. This protocol incorporates and enhances traditional keyswitching. However, some instruments (e.g., Kontakt, SampleTank) don’t implement Sound Variations. An issue with standard keyswitching is that the keyswitches are often placed on the keyboard’s lowest octaves, so the instruments assume you have at least a 5- or 6-octave keyboard. With a 4-octave keyboard, you may not be able to access the keyswitches and all the available notes at the same time.
Overdubbing keyswitch notes defeats the goal of real-time expressiveness. Dedicating an external mini-keyboard or pad controller like ATOM can generate keyswitch notes in real time, but may not be as convenient as triggering keyswitches from your keyboard controller. (Previous blog posts on using a mini-keyboard or ATOM for keyswitching are no longer available online, but see The Huge Book of Studio One Tips & Tricks, 2nd Edition for updated versions of these tips.) Fortunately, there are ways to do traditional keyswitching with keyboards that may not seem to have enough range.
The TL;DR Overview
1. Assume the virtual instrument’s keyswitch keys are C0 to E0.
2. Create two instrument tracks, a “Notes” track and a “Keyswitch” track. Assign both to your virtual instrument. These will essentially end up being keyboard splits.
3. Transpose the Keyswitch track down so that the keyboard’s lower keys (e.g., C1 to E1) trigger the C0 to E0 keyswitch range.
4. In the Keyswitch track, insert an Input Filter Note FX that covers the keyboard range C1 to E1 (the same range as the keys that trigger the keyswitches).
5. In the Notes track, insert an Input Filter Note FX that extends from the first key above the highest keyswitch (in this case, F1) to the top of the instrument’s note range.
Now you have a split keyboard, with the lower split triggering keyswitches and the upper split playing notes. Read on for details on how/why this works, and real-world applications.
Basic Use Case: Simple Keyswitch Fix
Keyswitches usually start at C0. Many acoustic instruments don’t extend down this low. If there are unused keys between the keyswitches and the available notes (fig. 1), the fix is simple.
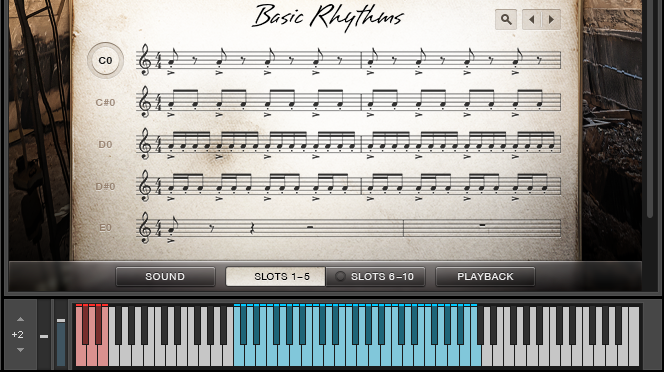
Figure 1: Native Instruments’ Action Strings has three octaves of notes (colored blue) starting at C2, and five keyswitched notes (colored red) starting at C0.
Moving the keyswitches up an octave so that they start at C1 fits the notes and keyswitches in a four-octave keyboard. To do this with a virtual instrument like Action Strings:
1. As mentioned above, create Keyswitch and Notes Instrument tracks. Assign them to the virtual instrument.
2. Open the Keyswitch track’s Inspector. Set Transpose to -12 (fig. 2).Now, C1 to E1 will cover the C0 to E0 keyswitch range.
Figure 2: This transposes C1-E1 in the Keyswitch Instrument track down to the keyswitch range.
3. However, there’s a problem. If you play (for example) C4, the Notes Instrument track will send a C4 to the virtual instrument. That’s fine, but simultaneously, the Keyswitch Instrument track will send a C3 to the virtual instrument because it transposes its input down -12 semitones. To avoid unintentional notes, insert an Input Filter Note FX in the Keyswitch instrument track. Set the Input Filter range as C1 – E1 (fig. 3). The Input Filter blocks any notes from reaching the virtual instrument unless they trigger keyswitches.
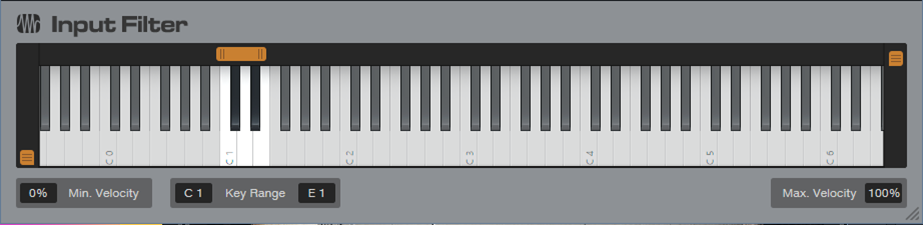
Figure 3: The Input filter passes only notes in the range of C1 to E1.
Now, C1 to E1 trigger the C0 to E0 keyswitches, while C2 to C5 trigger notes. Everything fits in a four-octave keyboard (fig. 4).

Figure 4: By moving the keyswitches to C1 – E1, it’s possible to play all notes and all keyswitches within a four-octave range.
Note that in this case, the Notes track doesn’t need an Input Filter Note FX. Although the C1 to E1 keys also trigger notes C1 through E1 via the Notes track, this doesn’t matter because the Kontakt preset doesn’t assign anything to these notes.
Advanced Use Case: Keyswitch Fix that Requires a Tradeoff
SampleTank’s Violins Multi preset (fig. 5) has over an octave of keyswitches and over 3 octaves of notes. Fortunately, I rarely (if ever) use the notes above C5. By limiting the highest note to C5, everything can squeeze into a four-octave keyboard by creating a Keyswitch Instrument track and transposing it down an octave. The goal is to create a split where C1 through F#2 play keyswitches, while G2 through C5 play notes.
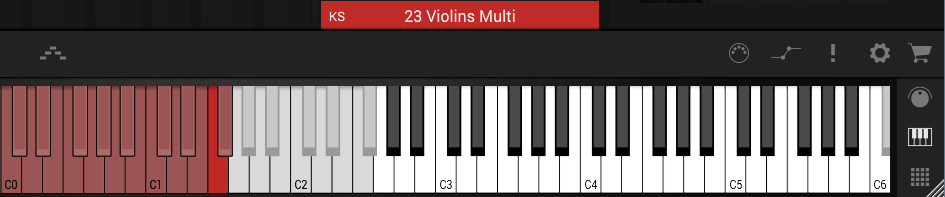
Figure 5: SampleTank’s 23 Violins Multi preset has over an octave of keyswitches (colored red) starting at C0. Shifting the keyswitches to C1 makes all the keyswitches available, with the tradeoff of not being able to play notes above C5.
As with the previous example, the virtual instrument receives Note data from two tracks. Transpose the Keyswitch track down by -12 semitones so keyboard keys C1 – G#2 trigger the keyswitches at C0 – G#1. However, because the keyswitches cover more than an octave, transposing these new keyswitch assignments downward means keyswitch notes can overlap. For example, if you play C1, the Keyswitch Instrument track will transpose it down to hit the keyswitch at C0. That’s what we want. But the Notes Instrument track will also let the C1 through, so it will trigger the C1 keyswitch.
The solution is to insert an Input Filter Note FX in the Notes Instrument track that restricts its range to notes above the keyswitches. Similarly to the previous example, the Keyswitch Instrument track will transpose any note down by -12 semitones. This means that if you play C4, the Keyswitch Instrument track will play C3. So, insert an Input Filter Note FX in the Keyswitch Instrument track that restricts notes to the range C1 to F#2. Then it will transpose only notes that trigger keyswitches (fig. 6).
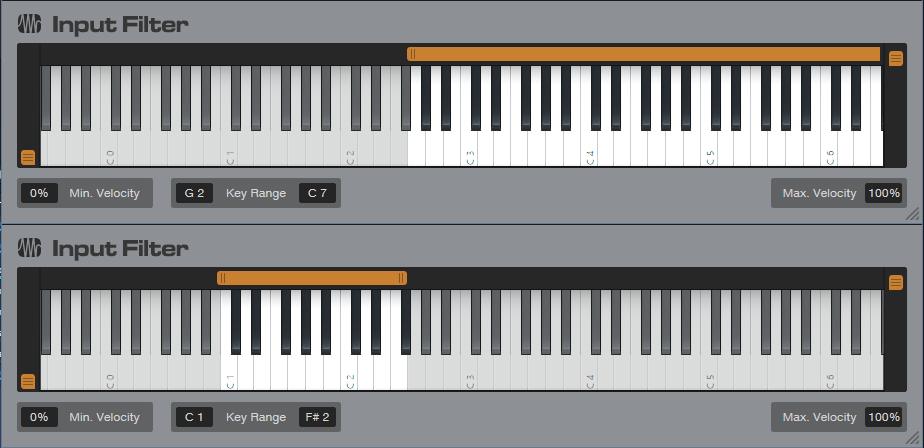
Figure 6: Restricting the note range on the Notes Instrument track (upper Input Filter) prevents doubled keyswitch keys. Restricting the range on the Keyswitch track (lower input filter) means only the keyswitch notes play back an octave lower, and don’t trigger any higher notes.
This may seem complex, but once you try this technique in a real-world situation, it will make sense. Granted, Sound Variations dramatically simplify keyswitching, but at least there are alternatives for instruments that use traditional keyswitching.
How to Get the Most Out of the Channel Editor
By Craig Anderton
The Channel Editor places all of a mixer Channel’s elements—level fader, inserts, sends, individual effects, input controls, routing, macro controls, and more—right at your fingertips. The Channel Editor has three sections: Overview, Macro Controls, and FX Routing, all of which have a useful Toolbar. Let’s explore the many ways the Channel Editor improves workflow.
To show/hide the Channel Editor, click on the Channel Editor button (fig. 1)in a mixer Channel or the Inspector. In the Arrange view, click on the Track number.
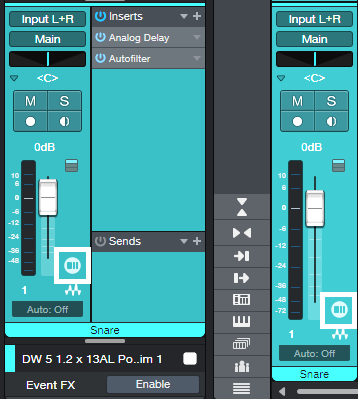
Figure 1: The white outlines surround the show/hide Channel Editor buttons.
The Toolbar
The Toolbar (top of fig. 2) has icons to select the three main Channel Editor sections. Tabs are also available to select any of the Channel’s effects. From left to right, the options are:
Channel Overview (three vertical bars icon). This consolidates track parameters, inserts, sends, cue mixes, and more in a single GUI. It also accommodates Micro View expand/collapse option for effects, and Fader Flip. If you like to work mostly in the Arrange View, the Channel Overview offers deep, per-channel editing without needing to open the Mix View.
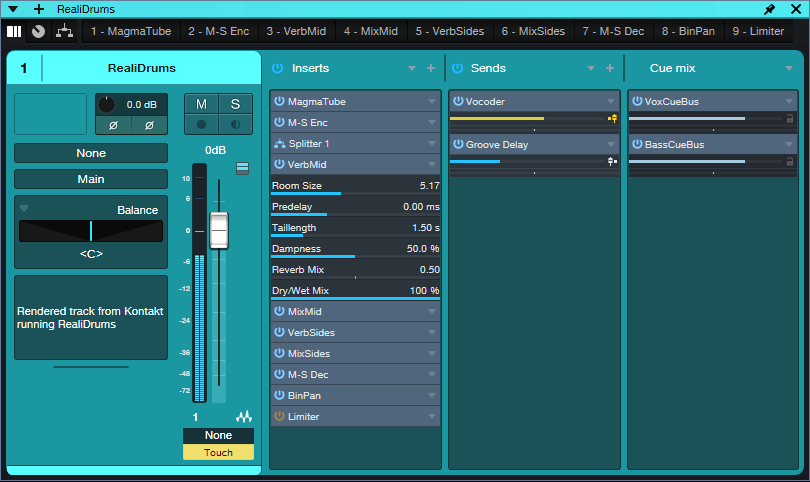
Figure 2: Channel Editor Overview. Note the Toolbar at the top.
Macro Controls (knob icon). Click to open a Panel where you can add up to 8 virtual knobs, 8 virtual buttons, and two X/Y pads. Assigning these controls to effect parameters can consolidate your most-used parameters in a single GUI, which reduces or eliminates the need to open individual effects interfaces. Macro controls can also modify multiple parameters simultaneously, like turning up gain when adding more compression. This is much easier than going back and forth among multiple knobs to tweak an effect.
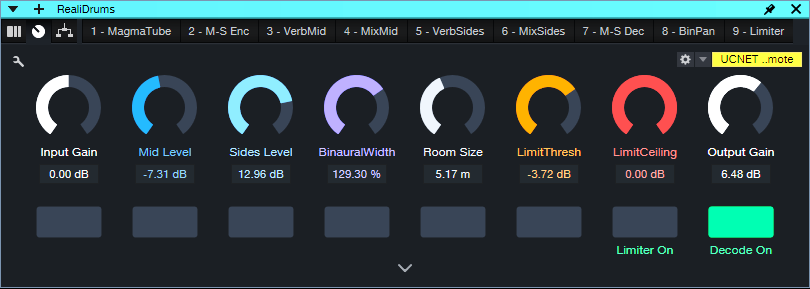
Figure 3: Macro Controlsused for my M-S Room Reverb Extended FX Chain.
Routing Window. For series effects, this shows the effects order. Additional controls cover input and output levels to the insert effects. However, the Routing Window’s most useful feature is being able to show and edit the routing for parallel and series/parallel effects.
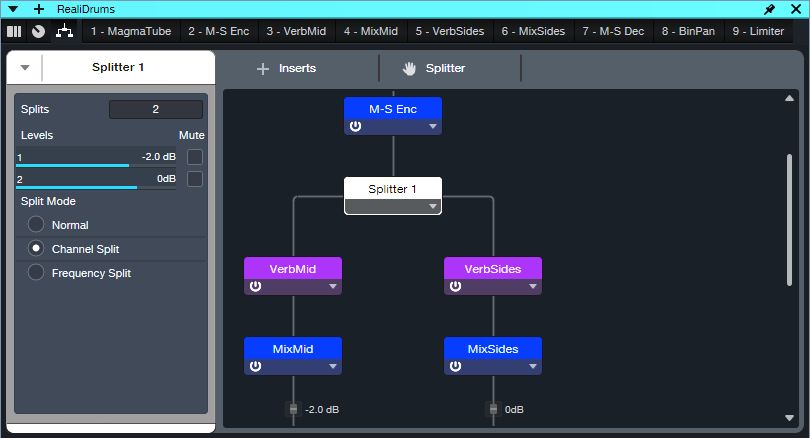
Figure 4: Routing Window for the M-S Room Reverb Extended FX Chain. Not all the effects are visible in this image, but the Routing Window is resizeable, and there’s also a vertical scroll bar. Only two splits are shown, but a Splitter can create up to five splits.
Insert Effects Tabs. These select individual effects for editing.
- Click on an effects tab (or double-click on an effect in the Routing Window), and the effect’s UI replaces the Channel Overview.
- Rearrange the order of series insert effects by clicking on an effect’s tab, and dragging left or right to the desired position. With parallel effects, use the Routing Window to rearrange the order of effects.
- If an effect is selected in the Toolbar, you can skip left and right in the effects chain to select a different effect. Use the keyboard shortcuts Ctrl+Page Up and Ctrl+Page Down, respectively.
Tab Drop-Down Menus. Several plugin management functions are available directly from the Channel Editor. Fig. 5 shows the tab drop-down menu for a third-party effect, which includes one more option than native effects.

Figure 5: With third-party plugins, an additional option allows updating the effect thumbnail.
- Rename is super-helpful when there are several instances of the same effect. For example, fig. 2 shows the insert effects for mid-side reverb. It uses four Mixtools. Normally, their tabs would just say Mixtool. Renaming allows differentiating in the Toolbar between the Mixtool Encoder, Decoder, and level controls for the Mid and Side audio.
- Choosing Favorite adds the current effect to the list of Favorites.
- The drop-down menu also lets you Disable, Enable, Remove, and select Plug-in Nap.
- Show in Console highlights the channel hosting the effect. This is handy when you have pinned instances of the same plugin that are hosted in different channels. If the channel is hidden, choosing Show in Console makes it visible. Show in Routing opens up the Routing Window.
- Update Plug-in Thumbnail appears only with third-party plugins. It updates the thumbnail that the effects Browser displays if Show Thumbnails is selected(the icon to the right of the effects Browser Wrench button).
Channel Overview Applications
When the Channel Editor is open, it follows Channel selection. This is particularly useful in three scenarios.
- A Narrow mixer view with lots of tracks. To start, open any Channel Editor. Now when you click on a narrow channel, the Channel Editor follows your selection. This makes it easy to edit a Narrow channel’s parameters without having to expand the channel. Note that a Narrow channel doesn’t expose the Channel Editor’s show/hide button, so either click on a track number, or double-click on a narrow channel to change its mode to Normal and reveal the Channel Editor button.
- When you need to see as many tracks as possible in the Arrange view. Opening the Channel Overview makes it easy to edit Channels without opening the Mixer view. This is ideal for those who like to work primarily in the Arrange view.
- Handling Channels with many insert effects. A single click in the Channel Editor opens an effect, compared to double-clicking on insert effects in a mixer Channel.
Visibility Tip
If Tracks or Channels are hidden, and a Channel Editor is open, click on a hidden Channel in the Channel List (or a hidden Track in the Track List) to open the associated Channel Editor.
Fig. 6 shows a song where I was working primarily on keyboard and vocal parts, so the guitar tracks were hidden. But I could still do quick edits on the hidden guitar Channels if they affected the keyboard or vocal parts. Also, to retain as much Arrange View real estate as possible, you can “hide” the Sends and Cue Mix sections by moving part the Channel Overview past the right side of the screen.
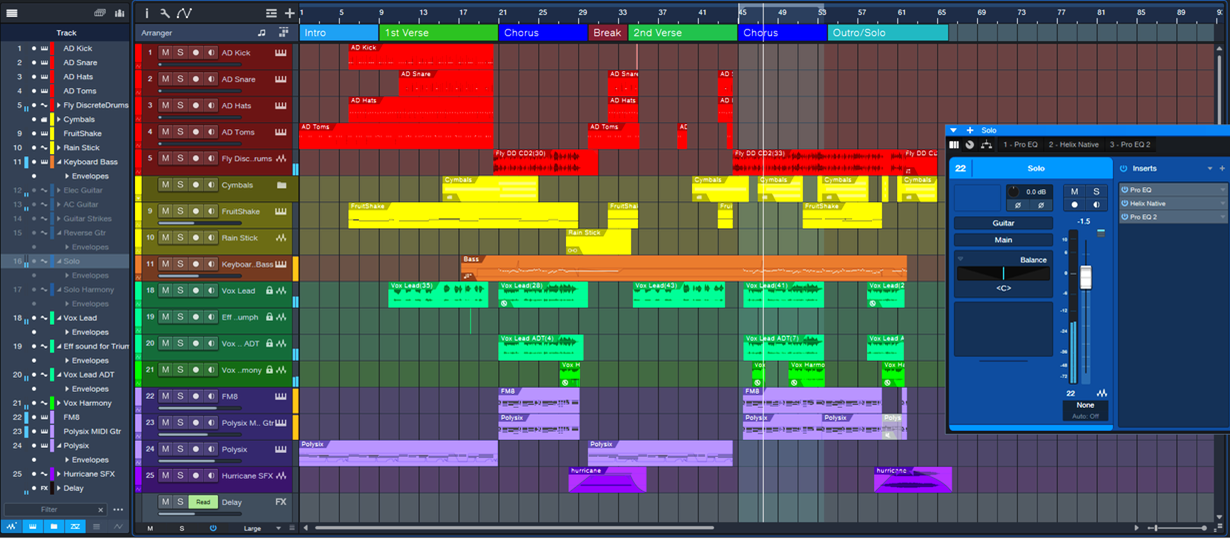
Figure 6: If you’re working primarily in the Arrange View, the Channel Editor gives you deep Channel editing without having to open the mixer.
Free Download: 25 “Analog” Cab IRs!

By Craig Anderton
Yes, just click here to download 25 Analog Cab IRs.zip. The IRs are 1024 samples long, 48 kHz, 24-bit, and mono, so they work with pretty much any amp sim. In addition to Ampire, I tested them with BIAS FX and BIAS Amp, Blue Cat Audio Axiom, Headrush ReValver, IK AmpliTube, Line 6 Helix, NI Guitar Rig, Overloud TH-U, STL Tones Howard Benson, and Waves PRS Supermodels.
The Backstory
Hopefully some of you were brave enough to try the technique in Grab Cab Impulses for Ampire from Any Amp Sim, or became interested in EQ-based cabs from the tip “Create Ampire Cabs with Pro EQ3”(no longer available online, but included in The Huge Book of Studio One Tips and Tricks, 2nd Edition). However, it takes a lot of EQ to create a convincing cabinet—I often use as many as 20 Pro EQ3 stages. So, because y’all have been so supportive of these blog posts, I thought you might appreciate downloading some cool IRs rather than having to roll your own.
The IRs are EQ-based versions of the stock Ampire cabs (the names are the same, but the IRs have _EQ as a suffix). As to why I’d bother making IRs of existing cabs, the FIR (Finite Impulse Response) digital filters used for amp sim IRs have a particular sonic character. Although accurate, they can have a “thin” sound quality. I sometimes prefer the fatter “analog” sound of EQ-based cabs. The more neutral response also lends itself well to additional editing with EQ and other processors.
Using the IRs
1. Unzip 25 Analog Cab IRs.zip.
2. Select Ampire’s User Cab. (Other amp sims will have some kind of IR loader feature.)
3. Drag the IR on top of the User Cab, or into the Cab’s Mic A slot.
4. Although you won’t have the miking options of the stock cabs, you can use more than one IR to modify the sound (fig. 1). The result is essentially a morph of the loaded IRs. The Mic Edit Mute, Phase, Delay, and Volume controls are all active. Note that there must be an IR in the Mic A slot. A second IR would go in the Mic B slot, and a third in the Mic C slot.

Figure 1: Two IRs are providing an analog-sounding cabinet for the MCM 800 amp.
Of course, you may prefer the sound of Ampire’s stock IRs. But give the analog cabs a try, and compare the stock sound with the EQ-based sound. Some sounds are close, some are different, but the EQ-based cabs provide useful—and at least to my ears, often preferable—variations.
How It Works: Creating the Impulses
If you’re curious about the process, I sent pink noise to two channels. One had the source Ampire Cab. The other had three or four Pro EQ3 plugins in series. Both channels were followed by spectrum analyzers. The goal was to match the stock cab’s curve as closely as possible with EQ, with a few exceptions for personal preferences. Fig. 2 shows curves for the 4×12 Gazoline cab.
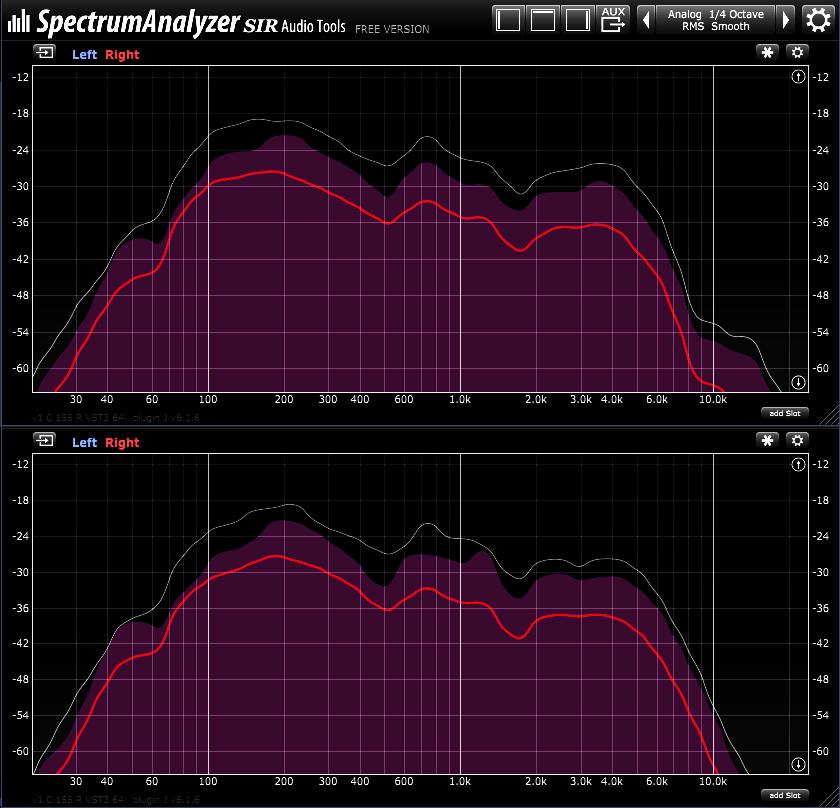
Figure 2: Stock cab’s response curve (top) and EQ-based cab’s response curve (bottom).
Fig. 3 shows the curves from three Pro EQ3s needed to create a curve for the 2×12 Boutique cab.
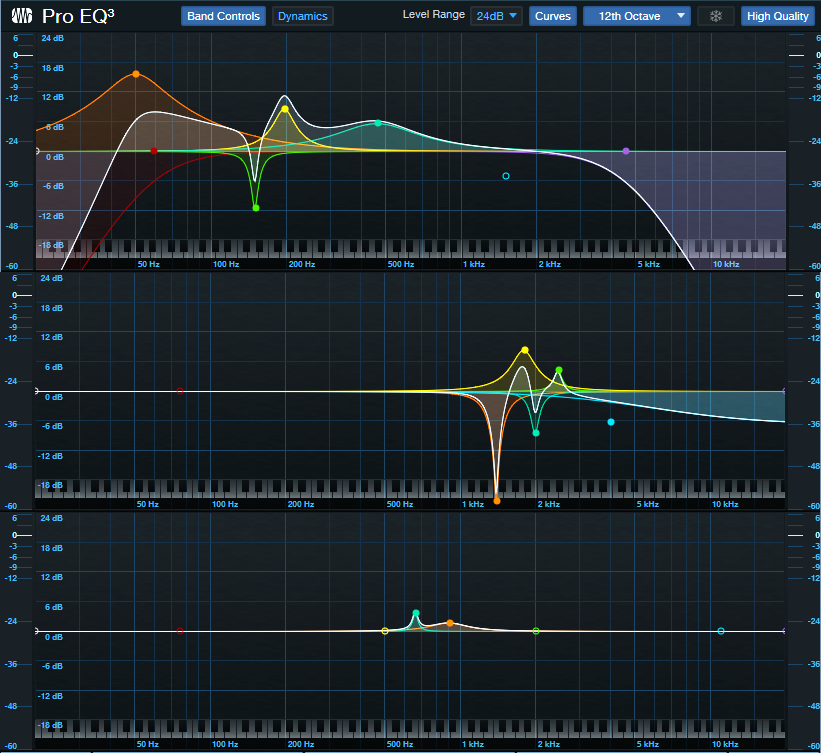
Figure 3: These EQ curves emulate the 2×12 Boutique cab.
To create the actual IR, another channel used the IR Maker, preceded by copies of the EQs needed to create the cabinet’s response curve. For more information on creating EQ-based IRs, see Grab Cab Impulses for Ampire from Any Amp Sim. Instead of inserting a cab prior to the IR Maker, insert the EQ stages needed to create the sound you want.