Creative FX Sound Design

By Craig Anderton
It’s been a while since we’ve had a post for sound design fans. So, let’s create some crazy FX for sci-fi/suspense/horror movies, DJ breaks, or even background sounds for weird social media videos. We’re going to convince Studio One that feedback is good, and in the process, nail some of the early electronic music sounds from the 50s—before synthesizers walked the face of the earth. Check out the audio examples at the end.
It’s All About the Feedback
Inserting processors in a feedback loop allows altering the feedback effects. Note that I didn’t say “controlling” the feedback effects, because feedback is a highly unpredictable process. So, part of this tip involves real-time recording of the effects you create. Then, you can cut the best parts, process them further, do transposition, crossfade different sections to cut out the unusable parts, and so on.
It’s helpful to create a dedicated sound design Song Setup (fig. 1). This setup requires a patch cord to connect an audio interface output to the same-numbered audio interface input. In this case, the output is mono but it could also be stereo. That would require two patch cords connecting like-numbered audio interface inputs and outputs.
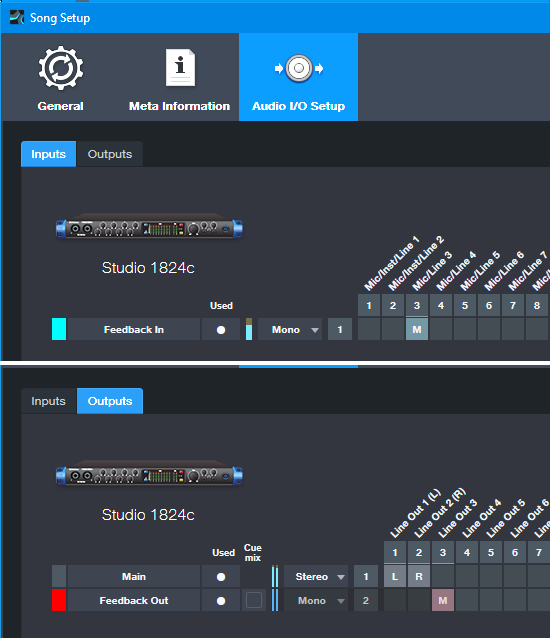
Figure 1: Song Setup for creating a feedback loop inside Studio One. This uses the Studio 1824c’s Mic/Line 3 for the Input and Line Out 3 for the output.
The Channel Layout
Fig. 2 shows the channel layout. Here’s how it works.
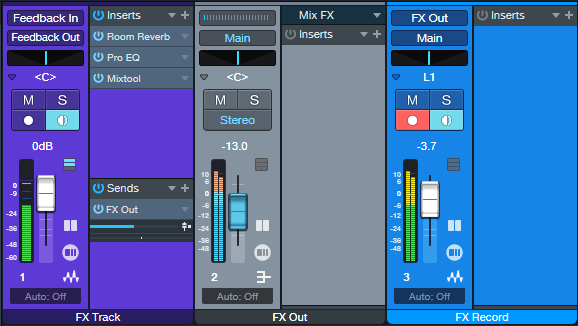
Figure 2: Channel layout to create feedback-based sound effects.
The sound creation occurs in the FX track’s channel. Set the channel input to the Sound Setup’s Feedback In, and the output to Feedback Out. So, the output feeds back to the input through the physical patch cord. Note that the Input Monitor must be on.
Insert effects to process the feedback. Some effects are more useful than others. The Pro EQ3 is one of my favorites, but Rotor, Reverb, using the Tone Generator to initiate feedback, and several others are also fun. Also try using the Vocoder, with a separate track of white noise feeding its sidechain.
Feedback effects generate a lot of signal level. Normally we’d just set up a track to record the FX Track’s channel, but the FX channel fader also affects the feedback. It’s best to keep it at a fixed level. So, a Send from the FX channel goes to the FX Out bus. The FX Out bus’s output goes to the FX Record channel’s input. This gives two ways to vary the recording level: The Send from the FX Channel, and the FX Out bus fader.
Recording Time
Now it’s time to get crazy. It takes a while to get the feel of how to control this, so keep the monitor levels way down. Seriously. You don’t want to damage your ears.
Start off with just the Pro EQ3. At first, you probably won’t hear anything because the feedback hasn’t started up yet. Increase the gain of various EQ stages, and the feedback will kick in. Change gain, frequency, and other parameters of various EQ stages to change the feedback’s character.
Once you get a sense of how the process works, start recording. One cool trick is to do multiple automation passes. Record one pass varying one stage’s parameters, then in Touch mode, do a second pass varying a different stage’s parameters.
The Final Process
After recording your sound sources, process them further. Time- and pitch-stretching is helpful, but so is flanging, various impulses for the Open Air, Ampire’s amps and effects, and so on. You’ll get sounds you can’t obtain any other way…like the following 1-minute audio example, which plays five short snippets of different sound effects.