Tag Archives: Studio One
The Latest Banging Add-Ons in the PreSonus Shop!

Click here for more!
New from PreSonus – Tom Brechtlein Drum Loops
Get Tom Brechtlein’s Drums HERE!
Friday Tip: The TonalVerb
Okay, Studio One isn’t lacking for reverb. Nor is the rest of the world. But we also aren’t lacking for tools to make new kinds of reverb sounds, and that’s what this week’s tip is all about.
Note that the TonalVerb is a bus effect, so don’t insert it in a track. (Or, do insert it in a track—you never know what might happen!) As with last week’s tip there’s a preset you can download, but I recommend reading about how this preset works. FX Chains are very powerful, and once you learn what you can do with them, you can create your own signature sounds instead of sounding like everyone else.
HOW IT WORKS

A Splitter, set to Normal mode, feeds two Mixverbs in parallel. One of the parallel paths goes through a Mixtool with both channel phases (polarities) inverted, so the summed audio cancels. Except… one Mixverb has damping fixed at 50%, while the other is variable (as set by the FX Chain Tone control). With both Damp controls at 50%, there’s no audio due to cancellation. However setting damping below 50% cancels the low frequency reverb components, yet the high frequency reverb components remain. With damping set above 50%, the reverse occurs—the high frequency reverb components cancel, while the low frequency components remain. The closer Tone is to 50%, the greater the cancellation so you may need to increase the bus level under these conditions.
This effect is very different compared to altering tone via equalization for several reasons, but the main one is that damping varies over time. At the onset of the reverb, there’s more cancellation because the two parallel signals have more in common. This reduces the attack of the signal being reverberated, which has its own uses—for example, you might want the crack of a drum to be more prominent, rather than being washed in reverb. With tone set to 0% and Size at a relatively high value (e.g., 70%), it’s almost like the reverb has an attack time of its own.
Regarding the other FX Chain controls, Predelay, Size, and Width all vary their respective Mixverb controls simultaneously over their full ranges. The only one that works differently, as noted above, is the Tone (damping) control.
So… why be normal? Here’s your chance to try a different type of reverb sound that’s especially well suited to EDM productions.
Friday Tip: Old School-Style Tape Variable Speed
Back in the days of variable-speed analog tape, we often cheated and sped up the master just a bit. This had three beneficial effects: it made the tempo a bit more lively, raised the pitch for a slightly brighter sound, and tightened timing. Even a 2% change could make a significant difference. (If you ever tried to play along with an old pop tune and found your instrument had to be tuned somewhat sharp, this is probably why.)
Digital technology gave us a major advance by making it possible to change tempo without changing pitch, or change pitch without changing tempo. Curiously, though, there aren’t as many options if you want to change both simultaneously. Fortunately, Studio One can do this easily.
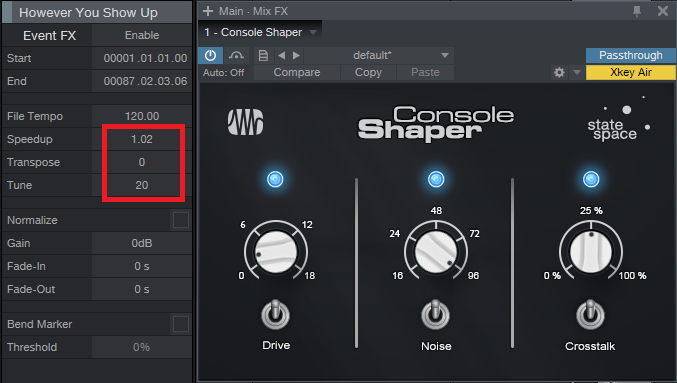
The key is the Inspector’s Speedup and Tune parameters. A speedup of 2% is about right for making a noticeable, but not obvious change; however many older masters were sped up a lot more than that, so don’t feel too constrained. For Tune, 20 cents works well as a general-purpose setting but again, there are no rules about this other than to use your ears.
If you enter these changes and then go back to 0 for the two settings, the song will sound less lively. However it’s important to acclimate yourself to any changes, either speeding up or “bypassed,” before making any final decisions about what sounds best.
Note that I much prefer to do any master speed/tune change processing on the finished, two-track mix instead of while working on a song. That way I don’t need to remember to set the Speedup and Tune on each track, or render loops so I can use the needed parameters.
And since we’re in old school territory, consider adding a bit of Console Shaper as well from the Mix FX drop-down. I seldom push drive above 9 o’clock for program material, and some crosstalk makes the sound a bit more speaker-like when wearing headphones (with headphones, you don’t get acoustical crosstalk like you do with speakers, where the left ear hears some of the right speaker, and vice-versa). As to noise…well I’m not a fan of noise, but with some tracks, it does add a little “glue.” Or maybe it just triggers the psychological response of working with older gear.
The audio example plays an excerpt from the remix of “To Say No Would Be a Crime” (from my album “Simplicity”). The first 19 seconds are the original version, the rest of the example speeds it up by 1.02 with a pitch increase of 40 cents. The complete song is available on YouTube/thecraiganderton.
In any case, when you want your music to be a little more lively, brighter, and tighter, try raising the Speedup and Tune parameters just a bit. It really does make a difference.
Friday Tip of the Week: Patterns: Not Just for EDM
Some people see “Pattern” and think “step sequencing—not useful for anything other than EDM.” This tip shows how to use Patterns in a rock drum context to add humanized percussion easily and effectively.
First, let’s subject ourselves to a 16th-note pattern of shaker hits, which is the kind of sound that shows why people don’t like step sequencers. Someone who would use this in a musical context is either not a nice person, or perhaps a pharmaceutical company executive who wants to increase sales of headache remedies.
Let’s start improving matters by copying the shaker to two more pads, and creating some sonic variations.
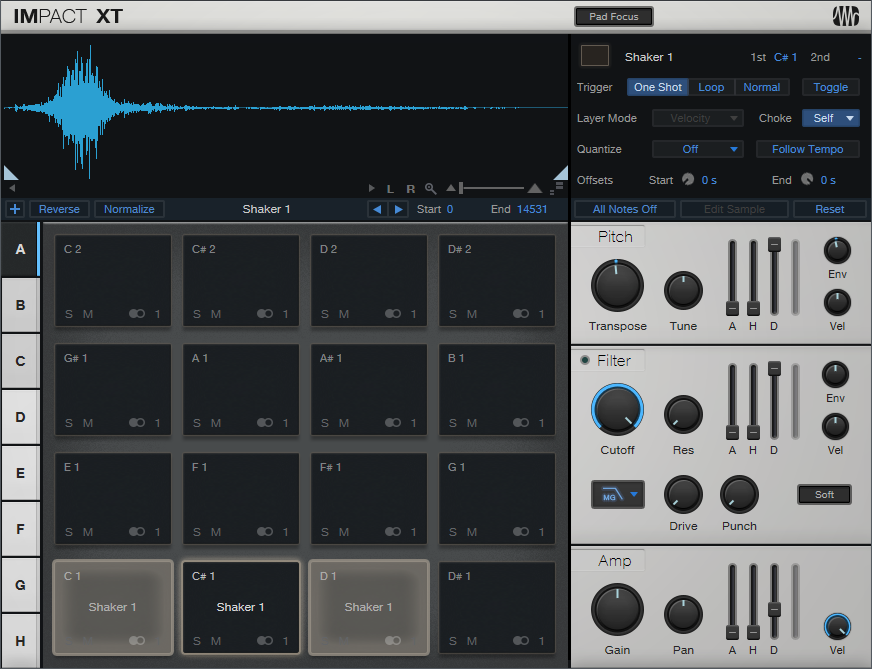
One copy is transposed down two semitones, and has a shorter decay. The other is transposed down three semitones. All three have slightly different filter settings. By alternating the different sounds, we have something that’s better. Well, at least slightly better.
Let’s make it a lot better. We’ll make sure the original shaker sound hits at maximum velocity on every beat to establish a rhythm.
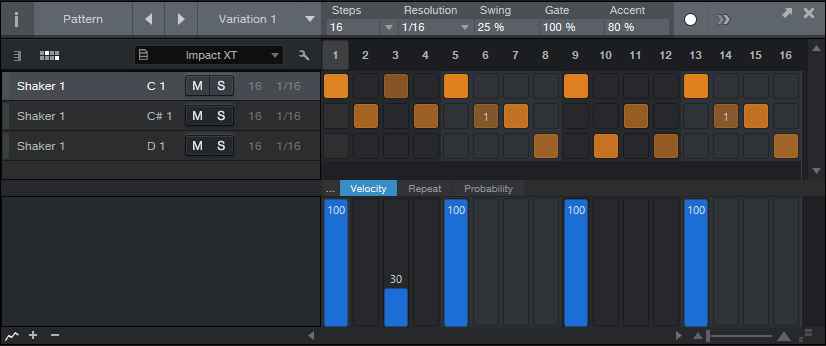
The second row uses a different shaker sound. Because this is a busier part, we’ll create some velocity variations.

Let’s also introduce some repeats so that two of the hits “stutter” a little bit.

However having repeats happen the same way every time doesn’t sound very realistic, and this is where the Pattern’s coolest feature (well, at least in my opinion) comes into play—Probability. The notes with repeats have a fairly low probability, so they’ll show up from time to time but not overstay their welcome. A few of the other notes have lower probability as well. Also, there’s some added swing—not only are Patterns not just for EDM, swing isn’t only for hip-hop.

Now we have a much more interesting shaker part.
If this is too inconsistent for you, it’s easy to make the velocity more similar, increase probabilities…whatever. And of course, we can create variations on these Patterns, make a few changes here and there, and have them sound similar yet different throughout the song.
Thankfully, Patterns don’t have to sound repetitive and boring…unless of course you want them to sound repetitive or boring. But that’s a whole other topic.
Friday Tip: The Customizable Phaser
Studio One’s Phaser is quite sophisticated, especially because you can set the number of stages from 2 to 20. This can emulate many classic phasers, as well as go beyond what was done with typical analog phase shifters. So why do we need yet another phase shifter?
As explained last week, a phaser’s response is like an EQ with multiple notches, because a pair of phase shift stages produces one notch. So for example, if you set Studio One’s Phaser to 8 stages, it produces four notches. The Customizable Phaser differs from standard phasers because every filter stage can be either a notch or peak, to any degree you want. Mixing resonant peaks in with notches produces a sound that recalls a phase shifter, but has a uniquely resonant quality.
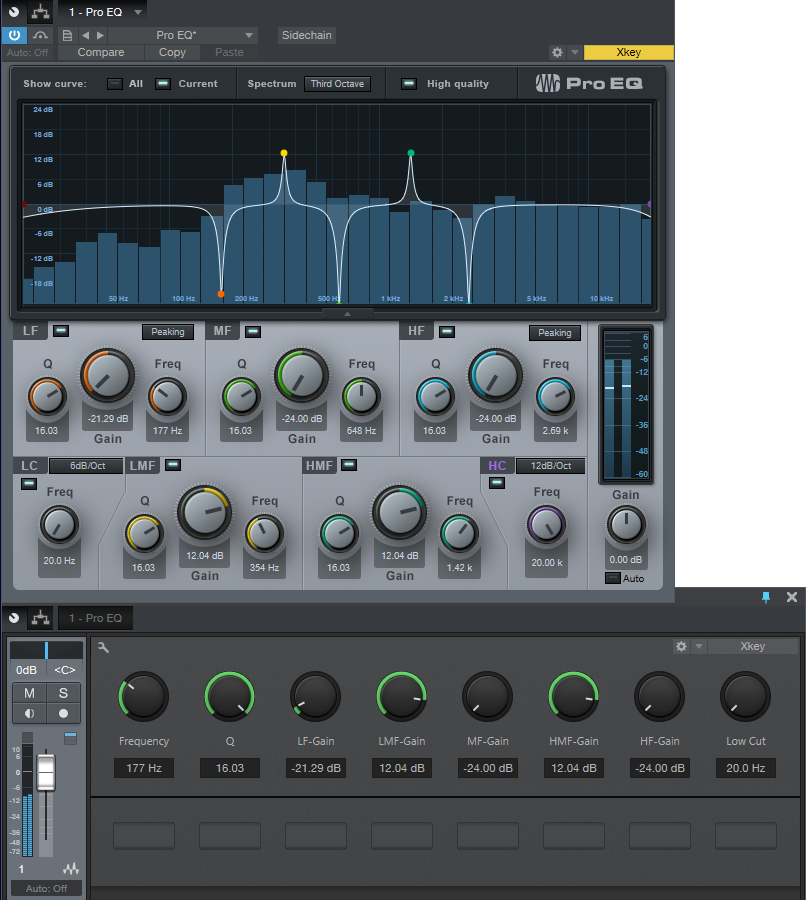
Again like last week, the Pro EQ is the star of the show. The five parametric stages are spaced an octave apart and cover a four-octave range. The trick is having a single Frequency control alter all five stages simultaneously… here’s how.
Creating the FX Chain
Although there’s a downloadable preset, delving into how this effect works is instructive. Mapping a control panel knob to a stage’s gain control is easy; open up the control panel to access the Macro Controls Mapping, and for the five Gain knobs, chose the respective Gain parameter as a target. I limited the knob’s range to -24 dB and +18 dB, because a +24 dB peak can be too much gain. After adjusting one knob as desired, copy the graph and paste it into the graph for the other knobs. Map Q similarly; a range of 4 to 16 works well.
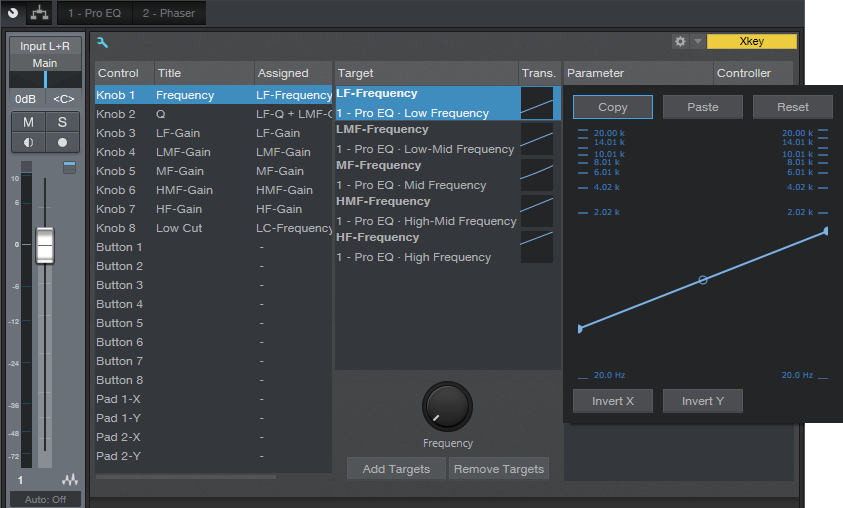
Mapping and offsetting multiple parameters from a single knob is a little more difficult. Start by pinning both the Pro EQ and the Macro Controls Mapping windows. I chose the initial frequencies for the five stages as 75, 150, 300, 600, and 1200 Hz. For the Knob 1 macro, add each stage’s Frequency control as a target.
Suppose you want to map the LF-Frequency target. Set the Frequency knob full counter-clockwise, click on the target’s graph, and while looking at the LF Freq knob on the Pro EQ, adjust the graph’s low node so that the LF Freq knob is at 75 Hz (or thereabouts). Now turn the Freq control fully clockwise, and set the graph’s high node four octaves higher (1.2 kHz) according to the LF Freq knob.
Proceed to the next filter Freq knob and use the same general procedure. For example for the LMF stage, the initial frequency would be 150 Hz, and the highest frequency would be 2.4 kHz. Continue mapping the remaining stages until all the filters cover the desired range when you move the Frequency control.
You’ll also note the Low Cut control is mapped to a knob that covers the range of 20 Hz to 1 kHz. Use this if the signal becomes too “boomy” with the frequency control set to a lower range.
In use
With all the Gain controls set to minimum and a fairly sharp Q, you have the equivalent of a 10-stage phaser. Now try increasing the LMF and HMF gains to around 8 or 9 dB—you’ll hear an immediate difference in the sound. Vary the Q for even more variations. You’ll find that between the Q and Gain controls, it’s possible to obtain phase-shifter sounds, but more importantly, you’ll be able to dial in combinations of resonant peaks and notches that aren’t quite like anything you’ve heard before. Ready for a new phase in phaser sounds? Check out this FX Chain.
Friday Tip: The Project Page Meets Bluetooth
The Project Page Meets Bluetooth
After mastering a project, I like to check out its suitability in a variety of contexts by listening to it over and over again—in the foreground, in the background while people are talking, while the dishwasher runs, whatever. This can be very instructive when trying for masters that are transportable not just for different playback systems, but for different listening conditions.
And that’s when it hit me: Bluetooth! I have IK Multimedia’s iLoud portable Bluetooth speaker, and carry it around the house to listen to music that’s streaming from a mobile device. Why not carry it around while listening to a mastered Project? Or even loop a Song, so I can get lyric ideas while the instrument tracks play in the background? Or listen over other Bluetooth devices, to get an idea of the type of sonic violence the music will have to endure at the hand of consumers?
Okay, so I was a little slow to tumble to this…but reality checks can indeed be useful, and I hope you find this tip useful as well. We’ll do the Mac first, and then Windows.
Mac
1. Choose Apple menu > System Preferences > Bluetooth.
2. Turn on Bluetooth at the Mac if it isn’t already.
3. Turn on your Bluetooth playback device, and enable pairing for it (usually by pressing a pairing button on the device).
4. When the Connection Request appears, click Connect.
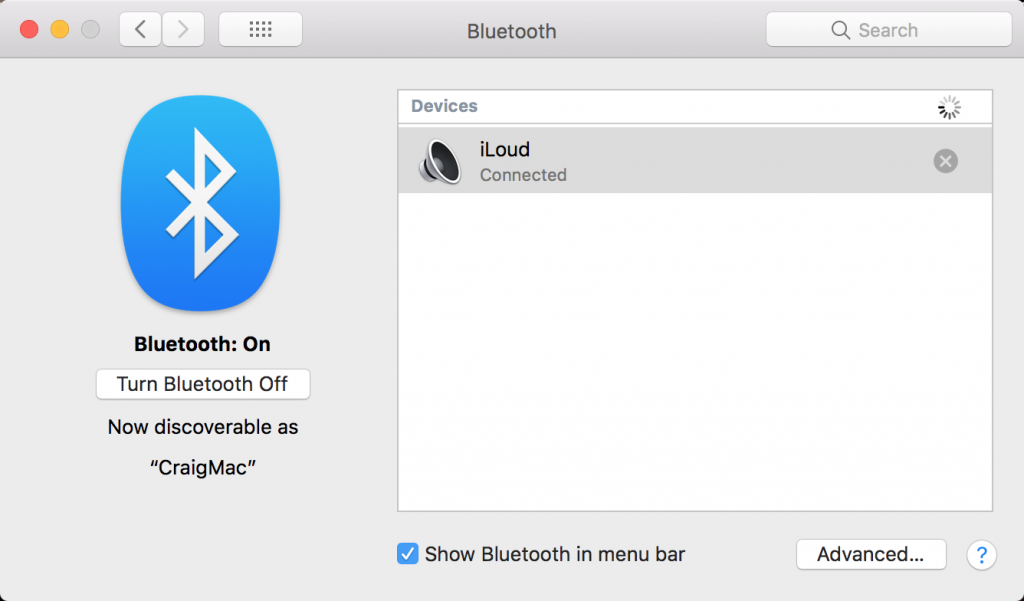
5. The Bluetooth window will show the device as connected.
6. In Studio One, choose Preferences.
![]()
7. For Playback Device, choose your Bluetooth playback device.
Windows
1. Choose Settings > Devices > Bluetooth & other devices.
2. Turn on Bluetooth in Windows if it isn’t already.
3. Click on Add Bluetooth or other device, then choose Bluetooth when Add a Device appears.
4. Turn on your Bluetooth playback device, and enable pairing for it (usually by pressing a pairing button on the device).
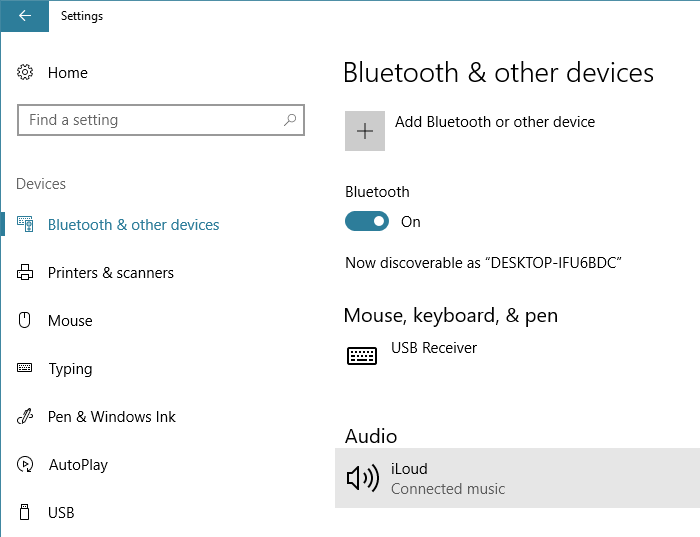
5. Click on the device name to connect it. Once it’s connected, click on Done.
6. In the Windows search box, type Sound and then select Sound Control Panel.
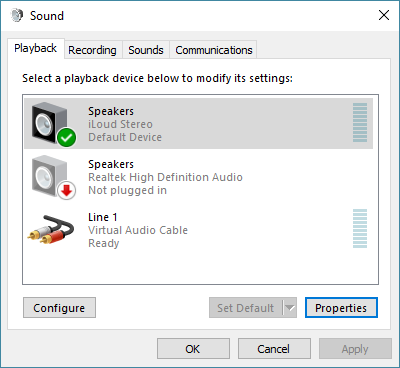
7. Your Bluetooth device should appear in the list of potential playback devices. Click on it, and then click Set Default to make the Bluetooth device your default playback device.
8. Now that Windows is set up, open Studio One, and choose Options. Select Windows Audio for your Audio Device, and you’re good to go.
Friday Tip: Pedal Power
Here’s a follow-up to last Friday’s tip on creating an authentic sounding wah with the Pro EQ. That’s fine, but what if you want to control it with a footpedal instead of a mouse? Keep reading.
First, you need a pedal that generates MIDI data. There are several options. Most keyboard controllers have an expression pedal input. Plug an expression pedal into this, and the controller will likely output controller 11 over MIDI. You may be able to assign this to a different controller number (see your hardware’s documentation); however, this probably won’t be necessary.
If you don’t have a keyboard (or floor multi-effects with a pedal that produces MIDI out), then check out the Pedal Controller, a small box from MIDI Solutions. This accepts an expression pedal input and outputs your choice of MIDI controllers. (For do-it-yourselfers, the circuit board is small enough you can probably mount it in a pedal if you want a stand-alone MIDI pedal.)
Assuming you’re using a keyboard with an expression pedal input, you now need to add the control surface to Studio One if you haven’t already. Call up the Options menu, and add the keyboard. Here, I’ve added The Laboratory controller from Arturia.
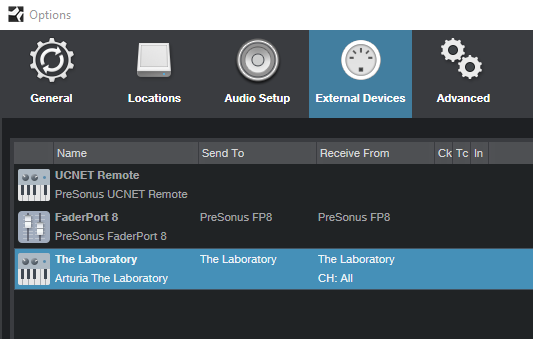
Next, you need to map the pedal. Go to the right-hand side of the Control Link menu and select the device to open the Device Control map. Note that The Laboratory is selected as the device.

If you can’t see the right section of the Control Link menu, then your monitor resolution is probably 1600 pixels wide or less. Another way to open the Device Control map is to open the Mix view [F3], and then click on External in the Console navigation column (to the far left of the Console). This opens the External panel; double-click on the desired device in the External panel.
Now click on the Device Control’s MIDI Learn button, and then move the footpedal. As if by magic, Control 1 appears, with its controller number assignment.
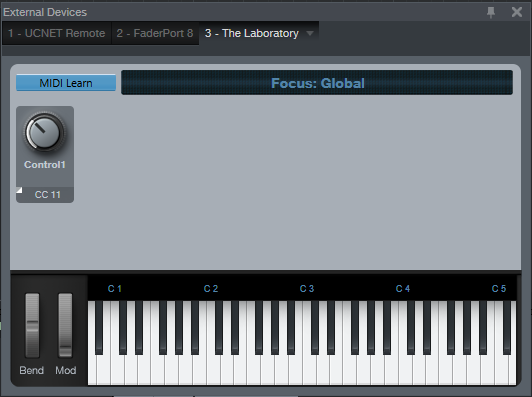
Now whenever you want something in Studio One to react to the footpedal, you just select Control 1. You can also rename this—perhaps not surprisingly, I changed Control 1 to Footpedal.
Now let’s suppose you want to control the Pro EQ Mid Frequency (Freq) control, which we used last week to vary the wah frequency. It’s simple:
- Vary the Freq control.
- Move the pedal.
- Right-click on the Freq knob.
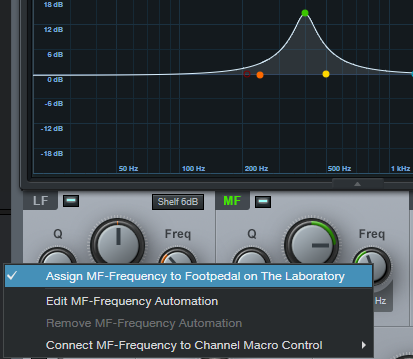
Now choose the desired assignment—in my case, “Assign MF-Frequency to Footpedal on the Laboratory.” Move the pedal, and it will change the frequency.
However, you probably don’t want the pedal to cover the full frequency range, but just a typical wah’s range so you have more precise control. We have a solution for that, too. Instead of right-clicking on the knob and assigning it to the footpedal, assign it to a Channel Macro Control, like Knob 1. Open up the Channel Editor, right-click on Knob 1, move the knob, next move the pedal, and then choose “Assign MF-Frequency to Footpedal on the Laboratory.” (By the way, you can assign pretty much everything in Studio One to a controller using the right-click + move controller + choose assignment protocol.)
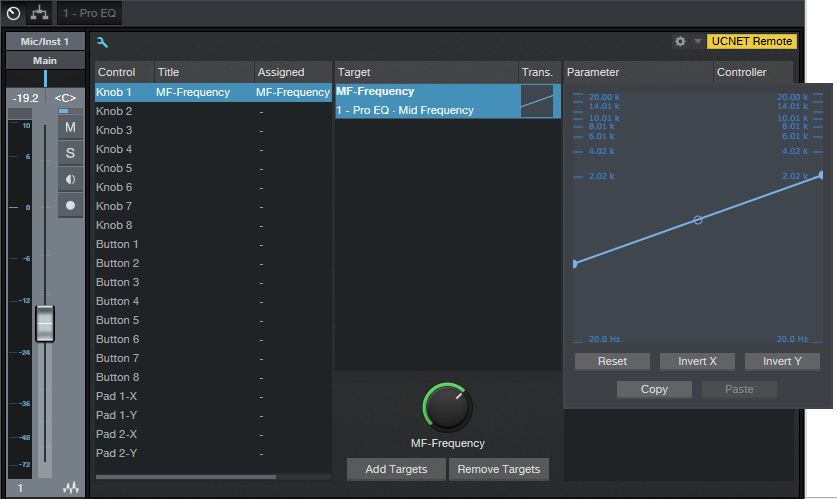
Now you can use the Transition settings graph to limit the pedal’s range. Alter the curve shape to a response you like—it doesn’t have to be linear—or even change the “sense” of the pedal travel so that pulling back on the pedal raises the wah frequency.
Once you’ve done this kind of assignment a few times, it will become second nature and you’ll be able to take advantage of pedal power for increased expressiveness. So put your foot down, get on the good foot, or put your best foot forward—the choice of clichés is yours!
Friday Tip: Using DX and DXi Plug-Ins with Studio One
Using DX and DXi Plug-Ins with Studio One

The DX and DXi (instrument) plug-in formats for Windows were developed in the late 18th century, shortly after the invention of the steam-powered computer. Okay, okay…they’re not really that old, but development of new DX plug-ins ceased years ago when VST became the dominant plug-in lifeform for Windows. Regardless, you may still have some DX plug-ins installed on your computer from other programs, and want to use them.
Like many other programs, in theory Studio One doesn’t support DX/DXi plug-ins. However, it does support shell plug-ins (e.g., like Waves uses). This means you can use a wrapper that makes DX plug-ins look like they’re VST types. With this workaround, Studio One can “see” and load DX and DXi plug-ins because it thinks they’re VSTs.
I’ve tested the following with many DX and DXi plug-ins, from several manufacturers, in 64-bit Studio One. They can’t do sidechaining, and 32-bit plug-ins that were never updated to 64 bits aren’t compatible with 64-bit Windows, but otherwise they work as expected. Here’s how to make your DX and DXi plug-ins productive members of Studio One society.
- Go to https://www.xlutop.com/buzz/zip/
- Download the zip file dxshell_v1.0.4b.zip
- Extract it.
- Copy the files dxshell.x64.dll and dxishell.64x.dll to the folder where Studio One looks for VST plug-ins.
That’s pretty much all there is to it. Open Studio One, and you’ll see all the DX and DXi plug-ins—the screenshot shows plug-ins from Cakewalk, rgc:audio, and Sony. The Instruments tabs will show any available DXi plug-ins.
I don’t have a 32-bit system so I didn’t test this with 32-bit DX shells. But if it works like the 64-bit one, you should be covered there as well.
Granted, this is a bit of a hollow victory because if a DX plug-in’s functionality is available with Studio One’s VST plug-ins, you’re better off using the VST versions. But there are still some DX effects that have no real equivalents in the modern world—and now you can use them.
New Packs from Sample Magic
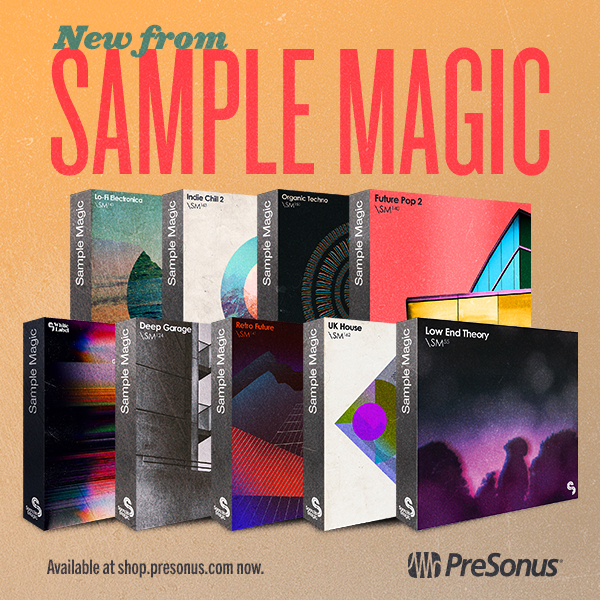
Sample Magic is back! Well, they never really went away. But it has been a little while since they’ve had new stuff available at shop.presonus.com, and this time around they brought a whopping nine sample packs for your Studio One productions!
These loop and sample packs sound incredible, (almost magical, right?) and are compatible with Studio One Prime, Artist and Professional (Version 3.5.6 and higher). They also include Impact preset kits for making your own beats.
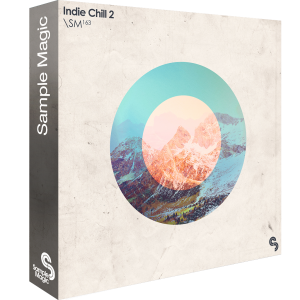
Assorted live instrumentation, Tycho-esque melodics and processed beats are the foundations of Indie Chill 2: Over 700 MB of overdriven keys, live bass guitars, and palm-muted Gibsons—this collection comes stocked with euphoric sounds blending the best of chilled electronica to ambient and indie rock/alternative. Featuring even more sounds, drum hits and high-quality guitar and bass loops, Indie Chill 2 is the perfect toolkit for any and all types of electronica and ambient music.
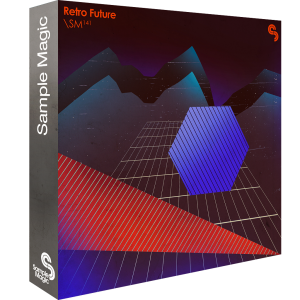
Future beats with a distinct retro flavour… The ultimate oxymoron brings succulent synths together with machine-drummed beats in Retro Future – a 900MB+ assortment of era-defining pop sensibilities and epic synthesized landscapes. Dive into an action-packed excursion of soundtrack themed melodics, pumping arpeggios, Disco-drummed beats and Tron-hinged analogue heaven.
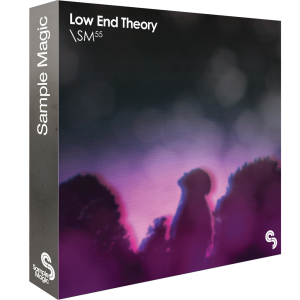
An artful collage of west coast hip-hop, sample-heavy electronica and chilled trap – pulling in elements of jazz, funk and soul along the way – Low End Theory is a 799MB exploration of the influential LA beat scene made famous by the likes of Flying Lotus, Gaslamp Killer and Daedelus.
Spanning the edgy and experimental to the hazy and hypnotic, Low End Theory comes packed with punchy low-slung beats, thick and fuzzy bass, languid keys, kaleidoscopic synths, skittish percussion, wildly pitched vocals, heavily processed FX and stacks of characterful drum hits and melodic shots expertly crafted from over 100 hours of analogue jams, field recording trips and late-night studio sessions.
Fusing the leftfield sound of downtempo, trip hop, LA Beat and IDM; Glitched Beats delivers 390MB+ of futuristic rhythms, wavetable bass, abstract elements and glitched textures. Including an assortment of WAV and MIDI, Glitched Beats is produced using cutting-edge sound design software and processing to give instant, top quality inspiration-starters.
Deep, contemporary garage beats and lush melodics for ambient and evolving tracks. Classic vocal vibes combine with experimental electronics and modern sound-design for a diverse and slamming collection. Get to grips with over 500MB of shuffling acoustic rhythms, booming subby basslines, lush chord stabs, hooky vox shots and more.
From the creators of the best-selling Chillwave Trilogy comes Lo-fi Electronica, an 840MB+ collection of dusky beats, polaroid-tinged music loops, and beach-hazed melodics. Inspired by a leftfield approach to chillout, indie and synth-pop, Lo-fi Electronica is the product of a love affair with thrift store synths, garage-sale guitar pedals, and tape machines.
Modern beats, warm subs, and club-ready melodies: Future Pop 2 blends the best of the digital era’s hip-hop, R&B, and trap scenes. Processed through the finest hardware, we’ve once again gone all out with this 550MB+ futuristic collection of fat one-shots, pulsating loops, and ethereal FX.
Powerful, deep, and emotive – Organic Techno is an energetic and vigorous assortment of the very latest in modern techno production. Armed with analogue sequences, fluttering arps, harmonically-intriguing mallets, hypnotic percussive drums and immersive atmospheres, this collection is guaranteed to get the inspiration flowing and the mind creative.
Friday Tip of the Week: The “Harmonic Tremolo” FX Chain
I did a Harmonic Tremolo as a Sonar FX Chain tip, and it was very popular—so here’s a Studio One-specific version. For those not familiar with the term, some of the older, Fender “brown” amps used a variation on the standard, amplitude-oriented tremolo which the company called “harmonic tremolo.” It splits the signal into high and low bands, and then an LFO amplitude-modulates them out of phase so that the while the highs get louder, the lows get softer and vice-versa. The sound is quite different from a standard tremolo, and many players feel the sound is “sweeter.” But unlike a guitar amp, you can sync this tremolo to the rhythm—and that makes it a useful addition to groove-oriented music as well.
Here’s the FX Chain “schematic.”
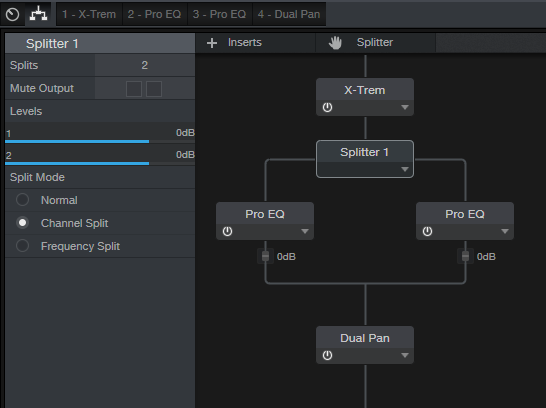
X-Trem needs to be in Pan Mode or this won’t work. As a result, this FX Chain must be inserted in a stereo track—a mono track switches X-Trem to Tremolo Mode (although a mono file inserted in a track set to stereo will work). If you switch a stereo track to mono accidentally and then switch it back to stereo, you’ll need to click on the Reset button in the FX Chain to return X-Trem to Pan Mode.
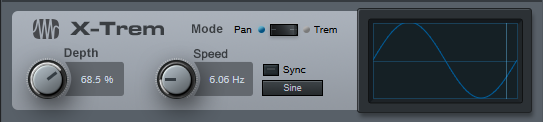
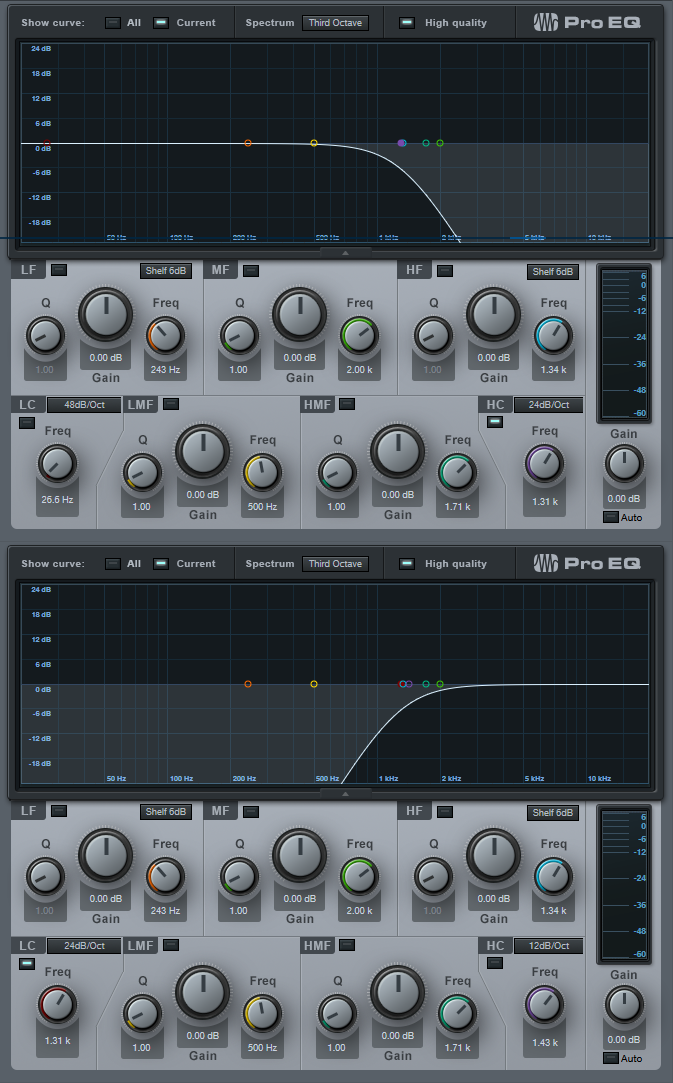
In Pan mode, while the left X-Trem channel gets louder, the other becomes softer and vice-versa. The Splitter (in Channel Split mode) sends the left split to a Pro EQ set to High Cut, while the right split goes to a Pro EQ set to Low Cut; their frequencies track to set the split point between the high and low bands.
Finally the two outputs go to a Dual Pan, which provides several functions.

Creating the FX Chain:

Crossover links the Pro EQ HC and LC Freq controls so you can adjust the split frequency between the high and low bands. At either the full clockwise or counter-clockwise position, the Harmonic Tremolo acts like a conventional tremolo.
Reset connects to the X-Trem Mode so you can reset it to Pan if needed.
LFO Speed controls the X-Trem speed from minimum to about 15 Hz. This control is inactive if the LFO Sync switch is on.
LFO Beats chooses the X-Trem sync rhythm and requires that the LFO Sync switch be on.
LFO Depth controls the X-Trem depth.
LFO Type chooses among the four standard waveforms (triangle, sine, sawtooth, square).
Lo/Hi Balance ties to the Dual Pan’s Input Bal knob. Fully counter-clockwise gives only the low band, clockwise gives only the high band, and the settings in between set the balance between the two bands.
Width controls the Dual Pan’s Width control. For the most authentic sound, leave this centered for mono operation (the Dual Pan should have Link enabled, and Pan set to <C>.
After assigning the controls, congratulations! You have your own Harmonic Tremolo… no soldering or guitar amps required!
Click here to download the effects chain described above. Just drag and drop it directly into a channel in Studio One!