Tag Archives: Studio One 5
The Studio One Cover-Up
Studio One 5 has many little features that might fly under the radar, but are surprisingly useful.
Like being able to change what happens when one Event overlaps (covers over) a different Event.
Prior to Version 5, overlapped Events were treated the same. The overlapping Event became translucent, so you could see the waveform or note data of the Event underneath it. This is ideal for making audio crossfades, which is one of the main reasons for overlapping audio Events. To create a crossfade, type X, and optionally, click and drag up/down at the crossfade junction to shape the crossfade curve. Then you can shift+click on the overlapped Event, type ctrl+B, and combine them into a single Event. With note data, overlapping Events is helpful when combining, for example, the main snare hits on one track with alternate snare hits on a different track.
Another option after overlapping Events is mixing them together. Shift+click on the overlapped Event to include it with the overlapping Event on top. Then type Ctrl+B to mix audio, or G to merGe note data.
However, if you don’t crossfade or mix, then the region below the overlapping Event is still there. The overlapping Event is grayed, which can get confusing if you have a lot of muted sections; and if you remove the overlapping Event because you want to replace it with something else, it’s not obvious where the overlap occurred.
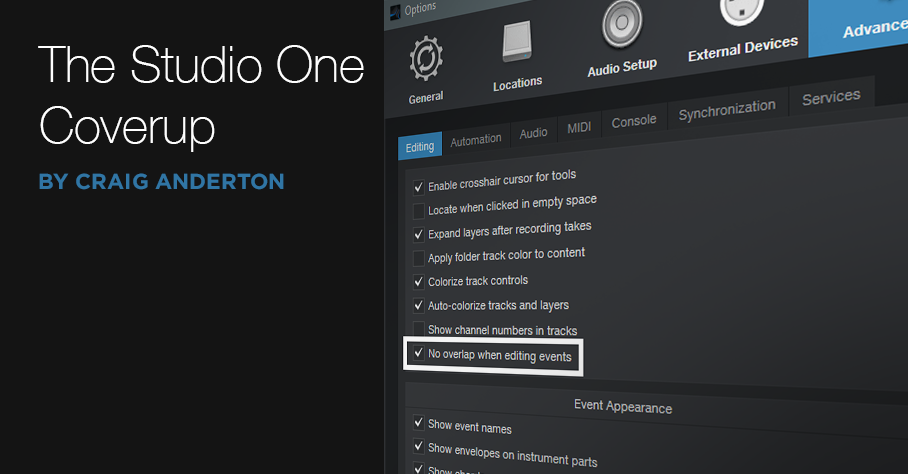
Meet “No Overlap” Mode
Some programs default to deleting, not just covering over, a section that’s being overlapped by another clip. This is useful when you’re doing lots of edits, because you’re not left with vestigial pieces of regions that still exist, but don’t do anything. To accommodate this type of workflow, Studio One 5 now offers a “no overlap” mode for Events. There are three ways to access this (Fig. 1).
- In Arrangement view, click the options Wrench and check “No overlap when editing events.”
- In Options/Advanced/Editing, check “No overlap when editing events.”
- Use the keyboard shortcut Ctrl Alt – [minus sign] to toggle between overlap and no overlap.
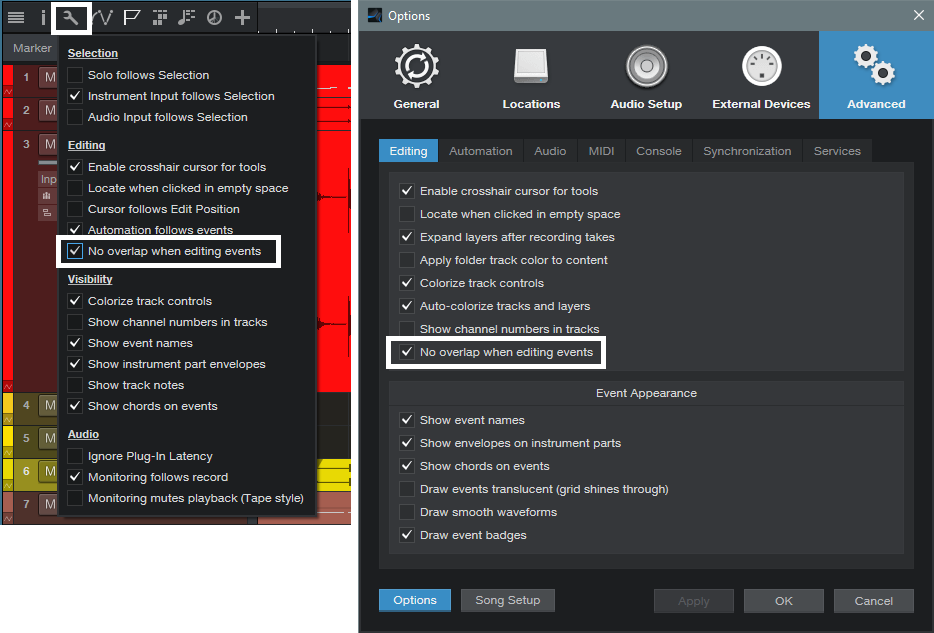
Figure 1: In addition to using a keyboard shortcut, Studio One can default to “No overlap when editing events,” as chosen in the Arranger view or under Options.
Selecting “No overlap when editing events” deletes the overlapped part of an Event, and the replaced section looks like it’s part of the track (i.e., not grayed). However, if you later decide you didn’t really want to delete the overlapped region, then just remove the section that overlapped it. Now you can slip-edit the edge of the underlying Event back to where it was.
(Note that if you enabled Play Overlaps in a track’s Inspector, or chose “Enable Play Overdubs for New Audio Tracks” in Options/Advanced/Audio, so that you could overdub over an existing track and hear both the original track and the overdub on playback, enabling “No overlap when editing events” overrides this setting.)
Granted, this may seem like a small change, but it accommodates more workflow possibilities—especially if you learn the keyboard shortcut, and choose the right option at the right time.
Sweet Multiband Chorus
 Full disclosure: I’m not a big fan of chorusing. In general, I think it’s best relegated to wherever snares with gated reverbs, orchestral hits, DX7 bass presets, Fairlight pan pipes, and other 80s artifacts go to reminisce about the good old days.
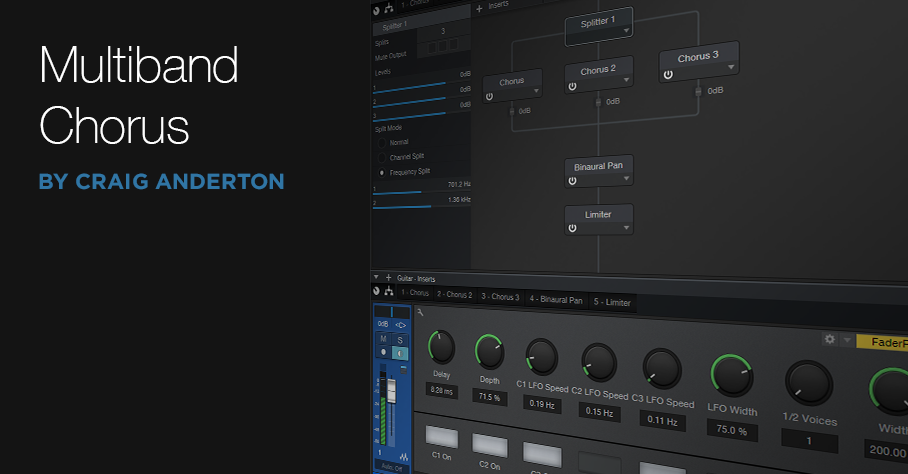
But sometimes it’s great to be wrong, and multiband chorusing has changed my mind. This FX Chain (which works in Studio One Version 4 as well as Version 5) takes advantage of the Splitter, three Chorus plug-ins, Binaural panning, and a bit of limiting to produce a chorus effect that covers the range from subtle and shimmering, to rich and creamy.
There’s a downloadable .multipreset file, so feel free to download it, click on this window’s close button, bring the FX Chain into Studio One, and start playing. (Just remember to set the channel mode for guitar tracks to stereo, even with a mono guitar track.) However, it’s best to read the following on what the controls do, so you can take full advantage of the Multiband Chorus’s talents.
Anatomy of a Multiband Chorus
The Splitter creates three splits based on frequency, which in this case, are optimized for guitar with humbucking pickups. These frequencies work fine with other instruments, but tweak as needed. The first band covers up to 700 Hz, the second from 700 Hz to 1.36 kHz, and the third band, from 1.36 kHz on up (Fig. 1).
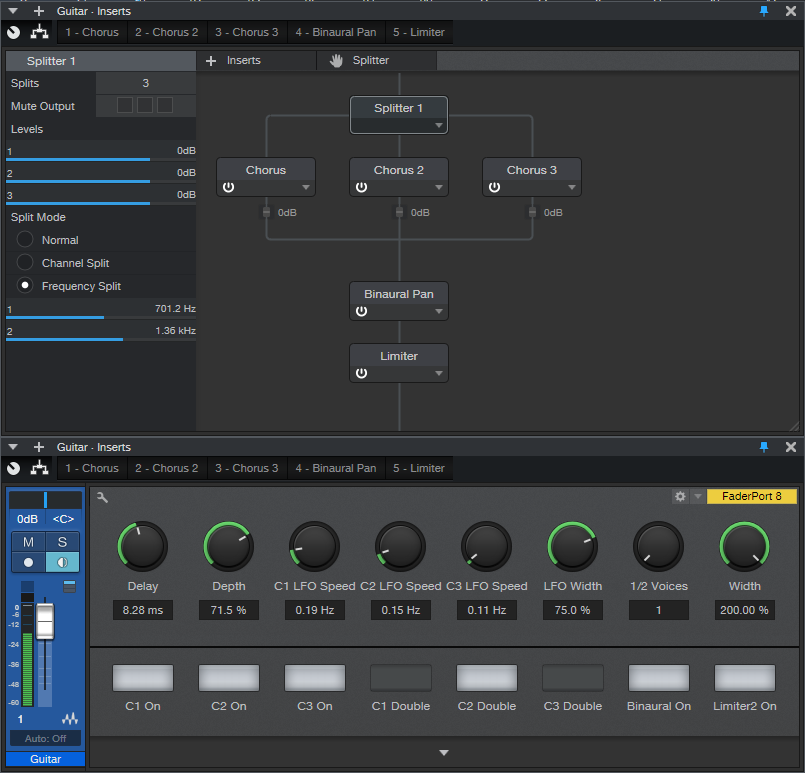
Figure 1. FX Chain block diagram and Macro Controls panel for the Multiband Chorus.
Each split goes to a Chorus. The mixed output from the three splits goes to a Binaural Pan to enhance the stereo imaging, and a Limiter to make the signal “pop” a little more.
Regarding the control panel, the Delay, Depth, LFO Width, and 1/2 Voices controls affect all three Choruses. Each Chorus also has its own on/off switch (C1, C2, and C3), Chorus/Double button (turning on the button enables the Double mode), and LFO Speed control. You’ll also find on/off buttons for the Binaural Pan and Limiter, as well as a Width control for the Binaural Pan. Fig. 2 shows the initial Chorus settings when you call up the FX Chain.
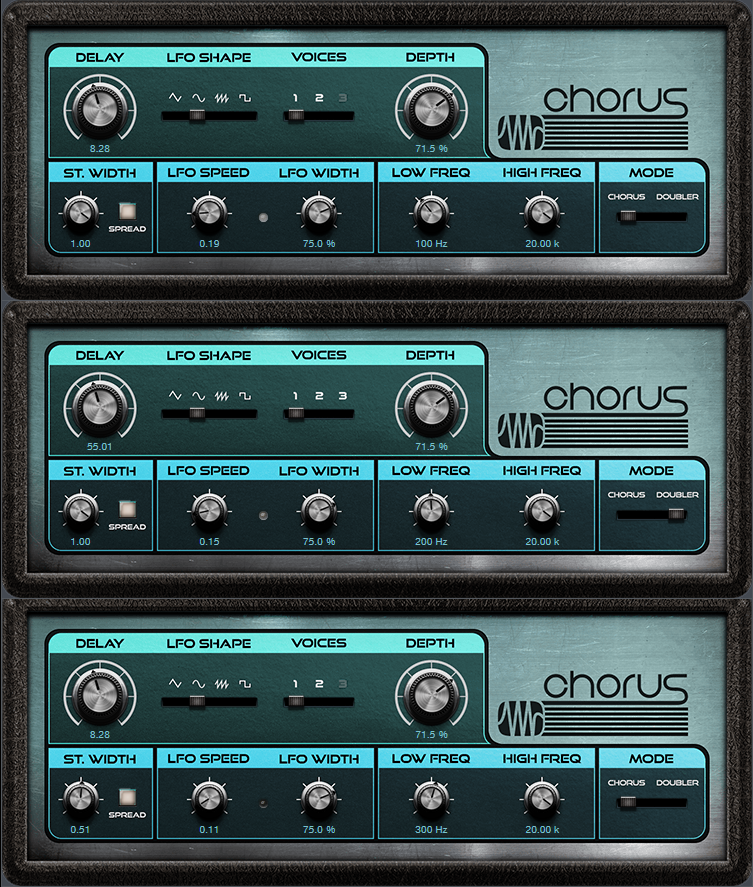
Figure 2. Initial FX Chain Chorus settings.
The Multiband Advantage
Because chorusing occurs in different frequency bands, the sound is more even and has a lusher sound than conventional chorusing. Furthermore, setting asynchronous LFO Speeds for the three bands can give a more randomized effect (at least until there’s an option for smoothed, randomized waveform shapes in Studio One).
A major multiband advantage comes into play when you set one of the bands to Doubler mode instead of Chorus. You may need to readjust the Delay and Width controls, but using Doubler mode in the mid- or high-frequency band, and chorusing for the other bands, gives a unique sound you won’t find anywhere else. Give it a try, and you’ll hear why it’s worth resurrecting the chorus effect—but with a multiband twist.
Download the .multipreset here.
Why Overlap Correction is Totally Cool

Studio One’s Overlap Correction feature for Note data isn’t new, but it can save you hours of boring work. The basic principle is that if Note data overlaps so that the end of one note extends long enough to overlap the beginning of the next note, selecting them both, and then applying overlap correction, moves the overlapping note’s end earlier so that it no longer overlaps with the next note.
My main use is with keyboard bass. Although I play electric bass, I often prefer keyboard bass because of the sonic consistency, and being able to choose from various sampled basses as well as synth bass sounds. However, it’s important to avoid overlapping notes with keyboard bass for two main reasons:
- Two non-consonant bass notes playing at the same time muddies the low end, because the beat frequencies associated with such low frequencies are slow and disruptive.
- The sound is more realistic. Most bass parts are single-note lines, and with electric bass, there’s usually a finite amount of time between notes due to fingering the fret, and then plucking the string.
One option for fixing this is to zoom in on a bass part’s note data, check every note to make sure there aren’t overlaps, and shorten notes as needed. However, Overlap Correction is much easier. Simply:
- Select All Note data in the Edit View.
- Choose Action > Length, and then click the Overlap Correction radio button.
- Set overlap to -00.00.01.
- Click OK.
Normally I’m reluctant to Select All and do an editing function, but any notes that don’t overlap are left alone, and I haven’t yet run into any problems with single-note lines. Fig. 1 shows a before-and-after of the note data.

Figure 1: The notes circled in white have overlaps; the lower copy of the notes fixes the overlaps with the Length menu’s Overlap Correction feature.
Problem solved! The reason for setting overlap to -00.00.01 instead of 00.00.00 is because with older hardware synthesizers or congested data streams, that very slight pause ensures a note-off before the next note-on appears. This prevents the previous note from “hanging” (i.e., never turning off). You can specify a larger number for a longer pause—or live dangerously, and specify no pause by entering 0.
Also, although I referenced using this with keyboard bass, it’s useful for any single-note lines such as brass, woodwind, single-note MIDI guitar solos, etc. It can also help with hardware instruments, including electronic drums, that have a limited number of voices. By removing overlaps, it’s less likely that the instrument will run out polyphony.
There’s some intelligence built into the overlap correction function. If a note extends past another note, there won’t be any correction. It also seems to be able to recognize pedal points (Fig. 2).
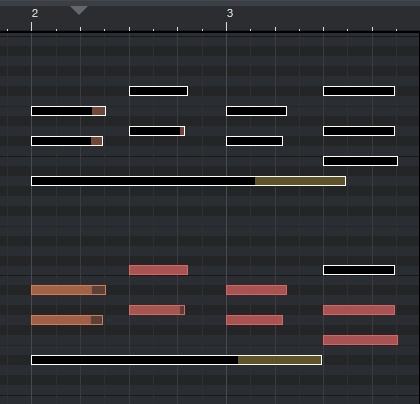
Figure 2: Overlap Correction is careful about applying correction with polyphonic lines.
Selecting all notes in the top group of notes and selecting Overlap Correction didn’t make any changes. As shown in the bottom group of notes, preventing the pedal point from overlapping the final chord requires selecting the pedal point, and any of the notes in the last chord with which the pedal point overlaps.
It’s easy to overlook this gem of a feature, but it can really help with instrumental parts—particularly with keyboard bass and solo brass parts.
Sound on Sound Reviews Studio One!
Sound on Sound Magazine is “the independent voice of music recording technology for over 34 years.” Their team is based in the United Kingdom and, like the rest of the world, Covid-19 has thrown a wrench in their day-to-day and service to their customers. In response to the lockdown, they’re now offering access to their September issue for FREE! Read cover to cover digitally here.
The PreSonus Quantum landed on the cover of Sound on Sound back in 2017. We are very excited to see Studio One featured in their latest issue! Writer Robin Vincent gives an extremely detailed review of many of Studio One 5’s enhancements, new features and so much more. All we can say is THANK YOU!
Here is a direct link to their deep dive into Studio One 5!
They also shout out to PreSonus Sphere! Here’s a little snippet:
The pricing is impressive, achievable, realistic and it keeps you in the upgrade loop.
Learn more about PreSonus Sphere here: https://shop.presonus.com/PreSonus-Sphere

Bucket Brigade Delay FX Chain
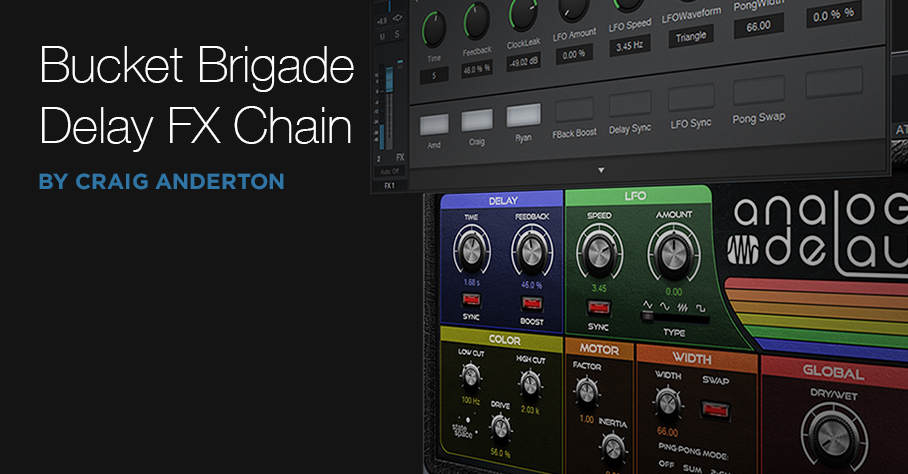
I wanted a Bucket Brigade Delay (BBD) effect in Studio One. Seriously.
Although some analog delays (e.g., Binson Echorec) were based on tape, others used analog “bucket brigade” technology. Bucket brigade integrated circuits (like the Panasonic/Matsushita MN3005 or Reticon SAD-1024) incorporated thousands of capacitive elements controlled by a clock. Each clock cycle passed the analog signal at the input from one stage to the next, so slower clocks meant longer delays. But because sampling (albeit analog) was involved, so was the Nyquist theorem—the more you slowed down the clock, the more likely you’d hear aliasing and distortion. At really long delays, sometimes you’d even hear leakage from a clock that had gotten down to the audible range.
So I emailed Arnd Kaiser, the General Manager for PreSonus Software, and told him I wanted to modify the Analog Delay into a BBD. He seemed puzzled and said that if you turn up the Drive and lower the High Cut frequency at longer delays, you’ll get the BBD sound. True, but that sound is of a clean, well-designed BBD where the designer didn’t push the chips, and knew how to layout a circuit board. That’s fine, but I wanted filth…time for an FX Chain (Fig. 1).

Figure 1: The Analog Delay plug-in is the heart of this FX Chain.
The solution was tracking the Delay Time with the BitCrusher’s Downsampling parameter, so at longer delay times, those lovely violations of Mr. Nyquist’s theorem could grace the sound with aliasing and sonic nastiness.
I was running late submitting the tip because of going down this crazy BBD rabbit hole, so I emailed Ryan Roullard at PreSonus (who among a zillion other things makes sure my Friday Tips roll along smoothly every week) to apologize for the delay and give him a heads-up of what to expect for this week’s tip. He asked if I’d included the clock leakage whine as part of the sound. I was embarrassed to say that I had overlooked it, but Ryan said that if I figured out how to add it in, he’d never tell anyone of my shameful omission.
You can download the Bucket Bridge Delay.multipreset, so I won’t go into much detail—reverse-engineer it to find out how it works, or modify it to do even stranger things. Please note: It’s probably best to insert this into an FX Bus with the Mix control set to wet only because unless none of the three switches is enabled, there’s no way to have a completely clean sound.
The important part is the three switches—Arnd, Craig, and Ryan. You can select none of them or any/all of them. With none of the three switches selected, you have a standard Analog Delay sound, with the other knobs and buttons doing their standard Analog Delay functions. But…
- Click Arnd, and now increasing the delay Time increases the State Space drive, and pulls back on the High Cut, to get that BBD-but-still-fairly-clean sound.
- Click Craig, and now the Bitcrusher Downsampling tracks the Delay Time as well.
- Click Ryan, and you’ll introduce that lovely clock whine, whose frequency also tracks the Delay Time. The whine has its own dedicated level control so you can decide how much clock leakage you want in the sound. (Pro Tip—turn it up to emulate the sound of a bad circuit board layout!)
And there you have it—delicious, modern digital meets filthy, vintage analog. Have fun!
Download the Bucket Bridge Delay.multipreset Here!
Use the Listen Bus for Dim Solo
Any time you want to do detailed edits in context with a mix, Dim Solo is your friend. When you solo a track with a Dim Solo function enabled, the non-soloed tracks aren’t muted but instead play back at a lower (dimmed) level. I find this essential for many workflows, particularly comping. When you use the Listen Tool to audition various comps, normally you don’t hear them along with the rest of the mix. So one of the comps might sound wonderful, but when you play it back in context, find the timing was off. Dim Solo provides an immediate reality check.
I wanted this function so much in Studio One that my second “Friday Tip” blog post was about how to kludge a Dim Solo function by adding a Sub bus. But kludges are no longer needed, because V5’s new Listen Bus provides an efficient, flexible Dim Solo solution.
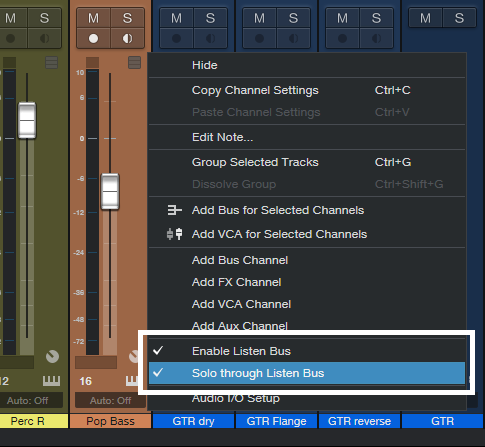
This technique works best with interfaces that have a mixer applet (like Universal Control) with virtual outs. I’ve tested this with the 1824c and Studio 192; just make sure you don’t bypass the Universal Control mixer. Start by right-clicking in a channel, enabling the Listen Bus, and checking Solo through Listen Bus (Fig. 1).
Now go to the Audio I/O setup and choose the Listen Bus output (Fig. 2). Although the line outs can feed physical outs, with the Universal Control mixer they can also feed virtual outs. The Main bus can feed the usual 1+2 outs, while the Listen Bus feeds the 3+4 outs.
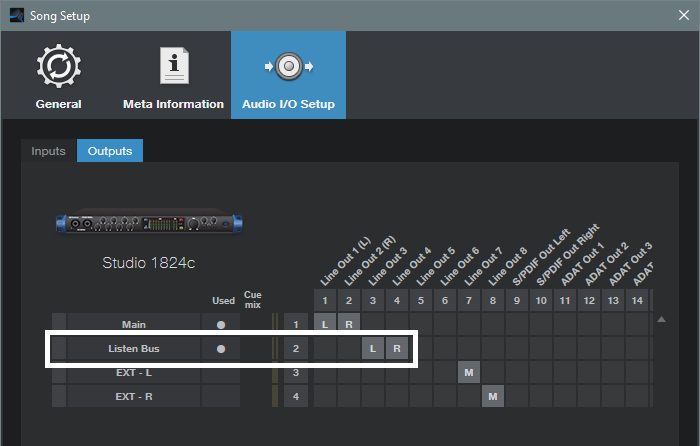
Figure 2: Audio I/O Setup for the 1824c or Studio 192.
As another example, Universal Audio’s Apollo Twin USB also creates virtual outs. Fig. 3 shows the Audio I/O setup.
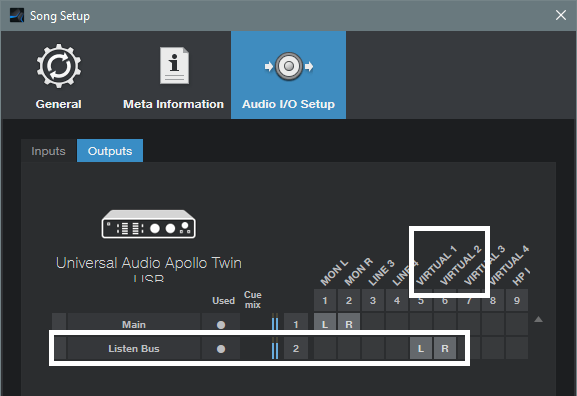
Figure 3: In Universal Audio’s Apollo Twin USB, the Listen Bus goes to a set of virtual outputs.
With the Listen Bus assigned to a virtual output, you can hear both the Main and Listen buses within your usual monitoring system. If virtual outputs aren’t available, then the Listen Bus needs to go to a hardware output, which requires a way to monitor the Listen Bus audio. For example, the Listen Bus could go to a Monitor Station input.
Now it’s time for the Dim part. Insert a Mixtool in your Main Bus, and lower the Gain to whatever creates an ideal balance for listening to the soloed track compared to the rest of the mix (Fig. 4).
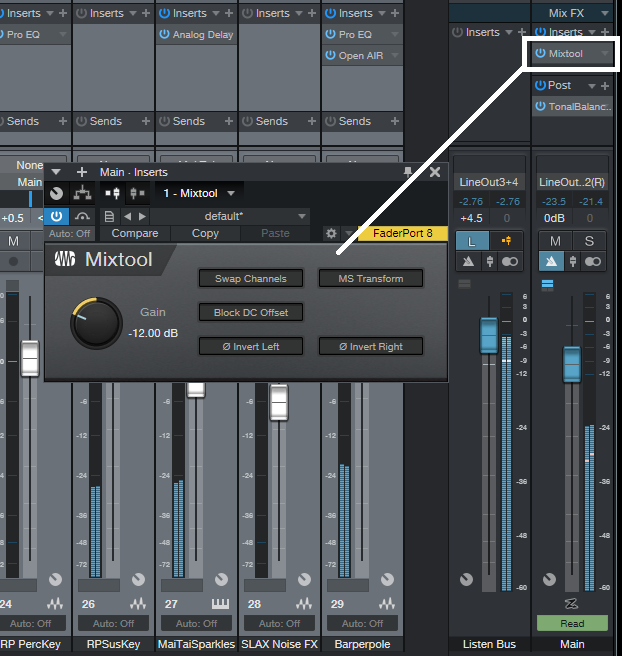
Figure 4: The Mixtool controls the Main bus level.
I usually choose about -12 dB of attenuation. To Dim the mix, enable the Mixtool. Bypass it to return the mix to its normal level. (Sometimes I even insert two Mixtools, one set to -6 dB and the other to -12 dB.)
So now we have the option of a continuously variable amount of dimming, down to -24 dB. But, Studio One V5 has a couple other tricks up its sleeve.
The Listen bus has a pre-/post-fader option. The soloed track will still appear in the dimmed mix if its fader is up, but this probably won’t matter because the Listen Bus level will be louder. However if you do need to excise the soloed sound from the dimmed mix, pull down the fader on the channel you’re soloing, and set the Listen Bus pre/post fader switch to pre-fader.
Another small but useful feature is that if there’s a fadeout on the Main bus, the Listen bus isn’t affected by the fade, so it’s easy to hear your edits even as a song fades out. Also, if you want to hear the track feeding the Listen Bus in isolation, no problem—just mute the Main bus.
Dim Solo improves workflow considerably when comping and editing, and thanks to the Listen Bus, it’s now easy to do.
Pro EQ2: More than Just a Facelift
Yes, Studio One 5’s Pro EQ2 has a more “pro” look…but there are also some major improvements under the hood, so let’s investigate.
Linear-Phase Low-Cut Filter
This is arguably the most significant change, and appears as an eighth filter stage just below the left of the frequency response display (Fig. 1).

Figure 1: The phase-linear Low-Cut filter section offers three cutoff frequencies and two different slopes.
There’s much mythology around linear-phase EQ, so here are the basics. Traditional EQ introduces phase shifts when you boost or cut. With multiple EQ stages, these phase differences can produce subtle cancellations or reinforcements at particular frequencies. This may or may not create a sometimes subtle, sometimes obvious effect called “smearing.” However, it’s important to note that these phase shifts also give particular EQs their “character” and therefore, can be desirable.
Linear-phase EQ technology delays the signal where appropriate so that all bands are in phase with each other. This tends to give a more “transparent” sound. You might wonder why there’s only one linear-phase stage, with a low-cut response, but there’s a good reason for this. Many engineers like to remove unneeded low frequencies for utilitarian purposes (e.g., remove p-pops or handling noise from vocals), or for artistic reasons, like reducing lows on an amp sim cab to emulate more of an open-back cab sound. Standard EQ introduces phase changes above the cutoff frequency; with linear-phase EQ, there are no phase issues. This can be particularly important with doubled audio sources, where you don’t want phase differences between them due to slightly different EQ settings.
The Pro EQ2 is very efficient, but note that enabling linear-phase EQ requires far more CPU power, and adds considerable latency—it’s not something you’ll want to add to every track. Fortunately, in many cases, it’s a setting that you apply and don’t think about anymore. This makes it a good candidate for “Transform to Rendered Audio” so you can reclaim that CPU power, and then use conventional EQ going forward.
By the way, an argument against linear-phase EQ is that it can create pre-ringing, which adds a low-level, “swooshing” artifact before audio transients. Fortunately, it’s a non-issue here, because pre-ringing is audible only at low frequencies, with high gain and Q settings. (Note that traditional EQ can add post-ringing, although you usually won’t hear it because the audio masks it.)
Level Range Options
I’ve wanted this feature for a long time. Some EQ changes are extremely subtle, particularly when mastering. With range set to 24 dB, it’s difficult to drag nodes around precisely. What’s more, when making fine gain changes, with the 24 dB view it’s easy to move slightly to the right or left, and end up editing frequency instead. Holding Shift provides fine-tuning, but for fast EQ adjustments, the 6 dB view is welcome (Fig. 2).
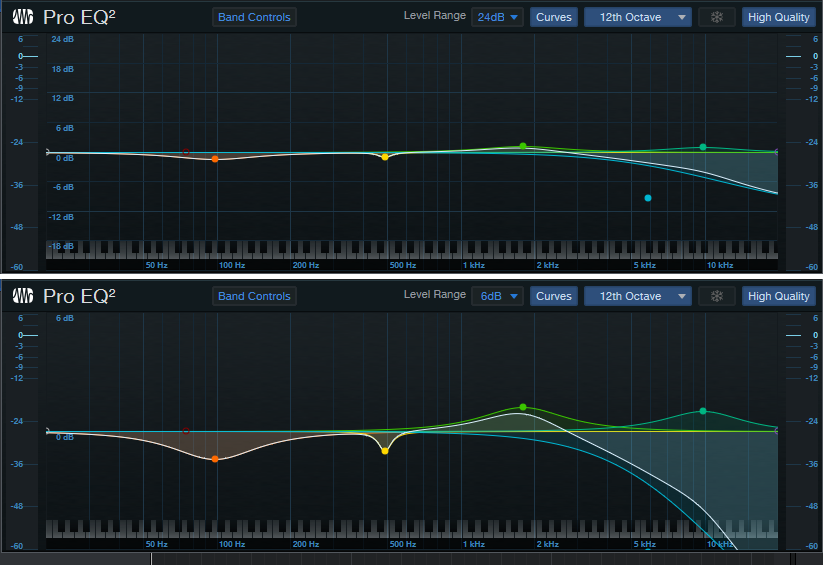
Figure 2: It’s much easier to see subtle EQ changes by setting the level range to 6 dB.
Granted, you adjust EQ with your ears, not your eyes—but learning how to correlate sound to frequency is important. I knew one guitar player who when he said something like “that track really needs to come down about 2.5 dB at 1.25 kHz,” he was 100% spot-on. When mixing, he could zero in on EQ settings really fast.
And there’s another implication. Those learning how to use EQ often overcompensate, so at seminars, I advise applying what I call “the rule of half”: if you think a sound needs 6 dB of boost, try 3 dB of boost instead and get acclimated to it before adding more boost. If you choose the 6 dB view, you’ll be forced to use smaller boost and cuts in order to adjust or see them graphically—and you might find those smaller changes are all you need.
12th Octave Frequency Response Display
The Third-Octave Display is good eye candy, and gives a rough idea of how EQ affects the sound. The new 12th-Octave resolution option gives far better definition. In Fig. 3, note how many of the peaks and dips visible in the 12th-Octave display are averaged out, and lost, in the Third-Octave version.
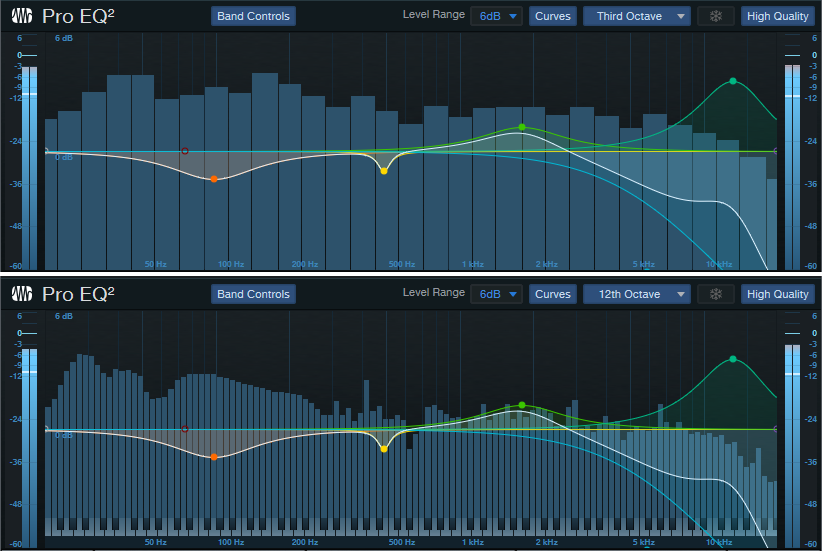
Figure 3: The 12th-Octave display in the lower view gives far greater detail and resolution.
Workflow Improvements
In addition to the more “marquee” improvements, several other additions make working with Pro EQ2 a better experience than the original Pro EQ.
Keyboard Display. Now you can correlate frequency to note pitches; note that these line up with the bars in the 12th-octave display.
Band Controls. In Studio One 4, there was a little, almost invisible arrow between the controls and the frequency response display. Clicking on this hid the controls. The Band Controls button does the same thing, and you won’t overlook it.
Curves Button. Similarly, Studio One 4’s All/Current buttons that control how curves are displayed have been consolidated into a single Curves button.
Sidechaining. We already covered Pro EQ sidechaining in the blog post The Sidechained Spectrum. However, when choosing the FFT curve, now there’s a sidechain spectrum peak hold button for the sidechain input. Clicking on the “snowflake” button freezes peaks (hence the name) until you click the button again.
Better Metering. Studio One 4’s Pro EQ had only output metering, whereas Pro EQ2 has metering for both input and output. This is a highly useful addition. If the output is too hot, you can always turn down the output level, but you won’t know if the reason why it’s hot is because you’ve boosted some frequencies too much, or the input level is hitting the EQ too hard. Now you’ll know. As with Studio One 4, the metering shows both peak and average levels.
And that’s a wrap for Pro EQ2. I guess you could say the newer version is ahead of the curve…the EQ curve, that is ?

Add Studio One 5 to your workflow today!
Big Fun with Tape Resampler
Tape Resampler, a new Studio One 5 feature, replicates an “old school” time-stretch technique that varied pitch and tempo simultaneously and proportionately. Today’s DSP can change pitch and tempo independently, which is cool. But the price you pay is artifacts, because when changing tempo or pitch, you need to either delete or add data.
With resampling, the data stays the same—so there are no artifacts, and the sound is natural. Although extreme speedups give the “Chipmunks” sound and extreme slowdowns evoke Darth Vader on tranquilizers, subtler speed changes were used all the time with tape. It was common to speed up a master tape by a few per cent to give the tempo a slightly faster, “peppier” sound, as well as some added brightness. (If you’ve ever tried to play along with a song that was several cents sharp, it was probably sped up a bit.)
The manual mentions using Tape Resampler to fit loops to tempo (assuming accurate pitch isn’t crucial), but there’s another application that at least to me, is worth the update price by itself. With tape, it was common to slow the tape down or speed it up, play along with the part, and then return the speed to normal. This produced a timbral and formant shift, and was popular for background vocals. For example, if a song was in the key of A, you’d slow down to the key of G, sing along with it in G, then return the tape to normal. The vocal would have a brighter formant change that often worked well. This could also help you hit notes that were just out of your range. (We covered similar techniques in the blog post Varispeed-Type Formant Changes, but because they used DSP, at least some artifacts were unavoidable.)
How to Do It
- Create a premix of the song from start to finish. The premix must begin at the start of the timeline, even if the actual tracks don’t come in until later. An easy way to create a premix is with Song > Export Mixdown, and under Options in the dialog box, choose Import to Track.
- Solo the premix and select the track. In the Inspector, choose Timestretch, and Tape for the Timestretch method.
- Look at the handy transposition chart that lists how to edit the Speedup parameter to transpose an Event up or down a specific number of semitones. For example, suppose you want to lower the premix pitch two semitones down so you can sing along with it. Select it, then enter 0.89 for the Speedup.
The Handy Transposition Chart
| Semitones | Pitch Up | Pitch Down |
| 1 | 1.06 | 0.94 |
| 2 | 1.12 | 0.89 |
| 3 | 1.19 | 0.84 |
| 4 | 1.26 | 0.79 |
| 5 | 1.33 | 0.75 |
| 6 | 1.41 | 0.70 |
| 7 | 1.50 | 0.67 |
| 8 | 1.59 | 0.63 |
| 9 | 1.68 | 0.59 |
| 10 | 1.78 | 0.56 |
| 11 | 1.89 | 0.53 |
| 12 | 2.00 | 0.50 |
- Sing along with the premix, which is now playing back two semitones lower and somewhat slower.
- When you’re done, extend the overdub’s beginning to the start of the timeline (e.g., use the Pencil to draw an event from the beginning to the start of the overdub, select them both, then type Ctrl+B to glue them together).
- Select the overdub, and again, choose Tape for the Timestretch method. This time, set the Speedup value to 1.12 to transpose the pitch up 2 semitones so it will match the song’s original pitch (Fig. 1).
- You no longer need the premix, so either remove it, or change its speedup value back to 1.00 to return it to its normal pitch. (If you select the overdubbed Event and type Ctrl+B, the new pitch will become a destructive edit, and the Speedup value will return to 1.00.)
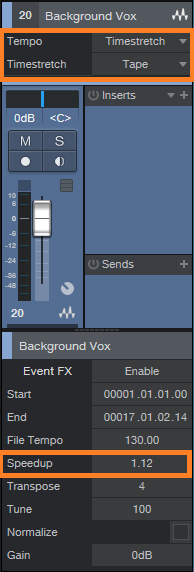
Figure 1: The overdub is being raised two semitones.
Calling All Rocket Scientists!
Note that the transpose numbers relate to the 12th root of 2. This irrational number (its numerical value has been taken out to over twenty billion decimal digits, but it still doesn’t repeat!) sets the ratio between semitones of the even-numbered scale. Fortunately, three significant digits covers our needs.

Learn more about Studio One 5 here!